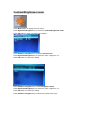
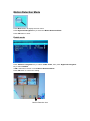
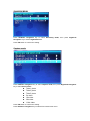
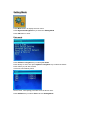
1
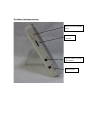
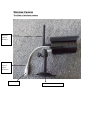
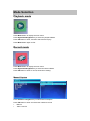
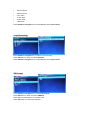
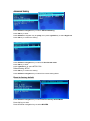
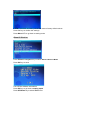
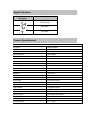
2.4GHz Digital Wireless Mini DVR Kit QC-3675 *Some photos of the product in this user manual may differ slightly from the actual unit, however all parts and functions remain the same. Caution __________________________________ For your safety, please use the power supply provided. Important Please only use the socket that matches the power supply. Use of non- original socket may cause electrical and fire damage. Safety Notice Do not use damaged power supply’s. Do not use the battery over the specified time period Fully charge the battery before use if it has been in storage or on first use. In order to protect your battery, please fully charge your battery before use. The battery must be fully discharged before you charge it again Over charge and over discharge will shorten the life of battery. If battery usage time diminishes this may be an indication that your battery will need replacement. Batteries are consumable items, its life will shorten from the first use. Don’t touch the DC converter with conductors e.g. rings etc Main Features: Digital wireless kit Interference-free 4 Channels, supports 4 cameras for one monitor Infrared night vision High sensitivity microphone Up to 32G memory card. Record Function Supports microSD Card Motion Detection Recording Waterproof wireless camera: IP65 Digital wireless kit components: Check the package to confirm that you have received all components shown above. Main Parts Wireless receiver The Front of wireless receiver Press Camera key change channels. Press Menu key to show Main menu Press Screen key to show 4 camera mode. press it again, video auto to show one by one, press it again to enlarge one of 4 video. Video Record key, press key to start record, press it again to stop recording. Press OK key to confirm the selection Press UP/DOWN/LEFT/RIGHT navigation key to select the mode to The Side of wireless receiver Wireless receiver ON/OFF Switch Memory Card slot Use AV cable to connect with TV/LCD DC 12V Input The back of wireless receiver Antenna Speaker Monitor stand Wireless Camera The Side of wireless camera Wireless camera Antenna Wireless camera power connector Pair Button Wireless camera stand The Front of wireless camera Power Indicator LED IR Night lights Power Indicator LED Status Red LED on = power on Red LED off = power off Pairing Indicator LED Status Green LED on = signal normal and paired Green LED flashing = pairing Green LED off = no signal Pairing Indicator LED Main Menu Press Menu button to display the main menu Playback mode Record mode Select Camera mode Contrast/Brightness mode Recording Schedule mode Motion Detection Mode Setting Mode Exit Setup Connect the 5VDC power adapter to the camera; turn on the receiver. Press Menu key, menu will show as below. Mode Selection Playback mode Press Menu Button to display the main menu. Press Right/Left Navigation key to select the playback Mode. Press OK Button to enter, and then select the file to play. Press Menu Button again to Exit Record mode Press Menu Button to display the main menu. Press Right/Left Navigation key to select the Record Mode. Press OK Button to enter to record, show below setting: Manual Capture Press UP/Down navigation key to select Manual Capture Press OK Button to enter and select the method to record Manual Take 1 PHOTO Take 3 PHOTO Take 5 PHOTO 5 sec video 10 sec video 30 sec video 1 Min video Press UP/Down navigation key to select Exit to enter record mode Loop Recording Press UP/Down navigation key to select Loop Recording Press OK Button to enter and select ON/OFF Press UP/Down navigation key to select Exit to enter record mode SD Format Press UP/Down navigation key to select SD Format Press OK Button to enter and select YES/NO Select Yes to format all files on microSD card. Press OK button to confirm the selection SD Info Press UP/Down navigation key to select SD Info Press OK Button to enter, this will show information on SD card Press OK Button to go back to the Record mode Press UP/Down navigation key to select Exit to back main menu Select Camera mode Press Menu Button to display the main menu. Press Right/Left Navigation key to select the Camera Mode. Press OK Button to enter, will show below setting: Press UP/Down navigation key to select Exit to go back main menu. Contrast/Brightness mode Press Menu Button to display the main menu. Press Right/Left Navigation key to select the Contrast/Brightness mode Press OK Button to enter, will show below setting: Press UP/Down navigation key to select Contrast mode Press Right/Left Navigation key to select the value, range from 1-4 Press OK button to confirm the setting. Press UP/Down navigation key to select Brightness mode Press Right/Left Navigation key to select the value, range from 1-4 Press OK button to confirm the setting. Press UP/Down navigation key to select Exit to back main menu. Recording Schedule mode Press Menu Button to display the main menu. Press Right/Left Navigation key to select the Recording Schedule mode Press OK Button to enter Press UP/Down navigation key to select enable mode, then press Right/Left Navigation key to select ON/OFF. If ON is selected, it will turn on auto Recording Schedule Mode. Press UP/Down navigation key to select Start Time, set the Record start time by Right/Left Navigation key, press OK button to confirm the setting. Press UP/Down navigation key to select End Time, set the record end time by Right/Left Navigation key. Press OK button to confirm the setting. Motion Detection Mode Press Menu Button to display the main menu. Press Right/Left Navigation key to select the Motion Detection Mode Press OK Button to enter Enable mode Press UP/Down navigation key to select enable mode, then press Right/Left Navigation key to select ON/OFF. If ON is selected, it will turn on auto Motion Detection Mode. Press OK button to confirm the setting. Motion Detection Icon Sensitivity Mode Press UP/Down navigation key to select Sensitivity mode, then press Right/Left Navigation key to select High/stand/Low. Press OK button to confirm the setting. Capture mode Press UP/Down navigation key to select Capture mode, then press Right/Left Navigation key to select below value: Take 1 photo Take 3 photo Take 5 photo 5s video 10s video 30s video 1 Min video Press OK button to confirm the setting. Press UP/Down navigation key to select Exit to back main menu. Setting Mode Press Menu Button to display the main menu. Press Right/Left Navigation key to select the Setting Mode Press OK Button to enter Pair mode Press UP/Down navigation key to select pair mode Press ok key to enter, then press up/down navigation key to select the CAM1 Press OK key to pair with camera If succeed, show below picture Cam2, cam3, cam4 paring procedure same as above cam1. Press UP/Down key to select Exit to back to Setting Mode Date & Time Mode Press UP/Down navigation key to select Date & Time Mode Press ok key to enter, then press up/down navigation key to set date Press Ok key to confirm the setting Press UP/Down navigation key to select Time Mode Press ok key to enter, and then press up/down navigation key to set Time Press Ok key to confirm the setting Press UP/Down navigation key to select Stamp mode Default setting is ON, if you select OFF, DATE & Time will not show on the LCD Press Ok key to confirm the setting Auto Switch Setting Press UP/Down navigation key to select Auto Switch setting mode Press ok key to enter, then press OK key to confirm the setting Under this mode, video can auto switch to show on the LCD. Press UP/Down navigation key to select Switch Time Mode Default setting value: 5 seconds 5 sec 10 sec 30 sec Press ok key to confirm the setting. Press UP/Down navigation key to select Exit to back setting Mode Advanced Setting Press UP/Down navigation key to select Advanced Setting Press OK key to enter Press UP/Down navigation key to quality, then press right/left key to select High/Low Press OK key to confirm the setting. Press UP/Down navigation key to select TV Out Format mode Press OK key to enter Press right/left key to select NTSC\ PAL Default setting: NTSC Press OK key to confirm the setting. Press UP/Down navigation key to select Exit to back setting Mode Reset to factory default Press UP/Down navigation key to select Reset to factory default Mode Press OK key to enter Press UP/Down navigation key to select NO/YES. If YES is selected, all setting values will reset to factory default values. Press OK key to confirm the settings. Press Menu KEY to go back to setting mode About & Version Press UP/Down navigation key to select About & Version Mode Press OK key to enter Can see the software information. Press OK key to go back to setting mode Press UP/Down key to select Exit to Exit Signal Indicators: Signal Strength Indicators Description Perfect signal Low signal No signal Product Specification: Camera Channels 2400-2483.5MHz Image Device 1/4” OV7725 CMOS Resolution 420TVL Min. Illumination 0LUX (IR ON) Lens 6mm Effective Pixels 640(H)x480(V) S/N Ratio More than 48 dB Video Output 1 Vp-p / 75 Ohms OperatingTemp ‘-5~+ 45 Power Supply 5V/1A Receiver Display 7” TFT LCD Video Format NTSC / PAL Compression Format MPEG-4 Video input 4CH wireless single Video output 1 Composite Output Audio Input 4CH wireless single Audio Output 1 Composite Output Frame rate 640x480 VGA 20fps 320x240 QVGA 25fps Memory Card up to 32GB(microSDHC) Transmitting Range ≥200m transmission range (line of sight) Power supply DC12V / 1A Operating temp. 0°C ~+50°C Trouble shooting Problem Solution No video Make sure the camera and monitor are in effective range. Distributed by: TechBrands by Electus Distribution Pty Ltd 320 Victoria Rd Rydalmere NSW 2116 Australia Phone: 1300 738 555 Int’l: +61 8832 3200 Fax: 1300 738 500 www.techbrands.com Made in China