1
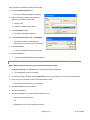
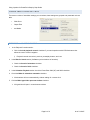
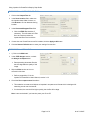
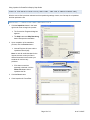
Using Impatica for PowerPoint Step-by-Step Guide UNIT 3: ADDING AN IMPATICIZED POWERPOINT FILE TO A WEBCT CLASS The impaticized PowerPoint file is now ready for use in your WebCT class. In the following exercises the impaticized PowerPoint files will be uploaded to a WebCT class and added as a Single Page. EXERCISE 1 – UPLOAD THE IMPATICIZED FILES INTO WEBCT 1. Open Internet Explorer. 2. Log in to WebCT and navigate to the appropriate course. 3. Using the Navigation Bar, click on Manage Files. The Manage Files screen appears. 4. Click on Upload button from the Options: Files menu on the right-hand side of the screen. 5. Click the Browse button. 6. Navigate to the Impatica files on the computer’s hard drive. 7. Double-click on the –imp.jar file. The file’s information is entered into the Filename field. 8. Click the Upload button. 9. Repeat steps 4-8 to upload the -Video.jar and -imp.html files. Important Note: For the impaticized file to work properly, all three files need to be placed together within the My-Files area. EXERCISE 2 – ADD THE IMPATICIZED POWERPOINT FILE AS A SINGLE PAGE 1. Using the Course Menu or Breadcrumbs, click on Homepage The Homepage screen appears 2. Click on Add page or tool from the Options: Links menu on the right-hand side of the screen. The Add Page or Tool screen will appear. 3. In the Pages column, click on Single Page. The Add Single Page screen will appear. Page 11 of 12 As of 10/18/07