1
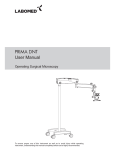
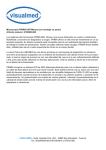
LABOMED
ideas for Vision
Lx 400 Phase Contrast Kit
User Manual
To ensure proper use of this instrument as well as to avoid injury while operating instrument,
understanding this manual completely before use is highly recommended.
www.laboamerica.com
INTRODUCTION
Phase contrast is the method used in light microscopy and was developed on the principle that if you speed up a direct light
path, you can cause destructive interferences patterns in a viewed image. These patterns make details in the image appear
darker against a light background. To cause these interferences patterns, a system of rings located both in the objective lens
and in the condenser system must overlap. When aligned correctly, light waves emiited from a light source reach your cornea
one- half of the wavelength out of phase, resulting in a specimen with details that are greatly enhanced. Phase contrasting is
only useful on the specimen that is colorless as well as transparent in nature and usually difficult to distinguish from its
surroundings. Such specimens are referred to as “Phase objects”. Examples of phase objects include cell parts in protozoans,
bacteria sperm tails and other types of unstained cells.
PACKING LIST
Lx 400 Phase Contrast Kit (9126000)
1
RP PH 10x
2
RP PH 20x
3
4
RP PH 40x (SL) RP PH 100x (SL, Oil)
5
1)
Phase Annulus Turret (3134045)
2
Centering Telescopic Eyepiece (3126005)
3)
Adapter for Telescopic Eyepiece(9126005-10)
4)
Green Filter (3126065)
5)
Phase Contrast Objectives (10X-9123010), (20X-9123020), (40X-9123040), (100X-9123100)
Pleas make sure all contents of the Phase Contrast Kit are intact. If any physical damage is visible, please
contact your local distributor.
INSTALLATION
1.
Loosen the thumb screw (1) to remove the condenser. Replace the
condenser with the new Abbe condenser provided in the phase kit.
2.
Remove the condenser from its position by loosening the two thumbscrews
on both sides of the condenser as shown in Fig. 1 and 2.
3.
Place the phase annulus turret in position from where the condenser has
just been removed so microscope looks like that in Fig. 3. Install all phase
contrast objectives in their respective positions.
4.
The long “push in to engage” thumbscrews on both sides of the phase turret
are provided for proper alignment of the phase ring. By disengaging these
screws, the phase turret can be adjusted at any desired phase annulus
(10X, 20X, 40X & 100X) by turning the thumbwheel to the desired position.
There is also an ‘0’ setting on the thumbwheel for bright field application.
CALIBRATING THE INSTRUMENT
1.
Fig. 1
Fig. 2
Turn ON the microscope illumination system. Close the diaphragm of
Koehlar illumination to minimum position and bring phase turret at '0'
position. Engage 10X phase contrast objective in field. Looking through the
normal eyepiece a bright circular field will appear in FOV. Center the
condenser of phase turret by using two thumbscrews so that the bright field
is in the center of field.
2.
Keeping the 10X phase objective in field, open the condenser diaphragm.
Put any specimen slide on mechanical stage and focus the 10X phase
objective on specimen keeping the phase turret at '0' position. Remove the
eyepiece and insert the centering telescopic eyepiece in one of the eye
Fig. 3
tube of binocular head (if the eye tube ID is 30mm, then an adapter
provided with kit is to be used with telescopic eyepiece).
3.
Loosen the thumbscrew of the telescopic eyepiece. While looking into the
telescopic eyepiece, extend the front lens until the dark ring of 10X
objective in the field of view becomes a very sharp and crisp image. The
ring should not appear fuzzy. Tighten thumbscrew and the image will
remain in focus.
Fig. 4
CALIBRATING THE INSTRUMENT
4.
Disengage the thumbscrews of the phase turret and bring 10X phase annulus in field by turning the thumbwheel (10X will
appear on thumbwheel). Push in thumbscrews to lock the position.
5.
While looking through the telescopic eye piece, two rings will be visible - one dark and other bright. They may not overlap.
By turning centering adjustment thumbscrews of the condenser, align the rings so that they overlap each other as shown
below.
6.
Place the green filter on koehler illumination system, remove the centering telescopic eye piece and place the actual eye
piece in eye tube. Put specimen slide on stage. Microscope is now ready for phase contrast observation.
7.
Repeat the entire procedure when observing through 20X, 40X and 100X phase objectives and make sure that
corresponding phase annulus is to be selected for that particular phase objective.
CARE AND MAINTENANCE
Loose particles can be removed from the surface of the condenser, diaphragm, or phase annulus by gently wiping
?
them with lens tissue dampened with Acetone or Methanol.
?
It is better to avoid leaving finger prints on the surface of condenser, phase annulus.
?
When not in use for long time, it is recommended to store the phase contrast kit in its original packaging.
Our policy is one of continuous development. Labo America, Inc., reserves the right to change design and specifications without prior notice.
Labo America Inc.
920 Auburn Court
Fremont
CA 94538
U.S.A.
Telephone: 510 445 1257
Fax: 510 445 1317
[email protected]
LABOMED and Lx 400 are registered trademarks of Labo America, Inc.
With a policy of continuous development, Labo America, Inc. reserves the right to change design and specifications without prior notice.
© 2009 Labo America, Inc. | 9126000-990A 12-2009