1
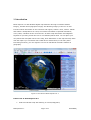
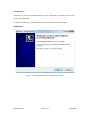
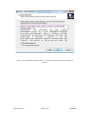
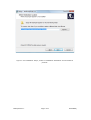
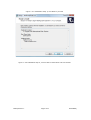
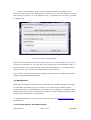
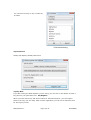
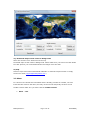
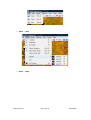
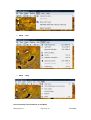
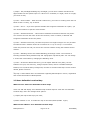
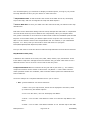
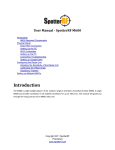
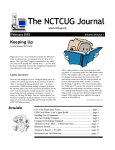
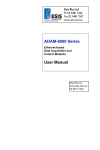
Motherplanet Inc.
Earth Explorer 6.1
User Manual
Motherplanet Inc.
Shengxia Road, Pudong New Area,
Shanghai, 201203, People's
Republic of China
Email Addresses:
Technical Support Team:
[email protected]
Sales Team:
[email protected]
Motherplanet Inc..
Page 1 of 37
8/22/2009kj
Welcome to Earth Explorer 6.1 User Manual
Thank you very much for your interest in Earth Explorer! With this User Manual, you will
have a better idea of Earth Explorer, 3D interactive digital world map with high-resolution.
Table of Contents
Welcome to Earth Explorer 6.1 User Manual································································2
1. Introduction·······································································································3
1.1 System Requirements··················································································4
1.2 Installation·································································································4
1.3 Registration·······························································································11
2. How to Use·······································································································12
2.1 Toolbar·····································································································12
2.2 Menu········································································································17
2.3 User-definable Location Map········································································21
2.4 Preference·································································································28
2.5 Keyboard Shortcuts····················································································30
3. FAQ·················································································································31
3.1 About·······································································································31
3.2 How to Buy·······························································································32
3.3 Navigation with GPS device··········································································33
3.4 Fleet tracking and management based on Earth Explorer···················33
3.5 Details & Tips····························································································34
4. Glossary···········································································································35
5. Reference·········································································································36
5.1 Contact Us································································································36
5.2 Trademarks & Disclaimers···········································································36
Motherplanet Inc..
Page 2 of 37
8/22/2009kj
1. Introduction
Earth Explorer 6 is GPS Enabled digital map software with high-resolution satellite
imagery, shaded relief topographic imagery and blending imagery of the two. It also
include location information of 270 countries and regions, 50000+ cities, 15000+ islands
and 50000+ earthquakes from 1973; And outline information of political boundaries,
rivers, lakes, coastlines of the world and etc. All those map information was integrated
together for providing a total 3D view of our beautiful planet earth. You can place your
own placemarks and path routes to the map, show GPS tracks on the map and keep them
with the maps if you connected with a GPS device. Beside these, it has many other
interesting functions, you can regard it is a kind of educational scientific software of
geography.
Figure 1 First look of Earth Explorer 6.1
Feature list of Earth Explorer 6.1:
1.
Real-time satellite map GPS tracking on vehicle/ship/plane;
Motherplanet Inc..
Page 3 of 37
8/22/2009kj
2.
30m-res satellite image(Landsat7) and 90m-res SRTM picture exploring in
online/offline mode;
3.
Include information of 270 countries and regions, 40000+ cities, 15000+ islands,
50000+ earthquakes from 1973 and vector layers includes political boundaries,
coastlines, rivers, lakes, longitude-latitude grids;
4.
User can add their own Placemarks, Paths, GPS Tracks to Earth Explorer;
5.
User can define and add their own map style to Earth Explorer;
6.
Support NMEA-0183 compatible GPS receiver;
7.
Other functions like Measure and calculate distance and bearing between any two
location, find by name, show day/night shadow effect, adjust Gamma, and etc.
8.
Download maps to disk cache in background (Advanced license).
1.1 System Requirements
The minimum system requirements for Earth Explorer 6.1 are as follows:
1.
Pentium Processor, PowerPC G3 800 or faster
2.
512MB RAM or more
3.
At least 50 MB free disk space
4.
Windows ME/Windows 2000/NT/Windows XP/Windows Vista/Win7 or Mac OS X
5.
Internet connection
1.2 Installation
Installation process of Earth Explorer 6.1
Installation of Earth Explorer is very easy and automatic. Please complete the following
steps to install Earth Explorer 6.1
For Windows users
Download "InstallEarthExplorer.exe" from Motherplanet.
Motherplanet Inc..
Page 4 of 37
8/22/2009kj
For Mac Users
Download "ee_mac.zip" from Motherplanet. This is a zipped file. Users will need to unzip
the file after download.
To start the installation, please double click the file that you have downloaded.
Installation:
Figure 1-2-1 Installation Step 1, click Next to proceed
Motherplanet Inc..
Page 5 of 37
8/22/2009kj
Figure 1-2-2 Installation Step 2, select "I accept the agreement" and click Next to
proceed.
Motherplanet Inc..
Page 6 of 37
8/22/2009kj
Figure 1-2-3 Installation Step 3, select an installation destination and click Next to
proceed.
Motherplanet Inc..
Page 7 of 37
8/22/2009kj
Figure 1-2-4 Installation Step 4, rename install folder (if needed) and click Next to proceed
Motherplanet Inc..
Page 8 of 37
8/22/2009kj
Figure 1-2-5 Installation Step 5, click Next to proceed.
Figure 1-2-6 Installation Step 6, confirm above information and click Install.
Motherplanet Inc..
Page 9 of 37
8/22/2009kj
Figure 1-2-7 Installation Step 7, Installation continues.
Motherplanet Inc..
Page 10 of 37
8/22/2009kj
Figure 1-2-8 Installation Step 8, when installation finished, click Finish to exit.
When you want to launch the Earth Explorer, double click on the Earth Explorer icon and
start using the program. For an unregistered copy, a registration box will ask if you want
to register now.
Figure 1-2-9 Launch Earth Explorer
Note: Users can experience full function Earth Explorer 6.1 in a trial mode. Even if you do
not have a registration key, you may also use the program by selecting Register Later. If
you have bought license key and serial number for Earth Explorer 6.1, you should select
Register Now to enter your keys for authentication and verification.
If you forgot your license key and serial number, please feel free to contact Motherplanet
support at [email protected].
1.3 Registration
Earth Explorer provide full resolution and full function for evaluation purpose. It will pop
up registration hint dialog every five minutes. If you want keep this software please
purchase and register it. Motherplanet provide life time free upgrade for registered user.
Please order Earth Explorer with Regsoft and register it with the supplied license key and
serial number promptly after your purchase.
To register Earth Explorer, you will need to place an order from Motherplanet's website in
the first place.
1) Order Earth Explorer from Motherplanet.
Motherplanet Inc..
Page 11 of 37
8/22/2009kj
You can purchase Earth Explorer by placing an online order from our consigned
partner, Regsoft, who accepts Visa, MasterCard, Euro Card, American Express,
Discover and JCB cards.
Right after you order Earth Explorer, a license key and serial number will be emailed to
your email box with your receipt. You will need the key pairs to finish registration.
If you have any question regarding order, please feel free to contact Motherplanet
sales at [email protected].
2) Register with the License Key and Serial Number
Double click on the Earth Explorer icon on your desktop to launch it.
Earth Explorer enquires of your license key and serial number on start up. Copy and
paste the license key and serial number into the proper boxes.
If you have already launched Earth Explorer, go to Help > Register, then copy and
paste the license key and serial number in the proper boxes.
If you have any question regarding registration process, please feel free to contact
Motherplanet sales at [email protected].
2. How to Use
In order to let you have a detailed understanding on how to use Earth Explorer 6.1, we
came up with four separate parts on the icons on the Toolbar, items in the Menu, how to
modify Preferences to make a better look and a full list of Keyboard Shortcuts.
2.1 Toolbar
1) Save Image Map
Save a bmp or jpeg format picture of the place you like.
2) Print (and preview) digital map
You can decide what to print by defining the center of the map and the size and resolution
of the map before hand. And then, you may preview the printing result and print out the
digital map.
3) Satellite view mode
Earth Explorer can show pure satellite image map view for user to browser the whole
earth.
Motherplanet Inc..
Page 12 of 37
8/22/2009kj
4) Blending view mode
Earth Explorer can blending the satellite view and DEM view to a special map mode for
user to browser the whole earth.
5) DEM view mode
Earth Explorer can show pure digital elevation map (DEM) view for user to browser the
whole earth.
6) Add Place Mark
Motherplanet Inc..
Page 13 of 37
8/22/2009kj
a) You can add your own comments over a
specific place. For instance, you can type in
"My home." over the place you live.
b) If you do not know the exact Latitude
and Longitude information, Find Location...
function may assist you with it.
c) You can add only one place at a time.
Press Add to confirm your modification.
d) When you are done, you will see a small
balloon comment over the place you have
just modified.
e) Select the place mark item from the side
list and click right mouse button for
choosing edit/delete operation.
7) Add Path
a) You can create a path between lots of
places. For instance, you can figure out a
well-planned path that runs from your home
to a destination.
b) If you do not know the exact Latitude
and Longitude information, Find Location...
function may assist you with it.
c) You can add more than one place at a
time. Press Add Points to add more places
in your path. Press Add to confirm all your
modification. Press Cancel to quit without
saving.
d) When you are done, you will see a vector
path over the places you have just added.
Motherplanet Inc..
Page 14 of 37
8/22/2009kj
e) Select the path item from the side list
and click right mouse button for choosing
edit/delete operation.
8) Boundaries
Check this button to add/remove Political Boundaries/Coastlines/Rivers/… on the map.
9) Countries
Check this button to add/remove countries name on the map.
10) Cities
Check this button to add/remove cities information on the map.
11) Islands
Check this button to add/remove islands information on the map.
12) Earthquakes
Check this button to add/remove earthquakes information on the map.
13) Rotate the Earth
Make the digital Earth spin the way you wish it. Turn left, right, upward and downward.
Click Stop to end the spinning.
14) Zoom in/out the map
You may either click on the buttons to zoom in or zoom out, or you can scroll up or down
your mouse to get the same results.
15) Drag/Center/Measure/GPS Navigation
Drag and move the image to the place you wish; Make a spot the center of your research;
Measure distance and bearings between two places. To enable bearings measurement, you
should check Calculate Bearing in Tools > Preference > Bearing. If your have connected to
a GPS device, the GPS Navigation button is enable. You can press this button to switch this
software between GPS Navigation mode and other modes.
16) Day/Night
Day/Night feature will mimic the switching effect of day and night.
17) Find
Motherplanet Inc..
Page 15 of 37
8/22/2009kj
You can find a country or city or island by
its name.
Find location dialog
18) Preference
Modify map display-related preferences.
19) Buy Now
If you did not buy the Earth Explorer you are using, you can click on this button to order a
key pairs for your permanent use. 20) Register
When you have license key and serial number for the Earth Explorer, you can register
them to the copy you are using. After success registration, you can use it with full access
for as long as you like.
Motherplanet Inc..
Page 16 of 37
8/22/2009kj
21) Download maps to disk cache in Background
Note: this function is for Advanced License only
Download maps to disk cache in Background. Please make sure you have more than 40GB
free disk space if you would download the full images set to the disk.
22) Help
Seek for help? Read online educational materials or read this Help document or simply
send us an email ([email protected] )
2.2 Menu
In a wish not to reiterate the information that is already provided on Toolbar, we have
items that are listed on the Menu, but may not be used as frequently as those on the
Toolbar. Please make sure you have read the Toolbar section.
➢
Menu → File
Motherplanet Inc..
Page 17 of 37
8/22/2009kj
➢
Menu → View
➢
Menu → Maps
Motherplanet Inc..
Page 18 of 37
8/22/2009kj
➢
Menu → Explorer
➢
Menu → GPS
Motherplanet Inc..
Page 19 of 37
8/22/2009kj
➢
Menu → Tool
➢
Menu → Help
Less frequently used functions on the Menu
Motherplanet Inc..
Page 20 of 37
8/22/2009kj
1) Maps > Day and Night Enabling Day and Night, you will have a better idea about the
approximate time the specific spot is in. When it's in a shadow, it's night; when it's in light,
you know it's day.
2) Tools > Find Location... With the Find Location tool, you won't be scrolling down the List
Panel to find a country, city or island.
3) Tools > Go to... If you have specific Latitude and Longitude information of a place, you
can use this feature to spot the exact location.
4) Tools > Distance between... This function calculates the distance between two places.
You will have to know the name of the two countries, cities or islands, or latitude and
Longitude information of the two places.
5) Tools > Gamma Control Do you think the picture isn't bright enough? You may increase
the Gamma value. Gamma values can increase from 1.0 up to 2.0 by 0.1 increments.
Check the preview box and you will see the outcome without closing the Gamma Control
window.
6) Tools > Blending Control The default Blending percentage is 50%. The outcome of
blending would be taking Satellite map and Topographic map half by half. You can change
it to the best visual effect by changing the Blending value.
7) Tools > Preference With Preferences, you can adjust Field Of View (FOV), convert
Distance Unit (km, mile and nm), change Lat/lon Format, choose a suitable Resample
Method, turn on/off the starry background, increase or decrease Grid Step. And for further
details, please click here.
18) Help > About About refers to information regarding Earth Explorer version, registration
and contact information of Motherplanet.
2.3 User-definable Location Map
What can I do with User-Definable location map?
Users can add and display user-definable map to Earth Explorer. With the user-definable
Location Map, users can manage these options.
1) Display the map at the style your wish;
2) Define whether or not to enable the map on the Menu/Search/Table region;
What can be added to user-definable location map?
Motherplanet Inc..
Page 21 of 37
8/22/2009kj
You can add anything you would like to display on Earth Explorer, as long as you provide
the map definition file and put your data to a data source file.
1
Map Definition File: A XML file define the format of the data source file, the display
style of the map, and how to integrate the map with Earth Explore.
2
Source Data File: to store your data in the file with the format you defined in the map
definition file.
Both files can be edited with editing tools like Word, Notepad and Ultra Edit or complicated
ones like Dream weaver(if source data file not compressed). After you complete these
files, please remember to move them to Location folder under the installation path of Earth
Explorer or the location folder you defined. Open the file “map.all” with a text edit, and
add a new line with the name of the map definition file. For instance, if you install Earth
Explorer in C: Drive, then you will need to move both files to C:\Program
Files\Motherplanet\Earth Explorer\location folder.
First you will need to create the above mentioned map Definition File and Source Data File.
Map Definition File(.xml)
A Definition File consists of six items, File, Data, Table, Search, Tips, and Render. These
items define a map and manage the Source Data the way you want. Each item serves a
different function. So let us have a closer look at how they work.
Compound Content:different contents can be joint with a plus mark (+). For instance,
compound contents can be written in this format: "My Name" + name. While contents
within quotation marks are constants; while contents without quotes are data defined in
Source Data File.
Here's an example of a complete Definition File for you to refer to.
1. File - general definition over these sub-items.
1. Name: Give your map a name, which can be displayed in the Menu, Table
(or Column list) and Search options.
2. Icon: Icon file name, the icon will display with Name.
3. Menu > True or False: This defines to show or to hide the map Name in the
Menu.
4. Table > True or False: This defines whether or not add the map to the table
Motherplanet Inc..
Page 22 of 37
8/22/2009kj
region like Countries, Cities, Islands and Earthquakes.
5. Search > True or False: This define whether the location items define in the
map can be searched in Earth Explorer, true or false.
6. Overlay > True or False: This defines whether or not your data allows to be
overlaid by other maps like Earthquakes.
7. Living: Define whether a map is a live map. An example routes:
<living>
<enable>true</enable>
<refresh>10</refresh>
</living>
enable: Define whether a map is a live map, true or false
refresh: Define the refresh period of a live map in seconds.
8. List: Define the web URL(begin with “http:” of “https:”) or file name of you
data source file, which contains the data you need to display in Earth Explorer.
Earth Explorer will add any map included in the file “map.all” and load the
location items stored in the data source file at start. If the map is live, earth
explorer will fetch the source data define by the map periodically.
9. Compress: This will determine if your data gets compressed in order to save
space.
10. Filter: This one controls the density for display. You can set minimum and
maximum number of display in order to make over-populated data area less
crowded and vice versa.
11. Class: If you wish to control the display of you map in a deep level, this
is what you want. You can implement this in java language, the most
populated compute language today. Place the binary file name of you java
extension file name(.class) in this line . Please refer to the documents locate at
“Install folder\API” for details. If you have any question, please discuss it in
the http://forum.motherplanet.com or write to [email protected] .
2. Data - define the format of Source Data File. Here with Data item, the following
information are important.
1. Each datum need to be aligned in a separate line.
2. Entries within the same line should be separated with this mark "|".
Motherplanet Inc..
Page 23 of 37
8/22/2009kj
3. Information like Latitude and Longitude is a must.
4. Data formats include “latitude”, “longitude”,”latitude”, “int”, “long”, “bool”,
“string”, “float” and “double”.
3. Table - define width, title of the Column lists. <table_column title= "Column Name"
width="a number for column width">Compound Content</table_column>.
Note: content supports “Compound Content” format.
4. Search - defines search subjects. Here name in this <key>name</key> represent
the same name in the <data_column>.
Note: content supports “Compound Content” format.
5. Tips - organizes the layout of cursor Tips. With the example on the left, Tips will
display your information in this order, name, province, country, population, inhabitants
and other comments you have added to Source Data File.
Note: content supports “Compound Content” format.
6. Render - defines color, font and order of text and images displayed on the 3D Earth
Explorer map.
Note: content supports “Compound Content” format.
1. Text: fully supports Compound Content input.
2. Image: define your image name and its location.
3.Html: If you click the item on the map, an browser window will pop up with
the content you defined in this node. Note: if this content is begin with “http:”
or “https:”, Earth Explorer will treat it as a URL and will open the link in the
browser window. Otherwise render it as html content in the browser window
directly.
Note: If the content include HTML tag, remember to bound this content with
“<![CDATA[“ and “]]>”. For example:
<html><![CDATA[name+"<br><a href=http://www.google.com/search?
q="+name+">"+name+</a>]]></html>
4. Color: define color of text, RGB format supported. For instance, you can set
the color to “160, 160, 160”.
5. Font: define font of text, including family, size and style. A quick example:
<font>”Verdana, 8, bold”</font>
Motherplanet Inc..
Page 24 of 37
8/22/2009kj
6. Order, add data_column name here and display order is dependent on size
of the column. Largest column always displays in the first place.
Source Data File(.lst)
Compose a “.lst” file with the above mentioned editing tool. Here are two rules to follow
when it comes to create a Source Data File.
Each LocationItem should be put in line by line.
And different entries in the same line should be separated with this mark "|".
Then you will need to allocate these files properly.
Take the one with C drive as installation path for example, you will need to paste the two
files you have previously created to C:\Program Files\Motherplanet\Earth Explorer
6.1\location folder.
Last but not least, add these two files in a file named map.all in this input format.
countries.xml
cities.xml
islands.xml
eq.xml
Add your own "definition_file.xml" there in a new line.
Extra Content – Custom the appear of you Location Item
If your map need a special and complex display style, you can implement it with a
extention write in Java language . It's not hard to extend LocationItemImpl to achieve this.
And here is sourcecode of the LocationItemCity.java used to define the city map of the
software:
package com.motherplanet.location.test;
import java.io.*;
import com.motherplanet.location.define.*;
public class LocationItemCity extends LocationItemImpl {
String imagePath = null;
Motherplanet Inc..
Page 25 of 37
8/22/2009kj
long population;
public LocationItemCity(LocationMap lmap, String content) {
super(lmap, content);
population = Long.parseLong(getDataColumn(5));
}
/**
* return the image file name displayed on the map
*/
public String getImage() {
if (imagePath == null) {
String key = null;
if (population >= 1000000) {
key = "1000";
} else if (population >= 500000) {
key = "500";
} else if (population >= 100000) {
key = "100";
} else if (population >= 20000) {
key = "20";
} else if (population >= 5000) {
key = "5";
} else {
Motherplanet Inc..
Page 26 of 37
8/22/2009kj
key = "1";
}
String adm = getDataColumn(5);
switch (adm.charAt(0)) {
case 'R': //region admin
key += "r";
break;
case 'C': //country admin
case 'B': //both region and country admin
key += "c";
break;
}
imagePath = "images" + File.separator + key + ".gif";
}
return imagePath;
}
/**
* return the font used to show the city's Name on the map.
*/
public String getFont() {
//population more than 1000,000 use the bold font
Motherplanet Inc..
Page 27 of 37
8/22/2009kj
int threshold = 1000000;
if (getParent().getRenderedCount() < 20) {
threshold = 100000;
}
if (population > threshold) {
return "verdana,7,bold";
}
return "verdana,7,normal";
}
}
2.4 Preference
Motherplanet Inc..
Page 28 of 37
8/22/2009kj
As you can see from this screen shot,
1) FOV Field of View. You may enter any number varying from 1 to 90. Generally the
default 30° guarantees a clear bird's eye view of our Motherplanet. The smaller the
number is, the closer will be the view. You can use it much the way like you zoom in or
zoom out.
2) Distance Unit This 3.5 new version added two distances unit for special needs,
Mile123456781234567812345678g and Nautical Mile.
3) Lat/Lon Format The following calculators will Convert Lat / Long Coordinates between
three different units types: Degrees Minutes Seconds - DD MM SS (Ex = 39 54 32 W).
Decimal Degrees (Ex = 39.8967deg) - minutes and seconds are converted to decimal
format. GPS Coordinates (Ex= 39deg 58.589min) - seconds are converted to decimal
format.
4) Grid Step Define the Lat/Lon Grids step, 10°, 15° and 30°.
Motherplanet Inc..
Page 29 of 37
8/22/2009kj
5) Bearing. It's not enough to have distance calculated. Get the bearing information too.
Check to enable it.
6) Max Resolution: The max resolution for the map. 30M, 10M, 5M and 1M per pixel.
10M, 5M and 1M per pixel resolution is provided for GPS Navigation purpose.
7) Max Items: Maximum items number of a thematic map can be displayed in screen at
the same time.
2.5 Keyboard Shortcuts
This is a full list of Keyboard Shortcuts for Earth Explorer. You can print this page out and
learn to utilize the keyboard shortcuts.
Motherplanet Inc..
Shortcut
Function
F1
Display/turn off Toolbar
F2
Display/turn off Status Bar
F3
Display/turn off List Panel
F4
Enable/disable Full screen mode
F5
List Panel on the right
F6
List Panel at the bottom
F7
List Panel on the left
F8
List Panel at the top
F9
Help Topics
F10
About
Ctrl+1
Political Boundaries
Ctrl+2
Coastlines
Ctrl+3
Rivers
Ctrl+4
Lat/Lon Grids
Ctrl+5
Countries
Ctrl+6
Cities Positions
Ctrl+7
City Names
Ctrl+8
Island Positions
Ctrl+9
Island Names
Ctrl+0
Earthquakes
Page 30 of 37
8/22/2009kj
Ctrl+A
Show all map layers on
Ctrl+N
Turn off all Map layers
Ctrl+S
Save a picture
Ctrl+H
Drag mode
Ctrl+C
Center mode
Ctrl+M
Measure mode
Ctrl+Left key
Pan Left
Ctrl+Right key
Pan Right
Ctrl+Up key
Pan Up
Ctrl+Down key
Pan Down
Ctrl++
Zoom In
Ctrl+-
Zoom Out
Ctrl+P
Print
Ctrl+F
Find Place...
Ctrl+G
Go to...
Ctrl+D
Distance ...
Ctrl+F5
Show/hide Compass
Ctrl+F6
Show/hide Map Scale
Ctrl+F7
Show/hide Hair Cross
Ctrl+Shift+G
Gamma Control
Ctrl+Shift+M
Add Place mark
Ctrl+Shift+P
Add Path
3. FAQ
Here we provide the most frequently asked questions and their answers in a hope to
provide solution for you before you contact our Technical Support .
Frequently Asked Questions:
3.1 About
1. What is Earth Explorer?
Motherplanet Inc..
Page 31 of 37
8/22/2009kj
Earth Explorer 6.1 is GPS Enabled digital map software with high-resolution satellite
imagery, shaded relief topographic imagery and blending imagery of the two. It also
include location information of 270 countries and regions, 50000+ cities, 15000+
islands and 50000+ earthquakes from 1973; And outline information of political
boundaries, rivers, lakes, coastlines of the world etc. All those map information was
integrated together for providing a total 3D view of our beautiful planet earth. You can
place your own placemarks and path routes to the map, show GPS tracks on the map
and keep them with the maps if you already connected with a GPS device. Beside
these, it has many other interesting functions, you can regard it as a kind of
educational scientific software of geography.
2. How does it work?
Earth Explorer is a easy-to-use software. When you exploring the earth surface,
imagery data is streamed to you PC from our web server and cached to your disk.
With the multi-resolution and tiled image technology, you can access this huge
information set and don't need to worry about your computer's memory limit.
3. What is the advantage of the Advanced License than the Standard License?
Earth Explorer with advanced license has two advanced features than Earth Explorer
with standard license:
1) 250% speed to load map data from Earth Explorer remote server when you explore
the not cached imagery.
2) User can start/stop threads to download maps data in background. This allow you
to cache the maps data of a defined region to your disk, and used it without internet
connection, such as use the Earth Explorer as a GPS navigation software on a plane,
boat or a car. Please make sure you have enough disk space to cache the maps data,
whole maps data of the world used by Earth Explorer is about 40GB.
3.2 How to Buy
4. Is your online order form secure?
Yes, it is 100% secure.
5. Is tech support free?
Yes! It's free for all.
6. Does it accept phone, fax and Euro checks orders?
Yes, it does. Please visit http://www.motherplanet.com for detail information.
Motherplanet Inc..
Page 32 of 37
8/22/2009kj
3.3 Navigation with GPS device
7. What kind of GPS device supported by Earth Explorer?
Earth Explorer support NMEA-0183 compatible GPS mouse, CF GPS, Bluetooth GPS
and other GPS receiver.
8. How to connect GPS device with Earth Explorer?
You can select the menu “GPS > Connect to GPS...” to connect to your GPS device.
Earth Explorer will scan serial ports for possible GPS device at the first time. If
successful the parameters will be saved as a default.
9. Can I display the GPS track in Earth Explorer?
Yes, you can display GPS track in Earth Explorer through check the menu item “GPS >
show GPS track”.
10. Can I add/edit/display GPS tracks in Earth Explorer?
Yes, you can. Please check the menu “GPS > Automatic Add GPS track to Track List”
to add GPS track. When you select the menu “GPS > Disconnect” or exit the program
GPS track will be added to the Track List. Edit the track, please select it from the table
list and click it with the right-button of your mouse, a edit/delete choice will appear.
To display the GPS Tracks map in Earth Explorer, please check the menu “Maps > GPS
Tracks”.
3.4 Fleet tracking and management based on Earth Explorer
11. Can Earth Explorer report my location to GIS database of our company in realtime?
Yes. Earth Explorer must connect with a GPS receiver to get the geographic
information of your location in realtime at first; then you need to set Earth Explorer
to report the location information to a remote server periodically through the
menu:GPS->Report Location.
The remote URL should receive the information and
put it to the GIS database after processing.
12. How to display a living map of a vehicle fleet with Earth Explorer?
Earth Explorer can fetch living map data from a web location periodically. You fleet
member should report their location to GIS database first, then you should add a
user-definable map with living style , the content of <list></list> node in the map
definition file set to a web link, the web server should generate the data source
Motherplanet Inc..
Page 33 of 37
8/22/2009kj
content of the map as the required content in realtime when Earth Explorer request
the link. So Earth Explorer will display the thematic living map. This can provide a
solution to tracking/monitoring a vehicle/ship/airplane fleet in real time.
3.5 Details & Tips
13. What is different between registered version and unregistered version?
The unregistered version will hint you to register the software.
14. Does the un-registered version have a date expire limit?
Although the unregistered version is for evaluation purpose only, no date limit for free
trial.
15. Does Earth Explorer need an internet connection?
Earth Explorer need an internet connection (broad band is better) to stream the maps
data when you browser the maps. But if you have cached the data required to you
disk cache, it will not access the internet.
16. What is the maximum resolution of the earth surface image?
The maximum imagery resolution of Earth Explorer is 30m per pixel. But you can set
it to 10m, 5m or 1m per pixel to display GPS tracks clear.
17. What is the meaning of 1m resolution?
1m resolution is meaning a point in the picture represent a 1m*1m square in the real
earth surface.
18. Do you provide Mac version of Earth Explorer?
Yes. We provide Earth Explorer for Mac OS X.
19. Is it free to upgrade it version 5.0 to the version 6.1?
Yes. It's free for customers, who had purchased previous versions of Earth Explorer,
to upgrade to Earth Explorer 6.1. Just installed it and register it with the license
information you have.
20. I have more questions; how can I contact you?
Motherplanet Inc..
Page 34 of 37
8/22/2009kj
Please send your additional questions to [email protected] .
4. Glossary
Terms you should know when using Earth Explorer, in alphabetical order.
1. Azimuth the horizontal angle or bearing of a point measured from the true
(astronomic) north. Used to refer to a compass on which the movable dial (used to
read direction) is numbered in 360°
2. Bearing A direction on the ground or on a map, defined by the angle measured
from some reference direction: this may be true (geographic) North, magnetic North,
or grid North. Used also to refer to a compass on which the movable dial (used to
read direction) is numbered as four 90o quadrants where N=0, 5=0, E=90, W=90.
See also azimuth.
3. Coordinate A set of numbers that designate location in a given reference system,
such as x,y in a planar coordinate system or an x,y,z in a three-dimensional
coordinate system. Coordinates represent locations on the Earth's surface relative to
other locations.
4. DEM Digital Elevation Model. A digital representation of a continuous variable over
a two-dimensional surface by a regular array of z values referenced to a common
datum. Digital elevation models are typically used to represent terrain relief.
5. Gamma Informal. A measure of the brightness of mid-level tones in an image.
Outside this specification, the term "gamma" is often used as the exponent of a power
function that is the transfer function of any stage(s) of an imaging pipeline: output =
input ^ gamma where both input and output are scaled to the range 0 to 1. Within
this specification, gamma refers specifically to the function from display output to
image samples.
6. GPS Global Positioning System Also refers to Global Positioning Satellite. A system
using satellites, receivers and software to allow users to determine their exact
geographic position.
7. Pixel An abbreviation of the term 'picture element.' A pixel is the smallest picture
element of a digital image. Like the fibers of a fabric, individual pixels are too small to
notice, but together they make up the whole.
8. Resolution The number of pixels (in both height and width) making up an image.
The more pixels in an image, the higher the resolution, and the higher the resolution
Motherplanet Inc..
Page 35 of 37
8/22/2009kj
of an image, the greater its clarity and definition (and the larger the file size).
9. Topographic The physical features of a surface area including relative elevations
and the position of natural and man-made (anthropogenic) features.
5. Reference
Last but not least, we wish to keep in touch with our users as always, and we have some
announcements and disclaimers to make in this last chapter.
5.1 Contact Us
Motherplanet, Inc., founded in October 2002, focuses on providing high-resolution
interactive 3D digital world map solutions for educational purpose. By its unique huge
image organization technology, Motherplanet combines aerial and satellite imagery,
shaded relief topographic imagery and user-definable map information together to give
you a total 3D view of our beautiful mother planet earth at user's interpretation. We are
always working to improve our products and your suggestion and comments will be our
great source of stepping forward. So feel free to contact us with the following information
provided.
For more information about us please visit our website at http://www.motherplanet.com .
Contact Us
Technical Support: [email protected]
Sales: [email protected]
5.2 Trademarks & Disclaimers
Important announcements on Trademarks and Disclaimers
Trademarks
The Earth Explorer logo, the Motherplanet company Logo and other versions of Earth
Explorer graphics, logos, page headers, button icons, scripts, and service names are
trademarks, certification marks, service marks, or other trade dress of Motherplanet or its
subsidiaries. Motherplanet's trademarks, certification marks, service marks, and trade
dress have inherent meaning and substantial value because of their restricted use. They
may not be used in connection with any product or service that is not Motherplanet's, in
any manner without Motherplanet's permission. All other trademarks not owned by
Motherplanet or its subsidiaries that appear on this document are the property of their
respective owners, who may or may not be affiliated with, connected to, or sponsored by
Motherplanet Inc..
Page 36 of 37
8/22/2009kj
Motherplanet or its subsidiaries.
Disclaimers on Distribution
This software may be freely distributed provided that:
Such distribution includes only the original archive. You may not alter, delete or add any
files in the distribution archive.
The distribution does not include a registration code. In particular, you may not distribute
a registered version of Earth Explorer.
If you have any comments or concerns about Earth Explorer, feel free to email us. Your
feedback is important to us in order to get an idea of how to make Earth Explorer a better
product for you. So if you have a grand idea for a new feature, or a better way of doing
something, please drop us a note.
Motherplanet Inc..
Page 37 of 37
8/22/2009kj