1
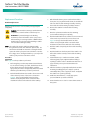
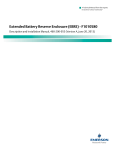
NetSure™ Rectifier Module
User Instructions, UM1R123000
Note: The rectifier locks into the module mounting assembly
Figure 6. Installing or Removing a Rectifier
through a latch located on the underside of the module. The
latch and module handle are interactive. Pushing the handle
up into the module’s front panel causes the latch to extend to
the locking position. Clicking the handle to pop it out from the
module’s front panel causes the latch to retract.
Note: For safety, the unit rear connector output DC pins are disabled
until "awakened" inside the module mounting assembly.
To install or remove
a module, push the
handle built into the
front cover in and
release at the top
center of the cover
as shown here.
Procedure
Refer Figure 6 as this procedure is performed.
1.
Unpack the rectifier.
2.
Note the model number located on the front of the
module. Ensure the correct module is being installed.
3.
If present, remove the blank cover panel from the
module mounting position into which a rectifier is to be
installed.
4.
Place the rectifier into an unoccupied mounting position
without sliding it in completely.
5.
Push the handle built into the rectifier’s front cover in and
release at the top center of the cover as shown in in
Figure 6. This pops the handle forward out of the
rectifier’s front panel (this will also retract the latch
mechanism located on the underside of the rectifier).
The handle pop
forwards out of
the module’s front
panel. Note this
will also retract the
latch mechanism
located on the
underside of the
module.
6.
Push the rectifier completely into the module mounting
assembly.
7.
Push the handle into the front panel of the rectifier. This
will lock the rectifier securely to the module mounting
assembly.
8.
Repeat the above steps for each rectifier being installed
in the system.
9.
After the rectifiers are physically installed in the module
mounting assembly(s), they are ready for operation
immediately after power is supplied to them.
THE HANDLE MUST
BE IN THE OPEN
POSITION WHEN
INSTALLING A
MODULE.
To remove a
module from a
module mounting
assembly, pull the
handle down to
pivot it out from the
module’s front panel.
This will slide the
module slightly out
of the module mounting
assembly, releasing the
module from the mounting
assembly connector.
10. Certain functions (i.e. rectifier current limit, rectifier
addressing) may require adjustment when adding or
replacing a rectifier. Refer to “Rectifier Current Limit” on
page 7 and the power system documentation for
instructions.
Spec. No: 1R123000
Model No: R12-3000
[9]
Document Code: 11UJ9716ER
Revision B, December 30, 2014