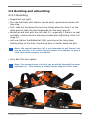
1
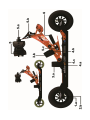
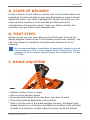
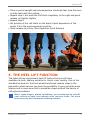
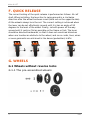
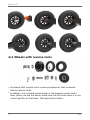
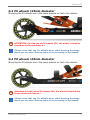
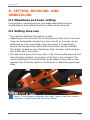
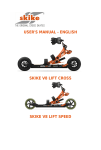
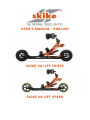
USER'S MANUAL - ENGLISH SKIKE V8 LIFT CROSS SKIKE V8 LIFT SPEED Table of Contents TABLE OF CONTENTS A. SCOPE OF DELIVERY ............................................................. 1 B. FIRST STEPS ........................................................................... 1 C. BRAKE ADJUSTING ................................................................. 1 D. X/O LEG ADJUSTMENT .......................................................... 2 E. THE HEEL LIFT FUNCTION .................................................... 3 F. QUICK RELEASE ..................................................................... 4 G. WHEELS .................................................................................. 4 G.1 Wheels without reverse locks ......................................... 4 G.1.1 The pre-assembled wheels .................................... 4 G.2 Wheels with reverse locks ............................................... 6 G.3 PU wheels 125mm diameter ............................................ 7 G.4 PU wheels 145mm diameter ............................................ 7 H. SETTING, BUCKLING- AND UNBUCKLING ........................... 8 H.1 Wheelbase and basic setting ........................................... 8 H.2 Setting shoe size ............................................................. 8 H.3 Buckling and unbuckling .................................................. 9 H.3.1 Buckling ................................................................ 9 H.3.2 Unbuckling ........................................................... 10 I. CHANGING PARTS ................................................................. 10 I.1 Change tires .................................................................... 10 I.1.1 Dismount tires ....................................................... 10 I.1.2 Mount tires ............................................................ 10 I.2 Directional stability - straight and track tuning ............... 11 I.3 Changing bearings .......................................................... 11 I.3.1 Dismantling ........................................................... 11 I.3.2 Assembly ............................................................... 11 © Four Ace International Ltd. Table of Contents © Four Ace International Ltd. skike v8 LIFT A. SCOPE OF DELIVERY For the contents of your skike set, please refer to the product labels and packaging. Content and delivery may vary depending on product model, design and series. Your skike is designed for normal, everyday use. Use under extreme conditions is not intended and shall relieve the manufacturer of all warranty claims. Treat your skikes carefully and accordinly only put them to their intended use. B. FIRST STEPS Before you can use your new skike you must first insert and lock the wheels supplied. Please follow to the following instructions carefully. The use of the wheels is completely straightforward and easy to do for everyone. We recommend before installation of pneumatic wheels to check the air pressure. This is much simpler before installation. The air pressure in all air wheels should always have between 6-7,5 bar (107 PSI). C. BRAKE ADJUSTING ● ● ● ● ● Optimal Surface: Grass or carpet Take a normal upright posture By pressing both knees all the way back, lean back to avoid The brake should be detectable in this position. If this is not the case or the brake engages too early, the lateral quick release (b) loosen on the brakes and adjust the position of the calf shell to brake so that with an upright stand, the brake can be felt without Version 1.5.0429.1627 1 skike v8 LIFT ● ● leaning back. Quick release (b) tighten properly. (See Operation Quick Release) With practice, the brake can be changed so that you must already lean back slightly before the brake can be reached. Note: If the brake is not sufficient forward or backward setting, please point wheelbase and basic setting (see section C.1) note! D. X/O LEG ADJUSTMENT ● ● 2 Optimal Surface: Grass or carpet Loosen rear quick release (a) at the calf shell, push calf shell (5) completely to the left, slightly tighten 2015 skike v8 LIFT ● ● ● ● ● Take a normal upright and relaxed posture intuitively feel, how the level in skike feels with this setting. Repeat step 2, but push the calf shell completely to the right and quick release (a) tighten slightly. Repeat step 3 Set position of the calf shells on the basis of past experience of the points 2-5 in the most ergonomic position. Quick release (a) firmly. (See Operation Quick Release) E. THE HEEL LIFT FUNCTION The skike v8 has a permanent heel lift feature that you will have available for both, skating and also for classic cross country. Due to the standard on-board in the front wheels reinforced reverse stops in the pneumatic wheel version you have the possibility to use your skike more intense and to overcome mild to moderate slopes without the hassle of rolling back problems. Note: steep slopes, alpine conditions, we recommend to retrofit your skikes at both rear wheels with reverse locks. For even more security and increased climbing comfort. Version 1.5.0429.1627 3 skike v8 LIFT F. QUICK RELEASE The correct locking of the quick release is performed as follows. At calf shell: When installing, the lever has to swing around in a clockwise direction after the wheel has been insert (hold nut on the opposite side). At the wheels always turn the nut. The correct setting is achieved when the lever can be set effortlessly around until it is has an angle of 90 degrees to the level of the wheel. Finally, set with power all the way around until it rests as flat as possible on the frame or fork. The lever should be directed backwards, so that it does not unnoticed dissolves when one touches an obstacle to the wheel, and so no cords, lines, wires or even garments are entrained in the dense (pedestrian) traffic. G. WHEELS G.1 Wheels without reverse locks G.1.1 The pre-assembled wheels 4 2015 skike v8 LIFT ● ● ● ● Check for completeness. Unpack the attached quick release and check for completeness. Unscrew the quick release nut. The tension pulley on the lever remains on the quick release. Insert wheel into the fork Quick release at the right skike push through the shaft hole in the frame, the wheel and the axle hole in the frame at the other side. Nut of the quick release screw and slightly tighten by hand. At left skike from left side. Version 1.5.0429.1627 5 skike v8 LIFT G.2 Wheels with reverse locks ● ● 6 On wheels with reverse locks is same procedure as that on wheels without reverse locks. In addition, the included values shown in the drawing contain small lever. When you use the wheel, make sure that this small lever is in the correct position to the frame. Then proceed as before. 2015 skike v8 LIFT G.3 PU wheels 125mm diameter Mounting the PU wheels are in the same manner as that of air wheels. ATTENTION: For the use of PU wheels 125, the wheel is fixed to the frame in the axle holes b.! Please note that the PU wheels have other bearing bushings. Never use air wheel bearing parts in the assembly of PU wheels! G.4 PU wheels 145mm diameter Mounting the PU wheels are in the same manner as that of air wheels. Attention: For the use of PU wheels 145, the wheel is fixed to the frame in the axle holes a.! Please note that the PU wheels have other bearing bushings. Never use air wheel bearing parts in the assembly of PU wheels! Version 1.5.0429.1627 7 skike v8 LIFT H. SETTING, BUCKLING- AND UNBUCKLING H.1 Wheelbase and basic setting Front position, standing position, and brake adjustment must be coordinated so that optimal function of skike can be achieved. H.2 Setting shoe size ● ● ● The heel belt definites the position in skike Depending on the shoe size the correct position of the foot to the front strap can be selected. Already from shoe size 43 on the shoe can be positioned as close as possible to the rear wheel. It is important to ensure that the point from which affects the brake, will be modified. The farther forward you are standing in skike, the later are the brakes. The further back, the sooner. The skike has a wing nut on one side (c). By loosening the wing nut and move the heel strap (6), the position of the foot is also changed. The coarse adjustment of the heel strap can be made in each case on the opposite heel lift fixture means of attachment to differently positioned holes. Note: The distance between the heel (shoe) and rear wheel , however, should never be less than 10mm 8 2015 skike v8 LIFT H.3 Buckling and unbuckling H.3.1 Buckling ● ● ● ● ● Regard left and right! The new foot belts with fixation can be easily opened and reared until they stop. First, slide the foot below the two foot straps when the shoe is on the skike ground, slide the foot backwards into the heel strap (6). Buckle up and start with the calf shell (5) , especially if there is no seat available, a firmly stand is already provided after tightening of the calf strap (5) Just now tighten the Middle Belt (3b), pressing on the lying down holding strap on the shoe. Avoid shoe-knot or similar below the belt. Note: the central aperture (d) is not intended to pull bands, but can be used for it in certain special cases, for example, to give a little foot better support or comfort. ● Front belt (3a) also tighten. Note: For narrow shoes, the belt can be pulled through the lower openings (c) . This ensures a stable lateral support in this area Version 1.5.0429.1627 9 skike v8 LIFT H.3.2 Unbuckling ● The unbuckling takes place in reverse order Note: Optimal is a sitting position. If this is not the case, make absolutely sure the calf shell to loosen last! ● ● ● Front retaining strap (a) loosen until it stops. Middle Belt (b) loosen until it stops. Calf shell belt (5) open and get out I. CHANGING PARTS I.1 Change tires I.1.1 Dismount tires ● ● ● ● Deflate and while pressing the tire together so that the air escapes as completely as possible. Press the tire casing, opposite the valve as far as possible into the rim and lift with a suitable tool the tire over the valve out of the rim Pull with a second tool immediately adjacent to the excavated site on the tires until one side of the jacket is lifted completely off the rim. Pull Second page, hose off the rim I.1.2 Mount tires ● ● ● ● ● So put tube inside the tire that shows the valve against the direction of the profile and run through the opening. Once the tube is in the correct position tighten the lock nut on the tube by hand Coat the tire at the rim seat assembly with tyre bed lubricant paste or soft soap Completely Press the first page of the tire casing by hand in the rim. The second side, starting next to the valve and push away from the valve in the rim, so that the tyre then slips in the end at the valve in the rim. 10 2015 skike v8 LIFT Note: Especially at the last piece make sure that the already mounted areas are deep in the rim, then the last piece slips in the rim relatively straightforward. ● ● ● Precisely aligned by moving the tire on the rim, the valve to the valve opening of the rim Inflation, thereby necessarily complete pull the valve out of the rim, in case this was not already performed by the luck (new type tubes). After installing the wheel, Check or adjust straight-line stability. (H.2) I.2 Directional stability - straight and track tuning Basic setting: buckle up skikes and open all four wheel quick releases on a smooth, flat surface. Roll 1 to 2 meters. Then close in the loaded condition all four quick releases again. Fine adjustment: If the directional stability is still not satisfying you can perform the fine tuning by loosen a quick release and press the front wheel to the straight-line stability. Please note that during the roll tests the skike must be kept completely straight (horizontal). Even slight inclinations influence the direction. This setting method can only lead to the desired success by proper performance. I.3 Changing bearings I.3.1 Dismantling ● ● ● Push pin (app. 4-5mm diameter) to the oposite bearing Press bearing out of the rim by giving a slight beat , the spacer sleeve falls out of it. Press the second bearing on the opposite side out. I.3.2 Assembly ● ● Insert bearing on a firm surface. Press rim on the bearing. Version 1.5.0429.1627 11 skike v8 LIFT ● ● ● Provide the second bearing with spacer sleeve to slip pad Turn rim and press from the other side of the bearing. Repeat on both sides until both bearings are fully seated in the rim. 12 2015 skike v8 LIFT Manufacturer and worldwide distribution: skike Sports International Ltd. Rm. 301-2, 3rd floor, Hang Seng Wanchai Building, 200 Hennessy Road, Wanchai, Hong Kong Version 1.5.0429.1627 Visit our websites and follow skike: www.skike.com www.facebook.com/skikeOfficial www.youtube.com/skikeTV www.instagram.com/skikeNow www.twitter.com/skikeCom (@skikeCom) 13