1
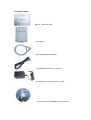
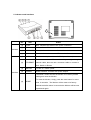
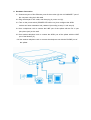
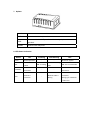
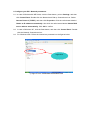
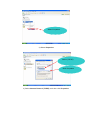
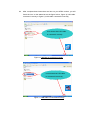
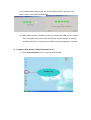
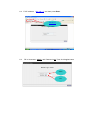
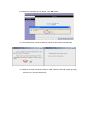
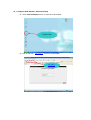
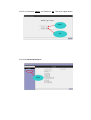
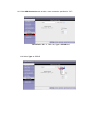
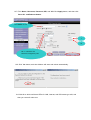
User’s Manual
ADSL Router Modem DB 120
4 Ethernet Ports
1. About ADSL
ADSL (Asymmetric Digital Subscriber Line) is a technology that allows high-speed
data to be transmitted over existing copper telephone lines. The frequency of the ADSL
signal is higher than that of voice, so voice and ADSL signal can coexist in one line by
using a splitter to insulate each from the other. ADSL supports upload transmission speed
up to 1Mbps and download speed up to 8 Mbps. Its data transfer rate adapts to the quality
of telephone line and its distance. ADSL modem is an ideal device for broadband access.
2. Feature of ADSL Router Modem DB120
1. Support ANSI T1.413 ISSUE 2, ITU G.992.1(G.DMT), ITU G.992.2(G.LITE).
2. Web-based configuration and monitoring.
3. Support up to 8 PVCs.
4. Routing function.
5. Support NAT, DHCP Server
6. Maximum downstream transmission rates of 8 Mbps.
7. Maximum upstream transmission rates of 1Mbps.
8. 4 Port Ethernet
3. System Requirements
- CPU Pentium® MMX 233 MHz / higher or Compatible
- Ram 64 Mb or higher
- Hard Disk 1 Gb or higher
- CD Rom 8 X or higher
- LAN Card ( Network Interface Card )
- Windows® 98/2000/NT/Me/XP
4. Package Contents
DB120, 4 Ethernet Ports
One splitter
One LAN cable (RJ-45 Cable)
Two telephone lines (RJ-11 Cables)
One Adapter AC 220 Volts, DC 11 Volts
CD Quick Setup/Thai &English user’s Manual
5. Indicators and Interfaces
9
Indicator
No.
(1)
(2)
(3)
(4)
(5)
(6)
Interface
(7)
(8)
(9)
Item
Power
DSL
INTERNET
LAN
LINE
Status
Red, Indicates the status of the power connection.
Yellow, Shows DSL line status.
Green, Indicates the status of internal Connection
Green, Indicates the status of Ethernet interface.
Connected with phone line or "ADSL" port of the splitter.
To be connected to a PC network card by a straight-through
ETHERNET network cable, also can use a crossover cable to connect to
Hub, Switch or Router.
SWITCH
To turn on / off the power.
POWER
Power interface, Connect with power adapter.
The RESET button will set the Modem to its factory default
setting and reset the Modem.
To reset the Modem, simply press the reset button for more
RESET
than 10 seconds. The Modem will be reset to its factory
defaults and after about 30 seconds the Modem will become
operational again.
6. Hardware Connection
6.1 Connect anyone of four Ethernet ports of the modem (6) with 10/100BASE-T port of
the computer using the LAN cable
6.2 Plug the adapter in AC outlet, and then plug in power cord (8).
6.3 Turn on the power switch (POWER LED will be on), then configure the ADSL
modem and enter username and password (according to step 11 and step12)
6.4 Use a telephone cord to connect the LINE port of the splitter with the RJ-11 port
(the phone jack) on the wall.
6.5 Use another telephone cord to connect the ADSL port of the splitter with the LINE
port of the Modem (5).
6.6 Use another telephone cord to connect the telephone set with the PHONE port of
the splitter.
7. Splitter
Interface
LINE
ADSL
PHONE
Introduction
Connected with telephone line.
Connect with the LINE port of the Modem by telephone line
provided.
Connect with telephone.
8. LED Status Indication
Status
Power
DSL
INTERNET
LAN
ON
Flashing
Fast Blinking
Normal Operation
DSL line is
DSL is transforming
DSL is training
trained
data
Internet
Connection
Ethernet is
connected
-
Ethernet traffic is
flowing
OFF
Power not applied
DSL line not Connected
No Internet not
Connection
Ethernet is not
connected;
Wrong type of Ethernet
cable used
9. Configure your PC’s Network parameters.
9.1 In case of Windows 98 /ME/ 2000, click the Start button, point to Settings, and then
click Control Panel. Double-click the Network and Dial-up Connections icon. Select
Internet Protocol (TCP/IP), and then click Properties. Click the radio button labeled
Obtain an IP address automatically. Also click the radio button labeled Obtain DNS
server address automatically. Click OK to confirm.
9.2 In case of Windows XP, click the Start button, and then click Control Panel. Doubleclick the Network Connections icon.
9.3 For Windows XP®. Follow the instructions presented on the figures below
Right Click
1) Right-click the Local Area Connection icon
Select Properties
2) Select Properties
Select (TCP/IP)
Click Properties
3) Select Internet Protocol (TCP/IP), and then click Properties.
1. Click Obtain an IP address
automatically
2. Click Obtain DNS server address
automatically
3. Click OK
4) Click the radio button labeled Obtain an IP address automatically. Also click
the radio button labeled Obtain DNS server address automatically. Click OK
to confirm.
1. Click Show icon
2. Click OK
5) Click the radio button labeled Show icon, and then click OK to save.
9.4 After complete these instructions and turn on your ADSL modem, you will
found the icon on the status bar as the figure below:, figure a) LAN cable
connected correctly or figure b) LAN cable connected incorrectly
Icon shows that LAN cable
is connected correctly
Figure a) LAN cable is connected correctly
Icon shows that LAN cable
is connected incorrectly
Figure b) LAN cable is connected incorrectly
10 Configure ADSL Modem: Quick Setup using CD
10.1 Insert Quick setup CD-Rom into your computer. Wait for a moment until
dialogue box is displayed as below. Then click “Continue” button.
10.2 Enter your Username and Password, assigned by TOT*, then click ”Finish”
*For TOT ADSL subscriber , you will get Username and password as followed
1. Super Package ( 256/128 ) Login Name : 0xxxxxxxx@supercyber Password : 0xxxxxxxx
2. Silver Package ( 512/256 ) Login Name : 0xxxxxxxx@silvercyber Password : 0xxxxxxxx
3. Gold Package ( 1024/256 ) Login Name : 0xxxxxxxx@goldcyber Password : 0xxxxxxxx
0xxxxxxxx is the Telephone number of ADSL subscriber
10.3 Username and Password will be saved in ADSL Modem, and then click
“Close” button.it will restart automatically.
10.4 After ADSL modem is restarted, wait for a moment until LED of LAN, Internet,
DSL are lighted and go solid. After that click at Internet Explorer to test the
internet connection. Till this point, the ADSL modem configuration is finished.
11. Configure ADSL Modem: Quick Setup without CD
11.1 Click Internet Explorer icon to open the web browser
Double Click
11.2 Fill IP address “192.168.1.1” and then press Enter
192.168.1.1
Router Log in name
11.3 Fill in Username: admin and Password: tot. Then click Log in button
Router Log in name
admin
tot
11.4 Click Quick Setup tab
Click
11.5 Please fill in Username and Password, assigned by TOT. Click Apply button,
and then click Save ALL and Reboots button.
1
2
3
11.6 When the message box is shown, click OK button.
11.7 Click Yes button, and then Modem will save and reboot automatically.
11.8 Wait for a while until three LEDs for LAN, Internet, and DSL status go solid,
and then you can surf webs now.
12. Configure ADSL Modem: Advanced Setup
12.1 Click Internet Explorer icon to open the web browser
Double Click
12.2 Fill IP address “192.168.1.1” and then press Enter
192.168.1.1
Router Log in name
12.3 Fill in Username: admin and Password: tot. Then click Log in button
Router Log in name
admin
tot
12.4 Click Advanced Setup tab
Click
12.5 Click NEW Connection tab to build a new connection specified for TOT *
TOT default * VPI : 1 , VCI : 32 , Type : PPPOE LLC Change
image
12.6 Select Type as PPPoE
Change image
12.7 Fill in Name, Username, Password, VPI, and VCI. Click Apply button, and then click
Save ALL and Reboots button.
Fill in Name as TOT
1
32
Fill in Username and
Password, assigned by TOT
Change image
12.8 Click Yes button, and then Modem will save and reboot automatically.
12.9 Wait for a while until three LEDs for LAN, Internet, and DSL status go solid, and
then you can surf webs now.
Troubleshooting
1. Cannot surf webs
1.1 DSL LED continues to blink but does not go solid. This means that the DSL line is
trying to train but for some reason it cannot establish a valid connection.
solution
1.1.1 Check for “Dial tone”. If no dial tone, please look for the location of the
telephone line disconnect.
1.1.2 Check for any equipment connected to the telephone line, which is
connected to Line port of splitter, such as fax, answering machine, and etc.
If you found one, please disconnect it
1.1.3 Try connecting the telephone line directly to modem (no splitter used). If
direct connection is OK, cables are incorrectly connected to the splitter or
the splitter is malfunction.
1.2 DSL LED is on and solid, but Internet LED is off. This means that ADSL signal is
synchronized, but modem configuration is incorrect.
solution
1.2.1 Verify these parameters: VPI=1, VCI=32, Type = PPPoE, and Encapsulation =
LLC.
1.2.2 Username and Password have no capital letter and no space. Please try to fill
Username and Password again.
2. ADSL connection loss often
2.1 Check for any equipment connected to the telephone line, which is connected to
Line port of splitter, such as fax, answering machine, and etc. If you found one,
please disconnect it, or use Micro Filter or Single Line Splitter connecting
between it and the telephone line. Otherwise you must move it to connect the
telephone line, which is connected to Phone port of splitter.
2.2 Reduce noise on telephone line
2.2.1 Should not connect 56 kbps modem.
2.2.2 The telephone line should not be near power lines, air condition, and any
electric appliance.
2.2.3 Check telephone line connectors. Eliminate any oxide on them and make
sure the telephone line connected tightly.
2.2.4 Turn off and on modem. Disconnect the cable between the modem and
the computer, and then reconnect them.
3. Listen noise as using telephone
3.1 Verify cable connection on splitter.
3.2 Check the bridge tab on the telephone line. The bridge tab must be on the
telephone line connected to Phone port of splitter.
3.3 In case that the bridge tab can not be as the recommendation in 3.2, please
use Micro Filter or Single Line Splitter connecting between your telephone set
and the telephone line.
If ADSL modem is defect or you have any question about it, please contact us:
Help Desk 5 lines (Kriangpat Co.,Ltd)
0-5218-6749-53 : 8.30-22.00 o’clock
0-2253-0614-8 Ext 501,502,312 : 8.30-17.30 o’clock
Find more Information, FAQ,Downlond user’smanual at :
www.himark-tel.com
TOT Call Center 1100