1
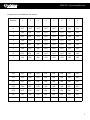
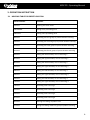
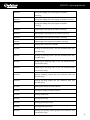
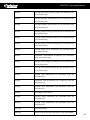
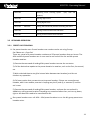
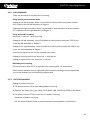
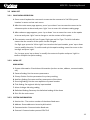
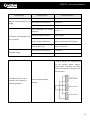
XSD27ZS
High Resolution 600 TVL
Speed Dome CCTV Camera
27x Optical Zoom
User Manual
XSD27ZS - Operating Manual
Contents
1. OVERVIEW
1.1 BRIEF INTRODUCTION AND APPLICATION ......................................................... 5
1.2 PRODUCT FEATURES .................................................................................... 5
1.3 TECHNICAL INDICATORS ................................................................................ 5
2. HARDWARE INSTALLATION ............................................................................... 6
2.1 ADDRESS SETTING ....................................................................................... 6
3. OPERATION INSTRUCTION ................................................................................ 8
3.1 MAPPING TABLE FOR PRESET LOCATION ......................................................... 8
3.2 KEYBOARD OPERATION ............................................................................... 11
3.2.1 PRESET LOCATION SCAN ..................................................................... 11
3.2.2 AREA SCANNING ............................................................................... 12
3.2.3 PATTERN SCANNING .......................................................................... 12
3.3 MENU SET ................................................................................................. 13
3.3.1 BASIC MENU OPERATION .................................................................... 13
3.3.2 MENU SET ........................................................................................ 13
3.3.3 SYSTEM INFORMATION ...................................................................... 13
3.3.4 CAMERA SETTING .............................................................................. 14
3.3.5 AUXILIARY SETTING ............................................................................ 15
3.3.6 SCANNING SET .................................................................................. 15
3.3.7 TITLE SET .......................................................................................... 15
1
XSD27ZS Operating Manual
XSD27ZS - Operating Manual
Contents
3.3.8 ALARM LINKAGE ............................................................................... 15
3.3.9 DEFAULTED SETTING ......................................................................... 16
4. TROUBLESHOOTING ....................................................................................... 16
4.1 TROUBLESHOOTING TABLE ................................................................... 16
2
XSD27ZS Operating Manual
XSD27ZS - Operating Manual
SAFETY CAUTION
WARNING: User shall be reminded to avoid the risk including potential deaths or severe
injuries.
1. Please refer to the ambient requirement for equipment when installation; do not install this
equipment in the environment with too much moisture, dust and smoke dust (which may result
in fire or electric shock).
2. In case that this equipment emits abnormal smell or smoke, please immediately stop it, shut
off the power and contact the supplier (otherwise this equipment may result in fire or electric
shock).
3. During cleaning this equipment do not directly spray water on any part of this equipment
(which may result fire or electric shock).
4. Please do not place this equipment near a heat source (otherwise, a fire risk is potential).
5. It is forbidden to store, install and use this product in danger areas with inflammable or
explosive substances.
NOTICE: Please carefully read the instruction book before installation.
1. During transportation, storage and installation, heavy load, violent vibration and immersion
shall be prevented to avoid the damage of the equipment.
2. Before moving or re-installing this equipment, please be sure that the power is shut off.
3. This equipment shall be installed at the site with good ventilation.
4. In case that this equipment does not work normally, please contact supplier and do not
disassemble or reform this equipment (Xvision will not take any responsibility for the problem
resulted from unapproved reformation or repair).
5. During cleaning the surfaces of this equipment, do not use chemical cleaning agent which
may result in the deformation of equipment surface or damage of covering layer.
6. It is important that the dome camera is not left in a position where the camera is pointing
directly at the sun or other extremely bright light source. This may result in CCD damage and
poor image quality.
3
XSD27ZS - Operating Manual
1
OVERVIEW
1.1 BRIEF INTRODUCTION AND APPLICATION
As a high-end monitoring product, the integrated smart high-speed dome camera features strong,
stable and reliable function, easy operation and installation, etc. It has a good cost performance,
and has become the mainstream product in monitoring industry.
This camera has many functions such as fast trace, 360° unlimited rotation, 180°automatic
overturn, areas can preset location scan, pattern scan, screen menu, etc.
The remote head is driven by a stable and reliable step motor that has several speeds.
The camera is designed to watch a moving target in a large area and is a performance unit.
Therefore, it is widely used in various areas such as Airports, stations, Supertores, Banks, and
Hospitals.
1.2 PRODUCT FEATURES
Supporting CVBS standard definition video signal output
Driven by accurate step motor, with stable running and low noise
Up to 255 programmable preset locations
Several scan modes such as area scan, preset location scan, pattern scan, etc.
Multi-function Chinese-English menu with flexible and easy configuration
Vertical and automatic over turn function can realize the continuous watch without
blind area
Telephoto and limit speed function provides a clear and stable monitoring picture
Self-adaptive baud rate and communication protocol
Non-polarity RS485 supports broadcast address and soft address
Supporting failure detection indication for RS485 communication
IP66 Protection grade: IP 66
Ultra lowpower consumption and ultra-strong stability
4
XSD27ZS - Operating Manual
1.3 TECHNICAL INDICATORS
No.
Item
Technical Indicator
1
Video standard
PAL/NTSC
2
Horizontal rotation scope
3
Vertical rotation scope
4
Horizontal operation speed
0.1~ 300° /s
5
Vertical operation speed
0.1~ 240° /s
6
Prese location running
speed
300° /s
7
Preset location accuracy
± 0.10°
8
Preset locations
255
9
Menu operation
Supporting multi language (Chinese and English)
10
Function display
Yes
11
Coordinate display
Yes
12
Communication Failure
detection and indication
13
Editable area to be blocked
14
Preset location scan
15
Routine scan
4 (left and right boundaries, speed and area name can be set)
16
Pattern scan
4 (there are no less than 200 instructions for each routine)
17
Watch location function
18
Timing running
19
Integrated protocol
20
Communication baud rate
2400/4800/9600/19200 bps
21
RS485
Supporting non-polarity
22
Telephoto and limit speed
360° continuous rotation
0° ~ 90° automatic overturn
Yes (error indications such as baud rate error, address error,
protocol unmatched, etc.)
8 areas
4 (32 preset locations for each routine)
Yes
Supporting 8 time intervals
PELCO-D, PELCO-P, Industrial protocol, DH-SD1, YAAN
self-adaption
Yes
5
XSD27ZS - Operating Manual
No.
2
Item
Technical Indicator
23
Power-off memory
Yes
24
Screen freeze
Yes
25
Compatible camera
26
Protection grade
27
Lightining protection
28
Working temp
Automatic Identification (LG/SONY/HITACH/CNB/SAMSUNG)
IP66
4000V
-35° C ~+35° C
HARDWARE INSTALLATION
Address setting
The address of dome can be set in three ways:
Address Dial Switch: when the soft address is closed, the dome address will be
determined by the dial switch.
Soft Address: After the Soft address option is opened, the address dial switch will not
work. The default soft address will also be closed.
Broadcasting Address: the fixed broadcasting address of dome if 100; no matter how
the dome address is set, key DVR is able to control the dome through 100 addresses.
6
XSD27ZS-Operating
XSD27ZS
OperatingManual
Manual
Comparison list of address dial switch:
Address
1
2
3
4
5
6
7
8
0
OFF
OFF
OFF
OFF
OFF
OFF
OFF
OFF
1
ON
OFF
OFF
OFF
OFF
OFF
OFF
OFF
2
OFF
ON
OFF
OFF
OFF
OFF
OFF
OFF
3
ON
ON
OFF
OFF
OFF
OFF
OFF
OFF
4
OFF
OFF
ON
OFF
OFF
OFF
OFF
OFF
5
ON
OFF
ON
OFF
OFF
OFF
OFF
OFF
6
OFF
ON
ON
OFF
OFF
OFF
OFF
OFF
7
ON
ON
ON
OFF
OFF
OFF
OFF
OFF
.
.
.
250
OFF
ON
OFF
ON
ON
ON
ON
ON
251
ON
ON
OFF
ON
ON
ON
ON
ON
252
OFF
OFF
ON
ON
ON
ON
ON
ON
253
ON
OFF
ON
ON
ON
ON
ON
ON
254
OFF
ON
ON
ON
ON
ON
ON
ON
255
ON
ON
ON
ON
ON
ON
ON
ON
7
XSD27ZS Operating Manual
XSD27ZS - Operating Manual
3. OPERATION INSTRUCTION
3.1 MAPPING TABLE FOR PRESET LOCATION
Preset Location
Function
95+CALL
Entering the main menu
XXX+PRESET
Saving some presetting point
XXX+CALL
Calling some presetting point
40+CALL
Operating the first group of preset location scanning
41+CALL
Operating the second group of preset location scanning
42+CALL
Operating the third group of preset location scanning
43+CALL
Operating the fourth group of preset location scanning
44+CALL
Setting the left boundary of area scanning 1
45+CALL
Setting the right boundary of area scanning 1
46+CALL
Setting the left boundary of area scanning 2
47+CALL
Setting the right boundary of area scanning 2
48+CALL
Setting the left boundary of area scanning 3
49+CALL
Setting the right boundary of area scanning 3
50+CALL
Setting the left boundary of area scanning 4
51+CALL
Setting the right boundary of area scanning 4
52+CALL
Operating area scanning 1
53+CALL
Operating area scanning 2
54+CALL
Operating area scanning 3
55+CALL
Operating area scanning 4
56+CALL
Starting the setting of pattern scan
57+CALL
Saving the setting ofthe first group of pattern scanning
8
XSD27ZS - Operating Manual
58+CALL
Saving the setting of the third group of pattern
scanning
59+CALL
Saving the setting of the third group of pattern scanning
60+CALL
Saving the setting of the third group of pattern
scanning
61+CALL
Operating the first group of pattern scanning
62+CALL
Operating the second group of pattern scanning
63+CALL
Operating the third group of pattern scanning
64+CALL
Operating the fourth group of pattern scanning
65+CALL
Starting 360° continuous rotation
67+CALL
Arming of alarming input 1 (for the machines with this
function only)
68+CALL
Arming of alarming input 2 (for the machines with this
function only)
69+CALL
Disarming of alarming input 1 (for the machines with
this function only)
70+CALL
Disarming of alarming input 2 (for the machines with
this function only)
71+CALL
Starting alarming output (for the machines with this
function only)
72+CALL
Closing alarming output (for the machines with this
function only)
75+CALL
Starting the display of status column
76+CALL
Closing the display of status column
77+CALL
Starting vertical flip
78+CALL
Closing vertical flip
79+CALL
Starting guarding function
80+CALL
Closing guarding function
81+CALL
Starting the privacy shelter grid(for the machines with
this function only)
9
XSD27ZS - Operating Manual
82+CALL
Closing the privacy shelter grid(for the machines with
this function only)
83+CALL
Starting backlight compensation (for the movement with
this function only)
84+CALL
Closing backlight compensation (for the movement with
this function only)
85+CALL
Starting image freezing function(for the movement with
this function only)
86+CALL
Closing image freezing function(for the movement with
this function only)
87+CALL
Starting image mirror function(for the movement with
this function only)
88+CALL
Closing image mirror function(for the movement with
this function only)
89+CALL
Automatic color-to-black function(for the movement
with this function only)
90+CALL
Starting color-to-black function(for the movement with
this function only)
91+CALL
Closing color-to-black function(for the movement with
this function only)
92+CALL
Closing wide dynamic(for the movement with this
function only)
93+CALL
Automatic wide dynamic(for the movement with this
function only)
94+CALL
Manual wide dynamic(for the movement with this
function only)
95+CALL
Entering the main menu
97+CALL
Starting image rollover(for the movement with this
function only)
98+CALL
Closing image rollover(for the movement with this
function only)
101+CALL
Defaulted setting
102+CALL
Switch manual operation speed (fast, slow and medium)
10
XSD27ZS - Operating Manual
103+CALL
Switching linear scanning speed
medium)
(fast, slow and
105+CALL
Starting digital zoom
106+CALL
Closing digital zoom
107+CALL 、108+CALL
Calling 107 followed by 108 and restarting the dome
109+CALL
Starting communication fault indication
110+CALL
Closing communication fault indication
3.2 KEYBOARD OPERATION
3.2.1 PRESET LOCATION SCAN
1. Set preset location scan: Preset location scan routine can be set using 2 ways:
See ‘Menu set -> Scan Set’
There are a total of 4 preset location routines and 32 preset locations that can be set. The
40th and 43rd preset locations are in turn used to set and call the 1st and 4th preset
location routines:
1) Execute the command of setting 40th preset location to enter the set status
2) Call the desired set option to the preset location in routines, such as the first, the second,
etc.
3) Wait a desired time to stay (the interval time between two location), and do not
conduct any operation.
4) Call next routine that you want to set to preset location. If there are unused preset
location, add it into routine, execute in looping way the 3) and 4), or execute 5) and the
set is over.
5) Execute the command of setting 40th preset location, and save the set and exit in
addition to calling preset location. Executing any command other than, such as up, down,
right or left does not need to be saved before exit.
2. Run preset location scan: call 40th - 43rd preset locations to run 1st-4th group preset scan
location series.
11
XSD27ZS - Operating Manual
3.2.2 AREA SCANNING
There are two ways to set the area of scanning.
Using special preset location order
Setting of the left boundary: dome is controlled to ideal position and preset location
44 is called to set the left boundary of Region 1
Setting of the right boundary: dome is controlled to ideal position and preset location
45 is called to set the right boundary of Region 1
Using keyboard for setting
Menu set -> scan set -> area scanning
Setting of the left boundary: control the dome to ideal position and press ‘OPEN’ key
to set the left boundary or Region 1
Setting of the right boundary: control the dome to ideal position and press ‘OPEN’ key
to set the right boundary of Region 1
4 area scanning can be set and the method is the same.
Setting of scanning speed: see ‘menu set -> auxiliary set’
Setting of regional title: see ‘menu set -> title set’
Operating area scanning
Call the preset location 52-55 to operate area scanning path 1-4 respectively
Dome rotates between the set right and left boundary according to the set speed and
the screen displays the corresponding regional title.
3.2.3 PATTERN SCANNING
Setting of pattern scanning
1. Call preset location 56 to start setting pattern scanning
2. Operate ‘up, down, left, right, WIDE, TELE, NEAR, FAR, CLOSE and OPEN on the dome.
3. Call preset location 57-60 to save the 1-4 pattern scanning
Operation of pattern scanning
Call the preset location 61-64 to operate pattern scanning path1-4 respectively
12
XSD27ZS-Operating
XSD27ZS
OperatingManual
Manual
3.3 MENU SET
3.3.1 BASIC MENU OPERATION
1. Press control keyboard or use matrix to execute the command of ‘call 95th preset
location’ to enter and set main menu
2. After the main menu page appears, press ‘up or down’ icon to move the cursor to the
submenu option to be set and press ‘right’ icon to enter this submenu setting page
3. After submenu page appears, press ‘up or down’ icon to move the cursor to the option
to be set and press ‘right’ icon to change or set the content of this option
4. The contents normally fall into 2 types; Digit type and List Type. The blink indication
means that the content of the option can be changed.
For Digit type: press the 'left or right' icon to select the input location, press 'up or down
icon to modify the value. To confirm and quit the option setting, move the cursor to the
last digit and press 'right'.
For List type; press 'up or down' to modify the content of option and press 'right' to
confirm and quit the option setting.
3.3.2 MENU SET
MAIN MENU
1. System Information: Check dome information (such as version, address, communication,
etc.)
2. Camera Setting: Set the camera parameters
3. Privacy Shelter: Set the parameters for privacy masking
4. Auxiliary Setting: Set some auxiliary parameters of the dome
5. Scanning Setting: Set the scan sequence of preset location
6. Title Setting: Set regional title by input method
7. Alarm Linkage: Alarming setting
8. Defaulted Setting: Recovery the defaulted setting of the dome
9. Exit: Exit the main menu
3.3.3 SYSTEM INFORMATION
1. Version No. : The version number of the dome fixed ware
2. Address: Dome address to be set by dial switch
3. Communication: Communication Baud rate
4. Protocol: Communication protocol PELCO-D
13
XSD27ZS-Operating
XSD27ZS
OperatingManual
Manual
5. Camera : Display the movement type of camera
6. Date of Manufacture: August 2012
7. Manufacturer: Xvision
8. Exit: Exit the sub menu of system information
3.3.4 CAMERA SETTING
1. Zoom Speed: Fast, medium and slow
2. Digital Zoom: On and off
3. White Balance: Automatic
4. R gain: 1-225 (white balance manually effective)
5. B gain: 0-225 (white balance manually effective)
6. Exposure Setting: 0-7
7. Backlight Compensation: On and off
8. Image Freezing: On and off
9. Wide Dynamic Mode: Automatic, off and manual
10. Wide Dynamic Level: 0-128 (wide dynamic manually effective)
11. Image Mirror: On and off
12. Colour-to-black setting: Automatic, on and off
13. Image Effect: Off, inverse colour and white-band-black
14. Image Rollover: On and off
15. Camera Display: On and off
16. Minimum Focus: 1cm, 10cm, 30cm and 100cm
17. Save: Save the settings and exit sub menu
18. Exit: Exit the sub menu without saving the modification
3.3.5 AUXILIARY SETTING
1. Area Scanning Speed: Fast, medium and slow
2. Manual Rotation Speed: Fast, medium and slow
3. Guarding Position: Preset location 0-225 (0:closing the guard position)
4. Recall Time: Set the time for automatic recall and duration when it will not be controlled
or return to the guard position time: 0-225s
5. Vertical Automatic Rollover: Dome 180° automatic rollover on/off
6. Setting of Status Bar: On and Off
14
XSD27ZS-Operating
XSD27ZS
OperatingManual
Manual
7. Language Setting: English and Chinese
8. Soft Address On and Off: On and Off
9. Soft Address: 001-255
10. Exit: Exit the sub menu without saving the modification
11. Save: Save the settings and exit sub menu
3.3.6 SCANNING SET
1. Setting of Area Scanning: Region No. (0-4)
2. Operating Area Scanning: Region No. (0-4) 0 means the scanning without linking area
scanning number
3. Setting Presetting Scanning: Preset location No. (0-225)
4. Operating Presetting Scanning: Preset location No. (0-225) 0 means the scanning
without linking presetting
5. Setting of Mode Scanning: Mode No. (0-4)
6. Operating Mode Scanning: Mode No. (0-4)
7. Exit: Exit the sub menu without saving the modification
3.3.7 TITLE SET
1. Region No. : 1-4
2. X Co-Ordinates: X position of title on the screen (0-29)
3. Y Co-Ordinates: Y position of title on the screen (0-14)
4. The title content in the current region. To change, move 'left and right' and select
characters. Move 'down' to confirm changes or move 'up' to exit this option
5. Mode: Input method mode (capitalized and low case characters, symbols, number and
Pinyin)
6. Delete: To delete the characters in the insert characters of ‘title’
7. Exit: Exit the sub menu without saving the modification
8. Save: Save the settings and exit sub menu
3.3.8 ALARM LINKAGE
1. Alarm Input: Alarm input No. (1 and 2)
2. Input Type: On and Off
3. Arming Time (Hours: Minutes)
15
XSD27ZS-Operating
XSD27ZS
OperatingManual
Manual
4. Disarming Time (Hours: Minutes)
5. Presetting Scanning: Linkage preset location scanning No. (0-4)
0 means the scanning without linking presetting
6. Pattern Scanning: Linkage pattern scanning No. (04)
0 means the pattern scanning without linking
7. Area Scanning: Linkage area scanning No. (0-4)
0 means the area scanning without linking
8. Alarm Output: On and Off
9. Exit: Exit the submenu without saving the modification
10. Save: Save the settings and exit submenu
3.3.9 DEFAULT SETTING
Cancel: Cancel and exit the sub menu
Enter: Perform the defaulted setting and exit the sub menu
4
TROUBLESHOOTING
4.1 TROUBLE SHOOTING TABLE
Phenomenon
Possible Cause
Countermeasures
Power damage or insufficient Change it
power
No action or image after
electrifying
Abnormal self-inspection;
image exists but with motor
noise
Error connection of power Correct it
line
Faults of engineering route
Eliminate it
Mechanical fault
Inspect it
Inclined camera
Adjust it
Insufficient power supply
Change the power complying with
the requirements and put the
switch power near the dome
Error video lines
Normal self-inspection but no
Poor video line connection
image
Camera damage
Correct it
Eliminate it
Change it
16
XSD27ZS- Operating
XSD27ZS
OperatingManual
Manual
Phenomenon
Possible Cause
Error video lines
Normal self-inspection but no
Poor video line connection
image
Camera damage
Countermeasures
Correct it
Eliminate it
Change it
Error connection of control
Correct it
signal line
Unmatched dome address
Successful self-inspection but
Unmatched protocol or
out of control
communication Baud rate
Select it again
Adjust the protocol or controller to
make it match and electrify again
Too far distance and too large Wire diameter in twisted-pair or
delay of 485 signal
thicker control line
Unstable image
Poor video line connection
Eliminate it
Insufficient power supply
Change it
If several domes are connected in
one line (central power supply),
AC24V power connector of dome
shall be connected according to the
same direction.
The video picture on the
monitor rolls vertically in
switching process
Incorrect camera phase
Dome power 1
position
Dome power 2
Dome power 3
17