1
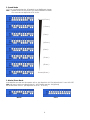
4. Sound Control Mode
When dipswitch #11 is turned on, the LED Cube will automatically change its color to the beat of the music.
With the Sensitivity control you can adjust its music-sensitivity.
Note : You must also set dipswitch #10 to ON.
DMX Controlled
1. Turn the power switch on. If the DMX cable has been plugged in, the LED next to the dipswitches will blink.
2. Now your unit is DMX-Controlled.
3. When all dipswitches are turned off, the LED Cube is in DMX Mode.
Dipswitches #1 - #9 control the DMX Addresses.
DMX products must have their own "address" to receive DMX signals. Addresses on the controller are set by
flipping the appropriate DMX dipswitches.
You need to know that DMX address settings are the sum of the dip switch values.
A standard DMX address for a LED Cube, which has 6 channels is as follow:
LED Cube
Address Value
Unit 1
Unit 2
Unit 3
Unit 4
DMX Dip Switches "ON"
1
7
13
20
#1
#1, #2 and # 3.
#1, #3 and # 4.
#3 and #5.
Explanation: Since each unit has 6 channels, each address advances 6 values (See Address Value above).
Once address values are determined, set the appropriate DMX dip switches on each unit.
Example:
1. If you want to give a LED Cube DMX address133, you first have to find the number 133 in the DMX Chart.
2. Then look at the left side (Dip Switches #1-#5) horizontally from 133.
In the Table you’ll see #1=ON, #2=OFF, #3=ON, #4=OFF, #5=OFF.
3. Finally look at the upper side of the table (Dip Switches #6-#9) vertically from 133.
In the Table you’ll see #6=OFF, #7=OFF, #8=ON, #9=OFF.
DMX Address Quick Reference Chart
DMX DIP SWITCH SET
#9
0
0
0
0
0
0
0=OFF
#8
0
0
0
0
1
1
1=ON
#7
0
0
1
1
0
0
#6
0
1
0
1
0
1
32
64
96
128
160
#1
#2
#3
#4
#5
0
0
0
0
0
1
0
0
0
0
1
33
65
97
129
161
0
1
0
0
0
2
34
66
98
130
162
1
1
0
0
0
3
35
67
99
131
163
0
0
1
0
0
4
36
68
100
132
164
1
0
1
0
0
5
37
69
101
133
165
0
1
1
0
0
6
38
70
102
134
166
7