1
Equipoise-Image User Manual
version 1.0
1 October 2002
1. Introduction
Equipoise-Image ("EqPi") is a Macintosh application that adds a number of macro language features to the
widely-used image processing packages NIH Image and Object-Image from which it is derived. EqPi can run
macro programs written in the NIH Image and Object-Image macro languages without change, and adds
capabilities not available in either of these applications. EqPi allows users to run encrypted macros created by
others. EqPi allows macro authors, to create encrypted macros.
EqPi runs on all versions of Mac OS X in Classic mode, as well as on Mac OS 8.6 and all versions of Mac OS
9. It can be freely used and distributed, and the source code is available upon request.
About macro files and file types
Macro programs in NIH Image and Object-Image are stored as source text in text files that are readable by any
text or word processor. These files may be loaded directly into NIH Image or Object-Image for execution, or
may be opened into a text window for user editing and loading. Object-Image introduced "object files", whose
names end with the extension ".obj". These files can contain several layers and types of information, and
tremendously extend the power available to programmers. These layers include definitions of "objects" defined
by the user, image files associated with a project, and macro text on the file's "macro card". It also implemented
a spreadsheet-like "results table" that can contain measurements of objects
While use of text in text files and on the macro card of ".obj" files has the advantage of simplicity, it does not
provide any security to macro authors. The macro code in these files can be viewed by users, depriving authors
of the means to prevent unauthorized use, alteration, or piracy of their macro program creations.
Using the online help viewer
Much can be learned about using EqPi and programming macros by using the Online help introduced by
Object-Image. It contains a complete description of the hundreds of programming commands and explains how
many features are operated. To use the online help, double-click on any macro language keyword while holding
down the option key. This will open a help window explaining the syntax and related information about the
__________
1
command. This window can be scrolled or searched to reach descriptions of every other macro language
command and other information.
2. Macro authoring capabilities added in EqPi
Creation and loading of encrypted macros
EqPi allows macro programs stored in text and object (".obj") files to be loaded, opened, and edited just as in
NIH Image and Object-Image. EqPi additionally provides for the creation and loading of encrypted macro
programs. It also allows authors to limit which features of their macros are available to users through the use of
a key (password) and through the use of several macro commands that set the user mode. This affords macro
program provides macro authors a method for protecting their macro creations. This mechanism does not
cripple or alter any of the features of EqPi itself.
Creating an encrypted file and key
Macros to be encrypted are first written, edited, and stored in text or ".obj" files using the internal text editor , as
in NIH Image and Object-Image. A new text document may be created using the "File>New" menu item (or the
<command-N> keyboard combination), or new text can be enetered into the macro card of Object-Image in the
usual manner. As with any Macintosh application, an existing text file may be opened using the "File>Open"
menu item (<command-O>). Text files are saved using either the "File>Save" menu item (<command-S>) or
"File>SaveAs" menu item.
To create an encrypted macro program, first make sure that the text window containing the macro program text
is open and active in EqPi. Then choose the "Equipoise>Encrypt eqPi macros" menu item. A dialog will open,
proposing a key to be used in the encryption of the macro text. Initially, a key consisting of 12 to 16 random
characters is generated and indicated in the dialog. The user may accept this key or replace the proposed key
text as desired. Be sure to remember this password, which will be needed later to load and use the encrypted
macros file.
Once the desired key text has been entered in the dialog, hit the "OK" button or the "return" key. A "Save"
dialog will prompt the user to enter a file name for the macro and allow navigation to the location where the file
will be created. The key will be offered as the default file name. Please note that the key text will be needed
later to load and use the encrypted macro program file. Be sure to note and safeguard the key text if you decide
to change the name of the encrypted macro program file at any later time. Use of encrypted macro program files
can be limited to those who have been given the key text.
__________
2
Loading and using encrypted macro files from a text file
Encrypted macro program files are loaded using the "Equipoise>Load eqPi macros" menu item. When this item
is selected, the user is prompted for a password. An Open/Save dialog then appears, allowing the user to
navigate to and open the encrypted macros file. A dialog then prompts the user to enter a valid key for the
encrypted macros file; if a valid key has been entered, the macros in the macros file will be loaded, and will be
listed and available in the EqPi "Special" menu. Loading will be terminated if the user enters an invalid key
when prompted, and the macros will not be loaded. During encrypted macro program loading, no text window
containing the macro text is opened or visible.
Note on encrypted file filetypes :
Encrypted files created by EqPi can be identified by their unique icon, which resembles the "filmstrip" icon
used by NIH Image and Object-Image. Encrypted file icons differ from these in several ways: they are blue (on
black) in color, and the symbols "=" and "π" are visible in the icon. The filetype of these files is "πOBJ", even
though their content is text. Because their file type is not explicitly "TEXT", many text editors and word
processors may not display these files in Open/Save dialogs. Many applications (such as "Tex-Edit Plus" and
"Nisus") allow the display and opening of files whose type is not "TEXT" or a type native to that application.
An encrypted macro program file may be inspected using such a text editor or word processor in the usual
manner. The text content of an encrypted file, however, will be indistinguishable from gibberish. This ensures
that encrypted macro files may be made available to users while preventing the underlying text from being read.
Loading and using encrypted macro files from a ".obj" file
EqPi supports the use of ".obj" files introduced in Object-Image. While ".obj" files can be used in EqPi exactly
as they are in Object-Image, there is presently no mechanism in EqPi for loading encrypted macro programs
from the macro card of a ".obj" file. There is, however, a new macro command that can be used in a "loader"
object file to load encrypted macro files ("target files"). This mechanism ensures that the object definitions and
list of images contained in the "loader.obj" file are available to the encrypted macros that the loader loads.
This mechanism entails storing a plain text "loader" macro on the macro card of the "loader.obj" file. The .obj
definitions are also defined in the "loader.obj" file. The encrypted macros are contained in a separate, encrypted
macro target file. While sounding complex, this mechanism is quite simple in practice: double click on a
"loader.obj" file icon and use the Open/Save dialog that opens to navigate to the encrypted macro program file.
The loader mechanism makes use of a new macro language command introduced in EqPi. This command uses
the following syntax:
__________
3
UserCode('EqpiLoadFile', 0, 0, 0);
Whenever this command is encountered in a macro, an Open/Save dialog for loading encrypted macro program
files is invoked. This command is similar to the "Equipoise>Load EqPi macros" menu item, except that the user
is not prompted for a key. Instead, the loader program must contain the key and code that prepares it. The
values of the three parameters contained in this command are ignored.
3. Tutorial example
NB: The files discussed in the tutorial can be created during this tutorial (preferred) or can be downloaded from
the following URL:
http://www.eqpi.net/eqpi/downloads/TutorialFiles.sit.hqx
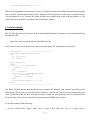
Here is the text to be placed on the macro card of the loader object file "SampleMacrosLoader.obj":
{autoload}-------------------------------------}
{filename: SampleMacrosLoader.obj}
var
q1, q2: string;
z1: integer;
Macro 'autorun';
Begin
for z1 := 1 to 256 do begin
rUser1[z1] := 0;
end;
q1 := 'kohoutec';
for z1 := 1 to length(q1) do begin;
q2 := substring(q1, z1, 1);
rUser1[z1] := ord(q2);
end;
UserCode('EqpiLoadFile', 0, 0, 0);
End;
{----------------------------------------------}
This macro will load and run automatically because it contains the "autoload" and "autorun" keywords (see the
online help). The key that is used in this macro ("kohoutec") must be the same key used to encrypt the target
macro file that the loader will load. Note that, as in this example, the ordinal analogs of the key characters must
be stored in the rUser1[] array so that the decryption routines in EqPi can access them.
To use this example, do the following:
1. Use the "Objects>New Object" menu item to create a new object file. Give it a name such as
__________
4
"MySampleTargetMacros.obj". You will be asked if you'd like to define the objects that are to be used. Select
"Yes". Create the objects that the encrypted macros will be manipulating. For this example,a single "ROI"
object should be defined for the new object file by dragging the "ROI" icon from the list on the left of the object
definition panel to the central area of the panel. This object will be given the name "RoiA" by default, and its
area is selected for measurement by default. You can verify this by examining the results table via the
"Objects>Show Obj. Results" menu item.
2. Type or paste the text in the sample above onto the macro card of the object you created. Be sure to type the
actual key that you used in encrypting the target macros file in place of the sample key ("kohoutec") given in
this example.
3. Save the object file. The filename you choose will have the extension ".obj" added to it.
NB: Do not encrypt the loader object file, and save it using the "File>Save" menu item.
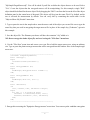
4. Use the "File>New" menu item and create a new text file to hold the target macros text, using an arbitrary
size. Type or paste the plain text target macros that will be encrypted into this window. Here is the sample target
macro text:
{----------------------------------------------}
{filename: SampleTargetMacros}
macro 'autoeqpi';
begin
InitStaticColumn('twiceArea');
end;
macro 'EncryptedMacro #1';
begin
PutMessage('Encrypted macros loaded!!');
end;
macro 'EncryptedMacro #2';
begin
PutMessage('This one, too!!');
end;
macro 'TwiceArea';
var
int1, columns, rows, twiceArea: integer;
begin
for int1 := 1 to nCount do begin
twiceArea := 2*GetValue('RoiA', int1);
SetValue('twiceArea', int1, twiceArea);
end;
end;
{----------------------------------------------}
5. Encrypt this text using the "Equipoise>Encrypt macros" menu item. You can accept the candidate encryption
__________
5
key or type in one of your own choosing. After noting the encryption key, save the encrypted file with the name
"SampleEncryptedTarget". The file that this creates is of type TEXT, although the text within it has been
encrypted. Note: The encryption key in the loader must match the one used during encryption. Whether you use
the candidate encryption key or create your own, go back to the loader file and replace the encryption key
given there, and resave the loader file.
6. Now you are ready to use the loader and encrypted macros by double-clicking on the "sampleLoader.obj"
icon. You will be prompted to navigate to the encrypted macros file, which will then be loaded. Voila! The
encrypted macros in the file will now appear at the bottom of the "Special" menu. The first user macro listed in
the "Special" menu has the name "autoeqpi"; this macro was autoexecuted when the file containing these
macros was loaded. Now run either the second or third macro by selecting its name in the "Special" menu you'll get a message that tells you that everything loaded correctly.
You can create objects using the tools introduced by Object-Image and examine the property values measured
for them by examining the results table (in the "Objects>Show Results Table" menu item). To do this, open or
create an image file, then select the "object" creation tool in the "Tools" palette on the left of the screen (this
tool looks like a crosshair with the letters "OBJ" at its center). This will activate an ROI creation tool; use this
tool to draw a closed curve in the image. A dashed red outline will appear on the image (don't worry - these
object outlines do not change the image, but exist in a transparent layer that lies over the image).
Now select the "Objects>Show Results Table" menu item, which will open a results table that lists the ROIs
that have been created. Go ahead and mark several other ROIs (also called "cells") in the image, and you'll see
more entries appear in the results table. If you click on the cell number of a particular cell in the results table
(this number is in the first column of the table), you'll see that a marker on the red ooutline for that cell is
highlighted in the image window. The second column contains the cell's area, since this measurement was
desgnated during the object definition operation.
The third column has a heading ("twiceArea") that was created by the first macro (which was autoexecuted
during loading). Notice that there are no measurements in this column. Now go ahead and run the "TwiceArea"
macro in the "Special" menu. This macro uses the data in the "Area" column to calculate values that are then
entered into the third colimn.
For detailed information on the many types of objects and the range of operation that can be done with them,
consult the Object-Image manual or the online help introduced by Object-Image (online help can be invoked by
depressing the option key while double-clicking any macro language keyword visible in a macro text window).
You can export the results table using the "Objects>Export Obj. Results" menu item. This creates a tab-delimited
(spreadsheet) file that can be opened in any spreadsheet or word processor.
__________
6
Finally, quit EqPi or close all of the opened files. NB: Do not save changes to the "sampleLoader.obj" file.
In summary, encrypted macros are kept in one file (the target), and they are loaded by an associated "loader.obj"
file that contains the key information in the macro on its macro card.
4. Control of user mode during execution of encrypted macros
Authors of encrypted macros may wish to provide one level of capability to the public while restricting access
to other features to those who have purchased a key. EqPi allows authors to prevent users lacking a key from
viewing the object window (with its macro card containing the text of macros) or from exporting the results
table. The availability of these features may be manipulated using the:
UserCode('EqpiUserMode', 0, 0, 0);
command. The first numerical parameter in this command controls whether the user may open the object
window, while the second controls whether the results table can be exported via the following parameter values:
Parameter 1
Value
1
0
Action
Disable opening of object window
Enable opening of object window
Parameter 2
Value
1
0
Action
Disable export of results table
Enable export of results table
Four different combinations of parameter 1 and parameter 2 are possible. The value of the third parameter
contained in this command is ignored. For example, the command:
UserCode('EqpiUserMode', 1, 0, 0);
will disable opening of the object window while enabling export of the results table.
Note that this command does not close the object window; if it is already open when the command is executed
(with the appropriate parameter values), it will remain open. The command only disables attempts to open this
window.
__________
7
To close the object window, use the command:
UserCode('EqpiHideObj', 0, 0, 0);
The values of the three parameters contained in this command are ignored. Note that this command does not
prevent the object window from being opened thereafter, it only closes it if it is already open.
In summary, "UserCode('EqpiHideObj', 0, 0, 0)" closes the object window but will not keep it from being
opened, while "UserCode('EqpiUserMode', 1, 0, 0)" keeps the window from being opened but doesn't
close it. Use "UserCode('EqpiUserMode', 0, 1, 0)" to disable export or "UserCode('EqpiUserMode', 0,
1, 0)" to enable export of the results table.
5. Other new features and commands
Using the "autorun" mechanism in EqPi macros
The "autorun" mechanism introduced by Object-Image is available in EqPi; plain text macros containing this
keyword operate as usual. However, while encrypted macros containing this macro language keyword will load
and can be run, they will not autorun. After testing of a plain text macro has been completed, change the
"autorun" keyword to "autoeqpi" just before encrypting the macro program file,; this will allow the macro to
autorun when it is loaded using the "UserCode('eqpiloadfile', 0, 0, 0)" macro command in a loader macro. Note
that encrypted macros loaded using the "Equipoise>Load eqPi macros" menu item will not autorun. In summary,
autorunning of encrypted macros is possible only if the macro uses the keyword "autoeqpi" and is loaded using
the "UserCode('eqpiloadfile', 0, 0, 0)" macro command in a loader macro. After creating an encrypted macro
program file, be sure to edit the "autoeqpi" keyword back to "autorun" in the plain text version of the macro
program file that is saved for testing and further development.
Plain text macros containing "autoeqpi" in their name will load and run correctly but will not autorun except
when they are used in encrypted macros. However, once a plain text macro containing "autoeqpi" in its name
has been loaded, the autorun mechanism for plain text macros (which normally uses the keyword "autorun in
the macro tile) is disabled until EqPi is restarted. This condition is not likely to be encountered during normal
use, and can be prevented by ensuring that the keyword "autoeqpi" is not used in plain text macro names.
Renaming image windows
In NIH Image and Object-Image, changing the name of an open image window entails either writing a macro to
perform the task or saving the file under a new name. In EqPi, an image window may be renamed using the
__________
8
"Equipoise>Rename active image" item in the menu. To rename the active image window, select this item and
enter the new image window name in the dialog. The new name will be evident in the window title bar and in
the list of windows in the "Windows" menu. Note that this name does not correspond to any existing file, and
that if a renamed window is closed or disposed without being saved, no file with that name will have been
created. Also, use of the "File>Save" menu item will generate an error message, and no save operation will be
performed. In order to save a renamed image window in a file, use the "File>Save As" menu item.
Background subtraction
EqPi has several specialized background subtraction routines built in, with supporting macro commands. These
include:
UserCode('EdgeSubt', val1, val2, 0);
This command takes two real number parameters (val1 and val2); the third parameter value is ignored.
"EdgeSubt" performs a background subtraction on an ROI region. At any point in the ROI, the background
value to be subtracted is computed from the weighted average of all of the points on the ROI's boundary. The
weight of each boundary point is computed as:
value of the boundary point
weight of boundary point
=
______________________________________________________________
val2*square of distance to the ROI point
Because a calculation using every point on the boundary must be done at each point within the ROI, it is very
computationally intensive. This background subtraction method is very effective in reducing the impact of
noise, and is locally adaptive to backgrounds that may vary over an image.
UserCode('EdgeSub4OverR', val1, val2, 0);
"EdgeSub4OverR" is similar to "EdgeSubt", but is used only with rectangular ROIs. It weights boundary points
using value / distance weighting, using only the boundary points directly above, below, to the left, and to the
right of the point in the ROI.
UserCode('BordRectSubt', val1, val2, 0);
"BordRectSubt" is similar to "EdgeSub4OverR", since it is used only with rectangular ROIs. "BordRectSubt"
weights boundary points using the same weighting formula as "EdgeSubt", but uses all points on the boundary.
Boundary points at a distance greater than val1 are given a weight of 0.
UserCode('LinearHoriz', 0, 0, 0);
This command ignores the parameter values. "PlaneSubt" subtracts a linear function from each row of a
__________
9
rectangular ROI, based on the ROI boundary points at the left and right ends of the ROI row.
UserCode('LinearVert', 0, 0, 0);
This command uses the same algorithm as "LinearHoriz", but acts on vertical columns.
UserCode('EqpiPDP', 0, 0, 0);
This command ignores the parameter values. It places the average value of all of the points in a column of a
rectangular ROI inter the User1[] array.
UserCode('EqpiCoordLine', 0, 0, 0);
"EqpiCoordLine" ignores the parameter values. It makes a segline ROI, using the contents of User1[] and
User2[] as the x- and y-coordinates of the ROI vertices..
Projecting extended focus stack slices onto a new slice
In image stacks constructed from a series of images acquired at different depths by confocal microscopy, it is
common that only part of the image in each slice is in focus. This is a direct result of confocal imaging's ability
to focus exclusively upon content at a particular depth. While this effect is intended in confocal imaging (and
exploited during later reconstruction of volumes from image stacks), it is sometimes desirable to effectively
compress or project the stack onto a single "maximum contrast" image generated from the in focus regions from
all of the slices in the stack.
EqPi contains a macro command implementing this capability. The LookDeep command operates on an open,
active image stack, and uses the following syntax:
LookDeep;
When LookDeep is executed in a macro program, two additional slices are appended to the stack. The maximum
contrast image is calculated and appears in the first of the two appended slices (i.e. the next-to-last slice of the
stack). In the last slice in the stack, the grayscale value of each pixel contains the slice number in which the
maximum contrast occurred at that pixel's position. For example, if the pixel with (x, y) coordinates of (11, 23)
has a value of 5 in the last slice, this indicates that the maximum contrast found in the stack at (11, 23) occurred
in slice 5, and it is the value of this pixel in slice 5 that is used in the maximum contrast image at (11, 23).
LookDeep calculates the best focus by using a coefficient of variation (COV) metric. The COV of a pixel is
computed by measuring the standard deviation of a 3 x 3 neighborhood centered on the pixel and dividing this
by the mean value of the neighborhood. The COV is not computed for pixels at the boundary of a image, since
__________
10
the 3 x 3 neighborhood extends beyond the image boundary. Hence, the maximum contrast image generated
using LookDeep has a value of 0 for all edge pixels.
Increased macro symbol space
The number of variables (symbols) that may be allocated in NIH Image and Object-Image macro programs is
limited to 236; EqPi increases this limit to 1200. This allows EqPi macro programs to use a greater number of
global and local variables than was previously possible. Please note that EqPi macro programs that use more
variables than NIH Image and Object-Image permit will not open in NIH Image or Object-Image.
Increased number of static columns
Object-Image implements user-created "static columns" in the results table that may be populated and manipulated
by macro authors through several commands. The maximum number of static columns allowed in Object-Image
is 50; this limit has been increased to 100 in EqPi. Please note that macros programs that take advantage of this
increased limit in EqPi may exceed the number of static columns that Object-Image permits, and macro
commands that attempt to surpass the Object-Image limit will not succeed in Object-Image.
6. Resources and related information
NIH Image homepage:
http://rsb.info.nih.gov/nih-image/
- the homeland of the whole Image family, laden with information and related software
Object-Image homepage:
http://simon.bio.uva.nl/object-image.html
- especially useful for familiarization with Object-Image
Equipoise-Imaging homepage:
http://www.eqpi.net/eqpi/
- examples, macros, and related software
__________
11