1
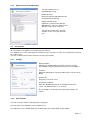
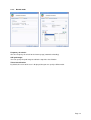
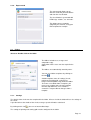
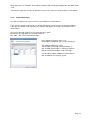
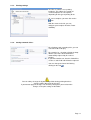
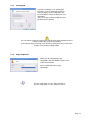
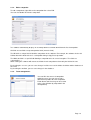
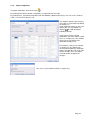
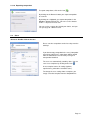
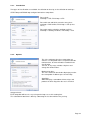
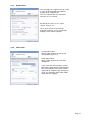
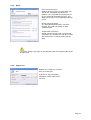
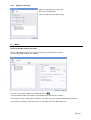
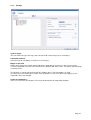
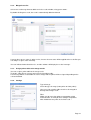
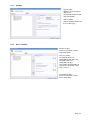
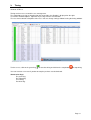
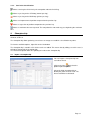
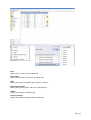
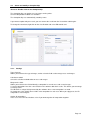
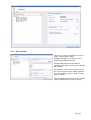
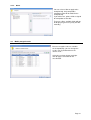
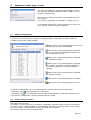
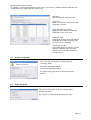
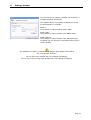
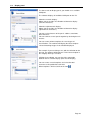
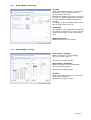
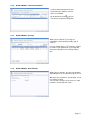
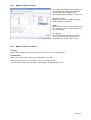
SOFTWARE ELITE V2
User manual
Version 06/10
Page 1
Table of contents
1. Introduction
1.1. System requirements
1.2. Firewall
1.3. Network requirements
1.3.1. Share data directory:
1.3.2. Connecting to the network drive
1.4. Getting started
1.4.1. Data Organisation:
1.5. Database
2. Race and competitor management
2.1. Event
2.1.1. Import events or championship
2.1.2. Export events or championship
2.2. Live Internet
2.2.1. Settings
2.2.2. Classification
2.2.3. Normal mode
2.2.4. Expert mode
2.3. Folders
2.3.1. Settings
2.3.2. Intermediate loops
2.3.3. Print settings
2.3.4. Setting automatic titles:
2.3.5. Starting grid
2.3.6. Copy competitors
2.3.7. Edit a competitor
2.3.8. Team management:
2.3.9. Import competitors
2.3.10. Exporting competitors
2.4. Races
2.4.1. Introduction
2.4.2. Options
2.4.3. Requirements
2.4.4. Points table
2.4.5. Other
2.4.6. Copy a race
2.4.7. Copy race passings
2.5. Merge
2.5.1. Settings
2.5.2. Merged races list
2.5.3. Assign points table to the merge results
2.5.4. Settings
2.5.5. Points table
2.6. Distribution
2.6.1. Settings
2.6.2. Race schedule
3. Timing
3.1. Passing
3.1.1. Passing colours
3.1.2. Identify a competitor
3.2. Classification
3.2.1. Filter on competitors
3.2.2. Icon in the classification
4
4
5
6
6
7
7
8
9
10
11
12
13
13
13
13
14
15
15
15
16
17
17
18
18
19
19
20
21
21
22
22
23
23
24
24
25
25
26
27
27
27
28
29
30
30
31
32
33
34
34
36
37
Page 2
4. Championship
4.1. Import a championship
4.2. Create and modify a championship
4.2.1. Settings
4.2.2. Race schedule
4.2.3. Other
4.3. Modify merged results
5. Competitor’s menu (copy – paste)
5.1. Editing starting position
5.2. Assign starting schedules
5.3. Assign transponders
5.4. Find a competitor
6. Settings, decoder
6.1. Display TV
6.2. Display panel
6.3. Options
6.3.1. Points table
7. Modules menu
7.1. Calculate results difference
7.2. Level of decoder
7.3. Enduro Module: overview
7.3.1. Enduro Module : Settings
7.3.2. Enduro Module: Processing
7.3.3. Enduro Module : changes
7.3.4. Enduro Module : Detected anomalies
7.3.5. Enduro Module: Passing
7.3.6. Enduro Module: Classification
7.4. Triathlon module
7.4.1. Module Triathlon : Settings
7.4.2. Module Triathlon : Treatment
7.4.3. Module Triathlon: Detected anomalies
7.4.4. Module Triathlon : Passings
8. Question / Answer
37
37
39
39
40
41
41
42
42
42
43
43
44
45
46
47
47
48
48
48
49
49
50
50
51
51
51
52
53
53
54
54
55
Page 3
1.
Introduction
Thank you for choosing the Elite v2 software.
This software has been designed to be user-friendly and intuitive.
We hope it will give you complete satisfaction.
For any questions, please contact us.
CHRONELEC
ZA BEAUREGARD
21490 NORGES LA VILLE
FRANCE
1.1.
System requirements
To use the software your computer must be equipped with:
Operating system: Windows 2000, Windows XP, Windows Vista, Windows 7
RAM: 1GB recommended
Microsoft .NET Framework 2.0
Dongle protection installed
Page 4
1.2.
Firewall
To take full advantage of the Elite v2 functionality you have to allow certain connections.
Elite v2 makes connections to the Internet to check if new updates are available.
When starting the program a security alert may appear.
Click on Unlock
COM port or RJ45 available to connect the decoder.
The user must have administrator rights
Page 5
1.3.
Network requirements
The Elite v2 software uses Windows file sharing to import data via a network.
You must have file sharing enabled to use this feature.
By default, the software is installed in the directory C:\Chronelec\Elite v2\.
The Data folder contains all events and championships. To import data via a network, you have to share
this directory.
Activate network shares:
Click on Control Panel and then click Network Connections. Make a right click on your network adaptor and
then select Properties.
Check that file sharing is
activated.
1.3.1.
Share data directory:
Share Data folder
and select
authority for users
/ everyone.
Right click on the
Data folder and
select Sharing.
Page 6
1.3.2.
Connecting to the network drive
Go to the workstation and select the Tools menu, then connect a network drive.
Select a letter available and enter the network path of the Data directory.
For Example:
You want to connect to the Data directory of the PC with the IP address 192.168.0.100:
Enter \\192.168.0.100\Data. If the connection is successful, another letter will appear in the workstation and
you have to view files in the Data directory.
In the software, simply specify the
letter of your choice (Z for example)
to import data from the network.
1.4.
Getting started
The software Elite v2 includes 4 main sections:
Database:
Enables the simplified copying and saving of competitors for future events. There is no requirement to copy
your competitors into the database. You can easily import competitors in the software without going through
the database.
Race management:
Setup and management of races. Easily print the results, calculate merges of races and apply penalties.
Timing:
Manage the race timekeeping. The competitors’ passing data is displayed on the left and the classification
is displayed on the right.
Championship:
Manage a championship, to combine several different event results.
The menus at the top may change depending on the section, and you must use the right click of the mouse
to show some options.
Page 7
1.4.1.
Organisation of data:
Main Database
Event A
Event B
Database of Event A
Database of Event B
Category X
Category X
Race 1
Race 1
Race 2
Race 2
Merge 1
Merge 1
Copy competitors 1
Copy competitors 1
Category Y
Category Y
Race 1
Race 1
Race 2
Race 2
Merge 1
Merge 1
Copy competitors 1
Copy competitors 1
Championship
Category X
Category Y
Principle of software:
Create an event. The event gathers together all races of all categories.
Create folders. In general, it creates a folder by category.
For example, if there are 4 different categories in the event and not all categories are timed at the same
time, we will create 4 folders.
Create race merges and copy competitors for each folder.
Races allows timing of competitors, Merges allow to merge races or other merges, while Copy competitors
allows the user to copy competitors in races automatically.
Import competitors in the folder from a text file, Excel or database. Then copy them in the races.
Page 8
1.5.
Database
Shortcut: CTRL+1
The database can store your competitors. However, this feature is optional!
You can overrule to import competitors in the race directly from an Excel file.
To view the options, right click on the right window. Double-click on competitor allow to edit it.
To organize your database, you can enable filtering and/or sorting by clicking on the icon
To copy competitors use the shortcut CTRL+C.
To paste competitors use the shortcut CTRL+V.
Page 9
2.
Races and competitors management
Shortcut: CTRL+2
The races management can manage your event.
You can create, modify or delete folders, races, merges or competitors copy, print results and starting grids.
To view available options, right click on the left window.
Event database:
Allows storing of all competitors for the event (optional). This database is only visible in the event
corresponding to the general database.
Folder:
Allows you to organize your event. Indeed, you can create a folder by categories to easily identify races in
each category.
The folder contains the settings of the circuit, printing and starting grid.
Race:
Allows timing of competitors.
2 types of classification are possible: classification on best lap, and classification on total laps.
Fusion:
Allows gathering data from races or merges.
4 types of classification are possible: classification on best lap, classification on total laps, fastest lap on
classification and classification on points (1st with more points or 1st with least points).
Several calculation methods are available to manage most cases.
Competitors copy:
Allows you to automatically copy competitors in races.
2 types of copy are possible: copying competitors of a race to several races, or copying competitors of
several races to a race.
You must right click in the left window to create folders, races, mergers or copy competitors.
Page 10
2.1.
Event
Shortcut: Double-click to open an event
To create or open an event, click on
Event then Open an event.
An event includes all races of all
categories.
When you create an event, the settings
of the event will be used by default for
folders.
If you want to apply the changes to all folders of your event, you must check the boxes at the bottom.
Page 11
2.1.1.
Import events or championship
You can import events or championships easily
from the Elite file or Data networking folder.
The drop-down list shows all the events found in
the source data.
Import all events:
All events from the drop-down list will be imported.
Import selected events:
Imports the selected event from the drop-down list.
You can import several different events at the same
time.
You can also import only a race, for example. In this case, just check the race box.
Import database:
Allows you to import the database. Competitors with the same ID will be overwritten.
If import data already exists on your PC, it will
be replaced.
Page 12
2.1.2.
Export events or championship
You can export events or
championships easily.
Export all events:
All events from the drop-down list will
be exported to an Elite file.
Export selected events:
Exports the selected event from the
drop-down list. You can export several
different events at the same time.
You can also export only a race for
example. In this case, just check the
race
2.2.
Live Internet
The live Internet can send the race timing over the Internet.
The software uses a FTP connection to send the file. You must have an FTP server visible on the Internet
to see the result.
You can customize the file of live Internet using the expert mode.
2.2.1.
Settings
Remote Folder:
Enter the destination path on the FTP server. Be careful,
HTTP address may be different from the FTP server address.
Timeout:
Maximum waiting time if no connection to the server has been
found.
Remote file:
Filename on the FTP server.
Frequency of upload:
Enter the upload frequency for classification on the FTP
server. The minimum time is 15 seconds.
The test button is used to detect if connection settings are
correct.
2.2.2.
Classification
You can select the columns to display on the web page.
For each type of classification, select a model to use.
The field name "class" HTML allows you to define your own layout HTML (expert mode).
Page 13
2.2.3.
Normal mode
Frequency of refresh:
Give the frequency of refresh for the Internet page (automatic reloading).
URL path image:
You can specify the path image to add at the top of the classification.
Title of classification:
By default, the name of the race is displayed, but you can specify a different title.
Page 14
2.2.4.
Expert mode
The expert mode allows you to
write the code that you want before
and after the classification.
The classification is generated with
HTML tags: <table>, <tr> and <td>.
This allows you to customize
completely live Internet, using your
PHP template for example.
2.3.
Folders
Shortcut: Double-click on the folder
The folders include races, merges and
competitors copy.
Competitors for the races must be copied in the
folder.
The folders are automatically sorted by name.
You can save folders templates by clicking on
the icon .
A folder template stores all settings (circuit,
printing and starting grid), and all races,
merges and competitors copy inside the folder.
To create a new folder from a template, you
must create a folder and select the template
from the drop-down list. Once a folder is
created, it is not possible to change it from a
template
2.3.1.
Settings
The details of the circuit must be completed in the folder. All races inside the folder will use the settings of
the circuit.
If you do not have the details of the circuit, average speeds will not be calculated.
By clicking on this icon
, you can set intermediate loops.
The settings of printing and starting grid must be configured in the folder.
Page 15
When you print a classification, the template of printing and starting grid configured in the folder will be
used.
If you want to apply the changes to all folders of your event, you must check the boxes at the bottom.
2.3.2.
Intermediate loops
The Elite v2 software can measure time or speed between 2 intermediates.
If you specify a distance equal to 0, the software will display a time between the two intermediates.
If you specify a distance not equal to 0, the software will display an average speed between two
intermediates.
STA means the loop START; it is the main loop of the track.
BOX means the loop BOX; it is the loop of pit lane.
B01, B02 ... B31 mean intermediates loops.
In the following example, there are 2
intermediates configured and 3 sectors displayed.
The software will display a time:
STA and B01 (Track loop and Intermediate 1)
B01 and B02 (Intermediate 1 and Intermediate 2)
B02 and STA (Intermediate 2 and Track loop)
It is possible to add an additional sector between
B01 and B02 to view average speed.
Page 16
2.3.3.
Printing settings
The Elite v2 software uses printing
templates. This allows the creation of
several templates to select quickly
depending on the type of printing to do.
To save a template, you must click on the
icon.
With the menu on the left, you can
configure your template: Header, Footer
and Body.
2.3.4.
Setting automatic titles:
For all primary and secondary titles, you can
select the fields to display.
For example, by selecting a field in the dropdown list, the name of the field will be
automatically replaced by his value at
printing.
If you write another text, then this field will be
used as a static field and will not be replaced.
You can change the font of all fields by
clicking on the icon .
You can always change the layout, change fields during printing but these
changes will be done only for this print.
If you want to apply the changes for all future printing then you need to make
changes in the print settings of the folder.
Page 17
2.3.5.
Starting grid
The Elite v2 software uses starting grid
templates set in the folder when printing.
You can display up to 6 competitors per
line and choose 2 fields to display for each
competitor.
You can specify in which location the pole
position must be printed.
You can always change the layout and change fields during printing but these
changes will be done only for this printing.
If you want to apply the changes for all future printing then you need to make
changes in the printing settings folder.
2.3.6.
Copy competitors
Allows you to automatically copy
competitors from the database of the event
to theselected folder.
Select a field and value to copy
competitors.
To copy competitors use the shortcut CTRL+C.
To paste competitors use the shortcut CTRL+V.
Page 18
2.3.7.
Edit a competitor
To edit a competitor, right click on the competitor then select Edit.
You can also double click on the competitor.
The software automatically displays in each drop-down list all fields found from the list of competitors.
All fields are text fields except transponder fields (numeric fields)
The ID field is a unique field. It identifies competitors in the software. For example, the software checks this
field to determine whether there is a competitor during a Copy/Paste operation.
The Multi sort field is a special field allowing a competitor to be in several categories. The fields are
separated by "_".
When sorting, the software will extract each field of each competitor to show only the field of the sort.
By checking the 1st case, you can save changes in all the races of the folder, the folder and the database of
the event.
By checking the 2nd box, you can save changes in the database.
2.3.8.
Team management:
You can fill in the names of competitors
within the team. You can also assign a
different transponder for each competitor.
Fields Name and Licensing can be used to
make a classification by competitor in the
championship
Page 19
2.3.9.
Import competitors
To import competitors, click on the icon
By clicking on the Browse button, competitors are imported from a text file.
By clicking Paste, you import competitors from the Windows clipboard (Excel file). You can use the shortcut
CTRL + C in Excel to copy the cells
The software displays data and you
must click on each column to identify
the field to use.
If you import files always in the same
format, you can store models by
clicking
, to avoid identifying
individual columns.
If you want to update existing
competitors, you must choose a field
to use as a unique key. The software
will use this key to detect if the
competitor already exists.
For example, if you use the number
as unique key, the software will
check before importing a competitor
that the number does not exist. If the
number already exists, you will be
asked to confirm to update the
changes.
You can use up to 3 different fields as unique key.
Page 20
2.3.10. Exporting competitors
To export competitors, click on the icon
By clicking on the Browse button, you export competitors
in a text file.
By clicking on a clipboard, you export competitors in the
Windows clipboard (Excel file). You can use the shortcut
CTRL + V to paste in Excel cells.
You can assign a sort on the field of your choice, and you
can specify up to 3 different sorts.
2.4.
Races
Shortcut: Double-click on the race
Races can time competitors on the best lap or on the
total laps
If you do not copy competitor in the race (Competitor
menu then Copy/Paste), competitors will be copied
from the folder to the race for each passing of a
transponder identified.
The races are automatically sorted by date. You can
save races templates by clicking on the icon
.
A race template stores all settings (options,
requirements, point tables and other items).
To change the race settings from a template, you
simply select the template from the drop-down list.
Page 21
2.4.1.
Introduction
Two types of classification are available: classification on best lap, or classification on total laps.
START loop and FINISH loop configure how to time competitors.
Race circuit:
Start loop = STA, Finish loop = STA
Race with start and finish not at the same place:
Start loop = BOX or B01, Finish loop = STA (or vice
versa)
Race with starting schedules and loop at finish:
Start loop = Starting schedules, Finish loop = STA
2.4.2.
Options
This is the minimum time that a competitor can
achieve. If a competitor makes a lap time below the
minimum time, his time will not be recorded in the
classification.
You can, at any stage, validate a lap time and
change the minimum time.
Maximum lap time :
This is the maximum time before displaying an alert
for a competitor if it did not pass over the loop.
Auto finish:
Allow to display a countdown of time or laps and
produce the finish flag when the race is finished
Staggered start:
Each competitor will have its 1st passing on the loop set as their starting time.
The calculation of total time is done by subtracting the last time with the first passing.
Page 22
2.4.3.
Requirements
You can apply race requirements to assign
a status to all competitors that did not
perform to the requirements.
The race requirements are calculated
when the race is finished.
By default, the statuses are: status1,
status2, status3, etc…
These texts can be renamed in not
qualified, not finish, etc. by selecting the
Settings menu and then Options.
2.4.4.
Points table
Overall points table:
Apply a table of points on the overall
classification of the race.
Fields points table:
Apply a table of points on each field
configured.
If you select the field category, a points
table will be applied on the field category.
By leaving a blank value, points will be
applied to all categories. By specifying a
value on a category, points table will be
applied to this category.
Page 23
2.4.5.
Other
Reset to zero race time:
Enables you to reset the race time when you
click on the Stop button. By default, the
software saves and adds the running time of
the last stop onto competitor passings. This
allows you to stop a race temporarily and then
restart.
Do not stop the decoder:
The Stop command will not be sent to the
decoder. This stops you losing the GPS
synchronization.
Start decoder at PC time:
During start, the PC will send a command to
synchronize the decoder time with the PC time.
This command is used by decoders with no
GPS.
The points add up if you apply an overall points table and a points table on one
or more fields
2.4.6.
Copy a race
Enables the creation of a new race
from an existing race.
If you check copy competitors,
competitors will be copied in the
new race.
Page 24
2.4.7.
Copy race passings
Allows the copying of race passings
from one race to another.
You can choose the passings to copy.
2.5.
Merge
Shortcut: Double-click on the merge
Merges allow gathering races or merges on best lap, on total laps or on points.
Several computing methods are available.
You can save merges templates by clicking on the icon .
A merge template stores all settings except path of races and merges merged.
To change the merge setting from a template, you simply select the template from the drop-down list.
To change the round text, right click on the classification and select Edit rounds text.
Page 25
2.5.1.
Settings
Type of merge:
You can choose the type of merge, and select the field used to merge races and merges.
Calculation method:
Select the type of calculations used on races and merges.
Merge on the field:
Allows you to choose the field by which to identify a competitor in several races and several merges.
If several competitors have the same field, then the software adds their results. This allows you to manage
results by teams.
The ID field is a unique field generated by the software when a new competitor is created.
It is better to use this field if you used the same competitors in each race. When you copy/paste, the
competitor’s ID is not changed.
Gather all competitors:
In the case of a team classification, select if you want to gather all competitors together.
Page 26
2.5.2.
Merged races list
Select races and merge them to add them in the results window, using green arrows.
By double clicking on a result, the result is automatically added or deleted.
A merge does not use status in other results; it means that no status will be applied to the result. But you
can always assign a status manually.
You can indicate how to break the ties, and the software will display the results in orange.
2.5.3.
Assign points table to the merge results
You can assign a points table to the merge result.
To do this, right click on a merge and select Assign points table.
A new merge will be created from the source merge and the points will be assigned depending on the
selected method.
2.5.4.
Settings
Type of merge:
Select the type of merge (more points or fewer points).
You can assign a points table to each result merged or
directly to the merge result.
Filter:
Allows you to not assign points to competitors which
match the filter. Used if you have "foreign" competitors
who should not have points in the final result. "
Page 27
2.5.5.
Points table
Overall points table:
Apply a table of points on the overall classification
of the race.
Fields points table:
Apply a table of points on each field configured.
If you select the field category, a points table will be
applied on the field category.
By leaving a blank value, points will be applied to
all categories. By specifying a value on a category,
points table will be applied to this category.
The points add up if you apply an overall points table and a points table on one
or more fields
Page 28
2.6.
Distribution
Shortcut: Double-click on copy competitors
Copy competitors can automatically copy competitors in races. Two types of copies are available:
Either the copied competitors are automatically sorted by name.
Or you can save copied competitors’ templates by clicking on the icon .
A copied competitor’s template stores all settings except path of races and merges selected.
To change the copy competitor settings from a template, you simply select the template from the drop-down
list.
Page 29
2.6.1.
Settings
Type of copy:
Allow to select the type of
copy to use.
The ID field will be used to
copy competitors.
Copy method:
Copy method to choose the
first result to copy.
2.6.2.
Races schedule
Source of copy:
Select results to be used to
copy competitors.
You can specify:
The position of the 1st
competitor for the copy start.
The total number of
competitors to copy.
The number of competitors to
copy at the same time (1 by 1,
2 by 2, 3 by 3 ...)
Destination of copy:
Select results to be used to
paste competitors
Page 30
3.
Timing
Shortcut: CTRL+3
Timing can time races created in races management.
The competitors passing are displayed on the left and the classification is displayed on the right.
To view the available options, right-click on passing or on the classification.
The race menu contains all options of the race. You can change settings without leaving the timing window.
To time a race, click on the green flag
to start the timing and click on the stop button
to stop timing.
You can not start a new race if you do not stop the previous race beforehand.
Shortcut for flags:
F5: green flag,
F6: yellow flag,
F7: red flag,
F8: finish flag.
Page 31
3.1.
Passing
The passings are automatically
sorted on the total time.
The 1st column indicates the
passing ID and the colour of the
race flag.
Right click on passings to view the available
options.
.
Confirm passing:
Allows the confirming of a passing if previously deleted or the minimum time was not respected.
Delete passing:
Allows the deleting of a passing in order to remove it from classification.
Confirm lap time:
Allows the confirming of a lap time if previously deleted.
Delete lap time:
Allows the deleting of a lap time. For example, if the competitor took a shortcut.
Edit passing:
Allows the changing of the total time or type of passing (STA, BOX or intermediate).
Identify / Do not identify competitor:
Allows/ignores the identifying of a passing of a competitor. The transponder will be added to or removed
from competitor.
Select the competitor:
Allows the viewing of the competitor from passing in the classification.
Display competitor’s passing:
Allows the viewing of only one competitor's passing in the list of passings. To view all passings, you must
select the option show all passing.
Insert flag:
Allows the insertion a flag from the selected passing. The flag is inserted until the next flag is detected.
Manual passing:
Allows you to add manual passing for a competitor.
Shortcut: F11 to insert passing and F12 to add passing.
Page 32
3.1.1.
Passing colours
: Passing deleted, the passing is not recorded in the classification.
: Lap time deleted, lap time is not recorded in the classification.
: Transponder passing is not assigned to a competitor.
If a passing does not match to a competitor in the race, you must identify the competitor.
: Lap time of passing is less than the minimum time in the race settings.
You can force the confirmation of passing with the confirm passing option.
: Manual passing assigned to competitor.
: Photocell passing assigned to competitor.
Start and finish at two different locations:
The flags are inactive in this type of race. Each start
is green and each finish is red.
If a competitor did not start or did not finish, the
passing will be automatically deleted.
Page 33
3.1.2.
Identify a competitor
If you receive a passing as not
identified , the transponder number is
not assigned in the race or in the
folder.
If this passing is valid, you should
identify the competitor.
The drop-down list allows you to filter
competitors in order to quickly identify
competitors.
You can also sort the columns by leftclicking on the header of the column
3.2.
Classification
A summary text displays the type
of classification, competitors in the
race and hidden competitors.
Right click on classification to view
available options.
Edit competitor:
Allows editing information for a competitor.
Edit several competitors:
Allows editing information for many competitors.
Penalties / Bonus:
Allows the application of penalties or bonuses on the classification.
Penalties / Bonus (several competitors):
Allows the application of penalties or bonuses on the classification for several competitors at same time.
Hide competitor:
Allows the hiding of a competitor from classification. You can at any moment display hidden competitors by
clicking on the icon
.
To view hidden competitors in the classification, you have 2 options:
- create a filter on competitors and select no filter.
- click on hidden competitors and select the option do not hide competitors.
Page 34
Status of competitor:
You can assign 12 possible. When a competitor has a status, it is automatically placed at the end of the
classification. If two competitors have a status, display order will be determined by the priority of the status.
You can rename the status.
Filter on competitor:
Allows the application of a filter on competitors in the race. All competitors who do not match the filter will be
hidden.
Display competitor’s passing:
Allows you to view only one competitor's passing in the list of passing. To see again all passing, you must
select the option Show all passing.
Print lap by lap:
Allows the printing of all of a competitor’s passings. You can select several competitors.
Competitor active in team:
Allows you to specify which competitor is in the vehicle. If you specify a competitor, the name of the
competitor will be displayed in the Name field. This feature is automatic with Chronelec transponders multidriver.
Add competitor:
Allows the adding of a competitor / new competitor to the race.
Remove competitor:
You can also remove a competitor from the classification. All competitor’s passings become ‘not identified’
and you should assign them to a new competitor.
Add or remove columns:
Allows the viewing of columns of your choice in the classification.
Page 35
3.2.1.
Penalties / Bonus
You can make corrections on the
classification from the menu Penalties /
Bonus.
You can amend the total time, the best lap,
the total laps or points. You can specify a
new position and a comment for penalty.
New result:
This is the new results when the corrections
are applied.
Add / Substract:
Allow adding or subtracting numbers to the
new result.
Old result:
Is the result without corrections.
Correction:
Displays the difference between New and
Old result.
3.2.2.
Filter on competitors
You can apply a filter on competitors. A filter can hide all competitors that do not match to the filter.
Select the fields to filter and click on button
to add them.
: Allow to apply AND select between two
filters. If one of them is false, the competitor will
be hidden.
: Allow to apply OR select between two
filters. If all are false, the competitor will be
hidden.
Page 36
3.2.3.
Icon in the classification
: Means crossing the finish line by the competitor under the finish flag.
: Means a passing on the STA loop (normal passing).
: Means a passing on the BOX loop (pit lane passing).
: Means an improvement of position compared to the previous lap.
: Means a regression of position compared to the previous lap.
: Means a maximum time not respected. The competitor has not made any passing during the maximum
time.
4.
Championship
Shortcut: CTRL+4
The championship allows gathering several races or merges to establish a classification on points.
To view the available options, right-click on the left window.
The championship is stored in a file all the results are added. This means that by editing a result in a race, it
will not be changed in the championship.
The Recalculate option allows the updating of results to the championship
4.1.
Import a championship
You can import a championship from
a text file or Excel.
Click on the icon
and select the
option import competitors.
Select the fields championship to
identify the points of each result. The
final result will be recalculated.
Page 37
New:
Allows you to create a new championship.
Recalculate
Allows you to update results of the championship.
Edit:
Allows you to edit a championship to change its settings.
Edit merged results:
Allows you to edit merged results in the championship.
Delete:
Allows you to delete a championship.
Printing settings:
Allows you to edit the layout and titles for printing.
Page 38
4.2.
Create and modify a championship
Shortcut: Double-click on the championship
The championships can gather races or merges on the points.
Several computation methods are available.
The championships are automatically sorted by name.
If you want to update only one result, you can remove the result from the list and then add it again.
To change the round text, right click on the classification and select Edit rounds text.
4.2.1.
Settings
Type of merge:
Allows you to choose the type of merge, and to select the field used to merge races and merges.
Calculate method:
Select the calculate method to do on races and merges.
Merge on the field:
Allows you to choose the field to identify a competitor in several races and several merges.
If several competitors have the same field, then the software adds their results. This allows you to manage
results by teams.
The ID field is a unique field generated by the software when a new competitor is created.
It is better to use this field if you used the same competitors in each race. When you copy/paste, the ID
competitors is not changed.
Gather all competitors:
In the case of a team classification, select if you want to gather all competitors together.
Page 39
4.2.2.
Race schedule
Select races, merges to add in the results to
merge using the green arrows.
By double clicking on a result, the result is
automatically added or deleted.
All competitors who have not made the
required results will be ranked at the end of the
classification.
A merge does not use status in other results,
thus it means that no status will be applied to
the result. However, you can always assign a
status manually.
You can indicate how to break the ties, and the
software will display the results in orange.
Page 40
4.2.3.
Other
You can select a filter to apply to the
championship. Only competitors
matching to filter will be added in the
championship.
If you add a race, points will be assigned
for competitors of the filter.
To create a filter, available fields will not
be displayed (you must specify the filter
manually).
4.3.
Modify merged results
Because merged results are stored in
the championship, you can change the
results even if you do not have the
source event.
Select the result to change and rightclick to apply a correction on the
classification.
Page 41
5.
Competitor’s menu (copy – paste)
The Copy menu allows the copying of all competitors selected.
You can copy competitors from the database, a folder, a race, a
merge or a championship.
The Paste menu allows the pasting of all competitors that have
been copied.
You can paste competitors in the database, a folder or a race.
If a competitor already exists (same ID) when you use the paste
menu, you must confirm to update competitor.
5.1.
Editing starting position
If a race has not started, you can change the starting positions of competitors. Several methods are
available to change the starting positions.
Allows you to assign starting positions manually. Use
the Return key to select next competitor..
Allows you to assign starting positions compared
with a result. Select the field that the software must
detect competitors in results.
Allows you to assign starting positions compared
with competitor numbers.
Allows you to assign starting positions compared
with a position specified. If several competitors are
selected, they will be all inserted at the position
specified.
Allows you to assign starting positions compared
with starting schedules.
Allows you to assign starting positions at random.
Allows you to assign starting positions in reverse
order.
Assign the starting positions of a race compared with a championship, then by number order:
to sort competitors by number order.
- Click on the icon
- Click on the icon to sort competitors compared with a championship. If competitors do not have the
same ID in the championship, select the Number field, for example.
5.2.
Assign starting schedules
Start with a fixed schedule:
This option is used in cycling races, running etc. Competitors start from location A to finish at location B.
You must assign a starting schedule for each competitor and choose starting schedules in race settings.
The start passing is simulated with the starting schedules of the software.
The finish passings are detected by the decoder.
Page 42
Staggered start (group starting):
This option is used in quad racing where there are several starts. It subtracts from the total time, the
staggered time of a competitor for each passing.
Start time:
Date and hour for competitor start.
Increment:
Allows incremental start times for each
competitor selected.
Total competitors by starting:
Apply the same starting schedule for
competitors in the same start.
Total laps to do:
Total lap to do to get finish flag. When a
competitor gets to the finish flag, their
passings are not calculated.
Total distance to do:
Select total distance if you have several
different categories in the race with
different circuit. This will calculate the
average speed.
5.3.
Assign transponders
You can assign transponders to competitors by
selecting a folder.
Select the competitor number.
Select the transponder number.
For a quick entry, you can press the Return key to
confirm.
5.4.
Find a competitor
You can find competitors in the classification from a
number or a name.
This feature can also look for competitor passings.
Page 43
6.
Settings, decoder
To receive the passing from the decoder, you should use a
available COM port or RJ45 port.
The software displays all available COM ports on the PC.
Several protocols are available:
Protime :
This protocol is used by decoders before 2000.
Protime Elite:
This protocol is used by decoders from 2000 to 2007.
Protime Elite v2:
This protocol is used by decoders after 2007Clicking the
test button, you can check the connection between the PC
and the decoder
You should not use two PC’s with two master dongles (blue dongle) connected on
the same decoder via RJ45 !
You can not test the decoder with a slave dongle (red dongle).
You can not receive passings from decoder with a slave dongle (red dongle).
Page 44
6.1.
Display TV
To view the results on TV, you must have a graphics card with
at least 2 VGA outputs.
You must activate the option Extend Windows desktop in the
settings display.
The software can manage up to 4 different channels (4
screens).
You can store display TV templates by clicking on the icon .
A display TV template stores all settings (Configuration,
Colours, Options and Other). The columns (classifications)
displayed on the screen are stored in another type of template.
To change settings of a canal from a template, you simply
select the model from the drop-down list.
You can create column templates for several types of
classification. The software will display the latest template
selected matching to type of classification displayed.
For example, if you time a race with classification on best lap,
the software will display on TV the latest template in the
category "Best lap" selected.
To display a preview on the TV click on the icon .
To add or remove columns, right click on the column header
and select the menu Add/Remove columns.
When template is finished, click on the icon
.
Page 45
6.2.
Display panel
To show results on display panel, you should use a available
COM port.
The software displays all available COM ports on the PC.
Chronelec numeric display:
Allows you to send the classification to Chronelec display
(numeric characters).
Chronelec alphanumeric display:
Allows you to send the classification to Chronelec display
(alphanumeric characters).
You must select features of the panel : address, total rows,
total characters.
You can connect several panels together by declaring them in
features.
You can create column templates for several types of
classifications. The software will display the latest template
selected matching to type of classification displayed.
For example, if you are timing a race with classification on the
best lap, the software will display on TV the latest template in
the category "Best lap" selected.
Clicking the test button, you can check the connection
between the PC and the display (time must be display).
You can create several templates and select the total
characters to be padded for each field.
When template is finished, click on the icon .
Page 46
6.3.
Options
Gather all software options.
You can change all fields (general fields, race fields,
status, abbreviations ...)
You can create defaults settings that will be used when
creating a new event.
You can create points tables and a transponders match
table (to change transponders number).
6.3.1.
Points table
Click on the icon
to create a new points table.
Type of points:
Ascending points table is starting from 1 to X (with X the total number of competitors).
Descending points table is starting from X to 1 (with X the total number of competitors).
If you select custom points, you must enter points for each position.
If the position of a competitor exceeds the number of position in the points table, the competitor will get the
points of the last position.
Page 47
7.
Modules menu
7.1.
Calculate results difference
Allows you to calculate the average time of
the first X competitors of each result and to
know the percentage difference.
This calculation is used to know the
difference between 2 or 3 qualificative series.
Statuses of competitors - specifies the points
for each competitor.
Click the
7.2.
icon to save the points table
Level of decoder
Allows you to adjust the level of decoder
sensitivity through the software.
0 means a maximum sensitivity; the height of
detection will be maximum.
Page 48
7.3.
Enduro Module: overview
The software allows managing the events such as Rallying and Enduro by using time trials.
The principle is as follows:
- Create a race (type of race is not important) which will be used as settings for time trials. Competitors
participating to time checks must be copied into the race.
- Assign starting schedules to competitors if necessary (Enduro)
- Click on time checks management to set circuit for competitors. The time trials will be combined to the
race selected.
7.3.1.
Enduro Module : Settings
The setting tab allows the assigning of time
trials (TT’s) for each competitor. The
categories are automatically detected from
the race of time checks.
Categorie selection:
Allows you to set up a category and apply
settings to other categories.
Test races selection:
Allows you to select a test to do for each
category.
Time checks list :
Allows you to assign a time allocated for the
TT.
For rally:
The start of a test is considered as a TT. To identify a special as TT, you should enter 101 for the test 1, 102
for test 2 ...
To apply time neutralization on a TT; you have to set 0 in time allotted.
Status of competitors:
Allow to select the status to apply if time checks are missed or maximum delay on a CH is elapsed.
Page 49
7.3.2.
Enduro Module: Processing
Passings :
Allows you to import or delete TT passings of
competitors. You can import several TT
passings at the same time.
Although the software can assign a manual TT
passing, it is recommended to correct manual
passings through the NotePad software for
example.
For rallying, the generate button allows you to
write starting schedules of tests.
TC Decoder:
You should save the assigned transponders on
SD card for the decoder. To reset the passing
stored in the decoder, click on stop and then
start.
Manual TC passing :
Allow to enter time of TT manually.
7.3.3.
Enduro Module : changes
Neutralization / Category:
Allow to neutralize a TT for a category.
You must enter the logic TT.
Click on Save to apply changes.
Neutralization / Competitor:
Allow to neutralize a TT for a competitor.
You must enter the logic TT.
Click on Save to apply changes.
Penalties :
Allows you to apply penalties as a new status
on the final classification.
Click on Save to apply changes.
Page 50
7.3.4.
Enduro Module : Detected anomalies
Used to show anomalies that were
detected by the software. Several
filters are available.
By clicking on the icon , you can
view the passing of the competitor.
7.3.5.
Enduro Module: Passing
Allows you to view all TT passings of
competitors and view total penalties got at
each TT.
You can add or delete a TT if changes should
be made. If you import new TT passing with
the processing tab CH, the changes will be
lost.
7.3.6.
Enduro Module: Classification
Allows you to calculate the final classification
depending on tests and penalties got at the TT.
Whenever you calculate a classification, a new
race will be created.
You can make changes in the new race, add
penalties, and change the status...
Page 51
7.4.
Triathlon module
The software allows the managing of Triathlon events. The principle is as follows:
- Create a race with classification on total laps.
- Select triathlon option in the race settings to calculate intermediate passing as a full lap.
- Start the race and make your timing.
- Once the race is finished, you can click on the Triathlon module to identify areas for each sport, as in the
drawing below.
Page 52
7.4.1.
Module Triathlon : Settings
The settings tab allows the identification of
intermediate loops and finishing loops for
each discipline. The categories are
automatically detected from the source race.
Category selection:
Allows you to set up a category and apply
settings to others categories.
Options:
Allows you to choose the start method of the
race and apply a status if competitors have
missed a passing.
Passings list:
For each intermediate passing received in
the race, you can select if passing is an
intermediate passing or a finish sector.
7.4.2.
Module Triathlon : Treatment
Passing:
Allows you to import or delete race passing to calculate sectors of each discipline.
Classification:
Allows you to calculate the final result and view times in sectors.
Whenever you compute a classification, a new race will be created.
You can make changes in the new race, add penalties, and change the status...
Page 53
7.4.3.
Module Triathlon: Detected anomalies
This is used to show anomalies that were detected by the software. Several filters are available.
By clicking on the icon
7.4.4.
, you can view the passing of the competitor.
Module Triathlon : Passing
Allows you to view all passings of
competitors and view sector times.
You can add penalties on a time zone.
If you import new passing from the
processing tab, penalties will be lost.
You can add penalties on a time zone.
If you import new passing from
processing tab, penalties will be lost.
Page 54
8.
Question / Answer
I can not detect the decoder.
Check the COM port or IP address of the decoder. Check the protocol selected.
If you have a red dongle, you can not detect the decoder. One possible remedy is to click on test button at
the same time that the PC has the blue dongle.
What does STA and BOX mean at bottom left ?
STA means noise (disturbances) on the main loop (START) and BOX means noise on the pit lane loop.
I receive BOX passings.
You probably have an inverted loops decoder. The BOX loop is normally used for the pit lane.
My classification is false.
Check the type of classification of the race. You may have selected classification on best lap, instead of
being on the total laps (or vice versa).
You may have to check whether you have staggered start enabled, if your race is not a staggered race.
All passings are orange and I have no classification.
The minimum lap time for passings is not respected. Edit the race settings to change the minimum time and
confirm all orange passings.
Laps of the 1st passings are not calculated.
Edit the race settings to consider the 1st first passing as full lap. To recalculate the classification, click on
race menu and then Recalculate Classification.
There is no display on the TV monitor.
Check the display settings for the graphics card in Windows; you must activate the option to extend the
Windows desktop.
Check that you have turned the channel onto TV display settings in the software.
Page 55
TAG Heuer
PROFESSIONAL TIMING
CHRONELEC
6A Louis-Joseph Chevrolet
2300 la Chaux-de-Fonds
Switzerland
Tel : 032 919 8000
Fax : 032 919 9026
[email protected]
ZA BEAUREGARD
21490 NORGES LA VILLE
France
[email protected]
www.chronelec.com
www.tagheuer-timing.com
Page 56