1
TAG Heuer by Chronelec
Software Suite
Version 11/2012
1.
SYSTEM REQUIREMENTS
5
2.
NETWORK REQUIREMENTS
5
2.1.1.
Share data directory: ...................................................................................................................... 5
2.1.2.
Connecting to the network drive ................................................................................................... 6
3.
HARDWARE SETTING
6
3.1.1.
Protocol selection ........................................................................................................................... 6
3.1.1.
Loop setting (Start – Finish – Split times) .................................................................................... 9
4.
CREATE A NETWORK IN ORDER TO WORK ON MASTER / SLAVE BASIS
10
4.1.1.
Change TCP/IP Settings ............................................................................................................... 10
4.1.2.
Create a homegroup ..................................................................................................................... 10
4.1.3.
Share folders (C:\Chronelec\Elite v3\Data) ................................................................................ 10
5.
GETTING STARTED
12
6.
INTERFACE DESCRIPTION
13
6.1.1.
Events ............................................................................................................................................ 14
6.1.2.
Competitors ................................................................................................................................... 14
6.1.3.
Settings .......................................................................................................................................... 14
6.1.4.
Help ................................................................................................................................................ 15
7.
DATABASE
15
8.
RACES MANAGEMENT
17
9.
TIMING
18
9.1.1.
10.
Import events or championchip .................................................................................................. 19
TRACK INSTALLATION EXAMPLE
21
10.1.1.
Start at the Time of Day (TOD Start) ........................................................................................... 21
10.1.2.
Race start at 00:00:00 ................................................................................................................... 22
11.
PRINT SETTINGS
23
12.
REMOTE DISPLAY
25
13.
TRACKING
27
www.tagheuer-timing.com written by Marcus MAIERHOFER
Page 2
14.
14.1.1.
15.
LIVE TIMING
30
Expert mode: ................................................................................................................................. 34
TAG HEUER BY LYNX PHOTO-FINISH CAMERA
38
15.1.1.
TAG Heuer by Lynx settings........................................................................................................ 38
15.1.2.
Elite V3 settings for TAG Heuer by Lynx camera ...................................................................... 39
16.
OLED MESSENGER
41
16.1.
OLED Messenger.exe settings .................................................................................................... 41
16.2.
Elite.exe settings........................................................................................................................... 44
17.
DECODER SETTING
45
17.1.
Software “Decoder Setting” ........................................................................................................ 45
17.2.
Elite Decoder ................................................................................................................................. 45
18.
“DECODER SETTING” – COMMANDS
46
18.1.
Menu Option .................................................................................................................................. 46
18.2.
Decoder .......................................................................................................................................... 46
18.3.
Commands .................................................................................................................................... 46
18.4.
Decoder Time ................................................................................................................................ 47
18.5.
Decoder Date ................................................................................................................................. 47
18.6.
Distant decoder ............................................................................................................................. 48
18.7.
Noise level ..................................................................................................................................... 48
19.
19.1.
20.
“DECODER SETTING” – SETTINGS
49
IP Settings ..................................................................................................................................... 51
THE DECODER
53
20.1.
General information ...................................................................................................................... 53
20.1.1.
Noise .............................................................................................................................................. 53
20.1.2.
Level of detection ......................................................................................................................... 53
20.2.
Front panel of the Elite decoder ................................................................................................. 54
20.3.
Rear panel of the Elite decoder .................................................................................................. 56
20.4.
Pin-out DB15 ................................................................................................................................. 56
21.
DECODER TECHNICAL SPECIFICATION
www.tagheuer-timing.com written by Marcus MAIERHOFER
57
Page 3
22.
TRANSPONDERS
57
22.1.
RK, LS, Elite, Elite Pro installation .............................................................................................. 57
22.2.
Passive Transponder (RCS and RC) ........................................................................................... 58
23.
LOOP INSTALLATION
59
23.1.
Passive loops (LS, Elite Transponder) ....................................................................................... 59
23.2.
Active Loops (RCS, RC, RCT and RK Transponder) ................................................................. 60
QUESTION / ANSWER
61
TAG HEUER
62
www.tagheuer-timing.com written by Marcus MAIERHOFER
Page 4
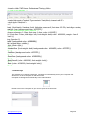
1. System requirements
To use the software your computer must be equipped with:
Operating system: Windows 2000, Windows XP, Windows Vista, Windows 7
RAM: 1GB recommended
Microsoft .NET Framework 2.0
Hardlock Dongle installed (Note that the Master Key is blue and the « Slave » Red)
2. Network requirements
The Elite v3 software uses Windows file sharing to import data network.
You must have file sharing enabled to use this feature.
By default, the software is installed in the directory C:\Chronelec\Elite v3\.
The Data folder contains all events and championships. To import data network, you have to share this
directory.
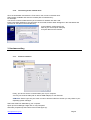
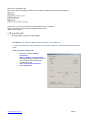
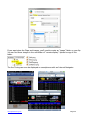
Activate network shares:
Click on Control Panel and then click Network Connections. Make a right click on your card and then select
Properties.
Check that file sharing is
activated.
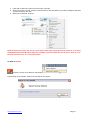
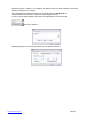
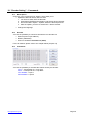
2.1.1.
Share data directory:
Share Data folder
and select
authorizations
reading for
everyone.
www.tagheuer-timing.com written by Marcus MAIERHOFER
Make a right click
on the Data folder
and select
Sharing.
Page 5
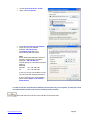
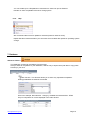
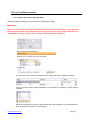
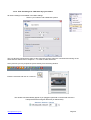
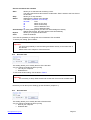
2.1.2.
Connecting to the network drive
Go to the workstation and select the Tools menu, then connect a network drive.
Select a letter available and enter the network path of Data directory..
For Example:
You want to connect to Data directory of PC with the IP address 192.168.0.100:
Enter \\192.168.0.100\Data. If the connection is successful, another letter will appear in the workstation and
you have to view files in the Data directory.
In the software, simply specify the
letter of your choice (Z for example)
to import data from the network.
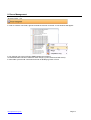
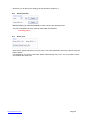
3. Hardware setting
3.1.1.
Protocol selection
Firstly, you have to set the communication port of your computer.
You may use a serial cable (with or without USB Adapter) or over Ethernet.
COM Port: Set the right com port used. In order to find the COM Port number you may refere to your
Operating system manager.
Select the COM Port attributed by your computer.
Open up Device Manager. Right click on "My Computer"
and select properties (at the bottom of the list that pops up).
www.tagheuer-timing.com written by Marcus MAIERHOFER
Page 6
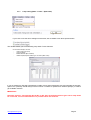
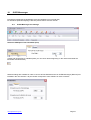
Click on the "Hardware" tab.
Click on the "Device Manager" button and a something similiar to this picture should appear.
Click on the '+' sign on the left of the "Ports (COM & LPT) to expand it.
The list of printers and Serial ports available will be shown.
Make a note of those.
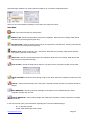
IP Address: The default IP address of the decoder is 192.168.000.010
In order to communicate with the decoder, the computer should be on the same Network and subnet
mask.
How to set your Computer IP:
•
•
•
Select the program Network
connection
(Start
Setting
Control Panel)
We suggest that you create a short cut
from your desk top to simplify the
access to the LAN.
Select Local Area Connection
Select Properties
www.tagheuer-timing.com written by Marcus MAIERHOFER
Page 7
•
•
Choose Internet Protocol TCP/IP
Again, select Properties
•
•
Select Use the following IP address
Enter the correct IP address
Example: 192.168.000.001
The Subnet mask will come
automatically (255.255.255.0)
Note
The IP addresses should be similar on
the first 3 groups of the 3 numbers
(example : 192.168.000.xxx)
The last groups of 3 numbers should be
different
Example:
Decoder
IP = 192.168.0.10
PC
IP = 192.168.0.03
If your PC is never connected to a LAN,
you can make this address permanent.
If not, to retrieve to the original setting,
please select Obtain an IP address
automatically
In order to test the communication between the decoder and your computer you may do a brief
test. Data frames should come into the communication window.
Note that this test mode don’t work with the Chronoprinter 540.
www.tagheuer-timing.com written by Marcus MAIERHOFER
Page 8
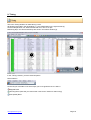
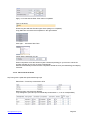
3.1.1.
Loop setting (Start – Finish – Split times)
If you have to use the same settings several times, don’t hesitate to tick those options below.
This window allows you to set all timing loop and/or Timer Channels.
On the below example, we have:
1 Start / Finish loop (STA)
1 Pit entry (BOX)
2 Distant decoder (B01 and B04)
1 Distant Speed, Speed measuring on 30 meters (B02 + B03)
If you set a distance, Elite will automatically consider it as a speed measuring zone and calculate the average
speed. The “speetrap” should always have more than 10 meters for speeds over 100km/h (60mph) in order to
get a reliable measure.
IMPORTANT
Note that “passive” Transponder like the RC or RK, after each ID transmission goes into a sleep mode
for 5 seconds, no second transmission is possible whitin this moment.
www.tagheuer-timing.com written by Marcus MAIERHOFER
Page 9
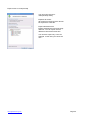
4. Create a Network in order to work on Master / Slave basis
4.1.1.
Change TCP/IP Settings
TCP/IP defines the language that your computer uses to communicate with other computers. In our
application we do not recommend using automated Dynamic Host Configuration Protocol (DHCP) to
automatically assign Internet Protocol (IP)
Open Network Connections by clicking the Start button , clicking Control Panel, clicking Network and
Internet, clicking Network and Sharing Center, and then clicking Manage network connections.
If you are prompted
1. Right-click the connection that you want to change, and then click Properties.
for an administrator password or confirmation, type the password or provide confirmation.
2. Click the Networking tab. Under This connection uses the following items, click either Internet Protocol
Version 4 (TCP/IPv4) To specify IPv4 IP address settings, do one of the following:
o
To obtain IP settings automatically, click Obtain an IP address automatically, and then click
OK.
o
To specify an IP address, click Use the following IP address, and then, in the IP address,
Subnet mask, and Default gateway boxes, type the IP address settings.
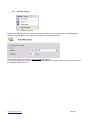
4.1.2.
Create a homegroup
Open HomeGroup by clicking the Start button
search box and then clicking HomeGroup.
, clicking Control Panel, typing homegroupe in the
On the Share with other home computers running Windows 7 page, click Create a homegroup, and
then follow the instructions.
NOTE:
•
•
•
If a homegroup already exists on your network, Windows will ask if you would like to join it instead of
creating a new one.
If you don't have a home network, you'll need to set one up before creating a homegroup.
If your computer belongs to a domain, you can join a homegroup but you can't create one. You can
access files and resources on other homegroup computers, but you can't share your own files and
resources with the homegroup.
Computers must be running Windows 7 to participate in a homegroup. HomeGroup is
available in all editions of Windows 7. In Windows 7 Starter and Windows 7 Home Basic,
you can join a homegroup, but you can’t create one.
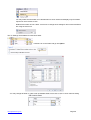
4.1.3.
Share folders (C:\Chronelec\Elite v3\Data)
Right-click a drive or folder, click Share with and then click Advanced sharing
1. In the dialog box that appears, click Advanced Sharing.
If you're prompted for an administrator
password or confirmation, type the password or provide confirmation.
2. In the Advanced Sharing dialog box, select the Share this folder check box.
3. To specify users or change permissions, click Permissions.
www.tagheuer-timing.com written by Marcus MAIERHOFER
Page 10
4. Click Add or Remove to add or remove users or groups.
5. Select each user or group, select the check boxes for the permissions you want to assign for that user
or group, and then click OK.
6. When you've finished, click OK.
NOTE that you can't share the root of a drive with a dollar sign following the drive letter as in versions
of Windows earlier than Windows Vista. For example, you can't share the root of your C drive as "C$,"
but you can share it as "C" or any other name.
On Elite V3 SLAVE
Import the current race edited on the Master
Point directly on the “Master” folder over the network and import
www.tagheuer-timing.com written by Marcus MAIERHOFER
Page 11
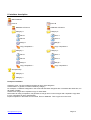
5. Getting Started
Elite v3 includes 4 main sections:
Database:
Allows saving your competitors to copy them more easily in future events. There is no requirement to copy
your competitors in the database. You can easily import competitors in the software without going through the
database.
Races management:
Allows you to manage races of the event. You can print the results, calculating merges of races, apply
penalties.
Timing:
Allows you the timing races of the event. The passing of competitors are displayed on the left and the
classification is displayed on the right.
Championship:
Allows you to manage a championship, to combine several different event results.
The menus at the top may change depending on the section, and you must use the right click of the mouse to
show some options.
www.tagheuer-timing.com written by Marcus MAIERHOFER
Page 12
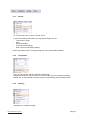
6. Interface description
Main Database
Event A
Event B
Database of Event A
Database of Event B
Category X
Category X
Race 1
Race 1
Race 2
Race 2
Merge 1
Merge 1
Copy competitors 1
Copy competitors 1
Category Y
Category Y
Race 1
Race 1
Race 2
Race 2
Merge 1
Merge 1
Copy competitors 1
Copy competitors 1
Championship
Category X
Category Y
Principle of software:
Create an event. The event gathers together all races of all categories.
Create folders. In general, it creates a folder by category.
For example, if 4 different categories in the event and that these categories are not timed at the same time, we
will create 4 folders.
Create races merges and competitors copy for each folder.
Races allow to timing competitors, merges allow to merge races or other merges and competitors copy allow
to copy competitors in races automatically.
Import competitors in the folder from a text file, Excel or database. Then copy them in the races.
www.tagheuer-timing.com written by Marcus MAIERHOFER
Page 13
6.1.1.
Events
To create a new event or open a recent event.
In the Event Settings information you may find all setting such as:
- Track Name / length
- Date
- Hardware Setting
- Print and results settings
- Web / Server broadcasting settings
Import and Export events or championship from or to another Elite Software.
6.1.2.
Competitors
Here you can manage, edit all competitors information.
Copy/Paste function is active in Elite v3 in order to add, remove or edit all information.
Double click on the selected competitor opens up automatically the information board.
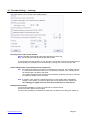
6.1.3.
Settings
Stopwatches : Hardware setting.
www.tagheuer-timing.com written by Marcus MAIERHOFER
Page 14
You can enable up to 9 Stopwatches connected over serial com port or Ethernet.
Decoder or other compatible TAG Heuer Timing system.
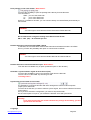
6.1.4.
Help
We recommend that check for updates is selected (needs an internet acces).
Repair Elite files. Restore all files if you encounter some troubles after update or operating system
change.
7. Database
Shortcut: CTRL+1
The Database conteins all competitors from all events.
Until you have all competitors in your database, it will be easy to import them (with filter or copy paste
function) in your race.
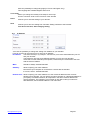
Filter function : This function allows you to show only requested competitors.
Sorting possibilities are listed in the window
Here is an example, filter selection : Category, available and selected field : STAR
Only 20 competitors on 44 are displayed in the main window.
www.tagheuer-timing.com written by Marcus MAIERHOFER
Page 15
Printer function: to print competitors list:
Import/Export funciton : With this function you can either import from a text file or .csv database or paste
from your excel clipboard.
www.tagheuer-timing.com written by Marcus MAIERHOFER
Page 16
8. Races Management
Shortcut: CTRL + F2
In order to create a new folder, right click inside the race list on the left. A new windows will appear.
In our example, we have one Event (EDRF Master Kart of Bercy).
An individual folder has been created for each category (Junior, Stars and TAG Heuer).
In each folder you’ll find all concerned races set as Qualifiying, Race or Final.
www.tagheuer-timing.com written by Marcus MAIERHOFER
Page 17
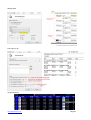
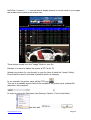
9. Timing
This is the Timing windows is visible during a race.
All passings are listed in the left window (1). Live classification on the right window (2)
On the example below, we started the decoder at 0, race of 14 laps.
Remaining laps, race time and best lap are show in the bottom window (3).
2
1
3
In the “Timing” window, you have several options:
Race selection
On the left you have little icons which helps you to recognize the race « status »
Stopped Race
Running Race (note that you cannot start a new race if another is still running)
New (blank) Race
www.tagheuer-timing.com written by Marcus MAIERHOFER
Page 18
Green Flag : Start Race / Start decoder (no passings are recorded if the Race is not started)
Yellow Flag : Safety Car out
Red Flag: Race stopped by race direction, passings are still recorded
Checkered Flag: Manual Race finish (note that this option won’t be available if you set laps or maximum
race time)
Stop Race / Stop decoder. A warning window will appear.
All informations will be listed in the passing list with race time or time of day:
9.1.1.
Import events or championchip
You can import events or
championships easily from Elite
file or Data networking folder.
The drop-down list shows all the
events found in the source data.
Import all events:
All events from the drop-down
list will be imported.
You can also import only a race for example, in this case, just select the race.
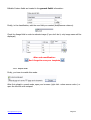
Import database:
Allow importing the database, competitors with the same ID will be overwritten.
If data to import already exist on your PC, it will
be replaced.
www.tagheuer-timing.com written by Marcus MAIERHOFER
Page 19
Export events or championship
You can export events or
championships easily.
Exporter all events:
All events from the drop-down list will
be exported to a Elite file.
Export selected events:
Exports selected event from the dropdown list. You can export several
different events at the same time.
You can also export only a race for
example. In this case, just check the
race
www.tagheuer-timing.com written by Marcus MAIERHOFER
Page 20
10. Track installation example
10.1.1. Start at the Time of Day (TOD Start)
Start/Finish with Elite decoder or Chronoprinter 540 (Starting schedule)
IMPORTANT
Note that if you use Distant decoder for Splits, the distant decode should be GPS synced (optional).
Normal distant decoder starts at 00:00:00 when they get the synchro signal from the Elite Decoder
over RS485. For settings, please refer to “decoder settings software” (Chapt.15).
Go into the Race management
Double click or right click on your race folder
Parameters
For the « Start loop » leave the stopwatch option empty and select « Starting schedule »
Then you’ll have to assign starting schedules to all competitors (competitors / Assign starting
schedule)
Select all competitors and enter an approximate Start Time (this will be corrected afterwards
when we get the TOD from the Chronoprinter).
www.tagheuer-timing.com written by Marcus MAIERHOFER
Page 21
Apply. You’ll see that the Start Time column is updated.
Then go to timing
Green Flag and wait the CP540s signal. Pass (assign no competitor).
Copy Start time and select all competitors in the right window.
Click right…. And select Start Time.
Finally Set the start time you get
When Competitors cross the finish line (with a Photocell passing) so you’ll have to set the ID
number manually as you are not using Transponder.
Elite will automatically consider that the competitors ended the race (checkered flag) and display
race time.
10.1.2. Race start at 00:00:00
Lap Timing with 2 splits and speed measuring loops
Same Start – Finish loop connected to STA
Distant 2 loops connected over RS485
Loop setting B01 (second loop is automatically incremented +1, so in our example B02)
www.tagheuer-timing.com written by Marcus MAIERHOFER
Page 22
11. Print Settings
You can set all list of officials:
Sharing the “Config” folder on the network allows you to share all templates also
Print the classification: During an endurance race, you can make timeslot rankings
www.tagheuer-timing.com written by Marcus MAIERHOFER
Page 23
Starting Grid
Print Lap by Lap:
TV Broadcasting
www.tagheuer-timing.com written by Marcus MAIERHOFER
Page 24
Example of Race incidents:
Print lap Chart:
12. Remote Display
Start Remote display on the concerned laptop.
You can even run remote display on the same computer if a second display is connected for
example. In this case, use the loopback Network address 127.0.0.1
The Channel correspond to your setting in Elite v3. Different display settings can be set on each
channel.
www.tagheuer-timing.com written by Marcus MAIERHOFER
Page 25
You may select the information to be broadcasted on each channel and display only information
required on each remote screen.
Default Port number is Port 14000. You’ll have to change those settings if other network software
are using the same one.
The TV Settings are available for each Race folder
or double clic on the folder and go into Option
You may change all fields. In order to get all available fields you’ll have to click on each columns setting
www.tagheuer-timing.com written by Marcus MAIERHOFER
Page 26
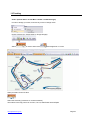
13. Tracking
need a special add-on on the Main “master” hardlock dongle)
In order to design your track, ensure that you are in Design mode.
Import a Picture (ex. Google earth or Google images)
Select
in order to start trace
with straight line or curves.
Same procedure for the Pit lane
Select the track way (clockwise or counterclockwise)
Then select each loop point even for Pit in, Pit out, Start/Finish line and Splits
www.tagheuer-timing.com written by Marcus MAIERHOFER
Page 27
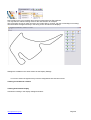
Don’t forget to save your racetrack and note the log directories for Elite software.
You may start the vehicle tracking mode for the race direction for example.
They may follow all cars on track and even set a Yellow flag on a sector, full yello or Red flag is necessary)
This information will appear directly in the timing screen and all remote displays.
Settings are available in the same window as the Display Settings
You have to select the right directory were the designed tracks have been saved.
Tracking as standalone software
Tracking with Remote Display
Activate the tracking in the display settings and select
www.tagheuer-timing.com written by Marcus MAIERHOFER
Page 28
In the display settings (Folder settings / Options)
Enable the display TV output.
In options you may activate the tracking on the remote display (note that all settings may be different for each
chanel)
Finally enable the tracking, set size and zoom factor
www.tagheuer-timing.com written by Marcus MAIERHOFER
Page 29
14. Live Timing
The live Internet can send the race in timing on the Internet.
The software uses a FTP connection to send the file. You must have an FTP server visible on the Internet to
see the result.
You can customize the file of live Internet using the expert mode.
You will find all settings in Options / Default event settings or set all parameters for each race folder:
Complete all requested fields:
Host: url of your ftp server (in our example: www.tagheuer-timing.net)
www.tagheuer-timing.com written by Marcus MAIERHOFER
Page 30
Port: port listening of your server (default setting is usually 21)
Passive mode: « Yes » The passive mode is recommended when the client is located
behind a firewall or a Network address translator (NAT). In this mode, all TCP sessions a
created directly from the client.
User: user name or account name
Password : user or account password
Remote folder: Remote folder is the basic root folder on the hosting server where you
Publish your site's files. Usually called public_html. After connecting to server, you may not
see this folder so you must expand the directories.
Timeout: The TCP port usually used for FTP connection is port 21. Most often the reason
for FTP time out is that your firewall or Internet service provider blocks this port or because
your FTP client is NOT set to use Passive mode. First of all you should make sure that you
use Passive mode with your FTP client. Then, if the problem persists, you should run a
check of the connection between your computer and the port 21. If there is a problem with
the connectivity you should try disabling your local firewall, or, if this does not help, you
should contact your Internet Service Provider.
Remote file: html page name (where the live timing is generated)
(in our example : test.html)
Upload frequency: updated information in second
With
your server.
you can test the connection to
In the toolbar on the bottom you can check if the information is being sent.
The live timing window can be modified, you may add or remove columns depending on the
race you are timing.
www.tagheuer-timing.com written by Marcus MAIERHOFER
Page 31
If you want show the Flags and images, you’ll need to create an “image” folder on your ftp.
You can find those images in the root folder of “remote display”. Upload a copy of this
folder.
The live Timing can even be displayed on smartphones with an Internet Navigator:
www.tagheuer-timing.com written by Marcus MAIERHOFER
Page 32
Until Elite v3 version 3.1.29 you are able to display pictures in normal mode on your pages
and enhance those pictures on mouse over.
Those picture should be in the “image” folder on your ftp.
Example: You want to display the picture of GT Car Nr. 32
Upload your picture (im .png format) on your ftp (drop it inside the “image” folder).
Ensure that the name is not used by another picture or category.
In our example, the picture name will be GT32.png
Then set in a available custom field of the competitor the picture name (without file
extension). Here custom3.
In order to change the field name (see Settings / Options / Text of the fields )
and then edit :
www.tagheuer-timing.com written by Marcus MAIERHOFER
Page 33
Editable Custom fields are located in the general fields’ information:
Finally, in the classification, add the new field you created (Add/Remove columns)
Check the Image field in order to activate image (if you don’t do it, only image name will be
displayed)
After each modification:
Don’t forget to save your template
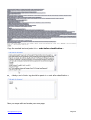
14.1.1. Expert mode:
Firstly, you have to enable this mode.
After first upload in normal mode, open your browser (right click « show source code ») or
open the html file with notepad.
www.tagheuer-timing.com written by Marcus MAIERHOFER
Page 34
Copy the marked text and paste it in « code before classification »
</body> and </html> tag should be paste in « code after classification »
Now you maye edit and create your own page.
www.tagheuer-timing.com written by Marcus MAIERHOFER
Page 35
<head><title>TAG Heuer Professional Timing</title>
<!—Title of your Webpage -->
<meta http-equiv=Content-Type content="text/html; charset=utf-8">
<style type="text/css">
<!-body {font-family: Verdana, Arial, Helvetica, sans-serif; font-size: 62.5%; text-align: center;
margin: 1em; background-color: #FFFFFF;}
<!—color of the best time, here in bold text -->
#menu a{margin: 0 10px; font-size: 1.4em; color: #0000FF;}
h1 {font-size: 1.6em; text-align: left; font-weight: bold; color: #000000; margin: 1em 0
1em 0;}
img {border:0;}
table {background-color: #BBBBBB;}
td {vertical-align: middle;}
.logo {float: right;}
<!-- -->
.HeaderRow {font-weight: bold; background-color: #0046D5; color: #FFFFFF;}
<!-- -->
.OddRow {background-color: #FFFFFF;}
<!-- -->
.EvenRow {background-color: #DDDDDD;}
<!-- -->
.BestOverall {color: #800080; font-weight: bold;}
<!-- -->
.Best {color: #008000; font-weight: bold;}
<!-- -->
7.3 Netmessage
This software is a network messenger. Language is automatically set as your Computer OS.
Should run on each computer on the same LAN.
Computer ID will appear automatically in the main Window
Double click on the Computer of your choice open the chat window.
www.tagheuer-timing.com written by Marcus MAIERHOFER
Page 36
Note that an option « SEND TV » is available. This feature sends your texte message on all remote
display connected on your network.
Some standard and redundant message can be saved inside the message.txt file.
This file should be saved on the root file were Netmessage is fired up.
In order to get the setting window: right click on the Netmessage icon in the taskbar
and select « Options »
Message settings for TV can be edited (font color, background, size etc..)
www.tagheuer-timing.com written by Marcus MAIERHOFER
Page 37
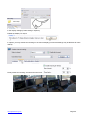
15. TAG Heuer by LYNX Photo-Finish Camera
This feature able you to get TAG Heuer by Lynx Photo-Finish Camera pictures directly into Elite V3.
Both devices should run on the Network and should be synchronised.
Install the special script on the Lynx Root file (eg. C:/Lynx….),
this script is available on: www.tagheuer-timing.net/script/THbL_EliteV3.zip
15.1.1. TAG Heuer by Lynx settings
Activate the dedicated module in “Image/Options/General”
Set Remote control on “Network listening” on port 13000
Then activate the Scoreboard module in the same window.
- Select the script you saved inside the Lynx install file.
- Set the serial port on Network listening on Port 13001
Precision on a thousandths of a second.
The Image module allows you to get the pictures into Elite
The Scoreboard module helps you to get all frames identified manually by the Camera operator
www.tagheuer-timing.com written by Marcus MAIERHOFER
Page 38
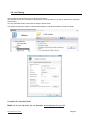
15.1.2. Elite V3 settings for TAG Heuer by Lynx camera
All camera settings are available in the Main settings.
- Select “Lynx Camera” and enable both options
The Lynx directory should be the same as the Computer were the camera is connected and running on the
same network. Please refer to chapter 2.1.1 in order to share directories.
At any moment you may request the picture directly from the timing window.
Enter the race time and click on « search ».
This window will automatically appear if you plugged a photocell on the decoder and set a
Transponder/Photocell signal delta time (in milliseconds)
Settings / Options / Timing
www.tagheuer-timing.com written by Marcus MAIERHOFER
Page 39
If the Camera operator identifies a passing on the Lynx Software manually a pop up will ask you to add a Lynx
dataframe in Elite V3
IMPORTANT NOTE :
The script sends the complete ranking at every export.
Only Elite V3 detects if a passing is missing or not.
If you leave Elite V3 where 5 competitors have been identified, Elite V3 will propose you to save those 5
competitors again on next Lynx export.
www.tagheuer-timing.com written by Marcus MAIERHOFER
Page 40
16.
OLED Messenger
(note that the language will set automatically on the same language as your computer OS )
For Hardware (Onboard display) instruction please refer to it’s user manual
16.1.
OLED Messenger.exe settings
Select the COM port of the transmitter (tool)
A radio and network Spy is available (there you can check what's happening on the network and what the
transmitter sends/receives)
Network settings are available in order to connect to Elite Software and even OLED Messenger (Remote).exe
installed in the race direction. All port should correspond to each software in order to interact.
www.tagheuer-timing.com written by Marcus MAIERHOFER
Page 41
Oled messenger software can send a global message to all “connected” Oled Messengers
There you can select different message to send and even change the colour.
MAIN MENU:
STOP : This button will stop any transmission
GREEN FLAG : Sends a general Green Flag to all competitors. Note that even Tracking, Oled remote
and Elite may send the general green flag
YELLOW FLAG : Sends a general Yellow Flag to all competitors. Note that even Tracking, Oled remote
and Elite may send the general yellow flag
SAFETY CAR : Sends a general « SC » information. Note that even Tracking, Oled remote and Elite
may send the general SC information.
RED FLAG : Sends a general Red Flag to all competitors. Note that even Tracking, Oled remote and
Elite may send the general Red flag.
STOP and GO : Sends the Stop and Go order to one Oled. Set the competitor number and click OK
DRIVE THROUGH : Sends the drive through order to one Oled. Select the competitor number and click
OK
CANCEL : Cancel last information sent. Select the competitor number of which the message should be
deleted.
SEND MESSAGE : Sends a personnal message on the bottom of one Oled Messenger. Select
competitor number and click OK.
CANCEL MESSAGE : Cancel last message sent. Select the competitor number of which the message
should be deleted.
In the main window you’ll get all information regarding the connected Oled Messenger.
-
Nr. : Competitor number
OLED: Oled Messenger serial number
www.tagheuer-timing.com written by Marcus MAIERHOFER
Page 42
-
Pos.: Competitors position
Lap: Number of laps
Lap Time: Last Lap time
Gap: Difference
Penality:
Message: Message sent
ACK: Acknowledge
Time:
On the bottom you’ll find how many Oled Messenger are detected.
Your IP address, connected clients, the time of day and the General Message displayed.
In the main Window you’ll see all connected Oled Messenger and miscellaneous information as:
-
Vehicle number
Oled Serial number
Position
Laps
Gap (previous car or between it’s best lap in Qualifying)
Penalties (if applied)
Message (last message sent)
Acknowledge signal (reception confirmation of all broadcasted messages/information)
Time of last information received
www.tagheuer-timing.com written by Marcus MAIERHOFER
Page 43
16.2.
Elite.exe settings
Enable the OLED Transmission on Elite and set the IP address of the computer were the Oled Messenger
software is running. Remote port should be the same on OLED Messenger.exe
Note that all computer should be on same network and gateway.
If you are using the same computer (Elite V3 and Oled Messenger running on same computer) you should use
the loopback address 127.0.0.1
www.tagheuer-timing.com written by Marcus MAIERHOFER
Page 44
17. Decoder Setting
17.1.
Software “Decoder Setting”
This application allows you to set different parameters of the new decoder Elite “TAG Heuer by
Chronelec”.
It allows you also to test communication (Ethernet, RS232),
”New feature”
It replaces the previous software “Test Decoder” provided by Chronelec.
IMPORTANT
Only with new generation of Decoder you can change the setting with the software.
For Decoder Elite
since serial number 968
For Decoder Protime since serial number 2072
For Decoder Distant since serial number 3049
17.2.
Elite Decoder
The Decoder is a highly precise timing device which allows you to:
Identify the passing of transponders and associate with a passing time
The Elite decoder allows the management of speed and intermediate loops via RS485 or RF
modem.
The Elite decoder memorize the transponder passing information internal memory
Sends passing information to a computer using our Elite V2 software or third party software.
The Elite decoder is equipped with an internal battery with autonomy up to 2 hours, operational
with passive loops only.
The Elite decoder is specifically used in races that require a resolution of 1/1000th of a
second.
The decoder has an Ethernet and RS232 interface for communication with the computer.
www.tagheuer-timing.com written by Marcus MAIERHOFER
Page 45
18. “Decoder Setting” – Commands
18.1. Menu Option
On the top – left, you find a menu “Option” which allow you to
• Update the Decoder with a new Firmware
1. You have to switch OFF the Decoder
2. Press button ENTER and maintain it and Switch ON the Decoder
3. Go into the Menu Option – Update, Select the file and press OK
4. After the update, you have to switch OFF / ON the decoder
•
Change the language
18.2. Decoder
You have the possibility to communicate with the new decoder via
• Ethernet protocol (IP Address)
• RS232 (19200 bds)
• Protocol: should be Chronelec v3 (2009)
For the IP address, please refer to the chapter below (chapter 3.2)
18.3.
Commands
You have the possibility to visualize the frames send by the decoder
“STA” + Transponder ID = Loop STA
“BOX” + Transponder ID = Loop BOX
“STA 000255” = Input 1
“BOX 000255” = Input 2
www.tagheuer-timing.com written by Marcus MAIERHOFER
Page 46
Several commands are available
Start:
Allows you to start decoder as during a race.
This start could be done also with the small button “Enter” situate to the front face of
the decoder.
Stop:
Allows you to stop decoder
Status:
Will display the status of the decoder
The frame : [00:00'00" 43 02 25 05]
00:00'00"
Time
42
Noise on STA loop
02
Noise on BOX loop
25
Level of detection STA
15
Level of detection BOX
Acknowledge On each passing frame you have can acknowledge it manually.
Without this function, the frame will be resent automatically.
Repeat
Allows you to repeat the last frame
Clear
Clear the windows
You have the possibility to change the level of detection STA and BOX
To check your setting, press “Status”
Important
You have the possibility to see the setting and Status directly to the small LCD of
the decoder
Please refer to the chapter 4 of this document.
18.4.
Decoder Time
This setting allows you to modify the time of the decoder.
You can change manually the time by using
• Time of your computer
• Selected time
To see result of this setting, use the button “Status”
Important
It is necessary to Stop / Start the decoder to take the Time set into the data frame.
Note that you can also (in the Setting) get the GPS time (chapter 3.1)
18.5.
Decoder Date
This setting allows you to modify the Date of the decoder.
You can change manually the time by using
• Date of your computer
• Selected date
www.tagheuer-timing.com written by Marcus MAIERHOFER
Page 47
Note that you can also (in the Setting) get the GPS time (chapter 3.1)
18.6.
Distant decoder
With this setting, you have the possibility to set the loop of the distant decoder.
The loop of all distant decoder could be defined with this software.
!! Coming soon!!
18.7.
Noise level
Noise (STA) / (BOX) will show you on the value of the noise detected to each loop, without using the
button “Status”.
It is possible for any reason to send the “Status” automatically every 5 sec. It is very useful to check
and visualize the noise level.
www.tagheuer-timing.com written by Marcus MAIERHOFER
Page 48
19. “Decoder Setting” – Settings
This menu allows you to configure all available setting.
Running Time to Time of the decoder
ON: the decoder will be sending the frame with the time of the day.
OFF: the decoder will send the frame with Start at Zero
It is important to set this correctly. If your decoder is connected to some other timing devices
(Chronoprinter for example) we are recommend to running with “Time of the Day” ON.
Detect transponders on the maximum level of detection
ON: the system will search the maximum of detection from the loop. It is specially used for
the race where transponders are not in a fix position (example: roller, running, where
RC transponder is located to the ankle.
The system will wait that the transponder has passed completely the loop to calculate
the maximum before to time the result.
OFF: on all other case, where the transponders are in a fixe position (bike, MotorSport,
Karting). In this setting, you have to adjust the level of detection (see chapter 2.2)
This setting give higher precision if the level of detection is correctly set.
GPS Synchronizsation
You have the possibility to connect your decoder to a GPS antenna.
Set the Time Zone before to Save value.
You have the possibility to visualize on the Decoder, the status of the GPS (see chapter 4)
www.tagheuer-timing.com written by Marcus MAIERHOFER
Page 49
Print passing on the serial printer ”New feature”
You have the possibility to print the passing frame directly from the Decoder.
The connexion is
GND : pin 10 of the SubD-15P
Tx
pin 3 of the SubD-15P
Rx
pin 4 of the SubD-15P
Hence to our Multi-box decoder, you can connect directly our HL200 Serial printer directly to
the Decoder
WARNING
You cannot get in same time the Printer ON and the Distant Decoder.
We recommend to change the setting of the Serial Printer HL200
SW 1 : OFF (UP) – 48 character per line
Distants decoders connected with RS485 / RS232
In standard, the communication between Elite Decoder and Distant Decoder is in RS485
Hence, you have the possibility with option to communicate in RS232
WARING
You cannot get in same time the Distant Decoder and Printer ON set
Distants decoders connected with fiber optic ”New feature”
This new item is avalaible only in option (hardware option on the decoder)
Generate a synchronization signal at each interval (min)
You have the possibility to send a synchronize signal from the Decoder.
The Pin 5 and 7 of the SubD-15p are using for that.
!! Coming soon !!
Synchronize running time at cells signal
It is possible to synchronize decoder with other timing device with an external Impulse
(Input 2) from Sub-D15P.
You have to set the time you want to make a synchro signal, and connect a Manual Contactor
on the Input 2.
Once you have saved the configuration, you have to stop the decoder.
On the next Impulse on Input 2, you will start the decoder and it will synchronize.
Warning:
If you stop the decoder and restart it without any change of the setting, you will
synchronize the Decoder.
Language
www.tagheuer-timing.com written by Marcus MAIERHOFER
Page 50
Allow the possibility to change language (in French and English only)
Two language are available:English and French
Tone loops
Allows you change the tonality of the beep for each loop.
Use the connector Audio on the front face of the decoder
Read
It allows you to read the setting of your decoder.
Save
It allows you to save the setting from “Decoder Setting” software to the Decoder.
You have to use this, after changing setting.
19.1.
IP Settings
You have the possibility to change the setting of IP Address of your decoder.
For that you have to insure that your PC has a fix IP address.
IP Address:
The first 3 blocks (in my example: “169.254.031”) has to be similar between your PC
and your decoder.
The last block “200” has to be different between your PC and your decoder.
Insure that no other material (Chronoprinter, Photo-finish) are connected to the LAN
with the same IP addres.
Mark:
Should be always “255.255.255.000”
Gateway:
Allow to specify your router address
Not useful if your computer is connected to a switch with the decoder.
If not use, select:: “000.000.000.000”
Remote host: Allow to specify your router address. It is the remote IP address which receives
passing’s from decoder. You can specify a unique computer or a broadcast address. If
you specify a broadcast address, all computers in the same network address will
receive passing’s. For example if your network is 192.168.0.0 and your subnet is
255.255.255.0, the broadcast address is 192.168.0.255
www.tagheuer-timing.com written by Marcus MAIERHOFER
Page 51
”New feature”
Thanks to the new Decoder, it is today possible to receive on the SubD-15p connector, two inputs
signal from Photocells, Start Gate or other detection devices.
TAG Heuer Timing provide to simplify connection our “Multibox decoder” TCD-COM.
Font:
Input 1: Photocells
Input 2: Photocells
RS485 : communication with Distant Decoder
Black: RS485 A
Green: RS485 B
SubD-9P:
Pin 1: NC
Pin 2: Tx RS232
Pin 3: NC
Pin 4: RS485 A
Pin 5: GND
Pin 6: NC
Pin 7: RS485 B
Pin 8: NC
Pin 9: NC
Back
SubD-15P
Copy of the SubD-15P of the Decoder
www.tagheuer-timing.com written by Marcus MAIERHOFER
Page 52
20. The decoder
The new decoder has not the possibility to change setting directly from the Decoder.
You have to use “Decoder Setting” software to change.
20.1.
General information
20.1.1. Noise
The noise is an indication of a higher interference level received by the system.
- A loop with a noise level of 0 corresponds to perfect so the decoder will detect the
transponders at the highest.
- A loop with a noise level between 0 and 35 allows the decoder to detect the transponder
in normal use without problems.
- A loop with a noise level between 35 and 45: there is a risk that the decoder will fail to
detect a transponder.
- A loop with a noise level of over 45: there is very little chance that the decoder will detect
the transponder on the loop.
If the noise level is higher than 45, it is necessary to check all the of the system cables
including (loop wire, resistance of the passive loop, coaxial cable, BNC connectors…) and
make sure there is no electronic equipment within 2 meters of the loop ( LAN and printer
cables, short-wave radio station, electricity or generator near any of the cables or timing
loops., …) which may be the cause of increased noise.
Note:
A decoder, without connected loop can already show a noise level between 2
and 8 points.
The important thing is to check the detection range of the transponder directly
over the loop.
20.1.2. Level of detection
You can change this parameter in the setting page of the decoder to increase the accuracy.
- 0 is the maximum sensitivity of loop / transponder detection
- 95 is the minimum sensitivity of loop / transponder detection (usually with this setting, you
will no longer detect the transponder).
By default the decoder is already programmed with a level of detection of 10.
www.tagheuer-timing.com written by Marcus MAIERHOFER
Page 53
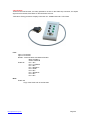
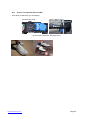
20.2.
Front panel of the Elite decoder
Jack plug: MAN
Used to connect a Manual Contactor (HL18) to give impulses manually.
Warning: this input could be not use as precise input (only for manual purpose).
Received frame <STA> with ID Nr. 255
Jack plug Audio
Allows you to connect computer speakers or headset in order to listen the beeps emitted at
each transponder passing.
You can set the beeps frequency in the menu “TONALITY BEEPS” (setting from “Decoder
Setting”)
LED
LCD
STA
Box
Tx
Flashes red when a passage of a transponder is identified by the “STA” loop.
Flashes red when a passage of a transponder is identified by the “BOX” loop”.
Flashes red every 10 seconds. It is to confirm that the decoder sent the
synchronization to the distant decoder (only with Elite decoder) Led Indicator “Tx” will
flash red when a passage of a transponder is identified by the intermediate loops. This
led indicator also allows you to visualize the number of intermediate loops connected
to the decoder.
ON
Indicated that your Decoder is ON (on battery or on the sector)
”New feature”
Two lines display allows you to get the setting of your decoder (without “Decoder Setting”
connected.
Main Menu
A
B
C
D
A: Race Time information
B: Time of the day
C: Status: Loop / Level of reception (last passing)
D: Transponder serial number (last passing)
www.tagheuer-timing.com written by Marcus MAIERHOFER
Page 54
Menu button
This button allows you to navigate into the different setting information.
It automatically comes back to the main display after couple of second.
Main menu:
Each time you press the Menu button, you change as follow
1. Loops Noise
(value BOX / STA)
2. Loops Level
(value BOX / STA)
3. Detect Max
(Yes / No)
Prot.
(protocols of the decoder)
4. GPS Sync
(Yes / No)
Time of Day
(Yes / No)
5. Time Zone
(value)
GPS Status
(Wait / OK)
6. IP Address
(value)
7. Subnet
(value)
8. Gateway
(value)
9. Remote Host
(value)
10. Print
(Yes / No)
Ext. Sync
(Yes / No)
11. In Sec
(Yes / No)
Time Sync
(value)
12. RS Inte.
(Yes / No)
Opto Into
(Yes / No)
13. STA Tone
(value)
BOX Tone
(value)
14. MAN Tone
(value)
Cell Tone
(value)
15. BXX Tone
(value)
16. ID / Version
Power
(ON / OFF) – if the decoder work on battery or on sector
Button Enter
Allows you to Start the decoder manually
Internal Memory
---------------------------- coming soon------------------------------
www.tagheuer-timing.com written by Marcus MAIERHOFER
Page 55
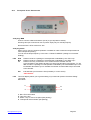
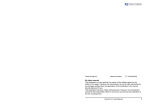
20.3.
Rear panel of the Elite decoder
A : 12Vdc Power supply connection
B : RJ45 connection (192.168.0.10 default address) to computer. Cannot be used at the same time
as the RS232
C : RS232 connection (19200,N,8,1) Cannot be used at the same time as the RJ45!
D : DB 15 Auxiliary connection (Pinout available upon request)
E : BOX input loop (Option : Often used for Pit In/Split timing)
F : STA input loop (often used for Start/finish line)
G : GPS connection
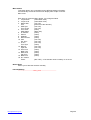
20.4.
Pin-out DB15
1 : Input Cells 1 +
2 : Input Cells 2 +
3 : TX RS232
4 : RX RS232
5 : +12 V
6 : Resitance RS485
7 : Output 1
8 : Output 2
9 : Input Cells 1 10 : 0 V
11 : 0 V
12 : Input Cells 2 13 : +12 V
14 : RS485 A
15 : RS485 B
www.tagheuer-timing.com written by Marcus MAIERHOFER
Pin-out for input cells
1
12V
Input 1
Input 2
Page 56
21. Decoder technical specification
Specification:
GPS Synchronization
Intermediate loops (up to 10) – option up to 32 loops
Clock stability : Oscillator TCXO 0.5 ppm
Power : 12 VDC via adapter
Temperature range : -20 à 55 °C (-4 à 131 °F)
Dimensions : 160 x 100 x 52 mm (6.3 x 3.9 x 2 in)
Resolution : 0.001 s
Detection loop :
Maximum width of the track (passive loop) : 25 m (82 ft)
Maximum width of the track (active loop) : 10 m (33 ft) I throught this was 15 meters
Maximum length of the coaxial cable (passive loop) : 100 m (330 ft)
Maximum length of the coaxial cable (active loop) : 50 m (164 ft)
Over those distances, use Distant Decoder to insure good timing
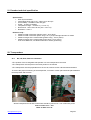
22. Transponders
22.1.
RK, LS, Elite, Elite Pro installation
• The position of the rechargeable transponder or a wire transponder is the same
• The transponder must be place in the same position in all vehicles
• The transponder must be perpendicular to the circuit, because it uses a directional transmission
To ensure the proper functioning of the transponder, no metal or carbon part should be place between
the transponder and the track
Wired Transponder as LS Wire or Elite Wire should be powered on +12V continuous power
Red or brown wire: + 12V
Black or Blue wire: 0V
www.tagheuer-timing.com written by Marcus MAIERHOFER
Page 57
22.2.
Passive Transponder (RCS and RC)
TAG Heuer provides two type of brackets:
The Neoprene strap
and the Bike bracket
As the Active tranponder, the beam of the
www.tagheuer-timing.com written by Marcus MAIERHOFER
Page 58
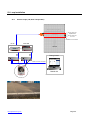
23. Loop Installation
23.1.
Passive loops (LS, Elite Transponder)
Max. width : 25 m (82 ft)
Cable 1 conductor minimum
0.75 mm²
65 cm (25 in) for
asphalt track
80 cm (32 in) for
dirt track
Resistance : 470 Ohms
PROTIME
ELITE
TRACK
or
Timing Center
or
RS232 or TCP/IP connection
TIMING PC
BNC
Connector
www.tagheuer-timing.com written by Marcus MAIERHOFER
Page 59
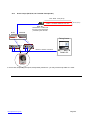
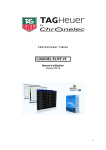
23.2.
Active Loops (RCS, RC, RCT and RK Transponder)
Max. width : 25 m (82 ft)
Wire loop
Cable 1 conductor minimum 0.75 mm²
80 cm (32 in)
Black Box
Led flashes to confirm that
the loop is connected and
powered by the decoder
ELITE
PROTIME
or
Timing Center
A
ST
A
ST
or
RS232 or TCP/IP connection
TIMING PC
BNC
connector
In some case, depending the speed, transponder position etc. you may set the loop width at 1 meter
www.tagheuer-timing.com written by Marcus MAIERHOFER
Page 60
Question / Answer
I can not detect the decoder.
Check the COM port or IP address of the decoder. Check the protocol selected.
If you have a red dongle, you can not detect the decoder. One possible remedy is to click on test button at the
same time that the PC has the blue dongle.
What does STA and BOX mean at bottom left ?
STA means noise (disturbances) on the main loop (START) and BOX means noise on the pit lane loop.
I receive BOX passings.
You probably have an inverted loops decoder. The BOX loop is normally used for the pit lane.
My classification is false.
Check the type of classification of the race. You may have selected classification on best lap, instead of being
on the total laps (or vice versa).
You may have to check whether you have staggered start enabled, if your race is not a staggered race.
All passings are orange and I have no classification.
The minimum lap time for passings is not respected. Edit the race settings to change the minimum time and
confirm all orange passings.
Laps of the 1st passings are not calculated.
Edit the race settings to consider the 1st first passing as full lap. To recalculate the classification, click on race
menu and then Recalculate Classification.
There is no display on the TV monitor.
Check the display settings for the graphics card in Windows; you must activate the option to extend the
Windows desktop.
Check that you have turned the channel onto TV display settings in the software.
Distant decoders are recognized by the Elite decoder but get no passings on intermediates into Elite
v3
Communication is working, check that the option « Display intermediates » is activated in the timing window
« Display intermediates and photocells passing »
www.tagheuer-timing.com written by Marcus MAIERHOFER
Page 61
TAG Heuer
PROFESSIONAL TIMING
6A Louis-Joseph Chevrolet
2300 la Chaux-de-Fonds
Switzerland
Tel : 032 919 8000
Fax : 032 919 9026
E-mail: [email protected]
Http: //www.tagheuer-timing.com
www.tagheuer-timing.com written by Marcus MAIERHOFER
Page 62