1
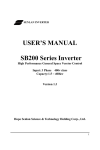
NuStep® T4r
Recumbent Cross Trainer
USER MANUAL
Contents
Introduction .........................................................................................................4
Safety Instructions............................................................................................ 5
Installation and Placement ...........................................................................6
T4r Feature Overview ..................................................................................... 7
Preparing to Exercise ................................................................................. 8-9
Console Operation......................................................................................10-11
Programs ..............................................................................................................12
Console Configuration and System Information ..............................13
Exporting Workout Data and Product Data ...................................... 14
Preventive Maintenance ................................................................................15
Warranty and Serial Number Information........................................... 16
Obtaining Customer Service and Parts.................................................17
Replacing Batteries .........................................................................................18
Cover Removal/Installation ..................................................................19-22
Technical Data ..................................................................................................23
Specifications ................................................................................................... 24
Safety Notifications................................................................................ 25-26
EMC Tables ................................................................................................. 27-30
US FCC Compliance & IEC/EN 55011 Compliance....................31
3
Introduction
Thank you for purchasing the NuStep® T4r Recumbent Cross Trainer, an
effective way to improve cardiovascular and overall fitness.
T4r recumbent cross trainers are suitable for physical therapy, cardiopulmonary
rehabilitation, sports medicine and general fitness purposes.
NuStep recumbent cross trainers set an unparalleled standard for total body
exercise. By combining a natural sitting position with a smooth stepping
motion, the NuStep works all major muscle groups, giving you an effective
cardiovascular workout in a comfortable seated position.
The unique design lets you move your arms and legs in a single, dependent,
fluid motion that simulates walking, with the added benefit of resistance
training. Working the upper and lower body simultaneously uses more muscles
and burns more calories.
As the originator of the recumbent cross trainer, NuStep is the leader in
developing total body exercise systems that are safe, effective, and easyto-use. Our products are used in healthcare facilities, wellness centers, and
senior living residences around the world, and millions of NuStep users have
transformed their lives through exercise – even when they were unable to use
other exercise equipment.
Thank you for your business and welcome to our ever-expanding network of
NuStep users.
4
Safety Instructions
CAUTION
This is the safety alert
symbol. It is used to call
attention to instructions
concerning personal
safety. Read and obey
all safety messages that
follow this symbol to
avoid possible injury
or death resulting from
misuse.
CAUTION indicates a
potentially hazardous
situation, which if not
avoided, may result in
minor or moderate injury.
It may also be used to
alert against unsafe
practices.
CAUTION
WARNING
WARNING indicates a
potentially hazardous
situation, which, if not
avoided, could result in
death or serious injury.
CAUTION
See your physician before beginning
any exercise program.
Do not use this product in the
presence of children and/or pets.
Supervision is required if you have a
disability or medical condition.
The heart rate, watts, METs and
calories displays are not suitable for
use in applications where the health
and safety of the patient may be
dependent on the accuracy of those
parameters.
Stop exercising if you feel faint or
dizzy while using this product, and
seek medical help or advice.
Use this product only as directed
by your physician if you have any
type of heart disease, hypertension,
diabetes, respiratory disease, or any
other medical problem, or if you are
pregnant.
Read this manual before using
this product and save it for future
reference.
Always wear shoes and proper
clothing when exercising.
Do not operate this product if it
appears damaged or inoperable.
Examine product regularly.
Make sure the seat position and upper
arm position are correctly setup for
you. Do not over-extend your legs or
your arm reach.
Do not let children use this product.
The maximum user weight limit for this
product is 400 lbs (182 kg).
Do not lift this product by yourself.
The T4r is very heavy, it weighs 210 lbs
(95 kg).
To avoid injury, or damage to the
product, always obtain assistance to
move this product. Use proper lifting
techniques.
To avoid injury, do not insert hands in
any cover openings.
WARNING
Do not modify this equipment without
authorization of the manufacturer.
5
Installation and Placement
Carefully unpack the NuStep from the
shipping container and transport the
product to the installation location.
Reposition and complete installation of
the electronics tube in accordance with
the provided assembly instructions.
To ensure safe and effective operation
of your NuStep, place on a flat, stable
surface. Adjust leveler feet as required.
The minimum amount of required free
space around the equipment is 18 inches
for the sides, and 12 inches for the
front and rear. Additional free space is
necessary to accommodate wheelchair
access.
6
!
CAUTION
The T4r is very heavy; it
weighs 210 lbs (95 kg).
To avoid injury, or damage
to the product, always
obtain assistance to move
this product.
Use proper lifting
technique.
T4r Feature Overview
Grab Ring
Water Bottle Holder
Console
Upper Arm
Arm Lock Lever
Armrest
Foot Pedal
Seat Swivel Release Lever
Electronics Tube
Load Lever
Leveler Foot
Seat Slide Release Lever
7
Preparing to Exercise
Swivel Seat Adjustment
Seat Adjustment
Arm Adjustment
The seat rotates 360o and
locks at 45o increments.
This provides users with
eight convenient positions
of access to facilitate easy
transfer to the seated
position. To swivel the
seat, lift up on the swivel
release lever directly under
the rear and sides of the
seat. Swivel the seat left or
right until it locks into the
desired position. To swivel
back to the original forward
facing position, lift up on
the release lever again. The
arm rests lift up and down
to allow easier access to the
NuStep.
The seat position may be
adjusted forward and back
by lifting up on the seat
release lever located directly
under the front and sides
of the seat. With both feet
on the foot pedals, push
one foot pedal all the way
forward to the end of the
pedal range limit. Lift the
seat release lever, and slide
the seat forward or back
until your extended leg has
a slight bend at the knee
(avoid over-extending your
legs and/or locking your
knees during exercise).
To adjust the upper arm
length, lift the green release
lever on the arm. Adjust the
upper arm length until your
elbow is slightly bent at the
extended point of the arm
stroke. (For many users,
the arm position number
matches their seat position
number.) Press the green
release lever down to lock
the upper arm.
Note: The seat cannot be
adjusted forward and back
as described in the next
section unless the seat is
locked in the forward facing
position.
8
This position allows your
legs to be slightly bent
during exercise; avoid overextending and striking the
pedal bumper excessively.
Try the motion to verify
the position allows for a
comfortable exercising
motion. If not, slide the
seat forward or backward
one notch until it feels
comfortable. The seat
number position appears on
the console while the seat is
being adjusted.
! CAUTION
Make sure the seat
and arm positions are
correctly set up before
exercising.
Do not over-extend
your step or reach
distance.
Preparing to Exercise
Workload Adjustment
Step Length
Foot Position
The workload adjustment
lever is located on the right
side of the NuStep. To increase workload, push the
lever forward. To decrease,
pull lever backward. The 10
different workload settings
appear on the display. The
workload is speed dependent, meaning, as you step
faster, the resistance increases.
The NuStep allows you
to determine your own
desired range of motion.
The maximum step length
is approximately 8.5 inches
(22 centimeters). For smaller
ranges of motion, simply
take shorter steps.
The NuStep’s stepping
action works virtually all leg
muscles. Instead of pushing
with your whole foot, which
works your quadriceps and
hamstring muscles, push
with the balls of your feet
to work your calf muscles.
! CAUTION
This product has arms
and pedals that move
during operation.
To avoid injury due
to contact with these
moving parts, use
caution while making
adjustments during
operation.
As shown above, your arm and leg should
have a slight bend at the fully extended point
of the stroke.
9
Console Operation
2
1
3
4
6
5
Item
Number
Name
Description
1
CALORIES DISPLAY
The quantity of calories burned during the workout is displayed in the CALORIES DISPLAY.
2
MAIN CONSOLE
DISPLAY
The
•
•
•
•
•
•
•
•
3
SPM (STEPS PER
MINUTE) DISPLAY
The stepping rate is displayed in the SPM DISPLAY.
4
WATTS/METS
DISPLAY
Watts or METS are displayed in the WATTS/METS DISPLAY and are an indication of exercise
intensity. Use the SELECT button to switch from one display to the other. Watts indicates
the amount of energy expended to maintain the workout intensity. METS, an abbreviation
for metabolic equivalents, is a unit of measure for expressing the energy cost of physical
activity. The MET level of sitting at rest is approximately 1 MET. The METS displayed will
increase as the user’s exercise intensity increases.
5
LOAD LEVEL
DISPLAY
The workload level (1 - 10) is displayed in the LOAD LEVEL DISPLAY. Use the lever below
the right side of the seat to increase or decrease load level.
6
DISTANCE/STEPS
DISPLAY
The workout distance and total accrued steps are displayed in the DISTANCE/STEPS
DISPLAY. Use the SELECT button to switch from one display to the other.
10
following functions are displayed in the MAIN CONSOLE DISPLAY:
Workout duration (minutes and seconds)
Battery charge level (during console power up only)
Seat position
Heart rate (coded Polar transmitter belt must be worn for heart rate display function)
Lap progress (track distance is a quarter mile [400 meters])
Lap counter
Pace partner icon displays if pace partner workout is selected
USB icon displays during data download to flash drive
Console Operation
B
A
C
G
D
F
E
Item
Number
Button Name
A
WEIGHT + and
WEIGHT -
To enter the user’s weight for the exercise session, push (or press and hold) the WEIGHT
+ or WEIGHT - buttons until the proper weight appears in the main console display, then
press the SELECT button. Press and hold the SELECT button to set a new default user
weight. Note: Entering user weight increases accuracy of calorie and METS outputs.
B
QUICK START
Press the QUICK START button to immediately start a basic exercise session.
C
AVG
D
RESET
E
SELECT
F
PACE PARTNER
G
(PACE PARTNER )
- AND +
6
Description
Press the AVG button to display workout averages for steps per minute, watts and METS.
Pressing the RESET button clears the current workout and allows the user to restart.
The SELECT button has two functions.
1. It allows the user to choose either watts or METS for display in the WATTS/METS
DISPLAY, and choose either distance or total cumulative steps in DISTANCE/STEPS
DISPLAY. The displayed outputs are indicated with a small triangle in the lower section of
the window.
2. The SELECT button is also used to accept an entered parameter (e.g. user weight or
steps per minute during pace partner program set up.)
The pace partner button and pace partner - and + buttons are used for the pace partner
exercise program. Please refer to the programs section of this manual for details on how to
use the pace partner exercise program.
11
Programs
The T4r recumbent cross trainer has two exercise programs, “Quick Start” and “Pace Partner”.
After adjusting the seat and upper arms according to the “Preparing to Exercise” section of
this manual, choose either the “Quick Start” or “Pace Partner” program. Note: Entering user
weight is optional for both programs. However, entering user weight increases the accuracy
of calorie and METS outputs. Refer to the “Console Operation” section of this manual for
information on entering user weight.
Quick Start
The Quick Start program is a basic program that allows users to start exercising immediately
without entering any information into the console. After pressing the QUICK START button,
begin stepping and adjust work load as needed. (Note: If the user begins stepping without
pressing any console buttons, the QUICK START program will start automatically.)
Pace Partner
This program enables users to more accurately maintain a steady pace by providing a pace
partner that is displayed in the main console window. The pace partner is represented by
blinking arrow heads that move around the lap track. The goal of the program is for users
to consistently match the pace of the pace partner as it moves around the track. During
program set up, users may select their preferred Steps Per Minute (SPM) pace.
Press the PACE PARTNER button to begin program set up. The default pace partner pace
will appear in the SPM display. To increase or decrease the default SPM pace, press the pace
partner - or + buttons until the desired pace displays in the console window then press the
SELECT button to complete the program set up. Start stepping and increase your stepping
speed so you are able to keep up with your pace partner. During your workout, you may
increase or decrease the selected pace by using the - or + buttons.
During your PACE PARTNER workout, the PACE PARTNER icon
will appear in the main
console window to indicate that a PACE PARTNER program is selected.
12
Console Configuration and System Information
Setting Date and Time
To set the console date and time, press the SELECT and AVG buttons simultaneously. Adjust
the fields using the (PACE PARTNER) - and + buttons. Use the SELECT button to cycle
through the fields. Press and hold the SELECT button to save the new date and time.
English and Metric Units
Press the WEIGHT + or WEIGHT - button. The currently configured weight will be displayed
along with either an “LB” or “KG” icon. Simultaneously press the WEIGHT + and WEIGHT buttons to switch between English and metric units of measure.
Reset to Factory Defaults
To return the console configuration to factory defaults, press and hold the RESET button until
the screen goes blank.
View System Information
To view system information for the T4r, press the SELECT and QUICK START buttons
simultaneously. Using the (PACE PARTNER) - and/or + buttons, you may cycle through with
the following system information screens:
•
•
•
•
•
•
•
•
Date and time
Total hours of use
Total hours of Pace Partner program use
Total number of steps taken
Total number of file writes to USB flash drive
Product serial number
Software boot loader version
Console software version
13
Exporting Workout Data and Product Data
Exporting Workout Summary Data
To export a workout summary file, insert flash drive into console USB port and upon
completion of workout, press the RESET button. A .csv file will be saved to the root of the
flash drive. Wait for the displayed USB symbol to stop blinking before removing the flash
drive from the console.
Exporting T4r Product Summary Statistics
To export a product data summary file, insert flash drive into console USB port and press
SELECT and WEIGHT - buttons simultaneously. A .txt file will be saved to the root of the flash
drive. Wait for the displayed USB symbol to stop blinking before removing the flash drive
from the console.
Data Logging
If a flash drive is inserted into the console USB port at the beginning of a workout, a .txt
file with incremental workout data will be saved to the flash drive approximately every five
minutes. The data is compatible with the web based Interactive Health Partner. Note: The
USB symbol on the console will not appear during the first five minutes of the workout.
Thereafter, the USB symbol will appear and will blink when data is being downloaded to the
flash drive. To ensure that all workout data is properly downloaded to the flash drive at the
end of your workout, do not remove the flash drive from the console until your workout is
complete, the workout timer on the main console display has stopped and the USB symbol
has stopped blinking.
14
Preventive Maintenance
Preventive Maintenance Intervals
Although your T4r is designed to be maintenance free, a few tasks are recommended to
increase the useful life of the NuStep. Please follow the recommended preventive maintenance
intervals according to the amount of usage that the NuStep receives. These are estimated
intervals and you may need to increase or decrease the time period between preventive
maintenance depending on your actual use.
ITEM
TA S K
FREQUENCY
Arm
* Clean
Weekly
Console
* Clean
Weekly
Covers and Frame
* Clean
Weekly
Seat
* Clean
Weekly
* Use a non-abrasive spray cleaner and a soft cloth to clean the NuStep.
15
T4r Warranty
To view your warranty online, go to: www.nustep.com
If you have any questions about your warranty, please contact customer service,
800-322-4434 or [email protected].
For international customers, please contact your local distributor for
warranty details.
T4r Serial Number Information
Location on the product:
The serial number is located on the rear support tube of the main frame (see image
below).
J
I
H
G
A
B
F
C
D
16
A
Manufacturer’s name and address
B
Model number and description of product
C
Serial number and date of manufacture
D
Quality management system registered to ISO
standard
E
WEEE Directive Mark
F
International patent protection for the product
G
Consult the user manual before use
H
Attention read accompanying documents
I
Type B applied part for electrical safety
J
CE Mark
E
Obtaining Customer Service and Parts
STEP 1 - Identify the problem.
Speak with the person who reported the problem to get a good
understanding of the problem.
STEP 2 - Verify the problem.
Inspect the cross trainer, and determine what parts may be required to correct
the problem. Figures and parts lists may be obtained from the NuStep, Inc.
web site or by contacting customer service.
STEP 3 - Contact NuStep, Inc. customer service.
Please have the serial number and a complete description of the problem so
our product specialists can better assist you.
Product specialists can be reached via e-mail, phone or fax at:
E-mail:
Phone:
Fax:
Address:
Web:
[email protected]
800-322-4434 or
734-769-3939
734-769-8180
NuStep, Inc.
5111 Venture Drive
Suite 1
Ann Arbor, MI 48108 USA
www.nustep.com
Customers outside the US and Canada, may obtain customer service by
contacting their local NuStep distributor.
17
Replacing Console Batteries
Tools Required
None
1. Use coin to remove battery access panel.
CAUTION
Do not dispose of batteries in a fire.
The batteries may explode.
Do not open or mutilate batteries.
They contain an electrolyte which
is toxic and harmful to the skin and
eyes.
Replace batteries with the same
number and type of batteries as
originally installed in the equipment.
2. Replace the 4 AA alkaline batteries.
(NiMH rechargeble batteries may also be
used.)
Note: Ensure batteries are properly
installed in the correct direction as
indicated by battery and polarity symbols
in console battery case.
3. To replace battery access panel,
horizontally align slot of the quarter turn
fastener before pressing it into square
hole of the console.
18
Recycle batteries in accordance with
local recycling procedures.
Cover Removal / Installation
1.
Remove seat rail
cap bolt.
Tools Required:
• Phillips screwdriver
• 3/16” hex wrench
• Scratch awl (use
to align holes
before screws)
2.
3.
4.
Remove seat rail
cap.
Roll seat off of
seat rail.
Keep upward
pressure on front
of seat to prevent
scratching end of
seat rail.
!
CAUTION
The T4r seat
assembly is heavy;
it weighs 50 lbs (23
kg). To avoid injury,
or damage to the
product, use caution
when removing or
installing. Obtain
assistance as
required. Use proper
lifting technique.
Remove 6
screws from top
cover.
Note: In center
of top cover,
only 2 screws
are used in the
forward 2 holes.
19
Cover: Removal and Installation
20
5.
Remove top cover.
6.
Remove 2 screws.
7.
Slide boot up out of way.
Remove screw from front.
8.
Remove screw from rear.
Cover: Removal and Installation
9.
Remove left side cover.
Pull rear outward, then front
end.
10.
Remove right side cover.
Pull rear over wheel and workload
lever, then front end.
To Re-Install Cover:
• See next page for cover installation instructions.
21
Cover: Removal and Installation
1.
Reinstalling Covers:
• To install covers, follow
cover removal steps in
reverse order. Note the
following:
Install front end of side
covers first...
22
2.
...then push rear of
covers over wheels.
3.
Hang side covers on
bracket directly below
seat rail.
4.
For top cover
installation, place
scratch awl in third
hole from front to
align holes, then insert
3 screws. Repeat for
opposite side.
Technical Data
Alkaline Battery
AA batteries, quantity 4, (Energizer EN91) (NuStep,
Inc. part number 41224). Note: If NuStep will not be
used for several months, remove AA batteries.
USB Port
The T4r console includes a USB host port for data
transfer. Note: USB port is for flash drive use only.
Standards
ANSI/AAMI ES60601-1, CAN/CSA-C22.2 No. 606011:08, IEC/EN 60601-1, IEC/EN 60601-1-2, EN 957-1, EN
957–8 Class SA
Directives
93/42/EEC
2004/108/EC
Marks
Eddy current resistance system
The T4r features a speed dependent eddy current
resistance system that is dependent on workload level
selected, the user step rate and the user step length.
Range
5 - 800 watts
Stepping Action
The T4r features dependent stepping action with
2”–8.5” (5-22 cm) stepping range.
Watts Testing Parameters
Displayed watt values represent the energy
consumption rate of the user. They are calculated in
real-time utilizing an algorithm based on mechanical
parameters of the machine and a measured average
ride style. The significant mechanical parameters
that influence the displayed watt values include the
inertia of the machine’s moving components, the load
level selected by the user, and the rotational velocity
of the eddy current disk. Validation testing of the
displayed watt values was performed by comparing
said value and the actual measured mechanical power
produced by multiple users. Displayed watt values
are independent of any physiological or anatomical
parameter possessed by the user.
23
Specifications
Dimensions and Weight
Frame
•
•
•
•
• Durable, heavy-duty
welded steel frame.
Length: 60” (152 cm)
Width: 27” (69 cm)
Height: 45” (115 cm)
Weight: 210 lbs (95 kg)
User Height and
Weight Limits
• Height: 4’6” to 6’4” (137 cm
to 193 cm)
• Weight: 400 lbs (182 kg)
! CAUTION
The maximum user
weight limit for this
product is 400 lbs (182
kg).
Overview
• Total body conditioning
of the cardiovascular and
muscular systems.
• Use arms alone, legs alone,
or both.
• Closed-kinetic chain
exercise.
• Low 7”–9” step-through
height for easy access.
• Biomechanically correct
workout position.
• Contralateral movement
– arm linked with opposite
leg.
• Smooth, fully connected
motion between arms and
legs.
• User-controlled step
length of 2”–8.5” (5-22
cm).
Resistance System
• Quiet, frictionless,
permanent magnetic eddy
current system with 10
workload levels.
• Four-point contact with
the floor and leveling feet
increase stability.
• Strong, impact-resistant
poly-styrene cover is easy
to clean.
Display
• Simple, one-button quick
start and reset; automatic
power on/off.
• Easy-to-read display
shows:
SPM:
5–210
Watts:
5–800
• Anodized aluminum
arms with extra-long,
comfortable hand grips.
METS:
2–24
Time:
Starts at 0:00,
counts up
• Ergonomically correct
hand position.
Steps:
Counts
cumulative
steps up to
9999
Distance:
MI or Km
• Long, 15” (38 cm) arm
adjustment range.
• Lift unit with front handle
and roll on rear wheels
or use optional NuStep
transporter device.
! CAUTION
The T4r is very heavy;
it weighs 210 lbs (95
kg).
To avoid injury,
or damage to the
product, always obtain
assistance to move this
product.
Use proper lifting
technique.
Seat and Arm Rests
• Swivel seat rotates
360o and locks at 45o
increments.
• Foam-covered seat and
swivel release levers work
from front, sides or back.
• User power output from
5–800 watts.
• Seat slides and adjusts
smoothly.
• All-belt drive.
• 15” (38 cm) forward/
backward seat adjustment
range.
• Long-life, high-grade
bearings.
24
• Powder-coated frame and
zinc-plated components
resist rust.
• Ergonomically designed
padded seat has
contoured back support.
Load levels: 10 load levels
Calories:
Up to 999 KCal
• User selects English or
metric measurement
system.
• Optional Polar® transmitter
belt enables heart rate
display on console.
• Cordless design uses 4 AA
alkaline batteries (NiMH
rechargeable batteries
may also be used).
• USB port for data
download.
Foot Pedals
• Pedals are made of
durable molded plastic.
• Four-bar linkage and
nonskid tread keep feet
secure.
For information about
optional accessories, please
visit our website,
nustep.com.
Safety Notifications
T YP E / D E GR E E O F
P ROT EC T I O N
C LASS IFICAT IO N /
I DENT IFICAT IO N/
WA RNING S
SYMB O L
Type of protection against
electric shock
Internally Powered
Equipment
The degree of protection
against electric shock
Type B applied part
The degree of protection
against the ingress of liquids
Not protected
NA
The degree of safety in the
presence of a flammable
anesthetic mixture with air or
with oxygen or nitrous oxide
Not suitable
NA
The mode of operation
Continuous
NA
Information regarding
potential electromagnetic or
other interference and advice
regarding avoidance
The NuStep® T4r
Recumbent Cross Trainers
use electromagnetic and RF
energy only for its internal
function. Therefore, its EMC
and RF emissions are very
low and are not likely to
cause any interference in
nearby electronic equipment.
NA
EMC warnings and tables
required by IEC 60601 -1 -2
See EMC tables.
NA
NA
25
Safety Notifications
T YP E / D E GR E E O F
P ROT EC T I O N
C L ASS IFICAT IO N /
I DE N T IFICAT IO N /
WA R NING S
ID of any risks associated
with the disposal of waste
products, residues, including
disposal of the equipment
itself at the end of its useful
life.
The NuStep® T4r Recumbent
Cross Trainer equipment contains
electronic circuit assemblies and
alkaline batteries that may require
compliance with specific local
disposal or recycling procedures.
The specification of the
environmental conditions of
transport and storage (also
marked on the outside of the
packaging).
The NuStep® T4r Recumbent
Cross Trainer equipment can be:
a) safely transported and stored in
these conditions
-10º to 50ºC;
≤ 95% non-condensing humidity;
20 to 107 kPa
SYMB O L
NA
b) operated in these conditions
5º to 40ºC;
≤ 85% non-condensing humidity;
60 to 107 kPa.
26
Indication that the
equipment is energized.
No such indicator provided.
NA
Indication of long term
battery storage
If the NuStep® T4r Recumbent
Cross Trainer equipment will not
be used for longer than 3 months,
please remove batteries.
NA
EMC Tables
Table 1 from EN 60601-1-2:2007
Guidance and manufacturer’s declaration – electromagnetic emissions
The NuStep model T4r is intended for use in the electromagnetic environment specified below. The customer or
the user of the NuStep model T4r should assure that it is used in such an environment.
Emissions test
Compliance
Electromagnetic environment – guidance
RF emissions
CISPR 11
Group 1
The NuStep model T4r uses RF energy only for its internal
function. Therefore, its RF emissions are very low and are
not likely to cause any interference in nearby electronic
equipment.
RF emissions
CISPR 11
Class B
Harmonic emissions
IEC 61000-3-2
Not applicable
The NuStep model T4r is suitable for use in all
establishments, including domestic establishments and
those directly connected to the public low voltage power
supply network that supplies buildings used for domestic
purposes.
Voltage fluctuations/
flicker emissions
IEC 61000-3-3
Not applicable
27
EMC Tables
Table 2 – Guidance and MANUFACTURER’S declaration – electromagnetic IMMUNITY –
for all ME EQUIPMENT and ME SYSTEMS
Guidance and manufacturer’s declaration – electromagnetic immunity
The NuStep model T4r is intended for use in the electromagnetic environment specified below. The customer or
the user of the NuStep model T4r should assure that it is used in such an environment.
IMMUNITY test
IEC 60601
test level
Electrostatic
discharge (ESD)
Compliance
level
± 6 kV contact
Floors should be wood, concrete or
ceramic tile. If floors are covered with
synthetic material, the relative humidity
should be at least 30 %.
± 8 kV air
IEC 61000-4-2
Electrical fast
transient/burst
± 2 kV for power
supply lines
Electromagnetic environment –
guidance
Not
applicable
Not applicable
Not
applicable
Not applicable
Not
applicable
Not applicable
3 A/m
Power frequency magnetic fields should
be at levels characteristic of a typical
location in a typical commercial or hospital
environment
IEC 61000-4-4
± 1 kV for input/
output lines
Surge
IEC 61000-4-5
± 1 kV line(s) to
line(s)
± 2 kV line(s) to earth
Voltage dips, short
interruptions and
voltage variations
on power supply
input lines
IEC 61000-4-11
<5 % UT (>95 % dip
in UT) for 0,5 cycle
40 % UT (60 % dip in
UT) for 5 cycles
70 % UT (30 % dip in
UT) for 25 cycles
<5 % UT (>95 % dip
in UT) for 5 s
Power frequency
(50/60 Hz) magnetic
field
IEC 61000-4-8
3 A/m
NOTE UT is the a.c. mains voltage prior to application of the test level.
28
EMC Tables
Table 3 – Guidance and MANUFACTURER’S declaration – electromagnetic IMMUNITY –
for ME EQUIPMENT and ME SYSTEMS that are not LIFE-SUPPORTING
Guidance and manufacturer’s declaration – electromagnetic immunity
The NuStep model T4r is intended for use in the electromagnetic environment specified below. The customer or
the user of the NuStep model T4r should assure that it is used in such an environment.
IMMUNITY test
IEC 60601 TEST
LEVEL
Compliance
level
Conducted RF
IEC 61000-4-6
3 Vrms
150 kHz to 80 MHz
Not
applicable
Radiated RF
3 V/m
3 V/m
IEC 61000-4-3
80 MHz to 2,5 GHz
Electromagnetic environment – guidance
Portable and mobile RF communications
equipment should be used no closer to any part
of the NuStep model T4r, including cables, than
the recommended separation distance calculated
from the equation applicable to the frequency of
the transmitter.
Recommended separation distance
Not applicable
d = 1.2
P
80 MHz to 800 MHz
d = 2.3 P 800 MHz to 2,5 GHz
Where P is the maximum output power rating
of the transmitter in watts (W) according to
the transmitter manufacturer and d is the
recommended separation distance in meters (m).
Field strengths from fixed RF transmitters, as
determined by an electromagnetic site survey,
a
should be less than the compliance level in
each frequency range. b
Interference may occur in the vicinity of
equipment marked with the following symbol:
NOTE 1
At 80 MHz and 800 MHz, the higher frequency range applies.
NOTE 2
These guidelines may not apply in all situations. Electromagnetic propagation is affected by absorption
and reflection from structures, objects and people.
a.
Field strengths from fixed transmitters, such as base stations for radio (cellular/cordless) telephones
and land mobile radios, amateur radio, AM and FM radio broadcast and TV broadcast cannot be
predicted theoretically with accuracy. To assess the electromagnetic environment due to fixed RF
transmitters, an electromagnetic site survey should be considered. If the measured field strength in the
location in which the NuStep model T4r is used exceeds the applicable RF compliance level above, the
NuStep model T4r should be observed to verify normal operation. If abnormal performance is observed,
additional measures may be necessary, such as re-orienting or relocating the NuStep model T4r.
b.
Over the frequency range 150 kHz to 80 MHz, field strengths should be less than 3 V/m.
29
EMC Tables
Table 4 - Recommended separation distance between portable and mobile RF communications equipment and the NuStep® T4r Recumbent Cross Trainer
The NuStep® Recumbent Cross Trainer is intended for use in an electromagnetic environment in which radiated
RF disturbances are controlled. The customer or the user of the NuStep® T4r Recumbent Cross Trainer can
help prevent electromagnetic interference by maintaining a minimum distance between portable and mobile RF
communications equipment (transmitters) and the NuStep® as recommended below, according to the maximum
output power of the communications equipment.
Rated maximum output
power of transmitter
Separation distance according to frequency of transmitter
150 kHz to 80 MHz
80 MHz to 800 MHz
800 MHz to 2.5 GHz
d = 1,2
d = 1,2
D = 2,3
0,01
0,12
0,12
0,23
0,1
0,38
0,38
0,73
1
1,2
1,2
2,3
10
3,8
3,8
7,3
100
12
12
23
W
For transmitters rated at a maximum output power not listed above, the recommended separation distance d in
metres (m) can be estimated using the equation applicable to the frequency of the transmitter, where P is the
maximum output power rating of the transmitter in watts (W) according to the transmitter manufacturer.
NOTE 1 At 80 MHz and 800 MHz, the separation distance for the higher frequency range applies.
NOTE 2 These guidelines may not apply in all situations. Electromagnetic propagation is affected by absorption
and reflection from structures, objects and people.
30
US FCC Compliance & IEC/EN 55011 Compliance
US FCC Compliance Statement:
Note: This equipment has been tested and found to comply with the limits for a Class B
Digital Device, pursuant to Part 15 of the FCC Rules. These limits are designed to provide
reasonable protection against harmful interference in a residential installation. This equipment
generates, uses and can generate radio frequency energy and, if not installed and used
in accordance with the installation instructions, may cause harmful interference to radio
communications. However, there is no guarantee that interference may not occur in a
particular installation. If the equipment causes harmful interference to radio or television
reception, which can be determined by turning this equipment off and on, the user is
encouraged to try and correct the interference by one or more of the following measures:
•
Reorient or relocate the receiving antenna.
•
Increase the separation between the equipment and the receiver.
Connect the equipment into an outlet on a circuit which is different from that to which the
receiver is connected.
Consult the dealer or an experienced radio/TV technician for help.
IEC/EN 55011 Compliance Statement:
This device complies with IEC/EN 55011, Group 1, Class B. Group 1 contains all ISM equipment
in which there is intentionally generated and/or used conductively coupled radio-frequency
energy which is necessary for the internal functioning of the equipment itself. Class B
equipment is suitable for use in domestic establishments and in establishments directly
connected to the low voltage power supply network which supplies buildings used for
domestic purposes.
European Authorized Representative
Emergo Europe
Molenstraat 15
6513 BH The Hague
The Netherlands
Tel: +31 (0)70 345 8570
Fax: +31 (0)70 346 7299
31
NuStep, Inc.
5111 Venture Drive, Suite 1
Ann Arbor, MI 48108
USA
(800) 322-2209
(734) 769-3939
www.nustep.com
The information in this manual is the most current at the time of printing. Due to our
commitment toward continuous improvement, specifications and descriptions are subject
to change without notice. No part of this manual may be reproduced or transmitted in any
form or by any means, electronic or mechanical, for any purpose without the express written
permission of NuStep, Inc. © Copyright January 2013 by NuStep, Inc.
NuStep® and Transforming Lives® are registered trademarks of NuStep, Inc.
Patents 5,356,356, 6,042,518, 6,361,479, 6,666,799, D610,635, and 7,775,942
ISO 9001:2008 Registered
Manual PN 45500 T4r User Manual, Rev C