1
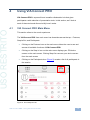
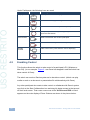
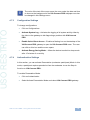
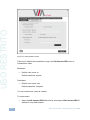
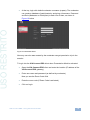
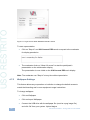
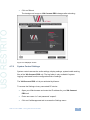
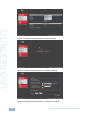
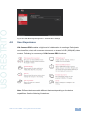
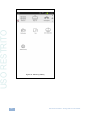
USO RESTRITO K R A ME R E LE CT R O N IC S L TD . USER MANUAL MODEL: VIA Connect PRO Collaboration Hub P/N: 2900-300419 Rev 1 USO RESTRITO USO RESTRITO USO RESTRITO USO RESTRITO USO RESTRITO Contents 1 1.1 1.2 Introduction Applications & Features Controls and Connections 1 2 2 2 2.1 2.2 2.3 Setting Up Connecting VIA Connect PRO to a Display Downloading and Running VIA Connect PRO Software Logging In to VIA Connect PRO 4 5 6 7 3 VIA Connect PRO Functions and What They Do 8 4 4.1 4.2 4.3 4.4 4.5 4.6 4.7 4.8 Using VIA Connect PRO VIA Connect PRO Main Menu Enabling Control Chatting with Participants Sharing Files Accessing Cloud Data Whiteboard Collaboration VIA Connect PRO Settings Menu User Experience 11 11 12 13 14 16 17 20 29 5 Technical Specifications 34 Figures Figure 1: VIA Connect PRO Collaboration Hub Figure 2: Connecting the VIA Connect PRO Collaboration Hub Figure 3: VIA Connect PRO Admin Screen and Features Figure 4: VIA Connect PRO Main User Screen and Features Figure 5: The Participant List Figure 6: Enable Control Figure 7: Chat Window Figure 8: Admin File Sharing Figure 9: User File Sharing Figure 10: Shared Files on the Cloud Figure 11: Whiteboard Toolbar Figure 12: Settings Screen Figure 13: LAN Settings Screen Figure 14: Room/Name Code Screen Figure 15: Authentication Screen Figure 16: Moderator Mode Figure 17: Login Screen When Moderator Mode is Active Figure 18: Wallpaper Screen Figure 19: Web Browsing Management - Network Settings Figure 20: Web Browsing Management - Wallpaper Settings Figure 21: Web Browsing Management - Configuration Settings Figure 22: Web Browsing Management - Authentication Settings Figure 23: Samsung Galaxy Figure 24: iPad Figure 25: iPhone Figure 26: PC 3 5 8 9 11 13 14 15 15 16 18 20 21 22 24 25 26 27 28 28 28 29 30 31 32 33 VIA Connect PRO – Contents i USO RESTRITO 1 Introduction Welcome to VIA Connect PRO. VIA Connect PRO is Kramer’s unique, powerful wireless presentation and collaboration hub. It converts any display at any location into an interactive meeting point, and it works with a wide range of presentation devices from desktop and notebook computers to tablets and smartphones. Each participant in a VIA Connect PRO session can quickly view, edit, annotate, comment, and share content with other participants. Participants can share their ideas through the primary screen, or break off with others into smaller groups during a meeting. The VIA Connect PRO integrates seamlessly with any organization’s current IT infrastructure, converting any projector or screen into a networked device that users can share and view on their current devices. Every local connection to VIA Connect PRO is wireless, free of dongles, cables, and other compatibility peripherals. Key features of VIA Connect PRO: Login using conventional Wi-Fi or LAN connections, no dongle needed Provides true HD 1080p/60 video streaming Supports Windows laptops and MAC®, as well as iOS and Android mobile operating systems Compatible with all common Web browsers Up to 255 simultaneous users can be logged in Up to 4 participant screens can be displayed simultaneously VIA Connect PRO - Introduction 1 USO RESTRITO 1.1 Applications & Features Present, share, chat, send and receive files, hold sidebar conversations, annotate, edit, and save copies of all your work, just as you would with a whiteboard or flip chart…except that you can do it all from your notebook computer, tablet, and smartphone. Here are just a few of the things you can do with VIA Connect PRO: Up to four different participant screens can be shown at the same time. VIA Connect PRO automatically sizes each screen to the maximum available resolution. Finished sharing? Tap Step-out to disconnect. Chat and Share a file: Need to ask a meeting participant a question? Click on their screen name and send them a text message with complete privacy. Windows and Mac PC users can also share files between themselves or the main presenter, all at the click of a mouse. Control a participant’s computer: Need to access files or play back a presentation from a participant’s PC? Simply click Enable Control on the PC, and its cursor can be controlled remotely to launch programs and play media. Multimedia: Sometimes it’s just easier to explain your ideas with a video. Simply click the Multimedia tab on your device’s screen and you can load and display JPEG images (all operating systems) and play MP4 videos (Windows and Mac PCs and iOS devices only). You can also display and share PDFs from any logged-in device. 1.2 Controls and Connections This section defines VIA Connect PRO. 2 VIA Connect PRO - Introduction USO RESTRITO Figure 1: VIA Connect PRO Collaboration Hub # Feature 1 USB 3.0 Connectors Connect to up to two USB devices 2 SPDIF 3.5mm Mini Jack Connects to earphones or a speaker 3 Lock Opening Connects to a security locking cable 4 Power Connector Connects to the 19V DC power supply 5 HDMI Connector Connects to an HDMI acceptor 6 Mini DisplayPort Connector Connects to a mini DisplayPort acceptor 7 LAN RJ-45 Connector Connects to a wireless router 8 USB 3.0 Connectors Connect to up to two USB devices VIA Connect PRO - Introduction Function 3 2 Setting Up i Always switch off the power to each device before connecting it to your VIA Connect PRO. After connecting VIA Connect PRO, connect its power and then switch on the power to each device. To connect the VIA Connect PRO as illustrated in the example in Figure 2 you USO RESTRITO need: A VIA Connect PRO Wireless Collaboration Hub A display (projector, monitor, or screen). NOTE: A touchscreen display is best for annotation A Local Area Network (LAN) cable for connection to your network. For wireless network connectivity, use a commercial wireless router The following client devices are applicable with Kramer's VIA collaboration hub: A Windows 7/8® (32-bit/64-bit) computer A Macintosh® computer, using OSX 10.6.5 or newer (version 10.6.8 recommended) An iPad/iPhone® tablet/smartphone with the VIA Connect PRO app installed (iPad 2 or later, iOS 5 or later, iOS 6.0 recommended) An Android® OS 3.2 tablet/smartphone with the VIA Connect PRO app installed 4 VIA Connect PRO - Setting Up USO RESTRITO Figure 2: Connecting the VIA Connect PRO Collaboration Hub 2.1 Connecting VIA Connect PRO to a Display VIA Connect PRO is equipped with HDMI and mini DP display output connectors. The HDMI connection can be used with any compatible projection or directview display, such as an LCD monitor. This connection carries embedded audio, and can also be routed and switched just like any other HDMI connection The mini DisplayPort connector connects to a DisplayPort display or to a VGA display by means of a mini DP to VGA adapter cable included in the packaging of VIA Connect Pro VIA Connect PRO’s internal video card reads the Extended Display Identification Data (EDID) for any connected display and sets the optimum display resolution and image refresh rate automatically through the HDMI and Mini DisplayPort jacks. VIA Connect PRO - Setting Up 5 USO RESTRITO For full functionality, VIA Connect PRO must be connected to a local area network (LAN). You must assign an IP address to the VIA Connect PRO. NOTE: Do not turn the device on before connecting the LAN port to the network. NOTE: To allow participation in a collaborative session (send and receive content), connect the VIA Connect PRO hub and all participant devices (PCs/ MACs/ smartphones/tablets) to the same network (LAN - wired/wireless). The VIA Connect PRO hub receives user’s display/screen information and multimedia files from their device (laptop/tablet/smartphone) and sends them to the collaboration display (the display connected directly to VIA Connect PRO hub unit). 2.2 Downloading and Running VIA Connect PRO Software All participants in a meeting must download and run either the Kramer VIA executable file (PC, Mac) or the appropriate Android/iOS app. To access the PC and Mac executable files: Open your Web browser and enter the IP address for your VIA Connect PRO unit Click on the file format (Win7/8, Mac OS) for your computer. You are prompted to save this file to your computer. Select “OK” and download. Once downloaded, locate the file on your computer (under “Downloads”) and click to launch it. You then see the VIA Connect PRO login screen. (For faster access, move the file to your desktop) For tablets and smartphones, the Kramer VIA app is found in the App Store (iOS) and Google Play (Android). Download the app to your tablet/phone 6 VIA Connect PRO - Setting Up USO RESTRITO and install. When you run the app, you see the following screen: 2.3 Logging In to VIA Connect PRO Windows and Mac OS Choose a username (nickname) for your device (it can be any mix of letters and numbers) then enter it on the login screen Next, enter the room code, seen on the lower right part of the screen. This lets you access VIA Connect PRO iOS and Android First, enter the IP address for the VIA Connect PRO. This is found on the main display screen in the lower left Next, choose a username (nickname) for your device (it can be any mix of letters and numbers) then enter it on the login screen of your device Finally, enter the room code as seen on the lower right part of the screen. This lets you access VIA Connect PRO. Now, you’re ready to go! VIA Connect PRO - Setting Up 7 3 VIA Connect PRO Functions and What They Do VIA Connect PRO presents two types of screens depending whether it is being used by the Admin or by a User. The following screen shots illustrate both types. USO RESTRITO Figure 3 shows the VIA Connect PRO main Admin screen and its functions: 1 2 3 6 7 4 5 Figure 3: VIA Connect PRO Admin Screen and Features 8 VIA Connect PRO - VIA Connect PRO Functions and What They Do USO RESTRITO Item Icon 1 Features Allows user to see and access all available features of VIA Connect PRO Action 2 Whiteboard Opens a canvas to annotate, draw, and update document collaboratively over a live stream 3 Participants Provides a list of all participants in the session 4 Cloud Drag and drop files to the cloud to share instantly with everyone in the session 5 Shutdown Shuts down VIA Connect PRO system 6 Reboot Reboots VIA Connect PRO System 7 Settings Performs settings on the LAN, configurations related to room code, system controls, wallpaper and activation center Figure 4 shows the VIA Connect PRO main User screen and its functions: 1 2 4 5 8 9 3 6 7 Figure 4: VIA Connect PRO Main User Screen and Features VIA Connect PRO - VIA Connect PRO Functions and What They Do 9 USO RESTRITO 10 Item Icon 1 Features Allows user to see and access all available features of VIA Connect PRO Action 2 Step-In/ Step-Out Allows the user to show his device's screen on main display, or to step out 3 Participants Provides a list of all participants in the session 4 Multimedia Supports video formats: avi, vob, mp4, mov, mpx (ex. mpg). Shares smooth full-motion video (up to 1080p/60), MP3 files and photos 5 Cloud Drag and drop files to the cloud to share instantly with everyone in the session 6 Enable Control Gives participants control over the presenters Mac or PC laptop 7 File Transfer Shares files between the available participants during the session 8 Start Collaboration Click to collaborate through a common display using your own device. Multiple users can interact and control the main display at the same time 9 Chat Allows sending chat messages among available participants during that session VIA Connect PRO - VIA Connect PRO Functions and What They Do USO RESTRITO 4 Using VIA Connect PRO VIA Connect PRO is a powerful and versatile collaboration hub that gives participants a wide selection of presentation tools. In this section, we’ll look at each of those tools and discuss briefly how it works. 4.1 VIA Connect PRO Main Menu This section refers to the user's experience. The VIA Connect PRO User main menu has three tabs across the top – Features, Step-In/Out, and Participants. Clicking on the Features icon on the main menu allows the user to see and access all available functions of VIA Connect PRO Clicking on the Step-In icon on the main menu displays your PC/device screen on the main screen. Clicking Step-Out removes your device screen from the main screen Clicking on the Participants icon (Figure 5) reveals a list of all participants in the session Figure 5: The Participant List VIA Connect PRO - Using VIA Connect PRO 11 USO RESTRITO Under Participants, the following icons are used: Item Icon Display Status Meaning Start a presentation at a display The user is currently presenting Chat Status Start a chat session with any available participants The participant is currently chatting with you. Click to open the chat session File Transfer Start a file transfer with another participant File transfer is already active with that participant Enable Control Take control of any user while the user is displaying Admin has the control of that user 4.2 Enabling Control This function allows the admin to take control of a participant's PC (Windows or Mac OS). (In our example, Figure 6, user Dave has stepped in and the Admin has taken control of Dave): The admin can work on Dave's system as he has taken control. (Admin can play media or work on a document or presentation file collaboratively with Dave). Any other participant who wants to take control or collaborate with Dave's system can click on the Start Collaboration icon and drag his laptop mouse to the top and off their local screen. That cursor now moves to the VIA Connect PRO unit and appears on the main display of Dave. Buttons are shown in the picture below: 12 VIA Connect PRO - Using VIA Connect PRO USO RESTRITO Figure 6: Enable Control 4.3 Chatting with Participants The admin or user can start a chat session to exchange text messages between users. To initiate a chat session: Go to the participant list and click the chat icon for the desired participant. The chat window opens (Figure 7) and you can chat with selected participant: VIA Connect PRO - Using VIA Connect PRO 13 USO RESTRITO Figure 7: Chat Window In the chat window, the participant’s name is at the left side of the window and your chat messages are on the right side. The user can check for active chat sessions by going to Features > Chat 4.4 Sharing Files VIA Connect PRO can transfer files between PC/Mac logged in users. To share a file: Go to the participant list and click on the file share icon for the desired participant with whom you wish to share a file. In the cloud directory, select the desired file on your device. Then, click Share 14 VIA Connect PRO - Using VIA Connect PRO USO RESTRITO Figure 8: Admin File Sharing The target participant needs to select a location to save the file and start the file transfer process. Once completed, the file is saved on that participant’s system. Figure 9: User File Sharing When completed, the file is saved at receiver’s system. You can check or cancel currently sharing file from Features > File Transfer. VIA Connect PRO - Using VIA Connect PRO 15 4.5 Accessing Cloud Data The cloud is used by the admin to access all data that has been shared by participants using VIA Connect PRO hub. To access cloud data: Click on Features in the Admin main menu and then click on the cloud USO RESTRITO icon to go to the Cloud directory where all the users’ shared files were saved. Figure 10: Shared Files on the Cloud 16 To delete all files from the cloud directory, click on Clean Directory A warning note appears that this is a permanent delete action VIA Connect PRO - Using VIA Connect PRO USO RESTRITO 4.6 Whiteboard Collaboration The whiteboard function, used by the admin, creates a canvas on the VIA Connect PRO hub. With whiteboard, the admin can: Access a wide range of drawing and annotating tools Insert any kind of images To open Whiteboard by the admin: Go to the main menu and click on the Whiteboard icon. This starts a whiteboard session on VIA Connect PRO. Users can collaborate on a shared document using their own device. To comment on content shown on main display user needs to: Click on Start Collaboration icon Drag the cursor to the main display Start annotate by using whiteboard tools Multiple users can interact, annotate and control the main display at the same time. VIA Connect PRO - Using VIA Connect PRO 17 4.6.1 Whiteboard Functions USO RESTRITO 1 2 9 1 10 3 11 12 13 4 14 5 15 6 16 7 17 8 18 Figure 11: Whiteboard Toolbar 18 Item Icon 1 Pen Enables drawing on the whiteboard Action 2 Colors Changes the color of line with various available colors 3 Size Chooses the line thickness 4 Eraser Erases your annotations 5 Erase All Cleans the page 6 Text Inserts text at your whiteboard page 7 Font Changes text font of your whiteboard page 8 File Share Shares files between the available participants during the session 9 Notes Creates comments or remarks about your annotation at whiteboard page 10 Keyboard Opens a virtual keyboard at whiteboard to insert text 11 Save Saves all your activities either as PDF or as JPEG format 12 Show Desktop Displays your desktop with all running applications, user can also annotate at the running application using desktop stylus 13 Arrow Selects any object or image 14 Capture Area Tool The mouse pointer turns into plus sign. Click the upper left corner of the area you want to capture and drag along the screen to the limit of the capture. The selected area is displayed in gray. The area is then included in the current or new page as an object 15 Previous page Moves to previous page (when multiple pages added) 16 New page Creates a new page or to add a new page 17 Next page Moves to next page (when multiple pages added) 18 Close Closes the whiteboard VIA Connect PRO - Using VIA Connect PRO USO RESTRITO 4.6.2 Show Desktop Show Desktop allows you to hide the whiteboard and to navigate freely on your desktop. A toolbar is available for making annotations on your desktop and capturing an object. For example, capture an area of the screen and add it as an object in your current page. Icon Name Action Whiteboard Press this button to immediately return to your board page Pencil Writes on the whiteboard Eraser Erases precisely what you have written on the whiteboard Selection Tool Selects any object to move it and apply changes Capture Area Tool The mouse pointer turns into plus sign. Click and drag over the desired area Window Selection Directly captures a window and all of its content. Save Saves your activity in either.jpg or .pdf format Show/Hide Show/hide annotations Exit Exits the whiteboard VIA Connect PRO - Using VIA Connect PRO 19 4.7 VIA Connect PRO Settings Menu The Settings menu is where you configure your VIA Connect PRO unit. USO RESTRITO The Settings menu tabs include: LAN Settings – configures network parameters Room Name/Room Code – manages room code and name preferences Configurations – activates/deactivates energy saving mode and system log System Controls – manages your display and audio settings Wallpaper – inserts a customized wallpaper Authentication – activates presentation mode and define moderator/participants settings To open the settings page use keyboard and mouse connected to VIA Connect PRO unit: Click on Features to expand Click on Settings. It requests user name and password for the VIA Admin user Enter user name “su” and the password “supass” The Settings screen opens: Figure 12: Settings Screen 20 After settings are defined, click on Reboot tab to apply all. VIA Connect PRO - Using VIA Connect PRO USO RESTRITO 4.7.1 LAN Settings Use LAN settings to change the IP address, DNS and default gateway of VIA Connect PRO. i When changing these settings, make sure they are correct. Incorrect values can cause a loss of communication. To change the IP address: Click on LAN Settings Enter as required the IP address, subnet mask, default gateway, DNS server 1, DNS server 2 Figure 13: LAN Settings Screen When finished, click on Apply Settings Click OK at the Confirmation Message Click on Reboot to restart the system with the new settings VIA Connect PRO - Using VIA Connect PRO 21 4.7.2 Room Name/Code Settings USO RESTRITO To activate/deactivate Room Code, Date & Time: Figure 14: Room/Name Code Screen Show Room Name on Wallpaper: This feature displays the Room Name (a standard IP address) on the VIA Connect PRO home screen. By default, it displays the current IP address, but you can change it to a Domain Name System (DNS) name if local DNS services are supported by the network. To change the Room Name, enter the new address or DNS name, then click on Apply and reboot VIA Connect PRO. To login any device to the VIA Connect PRO client, you must enter the same Room Name in the location field on your device Activate Room Code: The Room Code is a security overlay feature that generates and updates a four digit code. It appears on the lower right of the VIA Connect PRO home page. When activated, this code must be entered by any device before logging into VIA Connect PRO Show Date Time on Wallpaper: Displays the date/time on the top right of the display 22 VIA Connect PRO - Using VIA Connect PRO USO RESTRITO i 4.7.3 The color of the text of the room name, the room code, the date and time to show on the background of the VIA Connect PRO wallpaper can also be changed in this Settings menu. Configuration Settings To change configurations: Click on Configurations Activate System Log – Activates the logging of all system activity either by the client or the gateway to aid diagnosing a problem with VIA Connect PRO Enable Quick Client Access – Enables a floating icon on the desktop of the VIA Connect PRO gateway to open the VIA Connect PRO menu. The user can click on this icon and the menu opens Activate Energy Saving Mode – Allows the device to switch to sleep mode after 15 minutes of no activity 4.7.4 Authentication Settings In this section, you can activate Presentation (moderator–participant) Mode. In this mode, a participant requires permission from the moderator to use the Step-In function on VIA Connect PRO. To enable Presentation Mode: Click on Authentication Select Activate Presentation Mode and reboot VIA Connect PRO gateway VIA Connect PRO - Using VIA Connect PRO 23 USO RESTRITO Figure 15: Authentication Screen There are 2 default users available to login into VIA Connect PRO client in Presentation mode. Moderator: Default user name: su Default password: supass Participant: Default user name: user Default password: userpass You can create more users as needed. To create users: Open the VIA Connect PRO Web site by entering the VIA Connect PRO IP address in any Web browser 24 VIA Connect PRO - Using VIA Connect PRO USO RESTRITO At the top, login with default moderator username (supass). The moderator can create a database of participants by assigning a Username, Password and Role (Moderator or Participant) to each one of them, as shown in Figure 16 below Figure 16: Moderator Mode Now any user who was created by the moderator can get permission to join the session. To login into the VIA Connect PRO client when Presentation Mode is activated: Open the VIA Connect PRO client and enter the location (IP address of the VIA Connect PRO gateway) Enter user name and password (as defined by moderator) Now you see the Room Code field. Enter the room code (if Room Code is activated) Click on Login VIA Connect PRO - Using VIA Connect PRO 25 USO RESTRITO Figure 17: Login Screen When Moderator Mode is Active To start a presentation: Click on “Step-In” and VIA Connect PRO sends a request to the moderator for display permission The moderator clicks on “Allow full screen” to start the participant’s presentation on the collaboration display The presentation is now visible on the VIA Connect PRO main display Note: The moderator can "Step-In" at any time without permission. 4.7.5 Wallpaper Settings This feature allows any corporation or institution to change the default screen to match their branding and in-room equipment usage instructions. To change wallpaper: Click on Wallpaper Click on Import Wallpaper Connect the USB drive with the wallpaper file (must be a png image file) and click OK from your system. Upload begins 26 VIA Connect PRO - Using VIA Connect PRO USO RESTRITO Click on Reboot The background image on VIA Connect PRO changes after rebooting Figure 18: Wallpaper Screen 4.7.6 System Control Settings System controls access the audio settings, display settings, system health and log files of the VIA Connect PRO unit. The log folder is only available if system logging is activated from the configurations tab of settings. The VIA Connect PRO unit is pre-activated by Kramer. To access the Settings via any connected PC device: Open your Web browser and enter the IP address for your VIA Connect PRO unit Enter user name “su” and password “supass”. Click on Via Management tab to access the Settings menu. VIA Connect PRO - Using VIA Connect PRO 27 USO RESTRITO Figure 19: Web Browsing Management - Network Settings Figure 20: Web Browsing Management - Wallpaper Settings Figure 21: Web Browsing Management - Configuration Settings 28 VIA Connect PRO - Using VIA Connect PRO USO RESTRITO Figure 22: Web Browsing Management - Authentication Settings 4.8 User Experience VIA Connect PRO enables a high level of collaboration in meetings. Participants can share files, chat, edit a common document, or stream full HD (1080p/60) video content. Following is a summary of VIA Connect PRO functions: Note: Different devices enable different features depending on the device capabilities. See the following illustrations. VIA Connect PRO - Using VIA Connect PRO 29 USO RESTRITO Figure 23: Samsung Galaxy 30 VIA Connect PRO - Using VIA Connect PRO USO RESTRITO Figure 24: iPad VIA Connect PRO - Using VIA Connect PRO 31 USO RESTRITO Figure 25: iPhone 32 VIA Connect PRO - Using VIA Connect PRO USO RESTRITO Figure 26: PC VIA Connect PRO - Using VIA Connect PRO 33 USO RESTRITO 5 Technical Specifications INPUTS: 4 USB 3.0, 1 LAN on an RJ−45 connector GRAPHIC OUTPUTS: 1 HDMI, 1 mini DisplayPort AUDIO OUTPUT: 1 stereo headphones on a 3.5mm mini jack PROCESSOR: 4th generation Intel® Dual core 1.4GHz MAIN MEMORY: 4GB, high speed STORAGE: 32GB, solid−state drive LAN: Gigabit LAN AUDIO: Analog or embedded HDMI, S/PDIF Realtek ALC269 POWER SUPPLY: 65W power adapter (19V, 3.4A) INPUT VOLTAGE: 100V~220V AC, 50/60Hz, auto sensing OPERATING TEMPERATURE: 0° to +40°C (32° to 104°F) STORAGE TEMPERATURE: -40° to +70°C (-40° to 158°F) HUMIDITY: 10% to 90%, RHL non-condensing DIMENSIONS: 11.8cm x 11.5cm x 4.0cm (4.6” x 4.5” x 1.6”) W, D, H. NET WEIGHT: 0.475kg (1.0lbs) INCLUDED ACCESSORIES: 3 power cords (US, EU, UK), Kramer mini DP to VGA adapter, VESA mounting bracket Specifications are subject to change without notice at http://www.kramerelectronics.com 34 VIA Connect PRO - Technical Specifications USO RESTRITO USO RESTRITO For the latest information on our products and a list of Kramer distributors, visit our Web site where updates to this user manual may be found. We welcome your questions, comments, and feedback. Web site: www.kramerelectronics.com E-mail: [email protected] ! P/N: SAFETY WARNING Disconnect the unit from the power supply before opening and servicing 2900- 300419 Rev: 1