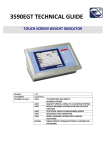
1
CENTRAL WEIGHING
LIMITED
Specialists in Vehicle Weighing, Tracking and Management Systems
Unit 142, Hartlebury Trading Estate, Kidderminster, Worcs, DY10 4JB, England
USER INSTRUCTIONS
CHEKLODE® FREEWEIGH
Version 4.2 June 2011
Portable Vehicle Weighing System
incorporating Bluetooth technology
ONLY MATCHING CHEKLODE® SERIAL NUMBERS AND
WEIGHPAD SERIAL NUMBERS CAN BE USED TOGETHER
Unit 142 Hartlebury Trading Estate, Kidderminster, DY10 4JB, UK
Tel: +44 (0)1299 251242 Fax: +44 (0)1299 250002 [email protected]
CHEKLODE® Freeweigh User Manual V 4.1 May 2011
www.central-weighing.co.uk
Page 1
This Manual is for:
•
Freeweigh Console Software Version: 0578161/1
•
Freeweigh Lite PC Software Version:
X.X.X
•
Freeweigh DB PC Software Version:
1.3.1.[50/1]
•
Freeweigh Live PC Software Version: 1.0.0.01 [50/1]
CHEKLODE® Freeweigh User Manual V 4.1 May 2011
Page 2
INDEX
1.
2.
3.
4.
INTRODUCTION .................................................................................................................... 4
SYSTEM COMPONENTS .......................................................................................................... 5
INSTRUMENT PANEL LAYOUT ................................................................................................ 6
ON-SITE SETUP ..................................................................................................................... 7
5.
EQUIPMENT SETUP............................................................................................................. 9
6.
BASIC WEIGHING OPERATION ......................................................................................... 10
7.
STORING/AMENDING VEHICLE INFORMATION ................................................................ 15
8.
TRANSACTION DATA ........................................................................................................ 17
9.
CONFIGURATION.............................................................................................................. 19
10.
11.
12.
13.
14.
15.
16.
4.1
4.2
4.3
5.1
5.2
5.3
5.4
6.1
6.2
6.3
6.4
6.5
6.6
7.1
7.2
7.3
7.4
7.5
8.1
8.2
9.1
9.2
9.3
9.4
9.5
9.6
9.7
Introduction ..................................................................................................................................7
Driver Control ................................................................................................................................8
Effect of Surface Irregularities on Weighing Accuracy..........................................................................8
Switching ON System .....................................................................................................................9
Initialising the System ....................................................................................................................9
Zero Weighpads .............................................................................................................................9
F Key Functions .............................................................................................................................9
Summary of Modes of Weighing ..................................................................................................... 10
Basic Weighing – Dynamic Mode .................................................................................................... 10
Basic Weighing – Static Mode ........................................................................................................ 11
Basic Weighing using Pre-entered Vehicle Types .............................................................................. 11
Basic Weighing using Pre-entered Vehicle ID ................................................................................... 12
Basic Weighing – Nett Weight Weighing .......................................................................................... 12
Accessing the Tables of Data ......................................................................................................... 15
Storing/Amending Vehicle IDs ....................................................................................................... 15
Storing Vehicle Types ................................................................................................................... 16
Storing Other Vehicle Data ............................................................................................................ 16
Maximum Storage Capacity on the Freeweigh Console ...................................................................... 16
Maximum Data Storage on the Instrument ...................................................................................... 17
Downloading the Data to the USB Memory Stick .............................................................................. 17
Introduction ................................................................................................................................ 19
MENU Instructions........................................................................................................................ 19
OPERATOR MENU Flowchart........................................................................................................... 20
MENU with PARAMETER Password ................................................................................................. 21
MENU with MACHINE Password ...................................................................................................... 24
MENU with ENGINEER Password..................................................................................................... 24
MENU with INSTALLATION Password .............................................................................................. 26
BATTERIES ....................................................................................................................... 27
SAMPLE WEIGHING TICKET PRINTOUT ............................................................................ 28
PRINTER........................................................................................................................... 29
GENERAL CARE AND MAINTENANCE ................................................................................. 30
SPECIFICATIONS.............................................................................................................. 31
ACCESSORIES AND SPARE PARTS..................................................................................... 33
DIAGNOSTICS .................................................................................................................. 34
CHEKLODE® Freeweigh User Manual V 4.1 May 2011
Page 3
1. Introduction
The Freeweigh Portable Vehicle Weighing System is a dynamic and static axle weighing
system. It consists of two weighpads with a separate instrumentation unit to weigh vehicles
with axle loads of up to 30,000 kg. The system measures individual axle loads and gross
vehicle weights, recording these either statically or dynamically when the vehicle is driving
slowly over the weighpads at speeds up to a maximum of 5 km/h.
The CHEKLODE® Freeweigh system is suitable for check-weighing vehicles and their
loads and for use in enforcement weighing programmes.
The weighpads can be mounted directly on a smooth road surface for weighing operations
or installed in a previously prepared shallow channel or weigh-pit. When weighing vehicles
with tandem or triple axles using a surface mounted weighpad installation, plastic roll-out
levellers positioned at both ends of the weighpads are essential to maintain a level profile
of the multiple axles throughout the weighing operation, thereby ensuring optimum
weighing accuracy.
The Freeweigh Instrument can be used to:
• Weigh statically or dynamically and print out every transaction
• Vehicle data can be entered using the keyboard after (by default setting) the
transaction has been completed, and this data will be printed on the ticket and
stored
• Vehicle data can be stored on the Instrument and then selected by the Operator
after the transaction has been completed
o This reduces the time to enter vehicle data
o Avoids mistakes being made
o Can enable the Instrument to determine if a vehicle has been overloaded
The transaction can be:
• Printed
• Downloaded to a Memory stick and transferred to a PC using Freeweigh Lite
standard software for viewing the data
• Freeweigh DB software is available to be able to analyse the transactions on a PC
• Freeweigh Live software is available to link the Instrument to a PC using Ethernet
and transfer the data to the PC after every transaction, thereby providing
unlimited transaction storage capability
Please Note:
• The Instrument can hold up to 100 transactions in its memory
• After 100 transactions, the instrument can either:
o Be set up to warn you that you have exceeded 100 transactions and you
should download the transactions to a USB Stick, otherwise further
transactions would not be recorded
or
o Be set up to wrap around and over-write the first data with the new data
• However, if a USB stick is inserted in the console the transaction data will be
transferred to the USB stick and also recorded on the console with the above
options
CHEKLODE® Freeweigh User Manual V 4.1 May 2011
Page 4
2. System Components
The CHEKLODE® Freeweigh Portable Vehicle Weighing System consists of three main
components:
•
•
•
x1 CHEKLODE® Freeweigh Instrumentation Console
x1 CHEKLODE® Freeweigh Left Weighpad
x1 CHEKLODE® Freeweigh Right Weighpad
Also supplied:
• x
• x
• x
• x
• x
• x
2
1
2
1
1
1
Aerials for the Weighpads
Mains Instrument Console Charger
Mains Weighpad Chargers
USB Memory Stick
Spare Printer Roll
Car Power Supply Connection
CHEKLODE® Freeweigh User Manual V 4.1 May 2011
Page 5
3. Instrument Panel Layout
Contrast on screen
Static/dynamic
mode
Functions in menu
Print button
Zero button
To scroll through menus
Fault code
<Enter> key
On/Off button printer
USB port
On/Off button console
Pad antennas point
towards weighing console
CHEKLODE® Freeweigh User Manual V 4.1 May 2011
Page 6
4. On-Site Setup
4.1 Introduction
Select a level site for the installation and make sure that the approach and departure areas
either side of the Weighpads are also level and straight. Avoid locations that cause vehicles
to change speed or turn or which impose any other restriction on smooth controlled driving
conditions.
Position the two Weighpads in the wheel tracks of the vehicle being weighed so that their
distance apart corresponds to the width of the vehicles wheelbase, usually 2 to 3 metres.
Remember that axles with twin wheels will have different wheel tracks from axles with
single wheels on the same vehicle. If necessary, measure the distance between the centres
of the twin-wheeled axles and set the centres of the Weighpads this distance apart.
Screw the aerials into the Weighpads and power on the Weighpads
Check that the Weighpads are lying flat and that they do not rock when someone stands on
them diagonally. If necessary, clear the ground of any light debris, stones or other material
that might prevent the Weighpads from being laid evenly.
The antenna on the pads and instrument should have clear vision to each other and
should be placed as shown below. It is strongly recommended that the equipment is
laid out in the following manner:-
CONSOLE
Ramp
Plastic Roll-Out
Levellers
Weigh
Pad
Antenna
Plastic Roll-Out Levellers
Ramp
Antenna
Ramp
Plastic Roll-Out
Levellers
CHEKLODE® Freeweigh User Manual V 4.1 May 2011
Weigh
Pad
Plastic Roll-Out Levellers
Ramp
Page 7
4.2
Driver Control
When weighing in motion, the vehicle driver should be instructed to maintain a steady
speed as he drives over the Weighpads and, if used, plastic roll-out levellers. The driver
can be assisted if someone walks steadily alongside so that the driver can match his
speed to the pace of the walker.
When weighing statically, try to avoid situations where the driver overshoots the centre
of the weighpad and has to reverse. This movement backwards and forwards can have
a significant influence on axle weight distribution and hence on weighing accuracy, the
effect being most apparent when weighing closely coupled compensating axles.
4.3
Effect of Surface Irregularities on Weighing Accuracy
It is essential that the weighing area is both smooth and level and that the plastic rollout levellers are used where applicable. The vehicle should proceed across the
Weighpads without braking or stopping. Adhering to these procedures will avoid
unnecessary errors created by weight transfer within the vehicle’s axle suspension
system. A shallow pit construction is an alternative to the plastic roll-out levellers.
These adverse effects can be mitigated by ensuring that the site selected for weighing
operations is flat and level and that the Weighpads are either installed in a pit or mounted
on the surface and used with ramps and plastic roll-out levellers. The site should allow
vehicles to approach and depart from the Weighpad installation without having to turn,
brake or accelerate. For these reasons, best weighing accuracy is obtained when vehicles
are weighed whilst in motion, particularly if they are multi-axle vehicles.
CHEKLODE® Freeweigh User Manual V 4.1 May 2011
Page 8
5. Equipment Setup
5.1 Switching ON System
1.
2.
3.
Switch Instrument Console on
Switch Printer on
Switch both Pads on
The console must be within 8 metres of the Weighpads.
5.2 Initialising the System
The display will initially be blank then the WEIGHING STATUS panel will show “initialising…..”
whilst the console searches for the signal from the Weighpads.
The Diagnostics “!” key will illuminate and flash, and the top right hand corner of the display
will flash L and R as it searches for the Left and Right Weighpad.
When the instrument finds the Weighpad, the L or R will stop flashing.
When the instrument has found both pads, the “!” key will stop flashing
5.3 Zero Weighpads
If the main weight display is not showing zero on either Weighpad while the Weighpads
are not in use, simply press and release the Zero (-0-) button to re-zero the Weighpads.
5.4 F Key Functions
F1
Press and hold down the F1 key
Displays Software version and build date.
F2
Press and hold down the F2 key
Displays Bluetooth Addresses for the Weighpads and Printer
F3
Press and hold down the F3 key
Displays Revision Number for the Software in the Console
F4
Scrolls between the weighing screen and the data entry screen.
This can be pressed when vehicle has cleared the weighing pads to begin entering data
allocated to the transaction.
(Please Note: this may be available before the weighing transaction if set up to operate in
this way)
F5
Sets backlight intensity. There are three settings:
Off
Mid-brightness
Maximum brightness
CHEKLODE® Freeweigh User Manual V 4.1 May 2011
Page 9
6. Basic Weighing Operation
6.1 Summary of Modes of Weighing
To operate in “dynamic mode”/”static mode” press
button and the
“Mode:” of operation will appear at the top of the screen.
IN DYNAMIC MODE
1.
Start vehicle 4 metres from the Weighpads and drive over at 5 km/h without
accelerating or braking between axles.
2.
When all axles have cleared the pads, press the “print” button.
IN STATIC MODE
1.
Drive axle onto pads and release foot brake.
2.
When axle is registered on display, drive next axle onto pads.
3.
When all axles have been weighed, press “print” button.
Note:
• As a default setting, the operation is set to be able to use the axles weighers to
determine the weights of each axle and then enter the relevant vehicle data for
checking against its permitted weights and/ or printing
• To change the operation to enter the vehicle data prior to the weighing operation, see
Section 9.2
↓ Enter Vehicle Details: After Weighing
and that needs setting to <No>
6.2 Basic Weighing – Dynamic Mode
1.
The vehicle should be driven over the Weighpads at a slow, walking pace, steady
speed
Once all the axles have been weighed the CHEKLODE® will calculate these values and
total up a gross weight.
After 20 seconds (or by pressing the F4 key) when the CHEKLODE® is satisfied with
the values the VEHICLE IDENTITY window will appear
Here the user can either:
• Press the “print” key and the weighing information will be printed
• Enter Vehicle ID and press the “print” key (eg: Vehicle Registration or Fleet
Number) for printing on the ticket
• Link to pre-stored data for the system by scrolling down by using the <Down
Arrow> key to the selected field, such as Vehicle ID, and then using the <Across
Arrow> to select the data you require and press <enter> to use that data.
2.
3.
4.
Please Note:
•
•
•
Move the cursor to a field by using the up and down arrow keys and then the
<Enter> key to select the field
Enter the data using the keypad, and press <Enter> again to store the data
When all the required fields are edited simply press the <Print> key to obtain a
weight ticket.
CHEKLODE® Freeweigh User Manual V 4.1 May 2011
Page 10
6.3 Basic Weighing – Static Mode
•
•
•
Static weighing is slightly different regarding the weighing of a vehicle.
The vehicle should approach the Weighpads as normal.
Once the first axle is located on the Weighpads, the driver must stop the engine and
apply the handbrake.
The CHEKLODE® will settle and sample the axle, once satisfied the weighing status
window will display proceed.
Weigh the next axle/axles exactly the same. When all axles have been successfully
weighed the vehicle identity window will appear.
Here the user can edit vehicle data in the fields shown just as described above for
Dynamic weighing
Simply press the print key once data entry is completed.
•
•
•
•
Note: Always ensure the printer is powered up.
6.4 Basic Weighing using Pre-entered Vehicle Types
You can have up to 99 different Vehicle Types stored on the Freeweigh, using Vehicle Type
number from 1 to 99.
The Permitted Axle Weights and Gross Vehicle Weight are entered against a Vehicle Type.
To enter a new Vehicle Type or modify a Vehicle Type, see Section 7.3
•
•
•
Weigh the vehicle as above
Press F4 to complete the operation and the VEHICLE IDENTITY window will appear
To key in a Vehicle ID (usually the Vehicle Plate number), the Vehicle ID will be
highlighted
o Press <Enter> to select Vehicle ID and then enter the data and press <enter> to
complete
• The cursor will move down to the Vehicle Type
• To find the correct Vehicle Type, use the <Left Arrow> or <Right Arrow> to find the
correct Vehicle Type and then either press <Enter>or <Down Arrow> to select
• You can now enter the:
o Trailer ID
o Trailer Type
o Driver
o Haulier
o Product
o Tare Weight:
And / or press <Print> to complete the transaction
CHEKLODE® Freeweigh User Manual V 4.1 May 2011
Page 11
6.5 Basic Weighing using Pre-entered Vehicle ID
You can have up to 250 vehicles stored in the Freeweigh console, using the Vehicle ID
number 1 to 250
Against each Vehicle ID you can store:
o Vehicle Name:
o Trailer: (enter <Yes> if you want this Vehicle to be a Trailer )
o Type Reference: This is the Vehicle Type for that Vehicle
If you do not have a Vehicle Type entered, then when you use this Vehicle ID you
either:
a: have to select a Vehicle Type
or
b: do not have permitted axle weights or gross vehicle weights to compare
against actual weights
o Permitted Train Weight: This is the maximum Train Weight that this vehicle can
have (only entered this vehicle is not a Trailer)
•
•
•
Weigh the vehicles as in Section 6.1 or 6.2
Press F4 to complete the operation and the VEHICLE IDENTITY window will appear
The Vehicle ID will be highlighted
o Press <Left Arrow> or <Right Arrow> to scroll around the Vehicles already stored
on the console
o Press <Enter> or <Down Arrow> to select your vehicle
• If there is a Vehicle Type already allocated to that vehicle the cursor will move down to
the Driver otherwise the cursor will move down to the Vehicle Type
o To find the correct Vehicle Type, use the <Left Arrow> or <Right Arrow> to find the
correct Vehicle Type and then either press <Enter>or <Down Arrow> to select
• You can now enter the:
o Driver
o Haulier
o Product
o Tare Weight:
And / or press <Print> to complete the transaction
6.6 Basic Weighing – Nett Weight Weighing
There are two methods of obtaining the Nett Weight of product on your vehicle:
a) To enter the Tare Weight of your vehicle and the Freeweigh Console will calculate the Nett
Weight from the Gross Weight less the pre-entered Tare Weight (see Section 6.5.1)
b) Weighing In and Weighing out. The Freeweigh Console can be set to subtract two
weighments that have been made by the same Vehicle within a defined time, and subtract
one Gross Vehicle Weight from the other Gross Vehicle Weight to derive the Nett Weight
of product used (see Section 6.6.2)
CHEKLODE® Freeweigh User Manual V 4.1 May 2011
Page 12
6.6.1 Net Weight from entry of Tare Weight
•
•
When the VEHICLE IDENTITY is requested, after entering the Vehicle ID and data, the
Tare Weight can be entered for the vehicle
In addition to the normal printout, there will be an further print of:
Weight 1:
Weight 2:
NETT
4500 kg
14000 kg
-----------9500 kg
Where Weight 1 is the pre-entered Tare Weight of the Vehicle
6.6.2 Nett Weight from “Weighing in and Weighing out”
•
To be able to “Weigh In and Weigh Out”, you need to set up the Console for this
operation in the “ENGINEER” Menu
You can access the “ENGINEER” by entering the correct password available in the
Technical Manual
Key presses
MENU DISPLAY
OPERATOR
↓
Password: (Login)
<Enter>
Password: ********
<Enter> Engineer Password<Enter>
ENGINEER
Under Range Limit:
Calibration Weight:
Zero Tracking Time Period
Language
Calibration Points:
Net Tare Time: 0 hrs
↓
↓
↓
↓
↓
↓
•
The “Nett Tare Time” is the time interval in hours between successive weighings of the
same vehicle which would activate the “Weigh In and Weigh Out” function. You need
to set it to the maximum time you need between successive weighings of the same
vehicle
•
In addition to the normal printout, there will be an further print of:
Weight 1:
Weight 2:
NETT
14000 kg
19000 kg
-----------5000 kg
CHEKLODE® Freeweigh User Manual V 4.1 May 2011
Tr.Number: 379
Page 13
Where:
Weight 1
is the pre-entered first weighing of the Vehicle
Weight 2
Tr.Number
NETT:
is the second weighing of the Vehicle
is the Transaction Number of the first weighing
is the difference in weight between the first reading and
the second reading
CHEKLODE® Freeweigh User Manual V 4.1 May 2011
Page 14
7. Storing /Amending Vehicle Information
7.1
Accessing the Tables of Data
•
•
•
•
•
•
•
o
o
o
o
o
o
o
o
7.2
To enter/amend Vehicle IDs, Types and permitted weights you need to enter the
PARAMETER menu
Whilst “Waiting for Vehicle”, press the Down arrow key and the MENU window will
change from “Operator” to “Password: (Login)”
Press the <Enter> key and type in 310156 followed by the <Enter> key
“PARAMETERS” will now be displayed in the MENU window.
You can now scroll round the different vehicle data that can be stored in the memory
of the instrument by pressing the <Right Arrow> or <Left Arrow> key
When you want to select that section of data, press the <down Arrow> key
The data you can access is:
TRANSACTIONS
VEHICLE ID
VEHICLE TYPE
VEHICLE DRIVER
VEHICLE HAULIER
VEHICLE PRODUCT
OPERATOR
PARAMETERS
Etc etc
Storing /Amending Vehicle IDs
1. To store/amend vehicle IDs, types and permitted weights you need to enter the
OPERATOR menu
2. Whilst “Waiting for Vehicle”, press the Down arrow key and the MENU window will
change from “Operator” to “Login”
3. Press the <Enter> key and type in 310156 followed by the <Enter> key
4. “PARAMETERS” will now be displayed in the MENU window.
5. Press the <Right Arrow> key until “VEHICLE ID” is displayed
6. Press the <Down Arrow> key once to “Vehicle ID Edit Code:?”
• To enter or edit data held against a Vehicle ID, press <Enter> to select that you
want to edit vehicle data
• Enter the Vehicle ID number
• Press <Enter> to store that Vehicle ID number
• Press <Down Arrow> key to show the “Name:”
• If you want to enter a Vehicle Name or Registration Number, press <Enter> key
and enter then name followed by the <Enter> key to save the same
• Press <Down Arrow> key to show “Trailer: No”
• If you want this Vehicle to be a Trailer, change the “No” to a “Yes” by pressing
<Enter>to edit the data, <Right Arrow> or <Left Arrow> to change the “No” to a
“Yes”, and then <Enter>to store the data
• By pressing the <Down Arrow> key the user can edit the:
o Type Reference:
o Driver Reference:
o Haulier Reference:
o Product Reference:
• You can then PRINT the data for that Vehicle ID by pressing <Enter> or PRINT
ALL vehicles
CHEKLODE® Freeweigh User Manual V 4.1 May 2011
Page 15
7.3
Storing Vehicle Types
To edit Vehicle Types key, get to the PARAMETERS part of the MENU screen as above
and using the <Right Arrow> key scroll across until you get “Vehicle “Type”
→ VEHICLE TYPE
↓ Vehicle Type Edit Code: ?
↓ Name: ?
↓ Axle Count: ?
↓ Permitted Axle Wt 1: ?
↓ Permitted Axle Wt 2: ?
………….. etc etc
↓ Permitted Gross Vehicle Wt:
?
↓ Permitted Train Weight: ?
↓ Group: Select by pressing <ENTER> and then <Right Arrow>
from
• NONE
• 2-3
• 3-4
• 4-5
• 2-3/4-5
• 2-3/4-6
• 2-3/4-7
• 2-3/5-6
• 2-3/4-5/6-7
↓ GROUP 1 Permitted Weight:
Etc
↓ PRINT
↓ PRINT ALL
etc etc
Vehicle driver, haulier and product can all be edited and stored by following the same
process. The main issue to remember is to always press the <Enter> key to store the data.
7.4
Storing Other Vehicle Data
You can store other data using the same process as above:
• Vehicle Driver
• Haulier
• Product
7.5
Maximum Storage Capacity on the Freeweigh Console
•
•
•
•
•
250 Vehicle IDs
99 Vehicle Types
32 Drivers
32 Hauliers
32 Products
CHEKLODE® Freeweigh User Manual V 4.1 May 2011
Page 16
8. Transaction Data
8.1 Maximum Data Storage on the Instrument
The instrument will store up to 100 transactions. The system can be set up to warn you
when the 100 transactions have been reached, or simply over-write the first transaction with
the next transaction.
If the system is set up to warn you when the memory is full, and the transaction data is not
downloaded to the USB stick, or a USB stick is not inserted into the Console, then further
transactions can be carried out on the instrument and the results printed, but the data will
not be stored.
If the USB stick is inserted into the Console, then all transactions will be recorded on the
USB stick.
8.2 Downloading the Data to the USB Memory Stick
In normal operating mode, without entering a password:
↓ OPERATOR ↔
↓ Password: (Login)
↓ Enter Vehicle Details:
↓ Driver Editable:
↓ Haulier Editable:
↓ Product Editable:
↓ Driver Editable:
↓
↓
↓
↓
↓
↓
↓
↓
↓
↓
↓
↓
↓
Date Year:
Date Month:
Date Day:
Time Hour:
Time Min:
Company Name:
Address L1:
Address L2:
Town:
County:
Post Code::
Tel:
Print Company Details:
↓ Automatic Print:
↓ CLEAR TRANSACTION MEMORY:
↓ EXPORT TRANSACTIONS
CHEKLODE® Freeweigh User Manual V 4.1 May 2011
↔ TRANSACTIONS
•
•
•
•
•
•
•
•
•
•
•
After Weighing
Never
Before Weighing
No
Yes
No
Yes
No
Yes
No
Yes
•
•
•
•
No
Yes
No
Yes
Page 17
•
•
•
Press the <Down Arrow> key until you get down to the “EXPORT TRANSACTIONS”
option and press the <Enter> key
Note: do not press <Enter> at any other point
o If you do not have the Memory Stick in the USB port, the MENU display will show
“No Memory Stick”
o The main display will show “EXPORT” and details of the data being exported
before returning to the weighing screen
Remove the Memory Stick and insert it into a PC where the new data will be appended
on to any previous data
The previous data will be erased from the Instrument
CHEKLODE® Freeweigh User Manual V 4.1 May 2011
Page 18
9. Configuration
9.1 Introduction
The instrument can be configured to operate in many different ways, to suit each application
The MENU section is at the bottom of the Instrument display
To access some parts of the MENU, a password is required
“OPERATOR”
9.2 MENU Instructions
OPERATOR
Sub categories for setting address headers, date and time, exporting and clearing of
transactions, summary reports and password login.
Password: (Login): Use this option to access the menus shown below. The Passwords are
available in the Technical Manual
TRANSACTIONS
This menu allows the user to go through and review the previous transaction results. These
can only be reviewed and no alterations can be made.
DATABASE ENTRY OPTIONS
These are located under the Operator login screen and follow after the Transactions menu
and before the Operator menu.
VEHICLE
VEHICLE
VEHICLE
VEHICLE
VEHICLE
ID: For editing vehicle IDs stored in the internal fleet management software.
TYPE: For editing vehicle types stored in the internal fleet management software.
DRIVER: For editing drivers stored in the internal fleet management software.
HAULIER: For editing hauliers stored in the internal fleet management software.
PRODUCT: For editing products stored in the internal fleet management software.
INSTALLATION
This gives access to the settings used to carry out the initial setup of the indicator.
Adjustments of any settings under this section should only be carried out by, or under the
supervision of, Central Weighing technical support.
STATUS
A to D counts, filtered and unfiltered, transaction number, stored transaction count,
database editing.
PARAMETERS
Factory set. Adjustments of any settings under this section should only be carried out by, or
under the supervision of, Central Weighing technical support.
CHEKLODE® Freeweigh User Manual V 4.1 May 2011
Page 19
MACHINE
Factory set. Adjustments of any settings under this section should only be carried out by, or
under the supervision of, Central Weighing technical support.
ENGINEER
Adjustment of some parameters may be required, namely, USB Function, Test Location and
Transaction Memory Full. Other settings are Factory Set. Adjustments of any settings under
this section should only be carried out by, or under the supervision of, Central Weighing
technical support.
CALIBRATION
Factory set. Adjustments of any settings under this section should only be carried out by, or
under the supervision of, Central Weighing technical support.
TRANSACTIONS
This gives information on the last transaction that was recorded by the system. This is read
only information and cannot be edited or altered.
9.3 OPERATOR MENU Flowchart
In normal operating mode, without entering a password:
↓ OPERATOR ↔
↓ Password: (Login)
↓ Enter Vehicle Details:
↓ Driver Editable:
↓ Haulier Editable:
↓ Product Editable:
↓ Driver Editable:
↓
↓
↓
↓
↓
↓
↓
↓
↓
↓
↓
↓
↓
Date Year:
Date Month:
Date Day:
Time Hour:
Time Min:
Company Name:
Address L1:
Address L2:
Town:
County:
Post Code::
Tel:
Print Company Details:
↓ Automatic Print:
↓
↓
↓
↓
CLEAR TRANSACTION MEMORY:
EXPORT TRANSACTIONS
PRINT SUMMARY REPORT
PRINT:
CHEKLODE® Freeweigh User Manual V 4.1 May 2011
↔ TRANSACTIONS
•
•
•
•
•
•
•
•
•
•
•
After Weighing
Never
Before Weighing
No
Yes
No
Yes
No
Yes
No
Yes
•
•
•
•
No
Yes
No
Yes
Page 20
Operator
→
↓
TRANSACTIONS (not able to be
modified in standard software)
↓
↓
↓
↓
↓
↓
↓
↓
↓
↓
↓
↓
↓
↓
↓
↓
↓
↓
↓
↓
↓
↓
↓
↓
System ID
Trans Number: 0
Test Location:
MODE: DYNAMIC
Axles Counted: 0
Vehicle ID:
Vehicle Type:
Haulier:
Driver:
Product:
Trailer ID:
Trailer Type:
Vehicle Axle Count: 0
Trailer Axle Count: 0
Vehicle Weight: 0kg
Trailer Weight: 0kg
Permitted Gross Vehicle Wt: 0kg
Permitted Train Weight: 0kg
GROUP:
UnderRangeLimit: 0kg
Weight Capacity Max: 0kg
Error Code: None
Tare Weight: 0kg
Linked Tare Wt Tr Number: 0
9.4 MENU with PARAMETER Password
Entering a Password
↓ OPERATOR ↔
↓ Password: (Login)
<Enter>
Password:********
There are several passwords that will enable you to access different parameters
• Parameter Password
• Machine Password
• Engineer Password
• Installation Password
CHEKLODE® Freeweigh User Manual V 4.1 May 2011
Page 21
Entering the Parameter Password
Key presses
MENU DISPLAY
OPERATOR
↓
Password: (Login)
<Enter>
Password: ********
<Enter> 310156 <Enter>
PARAMETERS
You can now scroll round and select the Menu you wish to access:
PARAMETERS → TRANSACTIONS → VEHICLE ID → VEHICLE TYPE →
VEHICLE DRIVER → VEHICLE HAULIER → VEHICLE PRODUCT → OPERATOR
→ PARAMETERS etc etc
Selecting any of the above and pressing <Down Arrow>:
9.4.1 Vehicle ID
9.4.2 Vehicle Type
→ VEHICLE ID
↓ Vehicle ID Edit Code:?
↓ Name: ?
↓ Trailer?
↓ Type Reference:?
↓ Driver Reference:?
↓ Haulier Reference:?
↓ Product Reference ?
↓ PRINT
↓ PRINT ALL
Etc etc
→ VEHICLE TYPE
↓ Vehicle Type Edit Code: ?
↓ Name: ?
↓ Axle Count: ?
↓ Permitted Axle Wt 1: ?
↓ Permitted Axle Wt 2: ?
………….. etc etc
↓ Permitted Gross Vehicle Wt: ?
Permitted Train Weight: ?
↓ Group: Select by pressing <ENTER> and then <Right Arrow>
from
• NONE
• 2-3
• 3-4
• 4-5
• 2-3/4-5
• 2-3/4-6
• 2-3/4-7
• 2-3/5-6
• 2-3/4-5/6-7
CHEKLODE® Freeweigh User Manual V 4.1 May 2011
Page 22
↓ GROUP 1 Permitted Weight:
Etc
↓ PRINT
↓ PRINT ALL
etc etc
9.4.3 Vehicle Driver
9.4.4 Vehicle Haulier
9.4.5 Vehicle Product
9.4.6 PARAMETERS
→ VEHICLE DRIVER
↓ Vehicle Driver Edit Code:?
↓ Driver:?
↓ PRINT
↓ PRINT ALL
→ VEHICLE HAULIER
↓ Vehicle Haulier Edit Code:?
↓ Haulier:?
↓ PRINT?
↓ PRINT ALL
→ VEHICLE PRODUCT
↓VEHICLE PRODUCT Edit Code:?
↓ PRODUCT:?
↓ PRINT
↓ PRINT ALL
→ PARAMETERS
↓ Vehicle Start Weight: 300kg
↓ Max Weight Difference: 100kg
↓ Min Similar Wts: 8
↓ Max Time Between Axles: 24000ms
↓ Min Time Between Axles: 100ms
↓ Max Vehicle Time: 90sec
↓ Max Axle Weight: 30000kg
↓ Error Display Time: 1000ms
↓ Mode: AVERAGE
↓ PRINT
CHEKLODE® Freeweigh User Manual V 4.1 May 2011
Page 23
9.5
MENU with MACHINE password
→ MACHINE
↓ System ID: ?
↓ Max + Zero Weight: 450kg
↓ Max –Zero Weight: 150kg
↓ Weight Capacity Max: 30000kg
↓ Shift Filter: 2
↓ Printer Eject Lines: 5
↓ Warm Up Time: 3 sec
↓ Settle Tolerance: 3
↓ Settle Tolerance Tare: 3
↓ Settle Weighings: 3
↓ Delay Before Zero: 100ms
↓ Minimum Samples: 7
↓ Settle Between: 3
↓ Weight Increment: 10kg
↓ PRINT
9.6 MENU with ENGINEER password
→ ENGINEER
↓ Under Range Limit: 475kg
↓ Calibration Weight: 9000kg
↓ Zero Tracking Time Period: 2sec
↓ Language: English
↓ Calibration Points: 1
↓ Nett Tare time: 0hrs
↓ Dynamic Corrector: 99.5%
↓ Max Zero Tracking Change: 10kg
↓ Show Weight Percentage: Yes
↓ Static Settling Time: 3000ms
↓ Static Sampling Time: 3000ms
↓ Auto Logoff Time: 60min
↓ Driver Alt: ?
↓ Haulier Alt: ?
↓ Product Alt: ?
↓ USB Function:
• Off
• Raw Data Export: No
• Transaction Export
↓ Test Location:
↓ Default Calibration
• No
• Yes
↓ Transaction Memory Full:
• Show Error
• Wrap Around
↓ Calibrate Checksum:
↓ CALIBRATE LEFT PAD
↓ CALIBRATE RIGHT PAD
↓ RESET TRANSACTION NUMBER ?
↓ PRINT
CHEKLODE® Freeweigh User Manual V 4.1 May 2011
Page 24
Calibration
Status
→ STATUS
↓ Pad Left Valid:
↓ Pad Right Valid:
↓ Pad Left 1 Range Corrector:
↓ Pad Left 2 Range Corrector:
↓ Pad Left 3 Range Corrector:
↓ Pad Left 4 Range Corrector:
↓ Pad Right 1 Range Corrector:
↓ Pad Right 2 Range Corrector:
↓ Pad Right 3 Range Corrector:
↓ Pad Right 4 Range Corrector:
↓ Pad Left Zero Corrector:
↓ Pad Right Zero Corrector:
↓ Pad Left Calibration Weight 1:
↓ Pad Left Calibration Weight 2:
↓ Pad Left Calibration Weight 3:
↓ Pad Left Calibration Weight 4:
↓ Pad Right Calibration Weight 1:
↓ Pad Right Calibration Weight 2:
↓ Pad Right Calibration Weight 3:
↓ Pad Right Calibration Weight 4:
↓ Pad Left Low Tare Limit
↓ Pad Right Low Tare Limit
↓ Pad Left High Tare Limit
↓ Pad Right High Tare Limit
↓ Number of Calibration Points Left
↓ Number of Calibration Points Right
↓ Default Calibration Used: No
↓ Calibration Checksum:
↓ APPLY DEFAULT CALIBRATION
↓ PRINT
→ STATUS
↓ Transaction Number: ?
↓ Transaction Stored: ?
↓ Live AD Pad Left: ?
↓ Live AD Filtered Pad Left: ?
↓ Live AD Pad Right: ?
↓ Live AD Filtered Pad Right: ?
↓ Live AD Count Pad Left: ?
↓ Live AD Count Pad Right: ?
↓ Live Raw Wt Left: ?
↓ Live Raw Wt Right: ?
↓ Live Wt Tared Left: ?kg
↓ Live Wt Tared Right: ?kg
↓ Live Raw Wt / Inc. Left: ?kg
↓ Live Raw Wt / Inc. Right: ?kg
↓ Live Wt Tared /Inc. Left: ?kg
↓ Live Wt Tared /Inc Right: ?kg
CHEKLODE® Freeweigh User Manual V 4.1 May 2011
Page 25
9.7 MENU with INSTALLATION password
→ INSTALLATION
↓ Parameter Password: ?
↓ Machine Password: ?
↓ Engineer Password: ?
↓ Installation Password: ?
↓ PAIR PRINTER
↓ PAIR LEFT PAD
↓ PAIR RIGHT PAD
↓ PRINT
CHEKLODE® Freeweigh User Manual V 4.1 May 2011
Page 26
10. Batteries
10.1 Recharging the Batteries
The Instrumentation can operate from either an AC voltage of 90 to 264 volts, or a DC
voltage of 9 to 18 volts DC – 0.75 Amps maximum.
The approximate discharge time of each battery is:
•
Instrumentation
5-8 hours (this can be prolonged by the use of the optional 12V
DC cable)
•
Weighpads
8 hours
10.2 Care of Batteries
The battery in the CHEKLODE® Freeweigh readout unit is a sealed 12v lead-acid
battery. Its characteristics differ from those of the 'Ni-Cad' batteries in that the life
can be reduced if it is allowed to become fully discharged. It is good practice,
however, to ensure that the battery is kept at or near its fully charged state. The
sealed lead-acid battery should last for at least 5 years before replacement is
necessary.
CHEKLODE® Freeweigh User Manual V 4.1 May 2011
Page 27
11. Sample Weighing Ticket Printout
CENTRAL WEIGHING
HARTLEBURY TRADING ESTATE
KIDDERMINSTER
WORCS
DY10 4JB
Tel: 01299 251242
Date:
17/05/2011
Time: 16:08
Test Location: Central Weighing Ltd
System ID:
009122
Number:
13
MODE:
DYNAMIC
Vehicle Type: CAR
---------------- Weight (kg) ----------------Axle
Weighed
1:
5400
2:
11500
Gross: 16900
Permitted
6500
10500
17000
Overload
1000
OVER
L%
60
50
R%
40
50
Operator Signature: …………………………………………………….
Driver Signature:………………………………………………………….
CHEKLODE® Freeweigh User Manual V 4.1 May 2011
Page 28
12. Printer
The printer fitted to the instrumentation is of the thermal paper type. It has a warning
light to indicate that paper is running low. It is also fitted with an auto cutter.
12.1 Opening / Closing the Front Cover
•
•
To open the front cover, raise the grey lever on the front cover and pull upwards.
The front cover should open fully away to the top of the Instrumentation.
When closing the front cover, fold the front cover down into its original position and
close it firmly.
12.2 Paper Feeding
Press the feed button on the right hand side of the printer once. The paper is fed by one
line. The paper is continually fed if the button is held. NEVER pull the paper, always use
the feed button.
CHEKLODE® Freeweigh User Manual V 4.1 May 2011
Page 29
13. General Care and Maintenance
13.1 Instrumentation
During wet weather, ensure the case is firmly closed to protect the instrument and printer.
Avoid applying excessive pressure to the display windows otherwise sensitive internal
electronics may be damaged.
Do not use solvents on the display windows.
When not in use, store the Instrumentation in a cool dry area. Remove the printer paper
roll from the readout during such periods of storage and keep it wrapped in a sealed
waterproof container.
13.2 Calibration of the CHEKLODE® Freeweigh
The CHEKLODE® Freeweigh should be calibrated at intervals not exceeding twelve months.
If the system is in use on a daily basis, a calibration interval not exceeding six months is
recommended.
13.3 Error Messages (! Button)
It is most uncommon that the instrument should detect a fault. The indicator comes with
its own internal fault checking system.
In the event of a fault, the red LED on the ! button will flash. Press the button to display
nature of error on the main LCD.
CHEKLODE® Freeweigh User Manual V 4.1 May 2011
Page 30
14. Specifications
WEIGHPAD
Freeweigh overall dimensions: 900 x 500 x 33mm
DIMENSIONS
Freeweigh active weighing area: 700 x 315 x 33mm
WEIGHPAD
15,000 kg per pad (30,000 kg per axle)
CAPACITY
Aircraft grade aluminium construction for strength and lightness
ACCURACY
50 kg divisions
CERTIFICATION
Pre-calibrated, traceable to National Standards with factory calibration
certificate
Option: UK and EC Legal-for-Trade Certificate
WEIGHT
28.5 kg per pad
SUPPLY VOLTAGE
90 to 264 volts AC 50/60 Hz (wide range without changing voltage settings)
or 9 to 18 volts DC - 0.75 Amps maximum
BATTERY LIFE
8 hours after an 8 hour (maximum) recharge from empty
KEYBOARD &
DISPLAY
Alphanumeric keypad under a polyester film
PORTS
Monochrome Transflective 320 x 200 pixels display with backlight for use in
low ambient light levels
100 MB Ethernet port (RJ45)
1 USB port with a 1 GB USB Memory Stick for import of parameters and
vehicle data and export of weighing data
TALLY ROLL
PRINTER
Thermal with integral rechargeable battery
Thermal paper roll
• 80 mm x φ 50 mm Max)
• Type: Thermal Paper
• Paper width : 80 ± mm
• Paper thickness : 65 ± 5µm
• Roll diameter : 50mm maximum
• Printing surface : Outside of roll (surface). Core :φ 12mm
(inner diameter) φ 18mm (outer diameter)
Printer battery is being recharged whenever the CHEKLODE® Freeweigh is
connected to an AC supply
CHEKLODE® Freeweigh User Manual V 4.1 May 2011
Page 31
PRINTOUTS
Data printed to include:
•
•
•
•
•
•
Address
Date and Time
Transaction Number
Vehicle ID
Vehicle Class
Up to 16 Axle Weights and Gross Weight
Optional:
•
•
•
•
SOFTWARE
SPECIFICATION
Nett Weights
Law Enforcement/Overload Warning Programmes
Overload Warning by vehicle class
Line for Driver or Officer Signature
Weighing data can be stored in the Freeweigh console or downloaded to the
USB memory stick for transfer to a PC
Freeweigh Lite is free PC software which downloads the most recent
transactions into a spreadsheet This software also allows the historic recall of
weighing data between selected dates.
Optional:
•
•
Freeweigh DB for Windows: PC software which allows full analysis and
reporting of the data supplied on the USB stick
Freeweigh Live for Windows: PC software which allows full data analysis
and reporting of data supplied through the Ethernet link to a PC
CHEKLODE® Freeweigh User Manual V 4.1 May 2011
Page 32
15. Accessories and Spare Parts
The following list gives details of items available as accessories or spares for use with the
CHEKLODE® Freeweigh Portable Vehicle Weighing System.
ITEM
ORDER REF.
Standard Items supplied for Freeweigh Lite
x 2 Freeweigh weighpads
9200RF
x 2 Mains Battery Chargers for weighpads
x 1 Weighing Console with Printer Roll
9207
2000
x 1 Mains Battery Charger for Weighing Console
527G
x 1 Car Battery Power Supply
9206
x 1 USB Memory Stick
2000W
x 1 Spare Printer Roll
N/S
Options
Plastic Lead Up Ramps
2006
Plastic Levellers 2.7m long
Freeweigh DB software for PC
2005
2001
Freeweigh Live software for PC when direct Ethernet link to Console
2001L
Spares
Printer Rolls (pack of 20)
415
Mains Cable for Instrumentation
527G
x 2 Mains Battery Chargers for Weighpads
9207
x 1 Mains Battery Charger for Weighing Console
527G
x 1 Car Battery Power Supply
9206
x 1 USB Memory Stick
2000W
CHEKLODE® Freeweigh User Manual V 4.1 May 2011
Page 33
16. Diagnostics
Displayed
Warming up
Left Pad Not Connected
Right Pad Not Connected
Left Pad Not Calibrated
Right Pad Not Calibrated
Pad Left Weak Signal
Pad Right Weak Signal
Transaction Memory Full
USB Memory Full
USB Memory Read/Write Error
P20 Left ADC Output Too Low
P20 Right ADC Output Too Low
P21 Left ADC Output Too High
P21 Right ADC Output Too High
P23 Left Pad Range Calib. Error
P23 Right Pad Range Calib. Error
P24 Left Zero Offset Too Low
P24 Right Zero Offset Too Low
P25 Left Zero Offset Too High
P25 Right Zero Offset Too High
P26 Left Zero Track Weight High
P26 Right Zero Track Weight High
P27 Left Zero Track Weight Low
P27 Right Zero Track Weight Low
CHEKLODE® Freeweigh User Manual V 4.1 May 2011
Condition
System is warming up.
Bluetooth connection is
not possible to the pad.
Action to take
Wait.
Make sure the pads are:
- powered;
- paired;
- within range;
No calibration setting for
pad.
Perform calibration on pad.
Transferred data loss
from pad.
Check pads:
- orientation;
- distance;
Stored transaction
counter is at 100.
Inserted USB memory
stick does not have
enough space for Raw
Data export.
An error occurred during
Raw Data export.
ADC reading is lower
than 6400.
ADC reading is higher
than 1.000.000.
Calculated weigh
increment is less than 8.
Export transactions to memory
stick and clear memory.
Free up space on memory stick.
Remove USB memory stick and
check it in a computer.
Refer to ‘Fault diagnostics and
error messages’ by Central
Weighing.
Refer to ‘Fault diagnostics and
error messages’ by Central
Weighing.
Refer to ‘Fault diagnostics and
error messages’ by Central
Weighing.
Zero offset is less than
1% of the total range
below zero reference
point.
Refer to ‘Fault diagnostics and
error messages’ by Central
Weighing.
Zero offset is more than
3% of the total range
above zero reference
point.
Refer to ‘Fault diagnostics and
error messages’ by Central
Weighing.
Zero tracking failed
because the weight was
more than Machine /
Max + Zero weight.
Refer to ‘Fault diagnostics and
error messages’ by Central
Weighing.
Zero tracking failed
because the weight was
less than Machine /
Max – Zero weight.
Refer to ‘Fault diagnostics and
error messages’ by Central
Weighing.
Page 34
P30 Weight Over Capacity
P31 Weight Below Under Range Limit
P40 Printer Fault
P55 Calibration Loss
CHEKLODE® Freeweigh User Manual V 4.1 May 2011
Weight is 9 weight
increments over
Machine / Weight
Capacity Max.
Weight is below
Engineer / Under
Range Limit.
Not used yet.
Saved calibration
checksum is different
from calculated
checksum.
Refer to ‘Fault diagnostics and
error messages’ by Central
Weighing.
Refer to ‘Fault diagnostics and
error messages’ by Central
Weighing.
Perform calibration on pads.
Page 35