1
USB-FTP Recorder System
MPEG- USB audio recorder with FTP upload and streaming, supervised by ICgraph.
App User Manual
Version
1.1
Firmware va1.1
Released 3Oth October 2010
Supported on:
Annuncicom 100/200
Index
1 Introduction................................................................................................4
1.1 About the USB FTP Recorder application..................................................4
1.2 USB FTP Recorder firmware features.........................................................5
1.3 ICgraph control software features..............................................................6
1.4 AudioLogger recording software features...................................................7
1.5 About this manual......................................................................................8
Links to chapters.....................................................................................8
Links to the Dictionary..............................................................................8
Bookmarks pane in Adobe Acrobat.........................................................8
2 Hardware Description.............................................................................10
2.1 Annucicom..............................................................................................10
2.2 Push button and led indication.................................................................11
2.3 USB stick.................................................................................................11
2.4 Loading the USB FTP Recorder Firmware................................................11
3 Annuncicom configuration.....................................................................12
3.1 Settings page...........................................................................................12
3.2 Application page......................................................................................17
State page.............................................................................................17
Configuration page.................................................................................18
3.3 Configuration example (server IP = 192.168.10.2)....................................21
4 Exstreamer configuration.......................................................................22
5 Software configuration............................................................................24
5.1 FTP server...............................................................................................24
5.2 AudioLogger............................................................................................24
Running modes......................................................................................24
Install - Uninstall - Start - Stop...............................................................24
Main configuration file............................................................................25
Main log file............................................................................................26
Audio logger component........................................................................27
5.3 ICgraph....................................................................................................28
ICgraph configuration.............................................................................29
5.4 Email configuration...................................................................................29
6 ICgraph operation....................................................................................31
6.1 Push-buttons description.........................................................................34
6.2 Error indications description.....................................................................35
7 Notes.........................................................................................................37
8 Dictionary.................................................................................................39
9 Legal Information.....................................................................................41
2
Illustration Index
Illustration 1: USB-FTP Recorder System............................................................................................................. 4
Illustration 2: RS232 connection for push-button and led ..................................................................................... 7
Illustration 3: Annuncicom configuration page.................................................................................................... 14
Illustration 4: Exstreamer configuration............................................................................................................... 15
Illustration 5: ICgraph screen (without devices connected)................................................................................. 20
Illustration 6: ICgraph screen (with devices connected)...................................................................................... 20
Illustration 7: ICgraph screen: Annuncicom window.......................................................................................... 21
llustration 8: ICgraph screen: Exstreamer window.............................................................................................. 21
3
1 Introduction
1.1
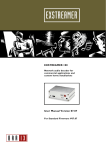
About the USB FTP Recorder application
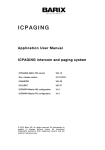
With Barix “USB FTP Recorder System” it's possible to record to an attached USB stick, upload
the recorded audio files to FTP server, record the audio stream on a Windows PC (with
AudioLogger software) and supervise the application with ICgraph software.
Below a schematic of the system.
ANNUNCICOM (x8)
mic/line in
indication led
Annuncicom
+
USB stick
push button for recording activation
network
CONTROL ROOM
computer with:
- ICgraph software
- AudioLogger recording software
- FTP software
- Syslog software
- NTP software
network
network
Exstreamer
Illustration 1: USB-FTP Recorder System
The device (Annuncicom 100/200) records the audio locally (and then sends the files to FTP
server). It also sends the audio streaming to AudioLogger for recording and to an Exstreamer for
playing.
The recording and streaming audio format are MPEG mono, with selectable sampling frequency,
bit-rate and quality.
All the system (maximum 8 Annuncicom) is supervised with ICgraph software.
With ICgraph is possible to select for playing, the audio signal coming from the Annuncicom: the
signal will be played on Exstreamer.
The commands of start/stop recording are local (with push button and indication led) or, remote,
4
Introduction
from ICgraph.
The USB FTP Recorder requires that a USB Mass Storage disk be attached to the device,
formatted with the FAT16 or FAT32 file system.
The application is contained in ABCL firmware package (also as source).
The complete system package (ABCL package + AudioLogger + ICgraph + this manual) is
downloadable from the Barix website: it's stored under 'ABCL applications' in the downloads
section; select 'USB-FTP Recorder System'.
1.2
USB FTP Recorder firmware features
•
•
•
•
•
•
•
•
•
•
•
•
•
1.3
MPEG audio recording on USB memory (FAT16 and FAT32 file system);
audio format: MPEG1 32, 44.1, 48 kHz; MPEG2 16, 22.05, 24 kHz (selectable quality);
file name: month_day_hour_minutes.mp3;
sending of recorded files to FTP server;
programmable sending to FTP sever, at hour (daily) or time interval;
sending of two contemporary streams to control room for recording and playing;
recording: streaming
on configurable TCP port (default 2020); playing: broadcast UDP
streaming on configurable ports (default from 3031 to 3038);
recording+streaming start/stop remote (from ICGraph) or local via logic contact (push
button) with led indication;
clock synchronization with NTP server;
all parameters selectable on web interface;
communication protocol with ICgraph software.
remote update of the firmware;
syslog;
automatic network configuration (BOOTP, DHCP, AutoIP and IPzator) as well as manual
static IP
configuration;
Features SonicIP ® announcing the IP address on power up over the audio outputs
(configurable).
ICgraph control software features
control boxes for 8 Annuncicom;
for each Annuncicom there are the following controls:
•
start/stop streaming (for playing);
•
start/stop recording/streaming;
•
start uploading to FTP server;
•
start/stop playing on Exstreamer (Ex 1) (when recording is not active, it needs to activate
also streaming to activate playing);
•
open browser on device web;
for each Annuncicom there are the following indications:
•
remote device connected or not connected;
•
streaming active;
•
FTP uploading active;
•
FTP error;
•
TCP error (error on AudioLogger recording);
•
USB memory on error/not present;
•
USB memory occupied (kilobyte);
•
no sync with NTP server.
5
Introduction
It is possible to control the notification of the following warnings via email
file icgraph.cfg.):
•
remote device not connected;
•
remote device connected;
•
recording/streaming started;
•
recording/streaming ended;
•
FTP uploading started;
•
FTP uploading ended;
•
FTP error;
•
USB memory partially full;
•
USB memory full;
•
USB memory not present;
•
clock error: no sync with NTP server.
(enabling/disabling from
All system activities are logged on file ICgraph.log.
The current logs are showed pushing Show LOG button.
1.4
AudioLogger recording software features
AudioLogger was made from Lake of Soft Ltd. and you can download it for free from
www.Barix.com (under Download – Software).
It can be started as service or as normal program. The advantage of AudioLogger is that it saves
the audio files automatically in a folder with the current date or name.
For every Annuncicom and every day, is automatically created (inside /record /audiologger
directory) a directory named roomname_day_month_year, and inside it are saved the MP3 files
roomname_hour_minutes_seconds.mp3.
The maximum files size is configurable.
File type is MP3.
Multiple streams from multiple Barix devices can be recorded on same port at the same time.
AudioLogger will run in the background, there is no GUI. It opens only two TCP ports, where your
Barix devices can stream to.
The AudioLogger.ini file contains the configuration of AudioLogger.
There you can define:
•
file length (in seconds)
•
file length (in bytes)
•
folder name to save the files
•
file name schema
•
update time for the AudioLogger.ini
•
TCP port numbers
•
and some other parameters.
1.5
About this manual
Links to chapters
References to chapters (e.g. X Chapter name) are red and underlined and serve as direct links
when viewed in Adobe Acrobat Viewer. Click on the link to jump to the referenced chapter , click on
the left arrow icon to jump back to where you came from .
Links to the Dictionary
Some technical terms (e.g. DHCP) are underlined and red. Click on them to jump to the dictionary
6
Introduction
at the end of this manual, click on the left arrow icon to jump back.
Bookmarks pane in Adobe Acrobat
The complete “Table of Contents” is available in Adobe Acrobat Viewer. Click on the “Bookmarks”
pane tab on the left side of Adobe Acrobat Viewer to open it. Click on any bookmark to directly
jump to the corresponding part of the manual.
7
2 Hardware Description
2.1
Annucicom
The audio signal is fed to Annuncicom through line input connectors: Terminal Block on
Annuncicom 200 and RCA on Annuncicom 100.
For the connection details, see the “Quick Install Guide” supplied with the device.
A printed version is included in the box, if you have lost it, a new one can be downloaded from our
site www.barix.com.
It's possible to use a push button to start/stop recording, and a led for state report.
They must be connected to RS232 serial port with the following schematic.
9
5
470 ohm
6
1
Illustration 2: RS232 connection for push-button and led
2.2
Push button and led indication
Press the push button to start recording/streaming.
Press again to stop.
In the table below there are the led indications.
Led state
Indication
OFF
Device OFF/upload FTP active
ON
Device ready
200 ms ON, 200 ms OFF
Error (NTP, USB, FTP)
1000 ms ON, 1000 ms OFF
Recording/streaming active
2.3
USB stick
Barix do not supply USB sticks, you will need to provide one of your own.
2.4
Loading the USB FTP Recorder Firmware
No Barix device is supplied with the USB FTP recorder application preloaded; you will need to
update the firmware in the device.
The ABCL package is inside the “USB FTP Recorder System” package, Unzip the package and
8
Hardware Description
follow the instructions in the '_Readme1st' file inside to load the application.
After loading the ABCL firmware and rebooting the device, you need to revert to the factory
defaults as described in Chapter 3.1. Now your device is ready to run the FTP MP3 application,
and you can continue configuring it following this manual.
9
3 Annuncicom configuration
You can adjust network settings and monitoring settings of Barix devices via the device's Web
interface. To enter the configuration mode you will need:
• the IP address, as announced over the audio outputs (see the Quick Install Guide)
• a standard web browser
Open your web browser and type in the IP address of the Barix device in the URL field and hit the
“Enter” key.
• Example: “192.168.0.12”
• When Annuncicom is properly configured inside the USB-FTP Recorder System, it's possible to
open the Web interface pressing the button “Device Web” from ICgraph.
The USB FTP recorder Control page will show up. Click on the needed button to navigate to the
corresponding web UI page (e.g. click on the “Network Configuration” button to open the network
configuration page).
3.1
Settings page
Use SonicIP
If set to "yes", the device will announce its IP address over the audio output when the device boots
up. The default setting is: "yes”.
IP Address
Enter the 4 values of the desired device IP address e.g.: "0.0.0.0" for automatic discovery
(DHCP/Bootp, IPzator, AutoIP), or a specific IP for an internal LAN.
Default value: "0.0.0.0"
Netmask
Enter the 4 values of the desired Static IP, e.g.:"0.0.0.0" for a default Netmask depending on the
used IP Address. "255.255.255.0" for a C class network.
Gateway IP Address
Enter the 4 values of the desired Gateway IP address e.g.: "0.0.0.0" for no Gateway, or the IP of
the gateway in your LAN.
Note: The Gateway has to be set only when connecting to other devices over the WAN (through a
router).
Default: "0.0.0.0"
Primary DNS
In this field you can give the desired primary and alternative DNS IP address to be able to connect
to URLs (e.g. www.radio.com). Example: "195.186.1.111"
Default: "0.0.0.0"
Alternative DNS
In this field you can type the desired alternative DNS IP address in case the primary DNS is not
reachable.
Example: "195.186.4.111"
Default: "0.0.0.0"
10
Annuncicom configuration
Syslog Address
Destination address for syslog messages sent by the BCL program via the SYSLOG command.
Set this to your syslog logging machine, if your syslog messages are recorded centrally.
If set to 0.0.0.0, syslog messages are broadcasted.
Default: "0.0.0.0"
DHCP Host Name
Name of the device sent in DHCP request. If left empty, a name based on the device's MAC
address is generated automatically. Enter up to 15 Characters.
Web server port
Defines the port where the webserver of the device can be reached. If set to "0" the default HTTP
port (80) is used.
Default Ethernet Port
On devices with dual-ethernet connection this parameter selects the default port to be used.
If you change this parameter do not forget to connect the Ethernet cable to the proper port on the
rear of the device.
Use Serial For
Select “BCL Application”.
Default: "BCL Application"
Baud rate
Select the serial transmission speed ("300" to "230400" Baud).
Default: "9600"
Data bits
Select "7" or "8" data bits.
Default: "8"
Parity
Select "no", "even" or "odd" parity.
Default: "no"
Stop bits
Select "1" or "2" stop bits.
Default: "1"
Handshake
Select the type of handshake:
RTS/CTS lines not used: "none"
RS232/RS422: "Software flow control(XON/XOFF)" or "Hardware flow control (RTS/CTS)"
RS485: "RS485 direction control"
Default: "none"
Reset Function
Enable or disable the "Reset" function on the Reset button and on the WEB UI. In order to restart
the device press the Reset button once.
Default: "enabled"
Factory Defaults
Enable or disable the "Factory Defaults" function on the Reset button. In order to revert all settings
to factory defaults keep the Reset button pressed until the red LED starts blinking (approx. 10
seconds).
11
Annuncicom configuration
Default: "enabled"
Update Function
Enable or disable the WEB Update function of the device.
If the Update function is disabled, the only way to update the firmware is to use the serial rescue.
Default: "enabled"
Set Password
This is visible as long as no password is set.
Enter a password (up to 25 characters) and hit the "Apply" button. After the restart you should
close the browser window and open a new browser window. You will be asked to supply user
name and password. The user name can be omitted but the password has to be supplied in order
to see the web configuration.
Old Password / New Password
These fields are visible as long as a password is set.
To allow free access (clearing the password) enter the old password and leave the field "New
Password" empty. Enter the old password in the password field above the "Apply" button as well
and then hit the "Apply" button.
After the restart you will not be asked for user name and password anymore.
To change the password enter the old password and enter the new password in the field "New
Password". Enter the old password in the password field above the "Apply" button as well and
then hit the "Apply" button.
After the restart you will be asked for user name and password. The user name can be omitted but
the new password has to be supplied in order to see the web configuration.
3.2
Application page
At the bottom of the page there are the following buttons:
Config - switch to ftp-usb recorder configuration page
State - switch to ftp-usb recorder state page
Start - start recording to USB
Stop - stop recording or playing
USB List - show current list of USB directory
Upload - upload all USB files to FTP immediately
Send Command - send a typed command like FTP client
State page
The header shows the current state (typically "idle"). If device fulfils a command, the state is
updated for each 2 seconds in format:
<command> [<parameter>] by <input> : <date&time>
Terminal window below shows the latest FTP command and device reply (up to 500 characters). It
allows to use this page like FTP client (send commands by button and get reply).
12
Annuncicom configuration
Command set:
"OPEN <FTP IP>" -- open FTP
"CLOSE" -- close FTP
"LIST" -- get FTP "dir"
"NLST" -- get FTP "ls"
"RETR <filename>" -- get file from server
"STOR <filename>" -- send file to server
"UTXT <filename>" -- get existing USB text file
"ULST" -- get USB directory
"UDEL <filename>" -- delete USB file
"UPLD" -- upload USB directory to FTP
"PLAY <filename>" -- play USB mp3 file
"UREC <filename>" -- record USB mp3 file
"FREC <filename>" -- record FTP mp3 file
"QUIT" -- quit & end of program
...and also many other usual FTP commands directly from FTP server, for example, USER, PASS,
CWD, DELE, HELP, SYST, STAT, etc.
All these commands can be sent also from serial terminal connected to COM port or by datagrams
to UDP command port 12301. Start/stop recording/streaming are triggered also with the push
button connected to RS232 (see chapter 2.1).
Configuration page
To store the settings click on "Apply" at the bottom of the page.
The device will restart with the new settings.
NTP Server
Enter the IP or DNS address of the desired NTP Server (e.g. "80.96.120.253"). When a valid
NTP Server is given, the internal clock is setted at start up and during the normal operating.
Time Zone
Enter the time zone information for your geographic location in order to display the correct local
time.
Input source
Choose the desired input source.
Default setting is "Mic".
Microphone gain
Choose the desired gain ("21" - "43.5" dB) for the microphone.
Default setting is "21" dB.
A/D amplifier gain
Choose the desired gain ("-3" - "19.5" dB) for the A/D amplifier.
Default setting is "-3" dB.
13
Annuncicom configuration
Encoding
Choose between different encoding types and sampling frequencies.
Default encoding is "MPEG1/48kHz".
Encoding quality
Choose the encoding quality from "0" (lowest) to "7" (highest).
Default quality is "0".
Volume
Choose between "0"% and "100"% in 5% steps.
Default: "50"%
Destination FTP Server
Enter IP or DNS address of the FTP server.
User ID (Login Name)
Enter your User ID for access to FTP server.
Password
Enter your password for access to FTP server.
To clear the password, enter 25 arbitrary characters.
Path
Enter path to the destination directory on the server.
NOTE:
A directory with this name must be present inside root directory of FTP server.
This name must correspond to the labels inside ICgrag.cfg file (annucicom1 - annucicom8).
Upload Period / Time
Enter the period (time interval: amount of minutes) or daytime (in "hh:mm" format) in order to
automatically upload the recorded USB mp3 files to FTP server.
Note:
The empty value will completely disable FTP upload and store MP3 files only locally
on the USB disk.
Default: empty (disabled). The value 0 will result in direct record to FTP with parallel
saving on USB disk (you can just remove USB disk if it is not necessary) (in this mode
Start/Stop Recordcommands on ICgraph do not work).
Destination TCP/UDP Sockets
Enter "IP:port" or "DNS:port" for streaming to receiving TCP backup (AudioLogger) or playing
devices (Exstreamer - for UDP you can use also broadcast IP for multiplying or cross
streaming). Empty Socket will disable the proper stream.
14
Annuncicom configuration
3.3
Configuration example (server IP = 192.168.10.2)
Illustration 3: Annuncicom configuration page
15
Annuncicom configuration
4 Exstreamer configuration
On the Exstreamer must be installed the Exstreamer standard firmware that can be downloaded at
the following link:
http://www.barix.com/downloads/Exstreamer_Standard_Firmware/1971
For the firmware installation instructions see:
http://wiki.barix.com/index.php5/FW_Update (web update)
To enter the configuration mode you will need:
the IP address, as announced over the audio outputs (see the Quick Install Guide)
a standard web browser
Open your web browser and type in the IP address of the Barix device in the URL field and hit the
“Enter” key.
Example: “192.168.0.12”
For configuration see help on web UI (right side).
All the settings must remain at default value, except Streaming Mode and Own Name:
Mode = 4 - Streaming Receiver
Own Name = ex_1
Note:
This name must correspond to the labels inside ICgrag.cfg file.
When Exstreamer is properly configured inside the USB-FTP Recorder System, it's possible to
open the Web interface pressing the button “Device Web” from Icgraph.
16
Exstreamer configuration
Illustration 4: Exstreamer configuration
17
5 Software configuration
5.1
FTP server
The FTP server must be configured with a directory for each Annuncicom, with same name setted
on "path" of Annuncicom configuration page.
Username and password must correspond to that setted on Annuncicom configuration page.
5.2
AudioLogger
The configuration is inside the file audiologger.ini.
Inside ipLookup.txt file there is a table with Annuncicom name-IP address association.
Install instructions you can find in the readme.txt which is contained in the Audiologger folder.
Running modes
Under Windows NT/2K/XP/2003: either as service, or as console application.
Under Windows 95/98/ME: console application only.
Install - Uninstall - Start - Stop
To install the application as a service, run it once with /install switch:
>audioLogger.exe /install
Make sure it was not installed as a service before (see uninstall).
To uninstall this application from services, run it once with /uninstall switch:
>audioLogger.exe /uninstall
Use Service Manager to start/stop the "IP Logger" service, or run this application with /start or
/stop switch to start or shutdown the service:
>audioLogger.exe /start
>audioLogger.exe /stop
To suppress output messages, in addition use /q switch, for example:
>audioLogger.exe /q /install
>audioLogger.exe /q /start
To run this application in console mode rather than as service under WinNT/2K/XP/2003, use
the /win95 switch:
>audioLogger.exe /win95
A console window will be created, where application's output will be directed.
Press ENTER inside this console window to exit application normally.
WARNING! Do not terminate the application by closing the console window.
Some resources and data may be lost in this case.
NOTE: Console mode is the only possible running mode under Windows 95/98/ME, regardless
of /win95 switch.
Main configuration file
When started, application (in either console or service mode) opens the main configuration file,
which should be located in the same directory as main .exe file, and named the same, but with .ini
extension ("audioLogger.ini" by default).
Edit all required configuration parameters, before starting the application for the first time.
There are three different types of configuration sections. Each section has unique name:
[srv.config]
This section contains configuration parameters that apply to main application.
[SLG.NN]
These sections contain configuration parameters that apply to individual components only (NN
specifies the number of a component to which this section applies).
18
Software configuration
The content of .ini file could be changed at any time. Application will re-read it periodically
("refresh.interval" parameter), and apply any changes as necessary (new components will be
created, or some components will be removed, and new configuration parameters will be applied
as needed).
NOTE: since application can re-read the .ini file at any time, make sure you made ALL REQUIRED
CHANGES AT ONCE. The best way to ensure this is by editing a copy of main .ini file, and then
overwriting the main .ini file with a new copy.
Or, simply stop the application, make required changes and restart it.
When application is running as a service, it is also possible to pause/resume it using Service
Manager. You can safety edit main .ini file when service is paused.
Main log file
Application writes some output diagnostic messages into main log file. The name of this file could
be configured in the main .ini file ("log.name" parameter) and the level (amount) of messages is
specified by the "log.mode" configuration parameter.
When running in console mode, same messages are also written into console window.
Audio logger component
This component has one TCP server component listening on port number specified by "port"
parameter.
When new connection is established with server, it creates a new "logger" module, which simply
writes all incoming data into file (or files) specified by "fileCount" and "fileNameFormat.NN"
parameters. Refer to ini file for more details about file names.
All files are created in a folder, specified by "rootFolder" parameter. It is not possible to create any
files outside this folder. (HACK: use ".." to go up one level).
File name can contain IP address and port of remote connection. If "iplookupFile" parameter
specifies existing lookup file, symbolic names will be used instead of IP address when possible.
If no data will be received within "dataTimeout" interval, server will close the connection and
"logger" module will be destroyed. Same will occur if remote side drops connection.
In addition, each file may have own (or default) max size and max writing time.
Default max size (in bytes) for all files is specified by "maxSize" parameter.
Individual file may have own max size, specified by "maxSize.NN" parameter.
When size of file exceeds specified max size, it will be close and new file will be created.
Therefore it is important that file name includes seconds or milliseconds in its name.
Default max writing time (in seconds) for all files is specified by "maxTime" parameter.
Individual file may have own max writing time, specified by "maxTime.NN" parameter.
When writing into file was performed for a period longer than specified max value, a new file will be
created.
Therefore it is important that file name includes seconds or milliseconds in its name.
Both max size and max writing time values may be set to 0, in which case no max limits will be
applied.
5.3
ICgraph
ICgraph is developed with Sun´s Java development kit 5.0 and is compatible to Sun Java Runtime
Environment (JRE) 6.0 and probably earlier versions. This must run on the ICgraph PC.
This JRE is available for free for many operating systems (e.g. Windows, Mac, Linux) and is
downloadable from : www.java.sun.com
Sun JRE should be installed first on the PC, if this is already installed on the PC you should go to
the next step. Otherwise please download and install the JRE on your PC.
Note, we have tested the application with JRE6.0, this JRE version should be also backward
compatible to JRE 5.0.
Please reboot the PC after the JRE installation!
For ICgraph detailed configuration information see ICgraph manual here:
19
Software configuration
www.barix.com/downloads/file/ICgraph__Graphical_Intercom_Java_Application_User_Guide_V14
0_PDF/6951/221
ICgraph configuration
ICgraph communicate with Annucicom devices using UDP port 12301
With the following instructions says to Exstreamer which channel (Annuncicom) to play:
MB|ex1_on#r1|0|0|0|0|S=udp://0.0.0.0:3031|ex_1|| #switch ON Exstreamer 1 to annuncicom 1
stream
MB|ex1_on#r2|0|0|0|0|S=udp://0.0.0.0:3032|ex_1|| #switch ON Exstreamer 1 to annuncicom 2
stream
MB|ex1_on#r3|0|0|0|0|S=udp://0.0.0.0:3033|ex_1|| #switch ON Exstreamer 1 to annuncicom 3
stream
MB|ex1_on#r4|0|0|0|0|S=udp://0.0.0.0:3034|ex_1|| #switch ON Exstreamer 1 to annuncicom 5
stream
MB|ex1_on#r5|0|0|0|0|S=udp://0.0.0.0:3035|ex_1|| #switch ON Exstreamer 1 to annuncicom 6
stream
MB|ex1_on#r7|0|0|0|0|S=udp://0.0.0.0:3037|ex_1|| #switch ON Exstreamer 1 to annuncicom 4
stream
MB|ex1_on#r8|0|0|0|0|S=udp://0.0.0.0:3038|ex_1|| #switch ON Exstreamer 1 to annuncicom 8
stream
If on Annucicom configuration you change the UDP port on Destination UDP Sockets, the strings
above must be changed accordingly.
5.4
Email configuration
The SMTP parameters are configured inside the file e-mail.bat inside the directory.
Es:
bmail -s 10.132.15.209 -t aem@localdomain -f test@localdomain -h -a "%1"
Follow the help below:
Usage: bmail [options]
-s
SMTP Server Name
-p
SMTP Port Number (optional, defaults to 25)
-t
To: Address
-f
From: Address
-b
Text Body of Message (optional)
-h
Generate Headers
-a
Subject (optional)
-m
Filename (optional) Use file as Body of Message
-c
Prefix above file with CR/LF to separate body from header
-d
Debug (Show all mail server communications)
To enable the email function, edit the file Icgraph.cfg inside Cgraph directory, and remove the
comment character “#” in the corresponding section.
Es:
# annuncicom1
PB|annuncicom1|0|0|0|0||| #annuncicom1
MB|dis#r1|0|0|0|0
|>e-mail.bat riunioni_not_connected| # call mail
MB|con#r1|0|0|0|0
|>e-mail.bat riunioni_now_connected| # call mail
MB|rec_start#r1|0|0|0|0 |>e-mail.bat riunioni_rec_started| # call mail
MB|rec_end#r1|0|0|0|0 |>e-mail.bat riunioni_rec_ended| # call mail
MB|FTP_start#r1|0|0|0|0 |>e-mail.bat riunioni_FTP_started| # call mail
MB|FTP_end#r1|0|0|0|0 |>e-mail.bat riunioni_FTP_ended| # call mail
MB|FTP_error#r1|0|0|0|0 |>e-mail.bat riunioni_FTP_error| # call mail
MB|USB_full#r1|0|0|0|0 |>e-mail.bat riunioni_USB_full|
# call mail
20
Software configuration
MB|USB_warning#r1|0|0|0|0 |>e-mail.bat riunioni_USB_warning| # call mail
MB|USB_absent#r1|0|0|0|0 |>e-mail.bat riunioni_USB_absent| # call mail
MB|NTP_error#r1|0|0|0|0 |>e-mail.bat riunioni_NTP_error| # call mail
21
6 ICgraph operation
To start ICgraph, run the ICgraph .bat file inside the ICgraph folder.
The ICgraph screen is composed by 9 sections: 8 Annuncicom sections and one Exstreamer
section (Preview).
Illustration 5: ICgraph screen (without devices connected)
Illustration 6: ICgraph screen (with devices connected)
22
ICgraph operation
Illustration 7: ICgraph screen: Annuncicom window
llustration 8: ICgraph screen: Exstreamer window
23
ICgraph operation
6.1
Push-buttons description
Start UDP audio stream to target configured on Destination UDP Socket. During
recording this button is disabled, since the streams start automatically pushing
recoding button.
Streaming active: press to stop UDP audio stream.
Start recording. If audio stream is active this button is disabled.
Recording active: press to stop recording.
Start FTP upload.
FTP upload active.
Start Exstreamer to play the UDP stream.
Pressing this button on another Annucicom switch the play to this Annuncicom.
Playing active on Exstreamer. Press to stop playing, or press Start to EX1 another
Annuncicom to switch playing.
Press to open device web interface.
6.2
Error indications description
Device connected.
Device not connected
USB stick present and working.
USB stick not present or not detected.
USB error.
USB space occupied.
Network Time Protocol ok: internal clock synchronized with NTP server.
Network Time Protocol error: unable to contact NTP server.
24
ICgraph operation
AudioLogger available.
AudioLogger available.
AudioLogger error.
Exstreamer connected
Exstreamer not connected
Press to open device web interface.
25
ICgraph operation
7 Notes
• The recording capacity (e.g. on 4GB USB memory), with the encoding parameters MPEG2/16
Khz, quality 3, is about 200 hours.
• On ICgraph start or on Annuncicom 200 start, is possible to have some errors. In this case start
a test recording and a test FTP upload. In case of USB error try to restart the device manually or
from web interface.
• It is possible the recording on AudioLogger also with USB memory not present.
• The audio files are deleted after to be copied on FTP server.
• In case of FTP connection problems, a file still present on USB memory could be partially copied
on FTP server: in this case there is an FTP error. Check if there is a file with the same name
inside the server and inside the USB memory (use for checking the State page using the web
interface).
• When recording is not active, to activate the preview it need to activate also the streaming.
• When the streaming is active is not possible to start recording.
• During the FTP upload is not possible to activate the recording.
• During the recording is not possible to activate the FTP upload.
• If during the expiry of upload to FTP (time or interval), the Annuncicom is recording, the upload
will start automatically after end the registration process.
• The Annuncicom 200 reboots automatically when is inserted/removed the USB stick.
• Using an Exstreamer (optional) at conference rooms is possible to send the audio from a room
to another room (Start Stream function).
26
Notes
8 Dictionary
DHCP
Short for Dynamic Host Configuration Protocol, a protocol used to assign an IP
address to a device connected to a Network.
IP
Short for Internet Protocol, the IP is an address of a computer or other network
device on a network using IP or TCP/IP. Every device on an IP-based network
requires an IP address to identify its location or address on the network. Example:
192.168.2.10
Barix IPzator™ technology is designed for the purpose that the Barix device can
create its own IP address according to the network structure in case it can’t
receive one from your network. If DHCP, AUTOIP or BOOTP fail, IPzator will create
an IP address within the subnet and test it. If the address works and is not being
used by another device on the network, it will give the address to the Barix device.
Abbreviation for Medium Access Control, a MAC is a unique address number
formatted in hexadecimal format and given to each computer and/or network
device on a computer network. Because a MAC address is a unique address a
computer network will not have the same MAC address assigned to more than
one computer or network device. Example: A1:B2:C3:D4:E5:F6
A number used to identify a sub network so that an IP address can be shared on
a LAN (Local Area Network).
A mask is used to determine what subnet an IP address belongs to. An IP
address has two components, the network address and the host address. For
example, consider the IP address 150.215.17.009. Assuming this is part of a
Class B network, the first two numbers (150.2) represent the Class B network
address, and the second two numbers (.017.009) identify a particular host on this
network. The Netmask would then be 255.255.0.0 .
Ping is a basic Internet program that lets you verify that a particular IP address
exists and can accept requests. Example: ping 192.168.2.10
Barix SonicIP® technology is designed to vocally announce the Barix devices
current IP address. This makes it easier and faster to obtain the necessary
network information. To make use of SonicIP plug in the included earphone into
RCA audio out, connect the network and plug in the power supply. It will
announce the address over the earphones right after power up.
A Static IP is a fixed IP address that you assign manually
to a device on the network. It remains valid until you disable it.
IPzator
MAC address
Netmask
Ping
SonicIP
Static IP
27
Dictionary
9 Legal Information
© 2006 Barix AG, Zurich, Switzerland.
All rights reserved.
All information is subject to change without notice.
All mentioned trademarks belong to their respective owners and are used for reference only.
Barix, Exstreamer, Instreamer, SonicIP and IPzator are trademarks of Barix AG, Switzerland and
are registered in certain countries.
For information about our devices and the latest version of this manual please visit
www.barix.com.
Barix AG
Seefeldstrasse 303
8008 Zurich
SWITZERLAND
Phone: +41 43 433 22 11
Fax:
+41 44 274 28 49
Internet
web:
email:
support:
28
www.barix.com
[email protected]
[email protected]
Legal Information