1
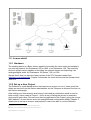
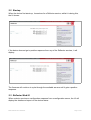
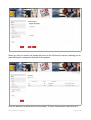
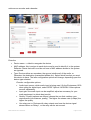
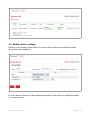
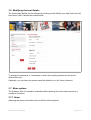
B a r i x R E F L E C TO R User guide Barix Reflector User Guide.doc Page 1 of 22 Table of Contents 1 Introduction.........................................................................................................................3 1.1 How does it work?.......................................................................................................3 1.2 In more detail...............................................................................................................4 1.2.1 Hardware..............................................................................................................4 1.2.2 Set up a User Project...........................................................................................4 1.2.3 Device startup and configuration update..............................................................5 1.2.4 Device operation...................................................................................................5 2 Reflector Client firmware.....................................................................................................6 2.1 Loading the STL firmware and selecting the Reflector. ..............................................6 2.2 Startup.........................................................................................................................7 2.3 Reflector Web UI..........................................................................................................7 2.3.1 Local relay status..................................................................................................8 2.3.2 Stream details.......................................................................................................8 2.4 Advanced users: configuring the client device............................................................8 2.5 Encoding in Mono......................................................................................................10 2.6 Device Input LEDs.....................................................................................................10 2.7 Auto Failover playback..............................................................................................10 2.8 Flag streaming error on local relay............................................................................10 3 The Reflector service web UI............................................................................................11 3.1 Requesting an account..............................................................................................11 3.2 Create a project.........................................................................................................13 3.3 Home page................................................................................................................17 3.4 Viewing project status................................................................................................18 3.5 Modify device settings...............................................................................................19 3.6 Modifying Account Details.........................................................................................20 3.7 Menu options.............................................................................................................20 3.7.1 Home..................................................................................................................20 3.7.2 Projects ..............................................................................................................21 3.7.3 Account Details...................................................................................................21 3.7.4 Search................................................................................................................21 4 Legal Information..............................................................................................................22 Barix Reflector User Guide.doc Page 2 of 22 1 Introduction The Reflector service is a way for Broadcasters to quickly and easily set up a unidirectional STL (Studio to Transmitter Links), without all the complexities of configuring IP networks, or punching holes through firewalls: no specialist IT knowledge is required to set up and use the service. The service can also be used for Remote Contribution and Syndication with no extra configuration. Barix hardware devices being used with the Reflector service must have the Barix STL firmware version FIXME loaded. The Beta versions of the Reflector client will operate in the Production environment, but will not support the new features introduced as a result of the Beta trial. The Barix STL firmware is preloaded on the Exstreamer 500 and 1000 series devices, where the Reflector functionality is 'dual boot' with the more complex STL application. Other suitable Barix hardware can have the STL firmware loaded on to them to enable use with the Reflector service. 1.1 How does it work? The Reflector Service is a subscription system, a User requires a User ID in order to be able to use it. These can be obtained via the 'Request an Account' functionality on the Reflector Service homepage. The Reflector Service only operates with devices that have been defined to it. A User must therefore set up a Project containing the details of all the Devices. Each project needs a Sending Device (Encoder) and Receiving Device(s) - Decoders - at the transmitter(s) / affiliates. Requests from unregistered devices are ignored. The main components of the Reflector are shown in the diagram: Database – stores all data about accounts, projects and devices Configuration server – assigns project devices to individual Reflector Servers and communicates configuration details to devices Reflector server(s) – receive details of devices from the config server and handle communications with them; receiving the network audio stream from the Encoder and forwarding it to the Decoder(s) Web server – handles the User Interface, allowing users to set up and maintain their projects, updating the database accordingly. Encoder/Decoders. On startup, each Reflector Client device will contact the Reflector Services defined to it in its startup configuration (US / EU ...), requesting the details of its project configuration, it then contacts the appropriate Configuration Server, applies its configuration and operates accordingly. Barix Reflector User Guide.doc Page 3 of 22 1.2 In more detail 1.2.1 Hardware The sending device is a Barix device capable of encoding the input audio and sending it out onto the network: An Exstreamer 500 or 1000, or an Instreamer 100. The receiving device is a Barix device capable of decoding the network stream and outputting it as analogue/digital audio: An Exstreamer 100 series 1, 500 or 1000. Always check that you have the latest version of the STL firmware loaded from www.barix.com/downloads. Chapter 2 discusses the client devices and the firmware that runs on it 1.2.2 Set up a User Project The Reflector is a web based service that requires an account to run it. Users must first obtain an account from the Service administrator via the 'Request an Account' function on the Service homepage. After setting up a User account and having it activated (a confirmation email is sent for both events), users create a 'Project' – this is a way of telling the service to associate devices with each other. Devices must then be registered to the Project, giving the unique MAC address2 of each device and a few straightforward configuration details. Chapter 3 details how to set up an account and projects in oder to be able to use the Reflector 1 Exstreamer 100 /110/120: these output Analogue audio 2 written on the underside label of every Barix audio device Barix Reflector User Guide.doc Page 4 of 22 service. 1.2.3 Device startup and configuration update On startup, a device must first find out what its configuration is. To do this, it works its way through the list of known Configuration Servers defined to the device, pinging each in turn until it receives a positive response. If the device is unknown to a Configuration Server, the server returns an 'unrecognised device' message and the device moves to the next entry in the list. If no positive response is received from any of the known configuration servers, the device will pause and then start querying the list again, repeating this behaviour until it gets a positive response. By default, the devices use DNS names to address the servers, so it is important either that the network they are connected to supports DHCP / DNS, or that the device is configured with the relevant network settings to be able to reach a DNS server. When a registered device contacts a configuration server, the server responds by sending the device's current configuration, the device receives this and applies it. During operation, devices regularly ping their configuration server with a 'keepalive' message: this information is used to update the device status of the project on the Reflector web UI. If a user updates the configuration of a device, the Configuration Server will immediately send an update to the device concerned, which will apply it. 1.2.4 Device operation Once a device has started up and successfully received its configuration, it then operates according to the configuration. The principle configuration element is whether the device is an Encoder, or a Decoder (this cannot be auto-detected as several Barix hardwares can operate as both). Barix Reflector User Guide.doc Page 5 of 22 2 Reflector Client firmware 2.1 Loading the STL firmware and selecting the Reflector. To use the Reflector Service, all devices must have the STL firmware loaded: this is a dual application firmware consisting of the Reflector Client and the more complex Barix STL application. The Exstreamer 500/1000 are delivered with the STL firmware preloaded, but any Barix audio hardware can run the firmware, subject only to limitations of the hardware (Instreamers cannot be decoders, for example). This guide is for the Reflector firmware, there is a manual for the STL Application available from www.barix.com/downloads where the firmware can also be found. The firmware is delivered as a zip file which contains a “_readme1st.txt” file that explains how to load the firmware into the hardware. All devices to be used must have the firmware loaded and be active in 'Reflector' mode. The same firmware is loaded onto the Sending and Receiving devices When loading the firmware, take a note of the MAC addresses, you will need them later: t's on the top line of the UI, to the right in the picture below it's physically written on the underside of the device Once loaded, to switch between the two applications, simply navigate to the 'Reboot' page of the Client web UI and select to 'reboot as' the application you want: Barix Reflector User Guide.doc Page 6 of 22 2.2 Startup When the device first starts up, it searches for a Reflector service, whilst it is doing this, the UI shows: if the device does not get a positive response from any of the Reflector services, it will display: The firmware will continue to cycle through the available servers until it gets a positive response. 2.3 Reflector Web UI When a device receives a configuration response from a configuration server, the UI will display the details and report on the device status: Barix Reflector User Guide.doc Page 7 of 22 The received configuration is shown in light grey on the left side of the screen, along with the timestamp of the configuration. 2.3.1 Local relay status On suitable hardware, relay 1 can be used to signal outgoing/incoming stream loss. Here, 'green is good', it means that the stream is OK. If the stream is missing, the relay is 'switched off' / shown grey on the UI. It is configured this way so that if power is lost, the logic for any equipment connected to this relay is consistent. 2.3.2 Stream details In decoder mode the middle section of the UI beneath the relay status shows some details about the received stream: bitrate, detected latency and some indicators as to the quality of the link: significant numbers of lost, duplicated or dropped frames should be investigated. 2.4 Advanced users: configuring the client device The Reflector Client should not need any configuration in most cases, however there can be some occasions when it is necessary for infrastructure reasons to configure certain settings. Clicking on the 'Configuration' tab on the UI navigates to a screen that allows the user to set the network details for the device, should this prove necessary. If the environment supports DHCP and DNS, then typically no extra configuration is required. Barix Reflector User Guide.doc Page 8 of 22 Clicking on the 'Reflector' tab on the left allows the Configuration server list to be updated e.g. If a user has set up their own instance of the Reflector service. The servers are contacted in order, so for the quickest startup, set server 1 to the Reflector Service that you are using. Clicking on 'Security' allows the user to set some basic security features such as a password for the web UI, to prevent unauthorised or accidental changes of the settings. Barix Reflector User Guide.doc Page 9 of 22 2.5 Encoding in Mono Note that when using the Reflector for Mono transmissions, the audio input should be presented on the left channel; in mono mode the right channel input is ignored. At the receiving end, the mono audio will be presented on both output channels. 2.6 Device Input LEDs On suitable hardware (e.g. Exstreamer500 / 1000) the IO LEDs on the front of the device show the state of the device's inputs. 2.7 Auto Failover playback In Decoder mode, if the incoming stream fails the Reflector client application will: set the device status to reflect the cause; either 'No incoming stream', or 'No Reflector service available' if a USB stick / microSD card is connected then the device will automatically search for a playlist file (playlist.m3u) in the root of the attached storage The playlist.m3u file should contain a list of MP3 files, which should also be on the storage media: these files will be played when the decoder has no network audio stream. As soon as the network audio stream is available again, the device playback will switch over to it, exiting failover mode. 2.8 Flag streaming error on local relay Both Encoders and Decoders can be configured via the Reflector service UI to flag stream failure on a local relay – the hardware device must have the relay! (Exstreamer 100 and Instreamer 100 do not, therefore, support this functionality. Owing to the nature of the service, the Decoder can flag this stream failure virtually instantaneously, but the encoder requires up to 90 seconds to report the failure. Barix Reflector User Guide.doc Page 10 of 22 3 The Reflector service web UI 3.1 Requesting an account Users use the Reflector web UI to set up, control and monitor their projects. Before doing so, they must first obtain an account. The Reflector is a subscription service operated by StreamGuys, to obtain an account, the user must first subscribe, either by mail [email protected], or via the home page of the appropriate service: http://us-reflector.barix.com or http://eu-reflector.barix.com the home page is a logon screen: Click on 'Request an Account' and fill in the details as shown on the screen below before clicking on 'Submit request'. Filling in the form creates a request that must be validated by the Reflector admin team: users must be confirmed as subscribing before being activated. You will receive a mail from the service confirming the details of your account request and then a second mail once the account has been activated. Barix Reflector User Guide.doc Page 11 of 22 When the request is submitted a confirmation page is displayed: Barix Reflector User Guide.doc Page 12 of 22 The first time you log in there will be no information to display: 3.2 Create a project To get audio streaming from source to destination using the Reflector service, you need to first set up a project to define the link. Allocating devices to a project allows you to set up an STL or multi destination audio distribution. To set up multiple STLs / distributions, simply add a project for each. Click on the '+ Add New' link brings you to the Create Project screen. - give the project a name (mandatory) and description (optional) Barix Reflector User Guide.doc Page 13 of 22 When you click on create, the system will move to the 'Device List' screen, allowing you to start defining the component devices for the project. Click on 'add new' to add a device to the project. To work, each project must have as a Barix Reflector User Guide.doc Page 14 of 22 minimum an encoder and a decoder. Enter the Device name – a label to recognise the device MAC address: this is unique to each device and is used to identify it to the system: Reflector Clients that call in and do not have a MAC address known to the system are ignored. Type: Devices either are encoders: the source (studio end) of the audio, or Decoders: the destination (transmitter/affiliate etc). Select which function you want this device to have. The later configuration options will change, depending upon the device type selected: Encoder configuration options: Audio input source: which audio input is being used. On the Exstreamer 1000 when using the digital input, select SPDIF Optical / AES-EBU. Other options are self explanatory. Input gain: the audio input can be amplified, adjust as necessary for your audio equipment, to obtain best results. Quality: 5 quality options are offered, choose the one that matches your requirements (mono/stereo, quality). The higher the stream rate (in kbps) the higher the quality. Use relay one to: Devices with relay outputs can have the device signal stream failure on Relay 1, or the relay can be set unused. Barix Reflector User Guide.doc Page 15 of 22 NOTE: this takes up to 90 seconds in Encoder mode Decoder configuration options: Buffer: the decoder stores (buffers) the incoming audio before playing it back; this is to allow for the variable timing of the delivery of the audio over the network. This buffering introduces a delay (latency) between the sent and received audio. Choose the buffering value that best matches your needs for latency and quality (too small a buffer can lead to audio artefacts caused by the network 'jitter' (delay in delivery of the audio) NOTE: Using a buffer setting of 100ms will automatically disable the flagging of Stream Loss on local relay 1. Output level: the audio output can be amplified, adjust as necessary for your audio equipment, to obtain best results. Use relay one to: Local relay one can be used to either automatically signal stream loss, or show the value of the Project's Encoder Input 1. Hardware devices with more than one relay output will automatically have their other relay outputs set to the corresponding Encoder Input (2>2, 3>3 and so on). Save as default: subsequent devices added to the project will have the same device type as this device suggested as the default value. When you have selected your configuration options for your first device, click on 'Create'. This creates the Project with one device associated. Barix Reflector User Guide.doc Page 16 of 22 The UI returns to the Devices List, showing the details of the device. Clicking on the “i” information symbol will display the configuration options. Before the device makes contact with the Configuration Server, it will show up in red (error) with 'No Contact' and 'No Status', there will also be no IP address displayed, as the client informs the server of it's IP address. Click on 'add new' to add further devices to the project. Note the 'Project Data' tab – use this to view/edit the Project name and description. 3.3 Home page Note the Green status overview: showing 'OK' for normal operation. Select a project to see more detail by clicking on the 'Modify' button. Barix Reflector User Guide.doc Page 17 of 22 3.4 Viewing project status If you need to check on the status of the project at any time, go to the Reflector web UI and select the project, you will see the details of when the devices last contacted the Configuration service (according to the time zone of the server). The Clients should contact every 30s, so it will quickly be obvious if there is a communications problem: Clicking on 'Cancel' returns you to the Home page with a list of your projects. Clicking on the 'Delete' button next to a device will, after a confirmation dialogue, delete the device from the project. Clicking on the 'Modify' button for a device will allow you to make changes to that device's settings: see the following chapter “Error: Reference source not found“ Clicking on will display the configuration settings for the relevant device, and clicking on the will restore the original view: Barix Reflector User Guide.doc Page 18 of 22 3.5 Modify device settings Clicking on the 'Modify' button next to a device in the Project view causes the details shown here to be displayed: All of the device settings can be changed as required. Press 'Save' to update the details, or 'Cancel' to abort. Barix Reflector User Guide.doc Page 19 of 22 3.6 Modifying Account Details The stored login details can be changed by clicking on the 'Modify your data' link in the left hand menu, the UI shows the screen below: To change the password, it it necessary to enter the current password as well as the desired new one.. Optionally, you can have the system email the details to you for future reference. 3.7 Menu options The Reflector Web UI maintains a standard Menu allowing the user instant access to a number of functions: 3.7.1 Home Selecting this option returns the user to the list of their projects. Barix Reflector User Guide.doc Page 20 of 22 3.7.2 Projects List: Selecting this option returns the user to the list of their projects Add Project: clicking on this tab allows the user to define a new Reflector project using the functionality explained in the section 3.2 Create a project 3.7.3 Account Details Using this option the user can update the registered details of their account. 3.7.4 Search The search for an individual device can be done either by IP address, or by MAC address and the function also works on partial entries – entering “.247” and hitting <enter> or clicking on “search” will bring up all of the user's devices that have this string in their IP address, for instance. Search by Project name works in the same way as search by MAC / IP. Barix Reflector User Guide.doc Page 21 of 22 4 Legal Information © 2011 Barix AG, Zürich, Switzerland. All rights reserved. All information is subject to change without notice. All mentioned trademarks belong to their respective owners and are used for reference only. Document version 2.0 April 2011 Barix Reflector User Guide.doc Page 22 of 22