1
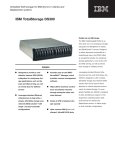
IBM TotalStorage DS300 and DS400 Quick Installation Guide
Before using this information and the product it supports, read the “IBM Statement of Limited Warranty”
in the IBM Machine Types 1700 and 1701 Warranty and Support Information document on the IBM®
Documentation CD.
Obtaining the documentation from the IBM Support Web site
All IBM TotalStorage® documentation that is referred to in this Quick Installation Guide is on the IBM
Documentation CD that comes with the storage subsystem. The storage subsystem might have features
that are not described in the documentation that you received with the unit. The documentation might be
updated occasionally to include information about those features, or technical updates might be available
to provide additional information that is not included in the storage subsystem documentation. These
updates are available from the IBM Web site. To check for updated documentation and technical updates,
complete the following steps.
Note: Changes are made periodically to the IBM Web site. The actual procedure might vary slightly from
what is described in this document.
1. Go to http://www.ibm.com/servers/storage/support/.
2. On the “Support for TotalStorage products” page, under Select your product, in the Product family
field, select Disk storage systems.
3. In the Product field, select DS300 Disk System or DS400 Disk System.
4. Click Go.
5. Under Technical resources, select Documentation.
Before you begin, you should have a plan for how you want to install this storage subsystem into a
storage network. This plan should allow for the data servers, management station, host bus adapters,
switches, and other equipment. See Chapter 2 (for TotalStorage DS300) or Chapter 5 (for TotalStorage
DS400) in the IBM TotalStorage DS300 and DS400 Hardware Installation and User’s Guide for more
information.
Installing the hardware
To install the hardware, complete the following steps:
1. Remove all packing materials.
2. Install the rails and the DS300 or DS400 storage subsystem into a standard EIA 19-inch rack (see the
printed Rack Installation Instructions document that comes with the storage subsystem for instructions).
3. Install the front bezel on the DS300 or DS400 storage subsystem (see Chapter 10 of the Hardware
Installation and User’s Guide for instructions).
4. Install hard disk drives in the DS300 or DS400 storage subsystem (see Chapter 10 of the Hardware
Installation and User’s Guide for instructions).
5. Connect the power cables that come with the DS300 or DS400 storage subsystem to the power
distribution unit (see “Power cabling” in Chapter 9 of the Hardware Installation and User’s Guide for
instructions).
6. Install the small-form-factor pluggable (SFP) modules and connect the Ethernet and Fibre Channel
cables. For instructions, see Chapter 3 (for DS300) or Chapter 7 (for DS400) of the Hardware Installation
and User’s Guide.
Important: If you want to use the IBM ServeRAID™ Manager program to manage the DS300 or DS400
storage subsystem, make sure that an Ethernet cable is connected to the management port on each
controller.
7. Turn on the storage subsystem (see “Turning the storage subsystem on and off” in Chapter 9 of the
Hardware Installation and User’s Guide for instructions).
Setting the controller defaults
To set up the RAID controller defaults, complete the following steps:
1. After turning on the storage subsystem, wait until the green controller ready LED is lit; then, from a
management station, open a Telnet session to IP address 192.168.70.123. For the location and a
description of the LED, see the storage subsystem rear view section in Chapter 4 (for DS300) or
Chapter 8 (for DS400) of the Hardware Installation and User’s Guide.
2. Change to administrator mode by typing administrator, admin, or ad and pressing Enter.
3. When prompted for a password, enter passw0rd (all lowercase letters with a zero, not O, in passw0rd).
4. For Controller A only: At the DS300 or DS400 prompt, enter setup.
The Setup wizard prompts you to enter the values for the parameters that are required to configure
the system to connect to a local network. You can also use the three commands that are described in
the following table.
Table 1. Setup wizard commands
Command
Function
abort
Quit the Setup wizard without saving changes
back
Go to the previous parameter
help
Display the current parameter values
If a parameter has a default value, the prompt displays the value in square brackets ( [ ] ). Some
parameters require an arbitrary string, in which case the commands back and abort cannot be used.
In these cases, enclose the string in quotation marks ("").
Use the following information to assign values for the parameters:
hostname
Enter the name that you want to use for the system. Enter back to repeat this prompt.
domain name
Enter the domain to which the system belongs.
SAN name
Enter the Storage Area Network (SAN) to which the system belongs.
timezone
Enter the system time zone.
system date
Enter the system date in the format hh:mm@dd/mm/yy.
define administrator password
Define whether an administrator password is required. If a password is required, you are
prompted for that password, which you must enter twice. Press Ctrl to leave the password
unchanged. Press Enter twice to not require an administrator password.
define operator password
Define whether an operator password is required.
default gateway
Enter the name or IP address of a router to which packets are sent if their destinations do not
have routes that are defined in the system. Enter no to clear the default gateway.
2
DNS servers
Enter the IP addresses of up to three systems that will act as DNS servers. Enter no to clear
the list of DNS servers.
dhcp
Enter yes if a DHCP server will be used to discover the system network values. Enter no if a
DHCP server will not be used.
If you enter yes, the wizard takes you to the finish parameter. If you enter no, the wizard
continues to prompt you for information about the main Ethernet interface of the system.
IP address
Enter the IP address, in x.x.x.x format. You can also define the netmask by typing its width
after the IP address.
Note: For the DS300 storage subsystem, the management interface must be in a separate
network segment from your iSCSI ports.
netmask
Define the size of the netmask. Any of the common formats are accepted.
Note: If you entered the netmask as part of the IP address in the previous prompt, this
parameter is skipped.
broadcast address
Enter the address to be used for broadcasts. Any of the common formats are accepted.
peer IP address
Enter the IP address for the peer controller, in x.x.x format.
Note: For the DS300 storage subsystem, the management interface must be in a separate
network segment from your iSCSI ports.
peer netmask
Define the size of the netmask for the peer controller. Any of the common formats are
accepted.
peer broadcast address
Enter the address to use by the peer controller for broadcasts. Any of the common formats are
accepted.
finish Enter yes to apply the values that you have entered, or enter no to return to the first
parameter and change the values that you have entered.
Note: If you changed the management IP address in step 4 on page 2, you must open a Telnet session to
the new IP address.
Installing the IBM ServeRAID Manager and Management Station
programs and adding a ServeRAID agent
To install the IBM ServeRAID Manager and Management Station programs and add a ServeRAID agent
for the storage subsystem, complete the following steps:
1. Install the ServeRAID Manager program on the management station, using the ServeRAID Application
CD that comes with the DS300 or DS400 storage subsystem (see Chapter 1 of the IBM TotalStorage
DS300 and DS400 Software Installation Guide for instructions).
2. Install the Management Station program on the management station (see Chapter 1 of the Software
Installation Guide for instructions).
3
3. Start the ServeRAID Manager program; then, complete the following steps to add a management
station object and a ServeRAID agent for the storage subsystem:
a. To add a management station object, right-click Networked Storage in the ServeRAID Manager
interface; then, select Add Management Station (see “Adding a remote system object” in the
ServeRAID Manager online help for more information about adding a management station).
b. To add a ServeRAID agent, right-click the management station object in the interface and select
Add agent. Use the IP address that you assigned to the storage subsystem in step 4 on page 2.
(See “Adding a Management Station Agent Object” in the ServeRAID Manager online help for
more information about adding an agent.)
Note: Enter the IP address of controller A or controller B. Only one controller must be added as a
ServeRAID agent.
Installing the controller firmware
The RAID controller firmware is updated occasionally to improve the function or performance of the
RAID controller in the storage subsystem. Obtain the latest firmware before proceeding to the next steps
(see the Software Installation Guide for information about how to locate and download the latest firmware).
Setting IP addresses for DS300 iSCSI ports
To set the IP addresses for the iSCSI ports on the DS300 storage subsystem, complete the following steps:
1. Open a Telnet session to controller A using either the default IP address (192.168.70.123) or the IP
address that you assigned in step 4 on page 2.
2. Log in as administrator using either the default password (passw0rd) or the password that you
defined in step 4 on page 2.
3. To set the IP address for iSCSI port eth2, enter the following commands:
interface manage eth2[x] ip IPaddress
interface manage eth2[x] netmask netmask
interface manage eth2[x] broadcast broadcast
where x is the controller, IPaddress is the IP address that you want to use for that port, and netmask is
the management network subnet address.
4. To set the IP address for iSCSI port eth3, enter the following commands:
interface manage eth3[x] ip IPaddress
interface manage eth3[x] netmask netmask
interface manage eth3[x] broadcast broadcast
where x is the controller, IPaddress is the IP address that you want to use for that port, and netmask is
the management network subnet address.
See the IBM TotalStorage DS300 Problem Determination Guide or IBM TotalStorage DS400 Problem
Determination Guide on the IBM Support Web site for a list of all the available commands.
5. Enter save to save the modified settings.
Configuring the RAID device in ServeRAID Manager
To create a RAID array and configure the access control list for the logical drive, complete the following
steps:
1. In the ServeRAID Manager interface on the management station, in the right pane, click the agent
(which is displayed as a controller device) that you created in step 3b in “Installing the IBM
ServeRAID Manager and Management Station programs and adding a ServeRAID agent” on page 3.
The interface displays the Enclosure View pane for the storage subsystem.
2. In the upper-right corner of the Enclosure View pane, click the disk icon. The array configuration
menu is displayed.
4
3. In the array configuration menu, select Create logical drive in a new array; then, click Next.
4. To select the drives that you want in the array (see the “Creating arrays and hot-spare drives” section
in the ServeRAID Manager online help for more information), complete the following steps:
a. Press Ctrl and click each drive that you want in the array.
b. Click the single arrow to move the drives to the left pane.
c. If you want to create more than one array, click Create New Array at the top of the left pane and
repeat steps 4a and 4b.
d. When you are finished, click Next.
5. Select the logical drive name, size, and preferred controller that you want; then, if you are finished,
click Next. If you want to create more than one logical drive or change the preferred controller,
complete the following steps (see the “Creating logical drives” section in the ServeRAID Manager
online help for more information):
a. Change the default size to less than the full capacity.
b. Select the preferred controller from the Controller menu.
c. Click Create new logical drive at the bottom of the pane.
d. Select the next logical drive name and size.
e. When you have selected all the names and sizes that you want, click Next.
6. For a TotalStorage DS400, continue to step 7; otherwise, select the authentication options for the
logical drive.
7. To configure the access control list for the logical drive, complete the following steps (see “Defining
initiator information” in the ServeRAID Manager online help for more information):
a. Select Add or Discover new initiators (DS400 only). A window opens containing the first entry in
the access control list.
b. If you selected Discover new initiators, in the top line in the window, type or select from the
menu one of the following choices:
v The worldwide port name (WWPN) for the Fibre Channel host bus adapter (HBA) that the
logical unit number (LUN) will be bound to
v The iSCSI Qualified Name (IQN) for the iSCSI initiator
c. In the second line in the window, type the alias that you want to use for the entity in the top line.
d. Click OK to accept the information that you entered. A new access-list-entry window opens.
Repeat steps 7b through 7d for each entry in the access list. When you are finished, click Cancel.
8. Click Next. The mapping pane is displayed. The aliases in the access control list are displayed in tabs
in the right pane; the logical drives are displayed in the left pane.
9. Complete the following steps to associate one or more logical drives with an alias (see “Assigning
logical drives to initiators” in the ServeRAID Manager online help for more information):
a. Highlight the logical drive.
b. Click the alias that you want to associate it with.
c. Click the single arrow in the middle pane to move the drive to the alias, or click the double arrow
in the middle pane to move all the drives to the alias. The drive moves to a point beneath the alias
in the right pane.
d. Click Next.
e. Click Accept to apply the changes, or click Back to return to the mapping pane to make changes
or to make more associations.
After you complete the associations, the Enclosure View pane is displayed again, and the LUN is
ready for access.
5
Getting help and technical assistance
If you need help, service, or technical assistance or just want more information about IBM products, you
will find a wide variety of sources available from IBM to assist you. This appendix contains information
about where to go for additional information about IBM and IBM products, what to do if you experience
a problem with your Eserver® or IntelliStation® system or optional device, and whom to call for service,
if it is necessary.
Before you call
Before you call, make sure that you have taken these steps to try to solve the problem yourself:
v Check all cables to make sure that they are connected.
v Check the power switches to make sure that the system and any optional devices are turned on.
v Use the troubleshooting information in your system documentation, and use the diagnostic tools that
come with your system. Information about diagnostic tools is in the Hardware Maintenance Manual and
Troubleshooting Guide or Problem Determination and Service Guide on the IBM Documentation CD that
comes with your system.
Note: For some server options, the Hardware Maintenance Manual and Troubleshooting Guide is available
only from the IBM support Web site.
v Go to the IBM support Web site at http://www.ibm.com/support/ to check for technical information,
hints, tips, and new device drivers or to submit a request for information.
You can solve many problems without outside assistance by following the troubleshooting procedures
that IBM provides in the online help or in the documentation that is provided with your IBM product.
The documentation that comes with Eserver and IntelliStation systems also describes the diagnostic tests
that you can perform. Most Eserver and IntelliStation systems, operating systems, and programs come
with documentation that contains troubleshooting procedures and explanations of error messages and
error codes. If you suspect a software problem, see the documentation for the operating system or
program.
Using the documentation
Information about your IBM Eserver or IntelliStation system and preinstalled software, if any, or optional
device is available in the documentation that comes with the product. That documentation can include
printed documents, online documents, readme files, and help files. See the troubleshooting information in
your system documentation for instructions for using the diagnostic programs. The troubleshooting
information or the diagnostic programs might tell you that you need additional or updated device
drivers or other software. IBM maintains pages on the World Wide Web where you can get the latest
technical information and download device drivers and updates. To access these pages, go to
http://www.ibm.com/support/ and follow the instructions. Also, some documents are available through
the IBM Publications Center at http://www.ibm.com/shop/publications/order/.
Getting help and information from the World Wide Web
On the World Wide Web, the IBM Web site has up-to-date information about IBM Eserver and
IntelliStation systems, optional devices, services, and support. The address for IBM xSeries® and
BladeCenter® information is http://www.ibm.com/eserver/xseries/. The address for IBM IntelliStation
information is http://www.ibm.com/intellistation/.
You can find service information for IBM systems and optional devices at
http://www.ibm.com/support/.
6
Software service and support
Through IBM Support Line, you can get telephone assistance, for a fee, with usage, configuration, and
software problems with xSeries servers, BladeCenter products, IntelliStation workstations, and appliances.
For information about which products are supported by Support Line in your country or region, see
http://www.ibm.com/services/sl/products/.
For more information about Support Line and other IBM services, see http://www.ibm.com/services/, or
see http://www.ibm.com/planetwide/ for support telephone numbers. In the U.S. and Canada, call
1-800-IBM-SERV (1-800-426-7378).
Hardware service and support
You can receive hardware service through IBM Services or through your IBM reseller, if your reseller is
authorized by IBM to provide warranty service. See http://www.ibm.com/planetwide/ for support
telephone numbers, or in the U.S. and Canada, call 1-800-IBM-SERV (1-800-426-7378).
In the U.S. and Canada, hardware service and support is available 24 hours a day, 7 days a week. In the
U.K., these services are available Monday through Friday, from 9 a.m. to 6 p.m.
7
Notices
This information was developed for products and services offered in the U.S.A.
IBM may not offer the products, services, or features discussed in this document in other countries.
Consult your local IBM representative for information on the products and services currently available in
your area. Any reference to an IBM product, program, or service is not intended to state or imply that
only that IBM product, program, or service may be used. Any functionally equivalent product, program,
or service that does not infringe any IBM intellectual property right may be used instead. However, it is
the user’s responsibility to evaluate and verify the operation of any non-IBM product, program, or
service.
IBM may have patents or pending patent applications covering subject matter described in this
document. The furnishing of this document does not give you any license to these patents. You can send
license inquiries, in writing, to:
IBM Director of Licensing
IBM Corporation
North Castle Drive
Armonk, NY 10504-1785
U.S.A.
INTERNATIONAL BUSINESS MACHINES CORPORATION PROVIDES THIS PUBLICATION “AS IS”
WITHOUT WARRANTY OF ANY KIND, EITHER EXPRESS OR IMPLIED, INCLUDING, BUT NOT
LIMITED TO, THE IMPLIED WARRANTIES OF NON-INFRINGEMENT, MERCHANTABILITY OR
FITNESS FOR A PARTICULAR PURPOSE. Some states do not allow disclaimer of express or implied
warranties in certain transactions, therefore, this statement may not apply to you.
This information could include technical inaccuracies or typographical errors. Changes are periodically
made to the information herein; these changes will be incorporated in new editions of the publication.
IBM may make improvements and/or changes in the product(s) and/or the program(s) described in this
publication at any time without notice.
Any references in this information to non-IBM Web sites are provided for convenience only and do not in
any manner serve as an endorsement of those Web sites. The materials at those Web sites are not part of
the materials for this IBM product, and use of those Web sites is at your own risk.
IBM may use or distribute any of the information you supply in any way it believes appropriate without
incurring any obligation to you.
Trademarks
The following terms are trademarks of International Business Machines Corporation in the United States,
other countries, or both:
BladeCenter
e-business logo
Eserver
IBM
IBM (logo)
IntelliStation
ServeRAID
ServerProven
TotalStorage
xSeries
Microsoft, Windows, and Windows NT are trademarks of Microsoft Corporation in the United States,
other countries, or both.
8
Linux is a trademark of Linus Torvalds in the United States, other countries, or both.
Red Hat, the Red Hat “Shadow Man” logo, and all Red Hat-based trademarks and logos are trademarks
or registered trademarks of Red Hat, Inc., in the United States and other countries.
Other company, product, or service names may be trademarks or service marks of others.
Important notes
When referring to hard disk drive capacity or communications volume, MB stands for 1 000 000 bytes,
and GB stands for 1 000 000 000 bytes. Total user-accessible capacity may vary depending on operating
environments.
Maximum internal hard disk drive capacities assume the replacement of any standard hard disk drives
and population of all hard disk drive bays with the largest currently supported drives available from
IBM.
Maximum memory may require replacement of the standard memory with an optional memory module.
IBM makes no representation or warranties regarding non-IBM products and services that are
ServerProven®, including but not limited to the implied warranties of merchantability and fitness for a
particular purpose. These products are offered and warranted solely by third parties.
IBM makes no representations or warranties with respect to non-IBM products. Support (if any) for the
non-IBM products is provided by the third party, not IBM.
Some software may differ from its retail version (if available), and may not include user manuals or all
program functionality.
Product recycling and disposal
This unit must be recycled or discarded according to applicable local and national regulations. IBM
encourages owners of information technology (IT) equipment to responsibly recycle their equipment
when it is no longer needed. IBM offers a variety of product return programs and services in several
countries to assist equipment owners in recycling their IT products. Information on IBM product
recycling offerings can be found on IBM’s Internet site at
http://www.ibm.com/ibm/environment/products/prp.shtml.
Notice: This mark applies only to countries within the European Union (EU) and Norway.
This appliance is labeled in accordance with European Directive 2002/96/EC concerning waste electrical
and electronic equipment (WEEE). The Directive determines the framework for the return and recycling
of used appliances as applicable throughout the European Union. This label is applied to various
products to indicate that the product is not to be thrown away, but rather reclaimed upon end of life per
this Directive.
9
Remarque : Cette marque s’applique uniquement aux pays de l’Union Européenne et à la Norvège.
L’etiquette du système respecte la Directive européenne 2002/96/EC en matière de Déchets des
Equipements Electriques et Electroniques (DEEE), qui détermine les dispositions de retour et de recyclage
applicables aux systèmes utilisés à travers l’Union européenne. Conformément à la directive, ladite
étiquette précise que le produit sur lequel elle est apposée ne doit pas être jeté mais être récupéré en fin
de vie.
In accordance with the European WEEE Directive, electrical and electronic equipment (EEE) is to be
collected separately and to be reused, recycled, or recovered at end of life. Users of EEE with the WEEE
marking per Annex IV of the WEEE Directive, as shown above, must not dispose of end of life EEE as
unsorted municipal waste, but use the collection framework available to customers for the return,
recycling, and recovery of WEEE. Customer participation is important to minimize any potential effects of
EEE on the environment and human health due to the potential presence of hazardous substances in EEE.
For proper collection and treatment, contact your local IBM representative.
Battery return program
This product may contain a sealed lead acid, nickel cadmium, nickel metal hydride, lithium, or lithium
ion battery. Consult your user manual or service manual for specific battery information. The battery
must be recycled or disposed of properly. Recycling facilities may not be available in your area. For
information on disposal of batteries outside the United States, go to
http://www.ibm.com/ibm/environment/products/batteryrecycle.shtml or contact your local waste
disposal facility.
In the United States, IBM has established a return process for reuse, recycling, or proper disposal of used
IBM sealed lead acid, nickel cadmium, nickel metal hydride, and battery packs from IBM equipment. For
information on proper disposal of these batteries, contact IBM at 1-800-426-4333. Have the IBM part
number listed on the battery available prior to your call.
In the Netherlands, the following applies.
For Taiwan: Please recycle batteries.
10
Electronic emission notices
Federal Communications Commission (FCC) statement
Note: This equipment has been tested and found to comply with the limits for a Class A digital device,
pursuant to Part 15 of the FCC Rules. These limits are designed to provide reasonable protection against
harmful interference when the equipment is operated in a commercial environment. This equipment
generates, uses, and can radiate radio frequency energy and, if not installed and used in accordance with
the instruction manual, may cause harmful interference to radio communications. Operation of this
equipment in a residential area is likely to cause harmful interference, in which case the user will be
required to correct the interference at his own expense.
Properly shielded and grounded cables and connectors must be used in order to meet FCC emission
limits. IBM is not responsible for any radio or television interference caused by using other than
recommended cables and connectors or by unauthorized changes or modifications to this equipment.
Unauthorized changes or modifications could void the user’s authority to operate the equipment.
This device complies with Part 15 of the FCC Rules. Operation is subject to the following two conditions:
(1) this device may not cause harmful interference, and (2) this device must accept any interference
received, including interference that may cause undesired operation.
Industry Canada Class A emission compliance statement
This Class A digital apparatus complies with Canadian ICES-003.
Avis de conformité à la réglementation d’Industrie Canada
Cet appareil numérique de la classe A est conforme à la norme NMB-003 du Canada.
Australia and New Zealand Class A statement
Attention: This is a Class A product. In a domestic environment this product may cause radio
interference in which case the user may be required to take adequate measures.
United Kingdom telecommunications safety requirement
Notice to Customers
This apparatus is approved under approval number NS/G/1234/J/100003 for indirect connection to
public telecommunication systems in the United Kingdom.
European Union EMC Directive conformance statement
This product is in conformity with the protection requirements of EU Council Directive 89/336/EEC on
the approximation of the laws of the Member States relating to electromagnetic compatibility. IBM cannot
accept responsibility for any failure to satisfy the protection requirements resulting from a
nonrecommended modification of the product, including the fitting of non-IBM option cards.
This product has been tested and found to comply with the limits for Class A Information Technology
Equipment according to CISPR 22/European Standard EN 55022. The limits for Class A equipment were
derived for commercial and industrial environments to provide reasonable protection against interference
with licensed communication equipment.
Attention: This is a Class A product. In a domestic environment this product may cause radio
interference in which case the user may be required to take adequate measures.
11
Taiwanese Class A warning statement
Chinese Class A warning statement
Japanese Voluntary Control Council for Interference (VCCI) statement
Seventh Edition (December 2005)
Printed in Singapore
© Copyright International Business Machines Corporation 2005. All rights reserved.
US Government Users Restricted Rights – Use, duplication or disclosure restricted by GSA ADP Schedule Contract
with IBM Corp.
(1P) P/N: 31R1617