1
Resco Mobile CRM
Woodford User Guide
Document version 8.1.0.0
Resco.net
RESCO MOBILE CRM WOODFORD USER GUIDE 1
1 Introduction ............................................................................................................................................ 7
2. Before we start the customization ........................................................................................................ 7
2.1 Prerequisites .................................................................................................................................... 7
2.2 Download or Install? ........................................................................................................................ 8
2.2.1 Download and Import of the solution file ................................................................................ 8
2.2.2 Updating Woodford Imported Solution.................................................................................. 10
2.2.3 Uninstall the Integrated Woodford ........................................................................................ 11
2.2.4 Install of the Standalone Woodford ....................................................................................... 11
2.2.5 Updating Woodford Standalone Application.......................................................................... 11
2.2.6 Uninstall the stand-alone Woodford application ................................................................... 11
2.3 First run .......................................................................................................................................... 12
2.3.1 Sign in troubleshooting ........................................................................................................... 12
2.4 Introduction ................................................................................................................................... 13
3 Administration ...................................................................................................................................... 14
3.1 Mobile Projects .............................................................................................................................. 14
3.2 Security .......................................................................................................................................... 16
3.2.1 Security Policy ......................................................................................................................... 17
3.2.2 Default Security Policy ............................................................................................................ 19
3.3 Mobile Users .................................................................................................................................. 20
3.4 Localizations ................................................................................................................................... 20
3.5 Geocoding ...................................................................................................................................... 25
3.5.1 Geocoder................................................................................................................................. 25
3.5.2 Toolbar .................................................................................................................................... 26
3.5.3 Usage....................................................................................................................................... 26
3.6 Plugins ............................................................................................................................................ 28
3.6.1 N:N Relationships .................................................................................................................... 28
3.6.2 Delete ...................................................................................................................................... 29
3.6.3 Owner ..................................................................................................................................... 30
3.7 Profile ............................................................................................................................................. 32
3.8 Settings .......................................................................................................................................... 32
3.9 Logs ................................................................................................................................................ 34
3.10 About ........................................................................................................................................... 35
2 RESCO MOBILE CRM WOODFORD USER GUIDE
4 Creating a customization ...................................................................................................................... 36
4.1 Creating a new project ................................................................................................................... 36
4.2 Fields .............................................................................................................................................. 38
4.2.1 Best practice when disabling field .......................................................................................... 39
4.3 Setting up a Sync Filter................................................................................................................... 39
4.3.1 Linked sync filters.................................................................................................................... 41
4.4 Views .............................................................................................................................................. 43
4.4.1 Creating a Public view ............................................................................................................. 46
4.4.2 Binding .................................................................................................................................... 51
4.4.3 View Style Editor ..................................................................................................................... 54
4.4.4 Additional View Configuration ................................................................................................ 56
4.4.5 Multiple Views ........................................................................................................................ 59
4.4.6 Row Scripts.............................................................................................................................. 65
4.4.7 Best practice in renaming a view ............................................................................................ 68
4.5 Form creation................................................................................................................................. 68
4.5.1 Contact Information Form ...................................................................................................... 69
4.5.2 Edit form ................................................................................................................................. 69
4.5.2.1 Advanced filtering ............................................................................................................. 72
4.5.2.2 Form item options ............................................................................................................ 74
4.5.3 Form Style Editor .................................................................................................................... 75
4.5.4 Additional Form objects .......................................................................................................... 76
4.5.4.1 Iframe ................................................................................................................................ 76
4.5.4.2 Map Frame ........................................................................................................................ 78
Prerequisites for the Map, GPS and Geocoding, as well as Update GPS option on custom entity’s
form .............................................................................................................................................. 78
4.5.4.3 Media tab .......................................................................................................................... 81
4.5.4.4 Form Rules – On Load, On Change, On Save .................................................................... 82
4.5.4.5 Edit Commands ................................................................................................................. 82
4.5.4.6 Custom Commands ........................................................................................................... 83
4.5.4.6.1 On Can Execute Example ........................................................................................... 86
4.5.4.6.2 Can Execute Example ................................................................................................. 90
4.5.4.7 Additional options for associated lists .............................................................................. 90
RESCO MOBILE CRM WOODFORD USER GUIDE 3
4.5.4.8 Placeholder text ................................................................................................................ 93
Localization approach ............................................................................................................... 93
Edit form Rules approach.......................................................................................................... 94
4.6 New UI............................................................................................................................................ 95
4.6.1 Hubs ........................................................................................................................................ 95
4.6.1.1 How to create a hub ......................................................................................................... 96
4.6.1.2 Drill down .......................................................................................................................... 97
4.6.2 Flexible forms .......................................................................................................................... 98
4.7 Dashboard .................................................................................................................................... 101
4.7.1 Charts .................................................................................................................................... 101
4.7.2 Creating Dashboard .............................................................................................................. 103
4.8 Managing entities available on the Mobile CRM application’s Home screen ............................. 105
4.8.1 Home Groups ........................................................................................................................ 106
4.9 Social ............................................................................................................................................ 109
4.9.1 Chat ....................................................................................................................................... 109
4.9.2 Activity Feeds ........................................................................................................................ 110
4.9.2.1 Prerequisites ................................................................................................................... 110
4.9.2.2 Setting up Activity Feeds using Woodford...................................................................... 110
4.10 Branding ..................................................................................................................................... 110
4.11Auditing....................................................................................................................................... 113
4.11.1 Auditing on the Server Side ................................................................................................ 114
4.11.2 Entering Google Maps API key ............................................................................................ 115
4.11.3 Adding Mobile Audit records on the server form ............................................................... 118
4.11.4 Adding Mobile Audit map on the server form .................................................................... 119
4.12 Images ........................................................................................................................................ 121
4.12.1 Changing a standard image................................................................................................. 122
4.12.2 Adding a custom image....................................................................................................... 124
Colorize ....................................................................................................................................... 129
4.12.3 Bulk change/import of custom images - Advanced ............................................................ 129
4.13 Configuration ............................................................................................................................. 132
4.13.1 Configuration examples ...................................................................................................... 133
4.13.2 Duplicate detection.......................................................................................................... 133
4 RESCO MOBILE CRM WOODFORD USER GUIDE
4.14 Global Maps ............................................................................................................................... 134
4.15 Calendar ..................................................................................................................................... 135
4.15.1 Views ................................................................................................................................... 135
4.15.2 Constraints .......................................................................................................................... 135
4.15.3 Rules .................................................................................................................................... 136
4.16 Events & Reminders ................................................................................................................... 139
4.16.1 CRM events in the personal (device’s native) Calendar: .................................................... 139
4.16.1.1 Filters ............................................................................................................................ 141
4.16.2 Personal events in the Mobile CRM Calendar: ................................................................... 141
4.17 Color Themes ............................................................................................................................. 142
4.18 SharePoint Integration ............................................................................................................... 145
4.19 Business Process Flow (CRM 2013 and later) ............................................................................ 147
4.20 Favorites..................................................................................................................................... 149
4.21 Email Integration........................................................................................................................ 151
4.21.1 Google Gmail....................................................................................................................... 151
4.21.2 Exchange email ................................................................................................................... 155
5 Advanced Topic ................................................................................................................................... 158
5.1 Filtered Lookup ............................................................................................................................ 158
5.2 Barcode scanner functionality ..................................................................................................... 163
5.3 Examples of advanced options .................................................................................................... 165
5.3.1 List and Form Images ............................................................................................................ 165
5.3.1.1 Available for CRM 2011 and 2013 .................................................................................. 165
5.3.1.1.1 List/View picture from Note .................................................................................... 165
5.3.1.1.2 Edit Form picture from Note.................................................................................... 170
5.3.1.2 Available for CRM 2013 only ........................................................................................... 172
5.3.1.2.1 Entity image on View ............................................................................................... 172
5.3.1.2.2 Entity image on Contact Information Form ............................................................. 173
5.3.1.2.3 Entity Image on Edit form ........................................................................................ 173
5.3.2 Custom Map Pins .................................................................................................................. 175
5.4 Mobile Apps ................................................................................................................................. 184
5.4.1 External (Portal) User project ............................................................................................... 184
5.3.4 Appointments on Global Map (Appointment entity does not have GPS fields) ................... 189
RESCO MOBILE CRM WOODFORD USER GUIDE 5
5.3.5 E-mail attachments ............................................................................................................... 191
5.3.6 Form items icon and name changes ..................................................................................... 191
5.3.6.1 Icon changes ................................................................................................................... 192
5.3.6.2 Localization of the tab name .......................................................................................... 194
6 Add offline HTML files ......................................................................................................................... 195
7 Resco JavaScript Bridge....................................................................................................................... 198
7.1 Implementing the CRM Fetch Request from JavaScript .............................................................. 199
7.2 Creating and Modifying the CRM entities using JavaScript Bridge .............................................. 201
7.3 HTML/JavaScript Bridge Sample .................................................................................................. 201
6 RESCO MOBILE CRM WOODFORD USER GUIDE
1 Introduction
Resco Mobile CRM Woodford Guide explains how to customize the Resco Mobile CRM application and
deploy the customizations to a mobile device.
The Guide will also show all the possibilities that Woodford provides including maintaining the mobile
users licenses and how to administrate the security policies.
The second section will show the possibilities in terms of installation of Woodford and the difference
between standalone and imported solution.
The third section describes the administration possibilities. How project administration works,
maintaining security policies, administrate licenses and other Woodford’s possibilities.
The fourth section shows how to create a project and what are the customizations available using
Woodford.
The fifth section shows some examples of advanced functionalities and answers for some frequently
asked questions.
Sixth and Seventh sections describe and show how to work with offline HTML files and how to
implement Java Script to these HTML files.
2. Before we start the customization
2.1 Prerequisites
Resco Mobile CRM Woodford—available at http://www.resco.net/mobilecrm/woodford.html
Resco Mobile CRM App, which minimum version is indicated on the right upper corner of
Woodford’s window—available for each of the supported platforms on Resco web
(http://www.resco.net/mobilecrm/app.aspx)
Note: Minimum Resco Mobile CRM version required for customization is indicated on the right
upper corner of Woodford’s window.
The user that is logging in to synchronize with the server needs to have administrator rights
RESCO MOBILE CRM WOODFORD USER GUIDE 7
2.2 Download or Install?
By clicking the link (http://www.resco.net/mobilecrm/woodford.html) you have two options:
Download or Install Resco Mobile CRM Woodford.
Note: Woodford integration by importing the managed solution file is not available for Dynamics CRM
4. Imported solution or standalone Woodford application is available for CRM 2011 and CRM 2013.
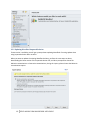
2.2.1 Download and Import of the solution file
Download option will download the Woodford solution file, which can be imported to your CRM
organization, and you will be able to run Woodford directly from CRM Settings section. In some cases
this option helps overcome some authentication problems that you may encounter when using
Standalone version.
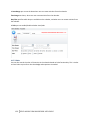
When you download the solution file, go to your CRM server Settings>Solutions and hit the Import
button.
Then choose the downloaded Woodford solution file to be imported. Then follow instructions.
8 RESCO MOBILE CRM WOODFORD USER GUIDE
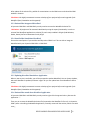
Do not forget to publish all customizations.
Woodford is then available from the CRM Settings, under MobileCRM section
RESCO MOBILE CRM WOODFORD USER GUIDE 9
2.2.2 Updating Woodford Imported Solution
If new version is available, you will get a prompt about updating Woodford. Choosing Update when
using imported solution does not work.
When you want to update the existing Woodford solution, perform the same steps as above,
downloading the latest version of the imported solution file, and when prompted to choose the
Maintain customizations or Overwrite customizations, during the import, please choose the Maintain
customizations option.
10 RESCO MOBILE CRM WOODFORD USER GUIDE
After update of the solution file, publish all customizations on the CRM server and reload the CRM
website in browser.
!Disclaimer: We highly recommend to create a backup of your projects before each upgrade of the
Woodford (both, Standalone and Integrated)
2.2.3 Uninstall the Integrated Woodford
In Dynamics CRM 2011 and CRM 2013 you only need to remove the Woodford solution file.
! Disclaimer: All projects will be removed. Make backup using the export functionality. In order to
uninstall the Woodford application or solution file, each entity enabled in Plugins (N:N Relations,
Delete, Owner) has to be deactivated in the plugin.
2.2.4 Install of the Standalone Woodford
Choose the Install option if you use Microsoft Dynamics CRM 4.0 or if do not wish to integrate
Woodford with your Dynamics CRM 2011 or CRM 2013.
2.2.5 Updating Woodford Standalone Application
When a new version is available, you will be prompted to update Woodford. You can choose Update,
wait until Woodford is updated, and start it again. Or you can update later from Woodford’s About
section.
!Disclaimer: We highly recommend to create a backup of your projects before each upgrade of the
Woodford (both, Standalone and Integrated)
2.2.6 Uninstall the stand-alone Woodford application
In Dynamics CRM 2011 and CRM 2013 you only need to right-click the app and select „Remove this
application...“.
Then you can remove the Woodford solution file (imported at the Woodford’s first run). In Dynamics
CRM 4, after uninstalling the Woodford application, manually remove all the entities, which start with
resco_.
RESCO MOBILE CRM WOODFORD USER GUIDE 11
! Disclaimer: When removing the solution, all projects will be removed. Make backup using the export
functionality. In order to uninstall the Woodford application or solution file, each entity enabled in
Plugins (N:N Relations, Delete, Owner) has to be deactivated in the plugin.
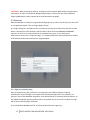
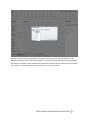
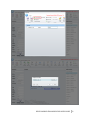
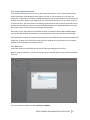
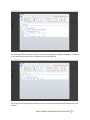
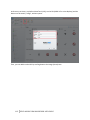
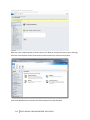
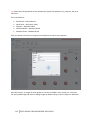
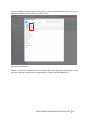
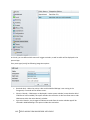
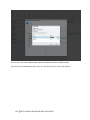
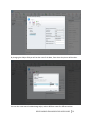
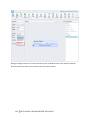
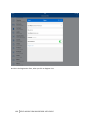
2.3 First run
When the Woodford is launched, a registration dialog pops up. In order to use the tool, you have to fill
in the registration details. Then, the login dialog is shown.
In the login dialog, fill in all fields in order to connect to your Dynamics CRM server and then click OK
button. Username for Active Directory and IFD needs to be in the format DOMAIN\USERNAME if
required. On the first run required entities are created on the server, so user with system
administrator security role is required to log in. It is recommended that system administrator handles
all the administration and customizations using Woodford.
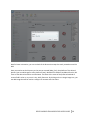
2.3.1 Sign in troubleshooting
Proxy or Reverse Proxy (ISA, Forefront) is not supported. Any middle component requiring
authentication to pass through is not supported for Stand-alone application. This scenario is not
present in case of the Woodford integration, as the authentication is covered by Internet Explorer, so
any middle component requiring authentication is supported. Also in case of an invalid SSL, the login
will fail, due to the Silverlight restrictions.
In case the Refresh Metadata will fail, increase the ReceiveTimout registry key.
12 RESCO MOBILE CRM WOODFORD USER GUIDE
[HKEY_CURRENT_USER\Software\Microsoft\Windows\CurrentVersion\Internet Settings].
ReceiveTimeout DWORD = 3600000 milliseconds (1hour).
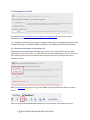
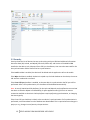
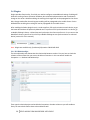
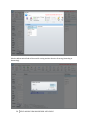
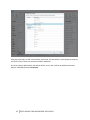
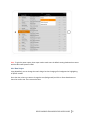
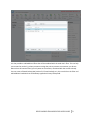
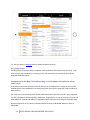
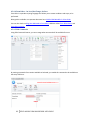
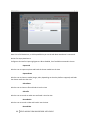
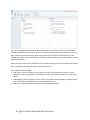
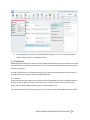
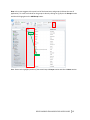
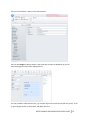
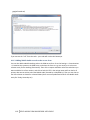
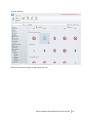
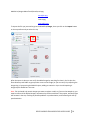
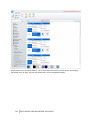
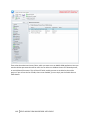
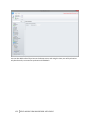
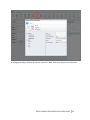
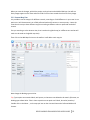
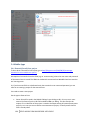
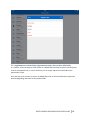
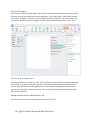
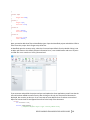
2.4 Introduction
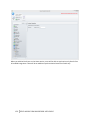
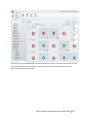
After the successful login, the main screen of the app shows up:
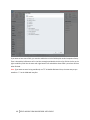
1. Administration Menu: Mobile Projects, Security, Mobile Users, Localizations, Geocoding (New),
Plugins, Settings, Logs and About
2. Main Menu or a Toolbar with basic options, that depends on the selected item from the
Administration Menu
3. Displays data and options according to the selected item from the Administration Menu
Note: While the Woodford is in the evaluation period, the Mobile Users menu is not available, as the
number of mobile users during the trial period is not limited.
RESCO MOBILE CRM WOODFORD USER GUIDE 13
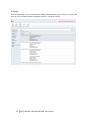
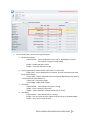
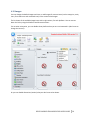
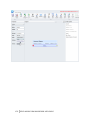
3 Administration
When We run the Resco Mobile CRM Woodford, using the Administration menu, we can access Mobile
Projects management, Mobile Devices management, Mobile Users management, Settings, Logs and
About
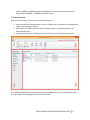
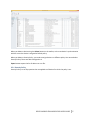
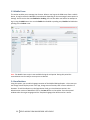
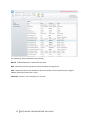
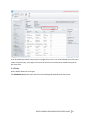
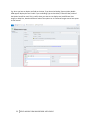
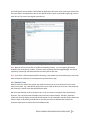
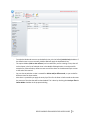
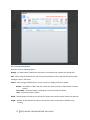
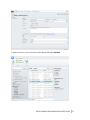
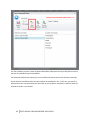
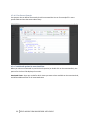
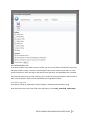
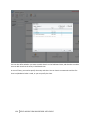
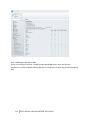
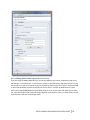
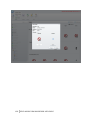
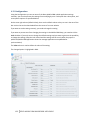
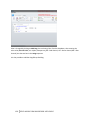
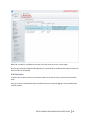
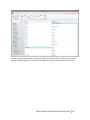
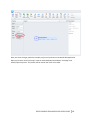
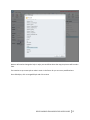
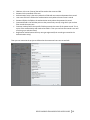
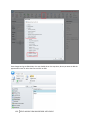
3.1 Mobile Projects
In the main menu, we can manage the selected project, or create new one using the New button.
Note: Mobile projects are stored as Note attachments to resco_mobileproject’s records.
Warning: When you do a bulk delete of your Notes, please note you might also delete your mobile
projects. To avoid this, please exclude Note attachments to resco_mobileproject’s records from the bulk
deletion.
Using Edit button I will open the project and adjust it (we can also double click on the project to
perform the same operation).
Clicking the Properties button we can adjust the project’s properties Name, Role and Priority.
Button Show Users opens up a window with a list of users, which will receive the customization, i.e.
users, with security role, assigned to the project.
The Delete button removes the selected Mobile Project.
Deactivate will deactivate the selected project. Deactivated project will not be used to customize the
Mobile CRM application, but the project will not be deleted.
Activate button will activate the deactivated project
Import will import the previously exported project.
Clone will duplicate the same Mobile Project and will prompt for the Name, Role and Priority. We can
use the Clone button for e.g. duplicating the same project to other user role, or to make changes to the
currently used Mobile Project without risk.
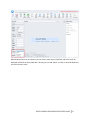
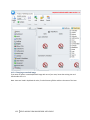
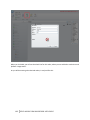
Clicking on the Check User button we will be prompted for the user name and the application will
show you all the Mobile Projects where the user is involved, including the project’s priority, so we can
see which Mobile Project will be used ( in screenshot - the project on top will be the one used).
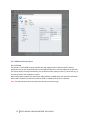
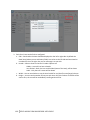
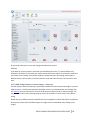
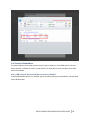
14 RESCO MOBILE CRM WOODFORD USER GUIDE
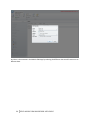
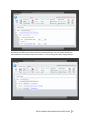
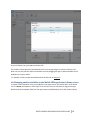
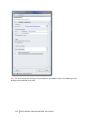
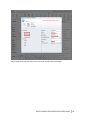
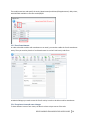
If a project has a grey icon with exclamation mark, it means the project is dirty, i.e. there has been a
change in the project, but it was not published after making these changes.
RESCO MOBILE CRM WOODFORD USER GUIDE 15
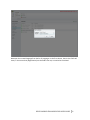
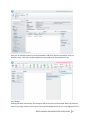
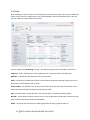
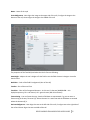
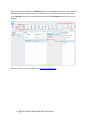
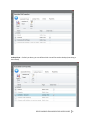
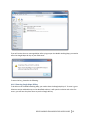
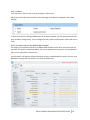
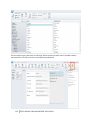
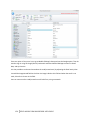
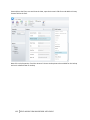
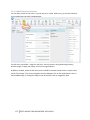
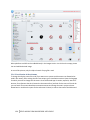
3.2 Security
Security shows the list of devices that are synchronizing with your CRM and additional information
about the State (Ok, Locked, and Wiped), Device ID, Device OS, and Version of the Mobile CRM
installed on the device, Lock, Wipe and Force Full Sync checkboxes, User name that was used for the
last synchronization and the date of the last synchronization.
If the Lock checkbox is enabled, the device will be locked and the application will not be usable.
If the Wipe checkbox is enabled, the device is wiped out, the local database on the device, the server
URL and user credentials are erased.
If the Force Full Sync checkbox is enabled, at the next device’s synchronization the full sync will be
performed. After a full synchronization, this checkbox will be disabled automatically.
Note: In case of Android and iOS platforms, for the Lock and Wipe the push notifications are used and
the device is Locked or Wiped out immediately (or after application start) if there is an internet
connection available on the device. Other platforms require performing synchronization, or changing
the Security policy.
If the Force Full Sync checkbox is ticked, at the next device’s synchronization a full synchronization is
performed, so the latest data from the database are downloaded. This is required at some changes in
project, or e.g. changes in user/security role permissions.
16 RESCO MOBILE CRM WOODFORD USER GUIDE
When you delete a device using the Delete button on the toolbar, at the next device’s synchronization
with the server the device is assigned to Default policy.
When you delete a Security Policy, you need to assign devices to a different policy. You cannot delete
Security Policy if there are device assigned to it.
Export button exports the list of devices to a csv file.
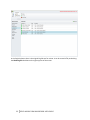
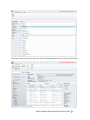
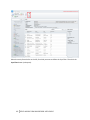
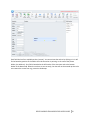
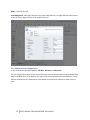
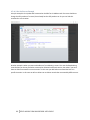
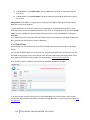
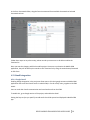
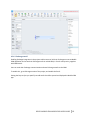
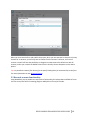
3.2.1 Security Policy
Security Policy is a set of properties that are applied to all devices for which the policy is set.
RESCO MOBILE CRM WOODFORD USER GUIDE 17
The Security Policy properties are in groups.
Application Session
Require Login after X minutes of inactivity – After defined time in minutes the Mobile CRM application
asks for the password to continue using it.
Check Security Policy
At Application Login – Mobile CRM application checks whether there is a change in the security policy
at the application login. The login is performed either at the start of the
application or if user enters a password to log in to the application.
Every X Hours – The Security Policy is checked periodically after defined time in hours.
Note: If none of these options are used, the policy is downloaded only at synchronization
Lock Application
Lock Application – If this option is enabled, all devices under this policy will be locked and the
application cannot be used unless the device has a different policy assigned.
If no server contact after X hours – The application is locked if the application did not connect the CRM
server either in matter of checking the policy or synchronization, or
online mode access. Application can be unlocked by entering the
correct password. In this case also the internet connection is
required.
During non-business hours – Application is locked if the time is outside the given interval.
Invalid password X times – If a wrong password is entered defined times to the login, the Mobile CRM
application locks up (Admin lock) and can be unlocked in the Woodford’s
Security list of devices. The locked device will have a Lock checkbox enabled
and needs to be unchecked.
18 RESCO MOBILE CRM WOODFORD USER GUIDE
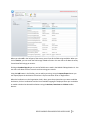
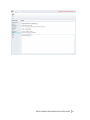
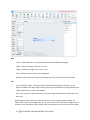
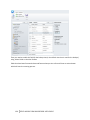
Wipe Application
Wipe Application – If this option is enabled, all devices under this policy are wiped, even if user tries to
synchronize the Mobile CRM with the server.
If no server contact after X hours – The device’s local Mobile CRM database is wiped out if the
application does not contact server after defined number of hours.
Invalid password X times – The device’s local Mobile CRM database is wiped out after entering a wrong
password defined number of times.
Devices can be assigned to Security Policy when the device is selected and the Edit button on the
toolbar is selected (or double-click on the device). To change the Security Policy, select the Policy that
should be used from the options. Please note, that you need to create a new Security Policy in order to
assign it to a device.
3.2.2 Default Security Policy
When a new device is used to synchronize with your server, it is automatically listed under policy
Default. You can edit this policy by selecting the Default row and clicking on Edit button on the toolbar.
When you edit this policy, you will define how all the device will handle Security until you move them
under a custom created Security Policy.
RESCO MOBILE CRM WOODFORD USER GUIDE 19
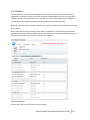
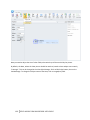
3.3 Mobile Users
This section enables you to manage User licenses. When a user logs to the CRM server from a mobile
device, he might receive the Woodford customization depending on the Auto assign licenses option in
Settings. He can receive the state Enabled or Pending. You can also add a user before he attempts to
log in using the Add button. You can also Enable the disabled or pending user, Disable the Enabled or
pending user or Delete a user.
Note: The Mobile Users section is not available during the trial period. During this period the
customizations can be used for as many users as desired.
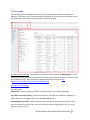
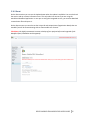
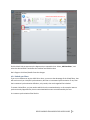
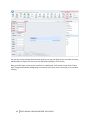
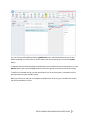
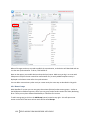
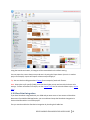
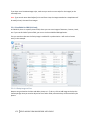
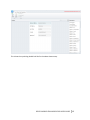
3.4 Localizations
Using this option, you can add a language mutation of the Mobile CRM application – this means you
can change various display names in the app, change name of entities, tabs in forms and other UI
elements. To add a localization on the Organization level, go to Localizations section in the
Administration section of Woodford. Click on the New Button on the toolbar. From the opened
window select the target Language and the Template language that will be used as a source.
20 RESCO MOBILE CRM WOODFORD USER GUIDE
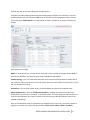
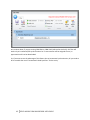
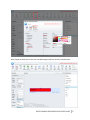
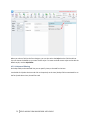
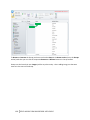
Now open the created language from the list of Languages. In the first column, there is the field's Id
name, in the second one (Organization) are the field's that are, or need to be translated.
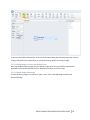
RESCO MOBILE CRM WOODFORD USER GUIDE 21
In the English column there is the original English text for review. It can be turned off by unchecking
the Show English checkbox on the right top part of the screen.
22 RESCO MOBILE CRM WOODFORD USER GUIDE
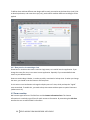
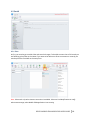
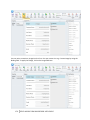
When you select All in the left part of the screen, you will see all the field strings available. When you
click on Entities, you can see all the field strings related to Entities. You can also scroll down the entity
list and view field strings per entities.
Clicking on Standard App UI you can see the fields that are used in the Mobile CRM application UI. You
can also scroll down the list of controls and view strings per controls.
Using the Add button in the Toolbar, you can add a new string. Using the Import/Export button you
can Import/Export the localization file and use it for/from another server or Organization.
When the localization on the Organization level is done, open the project where you want to add the
localization, click on Localizations and the list of available languages is displayed. Here you can disable
or enable or delete the selected localizations using the Activate, Deactivate and Delete toolbar
buttons.
RESCO MOBILE CRM WOODFORD USER GUIDE 23
The state (font) of the localization string meaning:
Normal - localized expression is taken from the server
Bold - expression from the template is used to overwrite the original text
Italic - expressions that are not available on the server neither on the template thus the English
(default) version from the server is used.
Italic Bold - new text - not in template, nor on server
24 RESCO MOBILE CRM WOODFORD USER GUIDE
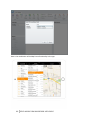
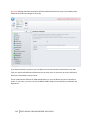
3.5 Geocoding
The Geocoding section in Woodford contains tools for geocoding your records according to the
addresses – this means you can translate address information of the records into raw GPS data which
the mobile application needs to properly display records on the Map.
Prerequisites for Geocoding – to geocode the records you need to obtain The Bing Map Key – (if your
company will be using the obtained GPS data only inside of the company, then the plain developer key
will should be enough) . More information about Bing Map Key can be found here
(http://msdn.microsoft.com/en-us/library/ff428642.aspx)
Prerequisites for GPS fields
3.5.1 Geocoder
Select Entity : Selects the entity from which you want to fetch the records for geocoding
City, State, Postal code, Country – select the fields which fall under their respective categories (i.e.
choose Address1_city as City, Address1_zip as Postal code and etc.)
Set additional street fields – after checking this option you will be given the opportunity to select
other street fields if you have more. You can also set their order by adjusting the {1} {0} {2} string
parameter (e.g. {2} {1} {0}).
RESCO MOBILE CRM WOODFORD USER GUIDE 25
Latitude,Longitude – select the longitude and latitude fields in which you keep the GPS data
Find position by query – when this is checked, Bing uses a different kind of search that is suitable when
your records are frequently missing fields like City, Zip and etc.
Filter By: you can define which records from the previously selected entity will be fetched by choosing
a view from the entity –records will be chosen by the view’s filter.
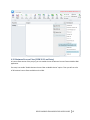
3.5.2 Toolbar
Fetch data button : after clicking on this button the records will be visualized in a grid in the right part
of the geocoding screen. The grid then also gives you the ability to change the information in the fields
if (to make corrections to addresses and etc.).
Find position button : starts the geocoding process (records need to be selected).
Find address button : finds/updates address if only the GPS data is available for the record
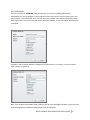
3.5.3 Usage
After you have fetched the data you can filter it by 5 categories
All – shows all records
26 RESCO MOBILE CRM WOODFORD USER GUIDE
New – shows those records which received the GPS coordinates after geocoding (after the Find
position button was activated) and didn’t have any prior GPS information (green font color)
Changed – shows those record, which GPS coordinates have been updated – they had GPS information
prior geocoding (blue font color)
Failed – records which have failed to geocode (red font color)
Empty Lat/Lon – records which have no GPS data prior geocoding (red font color).
By clicking on the „i“ button you can open a detail view on the record
Results – you can see results which Bing map provided
Search – you can manually search by your own criteria
Update / Location checkbox – will update the GPS data after clicking on the Confirm button
Update / Address checkbox – will update the address
Note – the map pin can be moved manually by dragging it across the map to enhance the accuracy of
the GPS coordinates
RESCO MOBILE CRM WOODFORD USER GUIDE 27
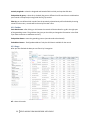
3.6 Plugins
Plugins provides functionality, for which you need to configure some additional settings. Enabling will
allow the tracking of some operation like delete, N:N relationship disassociation and record owner
change on the server. Without enabling the tracking the changes will not be propagated to the clients.
Only changes made after the tracking was enabling will be propagated to the mobile clients. Entries
deleted before enabling the tracking will not be propagated on the mobile clients.
After enabling the Delete plugin there is a need to perform full synchronization on each device, to get
the latest data without the previously deleted ones. To perform a full synchronization on a device, go
to Mobile CRM app’s Setup -> Delete Data and synchronize the client to perform it. Or you can use the
Woodford’s Security section to Force Full Sync Mobile CRM app at next synchronization on selected
device (section 3.2 of this manual).
Note: Plugins are available only for Microsoft Dynamics CRM 2011& 2013
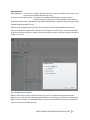
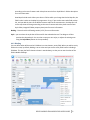
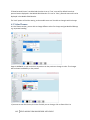
3.6.1 N:N Relationships
The N:N relationship will disassociate the relationship between entities. First you have to check the
relations of the entities that you want to be able to customize. In this case we will enable the
Competitor <=> Product N:N Relationship
Then open the desired project and enable the Competitor->Product relation as you will enable an
Entity. Of course both entities have to be enabled as well.
28 RESCO MOBILE CRM WOODFORD USER GUIDE
Then you can add the Products list to the Competitor’s edit form. And the Competitor list to the
Product’s entity. Then you can add competitors to the products on the Competitor’s tab.
3.6.2 Delete
Enabling the delete functionality, the changes made on the server will be tracked. When you check an
entity in this plugin, when an item from the entity will be deleted on the server, the change will also be
RESCO MOBILE CRM WOODFORD USER GUIDE 29
applied on the device, thus the item will be deleted from the local database on the device on the next
sync.
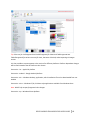
3.6.3 Owner
Enabling the tracking on the entity will enable changing the item’s owner on the client according to the
server change.
30 RESCO MOBILE CRM WOODFORD USER GUIDE
For things to work properly you might also need to enable the User entity as in the screenshot below.
RESCO MOBILE CRM WOODFORD USER GUIDE 31
3.7 Profile
When you connect Woodford to you CRM environment for the first time, you are asked to fill in the
profile information. This information helps us to identify you when you need our help. If you made a
mistake at entering the information, or you need to change anything, you can do so in this section.
3.8 Settings
When you keep the option Auto assign licenses checked, each user that will log into the CRM using
a mobile device, will be granted a license to use the Woodford customization. If you disable this
option, you will have to go to the Mobile Users administration and manually change the state from
Pending to Enabled. Until that time the user will not be able to use the Woodford customization. You
can also see the amount of available/total licenses.
If you check the Send licenses assignment, you will receive license assignment notification to the email,
that you specified in Profile, and you can add additional email addresses which will also receive
notification about assigned licenses.
32 RESCO MOBILE CRM WOODFORD USER GUIDE
RESCO MOBILE CRM WOODFORD USER GUIDE 33
3.9 Logs
If you will encounter an error with the Resco Mobile CRM Woodford, you can check it, or send us the
error log. This will help us locate the problem and fix it, or help you solve it.
34 RESCO MOBILE CRM WOODFORD USER GUIDE
3.10 About
On the About section you can use the Update button when the update is available. You can also check
the version and our contact information here. This only takes into account if you are using the
standalone Woodford application. In case you are using the integrated version, you need to download
a new solution file and import it.
On the About screen you can also see the Unique ID and Unique Name (Organization Name) that are
needed if you will be communicating with us about mobile user licenses.
!Disclaimer: We highly recommend to create a backup of your projects before each upgrade of the
Woodford (both, Standalone and Integrated)
RESCO MOBILE CRM WOODFORD USER GUIDE 35
4 Creating a customization
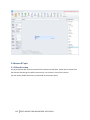
4.1 Creating a new project
We will create a new Standard User project, where we will customize the Resco Mobile CRM mobile
application by adding an entity, creating views, forms, charts and creating filters to get only the data
we need and sort them. More information about different type of projects can be found in Advanced
Topic section.
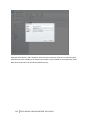
Click New (in the Main Menu) to add a new project. We can name the project (e.g. SalesApp), pick up
one or more roles for which the project will be used (Salesperson in our case) and we also have the
option to assign the project a priority. Priority is useful if one user has more roles, to which exists a
mobile project.
For example, let’s assume you have Sales Person and Sales Manager security roles with different
permissions. But because Sales Manager needs to have access to Sales Person data, they have both
roles assigned. So if you will create a project for Sales Person and Sales Manager, both with priority 0,
Sales Person will get the correct project (as each sales guy has only one role assigned), but for
manager, it is not determined. But if you will increase the priority of Sales Manager project, let say to 1
or higher, the project for Sales Manager role, in this case with the highest priority, will be used. So at
the end, it will not affect any sales person, but it will manage to get the sales manager the correct
project.
Let’s put there “30“ to make sure this one will be always used.
36 RESCO MOBILE CRM WOODFORD USER GUIDE
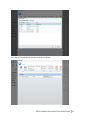
Click OK and now we can start editing the SalesApp project.
Click Edit (in the Main Menu) while having the SalesApp project selected. You now have a list of all
available entities from your Dynamics CRM server on the left. Look for Competitor entity, click on it,
click on the green Enable button in the top toolbar to make it available in our project and Save the
change.
Other parameters include
Mode – If set to Online only, the data for the entity will only be available in the app’s Online Mode. If
set to Online & Offline – the data of course will be available for both modes
Conflict Strategy – this is for cases when there the server and the mobile app want to modify data at
the same time. Either you can set it to that the Server always wins this conflict or Device wins or it let’s
the user decide (User Action).
Permissions – you can set the Read, Write, Create and Delete permission for the whole entity.
Advanced Properties – when the Include Lookup Labels is checked, the app will no longer show
related data to that entity as “Unknown” in the offline mode. This often happened with ownerID’s of
records as the data with User names is stored in the User entity (by default the Owner entity is not
enabled in Woodford).
Now, as the Competitor entity is activated (it has changed into full color icon), we have the option to
expand it, and see the five items that will roll down: Forms, Views, Charts, Fields and Indexes.
RESCO MOBILE CRM WOODFORD USER GUIDE 37
4.2 Fields
After enabling an entity, it’s best to start enabling and customizing the Fields. I pick up some additional
fields I want to use in my mobile project: City, Country/Region, Street and ZIP/Postal Code. Here you
can also enable the custom fields for the entity.
You can configure the Formatting of a field – this affects the appearance of the fields in the Forms.
Single line – field is formatted to have the appearance of a single line field in the mobile app
Multiline – field will have the appearance of a multiline field
Email - the field in the mobile app will have an action button that after activating will give the user an
opportunity to immediately create an email
Phone number – the field will have an action button that will activate the phone call function on the
device (the device will dial the number contained in the field)
URL – an action button to open the URL in the native browser of the device will be available
Barcode – action button activates a camera so user can scan Barcodes and QR codes. Function will only
work on devices that have a camera with Autofocus.
HTML – will format the text field into a HTML type (bodies of email, signatures and etc.).
38 RESCO MOBILE CRM WOODFORD USER GUIDE
Also you can configure the Permissions on the fields to either enable/disable the Read, Create or
Update permission.
Note: The functionality of the Add Images to the entity will be explained in the Advanced Topic section
of this manual – 5.2.
Warning: If you disable any previously enabled Field, please check the existing Views and Forms and
remove any Fields or Lists that are represented by the sign “Invalid”, or enable the correspond Field so
that the Field will no longer be listed as Invalid. If there will be any Invalid Field or List in the Form or
View, the application will crash when you will try to open an entity list or record details.
4.2.1 Best practice when disabling field
When you disable a field, that is used somewhere in the application, Mobile CRM application can crash
when you access view or form, where this field was used. To avoid this situation, you should keep in
mind these steps.
When you want to disable a field that is enabled in the entity, first remove the reference of this field
from each view, form or chart. Also from other entity views, where you used this field. To do so, you
need to use the Select Fields option in View and disable this field from the view. Same applies on the
Chart. Using Select fields you need to remove the field from the view.
On form, you just need to delete the field from the form. Then, you can disable the field, and it will not
be used in Mobile CRM application. Any change in fields (enabling/disabling a field) will cause a full
sync on this entity.
Special case is, when you want to remove a field from the CRM server. If this field is enabled and used
on the Mobile CRM application, first perform the above steps, let users synchronize and tell them not
to make changes to data, and after they all synchronize, remove the field, publish the project and ask
users to synchronize. Only this way you prevent problems, when users make changes to field, you want
to remove. The problem that can occur is that server will report an error when Mobile CRM app will try
to update/fill in a field that no longer exists on the CRM server.
4.3 Setting up a Sync Filter
By setting up the Sync Filter we define a condition for the CRM database entities (rows) which will be
synced to your mobile device. Please bear in mind the capacity of mobile devices. In this example we
set up a Sync Filter for opportunities that were created within the last 120 days.
RESCO MOBILE CRM WOODFORD USER GUIDE 39
Select the entity from the list on the left, for which you want to define the Sync Filter. Then click the
Sync Filter button (red square).
40 RESCO MOBILE CRM WOODFORD USER GUIDE
Click the black little arrow next to the Opportunity to expand the box. Select „Add Condition“, and
select the desired field. Then define the condition and add the value.
Don’t forget to click Save/Save & Close the changes.
4.3.1 Linked sync filters
If you run on CRM server version 2013 SP1 or later, you can use the advantage of the linked filters, that
will work not only on initial/full synchronization, but also on incremental synchronization. If not, from
the incremental synchronization definition, only records, that are changed will be included.
To create a linked filter, you just need to add a link to the associated entity. In this example I want to
synchronize only Opportunities, that are associated with account records owned by the user.
So I create a synchronization filter like this
RESCO MOBILE CRM WOODFORD USER GUIDE 41
As is written above, if you are running CRM 2011 or CRM 2013 (without Service Pack), this filter will
work only at incremental/full synchronization. So if a new account will be assigned to user, its
opportunities will not be downloaded.
So, if you want to use the advantage of this feature also at incremental synchronization, all you need to
do is to enable the use of “Incremental Linked SyncFilter” for the entity.
42 RESCO MOBILE CRM WOODFORD USER GUIDE
It can be enabled by default in the project’s Configuration, but it is not recommended as such filter will
create a complex query, that might increase server load. So we recommend to enable this option on
per entity basis.
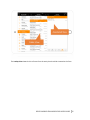
4.4 Views
Picture bellow shows the view types.
The Dashboard view shows views and charts that we designed and defined for the entities.
RESCO MOBILE CRM WOODFORD USER GUIDE 43
The Public View displays the selected entity’s list of records.
The Associated View shows the list of items from the associated entity that are relevant for the
selected item and entity.
44 RESCO MOBILE CRM WOODFORD USER GUIDE
The Lookup View shows the list of items from the entity that should be inserted to the form.
RESCO MOBILE CRM WOODFORD USER GUIDE 45
Note: If a custom Associated View, Lookup View or Dashboard View is not created, then the Public View
is being used.
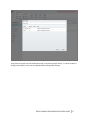
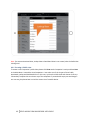
4.4.1 Creating a Public view
To create a new Competitor’s public View please click Views under Competitor’s entity and then New
in the Main Menu. I named the view Competitors. I can select one of the 4 types of view: Public,
Associated, Lookup and Dashboard View. In this case, I pick up the Public view and choose a Primary +
2 Secondary Template. We can choose any of the templates or proceed with empty one and design it
our own way, but please bear in mind the screen size of a mobile device.
46 RESCO MOBILE CRM WOODFORD USER GUIDE
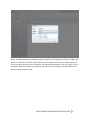
Firstly I will add the fields to be available on the Field Explorer by clicking Select Fields in the Menu Bar
and in our case select all of them. Select fields show all the fields available for the mobile device, not
only for the View, but also for Sort and Search. The selected fields appear in a list on the right. You can
also disable fields, that need to be enabled for synchronization, but you do not need to add them to
View to make the designer tidier.
RESCO MOBILE CRM WOODFORD USER GUIDE 47
If you want to have more fields, you need to enable them in the Fields option under Competitor Entity.
Then I selected the left bottom cell in the blue rectangle and double-click the City field in the list on the
right to add City field. I do the same with right bottom cell and add the Street field. I press Save & Close
when finished.
Note: If you want to search using a wildcard, use “%” in Mobile CRM search bar, the same way as you
would use “*” on the CRM web interface.
48 RESCO MOBILE CRM WOODFORD USER GUIDE
Each field also has four available anchors (arrows). You can activate the anchor by clicking on it. It will
fix the boundary position of the field to the side the anchor is pointing. In the case of the picture
bellow, the Address 2: City field is bounded to the left border of the view item and to the bottom
border of the Name field. When the anchors are set correctly, the view will not be messed up when the
user rotates the screen from e.g. portrait to landscape.
RESCO MOBILE CRM WOODFORD USER GUIDE 49
Row
Name – Defines the Row’s name (to distinguish between multiple Row designs)
Width – Defines the width of the row in a view
Height – Defines the height of the row in a view
Color – Defines the color of the row’s background
Selected – Defines the color of the row’s background, when the record in view is selected
Cell
Left, Top, Width, Height – Coordinates of the selected element (field on the row). You can
adjust the element size and position either by entering the coordinates or by drag and drop the
element and element’s sides in the designer
Kind – You can set the selected element as Text field, Image or Map Pin that will be used in the
Map view.
How Image Kind works: When you select a field to which you change the Kind to Image, the
field’s value is taken as the image name. So e.g. if you set the status code field as Image, and you
add the icons of the different status codes to the customization, the icon on the view will change
50 RESCO MOBILE CRM WOODFORD USER GUIDE
according to the record’s status code. Also please see the Form Style Editor’s Folder description
for more information.
How Map Pin Kind works: When you select a field to which you change the Kind to Map Pin, the
field’s value is taken as the Map Pin image name. So e.g. if you set the status code field as Map
Pin, and you add the icons of the different status codes to the customization, the Map Pin icon
on the map view will change according to the record’s status code. Also please see the Form
Style Editor, ImageCell Folder property description for more information.
Binding – Please check the following section (4.5.2) for more information.
Style – you can select the style that will be used for the selected element. The designer will also
preview the selected style. You can also create your own styles, or adjust the existing ones
using the Style Editor (button in the top toolbar).
4.4.2 Binding
You can define what will be used as Field Data in a view element, entity field. When you add an entity
field on the view, by default, Binding is set to Value and you see the entity field‘s name in Binding’s
field data. This way the field’s data are shown in standard way, so that you can see the value of the
field in Mobile CRM app.
RESCO MOBILE CRM WOODFORD USER GUIDE 51
E.g. when you have an Option set field on the view, if you leave the Binding Type on Value, Mobile
CRM app will display the item’s label. If you set Binding Type to Raw Value, instead of label, Value of
the Option Set will be used. This is useful, when you want to not display text, but different View
images, or Map Pins, based on different value of the option set. It is because images cannot have space
in their names.
52 RESCO MOBILE CRM WOODFORD USER GUIDE
When Binding Type is set to Constant, you can enter a static text as Field Data, and this text will be
displayed instead of the entity field data. This way you can add “labels” to views, to describe fields that
only show numeric value.
RESCO MOBILE CRM WOODFORD USER GUIDE 53
4.4.3 View Style Editor
It is also possible to change or add a style using the Edit Styles button on the Toolbar.
The editor enables you to change the default styles, or adding new styles, that can be then assigned to
fields on views. The styles are global, for all fields on views, so if you change a style that is assigned to
multiple fields, even to a view on a different entity, these changes are also applied to these fields. Also
it does not matter on which view you open and edit the Style Editor.
The properties of the ImageCell (is used when the Kind of the element is set to Image) that are useful
for this kind of item are following:
Folder – Enter the name of the Folder under the platform folder of the Image.zip where the icons for
the field values that you want to represent as pictures are stored
ForeColor – if the icon that you will use is colorized, you can change the color of the icon here
FormatString – if you use a non-string field to be used as source for the image (e.g. a lookup field), the
string should look like folder_name{0}.png. {0} represents the target name (name of the lookup record,
according to which the image is used.
HorizontalAlignment - Near aligns the image to the left side of the cell, Far aligns image to the right
side of the cell and Center aligns the image to middle of the cell
54 RESCO MOBILE CRM WOODFORD USER GUIDE
Name – Name of the style
VerticalAlignment - Near aligns the image to the upper side of the cell, Far aligns the image to the
bottom of the cell, Center aligns the image to the middle of the cell
The properties of the TextCell (used when the Kind is Text are following:
AutoHeight – Adjusts the row’s height to fit the field in case the field element in designer is smaller
than the font.
BackColor – Color of the field’s background (color of the cell)
FontSize – Size of the text’s font
ForeColor – Color of the foreground element – in this case it’s the text (#AARRGGBB – AA =
alpha/transparency, RR = red channel, GG = green channel, BB = blue channel)
Format String – You can format the way, how the field data are represented. E.g. you can enter a
format string in the way “Personal: {0}” where Personal: is a static text and the field data are entered
where the element {0} is
HorizontalAlignment – Near aligns the text to the left side of the cell, Far aligns text to the right side of
the cell and Center aligns the text to middle of the cell
RESCO MOBILE CRM WOODFORD USER GUIDE 55
Name – Name of the style
VerticalAlignment - Near aligns the text to the upper side of the cell, Far aligns the text to the bottom
of the cell, Center aligns the text to the middle of the cell
4.4.4 Additional View Configuration
In each view we can also define Buttons, Edit filter, Edit Sort and Edit Search.
You can configure the buttons on the view (visible only if the List Buttons option in Resco Mobile CRM
Setup is enabled). Click on the Buttons icon and set the action that the button should perform. These
buttons will be shown as a replacement of the default ones when user selects the record in the list
view.
56 RESCO MOBILE CRM WOODFORD USER GUIDE
Edit filter will restrict the displayed data in the view to only those that meet the conditions. The
difference between the Sync Filter and Edit Filter is, that the Sync Filter only allows to sync the fields
that meet the conditions, while the Edit filter works with all fields, and only displays those, that meet
the conditions. This is the perspective of having more views for one entity.
RESCO MOBILE CRM WOODFORD USER GUIDE 57
Edit Sort defines which field will be used for sorting and the direction of sorting (Ascending or
Descending).
58 RESCO MOBILE CRM WOODFORD USER GUIDE
In the Edit Search we can define in which field the application will search for the character entered into
the search field in the application. We can also define whether search at the field’s beginning, end or in
each full text. The search uses logical operation OR.
Note: Because the search uses OR, to enable more advanced search, you can create a filter with a
condition over a text field (e.g. Name, Title etc.) and as a filtered text enter @@filter@@. This will be
replaced (in runtime) by the text entered to the search field on the view.
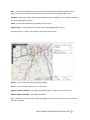
Note: If you have a GPS coordinates field in the entity, if you enable it for the mobile project, you will be
able to switch the view from list to map and see the records on a map.
4.4.5 Multiple Views
Multiple views are useful if the mobile user needs to have access to particular data from the same
entity at one place. E.g. if the default public view is set to show all data, we can create a new view that
will show only a subset of the data with different fields.
We will create multiple views for Account entity. First, we create a new public view named Seattle
Accounts. The new public view will display only accounts located in Seattle. Therefore, we define
a filter that will only display accounts located in Seattle. For this new public view we will also define the
Edit Sort order as Ascending and Edit Search, that will search for the address that contains the
characters entered to the search field in the Address field.
RESCO MOBILE CRM WOODFORD USER GUIDE 59
60 RESCO MOBILE CRM WOODFORD USER GUIDE
RESCO MOBILE CRM WOODFORD USER GUIDE 61
Using the same steps, we will create another public view, this time with the name Redmond Accounts,
and set the filter to show only accounts located in Redmond.
As the last step we define which view will be default. In our case it will be the Redmond Accounts.
Select it in Woodford and click Properties.
62 RESCO MOBILE CRM WOODFORD USER GUIDE
-
-
To make the Redmond Accounts as the default view, tick the Default (Initial View) checkbox. If
the default view is not set manually, Mobile CRM will apply the alphabetical key.
The option Hidden (Hide in view selector) can be used when you are creating a view, that will
not be shown in the list of multiple views in the Mobile CRM application. It can be used for
example for a filtered lookup. How to create one will be shown in the Advanced Topic section
at the end of this manual.
You can also set whether a view is created for Online and/or offline mode, so you can define
different views for these modes.
Also there is a possibility to apply the entity Sync filter for the View in Online mode to decrease
the amount of the data that will be downloaded. This is done by checking the Use Sync filter in
Online Mode checkbox in the properties dialog.
RESCO MOBILE CRM WOODFORD USER GUIDE 63
And here is the outcome in the Mobile CRM App. By selecting the different view we will have access to
different data.
64 RESCO MOBILE CRM WOODFORD USER GUIDE
Note: To gain the same output, these steps need to make over the default testing database that comes
with the Microsoft Dynamics CRM.
4.4.6 Row Scripts
Using Woodford, you can change the row’s design. Such as changing of its background or highlighting
of specific records.
Go to the view, where you want to change the row (background) and click on Clone Row button to
clone the current row. Then rename the Row.
RESCO MOBILE CRM WOODFORD USER GUIDE 65
You can also use Copy design button that will allow you to copy the design of any view from any entity.
Add Row adds an empty row, where you can add fields and design it from scratch.
Now, go to Edit Styles, click on Primary and click on +Add button. It will create a clone of the Primary
style. Change the BackColor (background), or ForeColor (text color), name of the style (in my case Red
Primary).
66 RESCO MOBILE CRM WOODFORD USER GUIDE
Now change the field style on the new row (Red background) from Primary to Red Primary
RESCO MOBILE CRM WOODFORD USER GUIDE 67
To define when and how different row designs will be used, you need to set the Row Script (rule). Click
on Row Script button, and create the script (rule), under which condition different row designs will be
applied.
4.4.7 Best practice in renaming a view
Please bear in mind that view name is used as a logic name, so it used all over the application. If you
change the name of a view, it can cause issue to application. Especially if you rename default view
names on pre-defined entities.
Views are used in Map, Calendar, in entities as public, associated or lookup views. So when you change
the name, you should re-set the views on all these places.
So it is easier to use Localization to change the display name of a view, while you keep the “logical”
name untouched. To enable this, you need to keep view names without spaces or special characters
(underscore is ok).
4.5 Form creation
We have two types of Forms: The Edit form and the Contact Information form. The Contact
information is a read-only type of form for quick access to information. By customizing the Edit form
we allow the user to edit the field’s information.
68 RESCO MOBILE CRM WOODFORD USER GUIDE
4.5.1 Contact Information Form
In the Contact Information form we can see the Contact Info section. In the Contact Info we can set
which information will be displayed in the special, Info tab. It is the summary of, in this case, the
competitor’s information. It contains predefined categories that cannot be edited, so it should be only
used for the entities, where it will make sense. It is not much a Read-Only form. It is rather a contact,
or Quick Info form. The main reason is to make a quick direct phone call or send an email without the
need to open the edit form. We can also add the available fields to the categories (Address, Call etc.).
Information on the Contact Info will be displayed without labels.
Other items on the Tabs section on the toolbar enables us to add the Iframe, Map and Wall objects.
You can also add available associated list, or unrelated list (list of records, that will not be filtered).
The Field Explorer enables us to add the associated views of the fields from the entities bound with the
foreign key. Or when you click on the Contact Info form designer part, you will see a list of available
fields that can be placed on the Contact Info tab.
4.5.2 Edit form
In Edit form we define which fields will be able for editing and designing of the form.
Now we design an Edit form—click Forms and then New in the Main Menu. Name the form and select
Edit Form.
The Form in default includes two tabs: General and Address.
RESCO MOBILE CRM WOODFORD USER GUIDE 69
Select General form and click on the Add Field button to add available fields. Once you’ve added one
field through the Add Fields button or you clicked on one of the fields in the center portion of the
screen (Designer area) you can drag and drop the fields from Field Explorer list on the right to the
designer.
And now I do the same for the Address tab (why to use Address tab?)
70 RESCO MOBILE CRM WOODFORD USER GUIDE
You can of course add additional tab using Add detail button, and place fields there, you can also
delete the default or custom tabs, or rename them (click on the tab and then click on the rename
button.
To add tabs that will show related/associated entities (list of related contacts, products & etc.) use the
Add list button (you can also drag&drop the lists from the right to the center portion of the screen)
To add list of unrelated records, use the same button, just use the last option, Unrelated Entity List,
and select the entity that should be used.
When you select a list and click on Properties (or double click on the list), you can define the view(s)
that will be available for this list.
RESCO MOBILE CRM WOODFORD USER GUIDE 71
When you select a field on the form designer, you can also select the Style that the field should use.
You can choose the default or your own custom styles. To create and edit custom styles and to edit the
default styles, use the Style Editor.
4.5.2.1 Advanced filtering
On lookup fields, and associated lists you can specify views, to be used for the item.
Just double click (select the item and click on Properties) on the item (lookup field on associated list on
the form) and select views, that will be used
72 RESCO MOBILE CRM WOODFORD USER GUIDE
It is also possible to add additional filter that will be combined with the used view’s filter. This can help
you narrow the results. E.g. when you want to assign the primary contact to an account, you do not
want to have all contacts listed, you only want to see contacts, associated with the account already.
You can create a filtered lookup view (section 5.1 Filtered Lookup) or in this case click on the Filter and
add additional condition that will be always applied to Primary lookup field.
RESCO MOBILE CRM WOODFORD USER GUIDE 73
4.5.2.2 Form item options
Each form item has following options
Binding – For detail tabs this defines the tab name. For associated lists it defines the lookup field
Side – When using the flexible forms, you can place the tab item to left or right side of the form when
viewing the form in full screen
Header – When using the flexible forms, you can set what to display as the form header
Hidden – The header is hidden and only records are shown (no plus, or flip to button is shown
as well)
Icon & label – the whole header, including the icon and name will be shown
Label – only the tab name is shown
Width – Normal means the ordinary size of one tab, Large means that the tab will take size of two tabs
Height – Number of rows that will be visible in the tab item, other records will be available using
scrolling
74 RESCO MOBILE CRM WOODFORD USER GUIDE
Orientation – Only available for list items and defines whether records are aligned horizontally or
vertically. Scrolling also follows this option
4.5.3 Form Style Editor
The editor enables you to change the default styles, or adding new styles, that can be then assigned to
fields on form. The styles are global, for all fields on forms, so if you change a style that is assigned to
multiple fields, even to a form on a different entity, these changes are also applied to these fields. Also
it does not matter on which form you open and edit the Style Editor.
Properties that can be changed in the Form Style Editor DetailItem (field) are following.
IsMultiLine – False means that the text field will be in a single line format, True means that the field
will be in multiline format
LabelAutoHeight – makes the field row higher if needed according to the size of the label
LabelHorizontalAlignment – PlatformDefualt follows the default alignment of the label according to
the platform settings (as is on not customized MobileCRM), Near aligns the label closer to the field, Far
aligns the label further from the field and Center centers the label to the middle of the label cell
LabelPosition – PlatformDefault follows the default placement of the label according to the platform
settings (as is on not customized MobileCRM), Left places the label on the left side of the field, Top
places the label on the top of the field (can be useful when the label is long and Right places the label
on the right side of the field
RelativeLabelFontSize – adjust the size of the label according to the default size by the positive or
negative number
RelativeTextFontSize - adjust the size of the field text according to the default size by the positive or
negative number
RESCO MOBILE CRM WOODFORD USER GUIDE 75
4.5.4 Additional Form objects
4.5.4.1 Iframe
The Iframe is a visual HTML browser window with URL support and it is able to send the entity’s
properties. You can also authenticate the current Mobile CRM user to use the credentials on the web
site. Also as shown on the picture bellow, you can bind an entity property name in {} to the link (e.g. in
this case search for the competitor’s name).
When Delay Load is enabled, the web site (or offline HTML) is loaded when user opens the tab. When
Delay Load is disabled, the web site (or offline HTML) is loaded when the form is opened.
Note: The authentication works only for Active Directory connection type.
76 RESCO MOBILE CRM WOODFORD USER GUIDE
Here is the visualization of the Iframe functionality in the app:
RESCO MOBILE CRM WOODFORD USER GUIDE 77
Tip: You can check our Blog Post about LinkedIn integration (search).
4.5.4.2 Map Frame
The Map frame processes 2 entity’s properties: GPS coordinates and visualize them on a map. To be
able to set the map coordinates, the entity (in this case Accounts) must possess the latitude and
longitude enabled property.
Prerequisites for the Map, GPS and Geocoding, as well as Update GPS option on custom
entity’s form
To be able to see the action button and to be able to use the Update GPS to assign the current GPS
enabled device’s GPS coordinates to custom entity fields, these are the steps that need to be done in
order to use it.
The entity must have a floating point number fields which names end with „latitude“ and „longitude“
e.g. GPS_coordinates_latitude and GPS_coordinates_longitude or as in case of Accounts, Contacts and
Leads Address1: Latitude and Address1: Longitude and the field must be Floating Point Number type.
Precision need to be set to 5 decinal numbers Maximum Value to 180.00000, Minimum Value to 180.00000.
78 RESCO MOBILE CRM WOODFORD USER GUIDE
To add it to the form, click on the Form under Objects and select Add Map.
RESCO MOBILE CRM WOODFORD USER GUIDE 79
Here is the visualization of the Map Frame functionality in the app:
80 RESCO MOBILE CRM WOODFORD USER GUIDE
4.5.4.3 Media tab
There is a specific tab, Add Media. Using this tab type, you can set up adding different files,
attachments to a note. By default it is set as signature tab, but you can set it up for other actions, like
capture photo, record video and more. You can also make a certain action required for specific status.
Name represents a name of the tab and Subject represents Subject, or Title of the Note, where the file
is attached.
(Example in the screenshot bellow: to change the records status to „In Progress“, the user needs to
input customer’s signature)
Note: You can add as many Media frames (tabs) as you like, each with different option. So you can have
dedicated signature tab, dedicated photo/picture tab, record tab etc.
RESCO MOBILE CRM WOODFORD USER GUIDE 81
4.5.4.4 Form Rules – On Load, On Change, On Save
Form Rules is a pseudo-scripting language that allows you to create conditions and steps, to be
performed.
Rules guide is available as a separate document here: Mobile CRM Woodford - Rules Guide
You can also check our Blog post dedicated to Form Rules, Webinar videos Form Rules Basics, and
Form Rules in Action
4.5.4.5 Edit Commands
Using Edit Commands button, you can manage what commands will be available for users.
By moving commands from section Available to Selected, you enable this command to be available on
the entity Edit Form.
82 RESCO MOBILE CRM WOODFORD USER GUIDE
If there is an item, that has multiple options (like ChangeState,ChangeStatus), you also need to set,
which options will be available on the command.
Default commands have the following functionality
ChangeState – Change state code of a record. You can also specify which state options will be available
to user. Each state option will be displayed as separate command
ChangeStatus - Change status code of a record. You can also specify which status options will be
available to user. Each state option will be displayed as separate command
Delete – Deletes the record from database. If it is performed in offline, after synchronization it is also
deleted from the CRM server
EmailLink – Creates an email with links to the record for CRM server and for Mobile CRM application.
Favorite – Adds/Removes record from Favorites. You also need to add Favorites to Home to give user
way to access favorite records.
PrintReport – Runs a report. For more information please check this Blog post
http://blog.resco.net/2015/03/03/run-reports/
Scan – Only on new record of Contact and Lead entity – Starts barcode scanner and by scanning
VCard/Me Card enabled QR code on a business card (or elsewhere) will fill in appropriate fields of a
new record.
ScanBusinessCard – Only on Contact and Lead entity – Similarly to the previous, but runs CamCard
application to scan business card and using text recognition fills in appropriate fields. You need to have
CamCard application installed on your device
Each command can be adjusted using On Can Execute and On Execute rules. More about these rules
can be found in the next section
4.5.4.6 Custom Commands
You can also create custom commands, where you can define, under which condition the command
will be available, and what to do at user action (when the command is used).
RESCO MOBILE CRM WOODFORD USER GUIDE 83
It is also possible to connect custom command with offline HTML with Java Script and perform actions,
that are not available using command Rules.
For commands (default and custom) you can also define On Execute and On Can Execute commands.
On Can Execute rule defines when the command will be available for user. In this rule, you specify in
what situation user can see and use the command, so you can hide a command in situation, when the
command’s action is not suitable.
84 RESCO MOBILE CRM WOODFORD USER GUIDE
On Execute rule defines the actions that the command performs. You can specify what will be
performed by the command, when user initiates it. It can be filling some data, hiding fields etc.
RESCO MOBILE CRM WOODFORD USER GUIDE 85
4.5.4.6.1 On Can Execute Example
A simple example is the Update GPS command on the Edit form’s Address tab. Like users should not
change the GPS position of a record, that already has the GPS position set. So you can hide this
command in such situation
Another example is when you want to disable user from deleting a record. You can disallow deleting
records when you do not put Delete command on Selected commands section, but what if you want
them to delete commands in some situation? In this case you add Delete command but hide it in
specific situation. In this case we will not allow user to delete records that are owned by different user.
86 RESCO MOBILE CRM WOODFORD USER GUIDE
Yet another example can be when you do not want to have Signature on Note’s Attachment. To disable
it, you need to go to Note’s Form and adjust the On Can Execute rule
The tricky part can be setting the command’s name. It needs to be exactly DocAction.CaptureInk, case
sensitive.
RESCO MOBILE CRM WOODFORD USER GUIDE 87
Here is list of all DocActions, so all the possibilities you can do with Note attachment’s commands.
Actions for empty Attachment
Configures the view for Capturing Signature. When disabled, list of available commands is shown
CaptureInk
Asks the user to capture a photo and loads the chosen media into the view
CapturePhoto
Asks the user to choose a media (image, video, depending on what the platform supports) and loads
the chosen media into the view
SelectPhoto
Asks the user to choose a file and loads it into the view
SelectFile
Asks the user to record an audio note and loads it into the view
RecordAudio
Asks the user to record a video and loads it into the view
RecordVideo
88 RESCO MOBILE CRM WOODFORD USER GUIDE
Actions for non-empty Attachment, i.e. when there is a file attached to a Note
Clears the view and marks it as empty
Clear
Shows a preview of the loaded document (fullscreen, etc.)
View
Opens the loaded document in an external application. Which application will be used, is platform
specific
OpenExternal
Find external application for opening specific document. Find method is platform specific (i.e. find on
Android Market)
FindApp
Saves file in device, platform specific
Download
Copy image to clipboard
Copy
Paste image/file from clipboard
Paste
Prints the document
Print
Let user to choose smaller image resolution
ResizeImage
Let user import VCard attachment (handled in common code)
Import
Pass document to edit in external app (Microsoft office so far)
Edit
RESCO MOBILE CRM WOODFORD USER GUIDE 89
4.5.4.6.2 Can Execute Example
Can execute rule can define what exactly should a command do. You can for example fill in some
specific fields and sets the status code as busy.
4.5.4.7 Additional options for associated lists
When you select an associated list, and click on Properties (or double click on the associated list), the
options for the list will be displayed in section.
Associated Views – Here you can define which views you want to have available on the associated tab,
and define additional filter for all associated views
90 RESCO MOBILE CRM WOODFORD USER GUIDE
Lookup Views – Similarly as above, you can define which view will be used as lookup (associating a
new record)
RESCO MOBILE CRM WOODFORD USER GUIDE 91
Charts – Again, you can define which charts will be available for the flip to chart functionality
Properties – options available on the Properties tab depends on the type on associated tab.
Actions – Here you can define what actions/command will be available. On most of associated
items you will have option Create New and Add Existing. This defines whether user can only create a
new associated record or associated already existing record using the plus button on the associated
item’s header.
Controls – In controls you manage the available options of displaying the associated item data.
Either to show them as list, or flip to a Map view or to a Chart view. By disabling on of the options, you
remove the option to flip data. If you only leave the List option enabled, the flip to…button will be
removed. Initial control defines, which display type will be used as the initial one.
92 RESCO MOBILE CRM WOODFORD USER GUIDE
4.5.4.8 Placeholder text
If you want to advise users what to enter to a field, you can use this feature. Placeholder text means,
that when a field is empty, it contains a text that gives a hint to user, what to enter there, or some
specific instructions. Once user taps on the field to enter data there, the placeholder text is cleared.
There are two options how to enter such text. One is a static one, using Localization, and the other is
both, static or dynamic, where you set placeholder text using edit form Rules.
Localization approach
Go to project’s level (or organization level) localization, and add a new localization string.
As Id please enter the entity name, field name and empty in form entity_name.field_name.empty
RESCO MOBILE CRM WOODFORD USER GUIDE 93
Edit form Rules approach
Using edit form Rules, you can set a placeholder text as static, or change it dynamically.
In this example, in OnChange rule, the placeholder text for address1_line1 is static and when user
enters data to the address1_line1, the placeholder text for address1_line2 and address1_line3 shows
up.
94 RESCO MOBILE CRM WOODFORD USER GUIDE
4.6 New UI
Disclaimer: If you want to use the New User Interface, we recommend to start with importing a default
project we’ve created into Woodford. It’s available for download here.
This project contains preconfigured settings of views, forms and images. These settings ensure the
New UI will behave correctly.
Building a New UI project consist of two parts. Creating Hubs and setting up Flexible Forms (simply put:
new way of displaying fields and associated lists).
4.6.1 Hubs
Hubs combine records that have something in common. These can be records that represent your
customers (like Accounts, Contacts and Leads) or are a part of the sales process (Leads, Quotes,
Opportunities, Orders, Invoices) etc.
In hubs, you can display not only the records themselves, but also associated records that help users
access more information from one place.
Note: How you decide to combine entities into hubs is up to you, it all depends on how you use your
CRM and what makes sense in your case. The only restriction is: the entities merged into one hub need
to have a common type of field that will affect the sorting of the view (e.g. for accounts, contacts and
leads the common field can be the name. For activities it can be the scheduled end date).
RESCO MOBILE CRM WOODFORD USER GUIDE 95
E.g. you can combine accounts and contacts into one hub. For Accounts, you can show associated
activities, opportunities and contacts. So user can see the latest communication with the account, its
opportunities and contacts directly, without the need to go to account’s form and search for the
needed information. On the other hand, for contacts, you can decide to only show the parent account
and related activities.
When you create a Hub (or edit a default one), you need to specify the structure of the entities and its
views, according to the data that will be displayed in the hub.
4.6.1.1 How to create a hub
1. Add Group – You can have one or more groups in a Hub. The purpose of the group is to have
entities of a similar type together. It allows user to filter Group sections under the in Hub’s view
easier.
2. Add Merged – Here you specify a section, which will combine views and display resulting records.
Only records from one merged section can be displayed at once.
3. Add View – add the views to be used for the selected Merged section.
96 RESCO MOBILE CRM WOODFORD USER GUIDE
4.6.1.2 Drill down
In Drill down, you specify the associated or parent views that will be displayed when user expands the
record in the view (as in the example of Accounts and Contacts described above).
In this case we are adding list of related opportunities to an account. If you set a view that has a filter,
this filter will be applied and only opportunities that fit the view filter will be shown (for example show
only opportunities where estimated revenue is higher than $10 000).
RESCO MOBILE CRM WOODFORD USER GUIDE 97
4.6.2 Flexible forms
The flexible form is a replacement of tabs. Now you can put record’s fields, associated views and other
items into one screen, so the users get a perfect overview of any record at a glance.
1. In project’s Configuration section, enable the use of Flexible forms (if it is not enabled, the old
UI using tabs is applied). In this section, you can also set how the form will be displayed by
default (whether it should be opened full screen or in one column). This is a tablet only option,
the form is always displayed in one column on phones.
98 RESCO MOBILE CRM WOODFORD USER GUIDE
2. For each entity form, you can set its specific layout.
a. Flexible Form option
Project Default – Form is displayed in old or new UI, depending on Flexible
Form option in project’s Configuration
Enable – Enables the New UI Form
Disable – Form with tabs will be used
b. Layout (Applicable for tablet devices, when form is in full screen)
Single Panel – Form is displayed in one column, all items are bellow each other,
like on phone devices
2 Panel Auto – Right or left panel covers more space (depending on the content
– which panel has more items on it)
2 Panel Left – Left panel is larger
2 Panel Right – Right panel is larger
c. Full Screen
Project Default – Form follows the project’s setting
Enable – Form is opened in full screen
Disable – Form is opened in collapsed mode (like in old UI)
d. User Resize
Project Default – Form follows project’s setting
Enable – User can resize the form (switch to full screen or to collapsed mode)
Disable – User cannot resize the form
RESCO MOBILE CRM WOODFORD USER GUIDE 99
3. Each form’s item can be further configured.
a. Side – Set whether the item should be displayed on the left or right side. By default the
detail item (where you can add entity fields) is set to be on the left side and associated or
unrelated list is on the right. But you can rearrange it as you wish.
b. Header – What to show on the item’s header. Options are
Hidden – Item will not have a header
Icon & Label – Both, the icon and the label (name of the item), will be shown
Label – Only the item’s name will be shown
c. Width – You can set whether to set the item’s width for one (Small) or two (large) columns
d. Height – You can set the number of lines per each item. Only this number of records will be
seen at first, the rest will be reachable by scrolling within the list.
100 RESCO MOBILE CRM WOODFORD USER GUIDE
4. It is also possible to set the form’s associated lists properties. For more information please
check the Form section – associated list setup.
4.7 Dashboard
Dashboard views enable you to access the most needed information from various entities in one place.
You can add Charts, Views and Iframes there. You can also create more dashboards and place them on
the Home separately.
In order to add a Chart to the Dashboard view, first you need to create/import the specific Chart for
the desired entity, that will be used on the Dashboard View.
4.7.1 Charts
Charts can be used in two cases. You can add a chart to a Dashboard, where you can add the desired
chart(s), or you can flip the list view into a chart view. In case of the Chart view, if you have more
charts, you can switch between them just like in case of multiple views.
You can create more Charts for one entity, or you can import a chart, that already exists on the CRM.
RESCO MOBILE CRM WOODFORD USER GUIDE 101
Select the desired item from the Legend Entries field (in our case the Total Amount) and the desired
aggregation function (Sum). The available functions will differ according to the item’s type. The next
item is the color set for the selected legend entry, and you can also set the limit for records shown in
the chart.
Mobile CRM supports multi series chart, so you can add a new legend entry clicking on the Add a series
option.
Then select the Horizontal Axis Label (e.g. Customer) and choose the type of the Chart. You can choose
from Bar, Column, Line and Pie chart (Pie chart is not available when you have multi series chart) types.
Save the changes when the chart is ready. You can also select additional fields and apply filters to
adjust the displayed data.
We will do similar steps to make a Case Chart. I will create a new Chart in case entity, and use the Case
item as Legend Entry, Count: All as function, Customer as Horizontal Axis label and Bar chart type. In
this case we can also set a Limit to Top and enter 10 into the field. It means that the maximum number
of cases shown in the Chart will be 10. I save the Chart and will go back to the Project screen.
102 RESCO MOBILE CRM WOODFORD USER GUIDE
Tip: An example of multi series chart setup can be found in our Blog Post
4.7.2 Creating Dashboard
As default there is already a dashboard called DashboardForm. When you open it, you can remove the
pre created items by selecting it and pressing the Delete button.
You can add View, Chart and Iframe items. Select an empty slot and press the appropriate button from
the toolbar.
In case of Views, you need to specify the entity and view(s) that will be available for user. If you select
more than one view, user can switch between them. View, set as initial (not required) will be selected,
until user changes it. It will be selected again after restart of Mobile CRM app.
RESCO MOBILE CRM WOODFORD USER GUIDE 103
You can also define whether you want to enable Search on the Dashboard view, and whether to enable
users to add records to the entity in Dashboard view.
In case of Charts, you need to specify the entity and chart. You can leave it on automatic and the first
chart in alphabetical order is used, or you can specify the chart.
104 RESCO MOBILE CRM WOODFORD USER GUIDE
In case of Iframes, you just need to enter the URL.
The number of items placed on the Dashboard can be set by adjusting the number of Columns and
Rows. You can also join two and more windows to one by dragging the right or bottom boarder of the
window to the right or down.
Tip: Example on how to adjust the Dashboard can be found in our Blog Post
4.8 Managing entities available on the Mobile CRM application’s Home screen
To create a new Competitor entity, accessible from the Home screen, we need to add it to the Home
list. Click Home, that appears in the Project list on the left. Then you only have to drag and drop (or
double-click) the Competitor field from the right column (Available Items) to the left column (Home).
RESCO MOBILE CRM WOODFORD USER GUIDE 105
When all changes are done, we need to publish the customization, so the device will download and use
it at the next synchronization. To do so, click Publish all.
Now run the app on your mobile device and tap the Sync button. Make sure you log in as a user with
Salesperson role (the role we created the customization for). A newly added Competitor entity is
displayed on the home screen after the synchronization.
You can add or customize any other entity or custom entity the same way as described in this guide.
4.8.1 Home Groups
With Woodford 7 version you can now group home items (Entities) under custom groups – similar to
the MS Dynamics CMR environment, where you can group entities under sections like Sales, Marketing
& etc. There you can place different Dashboards, or Calendars for instance.
To add a new group just click on the Add Group button located on top right – this will open a new
section on the left of the home column and it will be called Groups.
106 RESCO MOBILE CRM WOODFORD USER GUIDE
Root as the name suggests is the main level of the home items and groups (visible at the start of
application). To create a sub-level for the groups is done by clicking on a group in the Groups section
and then clicking again on the Add Group button.
Note: Green color highlights position of the same Group in Groups section and then in Home section.
RESCO MOBILE CRM WOODFORD USER GUIDE 107
To Rename or Remove the Group you have to select the Group in the Home section (not in the Groups
section) and then you can click the respective Rename and Remove buttons in the top toolbar.
Groups can also have their own images just like any other entity – when adding image, use the same
name as is the name of the Group.
108 RESCO MOBILE CRM WOODFORD USER GUIDE
4.9 Social
4.9.1 Chat
As first, you need to go to enable Chat and save the changes. To be able to access chat of all record you
are following, place Chat on the Home. If you want to be able to use Chat to comment on records, you
need to place the Chat Wall on the entity form.
Note: Chat works only when Internet connection is available. Chat uses Push Notifications to notify
about new message, when Mobile CRM application is not running.
RESCO MOBILE CRM WOODFORD USER GUIDE 109
4.9.2 Activity Feeds
4.9.2.1 Prerequisites
In order to be able to enable the Activity Feeds on the Mobile CRM, you need to make sure you have a
working Activity Feeds Solution on your Dynamics CRM server. If not, you can follow this “How to
install Microsoft Dynamics CRM Activity Feeds” guide on how to add and configure Activity Feeds on
your Dynamics CRM server.
4.9.2.2 Setting up Activity Feeds using Woodford
As first, you need to enable Activity Feeds and save the changes.
Then, if you want to access all the news, you need to place the Activity Feeds to the Home
You can also add the Wall to the entity’s Edit form so you can see all the News assigned to the
currently opened record. To do so, open the Edit or Contact Information Form of e.g. the Account
entity, and click on the Add Wall icon on the toolbar (in case of the Contact Information Form, click on
Form prior to the last step). Save the changes and don’t forget to publish the changes.
Note: Activity Feeds only work in Online Mode.
4.10 Branding
In the Branding section of the project, you can set custom information about the application. You can
change the name of the Manufacturer, the Title of the application, Subtitle, Website and Support
Email. You can enter your company’s support email address if you want to take care of the first level
support on your own. In this case the logs from the application will be sent to this email.
When you change the title, this title will be used as application name, application’s title on the main
screen.
110 RESCO MOBILE CRM WOODFORD USER GUIDE
The rest of information is shown in the About section.
You can also Design the About section in the same way as Views are designed, so you can
remove/change the information displayed there.
It is also possible to add a custom icon, e.g. company logo on the home screen (iOS only so far). To do
so, go to Images section in the project, and add a new item.
RESCO MOBILE CRM WOODFORD USER GUIDE 111
As Directory set Home, as platform MonoTouch (iOS), set the DPI (XHDPI is for retina displays) and the
Name must be exactly “Image”, without quotes.
Then, you can add the other DPI by scrolling down to the Image (Home) item.
112 RESCO MOBILE CRM WOODFORD USER GUIDE
4.11Auditing
In the Auditing section of the project you can set what kind of action on selected entities will be
recorded using the Mobile CRM application and sent to the CRM server when the application will be
synchronized. You can track the time when the action was performed and also the GPS position (the
device must contain the GPS chip). It is also possible to record the time and place where the
synchronization was performed.
You can also track application’s state events, and that is whether the application is running, is
terminated, or paused (put to background) or resumed (put back to foreground).
If you want to audit the movement, you can use the Track GPS position changes, where you can set the
Delay and Distance of the GPS position. If the devices moves the defined distance after the set time
interval expires, the position is recorded.
RESCO MOBILE CRM WOODFORD USER GUIDE 113
4.11.1 Auditing on the Server Side
On the server side go to Settings -> Auditing under MobileCRM section. Here you have two
possibilities. To check the Mobile Auditing Records or to view them on Map using the Mobile Auditing
Map.
114 RESCO MOBILE CRM WOODFORD USER GUIDE
If you will receive the error message bellow after trying to open the Mobile Auditing Map, you need to
enter the Google Maps API key to your CRM server.
To enter this key, please do the following.
4.11.2 Entering Google Maps API key
To be able to use the Mobile Auditing Map, you need to have the Google Api Key v3. To enter it, go to
Solutions section and double tap on the Woodford solution. It will open the solution and as the first
screen, you will have the place where to put the Google API key.
RESCO MOBILE CRM WOODFORD USER GUIDE 115
Different, more complicated way to do the same is this. While on the Dynamics Server, go to Settings,
select the Customizations under Customization section and click on Customize the System.
Then select Web Resources and open the Global properties for Map Providers.
116 RESCO MOBILE CRM WOODFORD USER GUIDE
On the Web Resources: Global properties for Map Providers click on the Text Editor to add the Google
API key to the script file.
In the last step please enter the Google API key to the selected area, specifying the key into
googleMapsApiKey field and leave googleClientID null:
googleMapsApiKey: "EnterYourGoogleApiKeyHere",
RESCO MOBILE CRM WOODFORD USER GUIDE 117
googleClientID:null,
If you remove the “null” from the code – your code will not be valid Javascript.
4.11.3 Adding Mobile Audit records on the server form
You can also add the Mobile Auditing tab on the CRM server form. Go to the Settings -> Customizations
-> Customize the system on the CRM server, and select the Form on e.g. User entity as it is the most
relevant entity for the Auditing functionality. Then click on Import and add or select the tab where you
want to add the list of user actions, and click on Sub-Grid. Fill in the unique name and from the list of
primary data source entities select the Mobile Audit (Created by or Modified by). Then you can also set
the View selector to show All or selected Views (there are some predefined views for the Mobile Audit
entity like Today, Yesterday etc.).
118 RESCO MOBILE CRM WOODFORD USER GUIDE
4.11.4 Adding Mobile Audit map on the server form
If you are using the Google Maps API key, you can also add the user activity visualization map. Go to
the Settings -> Customizations -> Customize the system on the CRM server, and select the Form on e.g.
User entity as it is the most relevant entity for the Auditing functionality. Then click on Import and add
or select the tab where you want to add the list of user actions, and click on Web Resource. There
select resco_MobileCRM/MapIframe.html Web resource. Then set the name and make sure to check
the „Pass record object-type code and unique identifier as parameters“ option, as it will show only the
records that the user we are looking at made.
RESCO MOBILE CRM WOODFORD USER GUIDE 119
Note: The Server support for Auditing is only available for the CRM2011 so far. The CRM4 support for
Auditing will be available in Q3 2012.
120 RESCO MOBILE CRM WOODFORD USER GUIDE
4.12 Images
You can change the default images and icons, or add images for custom items (such as map pins, entity
icons, form tabs icons and command icons) in the section titled Images.
The list shows all the available image items with its dpi variants, for each platform. You can narrow
down the list by using the Platforms and Directories filters.
For an easier orientation, you can disable those platforms that you are not interested in (don’t want to
change the icons of).
Or you can disable directories (sections) that you don’t want to be shown.
RESCO MOBILE CRM WOODFORD USER GUIDE 121
4.12.1 Changing a standard image
If you want to replace a standard/default image with one of your own, locate the existing icon and
then double-click on it.
Note: Items are listed in alphabetical order, first the Directory/folder and then the name of the item.
.
122 RESCO MOBILE CRM WOODFORD USER GUIDE
In the Edit Image window that will pop up, click on the no image icon to be able to upload a custom
icon from your computer. To return to the default icon, click on the Delete button.
RESCO MOBILE CRM WOODFORD USER GUIDE 123
Once you are done, save the changes.
4.12.2 Adding a custom image
When you want to add a picture to a custom item, you can use the default directories, or you can
create your own Directory, where you can store custom images. To do so, you need to go to Directories
list and click on New Directory.
124 RESCO MOBILE CRM WOODFORD USER GUIDE
To add a new image, click on Add on the toolbar.
In the Add Image window, set image’s properties.
You need to specify the Directory/Folder, where the picture will be placed in, the platform, target DPI
and name of the item, for which you are adding the picture.
RESCO MOBILE CRM WOODFORD USER GUIDE 125
Tip: Please check the appropriate section/example for specific item properties. E.g. map pins, tab icons,
view icons...
The list of platforms:
MonoDroid – Android devices
MonoTouch – iOS (iPhone, iPad)
Windows – Windows Tablets
Windows Mobile – Windows Mobile
Windows Phone – Windows Phone
Then you need to click on the no image icon and upload an icon from your computer.
Other DPI versions, or images for other platforms can then be added in more simple way. Just locate
the newly added image and continue adding images by double-clicking on the no image icon dedicated
126 RESCO MOBILE CRM WOODFORD USER GUIDE
to other platforms.
Click on the custom no image icon and upload your icon.
RESCO MOBILE CRM WOODFORD USER GUIDE 127
128 RESCO MOBILE CRM WOODFORD USER GUIDE
All you need to do now is to save the changes and publish the project.
Colorize
If you want to use your picture in the same way as default pictures are (i.e. picture follows color
selected in the theme or view style) you need to enable the Colorize option. It will create a mask from
the picture you are adding. Your picture needs to have alpha channel. Everything, where alpha is
different from 0, will be used as a mask and then this mask will follow the color set in theme or view
style.
4.12.3 Bulk change/import of custom images - Advanced
The Bulk import is done by importing a specifically named zip file that contains the images in a specific
folder structure – the best way to explore the folder structure is to download the icon package from
our website. Once you have the file, remove the directories and files you don’t want to change. This
way you don’t have to worry about getting the names of the folders or the structure of the folders
wrong.
Please note, that different devices have different screen capabilities, and therefore there are different
directories for them (like the Platform option in Images section in Woodford, when adding a new
image).
RESCO MOBILE CRM WOODFORD USER GUIDE 129
MonoDroid – Android devices
MonoTouch – iOS (iPhone, iPad)
Windows – Windows Tablets
Windows Mobile – Windows Mobile
Windows Phone – Windows Phone
Example: You want to place the image to the home section of the app - you need to place the image
file into the subdirectory Home to the MobileCrm.zip file. Then names and sizes of the actual pictures
have to follow existing ones as they differ per platform. In this example case, we will add a picture for
the iOS.
If your users use newer and older iPad/iPhone devices, you need two sizes of the image – this is
because the older apple devices have screens with a smaller resolution. Android devices are also
divided by LDPI, MDPI, HDPI, XHDPI according to the resolution of the app (you can regulate this in the
Android app’s setup).
That’s why you will need a small and a large image version that has a suffix @2x (e.g.
[email protected]). Please check the dimensions of existing images for the reference. Also the Tabs
directory can be interesting for you if you want to change the images of the associated views. The
name prefix of the image for the entity (on Home screen) should be the logic name of the entity. It can
be checked in the Dynamics CRM server’s Settings -> Customizations -> Customize the System ->
Entities -> Entity Definition Name.
E.g. If you want to only add one image to the home screen for your custom entity with name cust1 and
overwrite the default image for invoices then you create a zip file with following structure.
130 RESCO MOBILE CRM WOODFORD USER GUIDE
MobileCrm\Images.MonoTouch\Home\cust1.png
[email protected]
invoice.png
[email protected]
To import the file you just need to go to the Woodford/Images, there you click on the Import button
on the top toolbar and you select this zip.
After the import is done you can verify the added images by searching for them in the list (use the
filters Directory and Folder to get a quicker access to the images) or you can verify it by exporting the
Images.zip, or by exporting the Mobile Project, adding an extension .zip to it and inspecting it.
Images.zip file should be in the root.
Note: The zip should only contain images you want to replace or add, so if you use the sample zip, you
need to remove all the default images, otherwise they will be used twice in the project, and the project
will increase in the size, resulting to possible problems in synchronization, and increasing the time of
synchronization.
RESCO MOBILE CRM WOODFORD USER GUIDE 131
4.13 Configuration
Using the Configuration you can set some of the Resco Mobile CRM mobile application settings
remotely. You can also prevent the settings from modifying by user. Each option has a description, and
some specific options are specified bellow.
On the most right column (Default Value), there are the default values as they are set in the out-of-thebox version that can be downloaded from the stores or from our website.
If you want to set the setting remotely, you need to change the setting.
If you want to prevent user from changing the settings in the Mobile CRM Setup, you need to tick the
Lock checkbox. If you only want to change the default settings and you want to give user the possibility
to change the settings, keep the Lock cleared and the settings will be set only when the project is
published (Mobile CRM application shows the message Application was updated after
synchronization).
The Value column is used to define the value of the setting.
The changed option is highlighted in Bold.
132 RESCO MOBILE CRM WOODFORD USER GUIDE
4.13.1 Configuration examples
Client Customize settings does not use the Lock checkbox. If you leave the Value checkbox ticked, user
will be able to use the Data part of the Setup and enable/disable entities. If you clear the Value
checkbox, user will not see the Data part anymore and will not be able to enable/disable entities.
Multi Thread Sync does not use the Lock checkbox, as this setting is not available on the Mobile CRM
Setup. By default this option is enabled, but if you are experiencing synchronization problems, you can
turn it off.
Use Database Encryption does not use the Lock checkbox, as this setting is not available on the Mobile
CRM Setup. By default the local database on the mobile device is encrypted. But it can be disabled.
Save Signature As PNG – if you enable this option and set value to true, the signature files will be
saved as PNG files instead of SVG, that is used when value is false.
If you have some automatic field mapping set on the CRM server, by enabling Use Entity & Attribute
Map, you will enable the same functionality on Mobile CRM application.
Background synchronization – You need to set Require Sync Login option to False and Save Password
to True
Automatic synchronization – Please check our Blog post
4.13.2 Duplicate detection
The purpose of the Duplicate detection is to discover duplicate records, such as:
-
Accounts using the same name
Contacts using the same e-mail address
The duplicate detection rules are to be set on the CRM server (for more info, go to
http://www.microsoft.com/en-us/dynamics/crm-customer-center/set-up-duplicate-detection-rules-tokeep-your-data-clean.aspx). Mobile CRM application does not create any rules on its own; it just may
be directed to make use of the CRM server rules.
If you do so, then whenever an entity record is saved, this record is compared against the existing
records in order to find possible duplicates. If there are any, MobileCRM application displays a warning
and the user is given a chance to edit the data.
This process is called duplicate detection and can be set up to work in various ways. In particular, you
need to set up the Duplicate detection mode as either Disabled (no detection is done), Enabled or
AlwaysOnline.
Enabled mode works as follows:
RESCO MOBILE CRM WOODFORD USER GUIDE 133
a) If MobileCRM is in the offline mode: The local database is checked for duplicates using the
local rules.*
b) If MobileCRM is in the online mode: The server database is checked for duplicates using the
server rules.
AlwaysOnline mode differs in a single aspect: It always (even if Mobile CRM app is offline) looks for
duplicates in the server database.
*) Duplicate detection is stored in system entities duplicaterule and duplicaterulecondition. These
entities physically contain the duplicate detection rules. They are originally stored on the server (server
rules), but once enabled, the synchronization will copy the rules to the local database creating thus
local rules.
Note: Make sure that the SyncFilter does not exclude rules that are needed for the duplicate detection.
Also, please do not disable these entities in Woodford.
4.14 Global Maps
In Global Maps you can create items, which show selected entity records on the map, on the Home
section.
You can edit the default Map, or create a new one. On global map editor you can add any entity. You
also need to specify entity View, which will be used. This view need to have GPS fields enable. Either
entity fields or GPS fields from the parent record (Regarding). Please check this example.
If you enable “Is Initial” checkbox, that view will be enabled by default on the Map.
To be able to show records from this entity on the Global Map on the Home section, these records
need to have GPS coordinates entered as latitude and longitude fields. To learn more, please check the
prerequisites.
134 RESCO MOBILE CRM WOODFORD USER GUIDE
4.15 Calendar
You can add any activity entity to be available on the Calendar. Custom activity entities are also
supported. For calendar, you can set various constraints, and different color rules. You can create
multiple calendars, and each calendar can have different activity entities displayed, and different
constraints and rules applied. You need to place calendars on the Home separately.
When you open the existing calendar (Tourplan), or create a new one, you have various options to set.
4.15.1 Views
On the Views tab you select the entity views, which are available in the calendar. This also defines
which activity entities will be available on the specific calendar. You can select the default entity, and
the initial view that will be set each time the calendar is opened.
4.15.2 Constraints
In Constraints, you can set limitations for the calendar.
RESCO MOBILE CRM WOODFORD USER GUIDE 135
In Date Range you can set the date when user can create activities from the calendar.
Time Range sets hours, when user can create activities from the calendar.
Day Filter specifies which days are available on the calendar, and when user can create activities from
the calendar.
In Tabs you can enable/disable calendar views/tabs
4.15.3 Rules
You can also control the color of the entries in the calendar based on Rules functionality. This is similar
to Form Rules so prior form rules knowledge and experience is needed.
136 RESCO MOBILE CRM WOODFORD USER GUIDE
You can set different rules for specific activity entity, or you can setup Global Rule, where you can e.g.
disable the drag & drop functionality for a specific entity.
The rule can look like this.
Example – I want to color appointments by the subject. When the subject of the appointment contains
the string “meeting” I want to color this Appointment in orange color (#FFFF9000 color).
RESCO MOBILE CRM WOODFORD USER GUIDE 137
Color is changed by clicking on Add Step, then selecting Color from the dropdown, then entering the
color value (##AARRGGBB, AA = Alpha/Transparecny, RR = Red channel, GG = Green channel, BB = Blue
channel) into the text box in the Assign operator.
It is also possible to add the drag & drop disabling
138 RESCO MOBILE CRM WOODFORD USER GUIDE
4.16 Events & Reminders
This option defines how to show personal events in app’s calendar, or show CRM events in device’s
native calendar – available for iOS 6.0+, Android 4.0+. For other devices only reminders of the CRM
events are available.
4.16.1 CRM events in the personal (device’s native) Calendar:
To display MobileCRM events in a Calendar app on the phone/tablet, go to Woodford’s new tab called
'Events & Reminders'.
RESCO MOBILE CRM WOODFORD USER GUIDE 139
In this tab, you can define which events will trigger reminders, as well as which will be displayed in the
personal app.
Every event type (entity) has following integration options:
Reminder Only – When the activity is due and the Mobile CRM app is not running in the
foreground, a reminder will be shown to user.
Show in Calendar – CRM events are displayed in native system calendar (a new calendar called
'CRM Events' will be added). This option includes also reminders. It does not allow users to edit
CRM events within the native device’s calendar.
Sync with Calendar – Any changes of CRM events made from the native calendar app will be
reflected in MobileCRM app. This option includes also reminders.
140 RESCO MOBILE CRM WOODFORD USER GUIDE
4.16.1.1 Filters
You need to set a filter for each entity by clicking on 'Define Filter'.
Only those records that meet the filter criteria will trigger reminders/ be displayed in the system
calendar.
To force users to have reminders/CRM events on the device calendar, lock the settings (mobile users
won’t be able to change them). Go to 'Configuration' tab, enable 'Use Reminders' option and click on
'Lock'.
4.16.2 Personal events in the Mobile CRM Calendar:
The option to show personal events in the Mobile CRM Calendar can be set by each user within the
app itself. This option is disabled by default, but can be enabled by turning on the 'Private Calendars'
option in the application’s Setup section.
A system admin can however change this default setting or enable/disable this option. For this, go to
Woodford’s Configuration tab and click on 'Show Personal Events'.
RESCO MOBILE CRM WOODFORD USER GUIDE 141
If 'Show Personal Events' is enabled and the value is set on 'True', users will by default have their
personal events displayed in the Mobile CRM Calendar. If it’s set on 'False', personal events will not be
displayed in the Mobile CRM Calendar.
The 'Lock' option will lock the setting, so that mobile users won’t be able to change it within the app.
4.17 Color Themes
In Color Themes section, you are able to change different colors for the app and give Mobile CRM app
e.g. corporate branding.
Setup is WYSIWYG, so you can click on any sections on the preview to change its color. The changes
will be shown immediately on the preview.
If you want to see all the items, the color of which you can change, click on Show Color List.
142 RESCO MOBILE CRM WOODFORD USER GUIDE
Tip: Colors set for ListForeground and ListSelForeground for Views and TabForeground and
TabSelForeground for tab are aso used for icons, that were Colorized, when importing via images
section.
It is also possible to create separate color versions for different platforms. Platform dependent changes
will be used instead of the All Platforms color theme.
Customize – ios – Apple iOS platform
Customize – android – Google Android platform
Customize – win – Windows desktop, application, which installation file can be downloaded from our
website
Customize – winrt – Windows RT, 8, 8.1 Metro style applications available from Windows Store
Note: WinRT only accepts foreground color changes
Customize – wp – Windows Phone platform
RESCO MOBILE CRM WOODFORD USER GUIDE 143
On the bottom you can find the Palette – list of colors that are used in the current theme. By changing
the palette color, all items, that use this palette color, will be changed accordingly.
144 RESCO MOBILE CRM WOODFORD USER GUIDE
Using the Load Preset button, all changes will be reverted back to the default setting.
You can export the current theme setup and save it by using the Export button (to use it in another
project for example). Import will import a theme setup and apply it.
Tip: You can check our Blog post about Themes for an example of work with Themes.
Note: View styles set for specific field(s) on a view have higher priority and override the theme color
settings. To learn more about view styles, see the section 4.4.3. You can also check Row scripts, section
4.4.6
4.18 SharePoint Integration
If you have SharePoint integrated with your CRM and you want users to have access to SharePoint
documents from Mobile CRM application, you can enable and setup the SharePoint Integration in
Section titled SharePoint in a mobile project.
First you need to enable the SharePoint Integration by checking the Enable box.
RESCO MOBILE CRM WOODFORD USER GUIDE 145
Warning: Enabling SharePoint Integration will also enable SharePoint Site entity in the mobile project.
Please do not make any changes to this entity.
If you have SharePoint on premise, you can define the internal and external SharePoint server URL.
Then you need to add SharePoint Documents List to entity forms, so that user can access SharePoint
documents, associated to entity records.
If user credentials are different for CRM and SharePoint, or you use CRM on-premise vs SharePoint
online, or vice versa, your users can use the Mobile CRM’s Setup to enter SharePoint credentials and
deployment.
146 RESCO MOBILE CRM WOODFORD USER GUIDE
4.19 Business Process Flow (CRM 2013 and later)
In Process Flow section of the project, you can enable the use of Business Process Flow on Mobile CRM
application.
First step is to enable “Enable Business Process Flow on Mobile Device” option. Then you will see a list
of all Business Process Flows available on the CRM.
RESCO MOBILE CRM WOODFORD USER GUIDE 147
Then select those Business Process Flows, which you want to use on Mobile CRM application. Now you
need to validate processes that will be used. You can either use Validate Process for selected process,
or use Validate All Processes. This will check if fields, used by process are enabled on the mobile
project. If you will see the list of fields, that are not enabled, you can simply use the Enable Process
Fields button.
148 RESCO MOBILE CRM WOODFORD USER GUIDE
When OK is visible for each Business Process Flow, that you want to use, save changes.
Business process flow on Mobile CRM application is visualized by an additional tab, where the Business
Process Flow can be followed.
4.20 Favorites
To allow users to add records to the Favorites section on the Home screen, perform these two basic
steps:
First, go to Home in Woodford project and add the Favorites item by dragging it from Available Items
to Home column.
RESCO MOBILE CRM WOODFORD USER GUIDE 149
The next step is to go to Edit Form on the Entity, whose records you want users to be able to add to
the Favorites list. On Edit Form click on the Edit Command button.
150 RESCO MOBILE CRM WOODFORD USER GUIDE
In the Form Commands Editor, drag the Favorite command from Available Commands to Selected
Commands column.
Follow these steps on any other entity, whose records you want users to be able to add to the
Favorites list.
Once you save the changes, publish the mobile project. Once users synchronize the Mobile CRM
application, they will be able to pin records to their Favorites list by using the action button/command
on Edit Form.
4.21 Email Integration
4.21.1 Google Gmail
Enabling Google integration in the project to allow users to link their google account to Mobile CRM
application and to see their Gmail emails in mobile CRM, in E-mail activity entity, together with CRM
emails.
User can track their Gmail communication and save Gmail emails on the CRM.
To enable this, go to Google section of the project, and enable the Gmail.
Setting the Days to Sync you specify how old emails should be synced and displayed in Mobile CRM
app.
RESCO MOBILE CRM WOODFORD USER GUIDE 151
You can also add the Gmail Sync item to the Home screen, and using this item, user will synchronize
only Gmail emails, so no need to synchronize all CRM data.
152 RESCO MOBILE CRM WOODFORD USER GUIDE
Or when you add the Email item on the Home section, users will be able to synchronize only Emails
from all enabled integrations. There will be an additional synchronization button for Emails only.
RESCO MOBILE CRM WOODFORD USER GUIDE 153
From user point of view, user has to go to Mobile CRM app’s Setup and use the Google option. Then he
needs to sign in using his Google (Gmail) credentials and allow Mobile CRM app to access his Gmail
data, and synchronize.
It is also possible to make user know about the read/unread email, by adjusting the Email entity View
Just add the ImageUnread field to the View. An image is bind to this field and when the email is not
read, a blue line is shown in the field.
User can set an email as read/unread in email’s edit form, using commands.
154 RESCO MOBILE CRM WOODFORD USER GUIDE
4.21.2 Exchange email
Enabling Exchange integration in the project to allow users to link their Exchange account to Mobile
CRM application and to see their Exhcange emails in mobile CRM, in E-mail activity entity, together
with CRM emails.
User can track their Exchange communication and save Exchange emails on the CRM.
To enable this, go to Exchange section of the project, and enable the Email.
Setting the Days to Sync you specify how old emails should be synced and displayed in Mobile CRM
app.
RESCO MOBILE CRM WOODFORD USER GUIDE 155
When you add the Email item on the Home section, users will be able to synchronize only Emails from
all enabled integrations. There will be an additional synchronization button for Emails only.
156 RESCO MOBILE CRM WOODFORD USER GUIDE
From user point of view, user has to go to Mobile CRM app’s Setup and use the Exchange option. Then
he needs to enter his Exchange Email address, password, and if the auto discovery will not work, also
the URL of the Exchange server and User Name (with Domain if needed).
It is also possible to make user know about the read/unread email, by adjusting the Email entity View
Just add the ImageUnread field to the View. An image is bind to this field and when the email is not
read, a blue line is shown in the field.
User can set an email as read/unread in email’s edit form, using commands.
RESCO MOBILE CRM WOODFORD USER GUIDE 157
5 Advanced Topic
5.1 Filtered Lookup
Let say we want to add a primary contact field on the Account edit form, and be able to choose from
the contacts that belong to a specific Account only, not to select it from all the contacts.
First we need to enable the Primary Contact field on the Account entity.
158 RESCO MOBILE CRM WOODFORD USER GUIDE
Next step is to create a new Lookup view for the Contact entity. Let’s name it as Account’s Contacts.
We can also select the Hidden option, so that it will not be shown in the view selector in the Mobile
CRM application. Add any desired fields to the Primary and Secondary fields.
RESCO MOBILE CRM WOODFORD USER GUIDE 159
Now open the Edit Filter, add a condition, select the Parent Customer field, click on the Enter Value
field and click on Set variable on the toolbar (Set variable is only available on the Lookup View Filter).
Now select the Account row with AccountId Primary Key.
160 RESCO MOBILE CRM WOODFORD USER GUIDE
The condition should look like the one on the picture bellow.
RESCO MOBILE CRM WOODFORD USER GUIDE 161
Save and close the Filter, save and close the View, open the Account’s Edit form and add the Primary
Contact field to the form.
Now click on the Properties. Check the Account’s Contact Lookup view to be available for the Lookup
and set it as default view for Lookup.
162 RESCO MOBILE CRM WOODFORD USER GUIDE
When you now save the form and publish the project, when you now attempt to choose the Primary
Contact for an Account, you will only have to choose from the Account’s contacts, not from all
contacts. You will still have the possibility to change the Lookup view to the default one with all
contacts, unless you uncheck the Default View from the Primary Contact Properties on the above
picture.
Tip: It is possible to create a filter directly for the specific lookup (also for associated list) on the form.
For more information see the Advanced filtering.
5.2 Barcode scanner functionality
Using Woodford, you can enable bar code scanner functionality for lookup views and fields in forms.
You can set any text field’s Formatting (Single or Multiple line of text) to barcode.
RESCO MOBILE CRM WOODFORD USER GUIDE 163
Then you need to enable this field for the lookup view (or the default view that is used for the lookups)
using Select Fields on the View Toolbar.
Fields that have been formated to Barcode format when put into a form will have an action button
which will start the scanning process.
164 RESCO MOBILE CRM WOODFORD USER GUIDE
Then, when the lookup is called (choosing the lookup field from the Edit Form that brings the Lookup
view), you will notice a bar code scanner icon next to the Search. When you choose this icon, the
camera starts and when you focus it on the bar code or QR code, it recognizes the value and compares
the value with the field set to bar code formatting. If the value is found, the record is selected.
Note: Please note, that the screenshots only refer to the steps you need to make, the field that needs to
be formatted and enabled should be the one that is used for actual bar code scanning.
5.3 Examples of advanced options
5.3.1 List and Form Images
Tip: To learn more about what List and Form images represent, please check this Blog Post. You can
also check the example in Blog Post about the List and Form images Woodford setup
5.3.1.1 Available for CRM 2011 and 2013
5.3.1.1.1 List/View picture from Note
You can add pictures that are saved as Note attachments to a View and/or on an Edit Form. This way
you can show e.g. a contact’s photo or product pictures on Views or Edit Forms.
For showing pictures on a View: while you are on a view (e.g. a Public View for entity Accounts), use
the Add Image Option and select ListNoteImage. This will add a picture item on the view designer.
RESCO MOBILE CRM WOODFORD USER GUIDE 165
Now you need to adjust the size of other fields, otherwise they will be overlaid by the picture.
By default, the Note, where the View picture should be attached, needs to have subject name exactly
“ListImage”. This can be changed In the View Style Manager. Click on Edit Styles button, then on the
ListNoteImage. To change the Subject name of the Note, click on ImageQuery field.
166 RESCO MOBILE CRM WOODFORD USER GUIDE
By changing the Subject field you will set the name of the Note, from where the picture will be taken.
RESCO MOBILE CRM WOODFORD USER GUIDE 167
You can also create more ListNoteImage styles to use different notes for different Views.
If you have more ListNoteImage styles, make sure you set the correct one for the img item.
168 RESCO MOBILE CRM WOODFORD USER GUIDE
Now, save these changes, publish the mobile project and synchronize the Mobile CRM application.
Open any Account record in the app, create an associated Note with Subject “ListImage” and
attach/capture a picture. This picture will be used on the list for this record.
RESCO MOBILE CRM WOODFORD USER GUIDE 169
5.3.1.1.2 Edit Form picture from Note
You can add a picture for Edit Form in a similar way as on a View. When on e.g. an Account edit form,
click on Add Image and select FormNoteImage.
You will notice a new field – image1 on the Form. You can rename it using the Binding field (e.g.
Account Image). To apply the change, click on the image field item.
By default, the Note, where the Edit Form picture should be attached, needs to have a subject name
exactly “FormImage”. This can be changed In the Style Manager. Click on Edit Styles button, then on
the FormNoteImage. To change the Subject name of the Note, click on ImageQuery field.
170 RESCO MOBILE CRM WOODFORD USER GUIDE
By changing the Subject field you will set the name of the Note, from where the picture will be taken.
You can also create more FormNoteImage styles, and use different notes for different entities.
RESCO MOBILE CRM WOODFORD USER GUIDE 171
If you have more FormNoteImage styles, make sure you set the correct style for the image1 (or the
renamed) item.
Note: If you set the same Note Subject for List and Form view, the image attached to a simple Note will
be used for both, View and Form images.
5.3.1.2 Available for CRM 2013 only
In CRM 2013, there is a specific picture field, where you can store images of Accounts, Contacts, Leads,
etc. If you use this kind of picture field, you can use it also on Mobile CRM application.
First you need to make sure the Entity Image is enabled for synchronization. I will use the Contact
entity in this example.
5.3.1.2.1 Entity image on View
Now we can go ahead to the View and add a picture to it. To do so, click on Add Image and select the
ListEntityImage. Now you need to adjust the size of other fields, otherwise they will be overlaid by the
picture.
172 RESCO MOBILE CRM WOODFORD USER GUIDE
To preserve the default functionality, we do not recommend editing the ListEntityImage style. Save the
changes and publish the customization (or proceed to setting up Edit Form entity image).
5.3.1.2.2 Entity image on Contact Information Form
Once you enable the Entity Image field, the default image set for the record will be automatically
displayed on the Contact Information Form. No need to perform any further steps.
5.3.1.2.3 Entity Image on Edit form
To have the Entity Image on an Edit Form, open a form, click on the Add Image and select the
FormEntityImage.
RESCO MOBILE CRM WOODFORD USER GUIDE 173
You can notice a new item, image1 on the Form. You can rename it to e.g. Contact Image by using the
Binding field. To apply the change, click on the image field item.
174 RESCO MOBILE CRM WOODFORD USER GUIDE
When you save the changes, publish the project and synchronize the Mobile CRM app. You will see
Entity Images appear on the View and on the Edit Form for those records that have an Entity Image.
5.3.2 Custom Map Pins
It is possible to set the map pin for different records, according to a field difference. In your case it is an
option set. I will demonstrate it on a field preferred method of contact on account entity. I want the
records on the map to have different map pin according to different value on preferred method of
contact.
First you need to go to the Account view, that is used on the global map (or a different one and we will
make it to be used on the global map view).
Then click on the Add Map Pin icon on the toolbar. It will add a static map pin.
Now change the Binding type to Value.
Tip: If your option set contains labels, with spaces, or characters not allowed to be used in file name, set
binding type to Raw Value. Then in later steps do not use option set’s labels, but value (numbers).
Double click on the Select..., on the map pin item on the view and choose the Preferred Method of
Contact.
RESCO MOBILE CRM WOODFORD USER GUIDE 175
176 RESCO MOBILE CRM WOODFORD USER GUIDE
Now we will need to change the Style. In style you can define where the map pin pictures will be taken
from.
First need to set up a new style to make it easier in the future. Or you can use a predefined one.
Go to Edit Styles, click on ImageCellStyle and click on New.
RESCO MOBILE CRM WOODFORD USER GUIDE 177
Click on the arrow at ImageCellStyle and click on the new style. Here you can set the Folder, where the
images for the map pins will be taken from, and the style name. My style is named Map Pins and
images will be stored in Map_Pins folder. It is also important to set the FormatString option. It will tell
the application how the picture, map pin, will be named and where it will be stored. The format string
need to be set to “Map_Pins.{0}.png”. Map_Pins represent the folder, where the map pin picture will
be stored, {0} represent the actual value of the field, that is used to differentiate pins, and png is the
file format extension (each picture added to the project need to be in png format). Now Save & Close
the editor. You can use this style also for other pins on different views.
178 RESCO MOBILE CRM WOODFORD USER GUIDE
Set the Style of the map pins item to the new style, Save & Close the changes.
RESCO MOBILE CRM WOODFORD USER GUIDE 179
Now go to Images section. Click on the Directories, then on New Directory. Here we will create the
directory with exact name as we entered to the style and hit Create.
180 RESCO MOBILE CRM WOODFORD USER GUIDE
Now for better orientation, you can uncheck all the directories except the newly created one and hit
Add.
Here you need to set the Directory to the one you created (Map_Pins), the platform of the deisred
devices (you can add image for other platforms later), MonoDroid is Android, and MonoTouch is iOS.
Then set the desired resolution and the Name. The Name is the name of the preferred method of
contact field’s value. In my case it is Any, Mail, Phone etc. By clicking on the no image image icon, you
can add image that will be used as a map pin for account with that value.
RESCO MOBILE CRM WOODFORD USER GUIDE 181
When you click Add, you will see the whole line for this value, where you can add other resolutions and
platform images easier.
As you will be entering other desired values, it may look like this.
182 RESCO MOBILE CRM WOODFORD USER GUIDE
As the final step, go to Global Maps, open the Map where you want to use the customized view, and
set the View, that contains your newly created pins as the one that will be used for the entity
(Accounts view on Accounts entity).
RESCO MOBILE CRM WOODFORD USER GUIDE 183
5.4 Mobile Apps
5.4.1 External (Portal) User project
To learn what is the external user option, go to http://blog.resco.net/2013/08/22/new-usagescenarios-for-resco-mobile-crm-part-1/
Prerequisites: You need to have the fields (e.g on. contact entity), where the user name and password
of the external user is stored. The CRM user credentials are entered into Woodford and are stored on
our licensing server.
So, if you have two fields on a dedicated entity that contain the user name and password, you can
move on to creating a project for the external users.
You need to create a new project.
Set the type to External User.
Server Alias will be used in the Mobile CRM app’s sync dialog as URL. So in my case I enter
external (or External) to the URL field on Mobile CRM sync dialog. This alias needs to be
unique, as it an identifier of the project. It needs to be unique among all external/anonymous
projects, so in case you are not able to save new external project, it usually means that the
alias is already taken
184 RESCO MOBILE CRM WOODFORD USER GUIDE
CRM user is the user (license) that will be used as the access to CRM
Password is the password of the user
Authentication entity is the entity where the fields with user name and password are stored
User name field is the field on the authentication entity where the user name is stored
Password field is the field on the authentication entity where the password is stored
CustomerId field is the field that points to the parent entity record, using which you can then
filter records that users see
Customer Lookup Field is the specific field that contains the name of the parent record. This is
a part of the authentication and needs to be filled in. Then you can limit the records a user will
see (using sync and view filters)
Registration method means the way users get registered (their records get created in the
Authentication entity)
Then you can customize the project to define what these external users can see and edit.
RESCO MOBILE CRM WOODFORD USER GUIDE 185
Under Registration Method option you can change the way a new external user is created.
None – You need to create the External user manually in CRM before a user can synchronize the app.
Direct – User can create a new External user using a registration form, after selecting Register User on
Mobile CRM’s Sync dialog, a record will be created directly on the CRM server.
Web Service – Same as Direct method, but data from the registration form will be sent to the Web
Service that you want to use for creating the record. Please contact us if you want more
information about this option.
Email – Same as Direct method, but data from the registration form will be sent via an Email.
When you change the Registration Method to Direct, Web Service or Email, Edit Registration Form
option shows up. Click on it and you can set up the registration form.
You can place any field from the Authentication entity there. Of course the User name and Password
field should be there as well. Do not forget to add the field used as Customer Lookup Field that will set
up the parent record. E.g.:
186 RESCO MOBILE CRM WOODFORD USER GUIDE
This is how the sync dialog should look like for the above shown setup.
RESCO MOBILE CRM WOODFORD USER GUIDE 187
And this is the Registration form, when you click on Register User.
188 RESCO MOBILE CRM WOODFORD USER GUIDE
5.3.4 Appointments on Global Map (Appointment entity does not have GPS fields)
In a situation, when you want to show records on a Global Map according to position of their parent
records, like appointments, or service activities, you can simply add parent’s GPS fields on the
appointment’s view.
Go to the view, that you want to use on the Global Map. Click on Select Fields button, expand the
Account (Regarding) and select its GPS position fields.
RESCO MOBILE CRM WOODFORD USER GUIDE 189
Save changes and go to Global Map. You can double tab on the map item, where you want to add the
appointment view. Or select the item and click on Edit.
190 RESCO MOBILE CRM WOODFORD USER GUIDE
There add a new item and specify the entity (Appointment) and View (All Appointments). Only views,
with GPS field available on the view are displayed.
5.3.5 E-mail attachments
In order to be able to add e-mail attachments to an email, you need to enable the E-mail Attachment
entity. Then you need to place the E-mail Attachment List to the E-mail entity’s edit form.
In Mobile CRM app you need to save the E-mail activity in order to be able to add an attachment.
5.3.6 Form items icon and name changes
To have different icons on form items, the idea is to have unique names of the tabs.
RESCO MOBILE CRM WOODFORD USER GUIDE 191
5.3.6.1 Icon changes
So you need to rename the items (tabs), and make sure that the item name does not contain spaces or
characters that are not allowed to be used as file names. If you need to have a name where you want
to use these “forbidden” characters, you can change the name in localization. You can see that in the
next section. Without localization changes, the tab name will be displayed the way it is set in form.
Then you can go to Images section.
There tap on Add. Select a folder, e.g. Tabs. This is to define where the picture will be stored inside the
project. Also, if you want to have the same name of the tab but different picture on different forms,
you can create new folders and distinguish pictures. Then select the target platform (you can add
pictures to other platforms later on and easier, this is the initial step) and the desired DPI (other DPI
same as with platforms).
MonoDroid means Android, and MonoTouch is iOS.
The name of the picture should be the same as the name of the Tab.
192 RESCO MOBILE CRM WOODFORD USER GUIDE
For easier navigation, you can disable the folders that you do not need to see
RESCO MOBILE CRM WOODFORD USER GUIDE 193
Other platforms and DPIs can be added directly in the Images section. Just click on the empty picture
icon and add the desired image.
In case of tab pictures, only the alpha channel of a png file s used.
5.3.6.2 Localization of the tab name
To change the display name of the tab (if you want to use spaces and characters not allowed to be
used in file names), after making the tab name unique, go to Localization section. Open the language
for which you want to change the tab name. Go to Customized App UI section, expand it, search for
Account, form (because the tab is located on the account form) and look for the name of the tab. Or
you can search for account.detailview.contactsonaccount and change the text in project column.
Please bear in mind that the space for the tab name is limited, so rather short name should be used.
194 RESCO MOBILE CRM WOODFORD USER GUIDE
Now just save all the changes and publish the project.
6 Add offline HTML files
MobileCRM client allows you to use HTML and JavaScript to utilize and customize the application.
There are many scenarios, where you can benefit from using the HTML and JavaScript files within the
application. You can for example add the HTML 5 presentation to your home menu. While creating and
designing the presentation, you can use all the features of HTML, CSS and JavaScript. Another one
example, from many, is the complex Order builder. Suppose you want to create a new order. Your
order form contains several ComboBoxes from which you can choose the properties of the order.
These ComboBoxes are dependent on each other. If you pick a value from the first ComboBox, the
possible values of second ComboBox will change etc. This task would require a lot of effort if written in
C#. Using HTML and Resco JavaScript Bridge. This task can be done in a blink of an eye. (Note: learn
more about Resco JavaScript Bridge in following section).
To add a html file to your project:
1.
Open the MobileCRM project in Woodford
2.
In Woodford’s Offline HTML section, click on Import
RESCO MOBILE CRM WOODFORD USER GUIDE 195
Locate the zip file and press ‘Open’ button.
Publish the project.
2.
Sync the client application.
The zip file that you have uploaded should contain all the offline files that are required for your
presentation. Typically it contains an *.html file plus some *.js and *.css files.
As an example take a look on this simple HTML presentation. It contains the index.html file and
common.css file. The common.css file contains the cascading style sheet definitions of HTML elements.
(see www.w3.org for more info about css)
3.
1.
You can also add your *.html, *.js, *.css or any media files separately using Upload button. You can also
create folder structure, rename, delete or download files included in Offline HTML.
index.html:
<html>
<head>
<link rel="stylesheet" href="styles.css" />
<script type="text/javascript" src="JSBridge.js"></script>
</head>
<body>
<div class="account">
<div class="text">
<h1 id="account-name"></h1>
<p id="address-street"></p>
<p id="address-city"></p>
<p id="phone"></p>
</div>
</div>
</body>
styles.css:
body
{
font-family: Helvetica,Arial,sans-serif;
196 RESCO MOBILE CRM WOODFORD USER GUIDE
font-size: 8px;
padding: 15px;
}
p
{
line-height: 1.2em;
}
Now the project contains the html files and after you sync the application, these files are downloaded
to the client. But, no HTML files are displayed to the user yet. To achieve this, let’s add an Iframe item
to the Home screen.
Adding a new Iframe item:
1.
Click on a ‘Home’ item in the MobileCRM project
2.
Press the ‘Add Iframe’ button. (Located on the top ribbon)
3.
Name the Iframe and set the URL.
4.
Press OK. Save and Publish the project.
URL specified is the relative path to your html file (within the zip file). In our sample case, the path will
be file://index.html (note: we are using file:// prefix instead of http://). If your zip file contains
directories and subdirectories, the path to your html file could look like: file://dir/subdir/file.html.
Using Woodford you can also add an HTML frame to any entity form. Within this form you can pass,
through the URL, entity specific properties to the html file. To add an HTML file to entity form, do the
following:
1.
In Woodford MobileCRM project, open the entity form, you want to modify.
RESCO MOBILE CRM WOODFORD USER GUIDE 197
Click on the ‘Add Iframe’ button.
Similar to previous example, fill in the Name of the tab and the URL.
4.
Confirm the action by pressing the ‘OK’ button.
In application, now if you select the entity, you have modified in Woodford. The new tab will appear,
containing the HTML file specified in the URL property. You can pass any property of the entity to the
html. To do this, use the following syntax:
file://filename.html?{entitypropertyname1}&{entitypropertyname2}&...&{entitypropertynameN}
To access these properties from within the HTML file, simply get the window.location JavaScript object
and split the search property string:
2.
3.
var params = window.location.search.substring(1).split('&');
You can find more information and an example of how to work with Resco JavaScript Bridge in
following section.
7 Resco JavaScript Bridge
The JavaScript Bridge implemented in Mobile
CRM client application is an analogy of the PhoneGap. It customizes the platformdependent web browser controls so that it was possible to make a call from JavaScript to
C# code and invoking the JavaScript functions from the C# code.
Using JavaScript Bridge in your HTML or JavaScript file, you can create, modify and read entities stored
on a device. You read a list of entities by creating and executing
the MobileCRM.FetchXml.Fetch JavaScript object. For creating and modifying the entities, there
is a MobileCRM.DynamicEntity object.
Moreover, you can access the metadata, localized texts, platform-specific services (like device infom
bar-code scanner or location service), read the application configuration (including CRM server and
credentials) and access to the UI objects (like entity form and its views).
198 RESCO MOBILE CRM WOODFORD USER GUIDE
7.1 Implementing the CRM Fetch Request from JavaScript
To get the entity or list of entities, there is a MobileCRM.FetchXml.Fetch object in JavaScript
Bridge. Calling the execute method on this object, you will obtain the list of entities specified
by MobileCRM.FetchXml.Entity object.
First, you must tell the MobileCRM.FetchXml.Fetch object, which entities you are interested in. To
achieve this, you define the MobileCRM.FetchXml.Entity object. In constructor, specify the entity name.
For example:
var entity = new MobileCRM.FetchXml.Entity("account");
Note: The name of the entity is lower-case logical name, e.g.: “account”, “salesorder”…
Next, you may specify the attributes of the entity (fields), you want to obtain. For this, there is method
called addAttribute.
entity.addAttribute("id");
entity.addAttribute("name");
You may want to retrieve the list of entities in specific order. Sorted by the name,
or created date. The second parameter is boolean and indicates wheter to
sort entities in ascending or descending order.
entity.orderBy("createdon", true); // First sort by creation date; newest first
entity.orderBy("name", false);// First sort by name; ascending sort
If you want only specific entities of given type, define the filter
or group of filters, that will be applied on the result set. If you want to retrieve only those accounts, tha
t are from Boston and are active, you call the where function of filter object.
entity.filter = new MobileCRM.FetchXml.Filter();// create filter for entity
entity.filter.where("address1_city", "eq", "Boston");// get Boston Accounts
entity.filter.where("statuscode", "eq", 1);// which have “Active” status
First parameter is name of the field, second parameter is operator and third paramter holds value to co
mpare with. List of allowed operators is:
eq – equals
ne – not equals
lt – less than
le – less or equal than
gt – greater than
ge – greater or equal than
like – check if field contains specific string (you are allowed to use wildcard ‚%‘)
not-like – opposite of like operator
If you need more complex filter, you can use the MobileCRM.FetchXml.Filter object. Filters could be co
mbined. In other words, each filter can contain several subfilters, that are linked by logical AND
or logical OR operator. For example, let‘s create a filter that will return all active accounts from Boston
and all accounts from New York. (no matter if they are active or not)
var filterBoston = new MobileCRM.FetchXml.Filter();
filterBoston.where("address1_city", "eq", "Boston");
filterBoston.where("statuscode", "eq", 1);// get only “Active” entities
var filterNY = new MobileCRM.FetchXml.Filter();
filterNY.where("address1_city", "eq", "New York");
var finalFilter = new MobileCRM.FetchXml.Filter();
finalFilter.filters.push(filterBoston);// add boston filter
finalFilter.filters.push(filterNY);// add new york filter
finalFilter.type = "or";// accounts from NY or Boston
entity.filter = finalFilter;
Note: Every filter can have subfilters.
RESCO MOBILE CRM WOODFORD USER GUIDE 199
You can link entities of different type to the one you have specified for fetch. Assume that you want to
retrieve the name of contact for account entity.
var linkEntity = entity.addLink("contact", "parentcustomerid", "accountid", "outer");
linkEntity.addAttribute("fullname");
First parameter is entity name of the linked entity. Second is the lookup filed name, third parameter is
primary key of the entity (in this case it is account entity and primary key is accounted). Last parameter
specifies the type of the link.
Finally we set the newly created entity with fetch object and call the execute method.
var fetch = new MobileCRM.FetchXml.Fetch(entity);
fetch.execute("Array", function (res) { success(res); }, function (err) { fail(err); }, null); }
The result of the fetch execute method is passed back to
JavaScript assynchronously and is handled by two callback methods, that you pass as parameters of ex
ecute function. First function is for success. The result set is passed to this function in
a parameter. The result set may be in various forms. The structure of result is defined in first paramete
r of the execute function. Possible values are:
"Array" – entities are represented by twodimensional containing the requested values.
Example: [[89076B83-4EC0-4544-9CD5-2E85696E2F2D, "A company name"],
[5B2C3261-18F1-4C59-9713-8D0D4F94AA30, "Another Company"],...]
"JSON" – json representation of entities
"XML" – result is XML result set, similar to CRM SOAP response
"DynamicEntities"
– array of objects of MobileCRM.DynamicEntity (see next section for more)
If there was a problem obtaining the entities, the failure callback (third parameter
of the execute function) is called and error message is passed to this callback.
Fourth parameter is the scope for the callbacks: this object inside the callback functions will point
to the parameter passed here. You can leave this parameter empty.
Note: Remeber that the results are obtained asynchronously.
When put together, the above code looks like this:
function OnFetchData() {
var entity = new MobileCRM.FetchXml.Entity("account"); // alternatively, you can set the
entity
entity.addAttribute("accountid");
entity.addAttribute("name");
entity.orderBy("createdon", true); // First sort by creation date; newest first
entity.orderBy("name", false); // First sort by name; ascending sort
entity.filter = new MobileCRM.FetchXml.Filter();
entity.filter.where("address1_city", "eq", "Boston"); // get Boston Accounts
entity.filter.where("statuscode", "eq", 1); // which have “Active” status
var linkEntity = entity.addLink("contact", "parentcustomerid", "accountid", "outer");
linkEntity.addAttribute("fullname");
var fetch = new MobileCRM.FetchXml.Fetch(entity);
200 RESCO MOBILE CRM WOODFORD USER GUIDE
fetch.execute("Array", function (res) { DisplayResults(res); }, function (err) {
DisplayResults(err); }, null);
7.2 Creating and Modifying the CRM entities using JavaScript Bridge
If you want to create or modify entity, use the MobileCRM.DynamicEntity object. Creating and modifyi
ng entities is pretty straightforward. To create a new MobileCRM.DynamicEntity, call the static function
MobileCRM.DynamicEntity.createNew(entityName) :
var entity = new MobileCRM.DynamicEntity.createNew("account");
If you want to modify existing entity, pass the entity primary key in second parameter
var entity = new MobileCRM.DynamicEntity("account", entityID);
Next, add properties of this entity. To do so,
set the value of the entity.properties array on specific index.
Index is represented by the name of the attribute (field).
entity.properties["name"] = "Martin";
Sometimes you need to add reference to another entity. To do
so, add new property of object type, that contains id and entity properties. Id is the id
of the referenced entity. Entity contains the entity name (the type) of the referenced entity
entity.properties["primarycontact"] = { entityName: "contact", id: primaryContactId };
You can modify and set new properties of the entity. If you are
done, call the save method of the MobileCRM.DynamicEntity object.
entity.save(function (err) {
if (err != null)
DisplayError(err);
else {
// this.id contains the ID of the newly created entity
TestEntityID.value = this.id;
//
this.properties contains the previously specified properties plus other properties with their default val
ues
var props = this.properties;
DisplayResults(props);
}
}, null);
7.3 HTML/JavaScript Bridge Sample
In this section we provide you with a sample that will demonstrate and sumarize all the features of
JavaScript Bridge and Woodford offline HTML files support.
In this sample we create the HTML form for adding a new contact to existing account entity.
The best thing to start with, is creating the HTML file. This file will contain basic info about entity
and an HTML form for adding new contact. The source code looks like this:
<html>
<head>
<!-- Activate IE9 document mode, if available -->
<meta http-equiv="X-UA-Compatible" content="IE=edge" />
<!-- Defined iOS viewport -->
<meta name="viewport" content="initial-scale=1, minimum-scale=1, maximum-scale=1, user-scalable=false">
<link rel="stylesheet" href="styles.css" />
<script type="text/javascript" src="JSBridge.js"></script>
</head>
<body onload="onBodyLoaded()">
<div class="account">
<div class="text">
<h1 id="account-name"></h1>
<p id="address-street"></p>
RESCO MOBILE CRM WOODFORD USER GUIDE 201
<p id="address-city"></p>
<p id="phone"></p>
</div>
<div>
<h2>Add new contact:</h2>
<table>
<tr>
<td>First Name</td>
<td><input id="txtFirstName" type="text" /></td>
</tr>
<tr>
<td>Last Name</td>
<td><input id="txtLastName" type="text" /></td>
</tr>
<tr>
<td>Email</td>
<td><input id="txtEmail" type="text" /></td>
</tr>
<tr>
<td colspan="2"><button id="btnSubmit" onclick="addUser()">Add Contact</button></td>
</tr>
</table>
</div>
</div>
</body>
And this is how we want to have the HTML document displayed within the CRM application:
HTML elements within this file are styled in separate style.css file,
and the definition of this styles looks like this:
body
{
font-family: Helvetica,Arial,sans-serif;
font-size: 8px;
padding: 15px;
}
p
{
line-height: 1.2em;
202 RESCO MOBILE CRM WOODFORD USER GUIDE
}
.account input
{
margin-left: 40px;
}
.account p
{
margin: 15px;
font-size: 1.2em;
}
.account h1
{
color: #235cc2;
font-size: 1.8em;
}
.account h2
{
font-size: 1.5em;
color: #235cc2;
}
Next, we need to add those files to Woodford project. Open the Woodford project and add the HTML o
ffline file to this project. Don’t forget to zip these files.
In Woodfod, open the account entity, select the Forms and open Default form by double clicking it. No
w add a new Iframe to this default Contact Information Form, name it Add Contact and set url to point
to HTML file. In our case the url is file://account.html.
If you now save and publish the project and sync and update the client application you will see that the
new tab has been added to account entity. After clicking on this tab, the account.html document is
displayed, but contains no data yet. So as a last step we must add few lines of code to account.html.
Open the account.html file and append these lines to the body of the document:
<script>
var accountid = null;
function onBodyLoaded() {
// Request EntityForm object to get currently edited entity
RESCO MOBILE CRM WOODFORD USER GUIDE 203
MobileCRM.UI.EntityForm.requestObject(onAccountPropsChanged, onError, null);
// Bind the "onChange" handler to get changes performed on edited entity
MobileCRM.UI.EntityForm.onChange(onAccountPropsChanged, true, null);
// Bind the "onSave" handler to perform additional validation
MobileCRM.UI.EntityForm.onSave(onAccountSave, true, null);
}
function onAccountPropsChanged(entityForm) {
// entityForm is an instance of MobileCRM.UI.EntityForm (the account's edit form)
var editedEntity = entityForm.entity; // editedEntity is an instance of
MobileCRM.DynamicEntity representing our edited account
accountid = editedEntity.id; // Remember edited account id
var props = editedEntity.properties;
document.getElementById("account-name").innerText = props["name"];
document.getElementById("address-street").innerText = props["address1_line1"];
document.getElementById("address-city").innerText = props["address1_city"];
document.getElementById("phone").innerText = props["telephone1"];
}
function onAccountSave(entityForm) {
// entityForm is an instance of MobileCRM.UI.EntityForm (the account's edit form)
var editedEntity = entityForm.entity; // editedEntity is an instance of
MobileCRM.DynamicEntity representing our edited account
var props = editedEntity.properties;
if (!(props["telephone1"] && (props["address1_line1"] || props["address1_city"])))
entityForm.context.errorMessage = "Account must have phone number and address";
}
function onError(error) {
if (typeof alert != "undefined") // alert is not defined on Windows RT (Win8 Metro)
alert("An error occured:" + err);
}
function addUser() {
var contact = new MobileCRM.DynamicEntity.createNew("contact"),// create contact entity
lastname = document.getElementById('txtLastName').value, // get values from HTML form
firstname = document.getElementById('txtFirstName').value,
fullname = firstname + " " + lastname,
email = document.getElementById('txtEmail').value;
// create properties for contact entity
contact.properties["fullname"] = fullname;
contact.properties["lastname"] = lastname;
contact.properties["firstname"] = firstname;
contact.properties["emailaddress1"] = email;
// add lookup field pointing to account
contact.properties["parentcustomerid"] = {
entityName: "account",
id: accountid
};
// save the entity
contact.save(function (err) {
if (typeof alert != "undefined") {// alert is undefined on WindowsRT (Metro)
if (err != null)
alert('Update error ' + err);
else {
alert('New contact ' + fullname + ' was created.');
}
}
}, null);
}
</script>
Now save the file. Update the zip package and upload it to Woodford project. Sync and update client
application. Now you have a new HTML form for adding a new contact in your application.
You can download full sample here: http://resco.net/downloads/www.zip
204 RESCO MOBILE CRM WOODFORD USER GUIDE
RESCO MOBILE CRM WOODFORD USER GUIDE 205