1
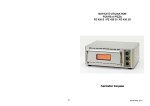
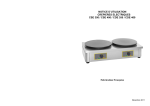
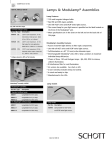
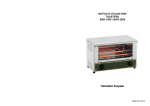
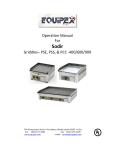
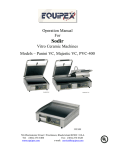
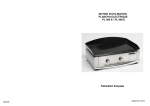
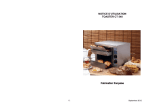
INSTRUCTIONS FOR USE AND INSTALLATION
PIZZA OVENS
PZ 430 S / PZ 430 D / PZ 4302 D
Made in France
November 2011
19
PIZZA OVENS
PZ 430 S / PS 430 D / PS 4302 D
Nomenclature PZ 430 2D
Spare parts PZ 430 2D
Congratulations for the acquisition of this upmarket appliance made in France. You
chose an appliance which alloys the best technical qualities with a big userfriendliness. We wish you the biggest contentment
Rep
Code
Qty
Pièce
Spare part
1
2
3
4
5
6
7
8
9
10
11
12
13
14
15
16
17
18
19
20
21
22
23
24
25
26
27
28
29
35124
D04039
D04038
35114SE
D04039
F07024
A08009
35113
35119SE
35120SE
H01075
A15060
A08003
A13017
A14078
35116
B04104
A18022
A16014
35123
A05008
35125
C01010
A10032
35099
35115
A02029
A06042
A04006
1
2
4
1
4
1
1
12
1
1
2
1
1
4
3
1
1
1
1
1
1
1
1
1
2
1
1
1
1
Déflecteur gauche
Résistance+tube
quartz haut arrière
Résistance+tube
quartz haut avant
Platine avant
Résistance + tube quartz bas
Chamotte
Voyant vert
Contre poids
Porte
Contre porte
Vitre
Poignée
Voyant orange
Pied
Bouton
Dessus
Tube vapeur
Support lampe + lampe
Bornier 6 plots
Fond arrière de cuve
Contacteur
Déflecteur droit
Cable
Serre cable
Flasque
Socle
Minuterie 15 '
Thermostat
Régulateur
Left deflector
Rear top quartz tube+heating element
Front top quartz tube+heating element
Control panel
Bottom quartz tube+heating element
Fire stone
Green pilot light
Against weight
Door
Inner door
Glass
Handle
Orange pilot light
Foot
Knob
Top
Stream tube
Lamp + lamp holder
Six holes domino
Tank back rear
Contactor
Right deflector
Cord
Cord closer
Side casing
Base
Timer 15 '
Thermostat
Regulator
1. SECURITY INSTRUCTIONS
18
Please respect these instructions scrupulously to avoid any risk of fire, electric shock,
scald or other wounds and damage. During the use of this appliance, fundamental
circumspection of security must always be noticed, such as:
- Take into account the instructions and keep it systematically with the appliance.
- Install the appliance always in instructions respect. A 10 cm distance minimum
with the partition or the wall is necessary.
- Protect the appliance from direct light of the sun, frost and humidity.
- Never leave the appliance within the reach of children or disabled persons without
surveillance.
- Never move the appliance when it is working or when the surfaces of cooking are
still hot.
- Check that the appliance is definitely off before connecting it up or disconnecting
it.
- Do not touch the hot surfaces of the appliance. The temperature of the hot surfaces can be very important when the appliance is working. Always use handles
and control knobs.
- Do not use the appliance for other functions than determined use.
- Do not leave the electrical cord in contact of hot surfaces.
- The appliance should not be used close to combustible materials.
- During use, look after not to obstruct hearings of aeration of the appliance
- To avoid any electric shock, never plunge the appliance, the cord or plug in water
or quite other liquid.
- If the cord is harmed, it must be replaced by the producer, his after sale service or
persons of similar skills to avoid any risk.
- Entrust repairs only to a skilled person.
- Use only spare parts of origin.
- At the end of cooking, before cleaning the appliance, do not forget to disconnect it.
3
2. CONTENTS OF CARDBOARD PACKAGING
Device: a pizza oven
Accessories: - a fire stone
- the present note
See exploded views for PZ 430 S / PZ 430 D / PZ 4302D at the end of the document
3. CONFORMITY OF USE
Use the appliance only to cook fresh or frozen products like pizzas, quiches, lasagnes,
pies, bread, pastries….
4. WAY OF FUNCTIONING
These pizza ovens are made for the fast cooking of fresh or deep frozen products.
Cooking is made thanks to 8 quartz tube heating elements (PZ 430 S/PZ 430 2D) or
16 quartz tube heating elements (PZ 430 D) which produce a maximum infrared radiation. A fire stone ensures an excellent spread of heat for an homogeneous cooking of
the dough.
To turn on the oven, select the heating time by turning the timer control knob (n°1 on
picture), the green pilot light (n°2 on picture) ignites.
You can put the timer on the continuous position by turning the timer control knob on
the left. In this case, do not forget to turn off the oven at the end of the service.
Turn on the thermostat control knob (n°3 on picture) on the wished position, the orange pilot light (n°4 on picture) ignites. The upper quartz tubes are running. Turn on
the regulation knob (n°5 on picture) on the wished power. The lower quartz tubes ignite.
You can reach full power by turning the knob on C position.
1
2
3
4
17
5
4
1 15 mn timer
Nomenclature PZ 430 D (2 cordons)
Spare parts PZ 430 D (2 cords)
2
On/off pilot light
3
Thermostat
4 Thermostatic pilot light
5 Regulator
5. FUNCTIONING / MANIPULATION
a) Installation / assembly:
Rep
Code
Qty
Pièce
Spare part
1
2
3
4
5
6
7
8
9
10
11
12
13
14
15
16
17
18
19
20
21
22
23
24
25
26
27
28
35111
D04041
D04040
35106SE
D04041
F07025
A08009
A13017
35113
35095SE
35096SE
H01076
A15061
A14078
35091
B04104
A18022
A16014
35110
35112
C03013
A10032
35109
35088
A08003
A02029
A06042
A04006
1
4
4
1
8
2
2
4
24
2
2
4
2
6
1
1
2
1
1
1
2
2
2
1
2
2
2
2
Déflecteur gauche
Résistance+tube
quartz haut arrière
Résistance+tube
quartz haut avant
Platine avant
Résistance + tube quartz bas
Chamotte
Voyant vert
Pied
Contre poids
Porte
Contre porte
Vitre
Poignée
Bouton
Dessus
Tube vapeur
Support lampe + lampe
Bornier 6 plots
Fond arrière de cuve
Déflecteur droit
Cordon avec prise
Serre cable
Flasque
Socle
Voyant orange
Minuterie 15 '
Thermostat
Régulateur
Left deflector
Rear top quartz tube+heating element
Front top quartz tube+heating element
Control panel
Bottom quartz tube+heating element
Fire stone
Green pilot light
Foot
Against weight
Door
Inner door
Glass
Handle
Knob
Top
Stream tube
Lamp + lamp holder
Six holes domino
Tank back rear
Right deflector
Cord with plug
Cord closer
Side casing
Base
Orange pilot light
Timer 15 '
Thermostat
Regulator
16
- Unpack carefully the device of its packaging.
- Place it on a plane and heatproof surface.
- Never place the device near a wall or near a partition makes of combustible materials even if it is very well isolated.
- A distance of minimum 10 cm with the partition or the wall is necessary.
- Remove the protective film around the device and unpack the fire stone
b) First starting:
During the first use, warm your machine up outside to evacuate residual smokes of
manufacturing oil from the metallic parts. This may emit a slight smell for a few moments.
First cleaning
Clean the device before the first use. (See 6. Cleaning)
Connection of the device
- Check that the tension and the frequency of the electricity network suit to the values
indicated on the descriptive plate.
- Check that neither the cord nor the plug are damaged. If necessary, it has to be
replaced by the manufacturer, its after sale service or any qualified person to avoid
any risk.
- Make sure that every control knob is positioned on 0.
- Unwind completely the electric power cable and connect it in a plug connected with
the earth.
- The device is connected.
NB: in case of connection of the device in a plug without earth protection or directly
on the electricity network, confide its connection to a qualified person .
5
c) Use of device :
Elements of command and display
Command/Display
Function
Regulator (n°5 on picture)
Temperature setting of the bottom heating element
Thermostat (n°3 on picture)
Temperature setting inside the cooking chamber
15 min timer (n°1 on picture)
Green pilot light
(n°2 on picture)
Orange pilot light
(n°4 on picture)
On/off + Cooking time
Machine on (pilot light on)
Machine off (pilot light off)
Warming up (pilot light on)
Desired temperature reached (pilot light off)
Putting on
Turn on the timer control knob (n°1 on picture) on wished cooking time. The green pilot
light (n°2 on picture) ignites
Turn on the thermostat control knob (n°3 on picture) on the wished position: the orange
pilot light (n°4 on picture) ignites. The machine is warming up.
Once orange pilot light (n°4 on picture) is off, the machine reached the wished temperature and is ready for cooking.
A few tips
To obtain much better results, we advise to regulate the oven as follows:
- A fresh pizza (diam.40cm) with a thin dough will be ready in 3 min, thermostat 350 °C,
regulator on position 9.
- A deep-frozen pizza (diam. 40cm) with a thick dough will be ready in 4 min, thermostat 320°C, regulator on position 7
You can use your pizza oven in continuous by turning the timer on left side from position 0. Caution : do not forget to turn off your pizza oven after use.
Temperature setting
Set the temperature by positioning the thermostat (n°3 on picture) to the desired
temperature. The orange pilot light (n°4 on picture) switches on if a higher level of
temperature is required and switches off when the same is reached.
The energy regulator enables you to adapt the heating power of the bottom heating
element regarding the thickness of the dough to be cooked. The thicker is the
dough, the higher the temperature has to be. The cooking of the pizza dough is
essentially made through the bottom.
15
6
Stopping the appliance
Set the thermostat control knob (n°3 on picture) on 0
Set the timer (n°1 on picture) on 0 : the appliance is no longer functioning.
Disconnect the power cable.
Clean the appliance. (see 6. Cleaning)
Nomenclature PZ 430 D (triphasé)
Spare parts PZ 430 D (3 phases)
d) Breakdown / repair:
In case of breakdown or of damaged part, please call your after-sales service and
confide any technical operation to qualified person.
Rep
Code
Qty
Pièce
Spare part
1
2
3
4
5
6
7
8
9
10
11
12
13
14
15
16
17
18
19
20
21
22
23
24
25
26
27
28
35111
D04041
D04040
35106SE
D04041
F07025
A08009
A13017
35113
35095SE
35096SE
H01076
A15061
A14078
35091
B04104
A18022
A16014
35110
35112
C01010
A10032
35109
35088
A08003
A02029
A06042
A04006
1
4
4
1
8
2
2
4
24
2
2
4
2
6
1
2
2
1
1
1
1
1
2
1
2
2
2
2
Déflecteur gauche
Résistance+tube
quartz haut arrière
Résistance+tube
quartz haut avant
Platine avant
Résistance + tube quartz bas
Chamotte
Voyant vert
Pied
Contre poids
Porte
Contre porte
Vitre
Poignée
Bouton
Dessus
Tube vapeur
Support lampe + lampe
Bornier 6 plots
Fond arrière de cuve
Déflecteur droit
Cable
Serre cable
Flasque
Socle
Voyant orange
Minuterie 15 '
Thermostat
Régulateur
Left deflector
Rear top quartz tube+heating element
Front top quartz tube+heating element
Control panel
Bottom quartz tube+heating element
Fire stone
Green pilot light
Foot
Against w eight
Door
Inner door
Glass
Handle
Knob
Top
Stream tube
Lamp + lamp holder
Six holes domino
Tank back rear
Right deflector
Cord
Cord closer
Side casing
Base
Orange pilot light
Timer 15 '
Thermostat
Regulator
14
When you contact the after-sales service of your distributor or your store, give him
the complete reference of your device (commercial name, type and serial number).
This information appears on the visible descriptive plate behind the device.
6. CLEANING AND MAINTENANCE
Disconnect the device.
- Let cool completely the device before any technical intervention or cleaning.
- Clean the fire stone when it is warm by scratching it slightly with a wire brush or a
small emery cloth to remove residues.
- Never clean the fire stone under water- Never clean the quartz tubes when they are
hot
- Avoid touching quartz tubes with your fingers but use a cloth moistened with spirit.
- Clean regularly the external walls of your device with warm water and wash liquid:
avoid the abrasive towelling. Rinse your device with a wet sponge.
- Never clean the device under a water jet, the infiltrations would risk to damage it in
a irreparable way.
- Never immerse the device, the cord or the plug in the water or quite other liquid to
avoid any electric shock.
- During a prolonged non-use, we recommend you strongly to keep the device
shielded from the humidity.
7. TECHNICAL SPECIFICATIONS
Model
Outside dimensions
Inside dimensions
PZ 430 S
670x580x270 mm
430X430 mm
PZ 430 D
670x580x500 mm
2x (430x430)
PZ 430 2D
895x580x270 mm
660x430
31 Kg
3000 W
8
54 Kg
6000 W
16
41Kg
5000 W
8
Current
13 A
13 A/Phase
11 A/Phase
Voltage
220-240 V ~
380-415 V 3 N~ ou
2x 220-240 V ~
380-415 V 3 N~
Weight
Power
No element
7
Wires colours correspondence
Phase 1
Phase 2
Phase 3
Neutral
Earth
Brown
Black
Grey
Blue
Yellow-Green
The equipotential connection marked by this symbol
must be linked with the
equipotential conductive connection of your installation by means of a minimum conduction of a 2.5 mm² section.
8. NORMS AND LEGALS DISPOSALS
The device is conform to :
IEC/EN 60335-1
IEC/EN 60335-2-36
EN 55014-1 + 55014-2
EN 61000-3-2 + 61000-3-3
Humidity protection degrees IPX3, in conformity with the norm 60335-2-36 (2008)
9. ELIMINATION OF THE ELECTRIC AND ELECTRONIC WASTE
The device respects the directives:
2002/96/CE (DEEE) N°34270064800021
2002/95/CE (ROHS)
2006/95 CE
2004/108 CE
Reach rule
Never put the device among household waste.
The device must be put down in a centre of recycling for the electric equipments.
The materials of the device are indeed reusable. By eliminating correctly the electric
and electronic wastes, the recycling and quite other shape of re-use of worn equipments, you participate in a significant way in the environmental protection.
For any information about the collection of electric and electronic waste, please contact your distributor.
8
13
10. GUARANTEE
Nomenclature PZ 430 S
Spare parts PZ 430 S
Conditions of guarantee
The guarantee applicable to any device is the commercial guarantee of the distributor
or the retailer. Please contact the store where you bought your device to know the
precise conditions.
The guarantee grants no right for damages.
The dispositions which follow are not exclusive of the profit of the legal guarantee
planned by articles 1641 and following ones of the Civil code relative to the defects
and the latent defects.
Rep
Code
Qty
Pièce
Spare part
1
2
3
4
5
6
7
8
9
10
11
12
13
14
15
16
17
18
19
20
21
22
23
24
25
26
27
28
35101
D04041
D04040
35087SE
D04041
F07025
A08009
35113
35095SE
35096SE
H01076
A15061
A08003
A13017
A14078
35091
B04104
A18022
A16013
35100
35102
C03013
A10032
35099
35088
A02029
A06042
A04006
1
2
2
1
4
1
1
12
1
1
2
1
1
4
3
1
1
1
1
1
1
1
1
2
1
1
1
1
Déflecteur gauche
Résistance+tube
quartz haut arrière
Résistance+tube
quartz haut avant
Platine avant
Résistance + tube quartz bas
Chamotte
Voyant vert
Contre poids
Porte
Contre porte
Vitre
Poignée
Voyant orange
Pied
Bouton
Dessus
Tube vapeur
Support lampe + lampe
Bornier 3 plots
Fond arrière de cuve
Déflecteur droit
Cordon avec prise
Serre cable
Flasque
Socle
Minuterie 15 '
Thermostat
Régulateur
Left deflector
Rear top quartz tube+heating element
Front top quartz tube+heating element
Control panel
Bottom quartz tube+heating element
Fire stone
Green pilot light
Against weight
Door
Inner door
Glass
Handle
Orange pilot light
Foot
Knob
Top
Stream tube
Lamp + lamp holder
Three holes domino
Tank back rear
Right deflector
Cord with plug
Cord closer
Side casing
Base
Timer 15 '
Thermostat
Regulator
Exclusion clauses of the guarantee
Bad installation and bad maintenance, in particular if they do not respect current regulations or instructions appearing in this user guide.
Cannot benefit from the guarantee the repairs required as a result of false operations,
of inappropriate use, of carelessness or of excess loads of the device, as well as
those resulting from variations of the power supply, over tension or from defective installations.
The damage due to shocks, bad weather is not flatware by the guarantee. The material travels at the risks of the user; in case of delivery by carrier, the consignee has to
have reservations towards the carrier before any delivery of the device.
The guarantee comes to an end in case of intervention, of repair, of modification by no
qualified persons, or of use in inappropriate purposes.
12
9
10
11