1
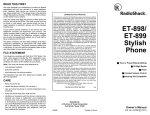
HDSICM ONE WAY INTERCOM
USER’S MANUAL
Avire Inc
415 Oser Avenue, Suite Q, Hauppauge, New York 11788
Phone: 631 864 3699 Toll Free: 800 527 9156
Janus is a brand of Avire
Fax: 631 864 2631 Email: [email protected]
www.avire-global.com www.januselevator.com
TABLE OF CONTENTS
SECTION
PAGE
FEATURES
3
OPERATION
3
PRE-TESTING
4
INSTALLATION
5
DUPLEX SYSTEM SAMPLE DIAGRAM
6
TROUBLESHOOTING
7
WARRANTY POLICY
9
RETURN POLICY
10
2
FEATURES
•
•
•
•
•
•
•
•
Complies with the 1996 Code for machine room to cab
communications
Simple off-hook operation
Easy installation with one pair wiring
Battery backup
Call is initiated from Machine Room phone only
Wall mounted phone with handset for machine room
Available in multi-button models for multiple cabs.
Cab unit can mount on ceiling using provided enclosure
or can be mounted behind speaker pattern if removed
from enclosure
OPERATION
1. Remove the handset from the telephone and it will
automatically establish communication with the elevator
unit. If there are 2 or more buttons on the telephone,
press the appropriate button to establish communication
with the unit you need to communicate with.
2. To end the call, simply just hang up the handset to the
cradle
3
PRE-TESTING
1. Remove intercom system from shipping box. If you want
to test the intercom before installation, connect a pair of
wires from the white terminal strip to the TELCO block
on the cab unit. Be sure that the positive side of the
European connector is connected to the positive side of
the TELCO block. See markings on the connector and
on the PC board beside the TELCO block for proper
terminal designations.
2. Plug the AC power supply into 110VAC outlet and
connect the 9-volt battery to the battery snap.
Take the elevator unit into an adjoining room and close
the door.
4. The person at the machine room phone should pick up
the handset. If it is a simplex unit (no pushbuttons),
communication can begin. If the unit is a duplex (2
button) or triplex (3 button), the person needs to press
the appropriate pushbutton to communicate with the
elevator cab unit.
3.
5. Check each elevator unit in the same manner.
4
INSTALLATION
1. The intercom system requires one pair wiring for each
2.
3.
4.
5.
6.
elevator unit to the machine room phone. The intercom
system requires 110 volts AC to trickle charge the
battery. The wiring from the AC plug can be extended as
needed to get to the nearest outlet. Connectors are
provided for this purpose.
Install the elevator unit on the ceiling using the mounting
holes provided in the galvanized box. The elevator unit
can be mounted behind a speaker grill in the car
operating panel (3.5 inch minimum diameter speaker
pattern required) by removing the intercom board from
the galvanized enclosure.
Install the machine room telephone on the wall using an
RJ11W or equivalent.
Connect the AC power to the machine room telephone.
For Simplex installations, connect one pair of wires
between the European connector of the Machine Room
telephone to the TELCO connector of the elevator unit.
This connection is polarity sensitive, so be sure to
connect the wiring so that the positive is on the No. 2
terminal.
On multi-button telephones, there will be a white
terminal strip at the Machine Room phone with a
connection for each cab unit. When you connect the
wiring at the TELCO connector, be sure that the positive
is connected to the No. 2 side of the connector. Positive
and negative are marked on the board.
5
DUPLEX SYSTEM SAMPLE DIAGRAM
6
TROUBLESHOOTING
1. Make sure that the Machine Room phone is getting
power from the AC transformer by checking the voltage
on the battery snap. There should be approximately 13
volts DC with the handset on-hook. There should be
positive voltage on the female side of the connector and
negative voltage on the male side. If the polarity is not
correct reverse the wires coming from the wall
transformer.
2. Make sure the wall phone is powered by taking the
handset off hook and pressing any of the digits. There
should be tones heard in the handset. If no tones are
heard check the connections to the power supply.
3. Make sure the 9-volt battery is charged. If you have less
than 8-volts you can temporarily replace it with any
charged 9-volt battery for testing purposes. The 9-volt
battery supplied with the unit is rechargeable and will
build up to full charge after a couple of hours connected
to the power supply.
4. Check to make sure voltage is being sent to the
European connectors. WITH THE HANDSET
OFFHOOK and THE APPROPRIATE PUSH
BUTTON PRESSED (if not simplex) check to see if you
have 9-13 volts DC to the European connector to the
selected elevator cab.
5. Check to make sure the cab unit is getting voltage.
WITH THE HANDSET OFFHOOK and THE
APPROPRIATE PUSHBUTTON PRESSED (If not
simplex) measure the DC voltage at the TELCO
connector. There should be 9-13 volts. Make sure that
polarity is correct-positive voltage on the No. 2 and
negative voltage on No. 1 connector. The CMU intercom
in the elevator cab does not require a 9-volt battery.
7
6. You can test each cab unit individually and without any
field wiring connected by attaching a 9-volt battery to the
battery connector that is soldered directly onto the PC
board and plugging a modular tone phone into the black
jack on the back of the board. You should be able to
communicate through the handset to the PC board.
Notes:________________________________________________
__________________________________________________
__________________________________________________
__________________________________________________
__________________________________________________
__________________________________________________
__________________________________________________
__________________________________________________
__________________________________________________
__________________________________________________
__________________________________________________
__________________________________________________
__________________________________________________
__________________________________________________
__________________________________________________
__________________________________________________
__________________________________________________
__________________________________________________
__________________________________________________
__________________________________________________
__________________________________________________
__________________________________________________
__________________________________________________
__________________________________________________
__________________________________________________
__________________________________________________
__________________________________________________
__________________________________________________
__________________________________________________
__________________________________________________
8
WARRANTY POLICY
Avire Inc. warrants its products to be free from defect in
materials and workmanship under normal use and service
for 24 months from date of purchase. Seller’s obligation shall
be limited to repairing or replacing, at its option, free of
charge for materials or labor any product which proves
defective in materials or workmanship under normal use and
service. Avire shall not be responsible for any damage to the
unit incurred during installation. Seller shall have no
obligation under this Limited Warranty or otherwise if the
product is altered or improperly repaired or serviced by
anyone other than Avire factory service. For warranty
service, contact Avire at 631-864-3699 or 800-527-9156.
THERE ARE NO WARRANTIES, EXPRESS OR IMPLIED,
OF MERCHANTABILITY, OR FITNESS FOR A
PARTICULAR PURPOSE OR OTHERWISE, WHICH
EXTEND BEYOND THE DESCRIPTION ON THE FACE
HEREOF. IN NO CASE SHALL SELLER BE LIABLE TO
ANYONE FOR ANY CONSEQUENTIAL OR INCIDENTAL
DAMAGES FOR BREACH OF THIS OR ANY OTHER
WARRANTY, EXPRESS OR IMPLIED, OR UPON ANY
OTHER BASIS OF LIABILITY WHATSOEVER, EVEN IF
THE LOSS IS CAUSED BY THE SELLER’S OWN
NEGLIGENCE OR FAULT.
9
RETURN POLICY
During installation, if a product does not appear to function
properly the installer must call the Avire Technical Support
Unit at (800) 527-9156, Monday through Friday. If the
technician determines that the product is not functioning, an
RA (Return Authorization) number will be issued, allowing
the installer to return the product directly to Avire for repair,
replacement or credit. Returns with no fault found, will result
in a bench charge plus shipping costs. Returns without an
RA number will result in a restocking charge of 25% or more
plus shipping costs.
Need Technical Assistance?
Call 1-800-527-9156
10