1
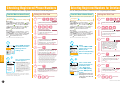
Entering a Registered Number for Deletion
You can enter a registered phone number to delete it from the list.
From the i-Menu or dmenu Screen
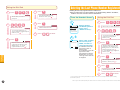
Deleting all entries from the Call Block list.
● This procedure deletes all telephone numbers in the Call Block list simultaneously.
The procedure does not allow numbers to be checked during deletion, or specific
numbers to be entered for deletion. In addition, numbers cannot be restored to the
list after deletion.
Using the Dial Pad
*Use of the service requires an i-mode or sp-mode subscription.
To navigate to 1
Nuisance Call Blocking Service Settings Site
●From i-Menu
Select "お客様サポート"(Customer Support).
Select
"各種設定(確認・変更・利用)
"(Various Settings[Checking,
Changes, Use]).
Select "その他サービス設定・確認"
(Setting and Checking of Other Services).
Select
"迷惑電話ストップサービス"(Nuisance Call Blocking
Service).
Enter the Network Password.
1
1
4
4
Announcement
"Please enter your network password."
(Network Password)
Announcement
"You are in the main menu...To check
or delete the registered phone
numbers, press 2 ..."
3
Press
2
Announcement
1
迷惑電話ストップサービス
"XX phone numbers are currently
registered for the Nuisance Call
Barring Service...To check and
delete the registered numbers,
press 2 . To delete a selected
number, press 3 . To clear all
registered numbers, press 9 ..."
Press
3
Announcement
"Please enter the phone number."
2
削除
削除したい番号を入力
してください。
※番号はハイフンなしで入
力してください。
×××××××××××
削除
キャンセル
Enter the phone number
to be deleted, and
select "削除"(Delete).
*Use of the service requires an i-mode or sp-mode subscription.
●From i-Menu
Select "お客様サポート"(Customer Support).
Select
"各種設定(確認・変更・利用)
"(Various Settings[Checking,
Changes, Use]).
Select "その他サービス設定・確認"
(Setting and Checking of Other Services).
Select
"迷惑電話ストップサービス"(Nuisance Call Blocking
Service).
Enter the Network Password.
●From dmenu
Select "お客様サポート"(Customer Support).
Select
"各種設定の一覧を見る"(View Various Settings List).
Select "迷惑電話ストップサービス"(Nuisance Call Blocking
Service)from "あんしん・安全"(Assurance and Safety)
menu.
Enter the Network Password.
-
5
1
Nuis.call blocking
Register caller
Register selected No.
Delete last entry
Delete all entries
Check No. of entries
Delete all entries?
1
YES
確認
登録
■最後に着信して通話
した番号の登録
■番号を指定して登録
削除
■リストから選択して削除
■番号を指定して削除
■全件削除
Select "全件削除"
(Deleting All Phone
Numbers) on the
Nuisance Call
Blocking Service
settings site.
Display the Nuis. call
bloking Service
menu, and select
"Delete all entries."
2
*The screens shown demonstrate i-Menu procedures.
迷惑電話ストップサービス
4
From the Handset Screen
NO
Select "YES" to clear
the Call Blocking list,
or "NO" to cancel it.
A confirmation screen will
appear. Select "YES" to
delete all entries from the
Call Blocking list.
A reconfirmation screen will
appear. Select "OK."
If the removal from the Call
Blocking list is successful,
a message to this effect will
be displayed.
Nuisance Call
Blocking Service
Nuisance Call
Blocking Service
確認
登録
■最後に着信して通話
した番号の登録
■番号を指定して登録
削除
■リストから選択して削除
■番号を指定して削除
■全件削除
Select
"番号を指定して削除"
(Specify Number and
Delete) on the Nuisance
Call Blocking Service
settings site.
From the i-Menu or dmenu Screen
To navigate to 1
Nuisance Call Blocking Service Settings Site
2
●From dmenu
Select "お客様サポート"(Customer Support).
Select
"各種設定の一覧を見る"(View Various Settings List).
Select "迷惑電話ストップサービス"(Nuisance Call Blocking
Service)from "あんしん・安全"(Assurance and Safety)
menu.
Enter the Network Password.
*The screens shown demonstrate i-Menu procedures.
Press
Deleting All Registered Phone Numbers
(Phone Number to Delete)
If the removal from the Call
Blocking list is successful,
a message to this effect will
be displayed.
With landline phones, register the number starting from
*the
area code; with mobile phones, start with 090 or
similar mobile phone prefix.
2
Select "削除"(Delete).
Announcement
削除
"Number deleted from list."
全件削除します。
よろし
いですか?
6
Press
to finish.
削除
キャンセル
If the removal from the Call
Blocking list is successful,
a message to this effect will
be displayed.
*If a caller calls from a number registered in the Nuisance Call Blocking Service by activating the Caller ID-blocking function, the number cannot be deleted by entering the specific phone number.
8
●
The set up procedure may differ depending on the handset. See the user's manual of your handset for details. ● Actual screen may be different.
9