1
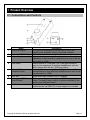
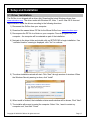
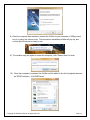
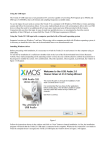
OriGen USB DAC and Preamplifier
Owner’s Manual
Got a Question or Need Help?
Email our technical support team at: [email protected] for personalized
assistance with the setup and use of this product. Please visit our product
information website www.miccatron.com for the following:
- Firmware Updates
- User’s Manuals
- Troubleshooting Wizard
- Technical Support Request
When contacting technical support, be sure to include your order information,
product model, and serial number from the bottom of the player.
Copyright © 2009-2015 Micca. All rights reserved.
This manual may not be reproduced in whole or in part without
permission for any purpose other than personal use.
Copyright © 2009-2015 Micca. All rights reserved.
V150713
Copyright © 2009-2015 Micca. All rights reserved.
V150713
1 Introduction
Thank you for your purchase! The OriGen USB audio DAC and preamplifier is a studio master
grade digital audio playback device that supports high resolution PCM audio up to 24-bit/192kHz
and DSD64 audio. Use the OriGen to bypass your computer's soundcard and unlock the full
potential of your music.
1.1 Features
1.1.1 Input and Output
Asynchronous USB 2.0 input for use with Windows XP/7/8/8.1, and MAC OSX.
Front 3.5mm and 1/4” stereo headphone outputs. Powerful built-in headphone amp supports
16-600 Ω headphones.
Rear 3.5mm stereo analog line level and combination optical S/PDIF digital output.
1.1.2 Digital Stream Formats
PCM audio up to 24-bit/192kHz
DSD64 (2.8MHz), Native or DoP
ASIO support
WASAPI Push/Event support
1.1.3 Key Components
VIA VT1736 USB 2.0 High Speed 480Mbps audio controller
Cirrus Logic CS4392 Stereo D/A Converter
JRC NJM4556 operational amplifier
1.1.4 What’s Included
Micca OriGen unit
USB cable
3.5mm to RCA audio cable
User’s Manual
Note: All the information contained in this manual was correct at the time of publication.
However, as our engineers are always updating and improving the product, your device’s
software may have a slightly different appearance or modified functionality than presented in
this manual.
Copyright © 2009-2015 Micca. All rights reserved.
Page | 1
1.2 Hearing Damage – IMPORTANT!
Please exercise caution and avoid listening to music at excessive volume. The following excerpt
is from the CDC website:
“Hearing loss can result from damage to structures or nerve fibers in the inner ear that respond
to sound. This type of hearing loss, termed “noise-induced hearing loss,” is usually caused by
exposure to excessively loud sounds and cannot be medically or surgically corrected.
Sound intensity is measured in decibels with a sound level meter. Noise-induced hearing loss
can result from a one-time exposure to a very loud sound (at or above 120 decibels), blast,
impulse, or by listening to loud sounds (at or above 85 decibels) over an extended period. The
louder the sound, the shorter the time period before hearing damage occurs.”
Listen smart, protect your hearing!
1.3 Output Power – IMPORTANT!
In order to drive low efficiency and/or high impedance headphones effectively, the Micca OriGen
is built with powerful headphone outputs. At the 0dB gain setting, the headphone output jacks
are capable of 5.6 Vrms output with the volume knob at maximum. Please be sure to take the
following precautions each time you use the OriGen:
•
Always start with the gain switch set at -10dB.
•
Always start with the volume no higher than the 9 o’clock position.
•
Never switch to a different pair of headphones without first restoring the above
default safe settings.
1.4 Other Notices and Precautions
1.4.1 FCC Statement
1. This device complies with Part 15 of the FCC Rules. Operation is subject to the following two
conditions:
(1) This device may not cause harmful interference.
(2) This device must accept any interference received, including interference that may
cause undesired operation.
2. Changes or modifications not expressly approved by the party responsible for compliance
could void the user's authority to operate the equipment.
NOTE: This equipment has been tested and found to comply with the limits for a Class B digital
device, pursuant to Part 15 of the FCC Rules. These limits are designed to provide reasonable
protection against harmful interference in a residential installation.
This equipment generates uses and can radiate radio frequency energy and, if not installed and
used in accordance with the instructions, may cause harmful interference to radio
Copyright © 2009-2015 Micca. All rights reserved.
Page | 2
communications. However, there is no guarantee that interference will not occur in a particular
installation. If this equipment does cause harmful interference to radio or television reception,
which can be determined by turning the equipment off and on, the user is encouraged to try to
correct the interference by one or more of the following measures:
Reorient or relocate the receiving antenna.
Increase the separation between the equipment and receiver.
Connect the equipment into an outlet on a circuit different from that to which the
receiver is connected.
Consult the dealer or an experienced radio/TV technician for help.
FCC Radiation Exposure Statement
This equipment complies with FCC radiation exposure limits set forth for an uncontrolled
environment. This equipment should be installed and operated with minimum distance 20cm
between the radiator & your body.
1.4.2 Disposing of the Product
When you dispose of the product, be sure to dispose it appropriately. Some locales may
regulate disposal of electrical device, please consult with your local authority.
1.4.3 Additional Precautions
Do not let the product come into contact with water or other liquids.
Do not disassemble, modify, or attempt repair of the product; any damage resulting from
these actions will not be covered by the product warranty.
Do not use excessive force when pressing buttons or rotating knobs.
Avoid hitting the product, shaking the product, and keep it away from strong magnetic fields.
Electrostatic discharge may cause the product to malfunction.
Copyright © 2009-2015 Micca. All rights reserved.
Page | 3
2 Product Overview
2.1 Connections and Controls
1
Name
Audio Info Display
2
3
Volume, On/Off Switch
3.5mm Headphone Jack
4
Gain Switch
5
6.3mm (1/4”)
Headphone Jack
6
7
USB Jack
Analog and S/PDIF
Optical Output
8
DC 5V
Description
LED grid for indicating audio stream type (PCM, DSD),
sampling rate, playback volume, and power indicator.
Combination power on/off switch and volume control.
Output jack for connecting 3.5mm headphones. If using low
impedance or high sensitivity headphones, be sure to set the
gain switch to -10dB.
Selects normal or -10dB gain. The -10dB gain should be
used for low impedance or sensitive headphones, such as
IEMs. Always start with the -10dB gain setting.
Output jack for connecting 6.3mm (1/4”) headphones. If using
low impedance or high sensitivity headphones, be sure to set
the gain switch to -10dB.
Digital audio input interface from a computer.
Two-in-one analog stereo output and S/PDIF optical digital
output. The analog stereo output is volume controlled by the
volume knob and gain switch.
Required to provide power to the OriGen when used with an
Android device via USB OTG. Power adapter not included.
Copyright © 2009-2015 Micca. All rights reserved.
Page | 4
3 Setup and Installation
3.1 Driver Installation
The OriGen is not shipped with a driver disk. Download the latest Windows drivers from
www.miccatron.com. The driver works with Windows XP, Vista, 7, and 8. Mac OS X does not
require drivers. Install the drivers according to the following directions.
1) Disconnect the OriGen from your computer.
2) Download the newest driver ZIP file for the Micca OriGen from www.miccatron.com.
3) Decompress the ZIP file to a folder on your computer. Close all programs on your
computer – the computer will be restarted as part of the installation.
4) Navigate to the driver folder and double click on SETUP.EXE to begin installation. If an
“untrusted location” warning is displayed, click “Yes” to continue.
5) The driver installation wizard will start. Click “Next” through a series of windows. When
the Windows Security warning is show, click “Install”
6) When install is finished, the installation status results window will be shown; Click “Next”.
7) The installer will prompt to restart the computer. Select “Yes, I want to restart my
computer now”, and click “Finish”
Copyright © 2009-2015 Micca. All rights reserved.
Page | 5
8) Once the computer has restarted, connect the OriGen to your computer’s USB port and
turn it on using the volume knob. The new device installation bubble will pop up, and
confirm that the device is ready to use:
9) The installer may ask again to restart the computer, click “Restart Now” to finish.
10) Once the computer is restarted, the OriGen will be added to the list of playback devices
as “SPDIF Interface - VIA USB Device”.
Copyright © 2009-2015 Micca. All rights reserved.
Page | 6
3.2 Installation Troubleshooting
The Micca OriGen is ready for use as soon as the driver installation is complete. The computer
should now be playing sounds through the OriGen. If there is no sound, try the following
troubleshooting steps:
•
Make sure that the Micca OriGen is connected to a USB jack on the computer. If using a
desktop computer, make sure to use one of the rear USB jacks.
•
Use only the USB cable that came with the Micca OriGen. It’s not a magical cable, but it
is a good quality cable that we know works.
•
Turn on the Micca OriGen, and ensure that the power indicator light is on.
•
Right click on the audio tray icon and select “Playback Devices”. In the “Playback” tab,
make sure that “SPDIF Interface – VIA USB Device” is found.
•
Right click on “SPDIF Interface – VIA USB Device” and select “Set as Default Device”.
There should now be a green checkmark on this device.
•
Connect a pair of headphones up to the front headphone output jack, set the gain switch
to -10dB, set the volume knob to the 9 o’clock position.
•
Open a web browser and go to your favorite video site to start playing a video. The audio
should play.
Things to try if you encounter errors in any of the above steps:
•
Try a different USB port on your computer.
•
Turn your computer off and back on again. :3
•
Uninstall and reinstall the driver package.
•
Make sure that the sound on your computer is not muted. In Windows it is possible to
mute a particular application even though the system volume is not muted. To check this,
click on the audio tray icon - all current applications with sound playback capability will
be listed individually along with their volume/mute controls.
If after the above steps you still have difficulty getting the OriGen to work with your computer,
please contact our support team at [email protected].
3.3 Advanced Configuration
Advanced users may wish to make adjustments to the default operating parameters based on
the guidelines in this section.
3.3.1 Playback Device Setting
• From the list of playback devices, right click on “SPDIF Interface - VIA USB DEVICE” and
select “Properties”.
Copyright © 2009-2015 Micca. All rights reserved.
Page | 7
•
In the General tab, rename the device to “Micca OriGen” so it’s easier to view later.
•
In the Supported Formats tab, uncheck DTS, Dolby Digital, and Microsoft WMA Pro
Audio. Check 44.1kHz, 48.0kHz, 88.2kHz, 96kHz, 176.4kHz, and 192.0kHz.
•
In the Levels tab, make sure it is set to maximum of 100. Use the volume knob on the
OriGen to set playback volume.
•
In the Advanced tab, select any Default Format desired, such as 24 bit 192000 Hz.
3.3.2 VIA USB Device Deck
The VIA USB Device Deck software is installed as part of the OriGen installation. Once installed,
it can be accessed from the Control Panel or from the Icon Tray.
The main screen of the VIA USB Device Deck allows basic volume adjustments. To access
additional configuration settings, click on the
icon to expand the window:
The first control panel allows independent adjustment of left and right channels. By default he
left and right channels are synchronized.
To access the second control panel, click on the
icon. The second control panel offers the
ability to independently set the sample rate and bit depth. Even though 32 bit is available as a
setting in this control panel, this bit depth is not officially supported by Windows XP/Vista/7.
Copyright © 2009-2015 Micca. All rights reserved.
Page | 8
3.4 More Advanced Configuration
This section provides certain setting recommendations for use with certain popular music
playback software such as Foobar2000 and JRiver Media Center.
3.4.1 Foobar2000 Playback Settings
The Micca OriGen supports all of the different methods that Foobar2000 can output audio. To
access these output options, select File -> Preferences and go to the Playback -> Output
configuration menu. In the Devices drop down box, the following output options are available for
the OriGen:
•
DS: Primary Sound Driver – Foobar2000 will output sound to the OriGen using the
Windows DirectSound component. The OriGen must be set as the default audio playback
device for this setting to work. In addition to Foobar2000, all other system and application
sounds will also be played through the OriGen.
•
DS: Micca OriGen (VIA USB Device) – Foobar2000 will always use the OriGen to output
sound. This is useful if the OriGen is not set as the default audio playback device and all
other system and application sounds use a different audio playback device, so that your
music isn’t interrupted by beeps, dings, and other computer system sounds.
•
ASIO: VIA KS Direct ASIO – Only available if the optional ASIO component for
Foobar2000 is installed. When using the ASIO interface, Foobar2000 requires exclusive
access to the OriGen such that other programs will not play sound through the OriGen at
the same time. It is important to set another audio device as the default audio
playback device prior to using the ASIO interface with OriGen. Otherwise, conflicts
with other programs may result in locked sound output requiring a system restart.
•
WASAPI (event/push): Micca OriGen (VIA USB Device) – Only available if the optional
WASAPI component for Foobar2000 is installed. Both event and push methods are
supported. When using the WASAPI interface, Foobar2000 requires exclusive access to
the OriGen such that other programs will not play sound through the OriGen at the same
time. It is important to set another audio device as the default audio playback
device prior to using the WASAPI interface with OriGen. Otherwise, conflicts with
other programs may result in locked sound output requiring a system restart.
3.4.2 Foobar2000 DSD Playback
To properly configure Foobar2000 to pass DSD audio to OriGen, follow the steps below. When
the playback goes from a PCM based file type such as MP3 or FLAC to DSD, there will be a
slight click at the beginning of the DSD song - this is normal.
1. Make sure that the optional ASIO component for Foobar2000 is installed.
2. Download and install the DSD component for Foobar 2000 from the following URL:
http://sourceforge.net/projects/sacddecoder/
Copyright © 2009-2015 Micca. All rights reserved.
Page | 9
3. Select File -> Preferences -> Output -> ASIO, and double click on “foo_dsd_asio”
4. In the pop up window, make the following selections; close the window when finished.
a. ASIO Driver: Select “VIA ASIO Driver”
b. DSD Playback Method: Select either “ASIO Native”, or “DoP Marker 0x05/0xFA”
c. DSD to DSD Method: None; Fs: DSD64
d. PCM to DSD Method: None; Fs: DSD64
e. DSD/PCM Transition: 0ms
5. Select File -> Preferences -> Tools -> SACD, and change the ASIO Driver Mode setting
to “DSD”. Click Apply when finished.
6. Select File -> Preferences -> Output, in the Devices drop down box, select “ASIO:
foo_dsd_asio”, click Apply when finished.
Foobar2000 is now properly configured and will output DSD audio in raw bitstream to the
OriGen.
3.4.3 JRiver Media Center Playback Settings
The Micca OriGen supports all of the different methods that JRiver Media Center can output
audio. To access these output options, select Tools -> Options and select the Audio
configuration menu. In the Audio Devices drop down box, the following output options are
available for the OriGen:
•
Default Audio Device (Direct Sound) – JRiver will output sound to the OriGen using the
Windows DirectSound component. The OriGen must be set as the default audio playback
device for this setting to work. In addition to JRiver, all other system and application
sounds will also be played through the OriGen.
•
DS: Micca OriGen (VIA USB Device) – Foobar2000 will always use the OriGen to output
sound. This is useful if the OriGen is not set as the default audio playback device and all
other system and application sounds use a different audio playback device, so that your
music isn’t interrupted by beeps, dings, and other computer system sounds.
•
VIA KS Direct ASIO (ASIO) – When using the ASIO interface, JRiver requires exclusive
access to the OriGen such that other programs will not play sound through the OriGen at
the same time. It is important to set another audio device as the default audio
playback device prior to using the ASIO interface with OriGen. Otherwise, conflicts
with other programs may result in locked sound output requiring a system restart.
•
Micca OriGen (VIA USB Device) (WASAPI) – When using the WASAPI interface, JRiver
requires exclusive access to the OriGen such that other programs will not play sound
through the OriGen at the same time. It is important to set another audio device as
the default audio playback device prior to using the WASAPI interface with OriGen.
Copyright © 2009-2015 Micca. All rights reserved.
Page | 10
Otherwise, conflicts with other programs may result in locked sound output requiring a
system restart.
3.4.4 JRiver Media Center DSD Playback – Windows
To properly configure JRiver to pass DSD audio to OriGen, follow the steps below. When the
playback goes from a PCM based file type such as MP3 or FLAC to DSD, there will be a slight
click at the beginning of the DSD song - this is normal.
1. Select Tools -> Options, and select the Audio configuration menu.
2. In the Audio Device drop-down box, select VIA KS Direct [ASIO].
3. Click on “Device Settings…”, check the box for “DSD bitstream in DoP format”. Click OK
when finished.
4. Below Settings, click on “Bitstreaming: None”, then click on “Custom…”
5. In the pop up window, check the box for “DSD”. Click OK when finished.
JRiver is now properly configured and will output DSD audio in raw bitstream to the OriGen.
3.4.5 JRiver Media Center DSD Playback – OS X
To properly configure JRiver to pass DSD audio to OriGen, follow the steps below. When the
playback goes from a PCM based file type such as MP3 or FLAC to DSD, there will be a slight
click at the beginning of the DSD song - this is normal.
1. Select Tools -> Options, and select the Audio configuration menu.
2. In the Audio Device drop-down box, make sure that SPDIF Interface [Core Audio] is
selected.
3. Click on “Device Settings…”, check the box for “Open device with exclusive access”.
Click OK when finished.
4. Below Settings, click on “Bitstreaming: None”, then click on “Custom…”
5. In the pop up window, check the box for “DSD”. Click OK when finished.
JRiver is now properly configured and will output DSD audio in raw bitstream to the OriGen.
Copyright © 2009-2015 Micca. All rights reserved.
Page | 11
4 Usage
Basic operation of the OriGen is simple, turn on the OriGen and adjust the volume knob to the
desired playback volume. This section describes the features of the OriGen in additional detail.
4.1 Volume Control
The volume knob on the Micca OriGen is also the power on/off switch. Always start each use
with the volume knob no higher than the 9 o’clock position. Adjust to the desired listening level.
If you switch output devices or headphones during use, remember to lower the volume to the 9
o’clock position first.
4.2 Gain Switch
The gain switch adjusts the output level of the OriGen as needed to properly drive the attached
device or headphones. The maximum output signal level corresponding to the gain switch
setting is as follows:
Setting
0dB
-10dB
Output Levels
5.6Vrms for all analog outputs
1.7Vrms for all analog outputs
The 0dB setting is suitable for driving amplifiers with low input sensitivity, or headphones with
low efficiency and/or high impedance. Always start with the gain switch in the -10dB setting and
the volume control at the 9 o’clock position. Switch to the 0dB position only if more volume is
desired.
4.3 Rear Analog Output
The 3.5mm rear output jack provides stereo line level audio output that can be used to drive a
downstream device such as an amplifier or powered speakers. The output signal level is
adjustable based on the volume control as well as the gain switch. Be sure to start with the gain
switch setting at the -10dB position and switch to 0dB only if additional output signal amplitude
is needed.
4.4 Rear Optical S/PDIF Output
Also built into to the 3.5mm rear output jack is also an optical output that accepts mini optical
jacks for connection to an outboard DAC. When used this way, the OriGen functions as a USBto-S/PDIF transport and does not perform any signal decoding or volume control function. This
is useful for providing high quality digital audio signal to an audio system that otherwise does not
have an USB interface of its own.
When the USB input is a PCM signal, the Optical S/PDIF outputs the same signal. When the
USB input is a DSD signal, the Optical S/PDIF output will be silent.
Copyright © 2009-2015 Micca. All rights reserved.
Page | 12
4.5 Headphone Outputs
The OriGen is equipped with two headphone jacks for connecting headphones with 3.5mm or
6.3mm (1/4”) headphone jacks. The headphone output signal level is adjustable based on the
volume control as well as the gain switch. Be sure to start with the gain switch setting at the 10dB position and switch to 0dB only if additional output volume is needed.
The two headphone output jacks are in parallel, so two pairs of headphones can be connected
in parallel. The minimum recommended impedance for headphones used with the OriGen is 16
Ω. If using two pairs of headphones in parallel, the minimum recommended impedance is 32 Ω
per headphone.
4.6 Signal Display Grid
To help indicate the current operating status, the OriGen has a grid of 10 display lights above
the volume control knob. The following describes the information conveyed by each status light.
Label
PCM
DSD
44.1 - 192
Description
The USB input signal type is PCM
The USB input signal type is DSD
These group of six lights indicate the sampling rate of
the current input audio signal, including 44.1kHz,
48kHz, 88.2kHz, 96kHz, 176.4kHz, and 192kHz.
Volume level indicator light. This light has a blue and a
red component, corresponding to the left and right
channels. When both channels have a signal, the light
will be purple. At relatively low playback volumes, the
light may not appear to turn on at all.
Power indicator.
4.7 DC Input Jack
The DC input jack accepts 5 volt DC power adapters for use when the OriGen is attached to a
compatible mobile device through an OTG USB Audio connection. Since support for OTG USB
Audio is not universal, this functionality is dependent on the specific mobile device and is
therefore provide only on an as-is basis.
4.8 Silicone Feet
The underside of the OriGen is equipped with four silicone pads for high quality support and
anti-skid protection. Look at them, aren’t they magical?
While looking at the silicone pads, notice the product label that contains helpful technical
support contact information. If you encounter issues using this product and don’t remember how
to contact us, simply refer to the contact information on the label. We would love to hear from
you. We are here to help!
Copyright © 2009-2015 Micca. All rights reserved.
Page | 13
5 Specification
5.1 General
PCM Formats: ································· PCM (44.1/48/88.2/96/176.4/192kHz, 16/24bit)
DSD Formats: ·································· DSD64 (2.8MHz), Native or DoP
USB Interface: ································· USB 2.0, Asynchronous Transfer Mode
Audio Controller: ······························ VIA VT1736
DAC IC: ·········································· Cirrus Logic CS4392
Output Op-amp: ······························· JRC NJM4556
Channel Imbalance: ·························· < 0.5dB
Optical S/PDIF Format: ······················ PCM Only (No signal when playing DSD)
Power Source: ································· 5V/500mA
Dimensions: ···································· 4.6 x 1.5 x 1.9 Inch (116mm x 38mm x 47mm)
Weight: ··········································· 6 Oz (170g)
5.2 Line Output
Frequency Response: ······················· 20Hz ~ 20kHz +/- 0.1dB
THD+N: ·········································· <0.003% (1kHz, A-wt.)
Signal to Noise Ratio: ························ >110dB (1kHz, A-wt.)
Crosstalk: ······································· >96dB (1kHz)
Output Voltage: ································ 5.6Vrms (Gain: 0dB); 1.7Vrms (Gain: -10dB)
5.3 Headphone Output
Frequency Response: ······················· 20Hz ~ 20kHz +/- 0.1dB
THD+N: ·········································· <0.003% (1kHz, A-wt.)
Signal to Noise Ratio: ························ >110dB (1kHz, A-wt.)
Crosstalk: ······································· >96dB (1kHz)
Output Voltage: ································ 5.6Vrms (Gain: 0dB); 1.7Vrms (Gain: -10dB)
Output Current: ································ 70mA (Nominal); 100mA (Max)
Output Impedance: ··························· 0.5 Ω
Load Impedance: ······························ 16 ~ 600 Ω
Copyright © 2009-2015 Micca. All rights reserved.
Page | 14
Copyright © 2009-2015 Micca. All rights reserved.
Page | 15
Information in this manual is believed to be accurate and reliable but Micca assumes no responsibility for its use nor for any
infringement of patents or other rights of third parties which may result from the use of this manual or the product. Micca
reserves the right to change product specifications at any time without notice.
Micca, OriGen, and the Micca logo are trademarks of Micca. Other trademarks referenced in this manual are the properties of
their respective owners.
© 2015 Micca All rights reserved.
Copyright © 2009-2015 Micca. All rights reserved.