1
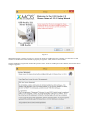
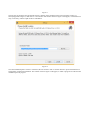
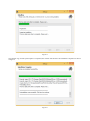
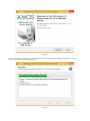
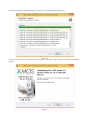
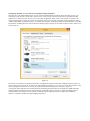
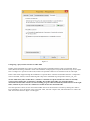
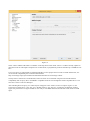
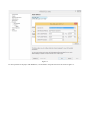
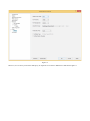
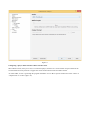
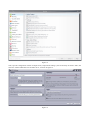
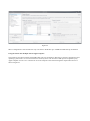
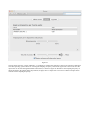
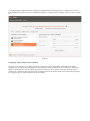
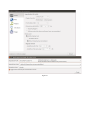
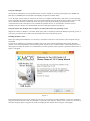
Using the USB input
The Triode 25 USB input uses a last generation D/A converter capable of converting PCM signals up to 384kHz and
DSD up to 5.6448MHz, that is all formats and sampling frequencies available today.
To use the input, the user needs to connect the Triode 25 to a computer with Windows, OSX (Mac) or Linux operating
system and follow the instructions below. Even some Android-based devices with certain players able to drive an USB
device without the need for an additional driver (user space mode) and some iPads provided with the Camera
Connection Kit can drive this input. In case of small size portable devices, we recommend to check the current
capability of their USB port, as it must fulfil the Triode 25 USB input requirement (300mA).
Using the Triode 25 USB input with a computer provided with a Microsoft operating system
Supported versions are Windows 7 and later. When using with a computer provided with Windows operating system, it
is necessary to install the driver that can be downloaded from www.unisonresearch.com
Installing Windows driver
Before proceeding with installation, it is necessary to switch the Triode 25 on and connect it to the computer using an
USB cable.
To start driver installation it is sufficient to double-click on the icon of the file downloaded from Unison Research
website. Once started, depending on the operating system version, the user could be asked to confirm the permission to
the program to modify the system. Give confirmation. Once this operation, when required, is performed, the window in
figure 1 will appear.
Figure 1
Follow the instructions shown in the window and click on “Next” button to launch installation. At first, the installation
program will check that the Triode 25 USB input is connected to the computer. Whenever the connection is not made or
when the computer doesn’t recognize the Triode 25 USB input, the window shown in Figure 2 will appear.
Figure 2
Should this happen, i twill be necessary to connect the Triode 25 USB input to the computer or to disconnect it and
reconnect it to allow the USB controller to properly recognize it. Then, click on “Next” button.
One the installation program has checked the presence of the Triode 25 USB input on the USB bus, the window shown
in figure 3 appears.
Figure 3
The use must accept the license agreement terms by clicking on the checkbox in the lower left of the window, as
already happened in figure 3, then click on “Next” button. The window shown in figure 4 will appear, in which the user
may, if necessary, indicate a path for driver installation.
Figure 4
Once the installation path is chosen or confirmed, the user needs to click on “Install” button to proceed with the driver
and ancillary components installation. The window shown in figure 5 will appear, in which a progress bar will show the
installation process progress.
Figure 5
Once the file copy and the system update is completed, the window will announce the installation completion as shown
in figure 6.
Figure 6
Click on “Next” to proceed. The window shown in figure 7 will appear. Click on “Finish” to terminate the installation
program.
Figure 7
Uninstalling the Windows driver
It may be necessary, for certain reasons, to uninstall the driver. The uninstall process can be started in two ways: by
opening the applications installation utility and selecting the driver for uninstall, or by accessing the driver folder and
starting the uninstall program. Either way, the window shown in figure 8 will appear.
Figure 8
Click on “Uninstall” to launch the drive uninstall process. The window shown in figure 9 will appear, in which a
progress bar will show the uninstall progress.
Figure 9
At uninstall completion, the window will be as in figure 10 to announce the uninstall success.
Figure 10
Click on “Next” to proceed. The window shown in figure 11 will appear. Click on “Finish” to terminate the uninstall
program.
Figure 11
Configuring Windows to use Triode 25 as predefined output peripheral
Some players, as Windows Media Player, use the system predefined audio peripheral. Some streaming services, too,
(which rely on the browser) do the same. In these cases, it is necessary to choose the Triode 25 as predefined audio
peripheral. To do that, the user needs to access the Audio configuration utility in the Control Panel. A window with
various tabs will appear (figure 12). Select the “Playback” tab to access the list of available output peripherals. Select
“XMOS USB Audio” as predefined device, as already done in figure. From that moment on all sounds made or handled
by Windows (including the ones from the browser and from players relying on the system to deliver audio) will be sent
to the Triode 25.
Figure 12
The system, in a similar way as happens with OSX, resamples the signals to make their sampling frequency same as a
certain value chosen by the used. To choose the output sampling frequency it is necessary to access the properties of the
selected peripheral (in this case, the Triode 25) and show the advanced properties, as shown in figure 13.
A drop-down menu will allow for choosing the desired sampling frequency between 44.1kHz and 192kHz (the latter
being the highest sampling frequency which Windows can handle). Please note that an ASIO-compatible player is
needed when the user wants to use the Triode 25 USB input with sampling frequencies higher than 192kHz, as
Windows is unable to handle such high sampling frequencies.
Figure 13
Configuring a player under Windows: FooBar 2000
FooBar (www.foobar2000.org) is able to operat with all modes compatible with the Triode 25 USB input: Direct
Sound, Kernel Streaming, WASAPI e ASIO. The installation of the program is beyond this manual scope: we’ll explain
how to configure it to operate in ASIO mode, which is the optimum solution to use with the Triode 25 USB input.
Foobar offers ASIO support through the installation of a specific DLL. It must be downloaded from the “Components”
section of FooBar, website, from the following link: http://www.foobar2000.org/components/view/foo_out_asio.
NOTE: unlike many other FooBar DLL’s, which are contained in a zip file and therefore must be manually
extracted and copied in the “Components” subfolder into FooBar main folder, the ASIO file which is
downloaded from FooBar website is an auto-installing program which automatically installs the DLL in the right
folder, without any user action. It is sufficient to double-click on the downloaded file.
Once this operation is done, the user can launch FooBar and access the Preferences window by clicking the CTRL+P
keys combination, or by the specific “File” menu item. Then, select the “output” item, which will show an “ASIO” subitem: the windows shown in figure 14 will appear.
Figure 14
Select “ASIO: XMOS USB ASIO 2.0 ST302D” in the drop-down menu called “Device”. FooBar is already capable of
using the Triode 25 USB input as output device in ASIO mode, to playback bit-perfect PCM audio up to 384kHz and 32
bits.
It’s now necessary to setup FooBar to playback DSD files. To this purpose the user needs to install another DLL, the
one for SACD compatibility, that can be downloaded from
http://sourceforge.net/projects/sacddecoder/files/latest/download on Sourceforge website.
The zip archive contains two executable files, both to be used: one to install the component for SACD ISO files
compatibility and one proxy file to send DSD to compatible audio devices through their ASIO compatible driver. One
such device is the Triode 25 USB input.
After installing DLL and proxy, two ASIO objects will appear in the “ASIO” section of “Output” (figure 15): the
Unison driver and the proxy (“foo_dsd_asio”). Double-click on “foo_dsd_asio” to make the configuration window
appear. Set parameters as in figure: FooBar is now ready to send DSD streams from DSD files to the Triode 25 USB
input.
Figure 15
For best operation of the player with DSD files, it is advisable to setup the SACD tool as shown in figure 16.
Figure 16
Moreover, it is necessary to select the DSD proxy as output device to listen to DSD files as indicated in figure 17.
Figure 17
Configuring a player under Windows: JRiver Media Center
JRiver Media Center (www.jriver.com) is a commercial player, therefore is a closed solution and provided from the
scratch with all necessary features to support the various audio transfer modes and audio formats.
As with FooBar, we won’t go through the program installation. Access JRiver options window and select “ASIO” as
“Output mode” in “Audio” (figure 18).
Figure 18
Then, open the configuration window of output mode (“Output mode settings”), that is obviously devoted to ASIO, and
select the “XMOS USB ASIO 2.0 ST302D” driver, as shown in figure 19.
Figure 19
JRiver is now able to handle DSD by the DoP (DSD over PCM) format. From the drop-down menu that shows up
clicking on “Bitstreaming” item, select the “Custom…” value, as shown in figure 20.
Figure 20
A window will automatically appear in which the user can manually set the bitstream configuration parameters (figure
21). Set parameters as shown in figure.
Figure 21
The configuration procedure is almost done: it’s still necessary to tell JRiver not to downsample data stream with
sampling frequency more than 192kHz, feature that’s usually enabled to correctly drive all DAC’s the can handle no
more than 192kHz, still the majority on the market. Of course this would impede the correct DSD128 decoding, as this
is same as a 352.8kHz PCM stream. Access the “DSP and output” menu item and set the parameter about handling of
files with sampling frequency more than 192kHz as in figure 22.
Figure 22
JRiver configuration is done and the user may now listen to PCM files up to 384kHz and DSD files up to DSD128.
Using the Triode 25 USB input with an Apple computer
The Triode 25 UPS input complies with USB Audio Class 2.0 specification, therefore it’s natively supported by OSX
operating system since 10.6.8 version and doesn’t need any driver. The Triode 25 USB input is recognized by any
Apple computer as soon as it’s connected to one of its USB ports and is listed amongst the output audio devices as
shown in figure 23.
Figure 23
The user must select the “Unison USB DAC 1” peripheral to send her/his computer’s audio to the Triode 25 USB input.
The OSX operating system allows for choosing the sampling frequency of the audio signal sent to the Triode 25 USB
input. This can be done through the MIDI Control Panel, as shown in figure 24. Whichever the sampling frequency of
the tracks listed in the playlist being played back, the player does a sample rate conversion to obtain an output stream
with the chosen sampling frequency.
Figure 24
This may not be desirable with the user wants to listen to the a playlist made of different sampling frequencies files and
doesn’t want the system to perform a real-time sampling rate conversion. In this case, a player capable of disabling this
system feature must be used. Many such players are available, both free and commercial.
Configuring a player under Apple OSX: Audirvana
Audirvana is a last generation player which allows for listening to DSD files with DSD-compatible devices, such as the
Triode 25 USB input. To use Audirvana at best it’s sufficient to set the various options as shown in figure 25.
Figure 25.
Connecting to a Linux computer
No driver is needed with a computer provided with Linux operating system and ALSA module, as ALSA natively
supports USB Audio Class 2.0.
To use the Triode 25 USB input with a computer provided with Linux operating system, it is sufficient to access the
audio configuration panel and select the “UNISON USB DAC 1” peripheral in the “Output” section, as shown in figure
26.
Figure 26
Configuring a player under Linux: Audacious
Of course, even with Linux, it could be necessary to select the Triode 25 USB input as predefined audio output
peripheral. As an example, the configuration for the Audacious, widely used under Linux, is shown. As displayed in
figure 27, the user needs to access Audacious preferences and select “ALSA output”. Then, the user must click on
“Preferences”, right below the drop-down menu for output selection: the window shown in the lower portion of figure
27 will appear. Set its various parameters as shown in figure.
Figure 27