1
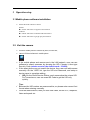
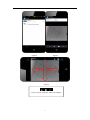
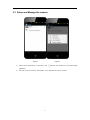
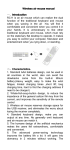
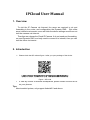
IPCloud User Manual 1. Overview To visit the IP Camera via Internet, the users are required to do port forwarding in the router, and configuration the Dynamic DNS. But under some internet environment, even we finish the above settings we still can not visit the cameras via Internet. Therefore we release the Cloud IP Camera. It do not need port forwarding, no need Dynamic DNS, and only need to connect it to internet, then you can visit the video via internet . 2. Introduction Please check the QR code as figure 1 after you open package of the device. Figure 1 QR code If view by iPhone or Android Smartphone, please install IPCloud APPS on your phones. Tips: About android system, only support Android2.2 and above. 3 Operation step 3.1 Mobile phone software installation Obtain IPCloud software as below iPhone: Search “IPCloud” in App Store and install it. Android: Obtain “IPCloud” in attached CD and install it Search “IPCloud” in google play and install it. 3.2 Visit the camera Connect mobile phone to internet by WIFI, 3G and 4G; Launch IPCloud software in mobile phone If the mobile phone and camera are in the LAN network, user can use software to search cameras, by showing the UID. Choose it, then type Security Code (admin account, the default code: 123456); If the smart phone can not search the device, then user can add camera manually. On the "ADD" list, type the UID and Password, and setup a device name to complete adding. UID:On the Cloud Service Sticker, each camera has the unique UID. For convenience, user can scan QR Code to get the UID very quickly. Tips: Because the UID number are case sensitive, so please enter correct font format when entering manually. Click the added device, then you can view video, control PTZ, snapshot, listen and speak etc. 2 Figure 2 Figure 3 Figure 4 Preview picture, Snapshot, Mute/Listen/Speak 3 3.3 Setup and Manage the camera Figure 5 Figure 6 Select device and hold on 3 seconds or click parametes. The user can set reconnect, edit camera, view snapshot and remove camera. 4 button near the device to set and manage 3.3.1 Edit Camera Enter“Edit camera”to perform two operation as below: 1. Device Setting 2. Advance Setting Figure 7 Enter “Advanced Setting” 1. Can modify the camera’s password 2. Can adjust common video parameters: Video quality, video flip, video mirror, Environment mode (50Hz/60Hz) 3. WiFi setting (please use in LAN) Click “Manage Wi-Fi networks” to enter searched wireless list, and then you can select usable wireless network. Figure 8 5