1
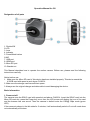
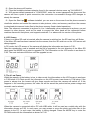
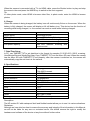
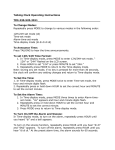
Operation Manual for f32
Designation of all parts
1. Shutter/OK
2.LCD
3. Lens
4. Indicator
5. Power/Mode button
6.MIC
7. USB port
8. HDMI port
9. Micro SD port
10. Bracket nut
This Manual describes how to operate the motion camera. Before use, please read the following
instructions carefully:
Notice before use:
1. Make sure the Micro SD card of this device has been installed properly. This device needs the
4-32GB card with speed at and above CLASS 4.
2. Make sure the storage card has sufficient space.
3. Always use the original charger and data cable to avoid damaging the device.
Basic Information
1. Power-on/off:
The camera uses the SDHC card with speed at and above CLASS 4. Insert the SDHC card into the
Micro SD card slot, press the Power key once, then the LCD screen will display the icon of the card
and the buzzers has one sound. Then the camera in default enter the 1080@ 30fps mode (green
LED).
If the camera is always in the idle state for 3 minutes, it will automatically switch off. But wifi mode does
not automatically shut down.
2. Mode Setup
Wireless wifi signal icon
Battery
Display the power capacity.
In photo mode.
Photo Mode
SD card
720 mode
1080 mode
The icon will flicker continuously when the SD card is
unidentifiable.
In 720p@60 frame/s video mode
In 1080p@30 frame/s video mode
3. Mode Switching
When the camera is switched on, the default mode is 1,080@30 frames/s and the LED indicator is in
green. To switch modes, press the Mode key once. Press the Power/Mode key to circulate modes in
the following order: 720P60, Photo, Back and 1080P30.
1080p@30fps Mode-Green LED
When the camera is switched on, the default mode is 1080@30 fames/s. In the preview mode, press
the Shutter button once again, the camera will start to take videos. In the process of videoing, the
green LED indicator will flicker; press the Shutter button again to stop, then the green LED indicator
will keep in solid green.
720P@60fps Mode-Blue LED
Press the Shutter button once. In the preview mode, the camera will start to take videos. In the
process of videoing, the blue LED indicator will flicker; press the Shutter button again to stop, then the
blue LED indicator will keep in solid green.
Photo Mode-Red LED
In 1080P30 mode, press the MODE key to switch to Photo mode; press the Shutter button to take
photos with the red LED in solid green. When the camera is in the standby mode, to take single photo,
press the Shutter button, then you will hear the sound from the buzzer and see the red LED indicator
flickers once, and thus one photo has been taken.
Wifi mode - Orange LED
WIFI function is turned off by default, to start the WIFI function, simply press the shutter button for 5
seconds, you will hear a beep, LCD display will show a fixed WIFI symbol, orange LED flashes. At this
point has entered the wifi mode. WIFI is activated, press and hold the record button for 5 seconds to
turn it off.
When you activate the camera after the wifi mode, follow the steps below to connect your phone to the
camera:
(1) AP software installed on the phone, ispo.APK for android mobile phones, ispo.APP for the
iphone mobile phones,
(2)Open the phone wifi function,
(3)From the available wireless networks found in the camera's device name: eg "A9-A000001"
(4)Wifi camera default password is "1234567890", enter the correct password the phone and the
camera will form a point to point connection, the connection is successful Orange LED changes to
steady the camera.
(5)Open the Start ispo
software installed, you can see on the screen from the phone camera's
viewfinder window and control the camera to take pictures, video, and memory card from the camera
to download pictures and video files to the phone memory finest related operations.
Note: The camera is connected to a phone is 1-to-1 relationship, when connected to a phone, can not
connect to other phones, such as the need to connect the other hand will be connected before
machine disconnect that phone, and supports android2. 3 or above with ios version of the phone.
4. LCD Screen
If there is no Micro SD card is inserted; after the camera is switched on, the SD card icon will flicker.
If the Micro SD card has been inserted into the camera, then the SD card icon on the LCD screen will
always appear.
In DV mode, the LCD screen of the camera will display the information as shown in P-01.
After the reproduction card is inserted and the file is upgraded to the root directory of the Micro SD
card; press the MODE key to start to upgrade FW. The information on the LCD screen is as shown in
P-02. The work indicator will flicker until the upgrade is over.
5. Tip of Low Power
When the capacity of the battery is low, in video mode, the information on the LCD screen is as shown
in P-03 below. If in Photo mode, the information on the LCD screen is as shown in P-04 below. If the
power is always low, the buzzer will give three sounds and then the camera will switch off. If this
happens in the recording process, the video file will be saved the portion before power outage and
generally can be played.
When the camera is connected with a PC with USB cable, it will be used as a mobile disc with the
information shown as P-05. In such case, you may access or move the photo and video files in the
camera to the PC. In such case, the battery is being charged. Press the MODE key to enter the
PCCAM mode with the information as shown in P-06.
When the camera is connected with a TV via HDMI cable, press the Shutter button to play and stop
the current video and press the MODE key to switch to the next segment.
Tip:
In video photo mode, enter HDMI to browse video files; in photo mode, enter the HDMI to browse
photos.
6. Charge
When the camera is being charged, the battery icon will continuously flicker on the screen. When the
battery is fully charged, the screen will display a full still battery icon. This device has the function of
recording while being charged, i.e. the camera can work as usual while is being charged.
Switch on
Button action
1080p 30 video mode
720p 60 video mode
Photo mode
Low power capacity
One buzzer sound
One buzzer sound
Green LED indicator flickering
Blue LED indicator flickering
Red LED indicator flickering
Red LED indicator flickering with
buzzer sound
7. Date/Time Setup
In PC, use TIMESET.TXT to set date/time in the format for example 01 00 00 06 01 2012, meaning,
Hour/Minute/Second/ Month/Day/Year. Copy TIMESET.TXT into the Micro SD card. When the camera
has the Micro SD with TIMESET.TXT set properly; after the camera is switched on, the camera will
automatically copy the set time into the camera.
8. Specifications
Items
Video resolution
Video format
Sound
Photo resolution
Photo format
Internal memory
Sensor
Lens
Angle of view
Focus
HDMI
Battery power
Specs
1080p @30 frames/s
720p @30 frames/s
H.264 MOV
Yes, one-channel
5.0 Megapixels
JPEG
Micro SDHC Class4+ up to32GB
2 Megapixels sensor
F/2.8
120°
0.4m-infinite
Mini Type D HDMI
3.7V lithium battery
Description:
The HD motion DV with waterproof shell and flexible bracket allows you to use it in various situations.
Disclaimer:
Although we have tried our best to ensure the accuracy and integrity of the information in this Manual,
we will not be liable for any error or omission herein. We should reserve the right to modify the
hardware and software of the device at any time without further notice.


![[VC120-2] [MENARDS] User Guide [FINAL] 20100618](http://vs1.manualzilla.com/store/data/005701495_1-e41e7e0d778d2f045f29de9890ac0ae7-150x150.png)