1
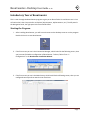
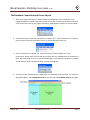
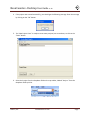
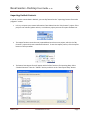
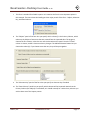
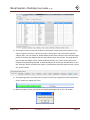
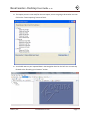
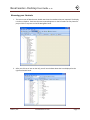
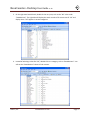
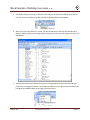
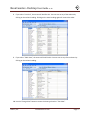
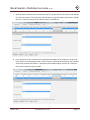
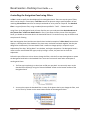
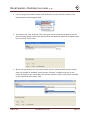
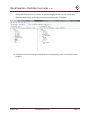
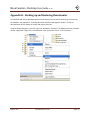
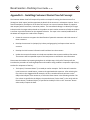
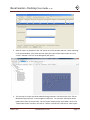
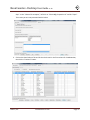
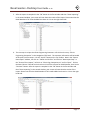
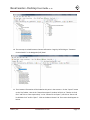
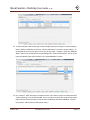
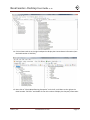
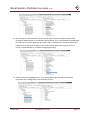
BeanCounter Desktop User Guide v1.10 TM BeanCounter Desktop TM User Guide Version 1.10 Copyright 2009‐2010 by Datura, LLC Datura, LLC www.datura‐llc.com Page 1 BeanCounter Desktop User Guide v1.10 TM Program Overview What Is BeanCounter and Legume? BeanCounter is a general purpose data entry, viewing, and organizing program, using the Legume database design. Legume can be built on most SQL‐based relational database systems to hold labels, text, pictures, numbers, and other data and relate them to each other in a flexible, pre‐designed database organization. You can import data from many different programs, files, or databases and store it in one place. System Requirements. BeanCounter is a Microsoft .Net 2.0 Framework program that runs on Microsoft Windows‐based systems. Additionally, it also uses a SQL‐based relational database system to hold the data. Though BeanCounter can support other databases, this version stores its data in the Microsoft SQL Server 2005 database server family, which includes a free version, called SQL Server Express. Consult the BeanCounter Installation Manual for details. Datura, LLC www.datura‐llc.com Page 2 BeanCounter Desktop User Guide v1.10 TM Introductory Tour of BeanCounter This is a tour through the BeanCounter program to give you an idea of what it is and how to use it. You will notice that it has a layout similar to Explorer (My Computer, My Documents, etc.). The left panel is the Navigation Panel; the right panel is the Item Details Panel. Starting the Program 1. After installing BeanCounter, you will have a shortcut on the desktop to use to run the program. Double‐click on it to start BeanCounter. 2. If the first screen you see is the Connection Manager, which looks like the following screen, then you have not finished the configuration of BeanCounter. To do so, follow “Part 2 – Configuration” in the BeanCounter Installation Manual. 3. If the first screen you see is the Main Screen, which looks like the following screen, then you are configured correctly and can start the tour from here. Datura, LLC www.datura‐llc.com Page 3 BeanCounter Desktop User Guide v1.10 TM The Database Connection and Screen Layout 1. When the program first opens, it should already be configured, but the connection to the Legume database is “Closed”, and most controls are inactive. To open the database connection and view the data, click on the “Open Connections” folder button as shown on the top toolbar. 2. An alternative way to open the connection is to choose “File”, “Open Connections” as shown in the top menu. The menu shows that “Ctrl+O” on the keyboard will work, too. 3. Once the connection is opened, the “Open Connections” folder changes to a “Close Connections” button. Most controls and menu choices are only enabled when the connection is open, but some things, such as the Connection Manager, can only be accessed when it is closed. The connection closes automatically when you exit the program. 4. The main window of BeanCounter is organized in the following, familiar manner. It is similar to Microsoft Explorer, with a Navigation Panel on the left, and an Item Details Panel on the right. Datura, LLC www.datura‐llc.com Page 4 BeanCounter Desktop User Guide v1.10 TM 5. Besides a button to open the connection, the Main Toolbar has quick access to a number of other functions, such as creating or open projects, importing data, and organizing it in groups. 6. The left Navigation Panel is managed by a pair of toolbars at the top of the panel. These can be divided into the following sections. 7. The right Item Details Panel is managed by a pair of toolbars at the top of the panel. These can be divided into the following sections. Datura, LLC www.datura‐llc.com Page 5 BeanCounter Desktop User Guide v1.10 TM Creating a Project 1. In normal mode, you must have a Project to put data into. To create a Project, choose “New”, “Project” from the middle of the top toolbar. 2. The “New Project Form” will appear, requesting a project name to create. 3. In the “Project Name” field, enter your new name, in this example, “My Contacts”. After entering the new name, click on the “Create Project” button. Datura, LLC www.datura‐llc.com Page 6 BeanCounter Desktop User Guide v1.10 TM 4. If the project was created successfully, you should get the following message. Clear the message by clicking on the “OK” button. 5. The “New Project Form” is ready to create more projects, but we are done, so click on the “Done” button. 6. Select the Project from the dropdown field on the top toolbar, labeled “Project:” from the dropdown field’s pick list. Datura, LLC www.datura‐llc.com Page 7 BeanCounter Desktop User Guide v1.10 TM Projects and Project List 1. After creating and selecting a new project, your screen should look like the following. 2. If you examine the left Navigation Panel, it displays the contents of a project, which is empty. 3. All projects are derived from the master project, “Project”. Any data that is in the Master Project should be included in any derived projects. Datura, LLC www.datura‐llc.com Page 8 BeanCounter Desktop User Guide v1.10 TM Importing Outlook Contacts If you do not have contact data in Outlook, you can skip forward to the “Importing Contacts from other programs” section. 1. Let’s try to import your contact information from Outlook into the “My Contacts” project. If the project is not selected, please select it, or whichever project you want to import the data into. 2. The Import function stores the new, imported data into the current project, which is the “My Contacts” project which was created and selected. To start the Import process, click the Import button on the top toolbar. 3. The Datura Data Import form will appear with all of the functions for importing data. Select “Outlook Contacts” from the “Tabular” choices, and click on the “Next Import Step” button. Datura, LLC www.datura‐llc.com Page 9 BeanCounter Desktop User Guide v1.10 TM 4. BeanCounter now tries to access your Outlook Contacts. Outlook may stop the process to display the following dialog window, to get permission. Click on the check box to “Allow access for “ and choose 10 minutes. Click on the “Allow” button. 5. BeanCounter will now scan through the Outlook data. You can see the progress bar along the bottom of the Datura Data Import form. 6. After the scanning is done, you should see the following “Import One Tabular File” form, which was created from the table information that was scanned. Datura, LLC www.datura‐llc.com Page 10 BeanCounter Desktop User Guide v1.10 TM 7. This form is standard for all table imports. Let’s examine the form’s most important points in this example. There are three tabs leading to three major panels of the form – Subject, Alternate Key, and Data Columns. 8. The “Subject” panel of the form lets you specify which column(s) is the Primary Column, which makes up the Subject of sentences that are created from the imported data. The program chooses the first column, unless the user tells it otherwise on this panel. Since the “FileAs” column is chosen, we don’t have to make any changes. The Add and Remove Button lets you choose the column(s). If you choose more than one, they will be put together. 9. The “Alternate Key” panel of the form lets you specify an alternate key if needed. 10. The “Data Columns” panel lets you specify which columns will be imported. Notice that the Primary Column (the Subject) is unchecked, as it should normally be. Uncheck any columns you wish to leave out of the import process. Datura, LLC www.datura‐llc.com Page 11 BeanCounter Desktop User Guide v1.10 TM 11. The last part of the form we wish to discuss is the bottom, which shows several options. If you choose “Import to a Group”, it will let you enter a Group name, and put all of the imported subjects into it. You can choose to “Reuse Subject Phrase if text matches” which tells the import process to combine any Subjects with the same value into the same phrase. The same option is given for the non‐Subject column values (Predicate Phrases). The “View” button lets you see samples of the data being imported. It should already be set correctly for Outlook data, so click the “Continue” button to perform the Import. If you decide to avoid the import process, click on the “Cancel” button. 12. The Importing process may take several minutes. You will see a progress bar across the bottom of the “Import One Tabular File” form. 13. When the Import is done, you will see the following message. Click on the “OK” button. Datura, LLC www.datura‐llc.com Page 12 BeanCounter Desktop User Guide v1.10 TM 14. The Import process is now ready for the next import, we are not going to do another one now. Click on the “Done Importing” button to finish. 15. You should now see your imported data in the Navigation Panel on the left. You can now skip forward to the “Browsing your Contacts” section. Datura, LLC www.datura‐llc.com Page 13 BeanCounter Desktop User Guide v1.10 TM Browsing your Contacts 1. The main screen of BeanCounter should now show the new data that was imported. The display is similar to Explorer. Each item that was imported appears on the left under the “My Contacts” project. Click on any item on the left Navigation Panel. 2. After you click on an item on the left, you will see the data about that item displayed on the right Item Details Panel. Datura, LLC www.datura‐llc.com Page 14 BeanCounter Desktop User Guide v1.10 TM 3. On the right Item Details Panel, double‐click on any item, such as the “NY” value under “StateBusiness”. The right side will display the search results of all occurrences of “NY” and display them. “NY” appears in several categories. 4. Instead of selecting a value like “NY”, double‐click on a category, such as “StateBusiness”. You will see the “StateBusiness” values of each contact. Datura, LLC www.datura‐llc.com Page 15 BeanCounter Desktop User Guide v1.10 TM 5. The display of data on the right is fine, but if you want to see the data sorted by state, you can click the “Reverse” button on the left side of the right Item Details Panel toolbar. 6. When you click on the “Reverse” button, you will see the data on the right Item Details Panel reverse its display order, now sorting and grouping by state. This does not change data, only the data display. 7. Another way to display the data on the right is by changing the View type. Both left and right panels have a Change View button. The Change View button on the right panel is located on the left side of the middle toolbar of the right Item Details Panel. Datura, LLC www.datura‐llc.com Page 16 BeanCounter Desktop User Guide v1.10 TM 8. If you select “List View”, the screen will look like this. You can sort on any of the columns by clicking on the column heading. Clicking on the same heading again will reverse the order. 9. If you select “Table View”, the screen will look like this. You can sort on any of the columns by clicking on the column heading. 10. Use the “Change View” button to return the view type back to “Tree View”. Datura, LLC www.datura‐llc.com Page 17 BeanCounter Desktop User Guide v1.10 TM Importing the Periodic Table from Microsoft Excel (CSV text file) A common way to transfer data between programs or databases is in a table, using a spreadsheet or CSV file (comma‐separated value text file). Both file types, and many others, can be imported into a spreadsheet program (such as Microsoft Excel) and then manipulated to prepare it for importing into BeanCounter. If you have any graphics or other non‐textual information, you should export it directly to a spreadsheet and keep it there, to import from, instead of the CSV file (the instructions are only slightly different). Use the following instructions or guidelines to import your data from a CSV text file: 1. Export the data from your other program. Most programs have an Export function, sometimes in the File menu. Choose CSV (comma‐separated values) text files as the export file type. If you do not have that choice, see if you can get it into a spreadsheet program. From there, you can save it as a CSV file. 2. Our example shows importing data from a spreadsheet that holds the chemical elements of the periodic table. The requirements for preparing the spreadsheet in a form that makes it acceptable to import are: a. Beware of commas in your data, since commas are used to separate the columns of each row. If you have a comma in your data, that data item should be enclosed in “quotation marks”. If you have difficulties, you may have to save it as an Excel spreadsheet and import that. a. The first non‐empty row must contain the Column Heading for each column you are planning to import from. There should only be one row of headings and it must be on the first row. b. The second row should start the first row of data. c. Decide which primary column holds the unique identifier for each row. Move this column to the first column. This isn’t totally necessary, but it is simpler if you do, because the settings will anticipate that. d. You can leave empty values in any cells but the primary column. Datura, LLC www.datura‐llc.com Page 18 BeanCounter Desktop User Guide v1.10 TM 2. Create a new project if you want to keep it separate from your other data. We will call it “Periodic Table”. If you want to put it into an existing project, select that project. 3. Open your project, in this case, “Periodic Table”, as shown in the previous Imports. Datura, LLC www.datura‐llc.com Page 19 BeanCounter Desktop User Guide v1.10 TM 4. Click on the Import button to start the Import process. Choose” Tabular via Excel Files” and click on the “Next Import Step” button. 5. Select the Tabular CSV file to import. For our example, choose “Periodic Table of Elements.csv” and click on the “Open” button. 6. After opening and analyzing the file, you will see the Import Form, as described previously when importing contacts. The same rules apply. The first column is the unique name for each row, and Datura, LLC www.datura‐llc.com Page 20 BeanCounter Desktop User Guide v1.10 TM you want each column, so you are done. Click on the “Continue” button when ready to import the data. 7. After the Import is done and you return to the main Import screen, you should click on the “Done Importing” button. Datura, LLC www.datura‐llc.com Page 21 BeanCounter Desktop User Guide v1.10 TM 8. You should now have the periodic table of the elements to see and browse. Select an element on the left, such as “aluminum”. You will see the details on the right. 9. Scroll down the Item Details Panel until you see the “Period” phrase. Double‐click on the phrase to make it the Selected Item for the Item Details Panel. Datura, LLC www.datura‐llc.com Page 22 BeanCounter Desktop User Guide v1.10 TM 10. Try using the “Reverse” button, on the bottom toolbar of the Item Details Panel, to get a list of periods and the elements in each one. Datura, LLC www.datura‐llc.com Page 23 BeanCounter Desktop User Guide v1.10 TM Importing sentences from a spreadsheet (Macbeth) Information can be imported into BeanCounter as sentences instead of tables. To import information in the style of sentences, from a spreadsheet, use the following method to prepare it for importing into BeanCounter. Our example shows importing data from a Microsoft Excel spreadsheet that holds sentences describing the play, “The Tragedy of Macbeth”, from The Complete Works of William Shakespeare. 1. The information is prepared as a set of sentences, one per row. Each row contains a Subject‐ Verb‐Object triplet, one per column. You can build more complex sentences, but this example keeps it simple by limiting it to triplets. 2. The sentence‐style spreadsheet should be prepared in a form that makes it acceptable to import. These are the requirements: a. The first non‐empty row must contain the Column Heading for each column you are planning to import from. b. The second row should start the first row of data. c. Three columns are specified for the phrase triplets of Subject‐Verb‐Object. The rest of the columns are used for specifying modifiers of the triplets. The modifiers come in pairs of columns – the first column specifies the column to modify (as the column letter code A, B, C, …) and the second column holds the phrase. Datura, LLC www.datura‐llc.com Page 24 BeanCounter Desktop User Guide v1.10 TM 3. Create and select your project, in this case, “Macbeth”, according to the method outlined above in the section entitled “Creating a Project”. 4. Click on the Import button to start the Import process. 5. Choose” Sentences via Excel Files” and click on the “Next Import Step” button. 6. Select your Microsoft Excel file to import. In our example, we choose “MacBeth details.xls” and click on the “Open” button. Datura, LLC www.datura‐llc.com Page 25 BeanCounter Desktop User Guide v1.10 TM 7. After the Import function opens and analyzes the file, you will see a list of columns, with options to set for each column. The same rules outlined above in previous imports are the same, except there isn’t a Primary Column of the Table. Sentences are different. 8. In our example, the first 3 columns are the Subject‐Verb‐Object of the sentences, so check the boxes shown in the following window. The first column is specified as the Subject, the second as Active Verb, and the third column is specified as the Predicate Object. Click on the “Continue” button when ready to import the data. Datura, LLC www.datura‐llc.com Page 26 BeanCounter Desktop User Guide v1.10 TM 9. While the import is in progress you will see a progress bar across the bottom of the window. 10. After the import is done, you should see a message like the following. Click on the “OK” button to clear the message. 11. After the Import is done and you return to the main Import screen, you should click on the “Done Importing” button. Datura, LLC www.datura‐llc.com Page 27 BeanCounter Desktop User Guide v1.10 TM 12. You should now see the imported data. This is also a good chance to learn to change the Navigation Panel’s Filter. Datura, LLC www.datura‐llc.com Page 28 BeanCounter Desktop User Guide v1.10 TM Controlling the Navigation Panel using Filters A Filter is used to specify the data displayed in the Navigation Panel. There are several types of filters, which can be chosen in several ways. Text filters search the phrases using a specified pattern of text matching. Phrase filters search for an exact phrase based on its key value or unique ID. The Standard Filter is a type of phrase filter, using a standard phrase specified in “Tools” – “Master Data IDs”. Using Filters in the Navigation Panel will seem familiar once you understand that the Selected Item is the “phrase filter” of the Item Details Panel. In fact, if you select the filter phrase of the Navigation Panel, you should see the same data in the Item Details Panel. This can be an easy way to discover and test phrases for filtering. Both the Navigation Panel and the Item Details Panel are both examples of a Filter Panel, because their display is a filtered view of the database. They have many similarities and work together, but they are designed to act differently. The Item Details Panel is meant to change quickly in response to your exploration of the data, “drilling down” into the data, and report composition. The Navigation Panel is meant to offer more flexible filter types, and, by locking in a filter, the panel acts as a base for exploration. Follow this part of the tour to learn how to change the filter, with the first step showing how to restore the Navigation Panel back to the Standard Filter. Later tour sections will teach other techniques of working with Filters. 1. The first step in exploring is to learn how to find your way back. You can easily return to the Standard Filter display by using the “Restore Standard” button on the bottom toolbar of the Navigation Panel. 2. You can also restore the Standard Filter in many of the places that let you change the filter, such as the “Filter By” button on the same bottom toolbar of the Navigation Panel. Datura, LLC www.datura‐llc.com Page 29 BeanCounter Desktop User Guide v1.10 TM 3. Let’s try using a Phrase Filter. Choose “Filter By Phrase” from the “Filter By” button on the bottom toolbar of the Navigation Filter. 4. This launches the “Filter By Phrase” form, letting you choose the phrase you want to use. The phrase already showing is the phrase specified as the Standard Filter phrase in the “Master Data IDs” area of the “Tools” menu. 5. We can use any phrase that is in the data, but the one you choose provides structure to your work. Our example of “Macbeth” uses the phrase “Contains” to organize the play, its acts, scenes, characters, props, and sounds. Let’s find the “Contains” phrase in the pick list provided for the “Choose Phrase to Select” field. Datura, LLC www.datura‐llc.com Page 30 BeanCounter Desktop User Guide v1.10 TM 6. If the phrase we were looking for was already on the screen, we could more easily convert it to the new phrase filter using the right‐click context menu shown later in the tour. After you find the phrase and select it, click on the “Choose” button to complete the process. 7. A new Navigation Panel based on the chosen filter now appears, with an empty Item Details Panel. This choice of phrase filter provides one useful organizing platform for exploring the play. 8. Click on one of the characters in Act 1, Scene 1, such as “First Witch”, and you will see the information about that character in the Item Details Panel. Datura, LLC www.datura‐llc.com Page 31 BeanCounter Desktop User Guide v1.10 TM 9. In the Item Details Panel, we see that the “First Witch is Leads by Hecate”. This sentence form is automatically generated by the Item Details Panel when it reverses the original sentence, which was “Hecate Leads First Witch”. This language is fine for daily usage, but for reporting, you may adjust a phrase’s wording in syntactical context, but not during this tour. 10. If you double‐click on “Hecate” to find out more about this character, “Hecate” becomes the new selected item for the Item Details Panel. This action is called “drill down” because you are drilling down into your data. You can drill down as much as you want, but you are distancing yourself from your original study of the “First Witch”. Let’s try an alternative mode to keep you connected to the “First Witch”. 11. Right‐click on the “First Witch” and choose “Explore” from the context menu that appears. The “Explore” command selects the chosen phrase as the new Navigation Filter. 12. By choosing “First Witch” as the new Filter, you can explore the character more thoroughly, making sure you cover all of the characteristics that you might miss if you only use drill down. Datura, LLC www.datura‐llc.com Page 32 BeanCounter Desktop User Guide v1.10 TM Notice that when you click on “Hecate” on the left Navigation Panel, you can answer your questions about Hecate on the right, and continue exploring the “First Witch”. 13. Complete the tour by restoring the Standard Filter. Keep exploring, there is much more to the program. Datura, LLC www.datura‐llc.com Page 33 BeanCounter Desktop User Guide v1.10 TM Appendix A – Creating a Primary Column When importing tabular data, you need to have a column which will be your primary column, which acts as a name for the row. It should be totally unique, or it may be confusing. If you don’t have a column that is convenient, but could create one from information in the other columns, try the technique that follows, using a spreadsheet like Microsoft Excel. Please note that BeanCounter can do this for you for tabular imports. Specify "Select if Sentence Subject comes from a prefix you enter" on the Subject tab when importing a Tabular File. Our example is a contact list which does not have the kind of “FileAs” column which you will find in Outlook. This column is handy especially when you have a Company Name but no personal name, or vice versa. Outlook uses the personal name first, and loads the company if there is no personal name. To build your own, 1. Insert an empty column in the first (A) column position 2. Label the column heading with “FileAs” 3. In the cell under the “FileAs” heading (cell A2), copy the following formula, and modify it to fit your columns locations and meaning: =IF(ISBLANK(E2),G2,CONCATENATE(E2," ",C2," ",D2)) a. E2 is the column that holds the Last Name b. G2 is the column that holds the Company Name c. C2 is the column that holds the First Name d. D2 is the column that holds the Middle Name e. The formula logic is to test if the Last Name is blank and store the Company Name if it is blank (true) or store a concatenation of Last Name, First Name, and Middle Name if the Last Name is not blank (False). 4. If the pattern works, copy it down the rest of the column Datura, LLC www.datura‐llc.com Page 34 BeanCounter Desktop User Guide v1.10 TM 5. The next task is to replace the formulas in the first column with the values that are the result of the formula a. click on the top of column A so that the whole column is selected b. copy this column to the clipboard using the Ctrl‐C key or Copy command c. use the “Paste Value” command to paste the values back to the same column 6. After the column is generated, check to make sure you don’t have any empty values in the primary column. a. If you have any blanks, adjust your formula, or b. type in a value, if there aren’t too many 7. After you are done, save the CSV file Datura, LLC www.datura‐llc.com Page 35 BeanCounter Desktop User Guide v1.10 TM Appendix B – Backing up and Restoring BeanCounter The Microsoft SQL Server 2005 Management Studio Express has the tools for backing up and restoring the database. See Appendix C, “Installing Microsoft SQL Server Management Studio”. Consult its documentation for the details on backup and restore functions. Using the Object Navigator on the left, open the “Databases” selection. The database that was created is named “Legume2G”. Right click on the database name, and choose “Tasks” to find “Backup…”. Datura, LLC www.datura‐llc.com Page 36 BeanCounter Desktop User Guide v1.10 TM Appendix C Using Microsoft SQL Server Management Studio If you are only using BeanCounter for demonstration purposes and it works well, then there is no reason to install this program. But if you plan on doing backups of your data, are troubleshooting your database connection, or other administrative access to your database, we highly recommend that you install Microsoft SQL Server 2005 Management Studio Express. See “Installing SQL Server Management Studio”, in the BeanCounter Installation Manual, for instructions on how to install it. See the Help section of the top menu for directions on how to use it. Datura, LLC www.datura‐llc.com Page 37 BeanCounter Desktop User Guide v1.10 TM Appendix D Troubleshooting BeanCounter Problem When running the program, it does not appear to be functioning correctly, or is erratic in behavior. During the upgrading of BeanCounter, after avoiding the erasing of the data during configuration, I still can’t find my data or find the project When trying to configure the Connection to the database server, the “Test Connection” button will not successfully connect. Remedies • Quit the program and restart the program • Restart the system, by choosing “Start”, “Shutdown”, “Restart”, and try again. • From the BeanCounter menu, choose “Tools”, “Restore Defaults”, and restore the configuration and quit the program. When you restart the program, you will have to repeat the configuration steps. • If you have installed a previous version of the Bean Counter program, you will have to delete the previous configuration files so the program can use the new default settings. If you are logged in as the Administrator you can find these files at the “C: \Documents and Settings\Administrator\Application Data\Datura” folder. You will find “vines.config” and other config files. Delete them all. The “Application Data” folder is a hidden folder in the logged‐in user’s folder of the “Documents and Settings” folder. When you restart the program, you will have to repeat the configuration steps. • Go to “Tools, “Connection Mgr” to bring up the connection information. Choose the Connection Details button. Find the “Initial Catalog field” and use the pick list to find your database, which is usually named “Legume2g”. • Go to “Tools”, “Install Numbers”, and use the pick list to find your “Active Install Number”. Click on the “Done” button. • Make sure you are using the correct Data Source name to connect to the server. If you have installed SQL Server Express, make sure to use the name “.\sqlexpress”, and if you are using the full version of SQL Server, make sure to use the name “.” and make sure you are not using the quotation marks. • Reset and reconfigure the program. Go to “Tools”, and choose “Restore Defaults” and clicking on the “Restore All Defaults” or the “Restore Configuration Defaults” button, then the “Done” button. Then go to “Tools”,“Connection Mgr” to restart the system configuration. • You can try using the dropdown pick list button for the Data Source field to select the name from a list of accessible SQL Server servers. If you have a firewall, it may ask you for permission to search. This will only work if the database is broadcasting its identity. Datura, LLC www.datura‐llc.com Page 38 BeanCounter Desktop User Guide v1.10 TM You see the message: • If the database server existed prior to this installation of BeanCounter, consult with the database manager to determine the correct settings, and to make sure you have the proper ADO.NET Provider (SQL Client) installed on the client to match the server. • If the SQL Server database server was installed for the purpose of using BeanCounter, make sure it is running and can be connected to by using SQL Server Management Studio (Appendix C). • Make sure the settings of Integrated Security and Data Server are set correctly to the settings specified in the Installation Manual’s “Part 2 – Configuration”. • From the BeanCounter menu, choose “Tools”, “Restore Defaults”, and restore the configuration and quit the program. Restart the program and reenter the configuration settings. • If you have installed a previous version of the Bean Counter program, you will have to delete the previous configuration files so the program can use the new default settings. If you are logged in as the Administrator you can find these files at “C: \Documents and Settings\Administrator\Application Data\Datura”. You will find “vines.config” and other config files. Delete them all. The “Application Data” folder is a hidden folder in the logged‐in user’s folder of the “Documents and Settings” folder. When you restart the program, you will have to repeat the configuration steps. • Go to “Tools”, “Install Numbers”, and use the pick list to find your “Active Install Number”. Click on the “Done” button. If there is no install number to choose from, then enter your assigned “New Install Number” and click the “Create Install Number” button. • You must open a project. Select a project with the dropdown pick list on the top toolbar, as seen in the following view: After opening a connection, no data appears. After opening a project, no data appears on the left Navigation Panel. • Choose a filter that shows data in the project. Try the restoring the Standard Filter. Click on the “Restore Standard”: Datura, LLC www.datura‐llc.com Page 39 BeanCounter Desktop User Guide v1.10 TM Appendix E – Installing Suggested Order Sample Project The installation of the Suggested Order will be importing sentences from a spreadsheet, similar to the Macbeth exercise in the User Manual. 1. Create and select the Project, in this case, “Suggested Order”, according to the method outlined in the section entitled “creating a Project”. 2. Click on the Import button to start the Import process. 3. Choose” Sentences via Excel Files” and click on the “Next Import Step” button. 4. Select your Microsoft Excel file to import. In our example, we choose “Suggested Order example.xls” and click on the “Open” button. Datura, LLC www.datura‐llc.com Page 40 BeanCounter Desktop User Guide v1.10 TM 5. After the Import function opens and analyzes the file, you will see a list of columns, with options to set for each column. The same rules outlined above in previous imports are the same, except there isn’t a Primary Column of the Table. Sentences are different. 6. In our example, the first, second and fourth columns are the Subject‐Verb‐Object of the sentences, so check the boxes shown in the following window. The first column is specified as the Subject, the second column (“Active Verb”) is the Verb, and the fourth column (“Predicate Object”) is specified as the Object. Click on the “Continue” button when ready to import the data. Datura, LLC www.datura‐llc.com Page 41 BeanCounter Desktop User Guide v1.10 TM 7. After the import is done, you should see a message like the following. Click on the “OK” button to clear the message. 8. After the Import is done and you return to the main Import screen, you should click on the “Done Importing” button. Datura, LLC www.datura‐llc.com Page 42 BeanCounter Desktop User Guide v1.10 TM 9. You should now see the imported data. 10. Set the Level on left side to 2 and left click on suppliers. 11. Change the right side level to 2 and you should see top down view of supplier level information. Datura, LLC www.datura‐llc.com Page 43 BeanCounter Desktop User Guide v1.10 TM 12. To explore wholesaler level information – double click on wholesaler A within Supplier 1. This provides wholesaler contents at a summary level. 13. To explore stock data double click on Stock A for details of stock level data. Datura, LLC www.datura‐llc.com Page 44 BeanCounter Desktop User Guide v1.10 TM 14. For product level information set levels, double click on one of “Product Code” tags and then hit the reverse button to explore stock and transaction adjustments per product. 15. To review summary of adjustments for wholesaler A – double click on Transaction Adjustments A. Datura, LLC www.datura‐llc.com Page 45 BeanCounter Desktop User Guide v1.10 TM 16. To review Person Information – go back to wholesaler level and double click on Person Data A. 17. To review information about an email address – double click on email address “n1@123”. Datura, LLC www.datura‐llc.com Page 46 BeanCounter Desktop User Guide v1.10 TM 18. Explore for different levels of information – double click on sales Email A and then – double click on “nc@127” to find 4 people from three wholesalers with same email address. Datura, LLC www.datura‐llc.com Page 47 BeanCounter Desktop User Guide v1.10 TM Appendix F – Installing General Text Import Sample Project The General Text Proof of Concept will provide an example of taking a period delimited text file, performing an initial transformation of the data and then load the content General Text importing rows from a spreadsheet, similar to the Periodic Table exercise in the User Manual. The source document of the General Text exercise is a period delimited text file: work.engineer.senior.active.h1.34.mechanical.rail work.engineer.senior.active.h1.35.mechanical.rail work.engineer.senior.active.h1.36.mechanical.rail work.engineer.senior.active.h1.37.mechanical.rail work.engineer.senior.active.h1.38.mechanical.rail work.engineer.senior.active.h1.39.mechanical.rail work.engineer.senior.active.h1.40.mechanical.rail work.engineer.senior.active.h1.41.mechanical.rail 1. This document was first imported into excel by selecting the Import External Data function from the Data drop down: 2. The input file was a Text File: Datura, LLC www.datura‐llc.com Page 48 BeanCounter Desktop User Guide v1.10 TM 3. Which was then imported into Excel using the import wizard: 4. A header row was added, with the resulting spreadsheet as below. Please note that the subject column (tag1) does not have unique values. 5. Create and select the Project, in this case, “General Text”, according to the method outlined in the section entitled “creating a Project”. Datura, LLC www.datura‐llc.com Page 49 BeanCounter Desktop User Guide v1.10 TM 6. Click on the Import button to start the Import process. 7. Choose” Tabular via Excel Files” and click on the “Next Import Step” button. 8. Select your Microsoft Excel file to import. In our example, we choose “General Text.xls” and click on the “Open” button. Datura, LLC www.datura‐llc.com Page 50 BeanCounter Desktop User Guide v1.10 TM 9. After the Import function opens and analyzes the file, you will see the Import Form, as described previously when importing contacts and the periodic table. In the previous examples, the first column had subjects that were unique. In this example, the values for the subject column, “tag1”, are not unique – and we want to keep each occurrence of “tag1”. To support this, we will make two changes from the steps taken previously. First, we will open the Data Columns tab and indicate that the first column (“tag1”) will be a data column by checking the box in the “Include This Column” column. 10. The next change is to have BeanCounter create unique keys. This is done by pressing the “Select if Sentence Subject comes from numbering rows automatically” button and by entering a Prefix for the Key (“GT Key”). Click on the “Continue” button when ready to import the data. Datura, LLC www.datura‐llc.com Page 51 BeanCounter Desktop User Guide v1.10 TM 11. After the import is done, you should see a message like the following. Click on the “OK” button to clear the message. 12. After the Import is done and you return to the main Import screen, you should click on the “Done Importing” button. You should now see the imported data. 13. Set the Level on left side to 2 and left click on the first record (“GT Key1”). You will see all records on the left and on the right you will now see the content of the first record. Datura, LLC www.datura‐llc.com Page 52 BeanCounter Desktop User Guide v1.10 TM 14. Double click on engineer and you will see that engineer is contained in all 8 records for the column “tag2”. 15. Change the right side level to 2 and you will see the detail of all 8 records on the right side. Datura, LLC www.datura‐llc.com Page 53 BeanCounter Desktop User Guide v1.10 TM Appendix G – Installing Customer Master Proof of Concept The Customer Master Proof of Concept will provide an example of creating the data structure first (through an initial import) and then populate the details of the structure in subsequent imports. From a context standpoint, the objective of the Proof of Concept is to create a Customer Master to support a new company with a brand new, innovative product. The immediate challenge is to identify the target industries with the target solution based on the product to attain market awareness of what the product is and how it provides solutions for the targeted industries. The steps in the creation/modification of the Master will support the needs of the company: • Create the structure to support the identification of potential customers and initial contact of these customers • Develop the customer list (uniquely by industry and geography) and import these into the structure • Develop the initial contact information and load these into the structure • Update the contact information to include new attributes that represent address information. The structure will be expanded as part of the load process to include this new information. Please note that besides the importing being done in multiple steps, this Proof of Concept will also introduce the procedure of removing duplicates and introduce using modifiers to expand a subject (key) to allow for uniqueness of the key . 1. The Project (“Customer Master”) is created per earlier examples. The file that will create the initial structure is named Datura_customers.xls populated with sentences. After selecting the file, similar to the Suggested Order example, the first, second and fourth columns are the Subject‐Verb‐Object of the sentences, so check the boxes shown in the following window. The first column is specified as the Subject, the second column (“Active Verb”) is the Verb, and the fourth column (“Predicate Object”) is specified as the Object. Click on the “Continue” button when ready to import the data. Datura, LLC www.datura‐llc.com Page 54 BeanCounter Desktop User Guide v1.10 TM 2. After the Import is complete hit the “OK” button in the first window and then “Done Importing” in the second window, your screen will now show the results of the import (make sure your “Levels” indicator is set to 2 on the Navigation (left) panel). 3. The next step is to input the Illinois Manufacturing Customers. Left click on the entry “Illinois Manufacturing Companies” in the Navigation (left) Panel. The customer information will be loaded at this point in the structure. Hit the “import” button on the Top Toolbar. Next in the “Datura Data Import” window, left click on “Tabular via Excel Files” and click on “Next Import Datura, LLC www.datura‐llc.com Page 55 BeanCounter Desktop User Guide v1.10 TM Step”. In the “Choose File to Import”, left click on “Illinois Mfg Companies.xls” and hit “Open”. The screen you are now presented with is below: 4. Click on the Data Columns Tab and hit the check mark in the first column for DUNS Number, then hit the “Continue” button. Datura, LLC www.datura‐llc.com Page 56 BeanCounter Desktop User Guide v1.10 TM 5. After the Import is complete hit the “OK” button in the first window and then “Done Importing” in the second window, your screen will now show the results of the import. Please note that the DUNS Numbers of all records added are shown in a list on the right hand side. 6. The next step is to input the Illinois Engineering Customers. Left click on the entry “Illinois Engineering Companies” in the Navigation (left) Panel. The customer information will be loaded at this point in the structure. Hit the “import” button on the Top Toolbar. Next in the “Datura Data Import” window, left click on “Tabular via CSV Files” and click on “Next Import Step”. In the “Choose File to Import”, left click on “Illinois Engr Companies.csv” and hit “Open”. Click on the Data Columns Tab and hit the check mark in the first column for DUNS Number, then hit the “Continue” button. After the Import is complete hit the “OK” button in the first window and then “Done Importing” in the second window, your screen will now show the results of the import. Please note that the DUNS Numbers of all records added are shown in a list on the right hand side. Datura, LLC www.datura‐llc.com Page 57 BeanCounter Desktop User Guide v1.10 TM 7. The next step is to link similar information (e.g., companies with the same “City” or “State”) for all companies already loaded to date. This is accomplished by the process called duplicate removal. Select “Data” from the Top Menu, “Advanced Management” and “Unattended Duplicate Removal”. Select “Yes” to the Remove all duplicates” request. 8. When the action is completed, the results will be displayed: 9. To view an example of information that has now been linked, select a particular company DUNS number: a. Hit “OK”. The screen will now appear similar to the screen in step 6. b. Click on “Illinois Manufacturing Companies” on the left c. Scroll down on the DUNS numbers displayed on the left until you find “5267471” (for Deere & Co.) d. Double click on the value “5267471” e. Double click on the “Mail City” value of “Moline”. This will retrieve all Companies who have a value of “Moline” in one of their attributes (see below right panel ‐ Companies are referenced by their DUNS number): Datura, LLC www.datura‐llc.com Page 58 BeanCounter Desktop User Guide v1.10 TM 10. The next step is to load Customer Contact information. Begin by left clicking on “Customer Contact Details” in the Navigation (left) Panel. 11. The Customer information will be loaded at this point in the structure. Hit the “import” button on the Top Toolbar. Next in the “Datura Data Import” window, left click on “Tabular via Excel Files” and click on “Next Import Step”. In the “Choose File to Import”, left click on “datura call list 050410 v2.xls” and hit “Open”. Click on the Data Columns Tab. The screen should appear as below: Datura, LLC www.datura‐llc.com Page 59 BeanCounter Desktop User Guide v1.10 TM 12. To allow multiple status records per Contact Company Name, the subject “Contact Company Name” will be modified by the column “Contact Information” to create a unique subject. To accomplish this scroll to the right as far as you can go, select “<subject>” from the “Modifies What” column (for the fourth row corresponding to the “Contact Information” column of the input spreadsheet) and check the box in the “Named Modifier” column: 13. Hit “continue”. After the Import is complete hit the “OK” button in the first window and then “Done Importing” in the second window, your screen will now show the results of the import. (Note that the Contact Company value has been modified by the Named Modifier “Contact Information” and the Contact Information value.) Datura, LLC www.datura‐llc.com Page 60 BeanCounter Desktop User Guide v1.10 TM 14. Click on Deere and Co on the right hand panel to display the Contact Status information (note the DUNS number is 5267471): 15. Next click on” Illinois Manufacturing Companies” on the left, scroll down on the right to the DUNS number “5267471” and double click on this number to display the Company information: Datura, LLC www.datura‐llc.com Page 61 BeanCounter Desktop User Guide v1.10 TM 16. The next step is to link Customer Contact records to the Customer Company records either through the DUNS number or the Contact Company Name. This is accomplished by the duplicate removal process. Remove duplicates per steps 7 and 8. The display will now be as follows (the linkage from the Customer Company record to the Contact Status record is given by the 2 entries “is DUNS Number by” and then the highlighted entry): 17. Double click on the highlighted entry. The resulting display provides the Contact Status Information and a linkage back to the Company instance. Datura, LLC www.datura‐llc.com Page 62 BeanCounter Desktop User Guide v1.10 TM 18. In the next set of steps, the Customer Contact Details will be reloaded with 4 additional columns of information (“Address”, “City”, “State”, “Zip Code”). Repeat Steps 10‐13, utilizing the updated status file “datura call list 050410 v2.xls”. The updated display is given below: 19. There are 2 status entries for each contact (1 for the original, 1 for the new status with the fields added). By removing duplicates the status records will be merged. Remove duplicates per steps 7 and 8. The display will now be as follows: 20. For additional display purposes, the third viewing panel will be opened on the right of the Item Detail Panel by selecting the “Display On Right” option from the first drop down on the Item Display Middle Toolbar. Datura, LLC www.datura‐llc.com Page 63 BeanCounter Desktop User Guide v1.10 TM 21. Next single click on “Deere and Co” in the middle panel. The contact information will be displayed in the right panel. Note that in the display on the right, the 4 additional attributes that were added, are shown along with the values for each attribute. 22. To show all the information associated with Deere, Double Click on the DUNS Number “5267471” in the right panel. Detail about Deere is now shown in the right panel. Datura, LLC www.datura‐llc.com Page 64 BeanCounter Desktop User Guide v1.10 TM Appendix H – Installing Program Management Proof of Concept The Program Management Proof of Concept is coming soon. Datura, LLC www.datura‐llc.com Page 65 BeanCounter Desktop User Guide v1.10 TM This document is a product of Datura, LLC and is copyrighted 2009‐2010 by Datura, LLC. Datura, Legume, and BeanCounter are trademarks of Datura, LLC. Other trademarks of other companies are their own. The data structure used by Legume and BeanCounter is patent‐pending by Datura, LLC. To get more help on using BeanCounter or other Datura products and services, send us an email at help@datura‐llc.com or call us in the USA at 1‐734‐878‐0109 in the Eastern Time Zone. The Draft of this Manual was printed on Friday, September 17, 2010. It is based on Build 195 of BeanCounter Desktop. Datura, LLC www.datura‐llc.com Page 66