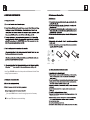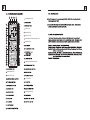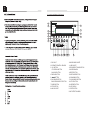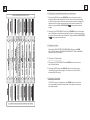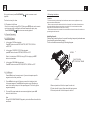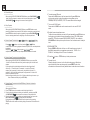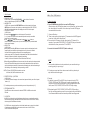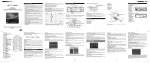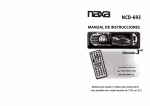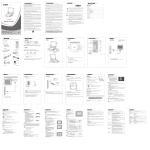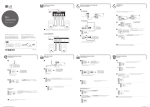
1
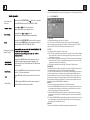
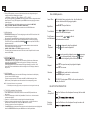
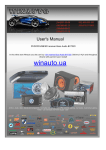
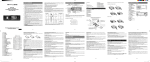
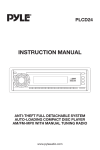
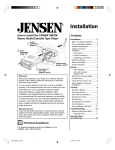
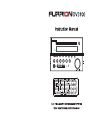
4x25W RMS
200x110.5 x 190 mm
NTSC/PAL/AUTO(optional)
6
11
14
15
17
18
18
19
19
19
19
19
20
20
20
20
21
21
21
21
22
22
22
22
23
23
23
24
24
25
25
25
25
29
30
31
33
34
(1) Short press TEL button on the remote control or 1 button on the front panel,
it will show last phone number on the LCD, then it will execute the dialing.
(2) Short press REDIAL button on the remote control, it will dial the last phone number.
Bluetooth with NFC function
Auxiliary inputs on front and rear
USB input with charging function
2 zone multi room audio output
2 x RCA audio/video outputs for connecting 2 additional TVs
1 x subwoofer output
Clock
5.1 Incoming call ringing, short press TEL button on the remote control or 1 button on
the front panel to accept the call.
5.2 To reject Incoming call ringing, short press HANG UP button on the remote control
or 2 button on the front panel to REJECT the call.
5.3 During a phone call, short press HANG UP button on the remote control
or 2 button on the front panel to end the call.
Note: When an incoming call is present the caller’s phone number will be displayed
on the screen.
(with mobile phone) or receiving a call, the car audio will temporarily wake up.
7. To play an audio file from a external Bluetooth device(mobile phone) on the wall
mount Stereo
terminated with an insulated end to avoid wires shorting or earthing which
After the device has been paired successfully and Wall mount Stereo screen displays
LINK OK
If your mobile device supports A2DP you will then be able to stream music from
your Bluetooth device so it can be played by stereo speaker.
You must select on your mobile Bluetooth device to play the audio through Bluetooth.
If your mobile device supports AVRCP then you will be able to control the basic phone
audio output functions by the Wall mount Stereo controls. Eg . Play Pause .
Note: During other modes(execpt Bluetooth conversation),
press BT MODE button on the
front panel to switch the mode with others.
8.To setup your Stereo using NFC(only support mobile phone with NFC function)
Do not attempt to disassemble or adjust this product, contact a service center
for assistance.
(1) Turn on the NFC function of your mobile phone and m ake sure the screen is active
and unlocked.
(2) With the NFC detection area of your phone touch with the NFC detection area
of the Stereo, you can connect or disconnect your mobile phone with the Stereo
conveniently.
Note: For the first time pair and connect, it will ask you to input a password.
The password is “0000”.
4
wipe it off before using.
+ side up
correct
B
wrong
A
Fig.1
correct
Fig.2
Fig.3
wrong
mobile
Note: Press BT MODE button on the front panel to switch between Unit and Phone
during BT phone conversation.
Short press CLEAR button to cancel the wrongly input number if necessary
Short press TEL button to execute the dialing.
,
result in injury or fire.
30
AV IN MODE BUTTON
UP BUTTON
NEXT BUTTON
RIGHT BUTTON
PREVIOUS BUTTON/CLEAR BUTTON
DOWN BUTTON
9
AM/FM RADIO MODE BUTTON
RANDOM BUTTON
REPEAT BUTTON
LEFT BUTTON
PROGRAM BUTTON
1.6 Locations and Names of the Controls
22
21
1
20
2
19
3
4
5
18
ZONE
A
B
1
2
3
RPT4
RDM5
TITLE6
6
AUX
USB
RESET
VOLUME
the relative content of SYSTEM SETUP menu for details.
7
8
9
10
11
12 13
14 15 16
1. DISC SLOT
2. IR REMOTE CONTROL SENSOR
3. 1/2/3 BUTTON
1 TEL /REDIAL BUTTON
2 HANG UP BUTTON
4.ZONE A/B BUTTON
5.
/
BUTTON
6.PLAY/PAUSE BUTTON
RADIO REGION SELECT BUTTON
7.POWER BUTTON
8.STOP BUTTON
9.AUX IN SOCKET
17
10.HEADPHONE SOCKET
11. USB SOCKET
12.BT MODE BUTTON/EQ BUTTON
13.MICROPHONE IN
14.RESET BUTTON
15.INPUT MODE BUTTON
16.5/RANDOM BUTTON
17.VOL KNOB/SEL BUTTON
18.6/TITLE BUTTON
19.4/REPEAT BUTTON
20.LCD DISPLAY
21.EJECT BUTTON
22.NFC DETECTION AREA
28
Description of icons on the LCD display
CONTRAST
It is for adjusting the contrast of the video output
HUE
It is for adjusting the hue of the video output.
SATURATION
It is for adjusting the saturation of the video output.
SHARPNESS
It is for adjusting the sharpness of the video output.
1.USB icon
After inserting a USB storage, USB icon is lit.
2.DVD icon
After inserting a DVD disc, DVD icon is lit.
3.DISC icon
After inserting a disc(DVD,VCD,CD), DISC icon is lit.
4.MP3 icon
If a disc or a USB storage contains MP3 format files, MP3 icon is lit.
5.RDM icon
In random playback mode, RDM icon is lit.
6.MONO icon
In mono audio mode, MONO icon is lit.
7.STEREO
In stereo audio mode, STEREO icon is lit.
8. ZONE <1> icon
When selecting the ZONE A speakers, ZONE <1> icon is lit.
9.ZONE <2> icon
When selecting the ZONE B speakers, ZONE <2> icon is lit.
10. FOLDER icon
If a USB storage contains more than 2 folders(contains playback file),
FOLDER icon is lit.
11.PLAYBACK icon
During disc or USB playback state, PLAYBACK icon is lit.
12.PAUSE icon
During disc or USB pause playback state, PAUSE icon is lit.
13.MUTE icon
When the Stereo is on mute state, MUTE icon is lit.
14. BLUETOOTH icon
When the Stereo is paired and connected successfully, BLUETOOTH icon is lit.
15.FLAT icon
When selecting flat audio mode playback, FLAT icon is lit.
16.ROCK icon
When selecting rock audio mode playback, ROCK icon is lit.
17.CLASSIC icon
When selecting classic audio mode playback, CLASSIC icon is lit.
18.CINEMA icon
When selecting cinema audio mode playback, CINEMA icon is lit.
19.LOUD icon
When selecting loud audio mode playback, LOUD icon is lit.
20.RPT icon
In repeat playback mode, RPT icon is lit.
5.17.5 SPEAKER SETUP
DOWNMIX
It is for selecting your desired sound effect when there is no center speaker
and subwoofer. There are 3 modes: LT/RT, STEREO, VSS.
LT/RT: When playing a disc with PRO LOGIC Dolby stereo effect, choose the
item, so it will output audio signal with vivid theatre effect.
STEREO: If you choose the item, when outputting audio signal with 5.1 channels,
it will output the left and right channels of signal ; when outputting audio signal
with 2 channels, it will output the common 2 channels of stereo signal.
VSS: If you choose the item, when playing a disc recorded with 5.1 channels,
the main channel speakers can output audio signal with VSS effect.
5.17.6 DIGITAL SETUP
DYNAMIC RANGE
After selecting the compression mode of LINE OUT, set the item, so you can
adjust the linear compression ratio. If you set it to be FULL, the Peak-to-Peak
value of the audio signal is the minimum; if you set it to be OFF, the Peak-toPeak value is the maximum.
DUAL MONO
It is for selecting a desired audio output mode for the left and right ways of signal.
It is mainly for Karaoke of Ac3. There are 4 modes in all as follows:
STEREO, MONO L, MONO R, MIX MONO.
27
Press MUTE button on the remote control to mute the audio,
“MUTE” will flash in the display. Press MUTE again to cancel.
an audio language.
Press INPUT MODE button repeatedly to select Tuner,Disc(After
inserting a disc),USB(After inserting a USB storage), BT,
AV IN and AUX mode.
Press EQ button to select between CINEMA,ROCK CLASSIC,
FLAT.
Press and hold CLOCK button on the remote control to enter
CLOCK Setup, rotate VOL KNOB to adjust hour. Press it briefly
to minute setting and rotate it to adjust. Once time is set,the unit
will automatically set after a few seconds.
Press and hold LOUD button on the remote control to turn on
or off LOUD mode.
Press ZONE A or B button to select speaker output,
“ZONE <1>” or “ZONE <2>” will display
on the LCD once it is selected.
RESET
9
26
For the DVD System Menu, there are 6 setup pages in all. They display as follows:
5 .17.1 SYSTEM SETUP
Area Frequency
Selection
Press and hold PLAY/PAUSE
button for 5 seconds
to set AM/FM radio region(Europe/USA1/USA2)
Press
or
button to move radio
frequence down or up one step at a time.
Press and hold
or
button to
search the next strongest station automatically.
Press and hold INPUT MODE button on the front panel
or briefly press AM/FM button on the remote control to
select between FM1,FM2.FM3,AM1,AM2.
Storing and Recalling
Station Presets
Press and hold APS button on the remote control to
automatically store the six strongest station in the
current band.(Up to 18 FM stations and 12 AM stations
can be stored)
Briefly Press APS button on the remote control to scan
presets 1-6 in the current band.
Press LOC button on the remote control to turn on/off
LOC.
Stereo/Mono
In FM mode,press ST button on the remote control to
select the Stereo or Mono sound mode.
TV SYSTEM
The Stereo supports output of various TV system.
If your TV has only NTSC or PAL system, the screen will blink and become
colorless when a wrong TV system is selected. In this case go to TV SYSTEM
and select NTSC, PAL or AUTO to match the system of your TV.
TV TYPE
The setup item is for matching TV screen size.
4:3 PS: Choose the item when connecting a TV set with 4:3 screen. When playing
the pictures with 16:9 size, the left and right parts of the video will be cut out,
and display in full screen.
4:3 LB: Choose the item when connecting a TV set with 4:3 screen. When playing
the pictures with 16:9 size, the top and bottom parts of the TV screen will be
turned into a black square respectively.
16:9: Choose the item when connecting a TV set with 16:9 wide screen.
PASSWORD
This setup item is for locking or unlocking the rating level of the Parental Control.
The defaulted state is locked. The defaulted password is 0000.
You can set a new password that you like: Select the PASSWORD item and then
press the > button to enter it, then input the original password 0000, and then
press the OK button to unlock it. Press the > button to enter it again, then input
a new password that you like and then press the OK button to make it effective.
Before the other persons see the Manual, you should get the password in mind
and cut out the part of PASSWORD in the Manual.
RATING
The item is for setting a new rating level of the Parental Control.
1. Select the PASSWORD item and then press the > button to enter it, then input
the password mentioned above, and then press the OK button to unlock the
setting of the rating level of the Parental Control.
2. Select the RATING item and then press the > button to enter it, then use the
direction buttons to select your desired rating level, then press the OK button
to confirm.
3. Select the PASSWORD item again and then press the > button to enter it, then
input the password, and then press the OK button to lock the new setting of
the rating level of the Parental Control.
DEFAULT
This item is for making all setup items change back to original status.
25
3. During JPEG playback, press one of the direction buttons to change the angle of
viewing picture that is displaying as follows:
>: 90 deg cw; <: 90deg ccw; ^:UP<-->DOWN; v: LEFT<-->RIGHT
During JPEG playback, press PROG button on the remote control to change the mode of
refresh picture. During JPEG playback, press STOP button to stop playing and return
to the root menu.
* During JPEG playback, the following buttons are not available: SLOW-FWD,
SUBT, TITLE/PBC, ANGLE, STEP, AUDIO, RDM and A-B.
* In JPEG mode,the other operations are same as ones in MP3/WMA mode.
5.14 MP4 Operation
1. The root menu is displayed on TV when beginning to switch on DISC mode, then it will
automatically play the first file.
During playback, press STOP button to stop playing and return to the root menu.
2. When displaying the root menu, press the direction buttons to select your desired
FOLDER or file, then press OK or PLAY/PAUSE
button to open the FOLDER, or
play the selected file.
When displaying the root menu, you can also use the number buttons to select the
serial number of the file and play the file.
* ANGLE, PROG, RDM, and TITLE/PBC buttons are not valid.
* The other functions are same as ones in DVD disc; but the “Repeat” function is same
as one in MP3/WMA.
5.15 ESP and ID3 Function
There is ESP function for all formats of discs.
In MP3/WMA mode, during playback, the information of the file name, folder name,
song s title, artist and album will be scrolling on the LCD display. As long as the
current playing MP3 music contains relevant ID3 tag information in version 1.0/2.0
format, the 3 items underlined above will be scrolling on the LCD display; otherwise,
they will not.
5.16 USB Operation
Power on the DVD player, then insert the USB storage, then the monitor will display
the root menu of the USB storage
This device support picture(JPG format),audio(MP3 or WMA format) and Video
(MP4 format), all the operations are same as ones of the corresponding format.
NOTE: 1.Playback file format is not guaranteed.
2.The USB input with charging function (not all products can be charged from the unit)
5.17 The DVD System Menu Setup Operation
1. Press SETUP button on the remote control to access the DVD System Menu on
the monitor.
2. There are 6 setup pages in all for the System Menu. Press the > or < button to select
an desired setup page.
3. Press the ^ or v button to select an setup item in the selected setup page.
4. Press the > button to enter the setup item. Then press the v or ^ button to select a
desired mode of the setup item, finally press OK button to confirm it.
* Press the < button to return to the upper level.
* Press SETUP button on the remote control again or use the direction buttons to highlight the
item of the EXIT SETUP and then press OK button to exit the System Menu.
10
Disc USB Opreation
Insert Disc
With the label facing up,insert a disc into the disc slot.
The disc will automatically begin playback.
Eject Disc
Press EJECT to eject the disc.
Track Select
Press
or
button to move to
previous or next track/chapter.
Fast Forward Press and hold
or
button to
and Backward fast backwards or forward.
Pause
Playback
Press
Press
to temporarily stop the playback.
again to resume playback.
Stop
Playback
Press once to pause the playback,press
to resume;
press
twice to stop playback, then press
to start
playback from the beginning of the first chapter/track.
Repeat
Press RPT to repeat current playing track/chapter.
Press RPT to resume.
Random
Press RDM to play each track in random order.
Press RDM again to resume.
Title
In DVD/VCD mode,press TITLE on the remote control to
display the title list.
BLUETOOTH OPERATION
Dial or
Accept Call
Reject or
End Call
Press the 1 button on the front panel to accept, dial or redial
a call.
Press the 2 button on the front panel to reject or end a call.
11
24
5.12 Program Playback
1.7 Wiring Diagram
1
It allows you to enter the order in which you want some chapters/tracks in
DVD/VCD/MP3/WMA/CD disc to play.
1 During playback, press PROG button on the remote control to enter a program
interface as follows:
For DVD discs /MP3/WMA
For VCD/CD discs
WIRING CONNECTING SOCKET A
2
BLACK
WIRING CONNECTING SOCKET B
The Description of the Wiring Diagram for Socket A and Socket B
WIRING CONNECTING SOCKET A
WIRING HARNESS PLUG A
WIRING CONNECTING SOCKET B
WIRING HARNESS PLUG B
2 Use the direction buttons to move cursor onto the desired place for inputting
the sequence number.
3 Use the number button to input desired sequence number of title/chapter/
track with desired sequence.
4 Use the direction button to move cursor onto PLAY, then press OK button on the
remote control to play the programmed titles/chapters/tracks in programmed
order; only pressing PLAY/PAUSE
button also can play the programmed
titles/chapters /tracks in programmed order.
* To exit program playback, firstly press STOP button, then press PLAY/PAUSE
button to enter sequence playback; or press PROG button twice again.
* To remove the all programmed sequence numbers, move the cursor onto
CLEAR, then press OK button on the remote control.
* To change the programmed sequence, move the cursor onto the item you
want to change, input the desired sequence number.
* During VCD playback, if it is in PBC ON mode, at the same time of entering
the state of program playback, it turns off PBC mode.
5.13 Playback the Picture CD in JPEG Format
1. The root menu is displayed on the monitor when beginning to switch on DISC
mode. At the time, it plays MP3/WMA file.( TITLE or PBC button is not
available).
In the root menu, the left file sort icon is for MP3/WMA file; the middle file sort
icon is for VIDEO file; the right file sort icon is for JPEG file. If one of these 3
file sort does not exist, you can not move cursor onto the file sort icon.
2. When displaying the root menu, press the direction buttons to select your
desired FOLDER, file or file sort icon, then press OK or PLAY /PAUSE
button to open the FOLDER, or play the selected file, or play only this sort of
file. When displaying the root menu, you can also use the number buttons to
select the serial number of the file and play the file.
When you select a JPEG file sort icon, press one of the direction buttons to
select the first JPEG file, then press the v button to select the desired JPEG file,
finally press OK or PLAY/PAUSE button to display the JPEG picture in full screen
from the selected JPEG picture.
23
12
ZOOMx2,ZOOMx3,ZOOMx4,ZOOMx1/2,ZOOMx1/3,ZOOMx1/4,ZOOM OFF.
Press one of the direction buttons to select the area you want to enlarge.
WIRING CONNECTING SOCKET A VIEW
5.9 Change the Caption Language
PURPLE
When playing DVD discs, press SUBT button on the remote control repeatedly to
select the language of the caption or turn off the caption.(depend on the disc used.)
PURPLE
When playing VCD/MP3/WMA/CD discs, the button is not available.
5.10 Change the Audio Language
1. When playing DVD discs, press AUDIO button on the remote control
repeatedly to select the desired language type(depend on the disc used)
2. When playing VCD discs, press AUDIO button on the remote control repeatedly to
select the sound mode of the MONO L, MONO R, and Stereo, no language function.
3. When playing CD/WMA/MP3 discs, AUDIO on the remote control button is invalid.
5.11 Look over the Playback Status
1. When playing DVD discs, press OSD button on the remote control
repeatedly to turn on/off the playback status. When it is on, it will display the
information such as: the serial number of the playing title, the serial number
of the playing chapter, the elapsed time of the playing chapter, the remaining
time of the playing chapter, the elapsed time of the playing title, the remaining
time of the playing title, etc.
2. When playing VCD/CD discs, press OSD button on the remote control
repeatedly to turn on/off the playback status. When it is on, it will display the
information such as: the serial number of the playing track, the elapsed time
of the playing track, the remaining time of the playing track, the elapsed time
of the disc, the remaining time of the disc.
WIRING CONNECTING SOCKET B VIEW
PIN NO
COLOR
FUNCTION
1
YELLOW
+12V DC MEMORY B+
2
PINK
AUTO ANTENNA
3
RED
+12V DC IGNITION SWITCH
4
BLACK
POWER GROUND(-12DC)
22
13
5.5 Playback from a specified chapter/track or a specified time
WIRES FROM RV,BOAT OR TRUCK
1. When playing DVD discs, press SEARCH button on the remote control to
display an interface and highlight the title item, then use the number buttons
to input the serial number of the title; use the direction buttons to highlight the
chapter item, then use the number buttons to input the serial number of the
chapter; finally press OK or PLAY/PAUSE
button to play the selected
chapter.
2. When playing VCD/MP3/WMA/CD discs, press SEARCH button on the remote
control to display an interface and highlight the track item, then use the number
buttons to input the serial number of the track; finally press OK or PLAY/PAUSE
button to play the selected track .
5.6 Playback in Random
When playing DVD/VCD(PBC OFF)/MP3/WMA/CD discs, press RDM
button to switch between RANDOM ON /RANDOM OFF. When in RANDOM
ON mode, it will play in random.
5.7 Playback in Different Angle
1. When playing VCD/MP3/WMA/CD discs, ANGLE button on the remote
control is not available.
2. When playing DVD discs, press ANGLE button on the remote control
repeatedly to view in different angle.(This function is only for the DVD
discs with ANGLE function)
5.8 Playback in Zoom Mode
In DVD/VCD mode, during playback, press ZOOM button on the remote
control repeatedly to enlarge a certain area of the images on the screen
with these multiples:
POWER AND SPEAKER WIRES FROM STEREO CONNECTOR
21
14
During slow forward, press PLAY/PAUSE
playback.
button to resume normal
1.8 Mounting Installation
The function is only for video.
Location
* Choose a mounting location away from humid areas, water sources, appliances or any
5.3. Playback with still frame
If the unit is currently running DVD.VCD disc,press STEP button on the remote
control consecutively to display the still frame forward with step by step.
Press PLAY/PAUSE
button to resume normal playback.
equipment that can radiate heat.
* Select an area on a wall or cabinet which is free from cable, fuel or brake lines and ensure
the area behind the wall mount stereo has a vent hole or if it is an enclosed box and has
adequate room around the rear of the unit for cooling.
* Ensure when the stereo is mounted in the cut out that the wires at the rear of the unit are not
pressed against the heat sink
5.4 Playback Repeatedly
5.4.1 ONE/ALL Repeat
1.
In the mode of DVD disc playback:
Press RPT button to select REP CHAPTER, REP TITLE, REP ALL
or REP OFF.
2.
In the mode of VCD(PBC OFF)/CD disc playback:
press RPT button to select REP ONE, REP ALL or OFF.
Installing the unit.
* Before finally installing the unit, connect the wiring temporarily and make sure
the unit and the system work properly.
*Fix the unit with screw according to following diagram.
SCREW
When it is in the state of PBC ON, during VCD disc playing, the RPT
button is not available.
3.
PLASTIC SHELL
OF THE FRONT PANEL
In the mode of MP3/WMA disc playback:
Press RPT button to select REP ONE, REP DIR, REP ALL or OFF.
5.4.2 A-B Repeat
Press A-B button on the remote control if you want to repeat a specific
segment on a disc that you define:
1.
2.
Press A-B button at a point (A) where you want it to be the start point
of the repeat segment. Press A-B button again at a point (B) where you
want it to be the terminal point of the repeat segment. Then it will play the
segment repeatedly.
To cancel A-B repeat mode and resume normal playback, press A-B
button for the third time.
Note:
During DVD/VCD/MP3/WMA/CD playback, points A and B must be within the
same track.
SCREW
1. Remove plastic shell of the front panel from the unit.
2. Fix the unit with 4 pieces #8 pan head self tapping screw.
3. Put back plastic shell of the front panel to the unit.
20
15
2. Common Operation
1.Turning On and Off the unit
By pressing the power button will turn on or enter standby mode
2.Selecting a Source:
1) Use INPUT MODE button on the front panel.
Press INPUT MODE button repeatedly to select Tuner,Disc(After
inserting a disc),USB(After inserting a USB storage), BT,AV IN
and AUX mode.
Note:
By pressing BT button to enter into the Bluetooth mode directly.
Press again to back to current playback mode.
In VCD mode
1. When starting to turn on the PBC function, it will play from the beginning of
the disc till it display the PBC menu on TV screen if the disc include the PBC
menu.
2. Press the number buttons to select your desired track to play.
In MP3/WMA mode
1. The root menu is displayed on the monitor screen all the time(and the TITLE/
PBC button is not available).
2. Press the direction buttons to select your desired FOLDER, then press
OK or PLAY/PAUSE
button to open the FOLDER, and then press the
direction buttons to select your desired file, finally press OK button to
play the selected file.
In CD mode, the TITLE/PBC button is disabled.
2 ) Use the corresponding buttons on the remote control.
4.7 Terminate the Playback
DVD / USB - once a DVD or USB is inserted into the unit, the unit will automatically switch
to display this source menu. Press this function button on the remote control to select
DVD if a disk is already inserted and the unit is playing from another source.
1. Press EJECT button to eject disc.
AM/FM - by pressing this button on the remote control will scroll through the FM1, FM2, FM3,
AM1, AM2.To switch this units AM/FM receiver between USA and Europe frequencies
button for 5 seconds until the region is displayed
p ress and hold PLAY/PAUSE
on the screen.
2. Press and hold POWER button on the front panel or briefly press
POWER button on the remote control to turn off the Stereo.
5. Advanced Disc, USB Operation
AUX/AV IN-these buttons on the remote control allow you to scroll through the AUX /AV IN
inputs fitted to the stereo.
AUX - connection on the front of the unit (Audio and Video input function)
AV IN - connection on the rear of the unit to connect an external audio source
3.Volume Adjust
Rotate VOLUME KNOB clockwise to increase volume, rotate anticlockwise to reduce
volume.
4. Mute
Press MUTE button to mute what ever source is playing and display mute on the screen.
Press MUTE button again to release unit from mute.
5. Clock Set
1) To display the clock on the LCD display, press CLOCK button on the remote control
2) To adjust or set the clock, press and hold CLOCK button on the remote control
until the clock set feature is displayed on the LCD display of the stereo then use
VOLUME KNOB on the unit or + and - on the remote control to adjust the time,
push in the volume knob on the stereo or press SEL button on the remote control
to change from setting hours to minutes. Once time is set the stereo will automatically
set after a few seconds if not pressing any functions.
5.1 Playback with Speed
During normal playback, Press and hold
or
button on
the front panel repeatedly or press and hold
/
button on the remote
control repeatedly to fast backwards or forwards at the following
speeds: x2, x4, x8,x16, x20, normal.
During speed playback, press PLAY/PAUSE
playback.
button to resume normal
5.2 Playback with Slow Speed
During playback , press SLOW_FWD button on the remote control to execute
the Slow Forward function.
With each consecutive pressing of SLOW_FWD button, the playback
speed decreases. The speed levels in Slow Forward as follows:
x1/2,,x1/3,x1/4,x1/5,x1/6,1/7,normal.
19
16
4.2 Pause Playback
When playing DVD/VCD/CD/MP4/MP3/WMA discs, press PLAY/ PAUSE
button on the front panel or remote control to pause the playback, press
PLAY/PAUSE
button again to resume normal playback.
4.3 Stop Playback
When playing DVD/VCD/MP3/WMA/CD discs, press STOP button once to
pause the playback, then press the PLAY button to resume the normal playback;
press STOP button twice to stop the playback, then press PLAY/PAUSE
button to start playback from the beginning of the first chapter/track.
4.4 Select Chapter/Track with the
or
button or
/
Button
or
button on the front panel or
/
Button
Press
on the remote control during playback to select the previous or next chapter/track
to playback.
or
button or press
/
Button
Note: Press
multiple times to advance multiple chapters/tracks backward or forward .
4.5 Select Chapter/Track with the Number Buttons
When playing DVD/VCD(PBC OFF)/MP3/WMA/CD discs, press one of the
1~9 and the 0 number buttons to directly select and play the 1st to 9th track /
chapter.
If you want to play the track/chapter with serial number bigger than 9,
use the 10+, 1~9 and 0 button. For example 1, to play the 13th track/
chapter, firstly press the 10+ button once, then press the 3 button. For
example 2, to play the 34th track/chapter, firstly press the 10+ button for 3
times, then press the 4 button.
Note: pressing and holding the +10 or -10 buttons will allow you to move up or
down 10 tracks at a time(only for MP3/WMA).
4.6 Select Chapter/Track with the Root/PBC Menu (If the disc includes the
root/PBC menu)
1.
2.
3.
When playing DVD discs:
Press TITLE button on the remote control to display the title list.
Press the direction buttons to select your desired title, and then press OK
or PLAY/PAUSE
button to open the root menu of the selected title.
Press the direction buttons to select your desired chapter, finally press the
OK or PLAY/PAUSE
button to play the selected chapter.
During playback, pressing TITLE button on front panel or long pressing
TITLE button on the remote can directly display the root menu of the title that is
playing.
6. To select a preset EQ mode
Press and hold EQ button on the front panel or briefly press EQ button
on the remote control to select the preset music equalizer curves:
CINEMA, ROCK, CLASSIC, FLAT. The sound effect will be changed.
7. To turn on/off LOUD mode
Press and hold LOUD button on the remote control to turn on/off LOUD
mode.
8.To adjust the sound equalizer curves
To adjust the sound equalizer curves, briefly and repeatedly press SEL button on
the remote control to select the sound equalizer curves of VOL, BAS(without
preset EQ), TRE (without preset EQ), BAL,BEEP(ON/OFF), then rotate the
VOL KNOB on the front panel or press the + and - on the remote control to adjust
level.
9.ZONE A/B BUTTON
Pressing ZONE A or B button will turn on or off the audio source in each of
the different areas which your speakers are connected. “ZONE <1>” or
“ZONE <2>” will display on the LCD once it is selected.
10.Press the
button or TITLE button up to the previous menu.
11.To reset the unit
When the display is incorrect, or the function buttons are not effective or
sound is distorted, then use a sharp point to press RESET button, that
will make the unit be reset to factory default and re-instate the correct functions.
17
3. Radio Operation
1. FREQUENCY SELECT
button for about 5 seconds to
In RADIO mode. Press and hold PLAY/PAUSE
select your desired frequency EUROPE,USA1 or USA2.
2. AM/FM BUTTON
In RADIO mode, press and hold INPUT MODE button on the front panel or briefly press
AM/FM button on the remote control to select your desired radio band of FM1, FM2, FM3,
AM1, AM2 , and the selected band will be displayed on the LCD of the front panel.
3. TUNE/SEEK UP/DOWN
In RADIO mode:
or
button on the front panel or Press and hold
1) Press and hold
|<< / >>| button on the remote control to automatically search down/up for a available
station from the current frequency.
2) Press
or
button on the front panel or press
/
button on
the remote control to manually search up or down with step by step for your desired station
from the current frequency.
4. APS BUTTON
In RADIO mode:
1) When pressing and holding APS button on the remote control, the radio searches from the
lowest frequency and checks the signal strength level until 1 cycle search is finished.
And then the 6 strongest stations are preset to the corresponding preset
number memory bank. The AS operation is implemented in each bank of the selected band.
When the AS operation is finished, it will resume broadcasting
on the M1.(It can store 3x6 stations for FM and 2x6 stations for AM in all)
2) When briefly pressing APS button on the remote control, the radio searches for each preset station
from the M1. When the field strength level is more than the threshold level of the stop level, the
radio holds at that preset number for a few seconds with releasing mute, and then searches again.
After finishing a circle of searching, it will stop searching on the M1.
NOTE: In FM band, FM1,FM2,FM3 is checked one at a time.
In AM band, AM1, AM2 is checked one at a time.
5. PRESET STATION [ 1-6 ] BUTTONS
In RADIO mode:
1) To memorize the current frequency on the current band, press and hold any one of the six preset
buttons (1-6) .
2) To recall the preset memory on the current band, press one of the preset buttons [1-6] .
6. STEREO/MONO BUTTON
Press ST button on the remote control to select the STEREO or MONO sound mode for
FM band.
7. LOC BUTTON
1) In RADIO mode, when the signal of the distance radio station are very weak and the receiving
effect is bad during tuning, press LOC button on the remote control to turn off the LOC function,
then tune again for the distance radio station;
2) In RADIO mode, when the signals from the local radio stations are too strong, this could lead
to interference. press LOC button on the remote control to turn on the LOC function,
Re-tune for the local station required.
18
4 Basic Disc, USB Operation
4.1 Begin playback
1. Press POWER button briefly to turn on the DVD player.
After turning on the DVD player, please turn on the monitor, and ensure that
the video output of the monitor is the video input from the DVD player
connected with the monitor.
? Common Question
Q: There is not anything is displayed on TV screen when the DVD player is
turned on. How to solve the problem?
A: Ensure that the TV was set to right video input(not TV channel); for
example, if you make VIDEO1 INPUT of TV and DVD player connected
with each other, then you need set TV to VIDEO1.
2. Insert a disc into the DISC SLOT(Label surface up).
! NOTE
1. For some discs that are seriously scratched or poor manufacturing or
recording quality, it may not play.
2. If the player can not read disc under normal condition, please try to
eject and reload the disc again.
3. Remark:
1) In addition to normal CD and DVD, this unit supports to play CD-R,
CD-R/W, DVD-R and DVD-R/W as well; however, depending on the
conditions of the recording equipment, recording program or the disc
itself, some CD-R, CD-R/W, DVD-R or DVD-R/W may not play.
2) When dealing with CD-R, CD-R/W, DVD-R or DVD-R/W recording,
too high recording speed may result in poor signal quality and therefore,
it is recommendable to select as lower as possible recording speed.