1
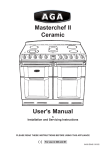
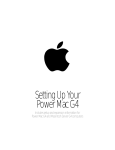
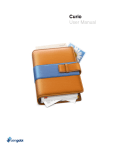
Flip down Kitchen TV / DVD VSKTV102 Mk II Instruction Manual Accessories The following accessories should be in the box; The TV Power Supply Remote control Mounting Template Mounting Bolts and spacers Cable Pack User Manual Note: The package will contain the English language manual only – this manual is also available in French and German and can be downloaded from www.invisua.co.uk Note: If mounting below a pelmet, 100mm extra-long screws and additional spacers are available (Product code VSKTV100X) please contact your retailer. TV Front View 1. 2. 3. 4. 5. 6. 7. 8. DVD Control Keys Infra-Red Eye Swivel Bracket Clock Display Clock Control Keys TV Control Keys Speakers LED Panel Note: The Power switch is touch sensitive – do not press down hard on this. Control Buttons 1 2 3 4 5 6 7 1. Power On/Off (This is a touch sensitive button do not press hard on this) 2. DVD/CD Eject 3. Play / Pause (DVD Mode) 4. Stop (DVD Mode) 5. Last Chapter (DVD Mode) 6. Next Chapter (DVD Mode) 7. USB/SD (use this button to switch between USB/SD/Disc modes) 8. Set Clock/Alarm 9. Set Clock/Alarm + 10. Set Time 11. Set Alarm 12. Select source TV/AV/VGA/HDMI/DVD etc 13. Select Main menu 14. Move up on channel 15. Move down on channel 16. Volume down 17. Volume Up (Also used to select an option from the menu) Remote Control The design of the remote control can vary, here are the key functions; Power Source Sleep Mute USB/SD Recall Upvrlist Rec Vol+/CH+/OK Menu Exit Red Audio Subtitle Fav TV/Radio EPG 0-9 Switch Power on / Standby Switch between Modes TV/DTV/Media/AV/PC etc Switch the TV off after a certain period Turn off the sound Switch between the SD Card slot and USB Slot. Return to previously viewed Channel In DTV Mode. This will show the programs recorded on your Memory stick. Record current programme (in DTV Mode only) Adjust the volume up or down Change the channel up or down Select a menu option or confirm selection Use to highlight an option on the menu Enter the menu system Exit the menu system Use on compatible interactive services to enter the menu. Green/Yellow/Blue buttons are used for navigation of these services Press to change sound mode Press to display subtitles Press to display a list of Favourite channels Press to jump to DVBT radio stations Display the Electronic Programme Guide. Select specific channel by typing its channel number There are also a range of buttons specific to DVD operation these are on the bottom of the remote control. Input Source Selection Press the source button to display the input source menu. Pressing the up and down buttons will scroll through the menu. Press OK to select the source you require or EXIT to quit. The Menu System Press the Menu button in any mode (Except Media) to display the menu, the first menu will be the channel menu with the following options; Use the left/right arrows to select a different menu and the up/down arrows to highlight an option then press OK The selection of options available will vary according to the mode you have selected. DTV mode for example will have more options available than HDMI . Menu Options Channel Menu Auto Tuning DTV Manual Tuning ATV Manual Tuning Programme Edit LCN Sorting The option automatically tunes both Analogue (ATV) and digital channels (DTV). First select the country and press OK. Tuning takes a few minutes to complete. See the Quick Setup Guide for full tuning instructions. Use this option to manually search for DTV channels. Select the UHF Channel you require and press OK to search. Use this option to manually search for ATV channels. Select the UHF channel you require and press OK to search. Program edit allows the manual removal of channels that you do not want. It also allows you to change the channel order. This feature ensures that the channels are sorted in the correct order for your region. This is normally defaulted to “ON”. Picture Menu Picture Mode Contrast Brightness Colour Sharpness Colour Temperature There are three pre-set picture modes Standard, Dynamic & Mild. Use the up/down arrows to select the mode you require and press OK. There is also a forth mode Personal which needs to be select if you wish to manually set the contrast, Brightness, Colour & Sharpness settings Manually set the contrast. Note picture mode setting must be set to Personal Manually set the brightness. Note picture mode setting must be set to Personal Manually set the colour. Note picture mode setting must be set to Personal Manually set the sharpness. Note picture mode setting must be set to Personal This adjusts the colour balance towards red (warm) or blue (cold) Sound Menu Sound Mode Treble Bass Balance Auto Volume Surround Sound SPDIF EQ There are four pre-set sound modes Standard, Music, Movie & Sports. Use the up/down arrows to select the mode you require and press OK. There is also a fifth mode “Personal” which needs to be select if you wish to manually set the Treble & Bass settings. Manually set the treble. Note sound mode setting must be set to Personal Manually set the bass. Note sound mode setting must be set to Personal Manually set the stereo balance Reduce sound fluctuations between channels Turn Surround sound on/off Not supported by this TV Not supported by this TV Time Menu Time zone Off time On time Sleep Timer Auto Standby OSD Timer Set the time zone Set the time for the TV to automatically go into standby mode Set the time for the TV to switch on (Note: Must be left in standby mode) Automatically switch of the screen after a specified period. You can also set this using the sleep button on the remote control Automatically go into standby mode after a specified period. The number of seconds until the menu disappears. It’s handy to set this to a higher value whilst you get used to the menu system. Lock Menu Lock System Set Password Block Program Parental Guidance Key Lock Activate the Lock system function. The default password is 0000. Note that this does not prevent the TV being used – but it does allow you to block specific programs etc. You can set a personal password to override the default password. Specific programs can be blocked using this option Not Supported by this TV Not Supported by this TV Setup Menu OSD Language TT Language Audio Language Subtitle Language Hearing Impaired PVR File System Aspect Ratio Blue screen First Time Installation Reset Software Update Change the language of the On Screen Display (i.e. Menus) Not Supported by this TV Audio Language setting (if supported by broadcaster) Subtitle Language (if supported by broadcaster) Not Supported by this TV Checks the PVR (Personal Video Recorder) file system. This option will only function if a USB memory stick has been inserted into the USB slot on the side of the unit. Change the Aspect Ratio of the picture. This is normally best left to Auto. On/Off Show a blue screen when there is no picture Re-run first time installation Reset to factory settings Update menu software (If instructed by engineer) The DVD Menu System The unit has a separate menu system to set up the DVD playback. When in DVD Mode, press the key D.SETUP on the remote control to enter the main menu of the system setup. Note that to play a DVD, you need to switch to DVD mode first using the source menu. Use the left/right arrows to select a different menu and the up/down arrows to highlight an option then press OK to select it. To exit the DVD menu press the D.SETUP Button. General Setup Menu TV Type TV Display Last Memory Allows you to change the TV type, this option should be set to PAL in most countries Allows the change of the Aspect ratio. This setting will be pre-set to wide screen which is the appropriate setting for this TV. When set to on, the DVD resumes from the point at which it was last stopped. Speaker Menu Tone Dynamic Dual Mono Adjust the tone Adjust the Dynamic Setting (This compresses audio output – When Full is selected, the peak signal is at it’s smallest) Allows you to change from Stereo to mono sound. In stereo mode, the speakers will have normal stereo output. Other options all you to select only the Left or Right channels or mix them both on both speakers. Preference Menu Note that the settings on this menu can only be changes when the TV is not currently playing a DVD or CD. Also, note that these effect of these changes will depend on if the DVD disc supports the language selected. OSD Language Audio Language Subtitle Language Disc Menu Parental Guidance Set the Language of the On screen Display Choose the Audio Language Choose the Subtitle Language Set the language of the DVD menu Restrict playback of DVDs according to the rating. Rating restrictions are divided into eight categories from KIDSAFE to Adult. Note: The default setting is locked and to make a selection or change it the password must be used. To edit the Rating please enter the numeric default password of 0000 and then press OK to confirm. This setting is only editable when unlocked and can only function when locked again. Default Setting Reset to factory default. DVD Operation Press the source button on the remote control or the front panel and use the up and down arrows to highlight DVD – then press OK to switch to DVD Mode. When the screen displays the DVD logo, put the disc in the slot loader, or put the SD card or Memory Stick into the appropriate slot. This unit can identify different disk formats as the display in the left corner and the screen will automatically display the disc type in operation. DVD disc formats which are compatible: CD, CD-R, CD-RW, MP3, MP4, VCD, DVD, DVD+/-R, DVD+/-RW, JPEG Playing a DVD Insert the disc into the slot loader and the disc will play automatically. When the disc is playing, the disk type will be identified on the display. Use either the remote control or the unit itself to Stop or Play etc. Card Reader & USB Operation To play audio or video files from the Card reader or USB slot p ress the USB/SD button to switch between DISC, SD or USB Mode. Press up and down keys on either the unit or the remote control to select either and press OK to confirm. The unit will now play the file you require in the correct mode. Notes Before inserting any media (SD/USB/DVD) you must switch the unit to the appropriate mode. If the system doesn’t read the USB or SD card, switch the power off for at least 30 seconds and then switch on again. The unit reads Audio and Video files recorded onto SD or MMC cards or USB 2.0 memory sticks. Setting the Clock To set the clock press and hold the TIME button on the front of the unit for a few seconds. 12H/24H will Blink. Press SEL+/SEL- to select the mode required and press TIME once to confirm. Press SEL+/SEL- to select the hour and press TIME to confirm Press SEL+/SEL- to select the minutes and press TIME to confirm The clock has now been set. Note that during this process, if no button is pressed within 5 seconds the clock will revert to the previous setting. Also note that the clock cannot be set using the remote control. Setting the Alarm Setting the alarm is very similar to setting the clock. Press and hold the ALARM button on the front of the unit for a few seconds. Press the SEL+/SEL- to ensure that the word “Alarm” appears on the display. If you want to switch the alarm off ensure that the “Alarm” is not displayed. Press ALARM to confirm Press SEL+/SEL- to select the hour and press ALARM to confirm Press SEL+/SEL- to select the minutes and press ALARM to confirm The alarm has now been set. Note that during this process, if no button is pressed within 5 seconds the alarm will revert to the previous setting. Also note that the clock cannot be set using the remote control. There are two alarms that can be set. Before initiating this process press the alarm button to switch between alarm1 and alarm 2. Visua is a Trademark of In21 Limited Unit 1, Runway Business Park Moor Farm Road West Ashbourne Derbyshire DE6 1HD UK [email protected] www.invisua.co.uk