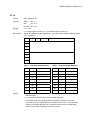
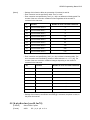
1
LR2000 POS THERMAL PRINTER PROGRAMMING MANUAL LR2000 Programming Manual V1.0 Copyright© by Bematech All rights reserved. No part of this publication may be copied, reproduced, adapted or translated without the prior written permission of Bematech, except when allowed by patent rights. Information in this publication is purely informative, subjected to change without notice and no liability is assumed with respect to its use. However, as product improvements become available, Bematech will make every effort to provide updated information for the products described in this publication. The latest version of this manual can be obtained through Bematech web site: www.bematechus.com Notwithstanding the other exceptions contained in this Manual, the consequences and responsibility are assumed by the Purchaser of this product or third parties as a result of: (a) intentional use for any improper, unintended or unauthorized applications of this product, including any particular purpose; (b) unauthorized modifications, repairs, or alterations to this product; (c) use of the product without complying with Bematech Corporation’s operating and maintenance instructions; (d) use of the product as component in systems or other applications in which the failure of this could create a situation where personal injury or material damages may occur. In the events described above, Bematech and its officers, administrators, employees, subsidiaries, affiliates and dealers shall not be held responsible or respond by any claim, costs, damages, losses, expenses and any other direct or indirect injury, as well as claims which alleges that Bematech was negligent regarding the design or manufacture of the product. Bematech shall not be liable against any damages or problems arising from the use of any options or any consumable products other than those designated as original Bematech products or approved products by Bematech Any product names or its logotypes mentioned in this publication may be trademarks of its respective owners and shall be here recognized. Product warranties are only the ones expressly mentioned in the User’s Manual. Bematech disclaims any and all implied warranties for the product, including but not limited to implied warranties of merchantability or fitness for a particular purpose. In addition, Bematech shall not be responsible or liable for any special, incidental or consequential damages or lost profits or savings arising from the use of the product by the Purchaser, the User or third parties. BEMATECH, International Division 999 S. Oyster Bay Rd Building #104 Bethpage, NY 11714 TEL: (516) 248-0400 FAX: (516) 248-0443 Email: [email protected] www.bematechus.com LR2000 Programming Manual V1.0 TABLE OF CONTENTS 1 Overview ........................................................................................................................................... 5 1.1 Appearance .................................................................................................................................... 5 1.2 Rear panel I/O connectors ........................................................................................................... 5 2 Command List .................................................................................................................................... 6 3 Command Set Details ......................................................................................................................... 9 HT .............................................................................................................................................................. 9 LF............................................................................................................................................................. 10 CR ............................................................................................................................................................ 10 DLE EOT n................................................................................................................................................ 10 DLE ENQ n ............................................................................................................................................... 12 DLE DC4 n m t ......................................................................................................................................... 13 ESC SP n .................................................................................................................................................. 14 ESC ! n ..................................................................................................................................................... 14 ESC $ nL nH ............................................................................................................................................. 15 ESC % n ................................................................................................................................................... 16 ESC & y c1 c2 [x1 d1...d(y x1)]...[xk d1...d(y xk)] .............................................................................. 16 ESC m nL nH d1...dk ............................................................................................................................. 19 ESC - n ..................................................................................................................................................... 21 ESC 2 ....................................................................................................................................................... 22 ESC 3 n .................................................................................................................................................... 22 ESC = n .................................................................................................................................................... 22 ESC ? n .................................................................................................................................................... 23 ESC @ ...................................................................................................................................................... 23 ESC B n t(Only for page mode and general 347) .................................................................................... 23 ESC E n .................................................................................................................................................... 24 ESC G n .................................................................................................................................................... 25 ESC J n ..................................................................................................................................................... 25 ESC M n ................................................................................................................................................... 25 ESC R n .................................................................................................................................................... 26 LR2000 Programming Manual V1.0 ESC V n .................................................................................................................................................... 27 ESC \ nL nH.............................................................................................................................................. 27 ESC a n .................................................................................................................................................... 28 ESC c 5 n .................................................................................................................................................. 28 ESC d n .................................................................................................................................................... 29 ESC p m t1 t2........................................................................................................................................... 29 ESC t n ..................................................................................................................................................... 30 ESC { n ..................................................................................................................................................... 31 ESC i (for cut) .......................................................................................................................................... 31 ESC m (for cut) ........................................................................................................................................ 31 ESC 9 n .................................................................................................................................................... 32 FS p n m .................................................................................................................................................. 32 FS q n [xL xH yL yH d1...dk]1...[xL xH yL yH d1...dk]n ............................................................................. 33 GS ! n....................................................................................................................................................... 36 GS * x y d1…d(x×y×8) .......................................................................................................................... 37 GS / m ..................................................................................................................................................... 38 GS B n...................................................................................................................................................... 38 GS I n ....................................................................................................................................................... 39 GS(H pl pH fn m d1 d2 d3 d4 (fn=48) ................................................................................................... 40 GS H n ..................................................................................................................................................... 40 GS L nL nH ............................................................................................................................................... 41 ①GS V m ② GS V m n ............................................................................................................................ 41 GS W nL nH ............................................................................................................................................. 42 GS : .......................................................................................................................................................... 43 GS ^ r t m ................................................................................................................................................ 44 GS a n ...................................................................................................................................................... 44 GS f n....................................................................................................................................................... 45 GS h n ...................................................................................................................................................... 46 ① GS k m d1...dk NUL② GS k m n d1...dn ............................................................................................. 46 GS r n ...................................................................................................................................................... 49 GS v 0 m xL xH yL yH d1....dk .................................................................................................................. 50 GS w n ..................................................................................................................................................... 51 LR2000 Programming Manual V1.0 GS x n ...................................................................................................................................................... 52 GS P x y ................................................................................................................................................... 52 KANJI CONTROL COMMANDS ................................................................................................................... 52 FS ! n ....................................................................................................................................................... 52 FS & ......................................................................................................................................................... 53 FS - n ....................................................................................................................................................... 54 FS ............................................................................................................................................................ 54 FS 2 c1 c2 d1...dk .................................................................................................................................... 55 FS S n1 n2................................................................................................................................................ 55 FS W n ..................................................................................................................................................... 56 PAGE MODE COMMANDS ......................................................................................................................... 57 FF ............................................................................................................................................................ 57 ESC FF...................................................................................................................................................... 57 ESC L........................................................................................................................................................ 58 ESC S ....................................................................................................................................................... 58 ESC T n .................................................................................................................................................... 59 ESC W xL xH yL yH dxL dxH dyL dyH ....................................................................................................... 59 GS $ nL nH............................................................................................................................................... 61 GS \ nL nH ............................................................................................................................................... 61 SPECIAL PRINTING COMMANDS................................................................................................................ 62 ESC Z m n k dL dH d1…dn........................................................................................................................ 62 GS Z n ...................................................................................................................................................... 62 GS ( k pL pH cn fn n (cn=48, fn=65) ........................................................................................................ 63 GS ( k pL pH cn fn n (cn=48, fn=66)......................................................................................................... 63 GS ( k pL pH cn fn n (cn=48, fn=67)......................................................................................................... 63 GS ( k pL pH cn fn n (cn=48, fn=68)......................................................................................................... 64 GS ( k pL pH cn fn m n (cn=48, fn=69) .................................................................................................... 64 GS ( k pL pH cn fn n (cn=48, fn=70)......................................................................................................... 65 GS ( k pL pH cn fn m d1 ... dk (cn=48, fn=80) .......................................................................................... 66 GS ( k pL pH cn fn m (cn=48, fn=81) ....................................................................................................... 66 GS ( k pL pH cn fn m (cn=48, fn=82) ....................................................................................................... 67 GS ( k pL pH cn fn n1 n2 (cn=49, fn=65)................................................................................................. 68 LR2000 Programming Manual V1.0 GS ( k pL pH cn fn n (cn=49, fn=67)......................................................................................................... 69 GS ( k pL pH cn fn n (cn=49, fn=69)......................................................................................................... 69 GS ( k pL pH cn fn m d1…dk (cn=49, fn=80) ............................................................................................ 69 GS ( k pL pH cn fn m (cn=49, fn=81) ....................................................................................................... 70 GS ( k pL pH cn fn m (cn=49, fn=82) ....................................................................................................... 70 GS ( A pL pH n m ..................................................................................................................................... 71 GS ( F pL pH a m nL nH ............................................................................................................................ 72 GS FF ....................................................................................................................................................... 73 GS C 0 n m ............................................................................................................................................... 73 GS C 1 aL aH bL bH n r............................................................................................................................. 74 GS C 2 nL nH............................................................................................................................................ 75 GS C ; sa ; sb ; sn; sr; sc; .......................................................................................................................... 75 GS c ......................................................................................................................................................... 76 LR2000 Programming Manual V1.0 1 Overview The LR2000 is a fast high quality POS printer using thermal technology for printing. It is compatible with most point-of-sale systems on the market. The printer can be used with computer peripheral systems, ECR and POS systems. The LR2000 was designed to facilitate simple and efficient operations. 1.1 Appearance 1.2 Rear panel I/O connectors At the rear panel of the LR2000 is a row of external I/O device connectors detailed as follows: USB RS232 ETHERNET (LE2000E) CASH DRAWER DC IN LR2000 Programming Manual V1.0 2 Command List A command set describes the behavior of the printer when sequences of bytes are received through the communication interface. The command set available with LR2000 is ESC/POS®. It is a standard defined by Seiko Epson Corporation. ESC/POS® commands can be classified as executing or setting. An executing command cause the printer to execute something and does not affect further incoming data. On the other hand, a setting command cause the printer to change its internal flags that may affect incoming data. ESC/POS® commands supported by LR2000 are summarized in the following table. Type Print Command Line spacing Command Character Command Command Name LF Print and line feed CR Print and carriage return HT JMP to the next TAB position ESC D n Set horizontal tab positions ESC J n Print and Feed n dots paper ESC d n Print and Feed n lines ESC = n Toggle the printer online or offline DC2 T Printing test page ESC 2 Select default line spacing ESC 3 n Set line spacing ESC a n Select justification GS L nL nH Set the left blank margin with dots ESC \nl nh Set relative print position GS W nL nH Set printing area width ESC $ Set absolute print position ESC ! n Select print mode(s) GS ! n Set or Cancel the double width and height GS B Turn white/black reverse printing mode ESC V n Turn 90°clockwise rotation mode on/off ESC M n Select character font ESC G n Turn on/off double-strike mode ESC E n Set or Cancel bold font ESC SP n Set the space between chars LR2000 Programming Manual V1.0 Type Bit Image Command Init Command Status Command Bar Code Command Command Name ESC { n Turn upside-down printing mode on/off ESC - n Set the underline dots(0,1,2) ESC % n Select/Cancel user-defined characters FS & Select Chinese mode FS . Select character mode FS! Set print mode for Kanji characters FS-n Turn underline mode on/off for characters FS 2 c1 c2 Define user-defined Kanji characters FS S n1 n2 Set left and right -side Kanji character spacing ESC & Define user-defined characters ESC ? n Cancel user-defined characters ESC R n Select and international character set ESC t n Select character code table ESC * Select bit-image mode GS * Define downloaded bit image GS / Print downloaded bit image GS v Print the bitmap with width and height FS p n m Print NV bitmap FS q n Define NV bitmap ESC @ Initialize printer DLE EOT n Real-time status transmission DLE ENQ n Real-time request to printer DLE DC4 n m t Generate pulse at real-time GS r n Transmit status ESC p m Generate pulse GS a n Enable/Disable ASB GS I Read Print ID GS ( H Set process ID response GS H Select printing position of human readable characters GS h Set bar code height GS w Set bar code width GS f n Select font for HRI characters GS k Print bar code LR2000 Programming Manual V1.0 Type Command GS x Set barcode printing left space ESC c 5 n Select/Cancel panel button。 ① GS V m ② GS V m n Printer Control Command Page mode command Name Select cut mode and cut paper GS : Start/end macro definition GS^ r t m Execute macro ESC B n t Set beep tone ESC i Cut Paper (For cut) ESC m Partial Cut Paper (For cut) ESC 9 Select Chinese code format ESC FF Print data in mode page FF Print and return to standard mode in page mode ESC L Select page mode ESC S Select standard mode ESC T Select print direction in page mode ESC W Set printing area in page mode ESC Z Print 2D barcode FS W Turn quadruple-size mode on/off for Kanji characters GS FF Feed marked paper to print starting position GS $ Set absolute vertical print position in page mode GS ( A Execute test print GS C 0 Select counter print mode GS C 1 Select count mode (A) GS C 2 Set counter GS C; Select count mode (B) GS Z Select 2D barcode type GS \ Set relative vertical print position in page mode GS c Print counter GS P Set horizontal and vertical motion unit LR2000 Programming Manual V1.0 3 Command Set Details This section presents detailed information about each ESC/POS® command implemented by the LR2000 printer. Some terms used in the description of ESC/POS command set need further explanation, as described below. Print buffer: a buffer that stores the image data to be printed. Print buffer full: the state where the print buffer is full. If new print data is input while the print buffer is full, the data in the print buffer is printed out and a line feed is executed. This is the same operation as the LF operation. Start of line: a state that satisfies the following conditions: Print buffer is empty. There is no data to print (including portions of data skipped due to HT). The print position has not been specified by the ESC $ or ESC \ command. Printable area: the maximum space available for printing. The printable area under ESC/POS for LR2000 is specified by horizontal direction (72mm or 2.84”). Printing area: a value set by the command. It must be always less than or equal to printable area. Ignore: a state in which all codes, including parameters, are read in and discarded, and nothing happens. MSB: Most Significant Bit LSB: Least Significant Bit HT [Name] Horizontal tab [Format] ASCII HT Hex 09 Decimal 9 [Description] Moves the print position to the next horizontal tab position. [Notes] This command is ignored unless the next horizontal tab position has been set. If the next horizontal tab position exceeds the printing area, the printer sets the printing position to [printing area width + 1]. Horizontal tab positions are set with ESC D. If this command is received when the printing position is at [printing area width + 1], the printer executes print buffer-full printing of the current line and horizontal tab processing from the beginning of the next line. [Reference] ESC D LR2000 Programming Manual V1.0 LF [Name] Print and line feed [Format] ASCII LF Hex 0A Decimal 10 [Description] Prints the data in the print buffer and feeds one line, based on the cu rrent line spacing. [Note] This command sets the print position to the beginning of the line. [Reference] ESC 2, ESC 3 [Name] Print and carriage return [Format] ASCII CR Hex 0D Decimal 13 CR [Description] When automatic line feed is enabled, this command functions the same as LF; when automatic line feed is disabled, this command is ignored. [Notes] This command line feed is ignored with a serial interface model. Sets the print starting position to the beginning of the line. [Reference] LF DLE EOT n [Name] Real-time status transmission [Format] ASCII DLE Hex 10 04 n Decimal 16 4 n EOT n [Range] 1 n 4 [Description] Transmits the selected printer status specified by n in real-time, according to the following parameters: n = 1: Transmit printer status n = 2: Transmit offline status n = 3: Transmit error status n = 4: Transmit paper roll sensor status [Notes] The status is transmitted whenever the data sequence <10>H<04>H<n> (1 n 4) is received. Example: LR2000 Programming Manual V1.0 In ESC m nL nH d1...dk, d1=<10>H, d2=<04>H, d3=<01>H Do not use this command within another command that consists of 2 or more bytes. Example: If you attempt to transmit ESC 3 n to the printer, but DTR (DSR for the host computer) goes to MARK before n is transmitted and then DLE EOT 3 interrupts before n is received, the code <10>H for DLE EOT 3 is processed as the code for ESC 3 <10>H. The printer transmits the current status. Each status item is represented by one-byte of data. The printer transmits the status without confirming whether the host computer can receive data. The printer executes this command upon receiving it. This command is executed even when the printer is offline, the receive buffer is full, or there is an error status with a serial interface model. With a parallel interface model, this command cannot be executed when the printer is busy. This command is executed even when the printer is offline or in error status, with a parallel interface model. When Auto Status Back (ASB) is enabled using the GS a command, the status transmitted by the DLE EOT command and the ASB status must be differentiated. n = 1: Printer status Bit Off/On Hex Decimal Function 0 Off 00 0 Not used. Fixed to Off. 1 On 02 2 Not used. Fixed to On. 2 Off 00 0 Drawer open/close signal is LOW.(connector pin3) On 04 4 Drawer open/close signal is HIGH.(connector pin3) 3 - - - Undefined. 4 On 10 16 Not used. Fixed to On. 5.6 -- -- -- Undefined. 7 Off 00 0 Not used. Fixed to Off. n = 2: Offline status Bit Off/On Hex Decimal 0 Off 00 0 Not used. Fixed to Off. 1 On 02 2 Not used. Fixed to On. 2 Off 00 0 Platen is closed. On 04 4 Platen is opened. Off 00 0 Paper is not being fed by using the FEED button. On 08 8 Paper is being fed by the FEED button. 4 On 10 16 Not used. Fixed to On. 5 - - - Undefined. 6 Off 00 0 No error. 3 Function LR2000 Programming Manual V1.0 7 On 40 64 Error occurred. Off 00 0 Not used. Fixed to Off. n = 3: Error status Bit Off/On Hex Decimal 0 Off 00 0 Not used. Fixed to Off. 1 On 02 2 Not used. Fixed to On. 2 -- -- -- Undefined. 3 Off 00 0 No autocutter error. On 08 8 Autocutter error occurred. 4 On 10 16 Not used. Fixed to On. 5 Off 00 0 No unrecoverable error. On 20 32 Unrecoverable error occurred. Off 00 0 No auto-recoverable error. On 40 64 Auto recoverable error occurred. Off 00 0 Not used. Fixed to Off. 6 7 Bit 6: Function Bit 6 is On when printing is stopped due to high print head temperature until the print head temperature drops sufficiently or when the paper roll cover is opened during printing. n = 4: Continuous paper sensor status Bit Off/On Hex Decimal 0 Off 00 0 Not used. Fixed to Off. 1 On 02 2 Not used. Fixed to On. 2.3 - - - Undefined. 4 On 10 16 Not used. Fixed to On. 5.6 off 00 0 Paper roll sensor: Paper present. on 60 96 Paper roll end detected by paper roll sensor. Off 00 0 Not used. Fixed to Off. 7 [Reference] Function DLE ENQ, GS a DLE ENQ n [Name] Real-time request to printer [Format] ASCII DLE ENQ n Hex 10 05 n Decimal 16 5 n [Range] 1 n 2 [Description] Responds to a request from the host computer. n specifies the requests as follows: LR2000 Programming Manual V1.0 [Notes] n Request 1 Recover from an error and restart printing from the line where the error occurred 2 Recover from an error at clearing the receive and print buffers This command is effective only when an auto cutter error, a black mark detecting error or a platen-open error occurs. The printer starts processing data upon receiving this command. This command is executed even when the printer is offline, the receive buffer is full, or there is an error status with a serial interface model. With a parallel interface model, this command cannot be executed when the printer is busy. The status is also transmitted whenever the data sequence of <10>H<05>H<n> (1 n 2) is received. Example: In ESC m nL nH dk, d1 = <10>H, d2 = <05>H, d3 = <01>H This command should not be contained within another command that consists of two or more bytes. Example: If you attempt to transmit ESC 3 n to the printer, but DTR (DSR for the host computer) goes to MARK before n is transmitted, and DLE ENQ 2 interrupts before n is received, the code <10>H for DLE ENQ 2 is processed as the code for ESC 3 <10>H. DLE ENQ 2 enables the printer to recover from an error after clearing the data in the receive buffer and the print buffer. The printer retains the settings (byESC !, ESC 3, etc.) that were in effect when the error occurred. The printer can be initialized completely by using this command and ESC @. This command is enabled only for errors that have the possibility of recovery, except for print head temperature error. [Reference] DLE EOT DLE DC4 n m t [Name] Generate pulse at real-time [Format] ASCII DLE DC4 n m t Hex 10 14 Decimal 16 20 n m t [Range] n m t n=1,m=0,1 1t 8 [Description] Outputs the pulse specified by t to connector pn m as follows: m Connector pin 0 Drawer kick-out connector pin2 1 Drawer kick-out connector pin5 LR2000 Programming Manual V1.0 The pulse ON time is [t x 100 ms] and the OFF time is [ t x 100 ms]. [Details] [Reference] When the pulse is output to the connector pin specified while ESC p or DEL DC4 is executed while this command is processed,this command is ignored. With a serial interface model, this command is executed even when the printer is receive the command. With a parallel interface model, this command is not executed even when the printer is receive the command. If printer data includes the same character strings as this command, the printer performs the same operation specified by this command. The user must consider this. This command should not be used within the data sequence of another command that consists of 2 or more bytes. This command is effective even when the printer is disabled with ESC = (Select peripheral device). ESC p ESC SP n [Name] Set right-side character spacing [Format] ASCII ESC SP n Hex 1B 20 n Decimal 27 32 n [Range] 0 n 255 [Description] Sets the character spacing for the right side of the character to [n×0.141 mm (n× 0.0055")]. [Notes] The right-side character spacing for double-width mode is twice the normal value. When characters are enlarged, the right-side character spacing is n times normal value. This command does not affect the setting of Kanji characters. This command sets values independently in standard mode. [Default] n=0 ESC ! n [Name] Select print mode(s) [Format] ASCII ESC ! Hex 1B 21 n Decimal 27 33 n n [Range] 0 n 255 [Description] Selects print mode(s) using n as follows: Bit Off/On Hex Decimal Function 0 Off 00 0 Character Font A (12×24). On 01 1 Character Font B (9×17). LR2000 Programming Manual V1.0 1 - - - Undefined. 2 - - - Undefined. 3 Off 00 0 Emphasized mode not selected. On 08 8 Emphasized mode selected. Off 00 0 Double-height mode not selected. On 10 16 Double-height mode selected. Off 00 0 Double-width mode not selected. On 20 32 Double-width mode selected. 6 - - - Undefined. 7 Off 00 0 Underline mode not selected. On 80 128 Underline mode selected. 4 5 [Notes] When both double-height and double-width modes are selected, quadruple-size characters are printed. The printer can underline all characters, but cannot underline the space set by HT or 90clockwise rotated characters. The thickness of the underline is that selected by ESC , regardless of the character size. When some characters in a line are double or more height, all the characters in the line are aligned at the baseline. ESC M can also select character font type. However, the setting of the last received command is effective. ESC E can also turn on or off emphasized mode. However, the setting of the last received command is effective. ESC can also turn on or off underline mode. However, the setting of the last received command is effective. GS ! can also select character size. However, the setting of the last received command is effective. Emphasized mode is effective for alphanumeric and Kanji. All print modes except emphasized mode are effective only for alphanumeric. [Default] n=0 [Reference] ESC -, ESC E, GS ! ESC $ nL nH [Name] Set absolute print position [Format] ASCII ESC $ nL nH Hex 1B 24 nL nH Decimal 27 36 nL nH [Range] 0 nL 255 0 nH 255 LR2000 Programming Manual V1.0 [Description] Sets the distance from the beginning of the line to the position at which subsequent characters are to be printed. The distance from the beginning of the line to the print position is [(nL + nH×256)× 0.141 mm]. [Notes] Settings outside the specified printable area are ignored. In standard mode, the horizontal motion unit (x) is used. [Reference] ESC \, GS $, GS \ ESC % n [Name] Select/cancel user-defined character set [Format] ASCII ESC % n Hex 1B 25 n Decimal 27 37 n [Range] 0 n 255 [Description] Selects or cancels the user-defined character set. When the LSB of n is 0, the user-defined character set is canceled. When the LSB of n is 1, the user-defined character set is selected. [Notes] When the user-defined character set is canceled, the built-in character set is automatically selected. n is available only for the least significant bit. [Default] n=0 [Reference] ESC &, ESC ? ESC & y c1 c2 [x1 d1...d(y x1)]...[xk d1...d(y xk)] [Name] Define user-defined characters [Format] ASCII ESC & y c1 c2 [x1 d1...d(y × x1)]...[xk d1...d(y × xk)] Hex 1B Decimal 27 38 y c1 c2 [x1 d1...d(y × x1)]...[xk d1...d(y × xk)] [Range] 26 y c1 c2 [x1 d1...d(y × x1)]...[xk d1...d(y × xk)] y=3 32 c1 c2 126 0 x 12 (when Font A (12×24) is selected) 0 x 9 (when Font B (9×17) is selected) 0 d1 ... d(y × xk) 255 [Description] Defines user-defined characters. y specifies the number of bytes in the vertical direction. c1 specifies the beginning character code for the definition, and c2 specifies the final code. x specifies the number of dots in the horizontal direction. LR2000 Programming Manual V1.0 [Notes] The allowable character code range is from ASCII code <20>H to <7E>H (95 characters). It is possible to define multiple characters for consecutive character codes. If only one character is desired, use c1 = c2. d is the dot data for the characters. The dot pattern is in the horizontal direction from the left side. Any remaining dots on the right side are blank. The data to define user-defined characters is (y×x) bytes. Set a corresponding bit to 1 to print a dot or 0 not to print a dot. This command can define different user-defined character patterns for each font. To select a font, use ESC ! or ESC M. User-defined characters and a downloaded bit image cannot be defined simultaneously. When this command is executed, the downloaded bit image is cleared. The user-defined character definition is cleared when: 1) ESC @ is executed. 2) GS is executed. 3) ESC ? is executed. 4) The power is turned off. When user-defined characters are defined in Font B (9 17), only the most significant bit of the 3rd byte of data in vertical direction is effective. [Default] The internal character set [Reference] ESC %, ESC ? [Example] When Font A (12×24) is selected. LR2000 Programming Manual V1.0 d1= <0F>H d4 = <30>H d7 = <40>H . . . . d2 = <03>H d5 = <80>H d8 = <40>H . . . . d3 = <00>H d6 = <00>H d9 = <20>H . . . . When font B (9×17) is selected. LR2000 Programming Manual V1.0 d1 = <1F>H d4 = <08>H d7 = <10>H... d2 = <FF>H d5 = <08>H d8 = <04>H... d3 = <80>H d6 = <00>H d9 = <00>H... ESC m nL nH d1...dk [Name] Select bit-image mode [Format] ASCII ESC m nL nH d1...dk Hex 1B 2A m nL nH d1...dk Decimal 27 42 m nL nH d1...dk [Range] m = 0, 1, 32, 33 0 nL 255 0 nH3 0 d 255 [Description] m Selects a bit-image mode using m for the number of dots specified by nL and nH, as follows: Mode Vertical Direction Horizontal Direction Number of Dots Dot Density Dot Density Number of Data (k) 0 8-dot single-density 8 60 dpi 90 dpi nL + nH × 256 1 8-dot double-density 8 60 dpi 180 dpi nL + nH ×256 32 24-dot single-density 24 180 dpi 90 dpi (nL + nH ×256)3 33 24-dot double-density 24 180 dpi 180 dpi (nL + nH ×256)3 LR2000 Programming Manual V1.0 [Notes] If the value of m is out of the specified range, nL and the data following are processed as normal data. The nL and nH indicate the number of dots in the bit image in the horizontal direction. The number of dots is calculated by nL + nH 256. If the bit-image data input exceeds the number of dots to be printed on a line, the excess data is ignored. d indicates the bit-image data. Set a corresponding bit to 1 to print a dot or to 0 not to print a dot. If the width of the printing area set by GS L and GS W less than the width required by the data sent with the ESC command, the following will be performed on the line in question (but the printing cannot exceed the maximum printable area): ① The width of the printing area is extended to the right to accommodate the amount of data. ② If step ① does not provide sufficient width for the data, the left margin is reduced to accommodate the data. For each bit of data in single-density mode (m = 0, 32), the printer prints two dots: for each bit of data in double-density mode (m = 1, 33), the printer prints one dot. This must be considered in calculating the amount of data that can be printed in one line. After printing a bit image, the printer returns to normal data processing mode. This command is not affected by print modes (emphasized, double-strike,underline, character size, or white/black reverse printing), except upside-down printing mode. The relationship between the image data and the dots to be printed is described in Figure 3.11.3. When 8-dot bit image is selected: LR2000 Programming Manual V1.0 When 24-dot bit image is selected: ESC - n [Name] Turn underline mode on/off [Format] ASCII ESC - n Hex 1B 2D n Decimal 27 45 n [Range] n2, 48 n 50 [Description] Turns underline mode on or off, based on the following values [Notes] n Function 0, 48 Turns off underline mode 1, 49 Turns on underline mode (1 dot thick) 2, 50 Turns on underline mode (2 dots thick) The printer can underline all characters (including right-side character spacing), but cannot underline the space set by HT. The printer cannot underline 90clockwise rotated characters and white/black inverted characters. When underline mode is turned off by setting the value of n to 0 or 48, the following data is not underlined, and the underline thickness set before the mode is turned off does not change. The default underline thickness is 1 dot. Changing the character size does not affect the current underline thickness. LR2000 Programming Manual V1.0 Underline mode can also be turned on or off by using ESC !. Note, however, that the last received command is effective. [Default] n=0 [Reference] ESC ! ESC 2 [Name] Select default line spacing [Format] ASCII ESC 2 Hex 1B 32 Decimal 27 50 [Description] Selects 4.23 mm (30×0.141 mm) line spacing. [Notes] The line spacing can be set independently in standard mode. [Reference] ESC 3 ESC 3 n [Name] Set line spacing [Format] ASCII ESC Hex 1B 33 n Decimal 27 51 n 3 n [Range] 0 n 255 [Description] Sets the line spacing to [n × 200/380 × 0.141 mm]. If result is less than 3.384mm then line spacing is set to 3.384mm. [Notes] The line spacing can be set independently in standard mode. In standard mode, the vertical motion unit (y) is used. [Default] n = 62 [Reference] ESC 2 ESC = n [Name] Set peripheral device [Format] ASCII ESC Hex 1b 3d Decimal 27 61 n [Description] = n n Set peripheral device: bit 0: Off (Hex 00) printer disabled On (Hex 01) printer enabled bit 1-7:undefine LR2000 Programming Manual V1.0 ESC ? n [Name] Cancel user-defined characters [Format] ASCII ESC ? n Hex 1B 3F n Decimal 27 63 n [Range] 32 n 126 [Description] Cancels user-defined characters. [Notes] This command cancels the patterns defined for the character codes specified by n. After the user-defined characters are canceled, the corresponding patterns for the internal characters are printed. This command deletes the pattern defined for the specified code in the font selected by ESC !. If a user-defined characters have not been defined, the printer ignores this command. [Reference] ESC &, ESC % ESC @ [Name] Initialize printer [Format] ASCII ESC @ Hex 1B 40 Decimal 27 64 [Description] Clears the data in the print buffer and resets the printer mode to the mode that was in effect when the power was turned on. [Notes] The DIP switch settings are not checked again. The data in the receive buffer is not cleared. The macro definition is not cleared. ESC B n t(Only for page mode and general 347) [Name] [Format] Set beep tone ASCII ESC B n t Hex 1B 42 n t Decimal 27 66 n t [Range] 1 n 9,1 t 9 [Description] Set printer beep tone. n specifies the number of the beep tone. t specifies the time of beep tone . LR2000 Programming Manual V1.0 ESC D n1...nk NUL [Name] Set horizontal tab positions [Format] ASCII ESC Hex 1B 44 n1...nk 00 Decimal 27 68 n1...nk 0 [Range] D n1...nk NUL 1 n 255 0k 32 [Description] Sets horizontal tab positions. n specifies the column number for setting a horizontal tab position from the beginning of the line. k indicates the total number of horizontal tab positions to be set. [Notes] The horizontal tab position is stored as a value of [character width n] measured from the beginning of the line. The character width includes the right-side character spacing, and double-width characters are set with twice the width of normal characters. This command cancels the previous horizontal tab settings. When setting n = 8, the print position is moved to column 9 by sending HT. Up to 32 tab positions (k = 32) can be set. Data exceeding 32 tab positions is processed as normal data. Transmit [n]k in ascending order and place a NUL code 0 at the end. When [n]k is less than or equal to the preceding value [n]k-1, tab setting is finished and the following data is processed as normal data. ESC D NUL cancels all horizontal tab positions. The previously specified horizontal tab positions do not change, even if the character width changes. The character width is memorized for each standard mode. [Default] The default tab positions are at intervals of 8 characters (columns 9, 17, 25,...) for Font A (12×24). [Reference] HT ESC E n [Name] Turn emphasized mode on/off [Format] ASCII ESC E n Hex 1B 45 n Decimal 27 69 n [Range] 0 n255 [Description] Turns emphasized mode on or off When the LSB of n is 0, emphasized mode is turned off. When the LSB of n is 1, emphasized mode is turned on. LR2000 Programming Manual V1.0 [Notes] Only the least significant bit of n is enabled. This command and ESC ! turn on and off emphasized mode in the same way. Be careful when this command is used with ESC !. [Default] n=0 [Reference] ESC ! ESC G n [Name] Turn on/off double-strike mode [Format] ASCII ESC Hex 1B 47 n Decimal 27 71 G n n [Range] 0 n 255 [Description] Turns double-strike mode on or off. When the LSB of n is 0, double-strike mode is turned off. When the LSB of n is 1, double-strike mode is turned on. [Notes] Only the lowest bit of n is enabled. Printer output is the same in double-strike mode and in emphasized mode. [Default] n=0 [Reference] ESC E ESC J n [Name] Print and feed paper [Format] ASCII ESC J Hex 1B 4A n Decimal 27 74 n n [Range] 0 n 255 [Description] Prints the data in the print buffer and feeds the paper [n×0.141 mm (0.0055")]. [Notes] After printing is completed, this command sets the print starting position to the beginning of the line. The paper feed amount set by this command does not affect the values set by ESC 2 or ESC 3. In standard mode, the printer uses the vertical motion unit (y). Even when the set value exceeds the maximum with the BM sensor enabled in standard mode, this command is effective. (BM =black mark.) ESC M n [Name] Select character font [Format] ASCII ESC M n LR2000 Programming Manual V1.0 Hex 1B 4D n Decimal 27 77 n [Range] n = 0, 1, 48, 49 [Description] Selects the character font. n Function 0, 48 Character Font A (12×24) selected. 1, 49 Character Font B (9×17) selected. [Notes] ESC ! can also select character font types. However the setting of the last received command is effective. [Reference] ESC ! ESC R n [Name] Select an international character set [Format] ASCII ESC R n Hex 1B 52 n Decimal 27 82 n [Range] 0 n 13 [Description] Selects international character set n from the following table: [Default] n=0 n Character set 0 U.S.A 1 France 2 Germany 3 U.K 4 Denmark I 5 Sweden 6 Italy 7 Spain I 8 Japan 9 Norway 10 Denmark II 11 Spain II 12 Latin America 13 Korea 14 Slovenia/Croatia 15 China LR2000 Programming Manual V1.0 ESC V n [Name] Turn 90clockwise rotation mode on/off [Format] ASCII ESC V n Hex 1B 56 n Decimal 27 86 n [Range] 0 n 1, 48n 49 [Description] Turns 90clockwise rotation mode on/off n is used as follows: n [Notes] Function 0,48 Turns off 90clockwise rotation mode 1,49 Turns on 90clockwise rotation mode This command affects printing in standard mode. However, the setting is always effective. When underline mode is turned on, the printer does not underline 90clockwiserotated characters. Double-width and double-height commands in 90rotation mode enlarge characters in the opposite directions from double-height and double- width commands in normal mode. [Default] n=0 [Reference] ESC !, ESC ESC \ nL nH [Name] Set relative print position [Format] ASCII ESC Hex 1B 5C nL nH Decimal 27 92 nL nH [Range] \ nL nH 0 nL 255 0 nH 255 [Description] Sets the print starting position based on the current position using horizontal or vertical motion units. This command sets the distance from the current position to [(nL + nH 256) × 0.141 mm] [Notes] Any setting that exceeds the printable area is ignored. When pitch N is specified to the right: nL+ nH ×256 = N When pitch N is specified to the left (the negative direction), use the LR2000 Programming Manual V1.0 complement of 65536. When pitch N is specified to the left: nL+ nH × 256 = 65536 - N In standard mode, the horizontal motion unit is used. [Reference] ESC $ ESC a n [Name] Select justification [Format] ASCII ESC a n Hex 1B 61 n Decimal 27 97 n [Range] 0 n 2, 48 n 50 [Description] Aligns all the data in one line to the specified position. n selects the justification as follows: n [Notes] Justification 0,48 Left justification 1, 49 Centering 2, 50 Right justification The command is enabled only when processed at the beginning of standard mode. the line in This command executes justification in the printing area. This command justifies the space area according to HT, ESC $ or ESC \. [Default] n=0 [Example] Left justification Centering ABC ABCD ABCDE ABC ABCD ABCDE ESC c 5 n [Name] Enable/disable panel buttons [Format] ASCII ESC c Hex 1B 63 35 n Decimal 27 99 53 n 5 n [Range] 0 n 255 [Description] Enables or disables the panel buttons. When the LSB of n is 0, the panel buttons are enabled. Right justification ABC ABCD ABCDE LR2000 Programming Manual V1.0 When the LSB of n is 1, the panel buttons are disabled. [Notes] Only the lowest bit of n is valid. When the panel buttons are disabled, none of them are usable when the printer cover is closed. In this printer, the only panel buttons is the FEED button. When in macro execution standby, the FEED button is enabled regardless of the setting of this command. However, the paper cannot be feed. [Default] n=0 ESC d n [Name] Print and feed n lines [Format] ASCII ESC Hex 1B Decimal 27 d n 64 n 100 n [Range] 0 n255 [Description] Prints the data in the print buffer and feeds n lines. [Notes] This command sets the print starting position to the beginning of the line. This command does not affect the line spacing set by ESC 2 or ESC 3. The maximum paper feed amount is 1016 mm (40 inches). If the paper feed amount (n line spacing) of more than 1016 mm (40 inches) is specified, the printer feeds the paper only 1016 mm (40 inches). Even when the set value exceeds the maximum with the BM sensor enabled in standard mode, this command is effective. (BM = black mark.) [Reference] ESC 2, ESC 3 ESC p m t1 t2 [Name] Generate pulse [Format] ASCII ESC Hex Decimal [Range] p m t1 t2 1B 70 m t1 t2 27 112 m t1 t2 m=0,1,48,49 0 t1 255 0 t2255 [Description] Outputs the pulse specified by t1 and t2 to connector pin m as follow : On time= t1 x 2 millisecond Off time= t2 x 2 millisecond m =0/48 Drawer kick –out connector pin 2; m=1/49 Drawer kick –out connector pin 5. LR2000 Programming Manual V1.0 ESC t n [Name] Select character code table [Format] ASCII ESC Hex 1B 74 n Decimal 27 116 n t n [Range] 0 n 5, 16 n19, n = 255 [Description] Selects page n from the character code table. [Default] N Code Page N Code Page 0 CP437 [U.S.A., Standard Europe] 26 Thai 1 Katakana 27 CP720[Arabic] 2 CP850 [Multilingual] 28 CP855 3 CP860 [Portuguese] 29 CP857[Turkish] 4 CP863 [Canadian-French] 30 WCP1250[Central Eurpoe] 5 CP865 [Nordic] 31 CP775 6 WCP1251 [Cyrillic] 32 WCP1254[Turkish] 7 CP866 Cyrilliec #2 33 WCP1255[Hebrew] 8 MIK[Cyrillic /Bulgarian] 34 WCP1256[Arabic] 9 CP755 [East Europe,Latvian 2] 35 WCP1258[Vietnam] 10 Iran 36 ISO-8859-2[Latin 2] 11 reserve 37 ISO-8859-3[Latin 3] 12 reserve 38 ISO-8859-4[Baltic] 13 reserve 39 ISO-8859-5[Cyrillic] 14 reserve 40 ISO-8859-6[Arabic] 15 CP862 [Hebrew] 41 ISO-8859-7[Greek] 16 WCP1252 Latin I 42 ISO-8859-8[Hebrew] 17 WCP1253 [Greek] 43 ISO-8859-9[Turkish] 18 CP852 [Latina 2] 44 ISO-8859-15 [Latin 3] 19 CP858 Multilingual Latin Ⅰ+Euro) 45 Thai2 20 Iran II 46 CP856 21 Latvian 47 Cp874 22 CP864 [Arabic] 23 ISO-8859-1 [West Europe] 24 CP737 [Greek] 25 WCP1257 [Baltic] n=0 LR2000 Programming Manual V1.0 ESC { n [Name] Turns on/off upside-down printing mode [Format] ASCII Hex 1B 7B n Decimal 27 123 n [Range] 0 n 255 [Description] Turns upside-down printing mode on or off. ESC { n When the LSB of n is 0, upside-down printing mode is turned off. When the LSBof n is 1, upside-down printing mode is turned on. [Notes] Only the lowest bit of n is valid. This command is enabled only when processed at the beginning of a line in standard mode. This command does not affect printing in page mode. In upside-down printing mode, the printer rotates the line to be printed by 180and then prints it. [Default] n=0 [Example] ESC i (for cut) [Name] partial cut paper [Format] ASCII ESC i Hex 1B 69 Decimal 27 105 [Description] ESC m select a paper cutting mode and then partial cut the paper. ESC m (for cut) [Name] partial cut paper LR2000 Programming Manual V1.0 [Format] [Description] ASCII ESC m Hex 1B 6d Decimal 27 109 ESC m select a paper cutting mode and then partial cut the paper. ESC 9 n [Name] Select Chinese code format [Format] ASCII ESC 9 n Hex 1B 39 n Decimal 27 57 n [Description] Select Chinese code format, n from the character code table as follows: 0: GBK code 1: UTF-8 code 3: BIG5 code NOTE:This version does not support English. FS p n m [Name] Print NV bit image [Format] ASCII FS p n m Hex 1C 70 n m Decimal 28 112 n m [Range] 1 n 255 0 m3 , 48 m 51 [Description] Prints NV bit image n using the mode specified by m. m Mode Vertical Dot Density Horizontal Dot Density 0,48 Normal 180 dpi 180 dpi 1,49 Double-width 180 dpi 90 dpi 2,50 Double-height 90 dpi 180 dpi 3,51 Quadruple 90 dpi 90 dpi n is the number of the NV bit image (defined using the FS q command). m specifies the bit image mode. [Detail] NV bit image is a bit image defined in non-volatile memory by FS q and printed by FS p. This command is not effective when the specified NV bit image has not been defined. In standard mode, this command is effective only when there is no data in the print buffer. LR2000 Programming Manual V1.0 This command is not affected by print modes (emphasized, underline, character size, white/black reverse printing, or 90rotated characters, etc.), except upsidedown printing mode. If the printing area width set by GS L and GS W for the NV bit image is less than one vertical line, the following processing is performed only on the line in question. However, in NV bit image mode, one vertical line means 1 dot in normal mode (m0, 48) and in double-height mode (m2, 50), and it means 2 dots in doublewidth mode (m1, 49) and in quadruple mode (m3, 51). ① The printing area width is extended to the right in NV bit image mode up to one line vertically. In this case, printing does not exceed the printable area. ② If the printing area width cannot be extended by one line vertically, the left margin is reduced to accommodate one line vertically. If the downloaded bit-image to be printed exceeds one line, the excess data is not printed. This command feeds dots (for the height n of the NV bit image) in normal and double-width modes, and (for the height n 2 of the NV bit image) in doubleheight and quadruple modes, regardless of the line spacing specified by ESC 2 or ESC 3. After printing the bit image, this command sets the print position to the beginning of the line and processes the data that follows as normal data. [References] ESC , FS q, GS /, GS v 0 FS q n [xL xH yL yH d1...dk]1...[xL xH yL yH d1...dk]n [Name] Define NV bit image [Format] ASCII FS q n [xL xH yL yH d1...dk]1...[ xL xH yL yH d1...dk]n Hex 1C 71 n [xL xH yL yH d1...dk]1...[ xL xH yL yH d1...dk]n Decimal 28 113 n [xL xH yL yH d1...dk]1...[ xL xH yL yH d1...dk]n [Range] 1 n 255 0 xL 255 0 xH 3 (when 1 (xL xH 256) 1023 0 yL 255 0 yL 1 (when 1 (yL yH 256) 288 0 d 255 k = (xL xH 256) (yL yH 256) 8 Total defined data area = 192K bytes [Description] Define the NV bit image specified by n. n specifies the number of the defined NV bit image. xL, xH specifies (xL xH 256) 8 dots in the horizontal direction for the NV bit image you are defining. yL, yH specifies (yL yH 256) 8 dots in the vertical direction for the NV bit image you are defining. LR2000 Programming Manual V1.0 [Notes] Frequent write command executions may damage the NV memory. Therefore, it is recommended to write the NV memory 10 times or less a day. The printer performs a hardware reset after the procedure to place the image into the NV memory. Therefore, user-defined characters, downloaded bit images, and macros should be defined only after completing this command. The printer clears the receive and print buffers and resets the mode to the mode that was in effect at power on. At this time, DIP switch settings are checked again. This command cancels all NV bit images that have already been defined by this command. From the beginning of the processing of this command till the finish of hardware reset, mechanical operations (including initializing the position of the print head when the cover is open, paper feeding using the FEED button, etc.) cannot be performed. During processing of this command, the printer is BUSY when writing data to the user NV memory and stops receiving data. Therefore it is prohibited to transmit the data, including real-time commands, during the execution of this command. NV bit image is a bit image defined in non-volatile memory by FS q and printed by FS p. In standard mode, this command is effective only when processed at the beginning of the line. This command is effective when 7 bytes <FSyH> of the command are processed normally. W hen the amount of data exceeds the capacity left in the range defined by xL, xH, yL, yH, the printer processes xL, xH, yL, yH out of the defined range. In the first group of NV bit images, when any of the parameters xL, xH, yL, yH is out of the definition range, this command is disabled. In groups of NV bit images other than the first one, when the printer encounters xL, xH, yL, yH out of the defined range, it stops processing this command and starts writing into the NV images. At this time, NV bit images that haven’t been defined are disabled (undefined), but any NV bit images before that are enabled. The d indicates the definition data. In data (d) a 1 bit specifies a dot to be printed and a 0 bit specifies a dot not to be printed. This command defines n as the number of a NV bit image. Numbers rise in order from NV bit image 01H. Therefore, the first data group [xL xH yL yH d1...dk] is NV bit image 01H, and the last data group [xL xH yL yH d1...dk] is NV bit image n. The total agrees with the number of NV bit images specified by the command FS p. The definition data for an NV bit image consists of [xL xH yL yH d1...dk].Therefore, when only one NV bit image is defined n=1, the printer processes a data group [xL xH yL yH d1...dk] once. The printer uses ([data: (xL xH×256)×(yL yH×256)×8] [header :4]) bytes of NV memory. The definition area in this printer is a maximum of 192K bytes. This command can define several NV bit images, but cannot define bit image data whose total capacity [bit image data header] exceeds 192K bytes. LR2000 Programming Manual V1.0 The printer does not transmit ASB status or perform status detection during processing of this command even when ASB is specified. When this command is received during macro definition, the printer ends macro definition, and begins performing this command. Once an NV bit image is defined, it is not erased by performing ESC @, reset, and power off. This command performs only definition of an NV bit image and does not perform printing. Printing of the NV bit image is performed by the FS p command. [Reference] FS p [Example] When xL = 64, xH = 0, yL = 96, yH = 0 LR2000 Programming Manual V1.0 GS ! n [Name] Select character size [Format] ASCII GS ! n Hex 1D 21 n Decimal 29 33 n [Range] 0 n 255 (1 vertical number of times 8, 1 horizontal number of times 8) [Description] Selects the character height using bits 0 to 2 and selects the character width using bits 4 to 7, as follows: Bit 0 Off/On Hex Decimal Function Character height selection. See Table 2. 1 2 3 4 Character width selection. See Table 1. 5 6 7 Table 1 [Notes] Character Width Selection Width Table 2 Hex Character Height Selection Hex Decimal Decimal Width 00 0 1(normal) 00 0 1(normal) 10 16 2(double-width) 01 1 2(double-height) 20 32 3 02 2 3 30 48 4 03 3 4 40 64 5 04 4 5 50 80 6 05 5 6 60 96 7 06 6 7 70 112 8 07 7 8 This command is effective for all characters (alphanumeric and Kanji), except for HRI characters. If n is outside the defined range, this command is ignored. In standard mode, the vertical direction is the paper feed direction, and the horizontal direction is perpendicular to the paper feed direction. However, when character orientation changes in 90clockwise-rotation mode, the relationship between vertical and horizontal directions is reversed. LR2000 Programming Manual V1.0 When characters are enlarged with different sizes on one line, all the characters on the line are aligned at the baseline. The ESC ! command can also turn double-width and double-height modes on or off. However, the setting of the last received command is effective. [Default] n=0 [Reference] ESC ! GS * x y d1…d(x×y×8) [Name] Define downloaded bit image [Format] ASCII GS x y d1...d(x×y×8) Hex 1D 2A x y d1...d(x×y ×8) Decimal 29 42 x y d1 ...d(x× y×8) [Range] 1 x 255 1 y 48 (where x×y 1536) 0 d 255 [Description] Defines a downloaded bit image using the number of dots specified by x and y. x specifies the number of dots in the horizontal direction. y specifies the number of dots in the vertical direction. [Notes] The number of dots in the horizontal direction is x×8; in the vertical direction it is y× 8. If x×y is out of the specified range, this command is disabled. The d indicates bit-image data. Data (d) specifies a bit printed as 1 and not printed as 0. The downloaded bit image definition is cleared when: 1) ESC @ is executed. 2) ESC & is executed. 3) Printer is reset or the power is turned off. The following figure shows the relationship between the downloaded bit image and the printed data. LR2000 Programming Manual V1.0 [Reference] GS / GS / m [Name] Print downloaded bit image [Format] ASCII GS Hex 1D 2F m Decimal 29 47 m / m [Range] 0 m 3, 48m51 [Description] Prints a downloaded bit image using the mode specified by m. m selects a mode from the table below: m [Notes] Mode Vertical Dot Density Horizontal Dot Density 0, 48 Normal 180 dpi 180 dpi 1, 49 Double-width 180 dpi 90 dpi 2, 50 Double-height 90 dpi 180 dpi 3, 51 Quadruple 90 dpi 90 dpi This command is ignored if a downloaded bit image has not been defined. In standard mode, this command is effective only when there is no data in the print buffer. This command has no effect in the print modes (emphasized, double-strike, underline, character size, or white/black reverse printing), except for upsidedown printing mode. If the downloaded bit-image to be printed exceeds the printable area, the excess data is not printed. If the width of the printing area set by GS L and GS W is less than the width required by the data sent with the GS / command; the following will be performed on the line in question (but the printing cannot exceed the maximum printable area) ① The width of the printing area is extended to the right to accommodate the amount of data. ② If step ① does not provide sufficient width for the data, the left margin is reduced to accommodate the data. For each bit of data in normal mode (m = 0,48) and double-height mode (m = 2, 50), the printer prints one dot: for each bit of data in double-width mode (m = 1, 49) and quadruple mode (m = 3, 15), the printer prints two dots. [Reference] GS GS B n [Name] Turn white/black reverse printing mode [Format] ASCII GS B n Hex 1D 42 n LR2000 Programming Manual V1.0 Decimal 29 66 n [Range] 0 n 255 [Description] Turns on or off white/black reverse printing mode. When the LSB of n is 0, white/black reverse mode is turned off. When the LSB of n is 1, white/black reverse mode is turned on. [Notes] Only the lowest bit of n is valid. This command is available for built-in characters and user-defined characters. When white/black reverse printing mode is on, it also applies to character spacing set by ESC SP. This command does not affect bit images, user-defined bit images, bar codes, HRI characters, and spacing skipped by HT, ESC $, and ESC \. This command does not affect the space between lines. White/black reverse mode has a higher priority than underline mode. Even if underline mode is on, it is disabled (but not canceled) when white/black reverse mode is selected. [Default] n=0 GS I n [Name] Transmit printer ID [Format] ASCII GS I Hex 1D 49 n 29 73 n Decimal [Range] n n=1,2,49,50 [the printer ID] 65 n 69 [printer information B] [Description] Transmit the printer ID or the information of the printer specified. the printer IDs that can be specified are as follows: n Type of printer ID ID 1,49 Printer model ID Hex:20/decimal:32 2,50 Type ID See table[Type ID] below 65 Firmware version Depends on firmware version 66 Manufacturer “BEMATECH” 67 Printer name “LR2000” 68 Serial number Depends on serial number 69 Type of additional fonts Depends on additional fonts LR2000 Programming Manual V1.0 [Type ID] (n=2) Bit Off/On Hex Decimal Contents 0 Off 00 0 Multi-byte code characters not supported On 01 1 Multi-byte code characters supported 1 On 02 2 Autocutter Installed.(Fixed) 2,3 - - - Not used 4 Off 00 0 Fixed 5 - - - Not used 6 - - - Not used 7 Off 00 0 Fixed GS(H pl pH fn m d1 d2 d3 d4 (fn=48) [Name] Set the process ID response [Format] ASCII GS ( H Hex 1D 28 48 pl pH fn m d1 d2 d3 d4 Decimal 29 40 72 pl pH fn m d1 d2 d3 d4 [Range] pl pH fn m d1 d2 d3 d4 (pl+pH×256)=6 (pl=6,pH=0) Fn=48,m=48 32d 126 [Description] Saves the process ID specified by (d1,d2,d3,d4)for the data processed immediately before this function. GS H n [Name] Select printing position for HRI characters [Format] ASCII GS H n Hex 1D 48 n Decimal 29 72 n [Range] 0n 3, 48 n51 [Description] Selects the printing position of HRI characters when printing a bar code. n selects the printing position as follows: n [Notes] Printing position 0, 48 Not printed 1, 49 Above the bar code 2, 50 Below the bar code 3, 51 Both above and below the bar code HRI indicates Human Readable Interpretation. HRI characters are printed using the font specified by GS f. LR2000 Programming Manual V1.0 [Default] n=0 [Reference] GS f, GS k GS L nL nH [Name] Set left margin [Format] ASCII GS L nL nH Hex 1D 4C nL nH Decimal 29 76 nL nH [Range] 0nL 255 0 nH 255 [Description] Sets the left margin using nL and nH. The left margin is set to [(nL + nH ×256) ×0.141 mm]. [Notes] This command is effective only when processed at the beginning of the line in standard mode. If the setting exceeds the printable area, the maximum value of the printable area is used. [Default] nL = 0, nH = 0 [Reference] GS W ①GS V m ② GS V m n [Name] Select cut mode and cut paper [Format] ① ② [Range] [Description] ASCII GS V m Hex 1D 56 m Decimal 29 86 m ASCII GS V m n Hex 1D 56 m n Decimal 29 86 m n ① m = 1, 49 ② m = 66, 0 n 255 Selects a mode for cutting paper and executes paper cutting. The value of m selects the mode as follows: LR2000 Programming Manual V1.0 m Print mode 1, 49 Partial cut (one point left uncut) Feeds paper (cutting position + [n ×0.141 mm]), and cuts the paper partially (one point left uncut). 66 [Notes for ① and ②] Cutting status is different, depending on the installed auto-cutter type. This command is effective only when processed at the beginning of a line. [Note for ① ] Only the partial cut is available; there is no full cut. [Notes for ②] When n = 0, the printer feeds the paper to the cutting position and cuts it. When n ≠0, the printer feeds the paper to cutting position + [n ×0.141 mm] and cuts it. When the BM sensor is set to active, value set by GS ( F + 0.141mm is applied. GS W nL nH [Name] Set printing area width [Format] ASCII GS W nL nH Hex 1D 57 nL nH Decimal 29 87 nL nH [Range] 0nL 255 0 nH 255 [Description] Sets the printing area width to the area specified by nL and nH. The printing area width is set to [(nL + nH ×256) ×0.141mm (0.0055")]. [Notes] his command is effective only when processed at the beginning of the line. If the setting exceeds the printable area, the maximum value of the printable area is used. The setting by GS L takes precedence over the setting by GS W. If the [left margin + printing area width] exceeds the printable area, the printer uses [Printable area width - left margin]. However, the setting by GS W is still reserved, even when it is not used in the current printing.. If the width set for the printing area is less than the width of one character, when the character data is developed, the following processing is performed: ① The printing area width is extended to the right to accommodate one character. LR2000 Programming Manual V1.0 ② If the printing area width cannot be extended sufficiently, the left margin is reduced to accommodate one character. ③ If the printing area width cannot be extended sufficiently, the right space is reduced. If the width set for the printing area is less than one vertical line, the following processing is performed only on the line in question when data other than character data (e.g., bit image, user-defined bit image) is developed: ① The printing area width is extended to the right to accommodate one line vertical for the bit image within the printable area. ② If the printing area width cannot be extended sufficiently, the left margin is reduced to accommodate one vertical line. [Reference] GS L GS : [Name] Start/end macro definition [Format] ASCII GS Hex 1D 3A Decimal 29 58 : [Description] Starts or ends macro definition. [Notes] Macro definition starts when this command is received during normal operation.Macro definition ends when this command is received during macro definition. When GS ^ is received during macro definition, the printer ends macro definition and clears the definition. Macro is not defined when the power is turned on. The defined contents of the macro are not cleared by ESC @. Therefore,ESC @ can be included in the contents of the macro definition. If the printer receives GS : again immediately after previously receiving GS : , the printer remains in the macro undefined state. LR2000 Programming Manual V1.0 The contents of the macro can be defined up to 2048 bytes. If the macro definition exceeds 2048 bytes, excess data is not stored. [Reference] GS ^ GS ^ r t m [Name] Execute macro [Format] ASCII GS Hex 1D 5E r t m Decimal 29 94 r t m [Range] ^ r t m 0 r 255 0 t 255 m 0, 1 [Description] Executes a macro. r specifies the number of times to execute the macro. t specifies the waiting time for executing the macro. m specifies macro executing mode. When the LSB of m = 0: The macro executes r times continuously at the interval specified by t. When the LSB of m = 1: After waiting for the period specified by t, the PAPER OUT LED indicators blink and the printer waits for the FEED button to be pressed. After the button is pressed, the printer executes the macro once. The printer repeats the operation r times. [Notes] The waiting time is t×100 ms for every macro execution. If this command is received while a macro is being defined, the macro definition is aborted and the definition is cleared. If the macro is not defined or if r is 0, nothing is executed. When the macro is executed (m = 1), paper cannot be fed by using the FEED button. [Reference] GS : GS a n [Name] Enable/Disable Automatic Status Back (ASB) [Format] ASCII GS a Hex 1D 61 n Decimal 29 97 n n [Range] 0 n 255 [Description] Enables or disables ASB and specifies the status items to include, using n as follows: LR2000 Programming Manual V1.0 Bit Off/On Hex Decimal 0 - - - Undefined . 1 - - - Undefined . 2 Off 00 0 Error status disabled. On 04 4 Error status enabled. Off 00 0 Paper roll sensor status disabled. On 08 8 Paper roll sensor status enabled. - - - Undefined. 3 4-7 [Notes] Status for ASB If any of the status items in the table above are enabled, the printer transmits the status when this command is executed. The printer automatically transmits the status whenever the enabled status item changes. The disabled status items may change, in this case, because each status transmission represents the current status. If all status items are disabled, the ASB function is also disabled. If the ASB is enabled as a default, the printer transmits the status when the printer data reception and transmission are possible at the first time from when the printer is turned on. The following four status bytes are transmitted without confirming whether the host is ready to receive data. The four status bytes must be consecutive, except for the XOFF code. Since this command is executed after the data is processed in the receive buffer, there may be a time lag between data reception and status transmission. When using DLE EOT, or GS r, the status transmitted by these commands and ASB status must be differentiated. The status items to be transmitted are as follows: GS f n [Name] Select font for Human Readable Interpretation (HRI) characters [Format] ASCII GS Hex 1D Decimal 29 102 n f n 66 n [Range] n 1, 48, 49 [Description] Selects a font for the HRI characters used when printing a bar code. n selects a font from the following table: n [Notes] Font 0,48 Font A (12×24) 1,49 Font B (9 ×17) HRI indicates Human Readable Interpretation. HRI characters are printed at the position specified by GS H. LR2000 Programming Manual V1.0 [Default] n=0 [Reference] GS H, GS k GS h n [Name] Select bar code height [Format] ASCII GS Hex 1D 68 n Decimal 29 104 n h n [Range] 1 n 255 [Description] Selects the height of the bar code. n specifies the number of dots in the vertical direction. [Default] n = 162 [Reference] GS k ① GS k m d1...dk NUL② GS k m n d1...dn [Name] Print bar code [Format] ① ASCII [Range] GS k m d1...dk NUL Hex 1D 6B m d1...dk 00 Decimal 29 107 m d1...dk 0 ② ASCII GS k m n d1...dn Hex 1D 6B m n d1...dn Decimal 29 107 m n d1...dn ① 0 m 6 (k and d depend on the bar code system used) ② 65 m 73 (n and d depend on the bar code system used) [Description] Selects a bar code system and prints the bar code. m selects a bar code system as follows: m ① ② Bar Code System Number of Characters Remarks 0 UPC-A 11 k 12 48 d 57 1 UPC-E 11 k 12 48 d 57 2 JAN13 (EAN13) 12 k 13 48 d 57 3 JAN 8 (EAN8) 7 k 8 48 d 57 4 CODE39 1 k′ 48 d 57, 65 d 90, 32, 36, 37, 43, 45, 46, 47 5 ITF 1 k (even number) 48 d 57 6 CODABAR 1 k′ 48 d 57, 65 d 68 , 36, 43, 45, 46, 47, 58 65 UPC-A 11 n 12 48 d 57 LR2000 Programming Manual V1.0 66 UPC-E 11 n 12 48 d 57 67 JAN13 (EAN13) 12 n13 48 d 57 68 JAN 8 (EAN8) 7 n 8 48 d 57 69 CODE39 1 n 255 48 d 57, 65 d 90, 32, 36, 37, 43, 45, 46, 47 70 ITF 1 n 255 (even number) 48 d 57 71 CODABAR 1 n 255 48 d 57, 65 d 68 , 36, 43, 45, 46, 47, 58 72 CODE93 1 n 255 0 d 127 73 CODE128 2 n 255 0 d 127 [Notes for ①] This command ends with a NUL code. When the bar code system used is UPC-A or UPC-E, the printer prints the bar code data after receiving 12 bytes of bar code data and processes the following data as normal data. When the bar code system used is JAN13 (EAN13), the printer prints the bar code after receiving 13 bytes of bar code data and processes the following data as normal data. When the bar code system used is JAN8 (EAN8), the printer prints the bar code after receiving 8 bytes of bar code data and processes the following data as normal data. The number of data for the ITF bar code must be even numbers. When an odd number of bytes of data is input, the printer ignores the last received data. [Notes for ②] n indicates the number of bar code data bytes, and the printer processes n bytes from the next character data as bar code data. If n is outside the specified range, the printer stops command processing and processes the following data as normal data. [Notes in standard mode] If d is outside the specified range, the printer only feeds paper and processes the following data as normal data. If the horizontal size exceeds printing area, the printer only feeds the paper. This command feeds as much paper as is required to print the bar code, regardless of the line spacing specified by ESC 2 or ESC 3. This command is enabled only when no data exists in the print buffer. When data exists in the print buffer, the printer processes the data following m as normal data. After printing the bar code, this command sets the print position to the beginning of the line. This command is not affected by print modes (emphasized, double-strike, underline, character size, white/black reverse printing, or 90rotated character, etc.), except for upside-down printing mode. LR2000 Programming Manual V1.0 Control character Control character ASCII Hex Decimal HRI character ASCII Hex Decimal HRI character NUL 00 0 ■U DEL 10 16 ■P SOH 01 1 ■A DC1 11 17 ■Q STX 02 2 ■B DC2 12 18 ■R ETX 03 3 ■C DC3 13 19 ■S EOT 04 4 ■D DC4 14 20 ■T ENQ 05 5 ■E NAK 15 21 ■U ACK 06 6 ■F SYN 16 22 ■V BEL 07 7 ■G ETB 17 23 ■W BS 08 8 ■H CAN 18 24 ■X HT 09 9 ■I EM 19 25 ■Y LF 0A 10 ■J SUB 1A 26 ■Z VT 0B 11 ■K ESC 1B 27 ■A FF 0C 12 ■L FS 1C 28 ■B CR 0D 13 ■M GS 1D 29 ■C SO 0E 14 ■N RS 1E 30 ■D SI 0F 15 ■O US 1F 31 ■E DEL 7F 127 ■T When CODE128 (m = 73) is used: When using CODE128 in this printer, take the following points into account for data transmission: ① The top of the bar code data string must be the code set selection character (CODE A, CODE B, or CODE C), which selects the first code set. ② Special characters are defined by combining two characters "{" and one character. The ASCII character "{" is defined by transmitting "{" twice consecutively. Transmit data Specific character ASCII Hex Decimal SHIFT {S 7B, 53 123,83 CODE A {A 7B, 41 123,65 CODE B {B 7B,42 123,66 CODE C {C 7B,43 123,67 FNC1 {1 7B,31 123,49 FNC2 {2 7B,32 123,50 FNC3 {3 7B,33 123,51 LR2000 Programming Manual V1.0 FNC4 {4 7B,34 123,52 "{" {{ 7B,7B 123,123 <Others> Be sure to keep spaces on both right and left sides of a bar code. (Spaces are different depending on the types of the bar code.) [Reference] GS H, GS f, GS h, GS w GS r n [Name] Transmit status [Format] ASCII GS r Hex 1D 72 Decimal 29 114 n n n [Range] n = 1, 49 [Description] Transmits the status specified by n as follows: n Function 1, 49 [Notes] Transmits paper sensor status When using a serial interface When DTR/DSR control is selected, the printer transmits only 1 byte after confirming the host is ready to receive data (DSR signal is SPACE). If the host computer is not ready to receive data (DSR signal is MARK), the printer waits until the host is ready. When XON/XOFF control is selected, the printer transmits only 1 byte without confirming the condition of the DSR signal. This command is executed when the data in the receive buffer is developed. Therefore, there may be a time lag between receiving this command and transmitting the status, depending on the receive buffer status. When Auto Status Back (ASB) is enabled using GS a, the status transmitted by GS r and the ASB status must be differentiated using. The status types to be transmitted are shown below: Paper sensor status (n = 1, 49): Bit Off/On Hex Decimal 0,1 - - - Undefined. 2,3 Off 00 0 Paper roll end sensor: paper adequate. On (0C) (12) Paper roll end sensor: paper near end. 4 Off 00 0 Not used. Fixed to Off. 5,6 - - - Undefined. 7 Off 00 0 Not used. Fixed to Off. Bits 2 and 3: Status for ASB When the paper end sensor detects a paper end, the printer goes offline and does not execute this command. Therefore, bits 2 and 3 do not transmit the status of paper end. LR2000 Programming Manual V1.0 [Reference] DLE EOT, GS a GS v 0 m xL xH yL yH d1....dk [Name] Print raster bit image [Format] ASCII GS v Hex 1D 76 30 m Xl xH yL yH d1...dk Decimal 29 118 48 [Range] 0 m xL xH yL yH d1...dk m xL xH yL yH d1...dk 0 m 3, 48 m 51 0 xL 255 0 xH 255 where 1 (xL + xH×256) 128 0 yL 255 0 yH 8 where 1 (yL + yH×256) 4095 0 d 255 k = (xL + xH×256) ×(yL + yH×256) (k ≠0) [Description] Selects raster bit-image mode. The value of m selects the mode, as follows: m Mode Vertical Dot Density Horizontal Dot Density 0, 48 Normal 180 dpi 180 dpi 1, 49 Double-width 180 dpi 90 dpi 2, 50 Double-height 90 dpi 180 dpi 3, 51 Quadruple 90dpi 90dpi xL, xH, select the number of data bytes (xL+xH×256) in the horizontal direction for the bit image. yL, yH, select the number of data bits (yL+yH×256) in the vertical direction for the bit image. [Notes] In standard mode, this command is effective only when there is no data in the print buffer. This command is not affected by print modes (character size, emphasized, doublestrike, upside-down, underline, white/black reverse printing, etc.) for raster bit image. If the printing area width set by GS L and GS W is less than the minimum width, the printing area is extended to the minimum width only on the line in question. The minimum width means 1 dot in normal (m=0, 48) and double-height (m=2, 50), 2 dots in double-width (m=1, 49) and quadruple (m=3, 51) modes. Data outside the printing area is read in and discarded on a dot-by-dot basis. The position at which subsequent characters are to be printed for raster bit image is specified by HT (Horizontal Tab), ESC $ (Set absolute print position), ESC \ ( Set relative print position), and GS L (Set left margin ). If the position at which subsequent characters are to be printed is a multiple of 8. LR2000 Programming Manual V1.0 The ESC a (Select justification) setting is also effective on raster bit images. When this command is received during macro definition, the printer ends macro definition, and begins performing this command. The definition of this command should be cleared. d indicates the bit-image data. Setting a bit to 1 prints a dot and setting it to 0 does not print a dot. [Example] When xL+xH×256=64 ← → (xL + xH×256)×8dots=512dots 1 2 3 **** * 62 63 64 65 66 67 **** * 126 127 128 yL+yH256dots **** * **** * 7 6 5 4 3 2 MSB 1 ↑ K-2 K-1 K ↓ 0 LSB GS w n [Name] Set bar code width [Format] ASCII GS w n Hex 1D 77 n Decimal 29 119 n [Range] 2 n 6 [Description] Sets the horizontal size of the bar code. n specifies the bar code width as follows: n Module Width (mm) for Multi-level Bar Code Binary-level Bar Code Thin Element Width (mm) Thick Element Width(mm) 2 0.282 0.282 0.706 3 0.423 0.423 1.129 4 0.564 0.564 1.411 5 0.706 0.706 1.834 6 0.847 0.847 2.258 Multi-level bar codes are as follows: UPC-A, UPC-E, JAN13 (EAN13), JAN8 (EAN8), CODE93, CODE128 Binary-level bar codes are as follows: LR2000 Programming Manual V1.0 CODE39, ITF, CODABAR [Default] n=3 [Reference] GS k GS x n [Name] Set barcode printing left space [Format] ASCII GS Hex 1D 78 n Decimal 29 120 n [Description] x n The print bar code staring positions is: 0255 GS P x y [Name] Set horizontal and vertical motion unit [Format] ASCII : GS P Hex : 1D 50 x y x y Decimal : 29 80 x y [Range] 0 x 255 0 y 255 [Description] This command sets the horizontal and vertical motion unit to 1 / x and 1 / y inches, respectively. The default value are x = 180 and y = 360. When x and y are set to 0, the default setting of each value is used. KANJI CONTROL COMMANDS FS ! n [Name] Set print mode(s) for Kanji characters [Format] ASCII FS Hex 1C 21 n Decimal 28 33 n ! n [Range] 0 n 255 [Description] Sets the print mode for Kanji characters, using n as follows: Bit Off/On Hex Decimal 0 - - - Function Undefined. LR2000 Programming Manual V1.0 1 - - - Undefined. 2 Off 00 0 Double-width mode is OFF. On 04 4 Double-width mode is ON. Off 00 0 Double-height mode is OFF. On 08 8 Double-height mode is ON. 4 - - - Undefined. 5 - - - Undefined. 6 - - - Undefined. 7 Off 00 0 Underline mode is OFF. On 80 128 Underline mode is ON. 3 [Notes] When both double-width and double-height modes are set (including right- and leftside character spacing), quadruple-size characters are printed. The printer can underline all characters (including right- and left-side character spacing), but cannot underline the space set by HT and 90° clockwise-rotated characters. The thickness of the underline is that specified by FS , regardless of the character size. When some of the characters in a line are double or more height, all thecharacters on the line are aligned at the baseline. It is possible to emphasize the Kanji character using GS !; the setting of the last received command is effective. It is possible to turn underline mode on or off using FS , and the setting of the last received command is effective. [Default] n=0 [Reference] FS , GS ! FS & [Name] Select Kanji character mode [Format] ASCII FS & Hex 1C 26 Decimal 28 38 [Description] Selects Kanji character mode. [Notes] For Kanji model: When the Kanji character mode is selected, the printer processes all Kanji code as two bytes each. Kanji codes are processed in the order of the first byte and second byte. Kanji character mode is not selected when the power is turned on. [Reference] FS . LR2000 Programming Manual V1.0 FS - n [Name] Turn underline mode on/off for Kanji characters [Format] ASCII FS - Hex 1C 2D n Decimal 28 45 n n [Range] 0 n 2, 48 n 50 [Description] Turns underline mode for Kanji characters on or off, based on the following values of n. n [Notes] Function 0, 48 Turns off underline mode for Kanji characters 1, 49 Turns on underline mode for Kanji characters (1-dot thick) 2, 50 Turns on underline mode for Kanji characters (2-dot thick) The printer can underline all characters (including right- and left-side character spacing), but cannot underline the space set by HT and 90° clockwise-rotated characters. After the underline mode for Kanji characters is turned off by setting n to 0, underline printing is no longer executed, but the previously specified underline thickness is not changed. The default underline thickness is 1 dot. The specified line thickness does not change even when the character size changes. It is possible to turn underline mode on or off using FS !, and the last received command is effective. [Default] n=0 [Reference] FS ! [Name] Cancel Kanji character mode [Format] ASCII FS . Hex 1C 2E Decimal 28 46 FS . [Description] Cancels Kanji character mode. [Notes] For Kanji model: When the Kanji character mode is not selected, all character codes are processed one byte at a time as ASCII code. Kanji character mode is not selected when the power is turned on. [Reference] FS & LR2000 Programming Manual V1.0 FS 2 c1 c2 d1...dk [Name] Define user-defined Kanji characters [Format] ASCII FS 2 c1 c2 d1...dk Hex 1C 32 c1 c2 d1...dk Decimal 28 50 c1 c2 d1...dk [Range] c1 and c2 indicate character codes for the defined characters. Model type c1 c2 Chinese kanji supporting model c1 = FEH A1H c2 FEH 0 d 255 k = 32 (slip), k = 72 (paper roll) [Description] Defines user-defined Kanji characters for the character codes specified by c1 and c2. [Notes] c1 and c2 indicate character codes for the defined characters. c1 specifies for the first byte, and c2 for the second byte. d indicates the dot data. Set a corresponding bit to 1 to print a dot or to 0 to not print a dot. The user-defined Kanji characters is printed on the selected paper set by the ESC c1 command. [Default] All spaces. [Reference] ESC c 1 FS S n1 n2 [Name] Set left- and right-side Kanji character spacing [Format] ASCII FS S n1 n2 Hex 1C 53 n1 n2 Decimal 28 83 n1 n2 LR2000 Programming Manual V1.0 [Range] 0 n1 255 0 n2 255 [Description] Sets left- and right-side Kanji character spacing to n1 and n2, respectively. The left-side character spacing is [n1×0.141 mm], and the right-side character spacing is [n2×0.141 mm]. [Notes] This command sets the left- and right-side character spacing for normal-sized characters. When double-width mode is set, the left- and right-side character spacing is twice the normal value. The spacing which is set with this command can be set independently in standard mode. In standard mode, the horizontal motion unit is used. [Default] n1 = 0, n2 = 0 FS W n [Name] Turn quadruple-size mode on/off for Kanji characters [Format] ASCII FS W Hex 1C 57 n Decimal 28 87 n n [Range] 0 n255 [Description] Turns quadruple-size mode on or off for Kanji characters. When the LSB of n is 0, quadruple-size mode for Kanji characters is turned off. When the LSB of n is 1, quadruple-size mode for Kanji characters is turned on. [Notes] Only the lowest bit of n is valid. In quadruple-size mode, the printer prints the same size characters as when double-width and double-height modes are both turned on. When quadruple-size mode is turned off using this command, the following characters are printed in normal size. When some of the characters on a line are different in height, all the characters on the line are aligned at the baseline. When characters are enlarged in the horizontal direction, they are enlarged to the right, based on the left side of the character. FS ! or GS ! can also select and cancel quadruple-size mode by selecting doubleheight and double-width modes, and the setting of the last received command is effective. [Default] n=0 [Reference] FS !, GS ! LR2000 Programming Manual V1.0 PAGE MODE COMMANDS The printer operates in two print modes: standard mode and page mode. In standard mode, the printer prints and feeds paper each time it receives print data or paper feed commands. In page mode, all the received print data and paper feed commands are processed in the specified memory, and no printing action is executed. All data in the memory is then printed when an ESC FF or FF command is received. For example, when the printer receives the data "ABCDEF12345" and <LF> in standard mode, it prints "ABCDEF12345" and feeds the paper by one line. In page mode, data "ABCDEF12345" is written to the specified printing area in memory. The position in memory for the next print data is shifted by one line. The ESC L command sets the printer into page mode, and all commands received thereafter are processed in page mode. Executing an ESC FF command prints the received data collectively, and executing an FF command restores the printer to standard mode after the received data is printed collectively. Executing an ESC S command restores the printer to standard mode without printing the data in page mode memory. The received data is cleared from memory instead. FF [Name] Print and return to standard mode in page mode [Format] ASCII FF Hex 0C Decimal 12 [Description] When in page mode, this prints the data in the print buffer collectively and returns to standard mode. When black mark is enabled, this prints the data in the print buffer and feeds paper to the TOF position (the black mark). [Notes] This command is enabled only in page mode. The buffer data is deleted after being printed. The printing area set by ESC W is reset to the default setting. This command sets the print position to the beginning of the line. [Reference] ESC FF, ESC L, ESC S ESC FF [Name] Print data in mode page [Format] ASCII ESC Hex 1B FF 0C LR2000 Programming Manual V1.0 Decimal [Description] 27 12 When in page mode ESC FF prints all data in the print buffer in one time.The buffer data is not deleted after being printed. ESC L [Name] Select page mode [Format] ASCII ESC L Hex 1B 4C Decimal 27 76 [Description] Switches from standard mode to page mode. [Notes] This command is enabled only when processed at the beginning of a line in standard mode. This command has no effect in page mode. After printing by FF is completed or by using ESC S, the printer returns to standard mode. This command sets the position where data is buffered to the position specified by ESC T within the printing area defined by ESC W. This command switches the settings for the following commands (in which the values can be set independently in standard mode and page mode) to those for page mode: Set right-side character spacing: ESC SP Select default line spacing: ESC 2, ESC 3 Only valve settings is possible for the following commands in page mode; these commands are not executed. Turn 90 degrees clockwise rotation mode on/off: ESC V Select justification: ESC a Turn upside-down printing mode on/off: ESC { Set left margin: GS L Set printable area width: GS W The printer returns to standard mode when power is turned on, the printer is reset, or ESC @ is used. [Reference] FF, CAN, ESC FF, ESC S, ESC T, ESC W, GS $, GS \ ESC S [Name] Select standard mode [Format] ASCII ESC S Hex 1B 53 Decimal 27 83 [Description] Switches from page mode to standard mode. [Notes] This command is effective only in page mode. LR2000 Programming Manual V1.0 Data buffered in page mode is cleared. This command sets the print position to the beginning of the line. The printing area set by ESC W is initialized. This command switches the settings for the following commands (in which the values can be set independently in standard mode and page mode) to those for standard mode: [Reference] Set right-side character spacing: ESC SP Select default line spacing: ESC 2, ESC 3 FF, ESC FF, ESC L ESC T n [Name] Select print direction in page mode [Format] ASCII ESC T n Hex 1B 54 n Decimal 27 84 n [Range] 0 n 3 48 n 51 [Description] Selects the print direction and starting position in page mode. n specifies the print direction and starting position as follows: n 0,48 Print Direction Starting Position Left to right Upper left (A in the figure) 1,49 Bottom to top Lower left (B in the figure) 2,50 Right to left Lower right (C in the figure) 3,51 Top to bottom Upper right (D in the figure) [Notes] When the command is input in standard mode, the printer executes only internal flag operation. This command does not affect printing in standard mode. This command sets the position where data is buffered within the printing areaset by ESC W. [Default] n=0 [Reference] ESC $, ESC L, ESC W, ESC \, GS $, GS \ ESC W xL xH yL yH dxL dxH dyL dyH [Name] Set printing area in page mode LR2000 Programming Manual V1.0 [Format] ASC II ESC W xL xH yL yH dxL dxH dyL dyH Hex 1B 57 xL xH yL yH dxL dxH dyL dyH Decimal 27 87 xL xH yL yH dxL dxH dyL dyH [Range] 0 xL, xH, yL, yH, dxL, dxH, dyL, dyH 255 (except dxL=dxH=0 or dyL=dyH=0) [Description] The horizontal starting position, vertical starting position, printing area width,and printing area height are defined as x0, y0, dx (inch), dy (inch), respectively.Each setting for the printing area is calculated as follows: x0 = [(xL + xH×256) ×0.141 mm] y0 = [(yL + yH ×256) ×0.141 mm] dx = [(dxL + dxH×256) ×0.141 mm] dy = [(dyL + dyH ×256) ×0.141 mm] [Notes] If this command is input in standard mode, the printer executes only internal flag operation. This command does not affect printing in standard mode. If the horizontal or vertical starting position is set outside the printable area, the printer stops command processing and processes the following data as normal data. If the printing area width or height is set to 0, the printer stops command processing and processes the following data as normal data. This command sets the position where data is buffered to the position specified by ESC T within the printing area. If (horizontal starting position + printing area width) exceeds the printable area,the printing area width is automatically set to (horizontal printable area -horizontal starting position). If (vertical starting position + printing area height) exceeds the printable area,the printing area height is automatically set to (vertical printable area – vertical starting position). Use 0.141 mm (0.0055") pitch for setting the horizontal starting position and printing area width, and use 0.141 mm pitch for setting the vertical starting position and printing area height. When the horizontal starting position, vertical starting position, printing area width, and printing area height are defined as X, Y, Dx, and Dy respectively, the printing area is set as shown in the figure below. [Reference] CAN, ESC L, ESC T LR2000 Programming Manual V1.0 GS $ nL nH [Name] Set absolute vertical print position in page mode [Format] ASCII GS $ nL nH Hex 1D 24 nL nH Decimal 29 36 nL nH [Range] 0 nL 255, 0 nH 255 [Description] Sets the absolute vertical print starting position to buffer character data in pagemode. This command sets the absolute print position to [(nL + nH 256) ×0.141 mm]. [Notes] This command is effective only in page mode. If the [(nL + nH×256) × (vertical or horizontal motion units)] exceeds the specified printing area, this command is ignored. The horizontal starting buffer position does not move. The reference starting position is that specified by ESC T. This command operates as follows, depending on the starting position of the printing area specified by ESC T: When the starting position is set to the upper left or lower right, this command sets the absolute position in the vertical direction. When the starting position is set to the upper right or lower left, this command sets the absolute position in the horizontal direction. [Reference] ESC $, ESC T, ESC W, ESC \, GS \ GS \ nL nH [Name] Set relative vertical print position in page mode [Format] ASCII GS \ Hex 1D 5C nL nH Decimal 29 92 nL nH [Range] nL nH 0 nL 255 0 nH 255 [Description] Sets the relative vertical print starting position from the current position in page mode. This command sets the distance from the current position to [(nL + nH ×256)× 0.141 mm (0.0055")]. [Notes] This command is ignored unless page mode is selected. When pitch N is specified for the movement downward: nL + nH ×256 = N When pitch N is specified for the movement upward (the negative direction),use the complement of 65536. When pitch N is specified for the movement upward: LR2000 Programming Manual V1.0 nL + nH×256 = 65536 - N Any setting that exceeds the specified printing area is ignored. This command functions as follows, depending on the print starting position set by ESC T: When the starting position is set to the upper left or lower right of the printing, the vertical motion unit (y) is used. When the starting position is set to the upper right or lower left of the printing area, the horizontal motion unit (x) is used. [Reference] ESC $, ESC T, ESC W, ESC \, GS $ SPECIAL PRINTING COMMANDS ESC Z m n k dL dH d1…dn [Name] Print 2D barcode [Format] ASC II ESC Z Hex 1B Decimal 27 m n k dL dH d1…dn 5A m n k dL dH d1…dn 90 m n k dL dH d1…dn [Application] PDF417 barcode only [Description] PDF417 barcode printing m specifies column number of 2D barcode.(1 ≤ m ≤ 30) n specifies security level to restore when barcode image is damaged.(0 ≤ n ≤ 8) k is used for define horizontal and vertical ratio.( 2 ≤ k ≤ 5) d is the length of data and it is consist of 2 bytes: dL: 1st byte is lower number. dH: 2 nd byte is upper number. d1…dn is barcode data. The size of PDF417 is influenced by barcode width command (GS w n). GS Z n [Name] Select 2D barcode type [Format] ASCII GS Z Hex 1D 5A n Decimal 27 90 n [Range] n n=0: PDF417(default) n=1: QR-CODE LR2000 Programming Manual V1.0 GS ( k pL pH cn fn n (cn=48, fn=65) [Function] Set PDF417 code number of columns in the data region [Format] ASCII GS ( k pL pH cn fn n Hex 1D 28 6B pL pH cn fn n Decimal 29 40 107 pL pH cn fn n [Range] pL = 3, pH = 0 cn = 48, fn = 65 0 ≤ n ≤ 30 [Default] n=0 [Description] Sets the number of columns in the data region for PDF417. • When n = 0, automatic processing is selected. • When n ≠ 0, the number of columns in the data region is set to n code words. [Notes] • Setting of this function affect the processing of functions 81 and 82. • When auto processing (n = 0) is selected, the maximum number of columns in the data area is 30 columns. • The following data is not included in the number of columns: - Start pattern and stop pattern. - Indicator codeword of left and right. • When automatic processing (n = 0) is selected, the number of columns is calculated by the print area when processing functions 81, 82, module width (function 67), and option setting (function 70). • Settings of this function are effective until ESC @ is executed, the printer is reset, or the power is turned off. GS ( k pL pH cn fn n (cn=48, fn=66) [Function] Set PDF417 number of rows [Format] ASCII GS ( k pL pH cn fn n Hex 1D 28 6B pL pH cn fn n Decimal 29 40 107 pL pH cn fn n [Range] pL = 3, pH = 0 cn = 48, fn = 66 n = 0 (automatic processing) [Description] Set number of rows for PDF417. GS ( k pL pH cn fn n (cn=48, fn=67) [Function] Set the PDF417 module width [Format] ASCII GS ( k pL pH cn fn n Hex 1D 28 6B pL pH cn fn n Decimal 29 40 107 pL pH cn fn n LR2000 Programming Manual V1.0 [Range] pL = 3, pH = 0 cn = 48, fn = 67 2≤n≤8 [Default] n=3 [Description] Set to the width of the module for PDF417 to n dots [Notes] • Settings of this function affect the processing of functions 81 and 82. • Settings of this function are effective until ESC @ is executed, the printer is reset, or the power is turned off. GS ( k pL pH cn fn n (cn=48, fn=68) [Function] Set PDF417 row height [Format] ASCII GS ( k pL pH cn fn n Hex 1D 28 6B pL pH cn fn n Decimal 29 40 107 pL pH cn fn n [Range] pL = 3, pH = 0 cn = 48, fn = 68 2≤n≤8 [Default] n=3 [Description] Set row height to [n × (module width)] for PDF417. [Notes] • Settings of this function affect the processing of functions 81 and 82. • Settings of this function are effective until ESC @ is executed, the printer is reset, or the power is turned off. GS ( k pL pH cn fn m n (cn=48, fn=69) [Function] Set PDF417 error correction level. [Format] ASCII GS ( k pL pH cn fn m n Hex 1D 28 6B pL pH cn fn m n Decimal 29 40 107 pL pH cn fn m n [Range] pL = 4, pH = 0 cn = 48, fn = 69 m = 48, 49 48 ≤ n ≤ 56 [m = 48] 1 ≤ n ≤ 40 [m = 49] [Default] m = 49, n = 1 [Description] Set error correction level for PDF417. m Function n 48 The error correction level is set by “level”. 49 The error correction level is set by “ratio”. The ratio is [n x 10%] LR2000 Programming Manual V1.0 [Notes] • Settings of this function affect the processing of functions 81 and 82. • Error correction level is specified by either “level” or “ratio.” • Error correction level specified by “level” (m = 48) is as defined in following table The number of the error correction codeword is fixed regardless of the number of codeword in the data area. n Function Number of error correction codeword 48 Error correction level 0 2 49 Error correction level 1 4 50 Error correction level 2 8 51 Error correction level 3 16 52 Error correction level 4 32 53 Error correction level 5 64 54 Error correction level 6 128 55 Error correction level 7 256 56 Error correction level 8 512 • Error correction level specified by “ratio” (m = 49) is defined in following table. The error correction level is defined by [number of data codeword × n × 0.1 = (A)]. The number of the error correction codeword changes depending on the number of codeword in the data area. (A) Function Number of error correction codeword 0-3 Error correction level 1 4 4-10 Error correction level 2 8 11-20 Error correction level 3 16 21-45 Error correction level 4 32 46-100 Error correction level 5 64 101-200 Error correction level 6 128 201-400 Error correction level 7 256 401 or more Error correction level 8 512 • The error correction codeword is calculated by modulus 929. • Settings of this function are effective until ESC @ is executed, the printer is reset, or the power is turned off. GS ( k pL pH cn fn n (cn=48, fn=70) [Function] Select PDF417 option [Format] ASCII GS ( k pL pH cn fn n LR2000 Programming Manual V1.0 [Range] Hex 1D 28 6B pL pH cn fn n Decimal 29 40 107 pL pH cn fn n pL = 3, pH = 0 cn = 48, fn = 70 n = 0 (standard PDF417) [Description] Select option for PDF417. GS ( k pL pH cn fn m d1 ... dk (cn=48, fn=80) [Function] Store PDF417 data in the symbol storage area [Format] ASCII GS ( k pL pH cn fn m d1 ... dk Hex 1D 28 6B pL pH cn fn m d1 ... dk Decimal 29 40 107 pL pH cn fn m d1 ... dk [Range] 4 ≤ (pL + pH × 256) ≤ 65,535 (pL ≤ 255; pH ≤ 255) cn = 48, fn = 80 m = 48 0 ≤ d ≤ 255 k = (pL + pH × 256) – 3 [Description] Store PDF417 symbol data (d1 ... dk) in the symbol storage area. [Notes] • Data stored in the symbol storage area is processed by functions 81 and 82. This data is not destroyed after execution of function 81 or 82. • k bytes of d1...dk are processed as symbol data. • Specify only the data codeword of the symbol with this function. The information listed below is added automatically by the printer: o Start pattern and stop pattern. o Indicator codeword of left and right. o The descriptor of symbol length (the first codeword in the data area). o The error correction codeword calculated by modulus 929. • Settings of this function are effective until the following processing is performed: o Function 80 is executed. o ESC @ is executed. o The printer is reset or the power is turned off. GS ( k pL pH cn fn m (cn=48, fn=81) [Function] Print PDF417 symbol data in the symbol storage area. [Format] ASCII GS ( k pL pH cn fn m Hex 1D 28 6B pL pH cn fn m Decimal 29 40 107 pL pH cn fn m [Range] pL = 3, pH = 0 cn = 48, fn = 81 LR2000 Programming Manual V1.0 m = 48 [Description] Encodes and prints the PDF417 symbol data stored in the symbol storage area by function 80. [Notes] • A symbol that size exceeds the print area cannot be printed. • If there is any an inconsistence in the data of symbol storage area, it cannot be printed. o There is no data (function 80 was not executed). o If [(number of columns × number of rows) < number of codeword] when auto processing is specified for number of columns and number of rows. o Number of codeword exceeds 928 in the data area. • The following data are added automatically by the encode process: o Start pattern and stop pattern. o Indicator codeword of left and right. o The descriptor of symbol length (the first codeword in the data area). o The error correction codeword calculated by modulus 929. o Pad codeword. • When auto processing (function 65) is specified, the number of columns is calculated by the current print area, module width (function 67), option setting (function 70), and the codeword in the data area. Maximum number of columns is 30. • Printing of symbol is not affected by print mode (emphasized, double-strike, underline, white/black reverse printing, or 90° clockwise-rotated), except for character size and upside-down print mode. • This command executes paper feeding for the amount needed for printing the symbol regardless of the paper feed amount set by the paper feed setting command. The print position returns to the left side of the printable area after printing the symbol. • The quiet zone is not included in the printing data. Be sure to include the quiet zone when using this function. GS ( k pL pH cn fn m (cn=48, fn=82) [Function] Request to transmit size information of PDF417 data in the symbol storage area [Format] ASCII GS ( k pL pH cn fn m Hex 1D 28 6B pL pH cn fn m Decimal 29 40 107 pL pH cn fn m [Range] pL = 3, pH = 0 cn = 48, fn = 82 m = 48 [Description] Request transmission of the size information for the encoded PDF417 symbol data stored in symbol storage area. [Notes] • The quiet zone is not included in the size information. • The following size information will be returned by the printer. LR2000 Programming Manual V1.0 Information Hex Decimal Data length (bytes) Header 37 55 1 Identifier 2F 47 1 30 - 39 48 - 57 1 to 5 1F 31 1 30 - 39 48 - 57 1 to 5 Delimiter 1F 31 1 Fixed Value 31 49 1 Delimiter 1F 31 1 30 or 31 48 or 49 1 00 0 1 Width Delimiter Height Other information NUL • The height and width data of the pattern are in dot units. The decimal values of the height and width data are converted to ASCII character format and sent in order from the MSB. Example.: When the horizontal size is 120 dots, “120” is converted to 3 bytes of data (Hex:31H, 32H, 30H, Decimal:49, 50, 48). • Other information data transmission: Hex=30H / Decimal=48 indicates that the data is printable Hex=31H / Decimal=49 indicates that the data is not printable GS ( k pL pH cn fn n1 n2 (cn=49, fn=65) [Name] Set QR Code model [Format] ASC II GS ( k pL pH cn fn n n2 Hex 1D 28 6b pL pH cn fn n1 n2 Decimal 29 40 107 pL pH cn fn n1 n2 [Range] pL = 4, pH = 0 cn = 49, fn = 65 n1 = 49, 50 n2 = 0 [Default] n1=50, n2=0 [Description] Set the QR Code model by n1. n1 n Function 49 Set model 1 QR code conversion 50 Set model 2 QR code conversion LR2000 Programming Manual V1.0 GS ( k pL pH cn fn n (cn=49, fn=67) [Name] Set QR Code module size [Format] ASCII GS ( k pL pH cn fn n Hex 1D 28 6b pL pH cn fn n Decimal 29 40 107 pL pH cn fn n [Range] pL = 3, pH = 0 cn = 49 fn = 67 1n 16 [Default] n=3 [Description] Set QR Code module size to [n dots * n dots] GS ( k pL pH cn fn n (cn=49, fn=69) [Name] Set QR Code error correction level [Format] ASCII GS ( k pL pH cn fn n Hex 1D 28 6b pL pH cn fn n Decimal 29 40 107 pL pH cn fn n [Range] pL = 3, pH = 0 cn = 49 fn = 69 48 n 51 [Default] n=48 [Description] Set the QR code error correction level n Function Approx. damage % recovery capability 48 Error correction level L 7% 49 Error correction level M 15% 50 Error correction level Q 25% 51 Error correction level H 30% GS ( k pL pH cn fn m d1…dk (cn=49, fn=80) [Name] Store QR code data in the symbol storage area [Format] ASCII GS ( k pL pH cn fn m d1…dk Hex 1D 28 6b pL pH cn fn m d1…dk Decimal 29 40 107 pL pH cn fn m d1…dk [Range] 4 (pL + pH × 256 ) (0 pL 255, 0 pH 27) cn = 49 LR2000 Programming Manual V1.0 fn = 80 m = 48 0 d 255 k = (pL + pH × 256 ) - 3 [Description] Stores QR Code data (d1... dk) into the QR Code symbol storage area. (pL + pH × 256) - 3) bytes are processed as QR Code data after m (d1...dk). GS ( k pL pH cn fn m (cn=49, fn=81) [Name] Print QR Code in symbol storage area [Format] ASCII GS ( k pL pH cn fn m Hex 1D 28 6b pL pH cn fn m Decimal 29 40 107 pL pH cn fn m [Range] pL = 3, pH = 0 cn = 49 fn = 81 m = 48 [Description] Print QR Code from data stored in QR code symbol storage area User must consider QR code quiet zone (spacing of above, below, left and right of printed QR code as specified in the QR Code specification.) GS ( k pL pH cn fn m (cn=49, fn=82) [Name] Request size information of QR Code in symbol storage area. [Format] ASCII GS ( k pL pH cn fn m Hex 1D 28 6b pL pH cn fn m Decimal 29 40 107 pL pH cn fn m [Range] pL = 3, pH = 0 cn = 49 fn = 82 m = 48 [Description] Request transmission of size information data of QR Code in symbol storage area. Following information will be returned by the printer. Information Hex Decimal Data length (bytes) Header 37 55 1 Identifier 36 54 1 30 - 39 48 - 57 1 to 5 1F 31 1 30 - 39 48 - 57 1 to 5 Width Delimiter Height LR2000 Programming Manual V1.0 Delimiter 1F 31 1 Fixed Value 31 49 1 Delimiter 1F 31 1 30 or 31 48 or 49 1 00 0 1 Other information NUL The height and width data of the pattern are in dot units. The decimal values of the height and width data are converted to ASCII character format and sent in order from the MSB. Example.: When the horizontal size is 120 dots, “120” is converted to 3 bytes of data (Hex:31H, 32H, 30H, Decimal:49, 50, 48). Other information data transmission: Hex=30H / Decimal=48 indicates that the data is printable Hex=31H / Decimal=49 indicates that the data is not printable [Note] This command does not print the QR code graphics. The quiet zone is not included in the size information. GS ( A pL pH n m [Name] Execute test print [Format] ASCII GS ( Hex 1D 28 41 pL pH n m Decimal 29 40 65 pL pH n m [Range] A pL pH n m (pL+(pH×256))=2 (where pL=2, pH=0) 0 n 2, 48 n 50 1 m 3, 49 m 51 [Description] Executes a test print with a specified test pattern on a specified paper. pL and pH set the number of parameters so that (pL + (pH ×256)) bytes. n specifies the paper to be tested. n Paper 0,48 Basic sheet (paper roll) 1,49 2,50 paper roll m specifies a test pattern. n 1,49 Test pattern Hexadecimal dump LR2000 Programming Manual V1.0 [Notes] 2,50 Printer status print 3,51 Rolling pattern print This command has enabled only when processed at the beginning of a line in standard mode. This command is no effect in page mode. When this command is received during macro definition, the printer ends macro definition and begins performing this command. After the test print is finished, the printer resets itself automatically. Therefore, data already defined before this command is executed, such as user-defined characters, downloaded bit image, and macro, becomes undefined; The printer cuts the paper at the end of the test print. The printer goes BUSY while this command is executed. GS ( F pL pH a m nL nH [Name] Set black mark adjustment value [Format] ASCII GS ( F pL pH a m nL nH Hex 1D 28 46 pL pH 61 m nL nH Decimal 29 40 70 pL pH 97 m nL nH [Range] (pL+pHx256) = 4 (where pL = 4, pH = 0) 1 ≤a ≤2 m = 0,1 0 ≤ nL ≤ 255, 0 ≤ nH ≤ 255 [Description] Sets the adjustment value of the black mark detection position. a specifies the type of adjustment value. a Function 1 2 Sets the adjustment value of the black mark detection position. Sets the adjustment value of the paper cutting position after black mark detection. m specifies the direction of adjustment m 0 Function Forward Direction (Paper Feed Direction) 1 Reverse Direction nL, nH specify the amount of adjustment. Adjustment = (nH×256 + nL) × 0.141mm. [Notes] When processing this command while defining a macro, the macro definition is immediately terminated and the command commences with processing. LR2000 Programming Manual V1.0 The black mark detection position (a = 1) is affected by the following command operations. FF GS FF The paper cutting position after black mark detection (a = 2) is affected by the following command operation. GS V m n Because this command is executed when processing a normal command after it is stored once in the reception buffer, there may be a delay between the reception of the command from the reception buffer to the actual operation. [Reference] FF, GS FF, GS V GS FF [Name] Feed black-marked paper to print starting position (top of form) [Format] ASCII GS FF Hex 1D 0C Decimal 29 12 [Description] Feeds the marked paper to the print starting position (TOF). [Notes:] This command is enabled only when the BM sensor is set to be effective. This command sets the next print position to the beginning of the line. If this command is executed at the print starting position of the marked paper, the printer does not feed the marked paper to the next print starting position. [Reference] GS ( F, FF, GS C 0 n m [Name] Select counter print mode [Format] ASCII GS C Hex 1D 43 30 n m Decimal 29 67 48 n m [Range] 0 n m 0 n 5 0 m 2, 48 m 50 [Description] Selects a print mode for the serial number counter. n specifies the number of digits to be printed as follows: When n = 0, the printer prints the actual digits indicated by the number value. When n = 1 to 5, this command sets the number of digits to be printed. m specifies the printing position within the entire range of printed digits, as follows: m Printing Position Processing of digits less than those specified LR2000 Programming Manual V1.0 [Notes] 0,48 Align right Adds spaces to the left 1,49 Align right Adds 0 to the left 2,50 Align left Adds spaces to the right If n or m is out of the defined range, the previously set print mode is not changed. If n = 0, m does not have any meaning. [Default] n = 0, m = 0 [Reference] GS C 1, GS C 2, GS C ;, GS c [Examples] n=3,m=0 n=3,m=1 001 ▲▲1 n=3,m=2 1▲▲ ▲Indicates a space GS C 1 aL aH bL bH n r [Name] Select count mode (A) [Format] ASCII GS C 1 aL aH aL bH n r Hex 1D 43 31 aL aH aL bH n r Decimal 29 [Range] 67 49 aL aH aL bH n r 0 aL 255 0 aH 255 0 bL 255 0 bH 255 0 n 255 0 r 255 [Description] Selects a count mode for the serial number counter. aL, aH or bL, bH specify the counter range. n indicates the stepping amount when counting up or down. r indicates the repetition number when the counter value is fixed. [Notes] Count-up mode is specified when: [aL + aH×256] < [bL + bH ×256] and n 0 and r 0 Count-down mode is specified when: [aL + aH ×256] > [bL + bH ×256] and n 0 and r 0 Counting stops when: [aL + aH ×256] = [bL + bH ×256] and n = 0 or r = 0 LR2000 Programming Manual V1.0 In setting count-up mode, the minimum value of the counter is [aL + aH ×256] and the maximum value is [bL + bH ×256]. If counting up reaches a value exceeding the maximum, it is resumed with the minimum value. In setting count-down mode, the maximum value of the counter is [aL + aH ×256] and the minimum value is [bL + bH×256]. If counting down reaches avalue less than the minimum, it is resumed with the maximum value. When this command is executed, the internal counter that indicates the repetition number specified by r is cleared. [Defaults] aL = 1, aH = 0, bL = 255, bH = 255, n =1, r = 1 [Reference] GS C 0, GS C 2, GS C ;, GS c GS C 2 nL nH [Name] Set counter [Format] ASCII GS C 2 nL mH Hex 1D 43 32 nL mH Decimal 29 67 50 nL mH [Range] 0 nL 255 0 nH 255 [Description] Sets the serial number counter value. nL and nH determine the value of the serial number counter set by [nL + nH ×256]. [Notes] In count-up mode, if the counter value specified by this command goes out of the counter operation range specified by GS C1 or GS C ;, it is forced to convert to the minimum value by GS c. In count-down mode, if the counter value specified by this command goes out of the counter operation range specified by GS C1 or GS C ;, it is forced to convert to the maximum value by GS c. [Default] nL = 1, nH = 0 [Reference] GS C 0, GS C 1, GS C ; GS c GS C ; sa ; sb ; sn; sr; sc; [Name] Select count mode (B) [Format] ASCII GS C ; sa ; sb ; sn ; sr ; sc ; Hex 1D 43 3B sa 3B sb 3B sn 3B sr 3B sc 3B Decimal 29 67 59 sa 59 sb 59 sn 59 sr 59 sc 59 [Range] “0” sa “65535” “0” sb “65535” “0” sn “255” “0” sr “255” “0” sc “255” LR2000 Programming Manual V1.0 These values are all character strings. [Description] Selects a count mode for the serial number counter and specifies the value of the counter. sa, sb, sn, sr and sc are all displayed in ASCII characters, using the codes for “0” to “9.” sa and sb specify the counter range. sn indicates the stepping amount for counting up or down. sr indicates the repetition number with the counter value fixed. sc indicates the counter value. [Notes] Count-up mode is specified when: sa < sb and sn 0 and sr 0 Count-down mode is specified when: sa > sb and sn 0 and sr 0 Counting stops when: sa = sb or sn = 0 or sr = 0 When count-up mode is specified, sa is the minimum counter value and sb is the maximum counter value. If counting up reaches a value exceeding the maximum, it is resumed with the minimum value. If the counter value set by sc is outside the counter operation range, the counter value is forced to convert to the minimum value by executing GS c. When count-down mode is specified, sa is the maximum counter value and sb is the minimum counter value. If counting down reaches a value less than the minimum, it is resumed with the maximum value. If the counter value set by sc is outside the counter operation range, the counter value is forced to convert to the maximum value by executing GS c. Parameters sa to sc can be omitted. If omitted, these argument values are unchanged. Parameters sa to sc must not contain characters, except 0 to 9. If an incorrect syntax is used, the corresponding parameter setting has no effect, and the data after that is processed as normal data. [Default] sa = 1, sb = 65535, sn = 1, sr = 1, sc = 1 [Reference] GS C 0, GS C 1, GS C 2, GS c GS c [Name] Print counter [Format] ASCII GS c Hex 1D 63 Decimal 29 99 [Description] Sets the serial counter value in the print buffer and increments or decrements the counter value. LR2000 Programming Manual V1.0 [Notes] After setting the current counter value in the print buffer as print data (a character string), the printer counts up or down based on the count mode set.The counter value in the print buffer is printed when the printer receives a print command or is in the buffer-full state. The counter print mode is set by GS C 0. The counter mode is set by GS C1 or GS C. In count-up mode, if the counter value set by this command goes out of the counter operation range set by GS C1 or GS C ;, it is forced to convert to the minimum value. In count-down mode, if the counter value set by this command goes out of the counter operation range set by GS C1 or GS C ;, it is forced to convert to the maximum value. [Reference] GS C 0, GS C 1, GS C 2, GS C ;