Transcript
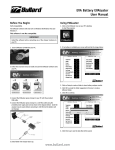
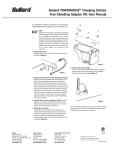
Bullard Powerhouse Charging Station
Free-Standing Adapter Kit User Manual
Converting Station to Free-standing Unit
This addendum contains instructions for converting the Powerhouse Charging
Station into a free-standing unit.
Note
A lthough the Powerhouse is designed for permanent vehicle installation,
Bullard also provides this adapter kit for unattached, free-standing use. As
a free-standing unit, the Powerhouse cannot provide secure storage of the
thermal imager and its spare battery in a vehicle in accordance with NFPA
1901-10-1.7. Free-standing use is not recommended for vehicles. The
adapter kit includes a back cover panel, rubber feet, an AC power adapter
and necessary wiring connectors.
1. Attach Power Cord:
Attach the DC Power Cord to the tab at the lower end of the Back Plate
(Figure 1).
Figure 2
5. Attach AC/DC Power Supply:
Insert the DC plug of the Power Supply into the rectangular opening in the
cover plate and plug it into the receptacle attached to the Powerhouse unit
(Figure 3).
Figure 1
2. Reattach the Back Plate to the Powerhouse Housing:
Place the latch spring (provided with the Powerhouse unit) firmly onto
the protruding spring seat on the back of the latch, near the top of the
Powerhouse unit. Set the unit in place on the back plate, making sure that
the free end of the latch spring seats into the milled recess in the back
plate and that the free end of the DC Power Cord extends toward the circuit
board. The Powerhouse unit is a snug fit on the back plate, and it may be
necessary to spread the sides slightly as you set it into place. Once in
place, secure the unit to the back plate using the four (4) stainless steel
#10-32 Phillips Head screws provided.
3. Connect Power Cord to Powerhouse Circuit:
Plug the connector on the free end of the DC Power Cord into the mating
connector on the battery charger circuit board (see Figure 4 of the
Powerhouse Users’ Manual).
4. Attach the Cover Plate:
Insert each screw into one of the four (4) rubber feet provided. Place the
cover plate in place on the back of the Powerhouse assembly and secure it
in place with the four screws and rubber feet. Tighten the feet finger tight;
if necessary, gently tighten with a Phillips screwdriver. Do not overtighten
(Figure 2).
Figure 3
Place the finished assembly on its feet on a flat surface. Plug the power
supply into a 110 volt AC receptacle and operate the unit as described in the
Powerhouse User Manual.
ISO 9001
certified
Americas:
E.D. Bullard Company
1898 Safety Way
Cynthiana, KY 41031-9303
Toll free: 877-BULLARD (285-5273)
Tel: 859-234-6616
Fax: 859-234-8987
www.bullard.com
Europe:
Bullard GmbH
Lilienthalstrasse 12
53424 Remagen • Germany
Tel: +49-2642 999980
Fax: +49-2642 9999829
www.bullardextrem.com
Asia-Pacific:
Bullard Asia Pacific Pte. Ltd.
LHK Building
701, Sims Drive, #04-03
Singapore 387383
Tel: +65-6745-0556
Fax: +65-6745-5176
www.bullard.com
©2012 Bullard. All rights reserved.
Bullard is a registered trademark of Bullard
6050046923C (0212)