1
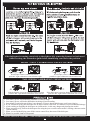
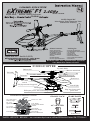
REMOTE CONTROL LCD DISPLAY
High / Low speed
(H for high speed / L for low speed)
Remote control battery level bar
(shows ‘AA’ battery life)
Advance forward
(displays speed as unit moves forward)
Signal Strength
(shows strength of R/C signal)
Left turn display
(displays degree of L-Turn)
Right turn display
(displays degree of R-Turn)
Up / Down throttle speed
(displays degree of unit
moving up or down)
MADE IN CHINA
30
Tail blade fine tuning
(display speed of tail motor)
Advance backward
(displays speed as unit
moves backward)
Left / Right fine tuning
(displays range of L/R fine tuning)
1
36
FRESH ALKLINE BATTERIES STRONGLY RECOMMENDED
LI-ION BATTERIES CAN BE DANGEROUS
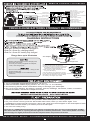
CHARGING INSTRUCTIONS
-pack.
lead wire into
A/C
4. Plug the pointed end of the A/C adaptor into the charge-pack.
adaptor
5
•Red light: shows A/C adapter is plugged in
•Red On / Green On: charging battery
•Red On / Green Off: battery fully charged
110V~
220V
Green-light
(CHARGE)
• Do not over-charge the battery – doing so will
shorten battery life.
• Misuse or damage of Li-ion batteries may
cause fire.
Red-light
(POWER)
Pow
• Gently insert the plug into the charge-pack,
and never use force.
• Use only the factory-supplied A/C adapter,
cords, and charge-pack.
Cha
rge
A/C adaptor
er
Charge time: up to 80 minutes
Charge Pack
Once Fully Charged
(1) Disconnect the wire from the charge box.
(2) Carefully connect the red / black wires underneath
the fuselage, making sure that the positive and
negative poles are aligned (Diagram A).
(3) After charging, put away charge-pack and A/C
charger for safe keeping.
If you will not be flying your helicopter for 24 hours
or more, disconnect the red/black wires underneath
the fuselage of the helicopter to prevent the battery
from draining. See Diagram (A) for details.
Only this wire plugs
into the charge box
Diagram A
1. Fly in moderate temperatures (50-80 F, 10-27 C).
2. Recommended outdoor flying area is: 40’ x 40’ (12.1 x 12.1 Meters).
3. Avoid strong winds, which could blow away or damage your helicopter.
4.Do not fly near children, the elderly, animals, homes, buildings, structures, water, mountains,
overhead cables, electrical or telephone wires.
NEVER TOUCH MOVING PARTS – MAY CAUSE INJURY
1. Turn helicopter power switch to “On” position. Place helicopter on stable ground.
2. On your remote control, push the left throttle stick down, then up, then down again. This
establishes a power signal connection, which will cause the colored lights on the helicopter to flash.
3. Stand back at least 8 feet (2.4 meters) from the helicopter.
4. You are now ready to fly!
Since this is a 2.4GHz Remote Controller, you will hear several beeps when you turn on the helicopter and R/C.
This means that the R/C is acquiring the best signal for maximum performance. Once found (within 5 seconds),
you will enjoy true digital performance with fast response times and precise movements.
PARTS - SERVICE - REPAIRS ... www.extremercbyrsi.com or call our MI Service Center: 586-757-1336 x 1
P