1
7$*,1$%$*
User’s Guide
Single Door RF/ID Proximity Access Control Unit
,QWURGXFWLRQ
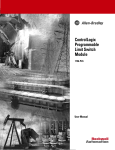
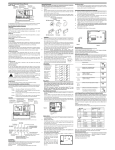
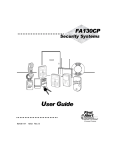
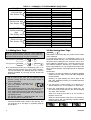
External reader
(optional)
Thank you for choosing the TIAB (Tag-in-a-Bag)
programmable proximity access control unit.
The TIAB is designed to limit access to restricted areas
while permitting authorized users to enter.
The unit uses state-of-the-art proximity (non-contact)
technology.
TIAB
control
unit
Personal
tag
The TIAB can be programmed by the installer to offer
one of two security levels for opening the door:
Personal
tag
Open
door
command
1. Valid tag only.
2. Valid tag and user PIN (Personal Identification
Number) code.
8VLQJWKH7,$%
Request-to- exit
command
Push-button or
motion detector
Figure 1 - TIAB Typical Configuration
Present a valid tag 50 - 100 mm (2 - 4 in.) from the
TIAB (or from the optional external reader, if installed).
3DQLF 2XWSXW
Verify that the green LED turns on and that the door
unlocks.
If the Panic output was connected, by the installer, to an
alarm system or to any other external device, pressing
“ ” and “#” simultaneously causes the panic output to
be activated for 5 seconds. In this case, the buzzer
does not beep.
If your TIAB is programmed to operate by tag and
user’s PIN code, present the tag and then enter your
user code.
The normal functions of the LEDs are summarized in
the following table.
TABLE 1 - LED functions in normal operation
LED
Function
GREEN
Indicates that a valid tag was presented
and the output relay was activated.
{
RED
{
YELLOW
{
Indicates that an invalid tag was
presented or an invalid PIN was entered.
Remains lit to indicate that power is on.
In security level 2, blinks after the tag is
accepted, to prompt the user for PIN.
7LPH RXW
A delay of more than 5 seconds between presenting a
tag and starting to enter the user PIN code, or between
any two digits, cancels the operation.
If you enter three consecutive wrong codes or present
an invalid tag for more than 5 seconds, the TIAB control
unit is disabled for 30 seconds and the buzzer beeps at
a rapid rate.
DE6260U
NOTE: It is recommended that the user ask the
installer, if any advanced features were incorporated
into the system, in order to get proper explanations.
3URJUDPPLQJE\WKH8VHU
The programming functions include adding, deleting
and reviewing user tags. For any programming, you
need the Master Tag and its 4-digit PIN code.
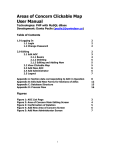
(QWHULQJ WKH 3URJUDPPLQJ 0RGH
Hold the master tag near the keyboard
for at least 10 seconds. After receiving
an acknowledge signal from the buzzer,
key in your master tag PIN code (4
digits). “Pr” (Programming) will blink in
the display.
([LWLQJ WKH 3URJUDPPLQJ 0RGH
Press the
button to exit any of the programming
mode options into the main programming mode. Press
the
button again to quit the main programming mode
and revert to normal operation.
Table 2 includes a summary of the user’s programming
functions and the following paragraphs describe the
procedures in detail.
1
TABLE 2 - SUMMARY OF PROGRAMMING FUNCTIONS
FUNCTION
ACTION
DISPLAY
Enter “Pr” mode and press “1”
Available address blinks
ADD
(Add new tags
Present a tag
“Cd”
See Section 3.1)
Enter PIN code (4-digit)
Last 2 digits of PIN
Press “#”
Available address blinks
Exit “Pr” mode by pressing “
”
Enter “Pr” mode and press “2”
Shows address
SHOW
(Review user tags
Press “#”
First 2 digits of PIN code
See Section 3.2)
Press “#”
Last 2 digits of PIN code
Press “#”
Shows next address
Exit “Pr” mode by pressing “
”
Enter “Pr” mode and press “3”
Blank
DELETE
(Delete presented
Present the tag
Tag address blinks
tags
Press “#”
Tag address steady
See Section 3.3)
Press “#”
Blank
Exit “Pr” mode by pressing “
”
Enter “Pr” mode and press “3”
Blank
DELETE
(Delete lost tags
Enter 3-digit tag address and “#” Tag address blinks
See Section 3.3)
Press “#”
Tag address steady
Press “#”
Blank
Exit “Pr” mode by pressing “
”
INDICATOR
Green
Red
Yellow
Yellow
Note: Arrows indicate that the process can be repeated, as needed.
$GGLQJ8VHU7DJV
5HYLHZLQJ8VHU7DJV
Note: It is recommended to maintain a list of valid tags
and user names for future reference. A user list form is
attached to this document, for your convenience.
Security level 1: “Pr” mode
)
1
)
#
Security level 2: “Pr” mode
)
1
)
PIN code
#
A. In programming mode (“Pr” is displayed), press “1” to
select the ADD function (the green LED will blink).
The unit will display two flashing digits (the memory
address available for the tag) and the buzzer will
beep twice.
B. Present a user tag near or on the keypad. Once the
tag is read by the unit, the two flashing digits
become steady and two short beeps sound to
indicate tag reading.
C. “Cd” is displayed, to prompt you to
enter the desired user PIN code
within 5 seconds.
If the TIAB security level is 1 (tag only), press “#” (or
wait until the tag address advances automatically).
If the TIAB security level is 2 (tag and PIN), enter the
user 4-digit PIN code and press “#” to conclude the
tag adding process.
For security reasons, 4 identical digits, like “1111”
are not accepted as valid PIN code.
D. The tag adding process is completed and the TIAB
reverts to the ADD mode, ready for the next tag. You
can program up to 250 tags, by repeating steps B
and C above.
2
“Pr” mode
)
2
The holder of the master tag may review all PIN codes
of the valid tags.
In programming mode (“Pr” is displayed), press “2” to
select the SHOW function. The red LED blinks and all
the 250 memory addresses are scanned, one by one.
Each address is displayed for 3 seconds and then the
next address appears, followed by 2 buzzer’s beeps.
Each empty address (no tag programmed) blinks and
each occupied address (tag programmed) is displayed
steadily.
Please Note:
1. Pressing “#” while the address is displayed steadily
shows the first 2 digits of the PIN code designated
for that address.
Pressing “#” again displays the last 2 digits of the
PIN code. Additional pressing “#” expedites advance
to next address.
2. You may enter a 3-digit number, to go directly to a
specific address (i.e., to see address 10, enter 010).
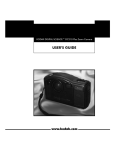
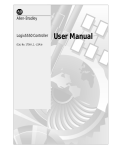
3. Since the TIAB display can show 2 digits only, the
two decimal point LEDs assist in the numeric display
of 3 digits, when needed.
When one decimal point LED is lit, the number is
between 100 to 199.
When two decimal point LEDs are lit, the number is
between 200 to 250. The following example clarifies
the decimal LED function.
= 46
= 146
= 246
DE6260U
“Pr” mode
or
“Pr” mode
)
3
)
3
#
#
TAG Address
#
#
5. If you made a mistake and do not want to delete,
press “ ”, before pressing “#”, to cancel the
operation and return the TIAB control unit to
DELETE mode. Pressing “ ” a second time causes
the TIAB control unit to return to normal operation
mode.
'HOHWLQJDQ([LVWLQJ7DJ
#
Deleting a tag is possible when the tag to be deleted is
available or not available (lost or stolen).
A. In programming mode (“Pr” is displayed), press “3”
to select the DELETE function. The yellow LED will
blink and the display will be blank.
B. Present to the keypad the tag you want to delete.
Alternately, if the tag is lost or stolen, enter its 3-digit
address instead and press “#”. The address will flash
in the display.
C. Press “#” again, to approve the tag’s deletion. The
display will stop flashing. Press “#” once more, to
confirm. The TIAB sounds 3 short beeps, to indicate
that the tag is deleted. The display blanks out, ready
to delete another tag.
Notes:
1. In the DELETE mode, the TIAB control unit searches
automatically through addresses 001 to 250 (does
not search address 000).
2. Tag deletion deletes tag information and the 4-digit
PIN code.
3. Deletion of address 000 causes the TIAB control unit
to return to the ADD mode. A new master tag and
PIN code must be entered for further use.
4. Deleting ALL codes except the master code is
accomplished by entering address 999.
7HVWLQJWKH7,$%
)
4 + 6
The test mode is used for checking the TIAB keypad,
display elements and the internal buzzer. To enter
TEST mode, press and hold buttons 4 and 6
simultaneously for 5 seconds.
Upon entering this mode, the display
shows “tS”. Press 0 - 9 successively
and then “ ” and “#”.
When pressing each button, the buzzer sounds and the
display shows the associated number ( =11, #=12).
Once the # button is pressed, the display shows “88”,
both decimal points and all LED’s light up (to verify that
all segments are operational) and the buzzer sounds for
2 seconds.
The test mode will time out 10 seconds after the last
button is pressed. Upon exit from test mode, the TIAB
control unit reverts to the previous mode (normal or
“Pr”).
Compliance with standards: Complies with Part 15 of the
FCC Rules and RSS-210 of Industry and Science Canada.
Operation is subject to the following two conditions: (1) This
device may not cause harmful interference, and (2) this
device must accept any interference received, including
interference that may cause undesired operation.
:$55$17<
Visonic Ltd. and/or its subsidiaries and its affiliates ("the Manufacturer")
warrants its products hereinafter referred to as "the Product" or "Products" to
be in conformance with its own plans and specifications and to be free of
defects in materials and workmanship under normal use and service for a
period of twelve months from the date of shipment by the Manufacturer. The
Manufacturer's obligations shall be limited within the warranty period, at its
option, to repair or replace the product or any part thereof. The Manufacturer
shall not be responsible for dismantling and/or reinstallation charges. To
exercise the warranty the product must be returned to the Manufacturer freight
prepaid and insured.
This warranty does not apply in the following cases: improper installation,
misuse, failure to follow installation and operating instructions, alteration,
abuse, accident or tampering, and repair by anyone other than the
Manufacturer.
This warranty is exclusive and expressly in lieu of all other warranties,
obligations or liabilities, whether written, oral, express or implied, including any
warranty of merchantability or fitness for a particular purpose, or otherwise. In
no case shall the Manufacturer be liable to anyone for any consequential or
incidental damages for breach of this warranty or any other warranties
whatsoever, as aforesaid.
This warranty shall not be modified, varied or extended, and the Manufacturer
does not authorize any person to act on its behalf in the modification, variation
or extension of this warranty. This warranty shall apply to the Product only. All
products, accessories or attachments of others used in conjunction with the
Product, including batteries, shall be covered solely by their own warranty, if
any. The Manufacturer shall not be liable for any damage or loss whatsoever,
whether directly, indirectly, incidentally, consequentially or otherwise, caused
by the malfunction of the Product due to products, accessories, or
attachments of others, including batteries, used in conjunction with the
Products.
The Manufacturer does not represent that its Product may not be
compromised and/or circumvented, or that the Product will prevent any death,
personal and/or bodily injury and/or damage to property resulting from
burglary, robbery, fire or otherwise, or that the Product will in all cases provide
adequate warning or protection. User understands that a properly installed
and maintained alarm may only reduce the risk of events such as burglary,
robbery, and fire without warning, but it is not insurance or a guarantee that
such will not occur or that there will be no death, personal damage and/or
damage to property as a result.
The Manufacturer shall have no liability for any death, personal and/or
bodily injury and/or damage to property or other loss whether direct,
indirect, incidental, consequential or otherwise, based on a claim that
the Product failed to function. However, if the Manufacturer is held liable,
whether directly or indirectly, for any loss or damage arising under this limited
warranty or otherwise, regardless of cause or origin, the Manufacturer's
maximum liability shall not in any case exceed the purchase price of the
Product, which shall be fixed as liquidated damages and not as a penalty, and
shall be the complete and exclusive remedy against the Manufacturer.
Warning: The user should follow the installation and operation instructions
and among other things test the Product and the whole system at least once a
week. For various reasons, including, but not limited to, changes in
environmental conditions, electric or electronic disruptions and tampering, the
Product may not perform as expected. The user is advised to take all
necessary precautions for his /her safety and the protection of his/her
property.
6/91
VISONIC LTD. (ISRAEL): P.O.B 22020 TEL-AVIV 61220 ISRAEL. PHONE: (972-3) 645-6789, FAX: (972-3) 645-6788
VISONIC LTD. 1998 TAG-IN-A-BAG DE6260U (REV. 0 11/98)
www.visonic.com
DE6260U
3
Appendix - Users List
Tag
No.
1
2
3
4
5
6
7
8
9
10
11
12
13
14
15
16
17
18
19
20
21
22
23
24
25
26
27
28
29
30
31
32
33
34
35
36
37
38
39
40
41
42
43
44
45
46
47
48
49
50
User name
PIN
code
Tag
address
001
002
003
004
005
006
007
008
009
010
011
012
013
014
015
016
017
018
019
020
021
022
023
024
025
026
027
028
029
030
031
032
033
034
035
036
037
038
039
040
041
042
043
044
045
046
047
048
049
050
Tag
No.
51
52
53
54
55
56
57
58
59
60
61
62
63
64
65
66
67
68
69
70
71
72
73
74
75
76
77
78
79
80
81
82
83
84
85
86
87
88
89
90
91
92
93
94
95
96
97
98
99
100
User name
PIN
code
Tag
address
051
052
053
054
055
056
057
058
059
060
061
062
063
064
065
066
067
068
069
070
071
072
073
074
075
076
077
078
079
080
081
082
083
084
085
086
087
088
089
090
091
092
093
094
095
096
097
098
099
100
Note
This is a sample user list for your convenience. Please copy the list as necessary.
4
D6260U


![USER MANUAL - [Ti] CCTV & Alarms](http://vs1.manualzilla.com/store/data/006900628_1-c3a0a7db8b1d500fbda94f290f289f51-150x150.png)