1
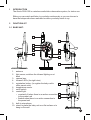
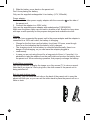
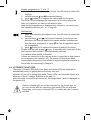
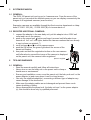
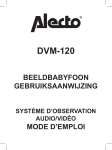
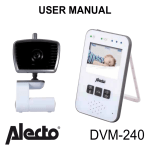
DVM-120
observation system
USER MANUAL
INDEX
1INTRODUCTION........................................................................................ 3
2FUNCTIONLIST
2.1BABY-UNIT................................................................................................. 3
2.2PARENT-UNIT............................................................................................ 4
3INSTALL
3.1 BABY UNIT................................................................................................. 5
3.2 PARENT UNIT............................................................................................ 5
4USE
4.1 SWITCH ON / OFF..................................................................................... 7
4.2 PARENT UNIT............................................................................................ 7
4.3 MENU DRIVEN FUNCTIONS & SETTINGS............................................. 8
4.4 AUTOMATIC NIGHTVIEW....................................................................... 10
5
SYSTEM EXPANSION
5.1GENERAL.................................................................................................11
5.2 REGISTER ADDITIONAL CAMERAS.......................................................11
6
TIPS AND WARNINGS
6.1GENERAL.................................................................................................11
6.2INSTALLATION........................................................................................ 12
6.3 RECEPTION INDICATOR / OUT OF RANGE ALERT............................. 12
6.4 DELAY IN SOUND AND VISION.............................................................. 12
6.5 POWER SUPPLY..................................................................................... 12
6.6
INTERFERENCE-FREE.......................................................................... 13
6.7REACH..................................................................................................... 13
6.8 BUGGING / TAPPING.............................................................................. 13
6.9MAINTENANCE....................................................................................... 13
6.10 ENVIRONMENT AND DISPOSAL............................................................ 13
6.11 IN CASE OF NO PICTURE, NO SOUND................................................. 13
7
DECLARATION OF CONFORMITY........................................................ 14
8SPECIFICATIONS.................................................................................... 14
9WARRANTY............................................................................................. 15
2
1
INTRODUCTION
The Alecto DVM-120 is a wireless audio/video observation system, for indoor use.
Either you can watch and listen to your baby continuously or you can choose to
have the babymonitor been switched on when your baby starts to cry.
2
FUNCTIONLIST
2.1 BABY-UNIT:
1
6
ON
2
3
5
7
8
MIC
OFF
4
9
10
1. antenna
2. light sensor, switches the infrared lighting on at
dusk
3. camera lens
4. Infrared LED’s (for night view)
5. registration button (to register the baby unit to
11
other parent units)
6. temperature sensor
7. on/off switch
8. controll light:
• constantly lit when there is an active connection 12
to the parent unit
13
• flashes when there is no active connection to
the parent unit
9. built-in microphone
10. stand, to place the baby unit on a flat surface or to
hang on the wall
3
11. night lamp
12. connection for the power adapter
13. built-in speaker
2.2 PARENT-UNIT:
1
TALK
ON
3
AV
7
2
OFF
8
4
5
MIC
9
10
6
1. indicators:
• green light:
constantly lit when there is an active con11
nection to the parent unit
12
flashes when there is no active connection
to the parent unit
• red light:
when the parent unit is switched on and the
battery is charging, the light will be turned
13
on, once the battery is fully charged, then
the light goes out
14
when the parent unit is switched off and the
adapter is being connected, than the light is
constantly lit (doesn’t go out, when battery
is fully charged)
2. button TALK, talkback button to the baby unit
3. screen
4. built-in microphone
5. menu-pushbutton (
)
6. OK button and buttons , , and : various functions, see these instructions
7. audio/video output
8. on/off switch
9. connection power adapter
10. push briefly to switch off the screen, push long to switch on the night lamp
11. antenna
12. belt clip
13. battery compartment
14. built-in speaker
4
3
INSTALL
3.1 BABY UNIT: (CAMERA)
The baby parent unit is not waterproof and therefore only suitable for
indoor use.
Power adapter:
1. Connect one of the supplied power adapters with de connector xx on the back
of the baby unit.
2. Insert the adapter into a 230V outlet.
Only use the supplied power adapter with modelnumber TGE050P055.
Make sure the baby can not touch the baby unit or the cord. Place the baby unit
at least 2 meters away from the baby and bundle long wires with tape or with
purpose-available wire ties.
Tabletop or wall model:
You can use the baby unit loose on a table, closet or office setting or hang on the
wall.
For wall mounting:
Drill next to each other and with a mutual distance of 3.3 cm, two holes in the wall
and insert plug and screw. Let the head of the screw protruding a few millimeters.
Hang the baby unit by sliding the notches into the camera standard on the screws
in the wall and by pushing the baby unit slightly downwards. Finish finally the
adapter cord neatly with cable brackets.
Placing advice:
• In case of use as a babymonitor place the baby unit on a minimum distance of
2 meters away from your baby and make sure the adapter
• cable is safely tucked away.
• For an optimal range, it is preferred to set up the baby unit as high as possible,
free from large metal surfaces.
3.2 PARENT UNIT:
The parent unit is not waterproof and therefore only suitable for indoor use.
Power:
The parent unit can be powered directly from the supplied rechargeable battery or
the included power adapter. Once you connect the power adapter, the battery is
charging, so the parent unit can be used mobile.
Battery:
1. Open the battery compartment by sliding the battery cover off the back of the
parent unit.
2. Place the battery.
5
3. Slide the battery cover back on the parent unit.
Don’t force placing the battery.
Only use the supplied rechargeable Li-ion battery (3.7V, 800mAh).
Power adapter:
1. Connect the other power supply adapter with the connector on the side of
the parent unit.
2. Connect the adapter to a 230V outlet.
Only use the supplied power adapter with modelnumber TGE050P055.
Make sure the power cable can not lead to stumble or fall. Bundle too long wires
with tape or with specially for this purpose designed and available wire ties.
Charge:
Once you have connected the parent unit to the power adapter and the adapter is
connected to a 230V wall outlet, the battery is charging.
• Charge for the first time use the battery for at least 15 hours, even though
there is an the indication that the battery is fully charged.
• The charging circuit for the battery is controlled electronically, there is no
danger of overcharging, so you can leave the adapter plugged in
• continuously.
• In case you are not using the set for a long period of time (> 2 months), it is
advisable to take the adapter from the wall outlet and remove the battery from
the parent unit. When resuming operation, first properly recharge the battery.
Audio/Video connection:
Use this connection to display the image on a (big screen) TV to view or record.
Note that if you insert a 3.5mm plug here, the own screen of the parent unit is
being switched off.
6
ON
OFF
OFF
ON
AV
AV
Belt clip and desktop stand:
Optionally, you can slide the belt clip on the back of the parent unit to carry the
parent unit with you, or you can use the table stand to place the parent unit on a
table or desk.
4USE
4.1 SWITCH ON / OFF:
Baby unit:
• Slide on the right side of the baby unit the switch to ON to switch on the baby
unit.
• Slide this switch to OFF to switch off the baby unit.
Parent unit:
• Slide on the right side of the parent unit the switch to ON to turn on the parent
unit.
• Slide this switch to OFF to switch off the baby unit.
4.2 PARENT UNIT:
Reception volume:
• Press repeatedly button to increase the receiver volume.
• Press repeatedly button to decrease the receiver volume.
• Press
button to capture the selection.
You can choose from five volume levels and volume off.
In the display, while setting, the level is shown.
Brightness:
• Press repeatedly button to increase the brightness.
• Press repeatedly button to decrease the brightness.
• Press
button to record your selection.
You can choose from five brightness levels.
In the display, while setting, the level is shown.
Zoom: (get closer)
• Press ZOOM button to zoom in the image.
• Now use the buttons , , and to look up, down, left or right.
• Push
button for normal image.
Talk back:
• Press TALK to talk back to the baby unit. (hold down the button while speaking)
Display on/off:
• Press
button to turn off the image. (the sound remains)
• Press
button again to switch on the image again.
This function is apart from the function which automatically switches off video and
audio when the baby sleeps. Please see later in this manual.
7
Night light on/off:
• Hold
button for over a second to turn on the night ligth on the baby unit.
• Again hold
button for over a second to turn off the night light.
4.3 MENU DRIVEN FUNCTIONS & SETTINGS:
Press the parent unit on
button to open the menu. At the bottom of the display
the following icons apear. Select with the buttons and the desired function.
volume of the talk back function of the baby unit:
1. push, after selecting the adjacent icon, the OK button to select this
function
2. set with buttons and the desired volume
3. push
button 2x to capture the setting and exit the menu
contrast:
1. push, after selecting the adjacent icon, the OK button to select this
function
2. set with buttons and the desired contrast
3. push
button 2x to capture the setting and exit the menu
time:
1. push, after selecting the adjacent icon, the OK button to select this
function
2. set with buttons and the hours
3. select with buttons and the minutes
4. set with buttons and the minutes
5. push
button 2x to capture the time and exit the menu
(wake-up) alarm:
1. push, after selecting the adjacent icon, the OK button to select this
function
2. switch with buttons and to the ON function or OFF function
3. select with buttons and the alarm time and push OK
4. set with buttons and the hours
5. select with buttons and the minutes
6. set with buttons and the minutes
7. push
button 3x to set the alarm time and exit the menu
An alarm sounds for 60 seconds max or push the OK button to turn off
prematurely.
The alarm is repeated daily until you disable it via the menu (see
Instruction 2 above).
8
Feeding timer:
1. push, after selecting the adjacent icon, the OK button to select this
function
2. switch with buttons and to the ON function or OFF function
3. use the buttons and to select interval times (minimum 30
minutes, maximum 8 hours, 30 minutes adjustable) and press OK
4. push
button 2x to capture the power timer and exit the menu
The power timer sounds for 60 seconds max or push the OK button tot
turn off prematurely.
After the interval time set by instruction 3, the signal sounds again and
this is repeated until you disable it via the menu
(see instruction 2 above).
Lullabies:
1. push, after selecting the adjacent icon, the OK button to select this
function
2. scroll buttons and to the songs 1/5, and then use the keypad
and to select per song or it should be played (a V appears
behind this song) or that this song should be skipped (an X appears
now after this song)
3. then scroll buttons and to ‘ ’ and then scroll and to “xx”
and select ‘ ’ to start playing or ‘ ’ to stop playing
Note: the lullabies sound CONTINUOUSLY until the moment you turn it
off according to the above instruction.
Automatically switch off video + sound when the baby sleeps: (VOX)
1. push, after selecting the adjacent icon, the OK button to select this
function
2. set with buttons and the sensitivity
= VOX switched off, the baby monitor continuously displays the
image and sound of the baby
= low sensitivity, the baby should cry loudly before baby monitor
switches on
= average sensitivity, the baby monitor switches on when the
baby cries
= high sensitivity, the baby monitor already turnes on when the
baby weeps softly
3. push
button 2x to capture the sensitivity and exit the
menu Push button to swich on the video and audio manually.
9
Display temperature in °C of in °F:
1. push, after selecting the adjacent icon, the OK button to select this
function
2. set with buttons and the desired display
3. press
button 2x to capture the setting and exit the menu
The DVM-120 only displays the temperature of the room where the
baby unit is placed; you can not set alarm in here.
Note that the temperature is displayed only indicative, you must consider a possible deviation of + or - 2 degrees.
Multicamera:
1. push, after selecting the adjacent icon, the OK button to select this
function
2. scroll buttons and to the desired camera to see the picture
from there (an asterisk behind the camera number indicates that
this camera is registered), or scroll
to view all registered cameras in sequence.
3. push
button 2x to capture the sensitivity and exit the menu
Please note that with choice
every 15 seconds will be switched to the
next camera; there will NOT be automatically switched
to a camera where sound is detected.
Is there no connection to the camera when it is switched to that camera
(out of range or the camera is off), the parent unit displays a black
screen during this period. Instructions to register expansion cameras to
the monitor are described in Chapter 5.
4.4 AUTOMATIC NIGHTVIEW:
There are 6 infrared LEDs built in the baby unit; these LEDs are switched on
automatically when it’s getting dark at the baby unit and
switched off when it is getting light again. These LEDs can illuminate objects to a
distance of about 2 meters. Note that in the dark, so
when the night vision LEDs are turned on, the image black / white is displayed on
the parent unit.
Caution: Infrared light can not be perceived by the human eye; so
you can not see with the naked eye that these LEDs are activated.
Depending on the type of infrared LED is a visible red glow, however,
possible.
10
5
SYSTEM EXPANSION
5.1GENERAL:
The DVM-120 parent unit can log up to 4 cameras max. From the menu of the
parent unit you can select the desired camera or you can display successively the
images of all registered cameras (scan function).
Expansion cameras are available through the Alecto service department on telephone 073 6411 355 (NL) , 03 238 5666 (B) of via www.alecto.nl
5.2 REGISTER ADDITIONAL CAMERAS:
1. connect the adapter to the new baby unit, put this adapter into a 230V wall
outlet and turn on the camera
2. push on the parent unit button and keep it pressed until after about one
second xx1 xx2 xx3 xx4 lights; behind the camera numbers that are already
in use is shown an asterisk (*)
3. scroll buttons and to a free camera-space
4. push the OK button, the green light above the screen of the
parent unit flashes
5. now push and hold the registration button on the new camera
until after about a second the image of the camera is displayed
on the parent unit, the camera is now registered
6
TIPS AND WARNINGS
press to register
MIC
6.1GENERAL:
• Read the manual carefully and follow all instructions.
• Never store or use the baby unit or the parent unit in damp or
humid area or environment.
• Ensure good ventilation; never cover the parent unit, the baby unit and / or the
power adapter (s) and never place it next to a heat source.
• Use only the supplied adapter(s); connecting a different type of adapter may
cause damage to the electronics.
• Make sure the adapter cables are not damaged and prevent these cords
cause stumbling or falling.
• Never disassemble the parent unit, the baby unit and / or the power adapter
(s); this should be done only by qualified personnel.
11
6.2INSTALLATION:
• Only connect the power adapter to the baby unit or the parent unit or disconnect when the power adapter is taken out of the wall outlet.
• Don’t install the DVM-120 during an electrical storm.
• Do not touch any uninsulated adapter cables unless the adapters have been
taken from the wall outlet.
6.3 RECEPTION INDICATOR / OUT OF RANGE ALERT:
• On the top left in the image of the parent unit the strenght is indicated by which
the signal from the baby unit is received:
: very good reception
: good reception
: moderate to good reception
: poor reception
• Once the parent unit doesn’t receive a signal from the baby unit (out of range
or the baby unit is switched off) ‘ ’ (no reception) is diplayed and the picture
turns to black.
• Also every second sounds an alarm tone. As soon as the parent unit receives
the signal again from the baby unit, the image lights again.
6.4 DELAY IN SOUND AND VISION:
• The baby unit sends the image and sound in digital blocks to the parent unit.
The parent unit turns these signals into a recognizable image and an audible
sound. Between the time of moving and making noise and displaying / hearing
on the parent unit is therefore a slight delay.
• Also, the sound and the image on the parent unit are not exactly running in
sync with each other.
6.5 POWER SUPPLY:
• Baby unit:
The baby unit draws its power only from the supplied power adapter. The baby
unit has no built-in battery for portable use.
• Parent unit:
The parent unit is powered by 3.7V rechargeable lithium-ion battery; this can
feed the parent unit 5 to 7 hours.
Top right of the display is shown the battery charge:
: battery is fully charged
: battery is 2/3 charged
: battery is still 1/3 charged, charging is desired
: battery is empty and the parent unit will turn off
About 5 minutes before the battery will be fully discharged, the red indicator
above the display flashes. Also attention beeps sound.
Now connect the adapter immediately.
In about 6 hours the adapter has a battery recharged, whether through the
parent unit is switched on or off.
12
6.6 INTERFERENCE-FREE:
• This image baby monitor is digitally coded. So you will never receive the signal
from other equipment nor will the signal of your baby unit (s) be displayed on
the parent unit of, for example, your neighbors.
• In case the baby unit (s) or parent unit is located in or in close proximity to
electromagnetic fields, the signal can then (video or audio) experience some
disturbance. In this case try a different location for the baby unit (s) or the
parent unit or move, if possible, the source of the interference.
6.7REACH:
• The range of the video baby monitor is up to 300 meters in the open field and
up to 50 meters in house; the range depends on local
• conditions. Are the units out of range from each other the image first freezes a
few seconds (no movement) followed by ‘ ’ (no reception),
• the screen turns black. Also every second sounds an alarm tone.
6.8 BUGGING / TAPPING:
• The bugging / tapping of this video baby monitor is virtually impossible. Not
only it is necessary to be in the range of the video baby
• monitor, one also needs expensive equipment.
6.9MAINTENANCE:
• Clean the video baby monitor only with a damp cloth; do not use chemical
cleaning products. Before cleaning, the adapters should be disconnected.
6.10ENVIRONMENT AND DISPOSAL:
• You can hand in the packaging of this video baby monitor as wastepaper.
However, we recommend to keep it so that during transport, the device can be
properly packaged.
• Defect or elaborate batteries must be handed over to your local depot
for chemical waste or the dedicated battery collection points. Never
throw developed batteries with household waste.
• Is the video baby monitor replaced, hand it over to your supplier; they
provide an environmentally friendly processing.
6.11IN CASE OF NO PICTURE, NO SOUND:
–– the parent unit and the baby unit are turned on? (connected adapter,
batteries fully charged?)
–– is the parent unit within the range of the baby unit?
–– the baby unit is not disabled as a result of silence? (VOX)
–– the volume on the parent unit is not at 0 (off)?
13
• Is this all okay, then take the adapters from the wall outlet, remove the
rechargeable battery from the parent unit, now wait more than a minute and
put everything back in place. Switch on the parent unit and the baby unit
again.
• If you still have no video or sound, please contact the Alecto service department on telephone 073 6411 355 (Netherlands), 03 238 5666 (Belgium) or via
internet www.alecto.nl
7
DECLARATION OF CONFORMITY:
The Alecto DVM-120 meets the essential requirements
and provisions as defined by European Directive 1999/5
/ EC.
The declaration of conformity is available on the website
www.alecto.info.
The use is permitted in all EU countries. In France, Italy, Russia and the Ukraine’s
only indoor use permitted.
8
SPECIFICATIONS
Reach:
Power parent unit:
Power baby unit:
Frequency:
Display
Battery charging time parent unit:
Battery life parent unit:
up to 50 m indoors
up tot 300 meters outdoors
3.7V Lithium Ion battery (incl.)
5VDC 550mA power adapter (incl.),
model: TGE050P055
5VDC 550mA power adapter (incl.),
model: TGE050P055
2.4GHz, digital frequency hopping (FHSS)
63 channels
2.4” TFT LCD display 320*240 pixels
~ 6 uur *
5~7 uur *
*: These times are approximate and depend on usage and settings and the condition of the battery.
14
9WARRANTY
Alecto DVM-120 is guaranteed for 24 months from date of purchase. We guarantee during this period the free repair of defects caused by material and manufacturing defects. All this at the final judgment of the importer.
HOW TO ACT: if you notice a defect, consult the manual first. If this manual gives
you no definite answer, consult the supplier of the video baby monitor or the Alecto
service department via www.alecto.info.
THE GUARANTEE EXPIRES: Improper use, faulty connections, leaking and / or
incorrectly installed batteries, use of unoriginal parts or accessories, negligence
and defects caused by moisture, fire, flood, lightning and natural disasters.
With unqualified modifications and / or repairs by third parties. By incorrect transport of the device without a suitable packing and if the device is not accompanied
by this warranty card and the purchase ticket.
Cords, plugs and batteries are not covered by the warranty. Any further liability,
especially for any consequential damages, are excluded..
15
Service
Help
WWW.ALECTO.NL
[email protected]
NL 073 6411 355
(Lokaal tarief)
BE 03 238 5666
(Lokaal tarief)
(Tarif local)
DE 0180 503 0085
Lokale Festnetzkosten
Hesdo, Australiëlaan 1
5232 BB, ‘s-Hertogenbosch
The Netherlands
Service
WWW.ALECTO.NL
[email protected]
NL 073 6411 355 (Lokaal tarief)
(Lokaal tarief)
Help
BE 03 238 5666 (Tarif local)
DE 0180 503 0085 (Lokale Festnetzkosten)
Hesdo, Australiëlaan 1, 5232 BB,
‘s-Hertogenbosch, The Netherlands
16
v1.0
v2.1