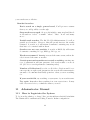
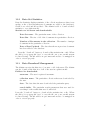
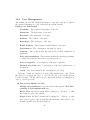
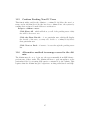
1
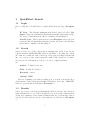
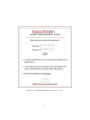
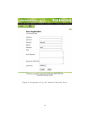
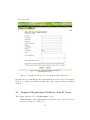
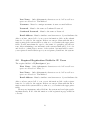
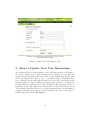
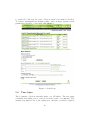
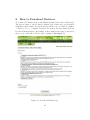
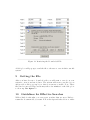
User Manual for the IU Information
Visualization Repository
Stephanie Gato, Todd Holloway, Mohd Saiful Nizam Bahari, Qian Wang
April 23, 2004
1
Contents
0 Introduction
4
1 QuickStart Search
1.1 Login . . . . . . . . . . . . . .
1.2 Search . . . . . . . . . . . . .
1.3 Results . . . . . . . . . . . . .
1.4 Download Documents . . . . .
1.5 Download Matrix . . . . . . .
1.6 Getting the Downloaded File .
.
.
.
.
.
.
.
.
.
.
.
.
.
.
.
.
.
.
.
.
.
.
.
.
.
.
.
.
.
.
.
.
.
.
.
.
.
.
.
.
.
.
.
.
.
.
.
.
.
.
.
.
.
.
.
.
.
.
.
.
.
.
.
.
.
.
.
.
.
.
.
.
.
.
.
.
.
.
.
.
.
.
.
.
.
.
.
.
.
.
.
.
.
.
.
.
.
.
.
.
.
.
.
.
.
.
.
.
5
5
5
5
6
6
6
2 How to Login & Register
6
2.1 Required Registration Fields for Non-IU Users . . . . . . . . . 12
2.2 Required Registration Fields for IU Users . . . . . . . . . . . . 13
3 How to Update Your User Information
14
4 How to Logout of the System
15
5 How to Search the InfoVis System
5.1 Overview . . . . . . . . . . . . . . .
5.2 Time Span . . . . . . . . . . . . . .
5.3 Text Field Searches . . . . . . . . .
5.3.1 Author . . . . . . . . . . . .
5.3.2 Title . . . . . . . . . . . . .
5.3.3 Keyword . . . . . . . . . . .
5.3.4 Journal . . . . . . . . . . .
5.3.5 Performing the Search . . .
.
.
.
.
.
.
.
.
.
.
.
.
.
.
.
.
.
.
.
.
.
.
.
.
.
.
.
.
.
.
.
.
.
.
.
.
.
.
.
.
.
.
.
.
.
.
.
.
.
.
.
.
.
.
.
.
.
.
.
.
.
.
.
.
.
.
.
.
.
.
.
.
.
.
.
.
.
.
.
.
.
.
.
.
.
.
.
.
.
.
.
.
.
.
.
.
.
.
.
.
.
.
.
.
.
.
.
.
.
.
.
.
.
.
.
.
.
.
.
.
15
15
16
17
17
17
17
18
18
6 Results
18
6.1 How to Read the Results Page . . . . . . . . . . . . . . . . . . 18
6.2 Options on the Results Page . . . . . . . . . . . . . . . . . . . 19
7 How to Download Documents
19
8 How to Download Matrices
22
9 Getting the File
23
10 Guidelines for Effective Searches
23
2
11 Adminstrator Manual
11.1 How to Login into the System . . . . . . . .
11.2 Data Set Statistics . . . . . . . . . . . . . .
11.3 Data Download Management . . . . . . . .
11.4 User Management . . . . . . . . . . . . . . .
11.5 Confirm Pending Non-IU Users . . . . . . .
11.6 Alternative method to manager users for the
. . . .
. . . .
. . . .
. . . .
. . . .
Admin
.
.
.
.
.
.
.
.
.
.
.
.
.
.
.
.
.
.
.
.
.
.
.
.
.
.
.
.
.
.
.
.
.
.
.
.
24
24
25
25
26
27
27
12 Glossary
29
13 Index
29
3
0
Introduction
The InfoVis CyberInfrastructure Database System is a web interface/database
which will eventually contain about a terabyte of research for the School of Library and Information Science at Indiana University. This system is a smaller component of the InfoVis CyberInfrastructure(http://iv.slis.indiana.edu).
The entire system serves as a data-code-compute resource for Research and
Education in Information Visualization.The documents are contributed from
many different sources such as Medline and Citeseer Databases and many
more are to be added in the coming years.
The purpose is to make these documents easily available for analysis and
visualization. The documents are searchable via a web-based interface and
retrievable either in plain text or as a co-author matrix or term-by-document
matrix. You have two options for finding information in the InfoVis CyberInfrastructure Database:
New search : Users type in new search parameters such as author,
title, keyword, and journal. Users may also choose which collections
to search on. Based on the entered information a query is constructed
and executed and the results are returned to the user based on the
relevance of the search parameters entered.
Historical Search : This option is for users that have previously
used and downloaded files from the system. This allows the user to
execute past queries instead of entering the same information again
and performing a new search.At the top of the Search Interface, up to
five of the user’s last executed queries are displayed with links. The user
may click on the past executed search query link and it will be executed
again just as if the user had typed in all of the search parameters.
This manual will give a quick summary as well as an in depth look on how
to effectively use the InfoVis CyberInfrastructure Database Search System.
4
1
1.1
QuickStart Search
Login
Choose either IU or Non-IU user to login from the Welcome Page. See figure
1
IU User : The Central Authentication Service page is loaded. See
figure 2 Type in your Indiana University username and password into
the text box and then press enter to submit your information.
Non-IU User : The Login Screen is loaded.See figure 3 Type in your
registered InfoVis username and password into the text boxes and then
press enter to submit your information.
1.2
Search
Select at least one of the collections by checking the check boxes by the
collection names (NSF,COS,NIH, Citeseer, Medline) or by using the ”check
all” button to search all of the collections. Next, type in a single search term
into one or more of any of the text fields: author, title, keyword or journal.
See Section 5 for information on how to do more complex searches.
ex:
Author : John,Robert,Jones
Title : A Cure For Cancer
Keyword : cancer
Journal : IEEE
Select a beginning year and an ending year to search on from the drop
down menus on the search page(default 1974-2003). Press the ”SEARCH”
button to perform the search query. See figure 8
1.3
Results
Select one or more collections by checking the check box next to the collection
name and then choose one of the following choices: new search, refined search,
download documents, or the download matrix button to perform any of those
actions. See the Section 6 for more information on each action. See figure
9
5
1.4
Download Documents
Select either standard or custom.
Standard : All of the fields available for each collection are included
in the Standard Download. Press the ”download” button to download
a file with all of these fields for each of the documents in the result set
from your search.
Custom : Select particular fields for each collection from the drop
down menus that you would like to download. Each collection has its
own specific fields as well as the common fields shared among all of the
collections. After you have chosen all of the fields you would like to
download, press the ”download” button. Only one collection may be
downloaded at a time. See figure 10
1.5
Download Matrix
Select either Term-by-Doc Matrix or Co-Author matrix from the selections
at the bottom of the page. Then press the ”download” button to perform
the matrix download. See figure 11
1.6
Getting the Downloaded File
After the file has been downloaded a dialog box will pop up asking you to
save the file. Save the file to your own file system. It is a .gz file that once
is on your file system needs to be unzipped in order to view it properly. See
figure 12
It is a comma delimited file in the form: field1 for doc1, field2 for doc1,
field1 for doc2, field2 for doc2, etc...
2
How to Login & Register
To login into the system choose either IU or Non-IU from the Welcome
Screen.See figure 1
IU : After choosing the IU user type the Central Authentication Service
webpage is loaded. See figure 2
6
Figure 1: Welcome Page
7
Figure 2: Central Authentication Service Page
8
Please type in your IU username and password in the appropriate labeled text boxes. Then press enter to submit your information. If you
pass the authentication the main search page is loaded for you to begin searching the system. If you fail the authentication you will either
have to try again in case you mistyped or register for the system via
the Non-IU registration process. If you pass authentication but are not
registered with the system, the registration page will be loaded and you
must register before you are allowed to start searching in the system.
Non-IU : After choosing the Non-IU user type the system’s login
screen is loaded. See figure 3
Please type in your registered IUIV username and password into the appropriate text boxes. Then press enter to submit your information. If you
pass the authentication the main search page is loaded for you to begin
searching. If you fail the authentication you will get another chance to type
in your username and password if there was a typo otherwise you will have
to register with the system.
If you are not a previously registered user then you will have to click on
the ”New User Registration” link. Either the Non-IU or IU registration link
depending on your affiliation. Then you will arrive at the ”Register Screen”.
For IU See figure 4 and for Non-IU See figure 5
9
Figure 3: Non-Indiana University Login Page
10
Figure 4: Registration Page For Indiana University Users
11
Or for Non-IU:
Figure 5: Registration Page For Non-Indiana University Users
On this screen you will fill in some required fields as well as some non-required
fields to be registered with the system. All of the required fields are marked
with an * .
2.1
Required Registration Fields for Non-IU Users
The required fields for Non-IU(See figure 5 )are:
First Name : Only alphanumeric characters a-z & A-Z as well as a
space are allowed ex: Mary Joe
12
Last Name : Only alphanumeric characters a-z & A-Z as well as a
space are allowed ex: Van Micheal
Username : Must be a unique username & same as email address
Password : Must be the same as Confirmed Password
Confirmed Password : Must be the same as Password
Email Address : Must be similar to [email protected] ex: [email protected]
After you have entered all of your correct information click on the submit
button to be added to the system. If there are any problems with the information entered the system will let you know so you can fix it the appropriate
fields. Non-IU users must also agree to the terms of copyright to use the system. After submitting your information the system admin will look it over
and decide to admit/deny your use of the system. An email will be sent to
your registered email address upon your acceptance/denial into the system.
2.2
Required Registration Fields for IU Users
The required fields for IU(See figure 4 )are:
First Name : Only alphanumeric characters a-z & A-Z as well as a
space are allowed ex: Mary Joe
Last Name : Only alphanumeric characters a-z & A-Z as well as a
space are allowed ex: Van Michael
Email Address : Must be similar to [email protected] ex: [email protected]
After you have entered all of your correct information click on the register
button to be added to the system. If there are any problems with the information entered the system will let you know so you can fix it the appropriate
fields.
IU users are instantaneously added into the system and can begin searching immediately. If all of the information on the registration page is filled in
correctly.
13
Figure 6: Update User Information Page
3
How to Update Your User Information
As a registered user you may update your contact information as it changes.
In order to update your contact information you must be logged into the
system. From the main search page click on the ”update user profile” link
in the top right hand corner to get to the update page. Usernames may
not be changed however through the update process. All of the fields(except
username) may be altered during this update just as when you registered.
Required fields are still required to have information filled in them. After you
have filled in all of the appropriate changes click on the submit button. If all
of the changes that were made are correctly formatted then your information
is updated in the system and you will be taken back to the search page to
resume using the system. See figure 6
14
Figure 7: Log out Screen
4
How to Logout of the System
To log out of the system click on the ”Log out” link on the top right hand
corner of the page. The Log out screen is shown. In order to completely exit
the system for security reasons your browser must be closed out. See figure
7
5
5.1
How to Search the InfoVis System
Overview
To search for documents in the database, enter the important information
pertaining to what you are searching for in the corresponding text fields as
well as choosing the options in the menus and checkboxes. The datasets that
are listed can be choosen to narrow down the search of documents. One of
the sets must be choosen otherwise no results will be retrieved. In order
15
to search all of the sets all of the collection check boxes must be checked.
To retrieve meaningful and helpful results, enter as many specific search
parameters relevant to your search. See figure 8
Figure 8: Search Page
5.2
Time Span
The document collection currently spans over 1974-2004. The user picks
a starting and ending year to narrow down the search of documents. The
starting year must be before the ending year otherwise you will be required
16
to go back and select all of your information again. If no parameters are
chosen then the default time span of 1974-2004 will be used to search on.
If only one extreme is chosen the default year(start or end) is used for the
other parameter.
5.3
5.3.1
Text Field Searches
Author
Type in a specific author’s name if known. Multiple authors are allowed to
be entered in the field. Due to the data’s complexity certain constraints are
imposed on the user to format the author text box.
Single Author : The following format must be used: first name,middle
name, last name If the user does not know all of this information or
does not care to search on all of the information then blanks are kept
between the commas.
ex: ,,
john,,
,bob,
,,jones etc.
Multiple Authors: must be separated by a semi-colon in order to be
searched upon properly.
ex: john,bob,jones;sally,ann,smith
5.3.2
Title
Type in a specific title if known. An exact match is not required. However,
in order to search for multiple titles they must be separated by semi-colons.
ex: title one;title two;
5.3.3
Keyword
Single Keywords: Type in any specific keywords that should be included in the search to narrow down the results.
ex: cancer
Multiple Keywords: Multiple words are allowed and need to be
separated by a semi-colon.
ex: cancer;colon;lung
17
These keywords are matched against the pre-determined list contained in the database.
5.3.4
Journal
Type in any specific institutions that the results are preferred to originate
from. Multiple sources can be separated by a semi-colon.
ex: journal1;journal2;journal3
5.3.5
Performing the Search
When you have finished entering the search parameters, click on the Search
button to perform the search. If for some reason you are unsatisfied with the
information that has been entered, select Reset to clear the search parameters
entered in the form and start over.
The InfoVis CyberInfrastructure search engine looks through the particular
fields of all InfoVis CyberInfrastructure documents, and returns the documents containing all your search words and constraints. The search results
page lists the documents found that contain your search terms. Users may
select to view 5,10,25,or 50 documents on the results page for each collection
by choosing from a drop down menu on the search page. .
See the section Guidelines for effective searching, below if your number
of results is in the thousands. Keep in mind that it may take a few tries
for you to find the combination of search terms that will return the answer
to your specific question. There are a lot of documents contained within
the database. In order to take advantage of the matrices and downloading
options your search will need to be narrowed down enough for an effective
download.
6
6.1
Results
How to Read the Results Page
At the top of the search results page, you’ll see how many total documents
your search found. Each collection that is selected to search upon will have
its own section of results on this page. Under each collection there will either
18
be 5,10, 25 or 50 document descriptions depending on your choice from the
search page. The document description includes the document title, author,
and abstract if there is one for the particular document. For each collection,
you may also view the next set of documents for each collection by clicking on
the ”next” button. You may also use the ”back” button to see the previous
set of documents. See figure 9
6.2
Options on the Results Page
On the results page you have the following options:
Perform a Refined Search and search within the results you got to
narrow it down further. You will be taken back to the search page with
your previous search parameters displayed so you may add or change
that information to obtain better results. If the total number of returns
seems too large to deal with, you probably need to narrow your search.
Proceed to the download page to download your results. See Section 7.
Submit a new search using the ”New search” button at the bottom
of the Search Results page and go back to the Search Page and start
over.
7
How to Download Documents
To download documents click on the Download Documents button on the
results page. The user is taken to the Document Format page where they
are presented with various fields to choose from to download. The user
can choose the standard format which includes all possible fields for every
collection. The other option is for the user to customize their download and
go through and pick what fields they would like to download. Each collection
has a different set of fields for download. After the format is chosen the user
must click on the Download button for the specific collection they would like
to download. Depending on the result set size and number of fields selected
for download, this process could take a few seconds or a few minutes. A
dialog box will pop up to send the file to the user to save in their own file
system. See figure 10
19
Figure 9: Results Page
20
Figure 10: Download Documents Format Page
21
8
How to Download Matrices
To download a matrix click on the Matrix Format button the results page.
The user is taken to the Download Matrix Page where they are presented
with their search results once again and are asked to choose either Co-Author
or Term by Doc to construct a matrix. From here the user must click the
Download Matrix button. Depending on the result set size being downloaded,
the process could take a few seconds or minutes. See figure 11
Figure 11: Download Matrix Page
22
Figure 12: Retrieving the Downloaded File
A dialog box will pop up to send the file to the user to save in their own file
system.
9
Getting the File
After you have chosen to download a file you will want to save it on your
system to view it and use it later. The system will create your file for you
and provide a dialog pop up box so that you can save your file. Note: These
files can become very large and it may take a few minutes for the dialog box
to show up. See figure 12
10
Guidelines for Effective Searches
With a little forethought, you can create searches that are more likely to
return the document set you want. Follow the tips and rules below to make
23
your searches more effective.
Standard searches:
Don’t search on a single, general word, You’ll get more returns
than you could possibly sort through.
Stop words are escaped. Stop words include common sql and Oracle
words such as ”select” ”rownum” ”where” ”likes” ”from” and many
more...
Partial word searches. The InfoVis CyberInfrastructure does allow
partial word searches. However, this will greatly increase the results
returned. A search on b will return documents containing any words
that have a b contained with in them.
Searches are not case sensitive A search on BiOLoGy will return
documents containing biology, BIOlogy, Biology, etc.
Words are stemmed. Running is treated the same as run, and motherly is treated the same as mother.
Certain punctuation marks are treated as nothing, entering any
sort of punctuation will just guarentee bad search results or none at
all. (See above search parameter formatting rules)
Number of Collections If you choose all of the collections and do not
enter specific enough search parameters the search will return massive
amounts of documents that hardly pertain to what you were searching
for.
If your search fails, try searching on synonyms of your search terms.
Try again. Remember that searching is not an exact science. It may
take a few tries before you find the answer you need.
11
11.1
Adminstrator Manual
How to Login into the System
To log in as the admin go to http://discover.uits.indiana.edu:8201/ivisadmin
The admin will be authenticated using Tomcat’s Realm configuration.
24
11.2
Data Set Statistics
Data Set Statistics displays statistics of the collections whenever there is an
update on the collections(when any documents are added to the database),
it will be recorded and showed here. The Admin is able to download these
statistics to as a plain text file.
Statistics to be shown and downloadable:
Data Set name : The particular name of the collection.
Data Size : The size of all of the documents in a particular collection.
Number of Documents in the collection : The number of unique
documents in the particular collection.
Date of Last Updated : The date that the most previous document
has been added to the database.
Press the ”download” button to download the statistics into a file. When
the dialog box pops up hit ”save” to save the file onto your own file system
for later viewing. The file will be in .gz format and needs to be unzipped in
order to view it properly.
11.3
Data Download Management
The Admin can view the histories of one user or all of the users. The Admin
can also download the histories of all of the user in a plain text file.
Fields to be downloaded:
username : The user’s registered username.
collection name : The particular collection that was downloaded by
the user.
date : The date that the user downloaded the particular query.
search fields : The particular search parameters that were used for
searching for the results that were downloaded.
Press the ”download” button to download the statistics into a file. When
the dialog box pops up hit ”save” to save the file onto your own file system
for later viewing. The file will be in .gz format and needs to be unzipped in
order to view it properly.
25
11.4
User Management
The Admin can view the detailed information of any user, and also download
the detailed information of all of the users in a plain text file.
Fields to be downloaded:
Username : The registered username of the user.
Firstname : The first name of the user.
Lastname : The last name of the user.
Address : The address of the user.
Homepage : The homepage of the user.
Email Address : The registered email address of the user.
Organization : The organization the user belongs too.
Position : The position that the user holds at their institution if
applicable.
Data sets permissions : The permissions that the user has pertaining
to which data sets the user can access and search on.
Area of expertise : A description of the user’s expertise.
Planned use of data set : A description of the user’s planned use of
the system.
status : The user’s status in the system(active/blocked).
Press the ”download” button to download the statistics into a file. When
the dialog box pops up hit ”save” to save the file onto your own file system
for later viewing. The file will be in .gz format and needs to be unzipped in
order to view it properly.
In this section Admin can also:
Modify the permissions of specific users in the system. This functionality is not implemented yet
Block User: the user’s status will be changed to ”blocked”, so this
user cannot login to the system.
Delete User: the user’s status will be changed to ”deleted”, so this
user cannot login to the system.But the username still exists so the
Admin can still view the user’s history.
26
11.5
Confirm Pending Non-IU Users
This functionality enables the Admin to confirm/block/delete the user’s status, and notify him/her if he/she has been confirmed into the system by
sending their registered email address a notification.
Steps to confirm a user:
Click Show All : which will show you all of the pending users. Only
five will be shown at once
Click the Show Details : of one particular user, which will display
the details of the user, you may also decide to confirm/block/delete
that particular user
Click Next or Back : if want to browse through the pending users
list
11.6
Alternative method to manager users for the Admin
The Admin may choose to login onto the server manually from SSH client to
perform any of these tasks. The Admin will have to perform updates on the
particular tables by executing SQL queries constructed by the Admin. This
requires that the Admin has prior experience working with Oracle and SQL.
27
Figure 13: Administrator’s Page
28
12
Glossary
Author: The author of a particular document. In some documents
there are many authors associated with the document.
Co-Author Matrix: The authors are the column and row types and
the frequency of their occurence of being co-authors for a particular
document is recorded in the row column values.
Collection: A collection consists of numerous documents all pertaining to a similar topic or field. Examples: NSF, Medline, Citeseer
History: A user’s history is there recently downloaded queries. They
are displayed on the search page and can be executed again by clicking
on them.
Journal: The journal that the article is associated with.
Keyword: Particular words associated with documents that reflect
the content of the text.
New Search: Clears all of the previous search parameters
Refined Search: Displays the previously used search parameters so
the user can refine their search to obtain less results.
Term-by-Doc Matrix: A matrix with unique terms as the row type
and the unique documents as the column type. The cross is filled in
with the frequences of the occurences of the terms in the documents.
Title: The title of the document.
13
Index
.gz, 6
admin, 24,28
alternative login method for admin, 27,28
author 5,17,29
beginning year, 5,16
CAS, 5,6,8
29
case sensitive, 24
Central Authentication Service, 5,6,8
check all button, 5
check box, 5
co-author matrix, 4,6,29
collections, 4,5,6,18,29
confirm new users, 26,28
contact information, 6,9,14
custom download, 6,21
data download management, 25,28
data set statistics, 24,28
dialog box, 23
download, 5,6,19,21,22
download documents, 6,19,21
download matrix, 5,19,22
download page, 19
effective searching, 18,23
end year, 5,16
file, 6,19,22,23
fixing your search, 19
historical search, 4
history, 4, 29
Indiana University registration, 9,11
InfoVis CyberInfrastructure,4
Information Visualization,4
30
journal, 5,18,29
keywords, 5,17,29
login, 5,6,10
logout, 15
narrowing your search, 18,23
new search, 4,19,29
new users, 9
Non Indiana University registration, 9,12
obtaining downloaded file, 6,19
options on the results page, 19
personal information, 6,9,14
plain text, 4
refined search, 19,29
register, 6,9
reserved words, 24
reset, 18
results, 5,18,19,20
result set, 6
search 5,15,16,18
search parameters, 4,15,16,18
standard download, 6,21
start year, 5,16
stop words, 24
term-by-doc matrix, 4,6,29
tips for effective searching, 18,23
31
title, 5,17,29
update, 14
user management, 25,28
welcome screen, 5,7
32