1
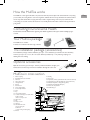
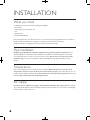
MT-instruk-alla-sv-eng-fi:Layout 1
14-02-19
11.28
Sida 13
MT-instruk-alla-sv-eng-fi:Layout 1
14-02-19
11.28
Sida 14
User Manual for MullToa
English
Congratulations on your purchase
of MullToa toilet
Your bio-toilet is patented and manufactured in Sweden and the brand is MullToa.
MullToa means that it produces natural humus in the actual unit, without the use of
water or chemicals. Our largest model has been awarded the Nordic Ecolabel (the
Swan mark).
1
MT-instruk-alla-sv-eng-fi:Layout 1
14-02-19
11.28
Sida 15
INTRODUCTION
Please read all these instructions before beginning to install your MullToa toilet.
Experience has shown that problems that usually occur are almost always related to
installation and maintenance. To ensure hassle-free use, please take a moment to read
through the manual.
Three important things to always remember:
– When the toilet is in use room temperature must be at least 18°C.
– If you are away for more than two days, you should always switch power off and place
the cover over the seat opening, otherwise the compost will become dry.
The moisture content is an important component of the biological process, so it is
important to retain the moisture as long as possible, even when the toilet is switched off.
– Apart from the natural needs being taken care of during a visit to the toilet, the only
thing that should go into the toilet is toilet paper.
Your new MullToa experience starts here! We hope you will be completely satisfied.
CONTENTS
2
How MullToa works
Contacting Environmental Health
Your MullToa package
Installation package
Extra accessories
MullToa cross-section – all parts
Installation
What you need
Pipe installation
Temperature
Air supply
Assembly
Starting the empty toilet
Maintenance
Regular maintenance
Mixing
Setting the thermostat
Liquid in the level tube
Keeping the compost at right temperature
3
3
3
3
3
3
4
4
4
4
4
5
5
6
6
6
6
6
6
If the red lamp lights up
6
If the white lamp lights up
7
Emptying the tray
7
Grating
7
Float
7
Emptying frequency
7
Emptying before season
7
Switch the power off!
7
Leaving the house for a couple of days or more 7
At the end of the season
7
At the start of the season
7
FAQ
8-9
Bad odour
8
Compost too dry
8
Compost too wet
8
Replacing the break-pin
9
Spare parts and service
9
MT-instruk-alla-sv-eng-fi:Layout 1
14-02-19
11.28
Sida 16
How the MullToa works
The MullToa is a biological toilet that composts waste and evaporates liquid, in the toilet itself. The composting
process takes place using nature's own microorganisms, without the need of any chemicals. The toilet should be
used as any other. Controlled air supply and heat, as well as regular mixing of the compost, accelerates the
composting process and converts the waste into eco-friendly humus. This makes a nutrien rich supplement for
your garden.
Eng
Contacting Environmental Health
Contact Environmental Health office regarding local health regulations. This applies when installing any type
of toilet.
Your MullToa package
The MullToa box contains:
A toilet, a 50 cm humus rake and a bag of humus.
The installation package (accessories)
The installation package contains: ventilation pipes, (4 x 1.1 m ventilation pipe with 55 mm outer diameter),
exterior pipes (2 x 0,5 or 1,0 m, 110 mm outer diameter), insulation (2 x 1 m), reducing coupling, roof
flashing and insect netting.
Optional accessories
Optional accessories: pipe bends (30° and 45°), additional insulation, straight pipes,
humus starter, an extra tray and a kit for installation through the outer wall.
MullToa in cross section
1.
2.
3.
4.
5.
6.
7.
8.
9.
10.
11.
12.
13.
14.
15.
16.
17.
18.
19.
Rubber coupling
Adjustable thermostat and switch
Fan motor
Micro switch (float)
Heating element
Airflow
External cord
Composting chamber
Rod for liquid indicator
Float
Tray
Lower heating element
a. Switch for mixing motor 25,55 and 65
b. Nut for switch
c. Nut for compost cover
Mixer motor
Plug
Compost cover
Shear pin
Shaft with mixer arms
a. Upper mixing arm
b. Fixed arm
c. Lower mixing arm with grating
Airflow
20. Grating
21. Front cover
22. Liquid tube, overflow (at the left hand side, seen from the front)
23. Liquid tube, tray (at the right hand side, seen from the front)
24. Indication lamp: time to empty the tray (white)
25. Indication lamp: high liquid level (red)
26. Sensor arm compost level
27. Handle mixing 15
a)
b)
c)
3
MT-instruk-alla-sv-eng-fi:Layout 1
14-02-19
11.28
Sida 17
INSTALLATION
What you need
For installation you need to have the following tools available:
– Electric drill
– Hole saw (55 mm) or Compass saw
– Saw
– Measuring tool
– Asphalt sealant/adhesive
Also check that the floor area where the toilet is to be positioned is large enough. The floor area required is:
Model 15,25 and 55 width 55 cm x length 110 cm (for the toilet and removal of the tray).
Model 65 width 65 cm x length 135 cm (for the toilet and removal of the tray).
Pipe installation
All pipes going through the ceiling into cold spaces (e.g. the attic) must be insulated. This is to
prevent draughts and condensation in the ventilation pipe. Insulation is essential, regardless of how much
or how little the toilet is used. Do not use pipe bends over 45°. Do not use a rain cap on top of the
ventilation pipe - the air must be allowed to flow freely. Only the insect netting should be on top of
the pipe.
Temperature
The room in which the toilet is installed must be insulated. When the toilet is in use the room
temperature must be at least 18°C to ensure it functions properly. The easiest thing to do is to
install a thermostatically controlled radiator. If the toilet is not in use then the temperature need not be
controlled, low temperatures will not damage the unit.
Air supply
In order to ensure adequate air supply, a vent should be installed in the exterior wall. The exhaust
air is evacuated through the toilet. Avoid having a bathroom fan in the toilet room as it creates a back draught,
which can lead to odours in the room.
4
MT-instruk-alla-sv-eng-fi:Layout 1
14-02-19
11.28
Sida 18
Assembly
1. Set the toilet in position against the wall.
The floor must be even and insulated.
Insect netting
Reducing coupling
Pipe 110 mm
MIN. 0,5 m
Eng
25 mm Insulation
2. Measure and make a hole for the ventilation
pipe in the ceiling, with 55 mm diameter. Install
the ventilation pipe with the non-sleeved end
down inside the rubber coupling on the toilet.
Roof flashing
MAX 45°
3. Measure and make a hole in the roof,
with 55 mm diameter.
25 mm
Insulation
VENT
alternative
4. Push the pipe up through the hole. Seal it well
using asphalt sealant between the pipe and the
roof to prevent any leaks.
18° C
5. Insulate the pipe from the ceiling up to the top.
All pipework in cold spaces must be insulated.
Ventilation pipe
55mm
Radiator
VENT alternative
6. Cut the exterior pipe to fit the angle of the roof.
7. Place the roof flashing on to the exterior
pipe. (Use soapy water to make it easier).
If you have a tin roof, the best thing to do
is to get a lead worker to create a junction
between the roof and the exterior pipe.
8. Pass the exterior pipe over the ventilation
pipe's insulation. Put on the reduction
coupling.
9. Adjust the roof flashing and seal firmly with
asphalt sealant between the roof flasing and
the roof.
Roof flashing
Nonsleeved end
Sleeved end
seal of asphalt
Roof (brick, paper or
plate/plastic)
10.Fit the insect netting against the stop on the
reducing coupling.
Starting the empty toilet
1. Pour 2/3 of the bag of MullToa humus starter into the toilet and the whole bag, model 65. About half of the
humus starter will fall through the grating into the tray.
2. Plug into an earthed socket. Open the lid and the motor will start automatically and run for a short while.
Close the lid and the motor will make one turn. Repeat this a couple of times. Turn the handle, Model 15, several
times. This will fill the tray and leave aprrox 5-10 cm on top of the grate. The tray will be full until you empty it
the first time.
3. Setting the thermostat. This depends on how many people are going to use the toilet. See recommended
use in the separate sketch under maintenance instructions, page 6.
5
MT-instruk-alla-sv-eng-fi:Layout 1
14-02-19
11.28
Sida 19
MAINTENANCE
Extra humus starter
For the best composting, the compost must be of a porous and moderately moist consistency. You can put in I litre of
humus starter a week in order to maintain a pourus compost. Use the humus rake to mix the humus starter in. Use the
humus rake to mix the humus in. If hard lumps form in the compost, make sure you break them up. Hard lumps can be a
sign that the heat is too high. If this is the case, turn the thermostat down.
Mixing
When the seat cover is opened, the motor will start automatically and run for a short time. Close the lid after the
toilet has been used. The motor will start again and complete a full turn. Model 15 must the handle must be turned a
couple of times after each use. This is so that waste and paper will be mixed into the compost and to make it more
porous. This is essential for efficient composting.
Setting the thermostat - Start
Before the first use the thermostat should initially be set according to how many people will be using the toilet.
Number of
people
1–2
3–4
Recommended
setting at start
1-5
6-7
8-10 emptying
For higher or lower loads, you can easily change the setting, as recommended below.
How to set the thermostat according to use
HOW TO SET THE THERMOSTAT MOD. 15/25
Adjust the thermostat according to the load. Check the liquid level tube (23) on the right side. The thermostat works in two steps.
• Setting 0 the power is off.
• Setting 1-7 the top heating element (5) is on, depending on setting.
• Setting 8-10 top and bottom (9) heating elements on.
HOW TO SET THE THERMOSTAT MOD. 55/65
Adjust the thermostat according to load. Check the liquid tube (23) on the right hand side. The thermostat works in two steps
depending on the setting; step one through the float in the tray and step two bypassing the float.
• Setting 0 the power is off.
• Setting 1-7 the heat is controlled by the thermostat setting and depending on the amount of liquid in the tray, the float turns
the heat on and off.
• Setting 8-10 the heat is on regardless the amount of liquid in the tray.
The float measures liquid level in the tray. This minimizes the risk of the compost becoming too dry.
The float does not increase the heat, this is done through the thermostat.
LIQUID IN THE LEVEL TUBE
The level tube (on the right hand side, viewed from the front)(23) shows how much liquid there is in
the tray. There will always be some liquid in the tray, but the tube should definitely not be full; this
would mean the tray is full of liquid. One centimetre of liquid in the tube is OK. If your compost is
too moist, or if you have an extra load over a longer period of time, turn up the thermostat.
RIGHT TEMPERATURE
At the right temperature, the compost has a porous and moderately moist consistency. If liquid stays on top of the compost
and seeps down into the tray slowly, then the compost is too wet and can no longer absorb the liquid as intended. Increase
the thermostat setting slowly and add a few litres of humus starter. On the other hand, if hard lumps form or toilet paper
remains on top, so that it doesn't get soaked and mixed in properly during mixing, the compost is too dry. If so, turn the
thermostat down.
IF THE RED LAMP LIGHTS UP MOD. 55/65
This indicates that the level of liquid in the tray is getting too high. Increase the thermostat setting to 8-10. Lower the
setting when the lamp signal is switched off and the level in the tube has been reduced.
6
MT-instruk-alla-sv-eng-fi:Layout 1
14-02-19
11.28
Sida 20
IF THE WHITE LAMP LIGHTS UP MOD. 55/65
This is an indication that the level in the composting chamber is getting to high.The lamp (24) might turn on and off for a period
of time, caused by f i toilet paper. But, when the signal becomes more consistent, it is time to empty the tray.
Eng
THE GRATING MOD. 55/65
The lower mixing arms (18c) have two ”sleighs” attached.These “sleighs” opens and closes the grating after each use of the toilet.
The grating is closed when the toilet is not being used to maintain the moisture in the compost.When the mixing arms turn, the
grating will be opened and at the same time the arms pushes compost down through the grating into the tray.
THE FLOAT MOD. 55/65
The toilet has a float controlled heat which turns on/off depending on the level of liquid in the tray. Heat goes on when
the liquid level in the tray is about 2-3 cm. This minimizes the risk of the compost becoming too dry and also creates a more
efficient composting. Check the liquid tube (23) every week. If the liquid level increases, adjust the thermostat until the level
is reduced.
EMPTYING FREQUENCY
In vacation homes, with a four to six weeks stay per year, it is usually enough to empty the tray once. But, at more frequent
use, you have to adapt the emptying frequency. The general rule is to empty the tray when the compost level reaches the
upper mixing arm.You soon learn to adapt the emptying frequency according to use. The tray will be filled up again after a
couple of days in use. It will only take a few days after emptying, before the tray is filled and should stay full for more
composting.
EMPTYING IN SPRING
Where you can get by with one emptying a year, leave the compost in the toilet over the winter.
The tray is then emptied in the spring before the toilet starts to be used.
EMPTYING THE TRAY
A few days before emptying, increase the thermostat to 10 to dry up the liquid in the tray. Once it has
disappeared from the level tube, do as follows:
1. Switch the power off!
2. Make sure that there is no liquid in the level tubes on the right (23) or left (22).
3. If there is liquid, increase the thermostat setting and wait a few days before emptying.
4. Emptying: Remove the front cover (21). Remove the tube to the tray. If the tray is stuck in place, due to compost
between the tray and the grating having dried release the tray by pulling the humus rake back and forth between
the tray and the grating.
5. Empty the tray in a suitable place for post-composting, such as in the garden compost.
6 Clean the tray. Before you slide it into place, check that the area where the tray goes is clean.
7. Replace the level tube. Replace the front cover.
For more frequent use, for example in the event of permanent use, the more often the tray has to be emptied. If the toilet
has not been used for the last 2 months, the contents in the tray can be used as fertilizer immediately. But, when emptying
the tray in the middle of the season, the contents needs to compost further for about 2 months. Remove the full tray and
replace it with an additional tray (which can be bought from us). Put the full tray in a plastic bag.
Prepare for brief absences
If you are away for more than two days, turn the power off and put the cover into the seat opening, otherwise the compost
will become hard and dry. If there is a lot of liquid, for example, after heavy use, you can leave the toilet running for a limited
period (approximately one week). Leave the toilet running with the thermostat in position 1. Then only the fan will run, and
the contents of the tray will dry slowly.
At the end of the season
When the season is over and it is time to leave your holiday cottage, unplug the toilet and put the cover in the seat opening.
You can also turn off the heat in the toilet room, as the MullToa does not freeze and break.
New season approaching
When the season is approaching, and it is time to open up your cottage, it is also time for the MullToa to be used again after
a long break. Check if the compost has become hard. If so, break it up with the rake. Then emplty the tray. If there is less than
10 cm of compost on the grate, add som more humus starter.
7
MT-instruk-alla-sv-eng-fi:Layout 1
14-02-19
11.28
Sida 21
FAQ
– How do I know if the compost is too dry?
Answer:The forming of hard lumps indicates that it is too dry. Another indication is that toilet paper remains on top
instead of becoming wet and getting mixed in properly during mixing.
– What do I do if the compost becomes too dry?
Answer: Use the thermostat to reduce the heat to a lower level and spray a couple of litres of water on the compost,
at the same time it may be useful to break up the compost through the seat using the rake.You should also use toilet
paper sparingly, as this is broken down more slowly when the compost is too dry. If the compost is consistently too
dry, despite the thermostat being at position 1-2, then you can install a timer that turns the toilet power off at night.
– How do I know if the compost is too wet?
Answer:When the compost is no longer able to absorb liquid, and it stays on top of the compost.
– What do I do if the compost becomes too wet?
Answer: First check that power is reaching the toilet, so that the fan and heater works. If the fan and heating element
are working correctly then you should be able to hear it and also feel the heat on the back of the toilet with your
hand.Then check:
– That the ventilation pipe has been installed according to the instructions and that it is well insulated.
– That the temperature inside the room is at least 18°C.
– If the toilet has been overloaded (if so, the thermostat setting needs to be adjusted).
– That there is plenty of air being supplied through the wall vent.
Drying up the compost, do the following:
1. Mix a few litres of MullToa Special Humus into the moist compost until all the liquid has been absorbed.
2. If there is liquid in the level tube, turn the thermostat up to a higher setting. Do not turn it down to a lower
setting until the liquid regains its normal level.
3. If there is liquid in the level tube on the left side as viewed from the front, the tray has overflowed. Increase the
thermostatsetting and wait a couple of days before emptying.
4. If the compost does not become drier, the excess liquid will need to be emptied out. Loosen the level tube (22)
at the top and connect a garden hose. Note: Do not open the front cover.
5. 1. If the toilet is full, empty the tray. It might be necessary to repeat this until the volume is back to normal.
– What can be put in the toilet?
The toilet can be used like any other, including for the disposal of toilet paper. However, the disposal of items
such as sanitary towels or tampons, cigarette butts, burning or glowing objects is not allowed.
– What do I do if there is a bad odour in the toilet room?
Answer: A properly installed and maintained MullToa is completely odour-free. If you do experience a bad smell in
the toilet room, it is an indication that something is wrong. Make sure you have carefully followed the installation
and maintenance instructions (using the quick-guide below) and you will probably be able to determine the cause
of the malfunction.
1.
2.
3.
4.
5.
6.
8
Check that the Biolet is getting enough air through a vent in the outer wall.
Make sure the front cover is closed properly.
Avoid draughts by not having both windows and vents open at once, or bathroom fan running.
Check that the pipes fit the toilet properly.
Check that the pipe joints are sealed completely tight.
Check that any pipe bends you have are not over 45°, and that you do not have more than two bends.
MT-instruk-alla-sv-eng-fi:Layout 1
14-02-19
11.28
Sida 22
– What do I do if the mixer motor does not work?
The mixer motor is protected in two different ways in order to prevent damange on mechanical parts.
Eng
– The motor runs normally, but the mixing arms do not move!
There is a shear pin mounted in the motor shaft. When the resistance is too high, the shear pin breaks
and must be replaced.
– The motor starts and stops and after a while it starts again by itself, but the mixing arms are still not moving!
The electrical motor has an overheating protection, which activates if the resistance is too high. It will turn
itself off. But it will try again after a while and it will repeat this until the high resistance in the compost has
been resolved. It usually is enough by mixing the compost using the manual rake and adding a few litres of
humus starter. See “What do I do if the compost becomes too dry” page 8
– What do I do if the shear-pin breaks?
There is an extra shear-pin next to the mixer motor or on Mod.15 on the back of the toilet.
1) Unplug the toilet.
2) Lift the toilet at the front, pull it forward and loosen the ventilation pipe.
3) Unscrew the round nut holding the switch (13b) for the mixer and press the button inside the plastic
and remove (pull) the thermostat dial(2).
4) Loosen the nut for the compost cover (13c). Lift the upper section.
5) Disconnect the wires that connect the mixer motor (14) to the terminal block on the electrical panel.
Memorise or take a picture off their postions before disconnecting them.
6) Remove the four Phillips screws holding the mixer motor in place in the lower section.
7) Lift the mixer motor straight up. (If the mixer motor is wedged in the shaft, then try
lifting the motor up while you rotate the shaft with an adjustable spanner.)
8) Working on a rigid surface or by fastening the motor shaft in a vice, tap out the remains of the broken
shear-pin (17) using a mandrel or the new shear-pin.
9) Tap in the new shear-pin and put the mixer motor back.
10) Reattach the wires to the terminal block.
11) Perform a test run.
12) Replace the top section, the round nut holding the switch for the mixer in place and the nut for the
compost cover.
13) Put the toilet in place.
14) Switch the power back on.
– When do I need to call a qualified electrician?
MullToa is approved for installation in bathrooms. If the main cord is damaged it must be replaced by the
manufacturer or its repair business, or another qualified person, to prevent injury. This warning is placed
near the toilet.
– Where do I get parts and service?
Contact your national dealer. Always have the serial number and model at hand.This information
can be found on a sticker at the upper back of the toilet.
9
MT-instruk-alla-sv-eng-fi:Layout 1
14-02-19
11.28
Sida 23