1
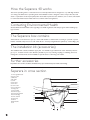
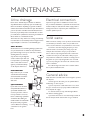
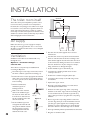
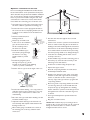
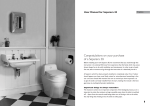
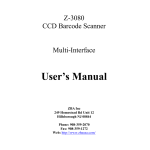
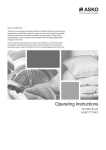
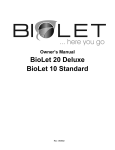
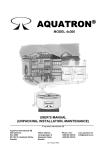
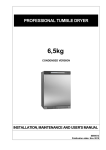
User Manual for Separera 40
User Manual for Separera 40
Congratulations on your purchase
of a Separera 40.
Before installing your new Separera 40, we recommend that you read through this
instruction in its entirety. We know from experience that the faults which may occur,
almost always has to do with installation and maintenance. In order to get a hassle
free use, take a moment and go through the instruction. It is absolutely worth it.
A Separera which has been properly installed, is completely odour free. If odour
should appear, you have most likely missed or misunderstood something in the
use- and care manual. We mention this now to remind you how important it is
to get the toilet correctly installed from the start; reading this manual is the best
guarantee to reaching full product satisfaction.
Important things to always remember:
The moisture content is an important component of the biological process, so it is
important to retain the moisture as long as possible, even when the toilet is switched
off. – Apart from the natural needs being taken care of during a visit to the toilet,
the only thing that should go into the toilet is toilet paper.
1
How the Separera 40 works
This urine separating toilet is constructed from eco-friendly material and is designed to cope with high demand
over many years.What does separating waste mean? Well, the toilet is designed so that on any toilet visit, solid
waste is separated from the liquid (urine).This means that Separera has two chambers, one for urine, and another
for solid waste. Both must be dealt with in accordance with local regulations.
Contacting Environmental Health
Contact Environmental Health office regarding local health regulations. This always applies when installing any
type of toilet.
The Separera box contains
Toilet with fan • Lid• Urine hose (1.5 m) • Screw with washer for wall bracket according to option A • Special
Humus • Ventilation Pipe 50 cm for wall • Mesh Cover • 2 Composting Chambers (40 litres) • Latrine Bags (10)
The installation kit (accessories)
The installation kit contains; ventilation pipes (4x1.1 m ventilation pipe with 55 mm outer diameter), exterior
pipe (1 x 1.1m with 110 mm outer diameter), insulation (2 x 1 m), reducing coupling, roof flashing and insect
netting. The connection kit used in installation option B can be ordered by your retailer
Further accessories
Pipe Bends 30° and 45°, Insulation,Ventilation Pipe, Special Humus, Ejector Tank, Latrine Bags.
Separera in cross section
1. Lid for vegetable waste
2. Upper section
3. Toilet seat
4. Air intake
5. Screen
6. Urine bowl
7. Urine hose
8. Lower section
9. Hose connection
10. Fixing holes
11. Floor bushing
12. Connector pipe
13. Composting chamber
14. Cord with plug
15. Inner container
16. Nylon clips
17. Fan kit
18. Wall bracket
19. Lid
1
2
3
19
4
5
18
6
17
16
15
14
7
8
10
10 9
13
12
2
11
MAINTENANCE
Urine drainage
Electrical connection
Urine can be drained away in a number of different
ways. Check what is required by your local authority;
there are variations depending on ground conditions
and the water table.You should never just deal with it as
you see fit, as this could have a harmful effect. A household of 4 people will produce around 35 litres of urine
per week; this is equivalent to about 3 kg of artificial fertiliser, which is a considerable amount.
There must be a drop in the hose coming out and away
from the toilet to avoid salt deposits; for longer hoses, it
may be helpful to connect it to a 32 mm PVC pipe.
Separera is approved for installation in wet rooms.
For permanent installation, a qualified electrician must
install a multi-pole switch. If the mains supply cable is
damaged it must be replaced by the manufacturer or
another qualified person.
GREY WATER:
Connect the hose to an existing drainage system such
as a percolation basin or similar. It is important that
pipes have enough of a drop for urine not to remain
standing in the hose. If necessary, the hose may be angled to
create a water trap. In this case
it is important to pour through
a litre of hot water now and
again to prevent the build-up
of salt deposits in the hose.
With normal use, a family of four produces around 7 litres
of solid waste per week. To create compost that is nice
and loose, add a few litres of Special Humus once a week.
You need to base the emptying frequency on how
often the toilet is used and by how many people. For
example, after 4-6 weeks’ use by 4 people it will be
time to switch composting chambers. Lift out the inner
container and carry it out, add a little ordinary topsoil
and put the lid on. Place the container in a shady place in
the garden for post-composting. It takes 6 to 9 months
of post-composting as a rule before the contents can be
used as a fertiliser.
Put a latrine bag in the other inner container and fit
this in place beneath the toilet.
Grey water
drainage
INFILTRATION:
May consist of a pit or a ditch
outside the house. Put large
stones/macadam around the
hose mouth and then fill
with sand.
EJEKTORTANK:
If you want to use the urine
as liquid fertiliser, there is a
special tank available as an
accessory; it can be ordered
from your dealer or from us.
Urine contains large quantities
of nutrient salts, making it a
useful fertiliser for lawns.With
the ejector tank you get the
correct dilution for watering;
connection to 1/2” garden
hose.
Solid waste
General advice
Infiltration
Wash the urine bowl with water now and again to prevent
salt deposits.
If insects get into the toilet, you can sprinkle BioLet
Insektsstopp on the compost.
If you do experience a bad smell in the room, check
the pipe connections are properly sealed and that there
is an adequate air supply.
To clean the toilet, use only mild detergent. Never
use abrasive cleaning agents.
If you leave the house for more than 2 days, switch off
the fan and put the lid down. If there is a good natural.
Ejector tank
3
INSTALLATION
The toilet room itself
FAN
300 m m
The toilet can be placed anywhere you like; it does
not need to have a particular room temperature.
However, the composting process will be more rapid
in a warmer room, as the microorganisms thrive in a
warm environment. It must be possible to conduct
urine away from the toilet. Separera is therefore most
suitable as a summer toilet, as there may be problems
with managing the urine in wintertime.
Option A: 370 mm
Option B: 415 mm
snapcoupling
Air supply
ejectortank
Make sure there is a good air supply, for example,
through a 10 mm gap under the door or via a vent.
Air will be evacuated via the toilet, so cross-draughts
must be avoided.
SOLID
WASTE
URINE
• Pass the urine hose through the floor and seal
with silicone.
Ventilation
• Set the lower section in position and seal between
Ventilation can be either via an external wall or up
through the roof.
the floor and the toilet. Fit the floor bushing to the
toilet and through the floor. Connect the urine hose
to the urine bowl, making sure there are no kinks in
the hose. Fix the hose in place using hose clamps,
being careful not to damage the nipple.
Option A – ventilation through
external wall
The toilet is accompanied by an installation kit
according to Option A.
• Lift off the upper section (2) of the toilet, remove
the inner container (15) and floor bushing (11).
• Position the lower section (8) against the external
wall of the room. Use the accompanying washers,
10 mm, to get the correct distance from the wall
before marking.
•
Mark for wall bracket,
ventilation pipe, floor
bushing and hose.
• Fit the ventilation pipe and
seal against the external wall
using silicone. On the outside
the pipe must be properly
sealed against the external
wall. Fit the mesh cover.
4
securely to the floor.
• Fit the inner container using the plastic clips.
• Screw the toilet securely to the wall using screws
and washers.
• Replace the upper section.
• Place the composting chamber on a level surface
immediately beneath the toilet
FAN
• Drill a hole in the external
wall for the ventilation pipe
55 mm, hole centre 300 mm
from the floor. Saw holes for
the floor bushing and for the
urine hose, 25 mm.
• Fit the ventilation pipe to the fan kit (17).
• Screw the floor bushing and the lower section
• Measure from the upper edge of the composting
chamber to the lower edge of the floor bushing, add
10 cm, and then cut the connection pipe. The stop
edge of the pipe must be up against the composting
chamber.
through screws
with nuts
Option A
w
A
L
washers
• Place a bag in the composting chamber and fold it
over the edge, then put on the lid with the hole and
pass the pipe up through the floor bushing. Set the
chamber in position and let the pipe down through
the hole in the lid so that the edge rests on the lid.
• Pour approximately 5 litres Special Humus into the toilet.
• Plug into an earthed socket.
Option B – ventilation via the roof
Prior to mounting the Installation Kit and Connection
Kit are needed; these can be purchased from the place
where the toilet was purchased.To install the ventilation
pipe, loosen the two through screws holding the fan
motor in place. Then install it using the two extra
screws that are in the lower section, under the fan
motor. Place the connecting piece on the fan cover.
MAX 45°
nonsleeved
• Lift off the upper section (2) of the toilet, remove
sleeved
pipe
the inner container (15) and floor bushing (11).
• Position the lower section (8) against the wall of
the room. Use the accompanying washers, 60 mm,
to get the correct distance from the wall before
marking.
• Mark for wall bracket, floor
• Measure up and drill a hole
FAN
•
fix the cover
using screws
and nuts
pre-mounted
screws
pip
• Install the ventilation pipe,
and seal the passage through
the exterior roof using
asphalt sealant to prevent
leaks.
B2
• Pass the urine hose through the floor and seal
bushing and hose.
in the roof for the ventilation
pipe, 55 mm. Saw holes for
the floor bushing and for
the urine hose, 25 mm.
B1
Use no more than 2 pipe bends, and none over 45° angle, to ensure a natural draught.
W
A
L
spacers
with silicone.
• Set the lower section in position and seal between
the floor and the toilet using silicone. Fit the floor
bushing to the toilet and through the floor. Connect
the urine hose to the urine bowl, making sure there
are no kinks in the hose. Fix the hose in place using
hose clamps, being careful not to damage the nipple.
• Screw the floor bushing and the lower section
Attachment
Option B
(from above)
Insulate all piping that passes
through cold spaces (e.g. in the
loft and on the outside of the building)
– this is to prevent condensation.
• Cut the exterior pipe to fit the angle of the roof.
securely to the floor.
• Fit the ventilation pipe and the connecting piece to
the fan kit (11). Screw the toilet securely to the
wall using screws and washers.
• Fit the inner container using the plastic clips.
• Replace the upper section.
• Place the composting chamber on a level surface
immediately beneath the toilet.
RUBBER
FLASHING
• Measure from the upper edge of the composting
chamber to the lower edge of the floor bushing,
add 10 cm, and then cut the connection pipe.
The stop edge of the pipe must be up against the
composting chamber.
sealing using asphalt sealant
roof covering (tile,
felting or tin/plastic)
• Position the rubber flashing – use soapy water to
make this easier. For those with a tin roof, it may
be best to get a metal worker to make some
metal flashing.
•
Place the outer pipe with rubber flashing over the
insulated ventilation pipe.
•
Adjust the rubber flashing to the external roof
and seal firmly with asphalt sealant between the
flashing and the roof.
• Once all the piping is insulated and covered, fit
• Place a bag in the composting chamber and fold it
over the edge, then put on the lid with the hole
and pass the pipe up through the floor bushing.
Set the chamber in position and let the pipe down
through the hole in the lid so that the edge rests
on the lid.
• Pour approximately 5 litres Special Humus into
the toilet.
• Plug into an earthed socket.
IMPORTANT! Insulate the pipe according to the instructions. Do not use pipe bends over 45° and avoid
having more than two; this is to ensure a natural
draught when the toilet is closed.
the reducing joint on the top, and then fit the
mesh cover.
5
Swedish Ecology AB Klippan 1J S-414 51 Göteborg Sweden
Tel: +46 31 42 29 30 Fax: +46 31 42 49 08 [email protected]
www.mulltoa.com