1
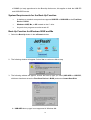
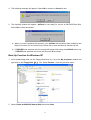
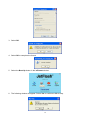
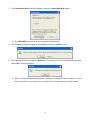
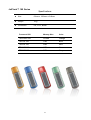
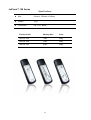
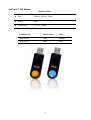
JetFlash™
User’s Manual
( Version 1.3 )
Table of Contents
INTRODUCTION..............................................................................................................................1
PACKAGE CONTENTS .........................................................................................................................1
FEATURES .........................................................................................................................................1
SYSTEM REQUIREMENTS ...................................................................................................................1
DRIVER INSTALLATION...............................................................................................................2
DRIVER INSTALLATION FOR WINDOWS 98SE ....................................................................................2
DRIVER INSTALLATION FOR WINDOWS ME, 2000, AND XP...............................................................2
DRIVER INSTALLATION FOR MAC OS 9.0 OR LATER..........................................................................2
DRIVER INSTALLATION FOR LINUX KERNEL 2.4.2 OR LATER.............................................................2
PARTITION & SECURITY FUNCTION .......................................................................................3
PARTITION TYPES ..............................................................................................................................3
ACCESS DATA IN THE SECURITY AREA ..............................................................................................5
LOG OUT OF THE SECURITY AREA.....................................................................................................6
CHANGE PASSWORD ..........................................................................................................................6
IF YOU FORGET THE PASSWORD ........................................................................................................8
PC-LOCK FUNCTION.....................................................................................................................8
PC-LOCK FUNCTION FOR WINDOWS 98SE, ME, 2000, AND XP .......................................................8
LOCK YOUR COMPUTER ....................................................................................................................9
UNLOCK YOUR COMPUTER ...............................................................................................................9
BOOT-UP FUNCTION......................................................................................................................9
SYSTEM REQUIREMENTS FOR THE BOOT-UP FUNCTION ..................................................................10
BOOT-UP FUNCTION FOR WINDOWS 98SE AND ME ........................................................................10
BOOT-UP FUNCTION FOR WINDOWS XP.......................................................................................... 11
REMOVE MFORMAT ...................................................................................................................14
SAFELY REMOVE YOUR JETFLASH .......................................................................................14
REMOVE JETFLASH IN WINDOWS 98SE ..........................................................................................14
REMOVE JETFLASH IN WINDOWS ME, 2000, AND XP.....................................................................14
REMOVE JETFLASH IN MAC OS ......................................................................................................14
REMOVE JETFLASH IN LINUX ..........................................................................................................14
TROUBLESHOOTING ..................................................................................................................15
ORDERING INFORMATION .......................................................................................................17
Introduction
Thank you very much for purchasing Transcend’s JetFlash™. This small device is designed to
expedite the exchange of huge amounts of data between any desktop or notebook computer with a
USB port. With a higher storage capacity and a much faster data transfer rates than other typical
portable storage media, JetFlash can easily replace floppy diskettes and hard disks. In addition, its
mobility, superior data retention ability, and impressive appearance will provide you with a
brand-new data storage experience.
Package Contents
The JetFlash package includes the following items:
•
JetFlash
•
Neck Strap
•
Driver CD
•
Quick Installation Guide
Features
•
Fully compatible with USB 2.0
•
Easy Plug and Play installation
•
PC-Lock Function: Makes JetFlash a key to your computer
•
Boot-Up Function: Makes JetFlash a bootable device
•
Partition & Security Function: Create a private partition with password protection
•
Driverless (Only Windows® 98SE needs the enclosed driver)
•
Powered via the USB port. No external power or battery needed
•
LED indicates the usage status of the JetFlash
System Requirements
•
Hardware: Desktop or notebook computer with USB port
•
Operating System: Windows® 98SE, Windows® Me, Windows® 2000 or Windows® XP
Mac™ OS 9.0 or later, Linux™ Kernel 2.4.2 or later
1
Driver Installation
Driver Installation for Windows 98SE
1. Put the Driver CD into the CD-ROM drive (Auto-Run supported). Select the Win98 Driver
button.
WARNING! Please ensure you install the driver before plugging in your
JetFlash™.
2. Follow the on-screen instructions to complete the driver installation.
3. Plug your JetFlash into an available USB port. A new Removable Disk drive with a newly
assigned drive letter will appear in the My Computer window.
Driver Installation for Windows Me, 2000, and XP
No driver is required. These Windows operating systems have built-in drivers to support JetFlash.
Simply plug JetFlash into an available USB port, and Windows will install the files needed to use
your device. A new Removable Disk drive with a newly assigned drive letter will appear in the My
Computer window.
Driver Installation for Mac OS 9.0 or Later
No driver is required. Just plug JetFlash into an available USB port and your computer will
automatically detect it. A new Disk icon will appear on the Desktop.
Driver Installation for Linux Kernel 2.4.2 or Later
No driver is required. Just plug JetFlash into the USB port and mount it.
Example:
1.
First create a directory for JetFlash
mkdir /mnt/jetflash
2.
Mount JetFlash
mount –a –t msdos /dev/sda1 /mnt/jetflash
2
Partition & Security Function
Partition Types
You can partition JetFlash into two partition types. The two types are:
Type 1: “Public Area Only”
This is the default partition type for JetFlash. It allows the entire volume of JetFlash memory to be
accessed by anyone. No secure data area is established.
Public Area
Type 2: “Public and Security Area”
JetFlash is partitioned into a single Logical Unit Number (LUN) identified device, which contains a
Public Area and a Security Area. Secure data can be established in the Security Area, which is
protected by a password. Access to data in the Public Area is unrestricted.
Public Area
Log Out / Log In
Security Area
1. Put the Driver CD into the CD-ROM drive (Auto-Run supported). Plug your JetFlash into an
available USB port of your computer and select the mFormat button.
2. Select the Partition button in the mFormat window.
3
3. The following window will appear. Select Yes to continue or No to stop.
4. Select the partition type you need.
a. To partition your JetFlash to the default type, i.e.,“Public Area Only.” Choose the
Public Area Only, and then select OK.
b. To partition your JetFlash to“Public and Private Area”, select Public and Private
Area and enter the memory sizes to be apportioned to the Private Partition Area.
i.
The minimum size apportioned to the Private Partition Area is 3MB, and the
maximum cannot exceed or equal the Total Storage Size.
ii.
Key in a New Password. (Maximum size for a password is 8 characters.)
iii. Key in a Password Hint, as a reminder in case you forget your password.
iv. Select OK.
4
5. The following window will appear to warn you. Select OK to continue or Cancel to stop.
6. Once the partition is finished, the following window will appear. Select OK.
Access Data in the Security Area
1. Plug in your JetFlash and double-click the mFormat.EXE in JetFlash. The icon
will
appear in the system tray and the following mFormat window will appear.
After the partition function is finished, the mFormat.EXE file will be copied to the JetFlash.
Please do not delete it. You can execute the mFormat function without the Driver CD by
running the mFormat.EXE on any computer.
2. Select the Login/out button in the mFormat window.
5
3. The following window will appear. Enter the correct password and select OK.
If a Password Hint was set up during the partition procedure, you can select the Hint
button to display your Password Hint to help you to remember the password.
4. The Removable Disk window will now appear and the Security Area is ready for use.
Log Out of the Security Area
1. Make sure that all files are closed and that no data is being transferred to or from your JetFlash.
2. Click the Login/out button in the mFormat window. Once you have successfully completed the
Log Out procedure for the Security Area of your JetFlash, only data in the Public Area will be
accessible.
Change Password
1. Select the Login/out button in the mFormat window.
6
2. The following window will appear. Select the Manage Password button.
3. Input the Old Password, and New Password and the Confirm New Password in each field.
(Maximum size for a password is 8 characters) You can also input a Password Hint to set up a
reminder for your new password. Select OK.
4. The following window appears. Select OK to close this window.
7
If You Forget the Password
If you forget your password, you can use the password hint to remember it. If you cannot recall the
password using the password hint, then all you can do is run the Partition function again to
repartition your JetFlash. Unfortunately, all your “Private area” data will be lost during this
procedure. You will have the chance to make a backup copy of your data in the “Public area” but all
data in the “Private area” is permanently lost.
PC-Lock Function
Once the PC-Lock function is enabled, you can use your JetFlash as a key to lock your computer,
protecting it from being used by other users.
The PC-Lock function is not supported in Mac or Linux Operating Systems.
To use the PC-Lock function, you must login into the Windows OS with Administrator
rights.
PC-Lock Function for Windows 98SE, Me, 2000, and XP
1. Select the PC-Lock button in the mFormat window.
2. The following window will appear.
3. In this window you can select the Protect Time you want, change the PC-Lock hint and the
Font.
8
4. Select the OK button to enable the PC-Lock function. If you want to lock your computer after
shutdown, you can select OK & ShutDown. You can remove your JetFlash when the computer
is turned off.
5. The following message will appear to show that the PC-Lock function is enabled.
Lock Your Computer
After the PC-Lock function is enabled, your computer will be locked whenever you remove your
JetFlash. If your computer is locked, the screen will display the locked status as shown below.
Unlock Your Computer
To unlock your computer, you must re-insert your JetFlash. The locked status on the screen will
disappear and you are now free to use your computer.
The computer’s locked status will be relinquished automatically after the lock time has expired.
Boot-Up Function
For systems that use Windows 98SE, Me, or XP, JetFlash can be configured to serve as an
MS-DOS Boot Disk. Upon completion of this procedure, JetFlash can be used to boot-up your
computer, allowing you to run MS-DOS programs. This does not make JetFlash a Rescue Disk for
Windows, nor does it put Windows Startup files onto your JetFlash. After booting with JetFlash, if
you wish to enter Windows, you must start Windows from your hard drive or a previously created
Rescue Disk.
The Boot-Up function is not supported in Windows 2000, Mac, or Linux Operating Systems.
To use the Boot-Up function, you must login into the Windows OS with Administrator rights.
If choosing to use the Boot-Up function, please be aware that there is a maximum capacity size
9
of 500MB (or less) apportioned to the Boot-Up disk sector; this applies to both the USB-ZIP
and USB-HDD formats.
System Requirements for the Boot-Up Function
•
A desktop or notebook computer that supports USB-ZIP or USB-HDD as the First Boot
Device in BIOS
•
Windows 98SE, Me, or XP located on the C: drive
•
Any anti-virus programs must be turned off
Boot-Up Function for Windows 98SE and Me
1. Select the Boot-Up button in the mFormat window.
2. The following window will appear. Select Yes to continue or No to stop
3. The following window will appear, choose the boot-up type you need (USB HDD or USB ZIP,
whichever has been set as the First Boot Device in BIOS) and select Create Boot Disk.
USB-HDD boot-up type is not supported in Windows Me.
10
4. The following message will appear. Select OK to continue or Cancel to exit.
5. The following window will appear. JetFlash is now ready for use as an MS-DOS Boot Disk.
Select OK to close the window.
When you have completed this process, your JetFlash will contain the files needed for the
Boot-up function. Do not remove any of these files or else the Boot-Up function will fail.
If USB HDD was selected, the C:\> prompt will appear after using the JetFlash to boot up.
If USB ZIP was selected, the screen will show the A:\> prompt.
Boot-Up Function for Windows XP
1. Insert a new floppy disk into the Floppy Disk Drive (A:). Go to the My Computer window and
right click on the Floppy Disk(A:) icon. Select Format… from the pull-down menu.
2. Select Create an MS-DOS Startup Disk then select Start.
11
3. Select OK.
4. Select OK to complete the format.
5. Select the Boot-Up button in the mFormat window.
6. The following window will appear. Select Yes to continue or No to stop.
12
7. The Create Boot Disk window will appear. Select the Create Boot Disk button.
The USB-HDD boot-up type is not supported in Windows XP.
8. The following message will appear. Select OK to continue or Cancel to exit.
9. The following window will appear. JetFlash is now ready for use as an MS-DOS Boot Disk.
Select OK to close the window.
When you have completed this process, JetFlash will contain the files needed to use the
Boot-up function. Do not remove any of these files or else the Boot-Up function will fail.
13
Remove mFormat
When the mFormat.EXE file is executed, the
icon remains in the system tray. If you do not
want to use this mFormat anymore, right click the icon and select exit to remove the mFormat.
Safely Remove Your JetFlash
Remove JetFlash in Windows 98SE
Unplug JetFlash from your system directly when data is not transferring.
Remove JetFlash in Windows Me, 2000, and XP
1. Select the
icon on the system tray.
2. The Safely Remove Hardware pop-up menu will appear. Select to continue.
3. Follow the on-screen instructions to complete the procedure.
4. The Safe To Remove Hardware message balloon will appear. JetFlash is now ready to be
unplugged.
Remove JetFlash in Mac OS
Drag and drop the Disk icon corresponding to your JetFlash into the trashcan. Then unplug your
JetFlash from the USB port.
Remove JetFlash in Linux
Unmount the device from the Linux environment.
Example: umount /mnt/jetflash
Before removing your JetFlash, please make sure the LED is on and Not flashing!
If you remove the JetFlash while the LED is flashing, unpredictable damage may occur
to the files and/or to your JetFlash due to a write cache fault.
14
Troubleshooting
If an error occurs, first check the points listed below before taking your JetFlash for repair. If you are
unable to remedy a problem from the following hints, please consult your dealer or service center.
Driver CD cannot auto-run in Windows
Enter Device Manager in the Control Panel and enable the Auto-Insert function for the CD-ROM
drive. Alternatively, you can execute the JetFlash.exe file in the driver CD manually.
Operating system cannot detect JetFlash
Check the following:
1. Is your JetFlash properly connected to the USB port? If not, unplug it and plug it in again.
2. Is your JetFlash connected to the Mac keyboard? If yes, unplug it and plug it into an available
USB port on your Mac Desktop instead.
3. Is the USB port enabled? If not, refer the user’s manual of your computer (or motherboard) to
enable it.
4. Is the necessary driver installed? If your computer is equipped with Windows 98SE, you must
insert the Driver CD into the CD-ROM and refer to the ”Driver Installation for Windows 98SE”
section to complete the driver installation before using your JetFlash.
Boot-Up Function Error Messages
The initialization of the Boot-up Function or installation of the OS is probably incomplete. Please
make sure that the path C:\WINDOWS\COMMAND\EBD exists in Windows 98SE, Me. If yes,
return to step 1 to re-initialize the Boot-up function. If this fails, the Boot-up function is not
supported by your computer operating system.
Cannot find the file that was just copied to the JetFlash
15
Re-copy the file and refer to the ”Safely Remove Your JetFlash” section to remove the JetFlash
after the copy process is completed.
File that was just deleted still appears
Re-delete the file and refer to the ”Safely Remove Your JetFlash” section to remove the JetFlash
after the delete process is completed.
mFormat (mFormat.EXE file) cannot be executed
You must be logged in to the computer you are using with Administrator rights in order to use the
mFormat Utility. If you want to access the security functions of your JetFlash™ , you must execute
the mFormat utility at least once.
16
ORDERING INFORMATION
JetFlash™ 150 Series
Specifications
Size:
59mm x 19mm x 10mm
Weight:
10 g
Certificates:
CE, FCC, BSMI
Transcend P/N
Memory Size
Color
TS256MJF150
256MB
Green
TS512MJF150
512MB
Blue
TS1GJF150
1GB
Red
TS2GJF150
2GB
Silver
17
JetFlash™ 120 Series
Specifications
Size:
75mm x 25mm x 11mm
Weight:
15 g
Certificates:
CE, FCC, BSMI
Transcend P/N
Memory Size
Color
TS128MJF120
128MB
Amber
TS256MJF120
256MB
Orange
TS512MJF120
512MB
Red
TS1GJF120
1GB
Blue
TS2GJF120
2GB
Light Blue
TS4GJF120
4GB
Turquoise
18
JetFlash™ 110 Series
Specifications
Size:
64mm x 21mm x 10mm
Weight:
11 g
Certificates:
CE, FCC, BSMI
Transcend P/N
Memory Size
Color
TS128MJF110
128MB
Gold
TS256MJF110
256MB
Green
TS512MJF110
512MB
Blue
TS1GJF110
1GB
Red
TS2GJF110
2GB
Gray
TS4GJF110
4GB
Amber
19
JetFlash™ 2A Series
Specifications
75mm x 25mm x 11mm (Mini Size)
Size:
88mm x 33mm x 15mm (Normal Size)
Weight:
Certificates:
15 g (Mini Size)
24 g (Normal Size)
CE, FCC, BSMI
Transcend P/N
Memory Size
Color
TS128MJF2A
128MB
Silver, Mini Size
TS256MJF2A
256MB
Silver, Mini Size
TS512MJF2A
512MB
Silver, Mini Size
TS1GJF2A
1GB
Silver, Mini Size
TS2GJF2A
2GB
Silver, Mini Size
TS4GJF2A
4GB
Silver, Mini Size
TS8GJF2A
8GB
Silver, Normal Size
TS16GJF2A
16GB
Silver, Normal Size
20
JetFlash™ V20 Series
Specifications
Size:
75mm x 25mm x 11mm
Weight:
15 g
Certificates:
CE, FCC, BSMI
Transcend P/N
Memory Size
Color
TS512MJFV20
512MB
Orange
TS1GJFV20
1GB
Blue
TS2GJFV20
2GB
Red
TS4GJFV20
4GB
Green
21
JetFlash™ V30 Series
Specifications
Size:
60mm x 16.5mm x 8.1mm
Weight:
7g
Certificates:
CE, FCC, BSMI
Transcend P/N
Memory Size
Color
TS512MJFV30
512MB
Orange
TS1GJFV30
1GB
Blue
TS2GJFV30
2GB
Red
TS4GJFV30
4GB
Green
22
JetFlash™ 160 Series
Specifications
Size:
61mm x 18.6mm x 9.8mm
Weight:
10 g
Certificates:
CE, FCC, BSMI
Transcend P/N
Memory Size
Color
TS512MJF160
512MB
Orange
TS1GJF160
1GB
Blue
TS2GJF160
2GB
Red
TS4GJF160
4GB
Green
TS8GJF160
8GB
Gray
23
JetFlash™ 168 Series
Specifications
Size:
61mm x 18.6mm x 9.8mm
Weight:
10 g
Certificates:
CE, FCC, BSMI
Transcend P/N
Memory Size
Color
TS1GJF168
1GB
Gray
TS2GJF168
2GB
Gray
TS4GJF168
4GB
Gray
24
JetFlash™ 210 Series
Specifications
Size:
70mm x 23mm x 11mm
Weight:
13 g
Certificates:
CE, FCC, BSMI
Transcend P/N
Memory Size
Color
TS1GJF210
1GB
Orange
TS2GJF210
2GB
Blue
25