1
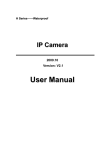
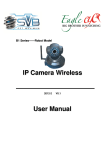
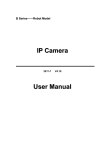
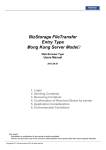
755-250
IP Camera
2009.4 V3.0
User Manual
Index
1
2
3
4
5
6
7
8
Introduction .............................................................................................................................. 3
Functions ................................................................................................................................. 3
Appearance and Interface ..................................................................................................... 4
3.1
Appearance of the device .............................................................................................. 4
3.2
Interface ........................................................................................................................ 4
Network Connection............................................................................................................... 5
4.1
Instruction for connection ............................................................................................. 5
4.2
Instruction for Visit ....................................................................................................... 5
Visit IP Camera on LAN......................................................................................................... 6
Visit IP Camera on Internet ................................................................................................... 8
6.1
Port Forwarding (Mapping) .......................................................................................... 8
6.2
Dynamic Domain Name Service (DDNS) .................................................................... 9
Concentrate control software .................................................................................................. 10
Specification ........................................................................................................................... 11
1 Introduction
The IP Camera combines a high quality digital video camera with network connectivity
and a powerful web server to bring clear video to your desktop from anywhere on your
local network or over the Internet.
Your IP Camera package should contain the following items, If any of the
listed items are missing, please contact your reseller from where you
purchased the camera for assistance.
The package includes.
IP Camera *1
IP Camera Utility CD *1
5V Power Adapter *1
Bracket * 1
1.5m cable *1
2 Functions
It is a video-transmission device based on net. The VGA/QVGA video will be
transmitted through LAN/WAN at most 30 frames per second. The video is
compressed by MJPEG
It adopts the TCP/IP network protocols and has inner webserver. It is very simple to
use, users can browse video through IE (It’s unnecessary to download ActiveX).
The infrared lights will start to work automatically when the environment is dark.
Detector can be connected to it for detecting alarm.
All the IP Cameras have a factory-default equipment SN and a domain name on it.
Free customer-end software SuperIPCam will be present to the users. Users can
browse several devices, record video for long time and realize the alarm check.
3 Appearance and Interface
3.1 Appearance of the device
Green LED
Orange LED
Power
Alarm in
Bracket
Figure 1
3.2 Interface
Power interface. Connect a 5V power adapter.
Network Interface. RJ45 socket and a network cable connect the socket with HUB/
Switch/ Routers.
Check the LEDs on the RJ45 socket of IP Camera. If connection is ok, the green LED
turns on. If there’s any active data transportation, the orange LED will flash.
External alarming interface. The input pins can connect for 1-way external sensor
input. For example, you may connect a Person Infrared Sensor (PIR) to it for motion
detection. When external sensor triggered, the switch close, and IP Camera will get a
alarm signal.
PIR
Input
pins
Switch
PIR Power
Figure 2
4 Network Connection
IP Camera can be connected with other PC through router, switch or hub to establish a
network. Figure 3 shown connections as below.
Figure 3
4.1 Instruction for connection
When IP camera-1 is connected to the router-1 from your home, you are able to
monitor this camera from PC-1. If the router-1 is connected to the Internet. Then you
are able to visit this camera from other PCs on the Internet (eg, PC-2, PC-3).
When the IP camera-2 is connected from office network and office network are
connected to Internet, all the PCs shows in the Figure 3 able to visit this Camera (IP
camera-2).
4.2 Instruction for Visit
Besides keeping the internet run well, some simple settings are needed for IP Camera
Visiting.
1) The computer and IP Camera should be in the same LAN. And their IP address should
be in the same segment. Otherwise, you need to set the IP Camera address of the IP
Camera. Example: the IP address of IP Camera-1 is 192.168.1.139(The segment is
192.168.1 segment) IP address of PC-1 is 192.168.0.175(192.168.0 segment), Herein,
the PC-1 can’t visit the IP Camera-1. The IP address of IP Camera-1 should be
changed into 192.168.0.139.
2) PC and IP Camera are not in the same LAN but both connected to WAN like IP
Camera-1 and PC-2 in Figure 3. If you want to visit the IP Camera-1 via PC-2, the
setting 1) is needed to ensure the IP Camera-1 can be visited via PC-1. And then set
the router. (Set the network port mapping on router-1), to ensure the IP Camera-1 can
be visited via PC-2. If the router is not set or setting failed, PC-2 can send data to
router-1 but can’t send to the IP Camera-1.
5 Visit IP Camera on LAN
The IP address of IP Camera should be in the same segment of your PC, otherwise the IP
Camera can’t be visited. In Figure 3, IP Camera-1 can’t be visited by entering
192.168.1.139 in the browser of PC-1.
NOTE: Factory setting IP is 192.168.1.139, the http port is 80.
Put the supplied CD into the CDROM, Click and run “QSearch_en.exe”. Users can set the
IP address like the following interface. Click [search] and select the searched device.
Then set the IP Camera’s IP address.
Figure 4
Note: If there is firewall installed on your computer, a dialog box will popup to ask if
you want to block or allow this program run, please select “allow”.
“Local PC Information” lists all IP information for your current computer. If there are
several network adapters, there will be several IP configurations. When you set the IP
Camera manually, please make sure the IP configuration is same with the computer’s IP
Configuration except the IP address.
When you revise the content of "IP Configuration" in the top right corner, please make
sure the data are the same as that of the current PC, only the last figure of IP address is
different which needs setting by yourself. Just like Figure 4, setting it as 139.
If you are not sure how to fill out the content of IP Configuration, you can also tick the "Set
IP automatically". IP Camera-1 will get the IP address from the router automatically.
Click "Update" button, the settings come into effect. Select the device in the list and click
"Browse" button, the IE browser will be triggered and you could watch the video now. Just
as below Figure 5.
Figure 5
6 Visit IP Camera on Internet
6.1 Port Forwarding (Mapping)
All TCP/IP network uses software ports. Ports can be thought of as channels on your
television. By default, all web page traffic is on channel (port) 80. By default, the IP
Camera uses port 80 to deliver its web page to your browser. Therefore, both of these
channels (ports) must be open (not blocked by your router/firewall) to incoming traffic in
order for you to connect to the camera from the Internet. Also, these two ports must be
forwarded or redirected to the camera’s LAN IP address by your gateway router. Your
router’s setup software should provide a utility for port forwarding or redirecting.
Before setting up port forwarding, it’s best to configure your IP Camera to use a static LAN
IP. Your port forwarding setup will need to be updated if the camera’s LAN IP address
changes.
Please follow the setting steps of Visit IP Camera on LAN, ensure that the PC-1 can visit
the IP Camera-1. In order to allow PC-2 and PC-3 on WAN to visit the IP Camera-1, the
port forwarding needs setting up in the gateway router.
Run the QSearch_en.exe in PC-1, click "setting router" button and visit the setting
homepage of router.
Note: clicking "setting router" button does not ensure that you could enter the
setting homepage of router, please look up the manual of your router and get into
this interface.
It’s different to set the port mapping for different routers. Please check the user manual for
router. Generally speaking, users can set port mapping in “Virtual Server”. Fill in the IP
address and port of the IP Camera. The Figure below is a sample.
Figure 6
Enter “status page”, and find the WAN IP. Input the IP into browser of PC-1, if you can visit
IP Camera-1, the port mapping is right. Now, you also visit IP Camera-1 via PC-2 or PC-3.
Note: When you connect several IP Cameras to the WAN, each one needs to set the
port mapping. The port for each device must be different. If the http port is not 80,
users need to add “: the http port which you set”, like as http://219.134.121.28:81.
6.2 Dynamic Domain Name Service (DDNS)
1) what is DDNS
Your Internet Service Provider (ISP) provides you at least one IP address which you use
to connect to the Internet. The address you get may be static, meaning it never changes,
or dynamic, meaning it’s likely to change periodically. Just how often it changes, depends
on your ISP. A dynamic IP address complicates remote access since you may not know
what your current WAN IP address is when you want to access your network over the
Internet. The solution to the dynamic IP address problem comes in the form of a dynamic
DNS service.
The Internet uses DNS servers to lookup domain names and translates them into IP
addresses. Domain names, such as www.nwsvr.com , are just easy to remember aliases
for IP addresses. A dynamic DNS service is unique because it provides a means of
updating your IP address so that your listing will remain current when your IP address
changes. There are many excellent DDNS services available on the Internet and best of
all most are free to use, such as www.3322.org. You’ll need to register with the service
and set up the domain name of your choice to begin using it. Please refer to the home
page of the service for detailed instructions.
2) Manufacturer’s DDNS:
The Manufacturer has establish a DDNS Server, and assigned a dynamic domain for
every device. It has been set into the IP Camera. You can find it when searching the
device via qsearch_en.exe, like as figure 7. The domain has also been recorded on the
label attached the device. If you have connected IP Camera-1 like figure 3, and set it
according to 6.1, you can visit it via this DDNS on PC-2 or PC-3.
Figure 7
Note: The domain name above is a forwarded one, it will change into the IP address
and http port when you input it in the browser.
3) The 3rd Party DDNS
Besides using the domain name which supplied by Manufacturer, users can also use the
3rd party DDNS to get domain name, such as www.3322.org. Users can login this website
to apply a free domain name. Then fill the related information in the below dialog box.
Figure 8
7 Concentrate control software
SuperIPCam is a free-software for customers to concentrate control. Users can visit
devices on LAN or internet through it. Functions of the software include:
Multi-view function
Video Record (choose MPEG4 to record longer)
Snap picture capture
Alarm
Figure 9
For more information, pls. refer the <<SuperIPCAM User Manual (Applicable for Q
series)>> in CD.
8 Specification
Item
Subitem
Specification
Sensor
1/4" CMOS sensor
Total of pixel
300k
Minimum
5 [email protected]; IR on,0 Lux
illumination
Dynamic Range
60db
SNR(max)
50db
Auto Exposure
yes
Auto White Balance
yes
Auto Gain Control
yes
Auto Flickerless
yes
Lens
f=4.0mm, F=2.0, Fixed Iris
Lighting Control
Auto control
Lighting
8pcs 850nm Infrared LEDs, 5m distant
Resolution
VGA/QVGA/QQVGA
Compression
MJPEG
Framerate
30fps/QVGA,30fps/QQVGA,15fps/VGA
Bitrate
100kbps ~ 4.5Mbps
Image Rotation
Mirror / Up-side down
Basic Protocol
TCP/IP、UDP/IP、HTTP、DHCP、DDNS
Image
Capture
Assistant
Video
Network
Video control
yes
User Setting
yes
DDNS
A free DDNS provided by manufacturer
Ethernet
10Base-T/100base-TX
Alarm In
1 Way
TTL 232
Customization(option)
Weight
180g
Main body
95mm(L)*51mm(W)*57mm(H)
Power
DC 5V
Power consumption
<3W
Other
Features
Hardware
Interface
Physical
Index
Operating
0℃~ 45℃
temperature
Humidity
10% ~ 80% non-condensing
OS Supported
Microsoft Windows 98/2000/XP/Vista
Software(PC
Internet Explorer6.0 and Above or Compatible
Browser
Side)
Browser
Application Software
Superipcam.exe