1
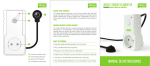
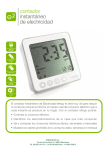
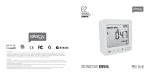
Instructions
Before operating and installation carefully
read all instructions.
At the end of its serviceable life, this product should not be treated as household or general
waste. It shold be handed over to the applicable collection point for the recycling of electrical
and electronic equipment, or returned to the supplier for disposal.
How to contact us:
If you have any questions about using your efergy monitor, or if you'd like further advice about energy saving at home or at
work, please feel free to contact us: Call efergy on +44 (0) 8450177 769
efergy will answer any installation or set-up questions and offer quick energy saving tips. Lines are open between 8.30am
and 5pm Monday to Friday. You can also email us: [email protected]. Further information is also available at www.efergy.com
CONTENTS
INTRODUCTION
INTRODUCTION ...................................................................................
3
SAFETY ................................................................................................
4
IN THE BOX ..........................................................................................
5
FIND THE FEED CABLE ........................................................................
6
INSTALLATION .....................................................................................
8
LINKING TRANSMITTER AND DISPLAY ..............................................
9
SETTING TIME AND DATE ....................................................................
10
SET-UP INSTRUCTIONS .......................................................................
11
DUAL TARIFF MODE .............................................................................
13
HOW TO CHANGE FUNCTIONS ..........................................................
15
HOW TO CHANGE MODES ..................................................................
16
HOW TO CHANGE THE DATE ..............................................................
17
FAQs .....................................................................................................
18
SPECIFICATIONS .................................................................................
19
Energy metering and monitoring are at the heart of energy management: you need
the information to tell when and where you’re saving money.
The efergy Wireless Electricity Monitor shows the amount of energy that a household
is consuming at the time the display is read. The display can also give the user a
reading showing usage in financial terms. You can walk around the home with your
display device, switching appliances on and off, and see the difference that this makes.
How to contact us
If you have any questions about using your efergy monitor or if you’d like further advice
on monitoring electricity at home, please feel free to contact us, or visit the website
for up to date information, downloads, and frequently asked questions.
Email your questions at [email protected]
We aim to answer all emails within 48 hours.
efergy Customer Service. T +44 (0) 8450 177 769
3
SAFETY
IT IS IMPORTANT THAT YOU OBSERVE SOME SIMPLE PRECAUTIONS BEFORE USING
THIS PRODUCT.
When installing the efergy monitor you should find that everything is relatively straight-forward.
However, there are number of important health and safety issues which you need to be aware
of.
The sensor clip fits onto the internal live feed cable inside the electricity meter, which delivers
the live supply to your home.
Please read and act upon the important information on the following pages. Remember the
device is not intrusive and does not require any rewiring.
If you notice anything unusual about the electricity supply, such as loose wires, exposed
cabling, bur n marks, holes in the insulating materials or damage to the
meter, then stop immediately and report the findings to your electricity supplier.
Do not force or bend the cables at any point during the installation. If you are worried or have
any concerns about the installation, please contact a qualified electrician immediately.
The user does not need to remove the sensor through the working life of the unit. Battery
changes are performed on the transmitter and on the display. There are no batteries to change
in the sensor.
4
IN THE BOX
Your efergy Pack contains the following elements:
Sensor
Transmisor
1x Sensor
1x Transmitter
1x Display Unit
You will need to fit the sensor to the live feed
cable which connects the meter to the
consumer unit. Any power you use in your
home will pass through this cable. The clipon sensor acts as a current sensor, and relays
the amount of current being drawn in the
home to the transmitter. From there it is sent
wirelessly to the monitor display unit, which
shows how much power is being
consumed.
Monitor
It also includes:
- 1x USB cable
- 1x Energy saving guide
- 1x CD ROM with the energy
management software
- 1x Instruction manual for the monitor
- 1x Instructions manual for the software
5
FIND THE FEED CABLE
Feed Wire
Modern office blocks and apartments may have safety panels
to protect wires entering the meter. It is recommended that
professional electricians be contacted where this is the case.
1
2
3
4
Diagram 2
Some installations will have Cable 1 and Cable 2 covered,
or partially covered to prevent any tampering with the supply
(see Diagram 2). Attach the sensor to Cable 4 (far right cable).
6
Feed Wire
FIND THE FEED CABLE
You should find four cables exiting the meter. The feed cable
(Cable 4) is the live cable exiting from the meter to the fuse
box. Connect the sensor to Cable 4 (Cable 4 will generally be
on
the right hand end of the meter, see Diagram 1).
1
4
2
Newer installations will normally have
two cables exiting from the bottom
of the meter. One is the earth cable,
the other the live feed cable. The
sensor should be clipped around the
live feed cable (this is normally brown
coloured).
If you have a three phase supply, or
economy 7 meter, then you may require
additional sensors. These can be simply
plugged into the additional sockets at
the base of the transmitter. Please
contact your supplier for additional
sensors.
Diagram 3
W
ire
Diagram 1
LOCATE YOUR ELECTRICITY METER
Locate your electricity meter and determine its type. You
can normally find this on an outside wall, in the garage,
basement or utility room. If you live in a flat, it can often be
found outside your front door, in the communal stair case, or
in the basement. Ensure there is enough of accessible cable
coming from the bottom of your electricity meter.
Dual Tariff meters (Diagram 3) will
often have an Auxiliary cable running
between Cable 3 and Cable 4. Auxiliary
cables will be smaller in diameter
than the feed cables, and will run
into an adjoining metering device.
Fe
ed
The efergy monitor is installed by cliping the sensor around the feed cable of your
electricty meter.
1
Cable 4
2
3
Auxiliary Cable
Safety
UNDER NO CIRCUMSTANCES SHOULD
YOU TRY TO ATTACH THE SENSOR IF
THERE IS ANY DAMAGE TO THE ELECTRIC
METER CABLES. NO CABLES NEED TO
BE CUT. DO NOT CUT ANY CABLES.
CONTACT YOUR LOCAL ELECTRICITY
SUPPLIER IF YOU HAVE ANY CONCERNS
ABOUT CLIPPING THE SENSOR ONTO THE
CORRECT CABLE.
3
7
LINKING TRANSMITTER AND DISPLAY
INSTALLATION
1. FIT THE SENSOR
1. Ensure three AA batteries are inserted in the transmitter
and three AAA batteries inserted in the display unit.
1. Push the release cap
to open the sensor.
2. Select the correct
feed cable, then place
the feed cable into the
top of the sensor.
Feed Wire
Feed Wire
The sensor needs to be fitted to the live feed cable. Sensors are suitable
for cables up to 12mm in diameter. You should not force the cable to fit.
3. Close the sensor.
The sensor is secure
when a “click” is heard.
2. PLUG THE SENSOR CABLE INTO THE TRANSMITTER
If the LINK is COMPLETED
you will see the transmission signal
2. Push the LINK button on the reverse of the display unit.
The transmission signal symbol will flash for one minute.
3. While the transmission signal in the display flashes push
the learn button in the transmitter and wait until the
transmission signal symbol becomes solid.
NOTE: The default value for the transmission frequency
is six seconds. This means the transmitter is sending
information every six seconds. You can change the
frequency from 6s (red light flashing) to 12s (green light)
and to 18s (orange light) pushing and holding the
transmitter button.
transmission signal
If the LINK is NOT
COMPLETED you will see
dashes on the display
link button
Insert the jack on the end of the white wire into any of the three input sockets on the
transmitter. The clip-on sensor acts as a current sensor and relays the current being
drawn in to the home to the transmitter.
If your cables are too big for the sensor you can order XL-sensors at www.efergy.com
learn button
8
9
SETTING TIME AND DATE
SET-UP INSTRUCTIONS
The efergy monitor needs to know the time and date in order to provide you with the
correct information.
Set the time and date as follows:
STEP 1
On the reverse of the display you will find the TIME button.
Press and hold for two seconds. Time set up will flash in
the display.
The efergy monitor needs to know unit cost per kWh charged by your electricity
supplier, along with voltage and alarm settings.The following four steps will move
through each of these settings. If you have dual or multiple tariff rate meter, please
see overleaf.
hold for 2 seconds
Press and hold down MODE button for two seconds, this will enable you to enter the
setting mode.
STEP 1. VOLTAGE
STEP 2
Set the hour to the correct time by using UP and DOWN
buttons. Press MODE button once to save the hours. Repeat
for minutes, using the MODE button to confirm.
Press and hold MODE button for two seconds. Default
voltage is set at 240V. Use UP and DOWN buttons to
change the voltage. Press MODE button to save your
setting and move into currency selection setting.
STEP 3
Set the date by using the UP and DOWN buttons. Press
MODE button to confirm and move to month set up. Repeat
the process to set the year. Once the correct time and date
have been set, push DATE button to save and exit.
STEP 2. CURRENCY SELECTION
Select the currency using UP and DOWN buttons. Default
currency will be “£”. Push MODE button to confirm and to
move onto tariff selection set up.
date button to exit
10
hold for 2 seconds
Note: 20 seconds of inactivity in setting mode will
return the unit to normal display mode without saving
changes.
11
DUAL TARIFF MODE
STEP 3. SINGLE TARIFF SET UP
On release you will see the symbol “TARIFF 1” flash. If you
are charged one single tariff push MODE button to confirm.
If you have dual tariff rate, please see overleaf.
QUICK HINT:
Throughout the set-up process, push DATE button at any time,
your settings will be saved & you will exit the function setting
mode.
STEP 4. ELECTRICITY COST
Default cost is set at 14p/kWh. This is the average price per
kWh electricity that suppliers charge in the UK. Use UP and
DOWN buttons to change the cost per kWh. Press MODE
button to save your setting and to move onto alarm setting.
STEP 5. ALARM
Default Alarm is set at 5kW. If the alarm function is switched
on, and you are using more than 5kW, the alarm will sound
and a red light will glow from the button of the display unit.
This value can be decreased or increased using UP and
DOWN buttons. Press MODE button to store the value.
Press DATE button to exit the function setting mode. To
activate and deactivate the Alarm at any time push ALARM
button on the reverse of the display.
12
If you have a dual or multiple tariff rate meter you may want to set-up the dual tariff
function.
STEP 1. ACTIVATION OF DUAL/MULTIPLE TARIFF
Press and hold MODE button for two seconds. On release
you will see the voltage setting flash. Press MODE twice and
you will move onto the tariff selection setting.
Now you will see the symbol “TARIFF 1” flash. Press UP or
DOWN buttons to select dual or multiple tariff set up (you
can select up to 4 tariffs). Push MODE button to confirm.
Now you have to set START and END times periods for
each tariif.
2 seconds
STEP 2. SET START & END TIME FOR TARIFF 1
Set the start time for TARIFF 1 first using UP or DOWN buttons.
Set the hours and press MODE button to save and move to
minute set up. Set minutes using UP or DOWN and pushing
MODE button to confirm. Repeat the process for third and
fourth tariffs if you have multiple tariff settings. You will always
set one period of settings less than the number of tariffs you
have selected as the remaining period will be saved
automatically.
13
HOW TO CHANGE FUNCTIONS
STEP 3. ELECTRICITY COSTS - TARIFF 1
Default price of 15p/kWh will flash. Use UP and DOWN
buttons to change the cost per kWh. Press MODE button
to save your setting. Tariff 2 set up will flash.
FUNCTION BUTTON: Press the top FUNCTION button to change the information
displayed from instant to average and to history.
STEP 4. ELECTRICITY COSTS - TARIFF 2
Default price of 5p/kWh for Tariff 2 will flash. Use UP and
DOWN buttons to change the cost per kWh. Press MODE
button to save your setting.
STEP 5. ELECTRICITY COSTS - TARIFF 3 & 4
Default price of 15p/kWh for Tariff 3 will flash. Use UP and
DOWN buttons to change the cost per kWh. Press MODE
button to save your setting. Repeat the process for tariff
4.
Example: If you are on an economy-7 tariff which starts at 1am and finishes at
8am, set start time at 01:00 and end time at 08:00. Push the MODE button to
confirm. Select the currency and set the cost per kWh you pay for each tariff,
approx 5p/kWh and 12p/kWh for night and day time rates respectively.
14
Time
INSTANT
The display unit shows
instant power (kW),
estimated electricity costs
per hour ( /hour) and
carbon emmisions per
hour (kg.CO2/hour).
The LED light will flash
every 6s, 12s or 18s in
the top of the display
indicating the time of use:
- Red: highest cost period
- Green: low cost period
Date
AVERAGE
The information shown is
the average calculated
since the monitor was
switched on for the first
time. It shows daily, weekly
and monthly average
consumption in kWh,
and kg.CO2.
Date
HISTORY
At this mode the monitor
shows consumption of
the last 7 days, last 7
weeks and last 24
months in kWh, and
kg.CO2.
15
HOW TO CHANGE MODES
HOW TO CHNAGE THE DATE
MODE BUTTON: Press MODE button to change the unit displayed
DATE BUTTON: Press DATE button to choose from daily, to weekly and to monthly
data.
DAY
POWER
Shows the power of your
whole house at any
instant, in kW.
ENERGY
At average and history
modes the display shows
energy consumption, in
kWh.
16
COST PER HOUR
Estimates the electricity
cost of your home as if all
appliances and lights
were running for an hour
( /hour) at that instant.
CARBON EMISSIONS
Estimates the indirect
carbon footprint for
electricity consumption
as if all appliances and
lights were running for an
hour (kg.CO2/hour) like
at that instant.
WEEK
MONTH
ARROWS: At history mode the arrows are used to scroll between date, weeks and
months.
17
FREQUENTLY ASKED QUESTIONS
If I remove the batteries will I lose the information on the display?
If you need to change or remove the batteries, the display has an internal
m e m o r y, s o information stored on the display will not be lost.
How do I reset the display (clear the data and start again)?
Press MODE and DATE buttons simultaneously and hold for two seconds.
How far does the device transmit?
Transmitter’s works around 40meters within the home. The 433MHz range is well
suited forin home use. This can cover three floors, and also well suited to builders
where metersare outside the main building.
I have three dashes (- - -) showing on the display. What does this mean?
Move the display closer to the transmitter and press the link button. If the dashes
remainon the display this would indicate the transmitter and receiver are not
communicating.Please contact efergy Customer Service to help locate the problem.
SPECIFICATIONS
Model Name/Number: efergy e2 1.0
Frequency: 433.52MHz
Transmision Time: 6s. 12s. o 18s.
Transmision Range: 40-70m
Voltage Range (in the sensor): 110V-400V
Measuring Current: 50mA-95A
Accuracy: >90%
The LED backlight will be activated from 18:00Hrs to 6:00Hrs.
Carbon ratio: 0,50 kg. CO2 / kWh
You will find some symbols on the monitor:
Low battery warnings (monitor/transmiter)
Alarm on/off
Transmission sign (Link is OK).
Backlight appears to work sometimes, and not other times. Is my display
broken?
No. The backlight is on a timer to save battery life. The display should work
at darkerperiods of the day, when any buttons are pressed.
For more information about the e2 and the elink software, go to www.efergy.com
18
19