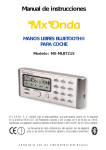
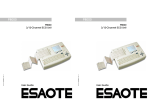
1
User Manual
and
Technical Documentation
Seca CT 220 / CT 220BT Configuration
Version 1.9
July 2010
seca ltd
40 Barn Street
Birmingham
B5 5QB
Phone:
Fax:
Email:
0121 643 9349
0121 633 3403
[email protected]
www.seca.com
PDF processed with CutePDF evaluation edition www.CutePDF.com
Contents
1
Quick introduction
1.1
Basic settings I / II tabs
1.2
Resting ECG tab
1.3
Layout tab
1.4
Signal window tab
1.5
Averaged complexes tab
1.6
Signal identifier tab
1.7
Measurement tab
1.8
Filter settings tab
1.9
Resting report tab
1.10 Default presentation parameters tab
seca
CT 220 Configuration
Page 2 of 14
1.
CT 220 Script - Configuration
1.1 Basic Settings I / II tabs
Under "Basic scheme" you can set the appearance of
the ECG recording program at start-up. “Scheme 1”
shows the trend data in the right part of the screen. If
you select “Scheme 2”, the whole screen is available
to display the on-line data. Schemes 3 and 4
correspond to displays 1 and 2. In addition, the
average of the 12 ECG derivations is shown.
In the "Signal layout" area, you can establish which
ECG derivations are shown in the on-line data
window during the examination. If you choose the
"user defined" option, the signals shown are those
selected in the “User defined” subtab of the “Layout”
tab.
In the “Show protocol after finishing a test” area, you
can select for which type of examination the report
should be shown.
seca
CT 220 Configuration
Page 3 of 14
1.
CT 220 Script - Configuration
The Device Manager enlists the ECG amplifier as
serial device with the reserved port number.
seca
CT 220 Configuration
Page 4 of 14
1.
CT 220 Script - Configuration
Via the “COM port (ECG module)” list box, choose
the port that your ECG module is connected to.
The ECG amplifier (Type B) with the
USB port automatically informs the
device manager that it is a serial
device. Please make sure that the
COM1 to COM99 ports are given.
If you check "Title bar", “Menu bar” and “Status
bar”, these will appear in the ECG recording program
in the upper edge of the screen.
Via the “basic measurement” check box you can
decide whether the ECG measurement is displayed in
the assessment program and in the printed reports or
not.
If “Patient management at program start” or “Show
patient manager after test” is checked, the “Patient
management”
dialogue
box
is
displayed
automatically at the start of program / end of
examination.
seca
CT 220 Configuration
Page 5 of 14
1.
1.2
CT 220 Script - Configuration
Resting ECG tab
If you wish to record the resting blood pressure
values under certain conditions, use the "Options
NIBP in Rest ECG".
The "Automatic measurement: without edit dialog"
and "Automatic measurement: additional dialog at
test’s end" options can only be used if an automatic
blood pressure device is connected to your PC.
If the "Additional comment before saving rest ECG"
box is checked, an input field will be displayed after
a resting ECG examination. Here, you can enter
additional comments to appear in the printed report.
seca
CT 220 Configuration
Page 6 of 14
1.
1.3
CT 220 Script - Configuration
Layout tab
In the upper
whether the
automatically
You can also
limbs.
part of the tab, you can determine
layout of the screen is to be
adapted to the selected examination.
specify the Cabrera sequence for the
In the lower part of the "Layout" tab, you can select
additional tabs for Resting examinations, and which
display and signal layout you would like.
In the "User defined" tab, you can select the ECG
derivations to be displayed if you set the channel
selection to “user defined”. This list is shown as
standard if you select “user defined” in the "Signal
layout" area "Basic settings" tab.
seca
CT 220 Configuration
Page 7 of 14
1.
1.4
CT 220 Script - Configuration
Signal Window tab
In this tab, you can set the colours for the signal
window of the ECG recording or assessment
program.
Click the appropriate button (e.g. Background
colour). A colour palette is opened so that you can
choose the colour you want (e.g. for the screen
background).
In the "Width" field, you can enter the line thickness
for the ECG signal display on the screen (on-line
data). The value "0" means that the signal will be
displayed with hairline thickness.
seca
CT 220 Configuration
Page 8 of 14
1.
1.5
CT 220 Script - Configuration
Averaged complexes tab
In this tab, you can set which averaged complexes are
to be used.
Click the appropriate button (e.g. Background
colour). A colour palette is opened so that you can
choose the colour you want (e.g. for the screen
background).
In the "Width" field, you can enter the line thickness
for the ECG signal display on the screen (on-line
data). The value "0" means that the signal will be
displayed with hairline thickness.
Under "Number of raw data leads", you can choose
whether the report print-out for the raw data should
display 1 or 3 derivations in the lower part of the
report.
seca
CT 220 Configuration
Page 9 of 14
1.
1.6
CT 220 Script - Configuration
Signal identifier tab
In the "Lead names" tab, you can determine which
derivation identifiers are shown in the report or on
the screen in the ECG channels. If you select "Predefined names", the channel identifier is adjusted for
the electrode application.
Edit the derivation identifier in the right part of the
tab so that you can save these identifiers using the
"apply user defined values" button and if necessary
re-select "Self-defined" in the “Pre-defined
identifiers” list box.
seca
CT 220 Configuration
Page 10 of 14
1.
CT 220 Script - Configuration
1.7 Measurement tab
In the "Measurement" tab, you can determine
whether the vector loop should be displayed with 5,
10 or 20 mm/mV. If the "Gain from averaged beat"
option is checked, the value to be shown will be
taken from the averaged complex that can be changed
directly in the program. If the "Gain from averaged
beat" option is not activated, the vector loop with the
input value will be taken from the configuration
program.
seca
CT 220 Configuration
Page 11 of 14
1.
1.8
CT 220 Script - Configuration
Filter settings tab
If you want to use the standard 35 Hz muscle filter or
the 50 Hz mains filter, you can check the desired
filter in the "Filter Settings" tab.
If drift correction is activated, you can determine in
the “Parameters” field whether a high or low filter
level is to be applied to the signal.
If you check the “use filter for aver” box in the lower
part of the screen, the filtered average values will be
displayed.
Make sure that signal filters eliminate
interference and change the desired
signal.
You should therefore try to eliminate
external interferences in every case.
seca
CT 220 Configuration
Page 12 of 14
1.
1.9
CT 220 Script - Configuration
Resting report tab
Via the “Raw signal”, “Averaged beats” and
“Measurement data” check boxes, you can state
whether these elements should appear in the printout
or not.
seca
CT 220 Configuration
Page 13 of 14
1.
CT 220 Script - Configuration
1.10 Default presentation parameters tab
In this tab, select the presentation parameters (feed
rate, amplification, channel selection) for printing
and displaying the signals (on-line data, raw data,
rhythm data, averaged complexes).
Make sure that your printer works with a resolution
of 300 dpi if you want to work with the “millimetre
raster”. A higher resolution would result in the raster
being unclear on the print-out.
If your printer only works with higher resolutions,
activate the grid instead of the raster.
Under "Averaged beats", decide on the selection that
should be displayed for the other three trend channels
in the report.
You can also choose the colour of the grid shown on
the screen and the print out separately.
seca
CT 220 Configuration
Page 14 of 14
User Manual and
Technical Documentation
Seca CT 220 / CT 220BT Script
Version 1.9
July 2010
0124
seca ltd
40 Barn Street
Birmingham
B5 5QB
Phone:
Fax:
Email:
0121 643 9349
0121 633 3403
[email protected]
www.seca.com
Declaration of Conformity
Electrocardiograph:
CT 220 / CT 220BT
We, the undersigned, hereby declare that the medical device (classe IIa) specified above
conforms with the Essential Requirements listed in Annex I, of
EC Directive 93/42/EEC
The Quality management system of Dr. Gerhard Schmidt GmbH is supported by
DEKRA Certification GmbH, D – 70565 Stuttgart
Certifikate of approval No.:
DIN EN 13485:2007:
Annex II of the Directive 93/42/EEC Medical Devices:
50626-10-01
50626-16-02
Valid date 07 / 2005
0124
Dr. Gerhard Schmidt GmbH
Wellesweiler Straße 230
D-66538 Neunkirchen
Phone.: +49 (0)6821 972991-0
Fax:
+49 (0)6821 972991-9
Neunkirchen,
02.07.2010
Heinz Schmidt
Quality Assurance Manager
Contents
1
2
3
Indications for the operator
Installation
1.1
Rules for working with the CT 220 System
3.1
Hardware connection
1.2
Responsibility of the operator
3.2
Software installation
1.3
Cleaning
3.3
Driver Installation
1.4
Requirements of the user
1.5
Maintenance
1.6
Disposal of old devices
3.3.1 Installation of the ECG device driver
(USB)
3.3.2 Installation of the ECG device driver
(Bluetooth)
Safety indications
2.1
Basic information
2.2
Earthing
2.3
Defibrillation
4
Quick introduction
4.1
Standard derivations
4.2
Entering patient data
4.2.1 Creating a new patient record
2.3.1 Pictograph
2.3.2 Precautionary measures when using the defibrillator
2.4
4.3
4.3.1 Recording a resting ECG
Patient environment
4.4
seca
Resting ECG
CT 220 Script
Displaying the current examination
Page 3 of 52
Contents
5
Appendix
Operating CT 220 Script
5.1
Technical data
The main screen
Contents/accessories
5.1.1 The menu bar
Symbols
5.1.2 The toolbar
Troubleshooting
5.1.3 The on-line data window
5.1.4 The info bar
5.1.5 The trend data window
5.1.5 Keyboard controls
5.2
Patient management
5.2.1 Selecting a patient already in the system
5.2.2 Deleting a patient already in the system
5.2.3 Entering a new patient in the system
seca
CT 220 Script
Page 4 of 52
1. Indications for the operator
1.1 Rules for working with the CT 220 System
The following rules should be heeded by the operators when using the CT 220 system:
-
The user instructions must always be available near the device.
-
The PC program should always be correctly closed down when possible, because the program saves program settings to the hard drive
during the close-down that may be lost if the system is quit incorrectly. Leaving the program incorrectly may lead to conflicts in the
database.
-
Carry out a backup of the patient database regularly (for a standard installation, the database is in the following directory
C:\Program Files\seca\CT220\db)
seca
CT 220 Script
Page 5 of 52
1. Indications for the operator
1.2 Responsibility of the operator
As operator of this medical device, you are responsible for:
-
Ensuring that the product is used correctly and properly by authorized specialized personnel
-
The technical instruction of the operating personnel on the system and ensuring that they are familiar with the user instructions
-
Ensuring that the safety instructions are adhered to and that precautions are taken to ensure safe working conditions and protection
against accidents
The CT 220 systems must be operated in accordance with the following EU guidelines and regulations:
-
VDE 107 (Electrical installations in hospitals and doctors surgeries)
-
EN 60601-1 (Safety of medical electrical devices)
-
EN 60601-1-1 (Safety requirements for medical electrical systems)
-
Accident prevention regulations
-
Medical device operator regulations (MPBetreibV).
For users outside of the Federal Republic of Germany, the regulations on accident prevention for that country apply as well as national
requirements that go beyond European provisions.
seca
CT 220 Script
Page 6 of 52
1. Indications for the operator
1.3 Cleaning
When cleaning the ECG Module the following rules should be heeded:
-
Rub the ECG Module with a damp cloth only. No water must be allowed to enter the device.
-
A small amount of soapsuds are suitable for cleaning the device.
-
Do not use any caustic household cleaning products or disinfectants as they may attack the surface of the casing and may damage it.
In addition, you should heed indications in the user instructions on the various electrodes:
seca
-
Adhesive single-use electrodes should be disposed of immediately after use to avoid them being re-used unintentionally.
-
Re-usable electrodes should be cleaned immediately after use in accordance with the user instructions.
CT 220 Script
Page 7 of 52
1. Indications for the operator
1.4 Requirements of the user
The user of the ECG system must:
seca
-
Be authorised to operate the system,
-
Have a full understanding of the processes,
-
Know and apply the valid safety provisions for operating the system,
-
Be informed of additional valid regulations (e.g. safety equipment),
-
Be aware of possible dangers that might ensure from operating such devices.
CT 220 Script
Page 8 of 52
1. Indications for the operator
1.5 Maintenance
Before using the device, a visual check must be carried out on the device, the connections and the ECG cables for mechanical damage.
If you notice any damage that might affect patient safety, you must not use the device again until it has been repaired.
The system must in addition be regularly maintained.
The device must be sent to the manufacturer for repairs.
seca
CT 220 Script
Page 9 of 52
1. Indications for the operator
1.6 Disposal of old devices
The synthetic parts are to be disposed of in accordance with the requirements of the Recycling Law.
The parts contained in it must be passed on to authorized collection and processing facilities.
seca
CT 220 Script
Page 10 of 52
2. Safety indications
2.1 Basic information
2.1 Basic Information
Follow the safety instructions to protect patients, users and third parties and to avoid the device being used incorrectly.
All users of this device as well as people dealing with assembly, maintenance and repair of the device must have read and understood the
instructions for use before starting to operate it.
seca
CT 220 Script
Page 11 of 52
2. Safety indications
2.2 Earthing
2.2 Earthing
Earthing the patient
Ensure that the patient is correctly earthed during the examinations.
Earthing the electrodes
The electrodes, in particular neutral electrodes, should not be earthed.
seca
CT 220 Script
Page 12 of 52
2. Safety indications
2.3 Defibrillation
2.3 Defibrillation
2.3.1 Pictogram
The ECG CT 220 is a type CF defibrillation-proof ECG.
2.3.2 Precautionary measures when using the defibrillator
The PC ECG Module CT 220 Script has defibrillator protection. This means that the ECG module is not disturbed during defibrillation of the
patient.
If the patient is being defibrillated, the following must be heeded:
The defibrillator electrodes must be kept apart from the ECG electrodes and metallic parts that come into contact with the patient.
Devices without defibrillator protection are to be removed from the patient before defibrillation.
Warning:
The patient must not be touched during defibrillation. It is imperative to heed the user instructions.
Defibrillation protection is only guaranteed when used with the cable provided!
seca
CT 220 Script
Page 13 of 52
2. Safety indications
2.4 Patient environment
The PC is not to be used within the patient environment, even if it complies with the relevant safety provisions for medical devices. It must in all
cases comply at the very least with the Requirements of the EN 60950 standard (Safety of IT equipment).
The patient environment is established as follows:
Area in which the patient is situated,
- Up to 2.5 m above the ground
- Up to 1.5 m horizontal distance from the patient.
seca
CT 220 Script
Page 14 of 52
3. Installation
3.1 Hardware connection
3. 1. Hardware connection
The CT 220 Script ECG amplifier comes in two
versions.
Type A has a serial port (RS232) to connect it to the
PC and Type B has a USB port.
The RS232 ECG Module can be connected to the
serial port of the PC with a cable (RJ45 – 15-way
sub-D).
Only use the special cables supplied to connect to the
PC!
The following steps are necessary to connect the
ECG amplifier (type A) to the PC:
- Connect the RJ-45 plug of the supplied PC
connection cable to the ECG module.
- Connect the 9 pole sub-D connector of the PC
connection cable to the RS232 port.
- Connect the PS2 plug / PS2 socket of the PC
connection cable to the PS2 connector of the
keyboard/ PC
seca
CT 220 Script
Page 15 of 52
3. Installation
-
3.1 Hardware connection
Connect the patient cable or electrode system to
the ECG module (15 pole sub-D plug).
The ECG amplifier (type B) is connected to the PC
using the USB cable. Please use the supplied USB
cable only.
A USB driver is to be installed for communication
using the USB port as part of the software
installation.
The device must only be connected
using the designated ports to avoid
damage being caused.
seca
CT 220 Script
Page 16 of 52
3. Installation
3.2 Software installation
Connecting via Bluetooth (type C)
The Bluetooth version of the ECG device has to be
connected to the PC using the supplied USBBluetooth-adaptor.
The following steps are necessary to connect the
ECG amplifier (type C) to the PC:
-
Connect the USB-Bluetooth-Adaptor to the USB
port of the PC.
-
Switch on the amplifier (use rechargeable
batteries of type AA only to avoid damage).
Install the required device driver (Windows XP,
service pack 2 or Windows Vista is
recommended, see chap. 3.3.2).
Connect the patient cable or electrode system to
the ECG module (15 pole sub-D plug).
-
-
seca
CT 220 Script
Page 17 of 52
3. Installation
3.2 Software installation
3. 2. Software installation
In order to install the CT 220 Script software, the
Installation CD must be inserted. The CD will start
up the installation automatically. If it does not start
up automatically, start the installation using Start
Execute – d:\setup.exe
In order complete the installation, the
software must be configured using the
configuration program before being
used .
If you want to keep the standard
configuration,
start
up
the
configuration program and confirm by
clicking “OK” without making any
changes. 1)
1)
The configuration program must be called up on all work
stations before running the software and confirmed by clicking
“OK”.
seca
CT 220 Script
Page 18 of 52
3. Installation
3.2 Software installation
If the CT 220 Script software has been successfully
installed, an item is added to the Start menu that can
be used to start up the program.
seca
CT 220 Script
Page 19 of 52
3. Installation
3.3 Driver Installation
3.3 Driver installation
3.3.1 Installation of the ECG device driver (USB)
After connecting the amplifier to the PC the “Found
New Hardware” wizard appears. Select “Install the
software automatically (Recommended)”. The device
driver will be installed automatically. Click finish to
close the wizard.
A second device driver has to be installed in the same
manner. Now the installation is successfully
completed.
seca
CT 220 Script
Page 20 of 52
3. Installation
3.3 Driver Installation
3.3.2 Installation of the ECG device driver
(Bluetooth)
1st Step
Insert the Bluetooth dongle in the computer and
switch on the ECG module
2nd Step
Open the Bluetooth Device Manager
3rd Step
Click the button “Add...”
4th Step
Activate “My device is set up and ready to be found”
The Bluetooth Device Manager ist searching for the
ECG module.
seca
CT 220 Script
Page 21 of 52
3. Installation
3.3 Driver Installation
5th Step
Select the “BlueRS+I/G2 67:27” device and click on
next.
6th Step
Set an own passkey for the Bluetooth device.
Key: 9876
7th Step
Looking for the “Outgoing COM port”
This COM port must be configurate after the driver
installation.
seca
CT 220 Script
Page 22 of 52
3. Installation
3.3 Driver Installation
8th Step
Open the Device Manager and click on the outgoing
com port with the right mouse button.
Open the Properties.
9th Step
Set the “Bits per second” on 115200.
10th Setp
At last open the CT 220 Configuration and set the
“COM port (ECG-Module) to the new Bluetooth com
port and activate the System Settings “Use System
Settings” in the right.
seca
CT 220 Script
Page 23 of 52
4. Quick introduction
4.1 Standard derivations
4.1 Standard derivations
Limb electrodes
The four limb electrodes are placed on the soft parts
of the skin.
Position of the electrodes:
R
L
Right arm
Left arm
N
F
Right leg
Left leg
R
V1
Chest wall electrodes
Position of the electrodes:
V1
right parasternal 4th intercostal space
V2
left parasternal 4th intercostal space
V3
5th rib between V2 and V4
V4
Left medioclavicular 5th intercostal space
V5
V6
Anterior, left, axillary line 5th intercostal
space
Middle, left axillary 5 line intercostal space
L
V2
V3
V4
V5
V6
N
F
seca
CT 220 Script
Page 24 of 52
4. Quick introduction
4.2 Entering patient data
4.2.1 Creating a new patient record
1. step:
Call up the Patient Management dialogue box. 1)
2. step:
Select the "New (F4)" button.
1)
Depending on whether the program has been configured, the
patient management window will start up directly when the
program is started up, even before the actual work screen is
displayed.
seca
CT 220 Script
Page 25 of 52
4. Quick introduction
4.2 Entering patient data
3. Step:
Enter the patient information.
The following fields must always be filled in:
Name
First name
Sex
Date of birth
For the date of birth, enter the year with
4 figures
4. Step:
Confirm by clicking "OK".
seca
CT 220 Script
Page 26 of 52
4. Quick introduction
4.3 Resting ECG
4.3.1 Recording a resting ECG
1st Step:
Select a patient whose details have already been
entered in the database or enter the details of the new
patient.
seca
CT 220 Script
Page 27 of 52
4. Quick introduction
4.3 Resting ECG
2nd Step:
Set the screen layout.
3rd Step
Apply the electrodes and check the signal quality in
the "Tune" mode (function key “F9”)
4th Step
Record the ECG by clicking the "Record" button
(function key “F10”).
seca
CT 220 Script
Page 28 of 52
4. Quick introduction
4.4 Displaying current examination
If an examination is found, it will be shown with a
“1” in column "B" in the Examination selection
screen.
If the examination was considered to be pathological,
a “1” is added to the “P” column.
With the “Edit” button, you can change the
comments and the results.
Click the "Display" button to call up the examination
and display it on the screen.
The processing of examinations is
explained in detail in the second part
of the "CT 220 View" user manual.
With the "Delete" button, you can delete an entire
examination from the database after the safety
confirmation.
seca
CT 220 Script
Page 29 of 52
5. Operating CT 220 Script
5.1 The main screen
5.1 The Main Screen
The main screen for the CT 220 Script ECG consists
of a title bar, menu bar, toolbar and on-line data
window with properties bar, info window.
Title bar (optional)
The title bar includes the program name and the
names of the current patients.
Menu bar (optional)
You can use menu entries to change the various
program options.
Toolbar window (optional)
With the toolbar you can control the way the program
runs.
On-line data window
In the on-line data window the signals of the ECG
amplifier can be viewed. The view can be modified
using the properties bar.
seca
CT 220 Script
Page 30 of 52
5. Operating CT 220 Script
5.1 The main screen
Info window
In the info window, the current data on the
examination can be previewed.
In the upper part, the details relating to the patient
such as current heart rate, and both blood pressure
values (systole and diastole), are shown. CT 220
Script gives premature ventricular contraction
information in "PVC per minute". Right at the top,
the whole ECG period is shown.
seca
CT 220 Script
Page 31 of 52
5. Operating CT 220 Script
5.1.1 The menu bar
5.1.1 The Menu Bar
File menu
Using this menu item you can call up the patient
management and then load an examination for
selected patients.
Settings menu
Using the "Clinic address..." entry you can open a
dialogue box for entering the address of your
practice. This address appears in the final report.
If the "Systole beep" entry is activated and there is a
recognized QRS complex, a tone will sound.
If you check the "Arrange in Cabrera format" option,
the ECG channels will be arranged in the Cabrera
format in the on-line data window and in the report.
seca
CT 220 Script
Page 32 of 52
5. Operating CT 220 Script
5.1.1 The menu bar
Layout menu
Layout - Display
The Scheme entry is for the configuration of the
screen. If you choose Scheme 1, the trend data will be
displayed in the right part of the screen. If you
choose Scheme 2, the whole screen will be dedicated
to the display of the on-line data. Scheme 3 and 4
correspond to the screens of displays 1 and 2. In
addition, the average of the 12 ECG derivations is
shown.
seca
CT 220 Script
Page 33 of 52
5. Operating CT 220 Script
5.1.2 The toolbar
Layout – Derivations:
Using this menu item, you can establish which ECG
derivations will be shown in the on-line data window.
Layout – Toolbars:
This menu item establishes how the toolbar is
configured, i.e. which buttons in the toolbar are
visible or removed.
5.1.2 The toolbar
The toolbar can be configured with the Toolbars item
of the Layout menu. This is used to switch on or off
the buttons individually for the patient management,
ECG operation and display.
Patient management:
Using these buttons, or using the corresponding
function keys, the dialogue fields for patient
management ("F2") can be called up and existing
examinations can be displayed ("F3"). You can show
the current examination in the assessment program or
print it out directly in the examination reports.
seca
CT 220 Script
Page 34 of 52
5. Operating CT 220 Script
5.1.2 The toolbar
ECG Operation:
Using the "Tune” button you can switch to monitor
mode. This will display the ECG of the patient on the
screen, but it will not be saved. This mode can also
be used to check the electrode system (if the
electrodes are not firmly attached this can lead to
noisy signals Appendix I). From the monitor mode
an examination can be started directly. The "Start
examination" button is not active (in grey), if no
patient has been selected. If a patient is selected, the
button is shown in green.
If you click the "RR" button, the blood pressure
measurement is started. The blood pressure values
are sent to the examination report.
seca
CT 220 Script
Page 35 of 52
5. Operating CT 220 Script
5.1.2 The toolbar
Basic display
Using the drop-down list "Scheme", you can
configure the screen.
If you select "Scheme 1", the trend data will appear
on the right side of the screen. If you select
"Scheme 2" the whole screen can be used to display
the on-line data.
The Schemes 3 and 4 correspond to Schemes 1 and 2.
In addition, the average of the 12 ECG derivations is
shown.
seca
CT 220 Script
Page 36 of 52
5. Operating CT 220 Script
5.1.2 The toolbar
Derivations
With this drop-down list, you can select which ECG
derivations are shown on-line on the screen.
You can choose to show limbs only, or only channels
V2, V4, V6.
If you choose "12 Leeds", all 12 channels are shown
on the screen under each other.
If you choose "2 x 6 Leeds", the on-line data window
will be divided into two columns with, on the right
side, the I, II, III, aVR, aVL, aVF derivations, and, on
the left side, derivations V1-V6.
By selecting “freely defined”, you can show the
channels that you selected in the "CT 220 Script
Configuration" program in the "Layout" tab.
seca
CT 220 Script
Page 37 of 52
5. Operating CT 220 Script
5.1.3 The on-line data window
5.1.3 The on-line data window
The on-line data window is used to display the ECGraw data. The data can be shown with a recording
speed of 5 mm/s, 10 mm/s, 25 mm/s or 50 mm/s.
With the “Intensity” drop-down menu, you can set
signal intensity values of 5 mm/mV, 10 mm/mV or
20 mm/mV.
seca
CT 220 Script
Page 38 of 52
5. Operating CT 220 Script
5.1.4 The info bar
5.1.4 The information bar
The heart rate is taken continually and shown in the
information bar.
Underneath the heart rate, the blood pressure is
shown if the automatic blood pressure setting has
been selected or if the values are entered manually.
seca
CT 220 Script
Page 39 of 52
5. Operating
5.1.5 The trend data window
5.1.5 The trend data window
The trend data window shows the average value
complex calculated from the raw data.
The display can be changed using the corresponding
properties bar.
The averaged complexes can be shown with the feed
rate settings of 25 mm/s and 50 mm/s. Each feed rate
setting can be combined with the resolutions of 5
mm/mV, 10 mm/mV and 20 mm/mV.
Using the "Derivation" drop-down list, the desired
ECG derivation can be selected.
As a standard, the first averaged complex is shown in
red as a reference complex upon starting the load.
If you click "Ctrl" + "F6" the current averaged
complex is selected as the reference complex (can
also be selected in the context menu).
seca
CT 220 Script
Page 40 of 52
5. Operating
5.1.6 Keyboard controls
The CT 220 Script PC ECG system can be controlled
extensively using your computer keyboard without
using the mouse.
In the table opposite, the "control keys" and their
function are shown.
seca
5.1.6 Keyboard controls
Key
Function
"F1"
On-line help
"F2"
Patient management
"F3"
Examination selection (list of examinations carried out for the patient to
date)
"F5"
On-line print-out (during ergometry). Output of the last 10 s of the
examination on the connected printer
"F6"
Opens up an input window for lactate input (these values are shown
optionally in the report)
"F9"
TUNE; TUNE STOP
"F10"
Record
Start recording
End of load phase
End of examination
"F11"
a) Resting mode: retrospective resting ECG. By pressing this key the
last 10 seconds of the displayed ECG signals are recorded in the
database as a resting ECG.
CT 220 Script
Page 41 of 52
5. Operating
5.1.6 Keyboard controls
Key
Function
b) Rhythm / ergometry mode: sets a manual event. These markers are
shown in the rhythm report and comments can be added to them directly
in the report view.
seca
"SHIFT" + "F1" to "F5"
Switches between the ergometry programs 1 to 5
"Ctrl" + "F6"
Shows the current averaged complex as a reference complex in the
average value window
" Ctrl " + "R"
Switches to the Resting ECG mode
" Ctrl " + "Y"
Switches to the Rhythm ECG mode
" Ctrl " + "E"
Calls up the dialogue box to define the ergometry programs
" Ctrl " + "P"
Starts the print-out on the printer
" Ctrl " + "Alt" + "S"
Switches the systole beep on/off
" Ctrl " + "N"
Starts the recording of an emergency ECG
CT 220 Script
Page 42 of 52
5. Operating
5.2
5.2 Patient management
Patient management
5.2.1 Selecting a patient already in the system
1. Step:
Call up Patient management. The program can be
configured so that the patient management dialogue
box appears automatically when the program is
started up, even before the main screen is displayed
( configuration program).
2. Step:
Check the desired patient in the patient list and then
click “Select” button. The selected patient is called
up as the current patient and the name of the patient
appears in the title bar of the program.
seca
CT 220 Script
Page 43 of 52
5. Operating
5.2 Patient management
5.2.2 Deleting a patient already in the system
1. Step:
Call up Patient management.
2. Step:
Check the patient to be deleted in the patient list and
click the "Delete" button. After a safety confirmation,
the patient and all examinations performed for that
patient will be deleted from the database.
seca
CT 220 Script
Page 44 of 52
5. Operating
5.2 Patient management
5.2.3 Entering a new patient in the system
1. Step:
Call up Patient management.
2. Step:
Click the “New (F4)” button.
3. Step:
Enter the patient information in the patient input
dialogue box.
The fields "Name", "First name", "Sex" and "Date of
birth" must be filled in. The year for the date of birth
should be entered with 4 figures.
The "Extended patient input dialogue box" button
calls up a dialogue box where you can enter the
insurance number, health insurance number, health
insurance scheme, status, ethnic group, native tongue
and notes field.
4. Step:
Confirm the details by clicking OK. The new patient
will be saved in the database.
seca
CT 220 Script
Page 45 of 52
Appendix
Technical data
Hardware
Model:
CT 220 BT
CT 220
Power supply:
3.6 V=
4.3 V=
Power input:
< 0.5 W
0.25 A
Sampling rate:
600 Hz per channel
600 Hz per channel
Resolution:
12 Bit, 4.88 µV
12 Bit, 4.88 µV
Transmission range:
0.05 Hz – 100 Hz
0.05 Hz – 100 Hz
Incoming impedance:
>20 MΩ
>20 MΩ
Common mode rejections: >105 dB
>105 dB
Risk class:
II a
II a
Type:
CF
CF
Housing protection class:
II, IPX0
II, IPX0
Module size:
LxWxH: 162x85x31 mm3
LxWxH: 188x98x45 mm3
Weight:
300 g (without storage batteries)
350 g.
Data transfer:
Bluetooth
USB port
Defibrillation protection
seca
CT 220 Script
Page 46 of 52
Appendix
Technical data
Software:
Feed rates:
5 mm/sec
10 mm/sec
25 mm/sec
50 mm/sec
12 derivations:
Wilson
Goldberger
Einthoven
Sensitivity:
5 mm/mV
10 mm/mV
20 mm/mV
Filter:
50 Hz
35 Hz
Antidrift
30 Hz low-pass filter
seca
CT 220 Script
Page 47 of 52
Appendix
Technical data
Environmental
conditions
Operation:
Temperature:
10°C to 40°C
Humidity:
25% – 95% rel. humidity
Air pressure:
70 – 106 kPa
Temperature:
-10°C - +50°C
Humidity:
15% – 95% rel. humidity
Air pressure:
70 – 106 kPa
Storage:
seca
CT 220 Script
Page 48 of 52
Appendix
Contents/Accessories
Accessories
CT 220 Script PC ECG System:
Articles
CT 220 Script ECG-module, USB, clamp-connection
Article number
100.110.120
Connecting cable ECG
100.130.205
PC, USB, 3 meters
Instruction manual
100.130.305
Software CD CT 220 / CT 220BT
100.210.116
ECG interpretation incl. measurement (Glasgow)
100.210.220
Patient cable 10-wired, banana plug, clump-connection 100.210.160
2 meters
CT 220BT PC-ECG module Bluetooth, screwconnection
100.210.330
Bag and belt
100.130.402
Quick-charger, 230 volt
100.130.409
Adapter for quick-charger, 230 volt, EU
seca
UK
100.130.411
Accumulator 2700 mAh
100.130.407
Bluetooth dongle
100.130.400
Patient cable, 10-wired, banana plug, screwconnection, 0.6 meters
100.130.406
CT 220 Script
Page 49 of 52
Annex
Symbols
Safety instructions: Heed the user instructions
seca
CT 220 Script
Page 50 of 52
Appendix
Troubleshooting
Malfunction: 50 Hz AC interference.
Cause: disruption to the 230V current
Remedy:
• Earth the couch.
• Check the positions
connections.
of
the
electrode
Regular AC interference
• Use a 50 Hz filter.
Malfunction: irregular AC interference.
Cause: disruption
movement artefacts.
through
muscle
Remedy:
•
Patient must not be cold.
•
Calm patient.
•
Possibly use muscle filters (35 Hz).
seca
potentials;
Irregular AC interference
CT 220 Script
Page 51 of 52
Appendix
Troubleshooting
Error
Possible cause
Signal faded
No signal
Remedy
Electrodes not correctly positioned
Apply electrodes again
No filter
Switch on filters
Defective patient cable
Request new patient cable
ECG module (not) connected
− Check the data connection to the COM port
− Check the power supply
− Port labels on PC mixed up
Automatic
blood
measurements does
automatically
pressure Communication to the ergometer broken
not start
− Is the connection cable (correctly) connected?
− Is the ergometer cable to the COM port connected?
− Is the ergometer switched on?
Load not placed on the ergometer
− Switch the ergometer off and then back on 10 seconds later
− Has the correct ergometer been switched on (configuration program)?
Printer does not print
seca
Printer is not switched on
− Switch on printer
Printer is not on-line
− Put printer on-line
No paper in the printer
− Fill up with paper
Defective/ no connection cable
− Check cable or change it if necessary
CT 220 Script
Page 52 of 52