1
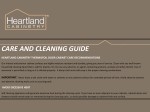
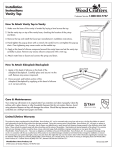
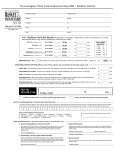
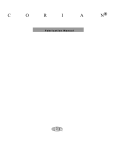
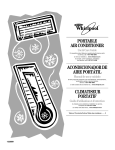
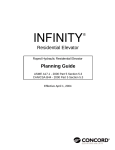
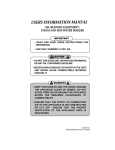
 Interior Finishes Manual Urban suites are either light or dark in colour selection. Standard suites come in Rosewood, Ash, and Light Oak colour selections. The following table itemizes your suite finishes: Urban Suite Finishes Kitchen Laminate Flooring Thermofoil Cabinets Solid Surface Backsplash/Sidesplash Bathrooms Ceramic Floor Tile, Ceramic Wall Tile Ceramic Floor Tile Thermofoil Vanity
Laundry Bedrooms Cut Pile Carpet Living/Dining Laminate Flooring Foyer Laminate Flooring Appliance: Washer/Dryer Combo with Separate Condensation Dryer, *Stacked Washer and Dryer Sliding Closet Doors *Swing Doors Switched Ceiling Capped Outlet Sliding Closet Doors *Swing Doors Solid Surface Countertop with Integrated Sink Solid Surface Countertop with Integrated Sink. Wall Mounted Mirror Appliances: Slide‐in Stove, Dishwasher, Refrigerator, Microwave/Range Hood Combo Glass Shower Door (Shower only), Solid Surface Shower Base, Acrylic Soaker Tub Switched Light Receptacle (2).
Cable Outlet
Multiport (Telephone and Internet) Outlet Cable Outlet
Multiport (Telephone and Internet) Outlet Switched Light Receptacle(s).
Security Panel
Standard Suite Finishes (Including Penthouses) Kitchen Laminate Flooring **Engineered Wood Flooring Wood Veneer Cabinets, Thermofoil Cabinets Tempered Glass Backsplash Quartz Countertop/Sidesplash with Stainless Steel Sink Undermount Bathrooms Ceramic Floor, Glass and Porcelain Wall Tile Wood Veneer Vanity
Solid Surface Countertop and Sink Medicine Cabinet with Mirrored Door Laundry Ceramic Tile Floor Bedrooms Loop Pile Carpet Appliance: Washer/Dryer Combo with Separate Condensation Dryer, *Stacked Washer and Dryer Sliding Closet Doors
*Swing Doors Switched Light Receptacle (2) Cable Outlet
Living/Dining Laminate Flooring Switched Ceiling Cable Outlet
Capped Outlet Foyer Laminate Flooring Sliding Closet Mirror Security Panel
Doors *Swing Doors *Please note that some features refer to certain plans ONLY **Please note that some features refer to certain Penthouse plans ONLY Multiport (Telephone and Internet) Outlet Appliances: Oven, Refrigerator, Dishwasher (Integrated in Cabinetry), Cooktop Microwave, Rangehood Glass Shower Door (Shower only), Solid Surface Shower Base, Acrylic Soaker Tub Dual Flush Toilet Multiport (Telephone and Internet) Outlet Switched Light Receptacle(s). 1
In Suite Care It is important to take proper care of your suite finishes so that they are functional and remain in good condition. It is also important to maintain your in suite finishes so as not to negate your new home Statutory Warranty. Cabinetry Veneer Cabinets Dust veneer cabinets frequently with a soft, lint‐free cloth. You may dampen the cloth slightly with water. Clean up spills, splatters and water spots as they occur. Pay special attention to the areas near the sink and dishwasher as they are more likely to come in contact with moisture. To clean cabinets, use a clean, microfibre cloth and mild soap diluted in water if necessary. Ensure you wipe the cabinet surface dry with a soft, clean cloth. Do not use abrasive cleaners, scouring pads, steel wool or powdered cleaners. Do not use aerosol sprays containing silicones or paste waxes, ammonia or ammonia based cleaners. Do not leave wet cloths on or near cabinets. Do not allow oven cleaners or other caustic cleaners to contact the cabinets. Thermofoil Cabinets Thermofoil doors are durable, seamless cabinetry that are easily cleaned. Follow the same care guidelines for the veneer cabinets. Do not use cleaners or polishes made specifically for wood or wood products. Cabinetry Door and Drawer Adjustment Your cabinet door and drawer hinges will loosen slightly over time from opening and closing them. This is a normal occurrence and is not considered a deficiency. You can fix this easily by making minor adjustments shown in the diagrams below: Drawer Adjustment Side adjustment ±1.5 mm
Height adjustment ±1.8 mm
Door Adjustment Carpet Depth adjustment ±2.0 mm Height adjustment ±2.0 mm
Care Procedures Over time, dirt and dust are deeply embedded in your carpets by foot traffic. Vacuum regularly to remove dirt. Treat any spills quickly before the stain has a chance to set. Blot or dab spills and spots with a clean, white, absorbent cloth or paper towel. Do not rub, scrub or brush stains. 2
Caulking The different materials in your suite expand and contract at different rates due to temperature changes. Caulking will seal the cracks that result from this movement. Caulking is also used to seal areas that are susceptible to water damage keeping them water tight. You must ensure that the caulking throughout your suite is maintained on a yearly basis. The most important areas include: along bath tub rims and bases and shower stalls. We suggest you use silicone caulking. Do not allow the caulking to go unattended as resultant water leakage may damage walls or ceilings. Any damages caused by not maintaining caulking will be the responsibility of the Homeowner. Replacing Caulking • Prepare the area by removing the existing caulking. • Wash the area with a nonabrasive cleaner, wipe area dry. Follow by wiping the area with rubbing alcohol. Wait for 1‐2 minutes and wipe with a clean cloth. • For best results, the applicator tip should be smoothly cut at a 45° angle. • The exposed hole should be about 1/8” in diameter or slightly smaller than the crack you wish to fill. • Hold the caulking gun at an angle similar to the angle of the cut applicator tip, with the edges of the tip straddling the joint to be caulked. This ensures the caulking material will be forced into the joint. • Apply the caulking in a continuous motion and smooth with the tip of a popsicle stick. If caulking around the rim of a bathtub, we recommend that you fill the tub with water prior to re‐caulking as to eliminate the possibility of the caulking coming loose when weight is applied. Do not use the bathtub/shower area for at least 24 hours after application. Countertops and Solid Surfaces Corion All suite bathroom(s) include a solid surface countertop, sink and shower base. Soapy water or commercially available solid surface cleaners applied with a soft cloth or sponge will remove dirt and residue. It is important to clean spills immediately to prevent staining of the countertop. Rinse the cleaner from the counter, sink or shower base and dry the area completely. Urban suite kitchens have a Corion counter top, sink and backsplash. Please follow the above procedures for cleaning Corion finishes. Quartz Countertops Standard suites have a quartz kitchen countertop. Quartz is an engineered stone which has a natural radiance, is durable and is easy to maintain. Its surface is nonporous and is highly resistant to stains and scratches. Quartz is heat resistant but not heat proof, therefore, do not place hot pots, pans or bakeware on your counter without a trivet. Clean your quartz counter with soapy water or commercially available quartz cleaners applied with a soft cloth or sponge. Follow by rinsing the counter of soap residue and dry completely. Damaged countertops not identified on the Pre‐Delivery Inspection form will be excluded from the Statutory Warranty. As most countertops can be damaged by impact, the key to prevent cracking or chipping is to maintain the countertop with care. Avoid sitting on or placing heavy objects on the countertop so as not to create an excessive load that may result in cracking or other damage to the counter. 3
Glass tiles and backsplash Standard suites have glass backsplashes in the kitchen and a glass tile wall in the bathroom(s). The procedures for care are the same for these surfaces. The surface of the glass backsplash withstands dirt and oil residue from cooking. To clean the glass backsplash use a mild cleaner and a soft, microfiber cloth. Avoid using abrasive cleaners, sponges and brushes to prevent scratching the glass. The glass tile wall in the bathroom must be regularly cleaned to remove soap scum and water deposits. Abrasive cleaners, sponges and brushes must be avoided to maintain the glass surface and the integrity of the grout. Doors, Frames, Trim and Baseboards As your suite settles following construction, doors and frames may shift. Trims and baseboards may separate from the floor leaving a small space that may catch dust and dirt. Should separation occur at corners or other seams, it can be patched with wood filler. Concord Adex will patch and sand carpentry cracks and nail pops only once during the first year (only at the request of the Homeowner) but will not be responsible for repainting or redecorating. The Homeowner is responsible for ensuring that all furniture and personal‐affects are cleared from the area that requires repair. Please report these items on your Year‐End Statutory Warranty Form. The exterior of your suite entry door, the frame and the trim are part of the Condominium Common Elements. Any damage to or defect in these items should be reported in writing to the Condominium Corporation or to Property Management directly. Drywall The building materials in a newly constructed condo contain moisture that will be released during the first year of occupancy. The drying out of materials may cause small cracks to develop in your walls, at joints between walls and trim, and nail pops may appear on walls. Such cracking and nail pops should not be taken as a cause of concern as it is a natural process in all new homes. Simply fill in the cracks with a paste of POLYFILLA, let the filler dry completely, sand lightly and smooth before repainting. The following are examples of drywall cracks and nail pops: Drywall Crack Nail Pop Concord Adex will patch and sand drywall cracks and nail pops only once during the first year (only at the request of the Homeowner) but will not be responsible for repainting, redecorating, or wallpapering. The Homeowner is responsible for ensuring that all furniture and personal‐affects are cleared from the area that requires repair. Please report these items on your Year‐End Statutory Warranty Form. 4
Electrical Breaker Panel There is one electrical breaker panel for your suite. The circuit breakers are arranged in two columns inside the panel. Each breaker provides power to a specific area within the suite and will trip (switch off) if the breaker is overloaded or short circuits. There is a legend located on the inside of the breaker panel listing each circuit breaker and the suite area with which it corresponds. Use this legend to quickly determine the source of an outage.
To restore the power to a tripped circuit breaker follow the procedures below: 1. Locate the breaker that has tripped on the breaker panel. Note: the tripped breaker will be set in the position opposite to the middle line of the breaker panel (to the right or left side). 2. Unplug everything that was plugged in the circuit serviced by that particular breaker. 3. Press the breaker fully to the “off” position, and then flip it back to the “on” position. This will reset it and power should be restored to the outlet. Electrical Panel and Circuit Breakers
Ground Fault Circuit Interrupter (G.F.C.I.) The Ground Fault Circuit Interrupter is a safety feature required under the electrical safety code. Its function is to interrupt the electrical power to an outlet in the event of exposure to water and to protect against accidental electrical shock. These outlets are located near the sinks in your bathrooms and kitchen. If your suite has more than one bathroom, a single G.F.C.I. outlet will connect all bathrooms. Your G.F.C.I. button has a test and reset button. You should check the proper functioning of your GFCI outlet at least once a month using the following procedure: Preparation – Ensure there is power to the outlet by checking the circuit breaker. The RESET button should always be pushed in. Testing ‐ To test the function of the RESET button, push the TEST button and the RESET button should pop out of place. If the RESET button does not pop out of place when the test button is pressed, do not use the G.F.C.I. outlet. Advise the Customer Care office of this test failure. Restoring Power ‐ Push on the RESET button firmly until a click is heard and the RESET button stays in place. Please GFCI Outlet note: if the RESET button on the G.F.C.I. trips when an appliance is used, the appliance may be defective. Depending on the design of the outlet installed in your bathroom or kitchen, the light may show that the outlet has been tripped and the power is off to the outlet or, alternatively, the indicator light may show that 5
the outlet has been reset and there is power to the outlet. Use the test button to acquaint yourself with the function of the indicator light on your GFCI outlets. Switched Receptacles Your suite is equipped with switched outlets. The switched outlets are typically located in the living room and bedrooms and there are usually one or two per room. These switched outlets are prewired to be connected to a light switch. A lamp plugged into the switched outlet can be controlled by the switch on the wall. The other receptacle of this electrical outlet is not controlled by the switch and will operate as a normal outlet. Capped Ceiling Outlet Your dining room ceiling has an embedded electrical box covered by a metal plate. The electrical box is prewired to be controlled by a light switch for future installation and operation of a lighting fixture. The installation of a light should be performed by a qualified electrician. Failure to do so may invalidate the Statutory Warranty on the electrical in your suite. Please have your electrician to follow these instructions when installing your light fixture: Ceiling Electrical Box Instructions to connect a fixture 1. Ensure power is turned off at the breaker panel prior to fixture installation. 2. Remove the two screws holding the electrical box cover plate to the ceiling and use an electrical test meter to confirm power is off. 3. Connect the ground wire of the fixture to the green wire in the ceiling electrical box. 4. Connect the white wire of the fixture to the white wire in the ceiling electrical box. 5. Connect the black wire of the fixture to either the yellow, orange, or red wires in the ceiling electrical box. 6. Do not use black wire in the ceiling electrical box. 7. Do not cross connect any wires that are not currently cross connected in the ceiling electrical box. 8. Ensure all connections are properly terminated and there are no bare wires left after fixture is installed. Bulb Type Below please find a chart with the bulb type for the fixtures used in your suite. It is the Homeowners responsibility to change all light bulbs. Bulbs can be purchased at any local hardware store. Location Type Bulb Identification Entry/Hall/Den Halogen G9 40watt Kitchen Ceiling Halogen HR16 50watt Kitchen Valance Halogen G9 20 watt Standard Suite Bathroom above Halogen HR16 50watt vanity/ Pot lights Urban Suite Bathroom mirror Halogen T10 60watt Bathroom Shower Halogen PAR20/R20 50watt 6
Flooring Ceramic Tile Ceramic tile is located in Urban suite bathrooms and all suite laundry closets. Ceramic tile is very durable if proper care is taken. Regularly sweep or vacuum floor tile to remove dust and dirt. Use a neutral ceramic tile cleaner diluted in the recommended amount of water to mop floors and wipe ceramic shower walls with a soft sponge. When mopping floor tile, do not use excessive amounts of water. A damp mop is the best. Thoroughly rinse the tile with water to remove left over cleaner residue that can trap dirt. Avoid using abrasive cleaners, sponges or brushes as they may damage the tile finish or grout. Please note that Concord Adex Inc. will only be responsible to repair or replace cracked, chipped or scratched tiles which are documented on the Pre‐Delivery Inspection Form. Concord Adex Inc will not repair damage that occurs after the Interim Closing Date. The Homeowner should keep in mind that in the event that a repair is required, it is not always possible to get a perfect match with original tiles. Variation in tile colour and pattern are to be expected. Concord Adex Inc. will not replace whole floors or tile walls to avoid a slight dye lot difference in colour. Laminate Floors Laminate flooring is made to look like natural wood flooring. The high quality laminate flooring in your suite is extremely durable. It is fade resistant, stain‐resistant and is easily cleaned and maintained. Use rugs and carpet runners in high traffic areas. Attach felt pads to the bottom of all furniture or use only soft rubber casters to protect against scrapes and scratches. Remove shoes, especially high‐heels, before walking on the laminate floor. Clean and remove spills as soon as they happen as excess moisture can damage the surface and seep into seams of the flooring. Use a damp cloth to blot the spill then immediately dry the surface thoroughly. Sweep, dust, and vacuum on a regular basis to remove debris that may cause scratches. Use a broom with soft bristles or a vacuum with the hardwood floor attachment. Never use wax, polish or scouring agents as they will dull or distort the finish. Do not use a buffing machine. Do not use spray mop or a regular mop and water to wash your floors. This will cause delaminating, swelling and warping. Swelling, warping, bubbling of laminate floors caused by improper maintenance will not be warranted. Please remember, that laminate flooring cannot be sanded or refinished. It is the responsibility of the Homeowner to ensure that this material is maintained in good condition. Any scratches, gouges reported after the Interim Closing Date will not be warranted. Grout Grout is the material used to fill spaces between tiles on floors and walls. Grout is susceptible to shrinkage, drying or cracking over time. The grout between the tiles and in corners should be checked regularly during cleaning. Any cavities found should be filled in as soon as possible. Leaving cavities unattended may result in water leakage to the wall behind the tile. Slight variation in grout colour is to be expected following repair. It is the responsibility of the Homeowner to ensure that the grout in their suite is maintained in good condition. 7
Painted Surfaces One paint colour is used throughout your suite. The bathroom walls, doors, door frames and trim are painted in a semi‐gloss finish. Suite walls that are not bathroom walls are painted in flat finish paint. Both paint types can be purchased at most hardware stores. Additionally, Concord Adex Inc. will provide you with a paint touch‐up kit of the flat and the semi‐gloss paint used in your suite. The paint touch‐up kit is located in the cabinet under your sink. The paint touch‐up kit will be provided while quantities last. Location Paint Information Sherwin Williams Builders’ Solution Matte Walls and Ceilings Colour: 1465 – A64W051 Sherwin Williams Quali Kote Semi‐Gloss Doors/ Trim/ Bathroom Walls
Colour: 1465 – A26WQ8151 To keep your painted surfaces looking new, simply wipe away dirt or marks with a damp cloth. Or use the paint repair kit provided to touch up larger areas. Please note that Concord Adex Inc. will only be responsible for the rectification of paint deficiencies listed on the Pre‐Delivery Inspection. Concord Adex Inc. is under no obligation to repair any paint deficiencies that occur after the Interim Closing date. Plumbing The plumbing in your suite was installed by a professional plumber and when cared for properly should generally need only minimal maintenance. If a problem arises attend to it promptly to prevent a bigger and often more costly problem. Any fixture that is used infrequently should be turned on or flushed at regular intervals. Doing so ensures that the water barrier remains in place and helps in preventing the seals from drying and becoming brittle. Please note plumbing fixtures are warranted for one year; water distribution is warranted for two years. Toilet Bowls Each suite is equipped with a high efficiency, low consumption toilet as specified in Ontario’s building codes. Under Ontario Law, all toilets installed in new homes can use a maximum of six litres per flush. These are referred to as low‐flush toilets. The operation of your toilet is sensitive to the effects of the amount of waste and the amount of toilet paper, therefore, multiple flushes may be required. Only toilet paper should be flushed. Damage resulting from the flushing of other items may invalidate the Statutory Warranty for the plumbing. When flushing the toilet it may be necessary to hold the lever down to ensure a complete flush and waste removal. As per suite design, some suites have been equipped with a dual flush toilet. This allows for the option of either a full or partial flush. To operate, push the button actuator located in the tank lid. All toilets are installed with a rubber gasket at the floor flange, which seals the toilet bowl and drain pipe. Infrequent flushing will allow the water to evaporate in the View of interior of cabinet under sink. toilet bowl. As a result, the rubber gasket may dry out and Water shut‐off valve cover plate is seen in left corner. 8
become brittle, which could lead to water leakage and other damage. A clogged toilet is generally caused by debris caught in the trap. You may attempt to clear the blockage by using a plunger. If this does not resolve the issue, contact a plumber. In the event that the water rises and appears that it may overflow, turn the water valve (located behind the toilet) to the OFF position. Water Shut Off Valves As per suite design, the main water shut‐off valves can commonly be found in the cabinet below the sink in the main bathroom or ensuite bathroom. In some suites the water shut off valve plate is located in the wall between the vanity and the toilet. There is only one set of main water shut‐off valves for the entire suite. To shut the water off, remove the plastic cover plate to expose 2 levers. Turn each lever so that it is at a 90 degree angle to the water line. There are individual water shut‐off valves for each sink faucet in the cabinets below each sink in the bathrooms and kitchen. This sticker will help you to locate the As per suite design, some units have cabinet drawers in the main water shut‐off valve in your suite.
bathroom vanity below the sink. The drawer must be taken off the track in order to access the water shut‐off valves. See the section Laundry Water Shut‐Off Valve for information on the water shut‐off valve in the laundry closet. Bathtubs Your suite is equipped with an acrylic bathtub. Use a gentle, liquid cleaner diluted with water to remove dirt and soap scum. Do not use powders, abrasive cleaners or scouring pads on acrylic tubs as they may scratch or dull the surface. Never step in your tub with shoes on or store items in the tub. Stainless Steel Sinks For Standard suites, the kitchen sink is made of high quality stainless steel. Keep the sink free of any standing water, which may cause build up of mineral deposits. Clean your sink using a soapy sponge and rinse the sink after using a cleaning agent. Wipe the sink dry to prevent water spotting. Any cleaning or scrubbing to remove stubborn stains should follow the direction of the grain line. Do not use chlorine bleach, abrasive pads or cleaners in your stainless steel sink as they will erode the protective surface. Do not leave rubber dish mats, wet sponges or cleaning cloths in the sink overnight as they will trap water and may discolour the surface. Faucets An aerator is the filter found at the mouth of the faucet. An aerator adds air to the water as it leaves the faucet and eliminates splashing. Aerators should be cleaned every 3 months. To clean the aerator, unscrew it from the mouth of the faucet, remove any deposits, rinse the screen and screw it back on the end of the faucet. Aerator Windows and Glass In accordance with the Ontario Building Code, the operable windows in your suite will open a maximum of four inches only. 9
The window manufacturer guarantees the thermal panes against defects for five years. Seal failures, pressure cracks and other glass breakage due to improper installation are warranted. Breakage due to any other reason is not covered by the Statutory Warranty. Please note that improper installation of window coverings on the window or frame will void the Statutory Warranty for the window. Defects on windows and glass are considered condominium common elements and as such any issues and/or concerns should be reported in writing to your Condominium Corporation’s or Property Management Office. Please note that Concord Adex Inc. will only be responsible for the deficiencies documented on the Pre‐
Delivery Inspection Form. During very windy conditions, any draft felt would be due to the vertical air movement over the face of the window. Interior air movement caused by convection should not be confused with air leakage through the window and doors. To care for your windows lubricate all operable parts approximately 2‐4 times a year or as required. A silicone lubricant, available in aerosol cans or petroleum jelly is recommended for use on weather stripping and tracks of windows. Caulking should be inspected occasionally. Pay particular attention to signs of loss of adhesion. Any faults or cracks should be caulked immediately. Clean glass as needed with either water and vinegar or a commercial glass‐purpose cleaner. It is the Homeowner’s responsibility to clean the exterior surfaces of all windows, doors and door tracks accessible by patio, terrace or balcony on a regular basis. Your Property Management Company will schedule routine window cleaning for non‐accessible exterior windows. Exterior windows will be cleaned two times a year. Property Management will give all Homeowner’s sufficient notice by posting the window cleaning schedule in all common areas. Appliances Each of the quality appliances in your unit come with a manual on proper operation, care and maintenance. We recommend that you read each manual and follow the instructions therein. Warranty documents can also be found in your appliances manuals. It is the Homeowner’s responsibility to send these completed documents to the manufacturer. Please read each of your user manuals before using your appliances. The appliance manuals were provided to each homeowner at Interim Closing. To obtain another copy of an appliance user manual, please contact the appliance supplier directly. Any warranty issue must be taken up directly with the supplier, as noted in the chart below. Appliance Supplier Supplier Telephone Number
LG, Panasonic, Frigidaire, Whirlpool Transglobal Service 905 696 3462 Miele Miele Canada 1 800 565 6435 Ariston and Falmec Elite Appliance Service 416 848 0670 Your appliance model number and serial number will be required. There will be no service fee to any warrantable problems reported within the first year. 10
Stackable Laundry Unit As per suite design, your laundry unit may be a stacked washer and dryer. The dryer is an energy efficient, vented unit. Your dryer’s lint screen should be cleaned after every use for optimal functionality. We recommend that the area around the drum be inspected for lint periodically. Also located on the ceiling directly above the dryer unit is a lint trap. The lint trap collects excess lint and should be cleaned frequently. To clean, pull down the lint trap, remove lint and replace the trap. Combo Laundry Unit As per suite design, the laundry unit installed in your suite may be a combination washer‐dryer. The machine is efficient, vent‐less and can be set to go from a wash cycle to a dry cycle automatically. It saves space, water, energy and detergent. The combination washer/dryer is a front load machine. High‐efficiency (HE) detergent must be used and can be identified by the HE logo on the bottle. Wipe underneath and around the door seal to clean and prevent mildew. The detergent dispenser drawer must be removed and rinsed This sticker is on your combination frequently to remove debris. The water inlet hose must be washer/dryer to remind you to use only checked at least once yearly for cracks and replaced immediately HE detergent.
if a fault is found. Condensation Dryer As per design your unit may come with a condensation dryer. This machine is placed on top of the combination washer/dryer. It has a larger drum size than the washer/dryer and will allow you to dry your load faster. The machine does not have a vent hose. The lint filter must be cleaned after every use. The vent in bottom right of the front of the machine will emit some warm, moist air so it is best to keep this area free of obstructions. The water on your wet clothes is converted to steam and is condensed on the metal condenser unit. The water collected is then flushed through the plumbing. The condensing coil should be cleaned regularly to remove any built up lint. Simply remove the condenser from the machine by releasing the 3 catches and pulling it toward you. Rinse the condenser with cold water from the rear of the condenser. Replace the condensing coil in the machine after shaking off any excess water. Clean the drum periodically with water and a soft cloth. Do not use abrasives, This sticker is on your dryer to remind steel wool or stainless steel cleaning agents to clean the drum. you to keep the water shut‐off valve off when your machine is not in use.
Laundry Water Shut Off Valve The water shut‐off valve is located in the laundry closet and should be turned off after each use to prevent leakage, flooding and other water damage. Any damage to property, personal and secondary items incurred as a result of improper use is the responsibility of the Homeowner or tenant. Push the leaver to the “on” position before using the washing machine. To shut the water off, push the lever to the “off” position. In cases where the suite will remain vacant for a long period of time, turn the valve on and off at least three times annually to avoid seizing of the valve. Water Shut‐Off Valve 11
Fitch Security Panel Each suite is prewired with a Fitch Surveillance Security Panel. Each panel is programmed with a default code of 1‐2‐3‐4. We highly recommend that you change this code when you move in. The security system can be used as a door chime or a sound deterrent but is not monitored by building security. You must register with Fitch Surveillance Systems if you would like your suite security system to be monitored and for someone to respond in the event that the alarm is activated. An operation manual was provided in your key package given to you on your Interim Closing Date. Communications Services Fitch Security Panel Your suite is pre‐wired for telephone, cable television and internet services. Multiport (telephone and internet) outlets are provided in every den, living room and bedroom. The green receptacle is for telephone and the blue receptacle is for internet. Cable outlets can be found in the living room and each bedroom. TELUS, in partnership with Rogers, will provide you with state of the art communication services. The demarcation panel for your TELUS telephone and internet service is typically located on the inside of your foyer closet. TELUS or Rogers will require access to your suite to complete your communications installation. To activate your services contact TELUS or Rogers at the telephone number listed below. TELUS Communications Centre 416‐883‐3550 Rogers 1‐866‐902‐9534 12
Smoke and Carbon Monoxide Detector Each suite has a combination smoke and carbon monoxide detector as per Ontario Building Code. It is the Homeowner’s responsibility to ensure that the device is operational at all times. The detector is connected to the central power for the building. In the event of a power outage, the detector has a back up battery. It is the homeowner’s responsibility to replace the battery. Heat Detector Heat Detector Smoke and Carbon Monoxide Detector
Each unit has a heat detector which senses extreme heat in the unit or adjacent hallway. The device is connected to the fire board. In the event of a fire, the device will detect the rapid rise in temperature and the temperature threshold being reached, allowing for increased fire detection and reduced false alarms. Climate Control Thermostat Your thermostat regularly takes readings of the temperature in your suite and turns the heating or air conditioning on or off to maintain a desired set temperature. The thermostat has a screen showing the current room temperature and the current setting. The temperature on your thermostat can be adjusted to a higher or lower setting by using the buttons beside the digital temperature display window. To operate your thermostat, HEAT/COOL/AUTO settings and fan settings of HIGH/MEDIUM/LOW/AUTO can be accessed by pressing the bottom below System & Fan. Use the left and middle buttons to tab through your settings. Use the right button to select “done” and confirm your settings. Use the Thermostat up and down arrow buttons on the right side of the thermostat to adjust the desired room temperature. Use the right button to select “done” to confirm your temperature setting. Please refer to the user’s manual for complete and comprehensive instructions on operating your thermostat. The user manual was provided in your key package given to you on your Interim Closing date. Suite Air Temperature Although you have control of the temperature in your suite, it is important to remember that Property Management turns the central heating and air conditioning system on in the building during the appropriate 13
season. Heat is normally turned on in October and the air conditioning is turned on in May. We recommend that you keep your thermostat set at 24°C or 75°F. Damage to suite materials resulting from failure to maintain room temperature will not be warranted. Ventilation Exhaust Fans The range hood and exhaust fans, provided in the kitchen and bathrooms, respectively, should be used to remove lingering odors and excess moisture in the air which can cause condensation. If there is more than one bathroom, there is one exhaust fan motor with a switch for the fan in each bathroom. The fan can be turned on and off in each bathroom. Your kitchen fan should be used whenever cooking on the stove to avoid lingering odors and to lessen grease build up on kitchen surfaces. Air is vented to the exterior of the building. The filter should be cleaned periodically following the instructions outlined in the appliance manual. Fan Coil Unit Your suite is equipped with a fan coil unit (FCU). Your FCU has a filter which will need to be replaced every two months during the first year of possession and quarterly thereafter. Filters can be purchased from Property Management. Failure to replace the filter regularly may result in invalidation of the Statutory Warranty. Property Management will maintain your fan coil unit twice a year. Corridor Air As you will notice, there is a gap around the door jamb of your suite entry door. This gap is not a deficiency. We recommend that you do not install any type of weather stripping around the suite entry door. This gap serves as one of the only sources of fresh air and helps maintain the air circulation in your suite, which in turn assists in preventing condensation. The corridor air also serves as a safety feature in the event of fire. If a fire occurs in the building, the corridor fresh air units are immediately disabled, so that the smoke does not enter into the suite. 14