1
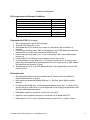
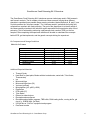
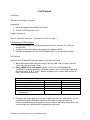
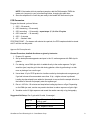
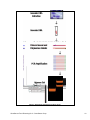
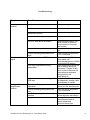
GenoSensor Corporation GenoSensor Food Poisoning Kit II Catalog # 3202 Version A July 2015 User’s Manual GenoSensor Food Poisoning Kit II Manual Table of Contents Notes for Instructors .............................................................................................. 2 Shipping, Storage and Safety ................................................................................. 3 GenoSensor Food Poisoning Kit II Overview .......................................................... 4 Kit Components and Storage Conditions .................................................................................................. 4 Additional Required Materials .................................................................................................................. 4 Student Guide ....................................................................................................... 5 Full Protocol........................................................................................................... 7 Lab Setting ................................................................................................................................................ 7 Reagent Preparation ................................................................................................................................. 7 PCR Reaction ............................................................................................................................................. 7 Agarose Gel Electrophoresis ..................................................................................................................... 8 Results and Discussion ............................................................................................................................ 10 GenoSensor Food Poisoning Kit II: Background…………......…………………..12 Troubleshooting……………………………………………….…………………………………………..17 Technical Service…………………………………....………..….………………………18 Literature Citation When describing a procedure for publication using these products, please refer to them as the GenoSensor Food Poisoning Kit II. GenoSensor Food Poisoning Kit II – GenoSensor Corp. 1 Notes for Instructors Kit Components and Storage Conditions: Component 2X PCR Master Mix Sample A Sample B Sample C Unknown DNA Negative control DNA ladder Storage -20ºC -20ºC -20ºC -20ºC -20ºC -20ºC -20ºC Preparation for PCR (for 6 teams) 1. Set up thermal cycler and the PCR program. 2. Thaw 2X PCR Master Mix on ice. 3. Spin Master Mix for 10 seconds, then vortex for 10 seconds, spin for another 10 seconds. 4. Label 6 microcentrifuge tubes "MM" and aliquot 40 μL of 2X PCR Master Mix into three tubes and 50 μL into the other three tubes. KEEP ON ICE. 5. Label 6 tubes (24 total) each "A, B, C, and U" and aliquot 10μL of each DNA sample, store on ice. 6. Label 3 tubes "N" and aliquot 10 μL of negative control, store on ice. 7. In class, distribute 1 each "MM, A, B, C, U" tubes to all teams and 1 "N" tube to three teams (they will share later for electrophoresis). Be sure to give the 50 μL "MM" tubes to the teams that also have the "N" tube. 8. Students will use 10 μL of 2X PCR Master Mix with 10 μL sample DNA for a final PCR volume of 20 μL. Electrophoresis Electrophoresis reagents are not provided in the kit. Please refer to the Additional Required Materials list, on page 4. Best results are obtained by adding DNA dye (i.e., Gel Red, Sybr® Safe) to molten agarose. For light sensitive DNA dyes, avoid exposing the agarose gel to light. It is best to store and run the gel in a dark room, or cover the gel with a box during gel polymerization and the whole electrophoresis process. DNA ladder supplied is enough for 3 lanes with 10 μL each. Negative control supplied is enough for 6 lanes with 10 μL added after PCR. DNA samples "A, B, C, and U" supplied is enough for up to 20 μL / lane for 6 teams. GenoSensor Food Poisoning Kit II – GenoSensor Corp. 2 Shipping, Storage and Safety Shipping and Storage GenoSensor Food Poisoning kits are shipped on blue ice. Components should be stored at temperatures shown in the above table. At proper storage conditions, components are stable for 1 year from the date received. Expiration dates are also noted on product labels. Safety Warnings and Precautions This product is intended for research use only. It is not recommended or intended for the diagnosis of disease in humans or animals. Do not use internally or externally in humans or animals. Consider all chemicals as potentially hazardous. Only persons trained in laboratory techniques and familiar with the principles of good laboratory practice should handle these products. Wear suitable protective clothing such as laboratory coats, safety glasses, and gloves. Exercise caution to avoid contact with skin or eyes: if contact should occur, wash immediately with water and follow your laboratory safety protocols. Safety Data Sheets for products are available upon request. GenoSensor Food Poisoning Kit II – GenoSensor Corp. 3 GenoSensor Food Poisoning Kit II Overview The GenoSensor Food Poisoning Kit II introduces common techniques used in DNA research and forensic analysis. The kit creates a food-borne illness scenario utilizing three different plasmids to represent three possible illness-causing microbes, labeled Sample A, B, and C, one of which matches the “Unknown sample”. The “Unknown sample” symbolizes the bodily fluid collected from a patient with food poisoning. The goal of the experiment is to identify which of the illness-causing microbes is the infectious agent responsible for this particular case of food poisoning. This is achieved by performing a polymerase chain reaction (PCR) on the four samples. After completing the experiment students will be able to understand the concepts behind PCR, gel electrophoresis, and the genetic concepts driving the experiment. Kit Components and Storage Conditions Materials for 6 teams Component 2X PCR Master Mix Sample A Sample B Sample C Unknown DNA Negative control DNA ladder Amount (27 rxns) 270 µL 60 µL (6 rxns) 60 µL (6 rxns) 60 µL (6 rxns) 60 µL (6 rxns) 30 µL 30 µL Storage -20ºC -20ºC -20ºC -20ºC -20ºC -20ºC -20ºC Additional Required Materials Thermal Cycler Heat Block or (heat plate, Beaker with de-ionized water; water bath, Tube floater; Thermometer) Ice Microcentrifuge Microcentrifuge tubes (36) Vortexer (optional) Micropipettes (p10, p200, p1000) Pipette tips PCR tubes (27) Tube Racks Ethanol or ethanol wipes Electrophoresis equipment Electrophoresis supplies: agarose, TBE buffer, DNA loading buffer, running buffer, gel dye (e.g., SYBR® safe, Gel Red) UV light box or “Gel Doc” equipment and program Permanent marker GenoSensor Food Poisoning Kit II – GenoSensor Corp. 4 Student Guide Objective overview 1. Understand how DNA is responsible for g e n o t y p i c differences between microbial pathogens. 2. Investigate techniques used in DNA technology: DNA sequence diversity and uniqueness, PCR, gel electrophoresis. 3. Investigate and understand the process for gel electrophoresis including analyzing band pattern data. In this lab you will examine a n a b r i d g e d version of a DNA analysis – PCR. During the exercise you will learn to analyze and compare a number of DNA fragments to determine whether or not they are from the same microbial pathogen. These fragments can be visualized through a process known as "gel electrophoresis.” DNA is long double helix polymer that uses deoxyribose rings (sugars) and phosphate molecules as support in its backbone. Attached to the backbone are unique sequences of nucleotides which are often referred to as base pairs. There are two different types of nucleotides: purines and pyrimidines. Adenine (A) and Guanine (G) are both purines because they have two rings in their structures. Meanwhile, Thymine (T) and Cytosine (C) are pyrimidines because they have only a single ring in each of their structures. These nucleotides form a bond with their complementary base pair on the other strand of DNA. This is how the double helix structure is formed that resembles a spiral staircase. Each individual will have different sequences of A, T, G, and C in their DNA. There are highly similar and yet unique sequences of DNA that are used to identify humans by looking at the minute differences in their DNA. In this exercise, you will use several techniques to figure out if the DNA in any of the three samples matches up with the DNA of the unknown sample. In this exercise, you will use several techniques to figure out if the DNA in any of the three samples matches up with the unknown DNA sample. We are very different from each other in many ways, but not as much as you might think on the genetic level. Our genome consists of over 3 billion base pairs, and yet the genetic makeup from one person to the next may differ by as little as 0.1%. Evidently, that 0.1% still makes a huge difference. Organisms need to be able to differentiate their species from that of closely related species; increasing genetic diversity is what makes that possible for them. Genetic diversity is the driving force behind speciation in any population of organisms. In the 1700's, Swedish scientist Carl Linnaeus devised his hierarchical classification system for naming organisms. The Linnaean system uses seven different tiers of classification in order to properly name every species because the genetic diversity on earth is so great. The differences between these genomes underlie the theory behind DNA profiling. There are a number of specific regions in our genomes that vary reliably between individuals. For this experiment, the focus will be on a “Variable Number Tandem Repeat (VNTR)” region. Throughout the genome there are segments that feature small repeating sequences of DNA. A repeated sequence is generally the same GenoSensor Food Poisoning Kit II – GenoSensor Corp. 5 between individuals, but the number of times it repeats can vary. By analyzing enough of the VNTR segments, a genetic “fingerprint” for an individual can be generated. Genomes contain many random insertions by short repetitive interspersed elements (SINEs), and long repetitive interspersed elements (LINEs). Those elements have become randomly inserted within our genome, mostly in introns, over millions of years. VNTR and Alu elements are the most common. Polymerase Chain Reaction (PCR) technology is a powerful tool to examine and compare genetic variations. GenoSensor Food Poisoning Kit II – GenoSensor Corp. 6 Full Protocol Lab Setting Materials are enough for 6 groups. Preparation 1. Set up and program the thermal (see below). 2. Thaw 2x PCR Master Mix on ice. Reagent Preparation Refer to “Notes for Instructors – Preparation for PCR” on Page 2. Pre-Experiment Observations 1. Describe the samples of DNA (physical properties: color, viscosity, etc.). Can you see the DNA? 2. Is there any observable difference between the samples of DNA? 3. Describe the appearance of the 2X PCR Master Mix? Can you see the enzymes? PCR Reaction Keep the 2X PCR Master Mix and all samples on ice when not in use. 1. Wear gloves and handle solutions carefully. Spin the "MM" tube for 10sec, vortex for 10sec, then spin for another 10sec. 2. Using a NEW TIP for each sample, pipette 10 μL of the 2X PCR Master Mix, (containing Taq DNA polymerase, nucleotides, primers, and PCR reaction buffer) into the sample tubes "A, B, C, and U," already containing 10 μL of each DNA and the "N" tube if your team received one. DNA Samples Unknown DNA [U] Sample A [A] Sample B [B] Sample C [C] Negative control [N] (3 reactions) PCR Reaction Mixtures 2X PCR Master Mix 10 μL 10 μL 10 μL 10 μL 10 μL 10 μL 10 μL 10 μL 10 μL 10 μL Total Reaction Volume 20 μL 20 μL 20 μL 20 μL 20 μL 3. Pipette up and down carefully to mix well. Tightly cap each tube. Alternatively, mix the components by gently flicking the tubes with your finger. Arrange the tubes in a microcentrifuge and spin for 5 seconds to force all liquid to the bottom of the tubes. (Be sure the tubes are in a BALANCED arrangement in the rotor). GenoSensor Food Poisoning Kit II – GenoSensor Corp. 7 NOTE: If the teacher did not pre-aliquot samples, add the DNA samples THEN the master mix (enzyme) to your microcentrifuge tubes, changing tips each time. 4. Store the samples on ice until they are ready to be loaded into the thermal cycler. PCR Parameters Program the thermal cycler as follows: 1. 94ºC – 30 seconds 2. 94ºC denaturing – 20 seconds} 3. 58ºC annealing – 20 seconds} repeat steps 2, 3, & 4 for 35 cycles 4. 68ºC extension – 30 seconds} 5. 68ºC – 5 minutes 6. 4ºC – finished / hold STOPPING POINT – For classes with shorter time periods, the PCR samples should be stored at 4ºC until the next lab period. Agarose Gel Electrophoresis General Procedure, detailed directions as given by instructor 1. Prepare 1% agarose. 2. Set up electrophoresis apparatus and pour in the 1% molten agarose with DNA dye for gelation. 3. For staining, use a DNA dye which is added directly to the molten agarose. For light sensitive dyes, keep the gel in the dark during gelation, either by performing in a dark room or placing a box over the gel. 4. Use at least 10 µL of PCR product to visualize results by electrophoresis on agarose gel. If gel well volume will accommodate more than 10 μL, a higher volume is preferred. Loading dye has already been added to the sample to ensure that the sample will sink to the bottom of the well and properly enter the agarose gel. 5. Run at ~100V for ~20 minutes and stop before loading dye has run off gel. Depending on the DNA dye used, caution may need to be taken to reduce exposure of gel to light. 6. Visualize under UV light exposure and record the results manually or by photography. Suggested Gel Setup: Run 3 gels with 10 wells, 2 teams/gel. . Lane 5 Team "1" samples A, B, C, and U up to 20 μL each. 10 μL DNA Ladder Lane 6: 10 µL Negative Control Lane 1-4: GenoSensor Food Poisoning Kit II – GenoSensor Corp. 8 Lane 7-10: Team "2" samples A, B, C, and U up to 20 μL each. GenoSensor Food Poisoning Kit II – GenoSensor Corp. 9 Results and Discussion Observe the bands visible in your samples on the gel. Recall which lanes contained the samples and which contained the unknown DNA sample. Do any of the samples match the unknown DNA sample on the gel? Looking at the bands in relation to one another is quick and useful. What would be a more accurate way to infer band size and their distance traveled? Fig 1. 100 bp DNA Ladder Compare the results from your gel with those of the other teams. Describe the similarities and differences. DNA Ladder reference for band size comparison Summarize the process of PCR using the correct terminology. Describe a new experiment you could perform using PCR and DNA agarose gel electrophoresis. Final Conclusions 1. Which sample matched the unknown patient's sample? 2. Describe the evidence that confirms the identification of the infectious agent? GenoSensor Food Poisoning Kit II – GenoSensor Corp. 10 3. What are some possible errors that could lead you to have inconclusive results? 4. What further investigations could you perform to better support your evidence? 5. What are the top 3 food poisoning infectious agents in the US? How are they different from each other? What are their similarities? 6. Identifying the pathogen is a step performed later in the surveillance of a foodborne disease outbreak. Describe the steps that are taken as soon as two or more cases of food poisoning are reported in one area. 7. How else might PCR be used in the food industry? GenoSensor Food Poisoning Kit II – GenoSensor Corp. 11 GenoSensor Food Poisoning Kit II: Background Introduction to PCR In 1983, during his time at Cetus Corporation, Kary Mullis developed a technique that significantly changed the field of genetics and that of all other biological sciences. This revolutionary process was termed “polymerase chain reaction,” or PCR. By 1993, he had earned the Nobel Prize in Chemistry for PCR. His new technique enabled researchers in numerous fields of biology, to easily and rapidly amplify DNA. Before that, amplification of DNA was extremely difficult and time consuming. Now, in the 21st century, it's not just research scientists who use this molecular biology technique. PCR has applications in a wide variety of areas including: gene detection and mapping, whole genome sequencing, analysis of gene expression, forensics, criminal justice, clinical diagnostics, pharmacogenomics, and dozens of others. Nearly every one of these applications were impossible prior to the implementation of PCR. Besides the initial investment in specialized machinery, the cost of performing PCR is relatively low, and the process is simple enough that nearly anyone can do it and get successful results every time! PCR: The Birth of Recombinant DNA Technology PCR uses specific nucleotide sequences, named primers, to amplify segments of a genome from a very small amount of starting material, referred to as the template. DNA can be extracted and isolated from almost any cell type i.e., bacterium, blood cells, tissue cells, hair cells, cheek cells, etc. After proper treatment, with PCR, millions of copies of nearly any desired DNA sequence can be produced. The power of PCR is its specificity. PCR uses unique primers to target just the desired sequence of DNA out of the entire genome and amplifies only that segment with little error. The basic components of PCR: - Reaction Buffer - DNA nucleotides (dNTP’s) of adenine, guanine, thymine, and cytosine - DNA polymerase - Forward and reverse DNA oligonucleotide primers - Template DNA (starting material) PCR Makes Use of Two Basic Processes in Molecular Genetics 1. Complementary DNA strand hybridization For DNA to be amplified, one must have a known sequence that flanks the gene of interest both upstream and downstream. These sequences are used to create ‘oligonucleotide primers,’ meaning a short ~20 base pair nucleotide sequence which is used as a starting point GenoSensor Food Poisoning Kit II – GenoSensor Corp. 12 for DNA replication. The primers are complementary to their target regions so they will anneal (attach) to those regions with great precision. Primers serve the same purpose that runways do for planes trying to lift off the ground. DNA polymerase cannot add nucleotides without a preexisting chain to start from. This process is referred to as primer extension. DNA polymerase recognizes the partially single stranded segment of DNA, attaches itself to the primer just as it normally would during the DNA replication phase of the cell cycle, and proceeds to add complementary nucleotides to fill in the gap. Complementary strand hybridization occurs when two different oligonucleotide primers anneal to each of their respective complementary base pair sequences on the template. They are designed specifically to anneal at opposite ends of opposite strands of the specific sequence of DNA that is desired to be amplified. 2. DNA strand extension via DNA polymerase In a PCR, a special type of DNA polymerase is used that is able to function properly and not become denatured during the temperature fluctuation cycles required for thermal cycling. Most mammalian DNA polymerases cannot tolerate the high temperatures and fluctuations from ~60ºC-94ºC. The breakthrough in PCR came with the isolation of DNA polymerase from a thermophilic bacterium known as Thermus aquaticus. This bacterial species lives in high temperature steam vents and its DNA polymerase has evolved to withstand the high temperatures of its environment. During PCR, DNA is synthesized and its quantity doubles after each cycle making the reaction product grow at an exponential rate. In theory, after 30 cycles there will be 230 -over a billion- copies of DNA. Yielding this much DNA allows it to be visualized after only a few simple procedures. One of the easiest and most popular methods of doing this is agarose gel electrophoresis. Genes and DNA The human genome contains 23 pairs of chromosomes that contain a total of thirty to fifty thousand protein coding genes. However, those genes only comprise about 5% of the genome, leaving 95% of it to be classified as non-coding DNA. This non-coding DNA is found not only between, but within genes, splitting them into segments. In eukaryotes, non-coding DNA sequences found within genes are known as introns. The sequences that do code for proteins are called exons. In eukaryotes, genomic DNA is transcribed into RNA molecules in its unmodified form containing both introns and exons from a particular gene. While the RNA is still in the nucleus (before being transported out of the nucleus), the introns (which interfere with the gene product) must be removed from the RNA while the exons (excised from the original transcript)) are spliced together to form the complete messenger RNA sequence which will soon be translated into a protein. This process is called RNA splicing. Some genes may contain a few introns, others may contain dozens. Interestingly, it is the non-coding ‘junk’ DNA that is useful to GenoSensor Food Poisoning Kit II – GenoSensor Corp. 13 us when considering the DNA profile of an individual, rather than the protein coding DNA previously thought to be the most aspect of the genome. As discussed, functional segments of genes (exons) code for proteins. Proteins are molecules that carry out most cellular functions. Exon sequences are therefore very similar among individuals. That is why when mutations in protein coding genes arise the result is very evident, and is sometime catastrophic. Many metabolic disorders and rare diseases are caused by mutated and nonfunctional proteins). Introns, however, often vary in size and number among individuals. Intron sequences are thought to be the result of the differential accumulation of mutations over time and through evolution are silently passed on to descendants after reproduction. It is differences in the presence and number of intron sequences that allow us to determine the diversity of human genetics. The recognition of these distinctive characteristics in DNA represents the molecular basis from which human identification and population genetics are made possible. Throughout evolution, intron sequences have been the target of random insertions by short repetitive interspersed elements (SINEs), or long repetitive interspersed elements (LINEs). Those elements have become randomly inserted within our introns over millions of years. PCR Stages The machinery required to perform PCR is known as a thermal cycler. The thermal cycler enables the steps of PCR to be automated. The reaction involves a repetition of cycles that promote template denaturation, primer annealing, and primer extension by the Taq DNA polymerase. A DNA sample is added to a mixture of the necessary reagents: oligonucleotide primers, thermostable DNA polymerase (Taq), the four nucleotides (A, T, G, C), and reaction buffer. These reagents are pre-mixed as a 2X PCR Master Mix in the GenoSensor Food Poisoning kit II. The tubes are placed into the thermal cycler which contains an aluminum block that holds the samples and can be rapidly heated and cooled by extreme temperature changes in a controlled environment. The rapid heating and cooling of this thermal block is called temperature cycling or thermal cycling. The first step of the PCR temperature cycling procedure heats the sample to 94°C causing the template strands separate. This process is called denaturation. The thermal cycler then rapidly cools to 60°C allowing the primers to anneal to the separated template strands. This is the annealing process. The two original template strands may re-anneal to each other or compete with the primers at the primers' complementary binding sites. However, the primers are added in excess so that the primers may out-compete the original DNA strands for their complementary binding sites. Lastly, the thermal cycler heats the sample to 72°C (the usual environment temperature for Thermus aquaticus) so that Taq DNA polymerase can perform primer extension and produce complementary DNA strands of the target sequence. The two resulting new sets of GenoSensor Food Poisoning Kit II – GenoSensor Corp. 14 double-stranded DNA (dsDNA) will be used for the next cycle and proceeding strand synthesis. At this stage, a full temperature cycle (thermal cycle) will have been completed. Each step takes 30 seconds to 1 minute, and will repeat for 30-40 cycles depending on how the user has programmed the thermal cycler. At the end of the pre-programmed number of cycles, the product is put on hold at 4°C until the user is ready to retrieve the PCR product and analyze its contents. GenoSensor Food Poisoning Kit II – GenoSensor Corp. 15 Figure 3. Experiment flowchart from start to finish GenoSensor Food Poisoning Kit II – GenoSensor Corp. 16 Troubleshooting Symptom Possible causes Solutions No amplification product Questionable template quality Analyze starting material Inhibitory Substance in reaction Decrease sample volume Insufficient cycle # Run additional cycles Incorrect thermal cycler program Verify times and temperatures Errors in heat block incubation Calibrate heating block, use sand or water to maximize contact with tube for proper heat transfer Autoclave tubes and use filter tips Lower annealing temperature in 2ºC increments Make sure enough DNA has been added; see recommended amount of DNA to load into PCR reaction. Light sensitive dyes should be kept in the dark during gel preparation. Prepare in dark room or place a box over the electrophoresis apparatus during gelation and electrophoresis. Verify that the DNA dye has not degraded in storage, been contaminated or expired. Mix solutions on ice, place rxn directly into 94º thermal cycler Contaminated tubes/solutions Weak bands/faint signal Primer annealing temperature too high Low concentration of DNA template DNA Dye degradation during preparation Expired, contaminated or degraded DNA dye Non-specific amplification product Premature Taq-polymerase replication Primer annealing temperature too low Insufficient mixing of reaction solution Exogenous DNA contamination GenoSensor Food Poisoning Kit II – GenoSensor Corp. Raise annealing temperature in 2ºC increments Mix solutions thoroughly before beginning the reaction -Wear gloves -Use dedicated area for sample preparation -Use non-aerosol tips 17 Technical Service For more information or technical assistance, please call, write, fax, or email. GenoSensor Corporation 4665 S. Ash Avenue Suite G-18 Tempe, Arizona 85282 Tel: 1-480-598-5378 Fax: 1-480-755-3319 Email: [email protected] Web: www.genosensorcorp.com Limited Warranty GenoSensor is committed to providing our customers with high-quality goods and services. Our goal is to ensure that every customer is 100% satisfied with our products and our service. If you should have any questions or concerns about a GenoSensor product or service, please contact our Technical Service at [email protected]. GenoSensor warrants that all of its products will perform according to the specifications stated on the certificate of analysis. This warranty limits GenoSensor Corporation’s liability only to the cost of the product. No warranty is granted for products beyond their listed expiration date. No warranty is applicable unless all product components are stored in accordance with instructions. GenoSensor reserves the right to select the method(s) used to analyze a product unless GenoSensor agrees to a specified method in writing prior to acceptance of the order. GenoSensor makes every effort to ensure the accuracy of its publications, but realizes that the occasional typographical or other error is inevitable. Therefore GenoSensor makes no warranty of any kind regarding the contents of any publications or documentation. If you discover an error in any of our publications, please report it to our Technical Service. GenoSensor assumes no responsibility or liability for any special, incidental, indirect or consequential loss or damage whatsoever. The above limited warranty is sole and exclusive. No other warranty is made, whether expressed or implied, including any warranty of merchantability or fitness for a particular purpose. GenoSensor Food Poisoning Kit II – GenoSensor Corp. 18