1
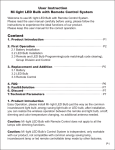
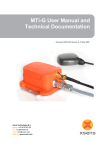
Table of Contents
I DDNS Configuration................................................................................... 2
Q1: What are the ports needs to be opened and forwarded on my IP sharing
router or physical firewall? .............................................................................................. 2
Q2: What is the difference between DDNS and DNS service? ....................................... 2
Q3: How shall I do to make DDNS connection working in my IP sharing/NAT
network infrastructure? How to open necessary ports on IP sharing device
and how to do port forwarding/port mapping?................................................................. 3
Q4: How to register DDNS domain name on DDNS server? .......................................... 8
Q5: After registered Domain name on DDNS server where and how shall I
enter in DVR setup to make the DVR able to report current IP to DDNS
server constantly?........................................................................................................... 9
(I)EB Series DVR Remote Console Setup ................................................................... 9
(II)NV/NX/SA/XR Series DVR Setup.......................................................................... 14
Q6. How do I do if I found my Dynamic domain name is not working? ......................... 15
Q7: How shall I do if I can’t access to http://ddns.avers.com.tw/?................................. 17
Q8. How shall I do if I don’t know the IP of DNS server of my ISP?.............................. 19
(I)EB Series DVR Network Setup............................................................................... 19
(II) NV/NX/SA Series DVR Network Setup ................................................................. 20
II DVR Network Setup................................................................................. 23
Q9. How to configure DHCP on DVR server?............................................................... 23
(I)EB Series DVR Network Setup............................................................................... 23
(II)NV/NX Series DVR Network Setup ....................................................................... 25
Q10. How to configure Static IP on DVR server?.......................................................... 27
(I)EB Series DVR Network Setup............................................................................... 28
(II)NV/NX Series DVR Network Setup ....................................................................... 29
Q11. How to setup PPPOE on DVR server?................................................................. 31
(I)EB Series DVR PPPOE Network Setup ................................................................. 31
(II)NV/NX Series DVR Network Setup ....................................................................... 37
I DDNS Configuration
Q1: What are the ports needs to be opened and forwarded on my IP
sharing router or physical firewall?
Answer1:
Following is the table for the ports usage and variable needs to be opened
and mapped/forwarded on your IP sharing router or firewall
Usage
Port#
Variable
Remote Console
80
Yes (Under Network setup)
Web Viewer
80
Yes (Under Network setup)
CM3000
80
Yes (Under Network setup)
5005
Yes (Under Network setup)
Firmware Update
DVR DDNS (Upload / Download)
53/1053
N
Q2: What is the difference between DDNS and DNS service?
Answer 2:
DNS is a service that maps Internet domain names to IP addresses. DDNS
serves a similar purpose to DNS: DDNS allows anyone hosting a Web or FTP
server to advertise a public name to prospective users.
2
DDNS (Dynamic Domain Name Service) is a data query service mainly used
on the Internet for translating domain names into Internet addresses. It allows
remote clients to intelligently search dynamic servers without any previous
enquiring for servers’ Internet addresses.
Unlike DNS that only works with static IP addresses, DDNS works with
dynamic IP addresses, such as those assigned by an ISP or other DHCP
server. DDNS is popular with home users, who typically receive dynamic,
frequently-changing IP addresses from their service provider.
To use DDNS, one simply signs up with a provider and installs network
software on their host to monitor its IP address.
Compared to ordinary DNS, the disadvantage of DDNS is that additional host
software, a new potential failure point on the network, must be maintained.
Q3: How shall I do to make DDNS connection working in my IP
sharing/NAT network infrastructure? How to open necessary ports on IP
sharing device and how to do port forwarding/port mapping?
Answer 3:
i
Before using DDNS service on DVR please make sure TCP and UDP
Ports 53 and 1053 are opened on router or firewall and map to DVR LAN
IP first thus DVR could report the correct WAN IP under NAT
infrastructure.
Please make sure set the necessary settings on your router before you start
to use the Internet (Please refer to the router user manual for more detailed
information). For example, we are now using a D-Link router.
Please make sure to open the following port before using the DDNS
service:
DDNS (Dynamic IP) ÆPlease open 53 and 1053 port and port forward or port
map to the DVR LAN IP
Step 1:
Please enter the IP address of your router in the Internet Explorer address
column, to set the settings in the router.
A
B
C
3
Step 2:
Go to Advanced. Select Enabled and type a name whatever you want in
Name column. Type the LAN IP address which belongs to your DVR machine
in Private IP column. Select Both in Protocol type column.,
Type the number 53 in both Private and Public port column. Select Always
in Schedule column. Finally, please click Apply button to confirm the settings.
Step 3:
Click Continue
4
Step 4:
Go to Advanced. Select Enabled and type a name whatever you want in
Name column.
Type the LAN IP address which belongs to your DVR machine in Private IP
column. Select Both in Protocol type column.,
Type the number 1053 in both Private and Public port column. Select
Always in Schedule column. Finally, please click Apply button to confirm the
settings.
Step 5:
Click Continue
5
Step 6:
You will see two settings (about the 53 and 1053 settings we just set in the
Advanced page previously.) in the Virtual server option. Please make sure the
two settings were selected and enabled thus your DDNS ports are forwarded
to your DVR LAN IP.
Step 7:
Please make sure you did not set the 53 and 1053 port in the Filter option or it
will block the 53 and 1053 port.
6
Step 8:
Please also make sure you have allowed the 53 and 1053 port in Firewall
option or it will block those two ports thus the ports 53 and 1053 are opened on
your router
7
Q4: How to register DDNS domain name on DDNS server?
Answer 4:
In order to take advantage of DDNS service, first register your domain name
on the following Web site http://ddns.avers.com.tw
1. User Login
Browse the website http://ddns.avers.com.tw with Microsoft Internet
Explorer
First input the serial number of your product and select the product name.
Then click OK to login or Reset to clear the previous input.
i
MAC address of the DVR system is the serial number for user to register the domain name on
AVerMedia DDNS web site.
To find MAC address of your DVR system, follow the steps below:
1. In OSD menu, select NETWORK SETUP
2. Select any one of IP mode
3. A NETWORK INFORMATION windows will show up
4. MAC address of DVR system is display as shown
5. The CD-Key of MAC address input format shall be xxxxxxxxxxxx 12 digits without colon (:) or
hyphen (-)
2.
User Information
Please provide the following user information, Host Name, Password,
E-mail, Company, and Country to complete the registration process.
8
Q5: After registered Domain name on DDNS server where and how shall I
enter in DVR setup to make the DVR able to report current IP to DDNS
server constantly?
Answer5:
(I)EB Series DVR Remote Console Setup
Step 1: Install ActiveX into Internet Explorer to access Web Viewer
Input IP of DVR in the Address column and it will prompt Information bar for
installing ActiveX control please press OK on the Information inquiry.
9
Right click on the information bar and select to Install ActiveX Control.
Internet Explorer will therefore prompt an ActiveX installed message and press
install to install it.
After installed the ActiveX, Web viewer will prompt login inquiry message as
10
illustrated.
Number of
channels
Default ID for
changing setting,
view live video, and
playback……etc.
Default ID for view
live video only
Default ID for live
viewing and
playback using
remote console
4CH DVR
superuser
user
N/A
16CH DVR
ADMIN
USER
OPERATOR
or
ADMINISTRATOR
i
Factory default for all login IDs’ password is 111111.
After input ID and password please select network type to connect, if you are
not for sure of the type, please select LAN.
You can access DVR web viewer as illustrated below.
11
Step 2: Use Web Viewer to connect DVR and perform network setup
Press Remote setup option button as illustrated below.
Web Viewer will prompt for login inquiry message as illustrated to confirm
user account has the authority to access and change the DVR setup remotely.
12
i
Make sure you have input login ID that has authority for changing setting
After input password, web Viewer will therefore prompt the remote setup
option as following. Press Network button
Network setup page will prompt and it is where you can setup DDNS setting
13
Please check the comparison picture to put your registration info into related column
- Domain Name
Enter the domain name that user wanted.
i
Please be noted that you must input full name into this column input format is like
hostname.avers.com.tw
- Auth Key/Password
A password use to access DDNS to register the domain name.
i
Please press OK and restart the Stand Alone Series DVR for saving setting and activated the
DDNS function.
(II)NV/NX/SA/XR Series DVR Setup
In the Preview/Advanced screen mode, click
button to
customize your DVR. When DVR configuration setup selection appears, select
and click the Network button.
14
Please check the comparison picture to put your registration info into related column
.avers.com.tw
Make sure press Network button to enable the network service of DVR on
DVR.
Q6. How do I do if I found my Dynamic domain name is not working?
Answer 6.
Please execute DDNS test tool in any PC within the same LAN network with
our DVR product. You can execute this program in NV DVR PC as well.
After unzip the test tool software, please execute the DDNS.exe program.
15
Press Start to start the test tool
Wait for the Finished message then send back the history.log , which is under
the same folder of DDNS.exe is located ,for RD to reference.
16
Also, please provide us your current WAN IP, Your registered domain name,
Password for domain name, DVR login ID and password for FAE to help.
Q7: How shall I do if I can’t access to http://ddns.avers.com.tw/?
Answer7:
Please follow following instruction to add 168.95.192.1 as your domain name
server in Windows TCP/IP setting
Step1:
Select My Network places on Desktop and right click mouse button to prompt
drop-down menu then select Properties.
Step2:
Select Local Area connection or network connection icon and double click the
icon.
17
Step3:
Select the Properties under General page of Connection status and select
Properties on connection properties to enter IP setup.
Step 4:
By default, computer which using dynamic IP not fixed IP the DNS server
address here is chosen to automatically obtain server. Please change to Use
the following DNS server addresses. Please enter 168.95.192.1 in the
Preferred DNS server and put 168.95.1.1 in Alternate DNS server column then
press OK to save the change.
18
Please reboot your computer to activate the change. Then please try access
http://ddns.avers.ocm.tw/ to check.
Q8. How shall I do if I don’t know the IP of DNS server of my ISP?
Answer8:
Please follow following instruction to add 168.95.192.1 as your domain name
server
(I)EB Series DVR Network Setup
EB 4CH series DVR OSD Setup
EB 16CH series DVR OSD Setup
19
MAIN MENU
CAMERA SELECT
VIDEO RECORD
AUDIO RECORD
AUDIO MUTE
RECORD MODE
RECORD FRAMERATE
VIDEO QUALITY
RECORD SCHEDULE
SUBMENU
HARD DRIVE SETUP
NETWORK SETUP
USB BACKUP
LANGUAGE
NETWORK SETUP
IP MODE
NW ENABLE
VIDEO PORT
UPGARDE PORT
1
1
2
2
3
3
MAIN MENU
CAMERA
RECORD
HARD DRIVE
SENSOR / ALARM
MOTION
NETWORK
BACKUP
SYSTEM
4
4
ON
D1
60
GOOD
ENGLISH
NETWORK SETUP
STATIC
1
2
0080
5005
3
Input 192.168.192.1 into the DNS column
NETWORK INFORMATION
192.168.153.100
IP ADDRESS
255.255.255.255
SUB NET
192.168.153.254
GATEWAY
192.168.153.1
DNS
00.00.00.00.00.00
MAC ADDRESS
168.95.192.1
CHANGE
4
IP MODE
NW ENABLE
VIDEO PORT
UPGARDE PORT
1 2 3
9 10 11
0080
5005
4
12
5
13
6
14
7
15
8
16
Input 192.168.192.1 into the DNS column
IP MODE
IP MODE
IP ADDR ESS
SUB NET
GATEWAY
DNS
MAC ADDR ESS
CHANGE
STATIC
192 . 168 . 153 . 100
255 . 255 . 255 . 255
192 . 168 . 153 . 254
000 . 000 . 000 . 000
00
. 18 . 1A. 02. 00 . 0F
168.95.192.1
Then Select and press CHANGE to confirm the change setting.
(II) NV/NX/SA Series DVR Network Setup
Please follow following instruction to add 168.95.192.1 as your domain name
server in Windows TCP/IP setting
Step1:.
Select My Network places on Desktop and right click mouse button to prompt
20
drop-down menu then select Properties.
Step2:
Select Local Area connection or network connection icon and double click the
icon.
Step3:
Select the Properties under General page of Connection status and select
Properties on connection properties to enter IP setup.
21
Step 4:
By default, computer which using dynamic IP not fixed IP the DNS server
address here is chosen to automatically obtain server. Please change to Use
the following DNS server addresses. Please enter 168.95.192.1 in the
Preferred DNS server and put 168.95.1.1 in Alternate DNS server column then
press OK to save the change.
22
Step 5:
Please reboot computer and enter DVR program again to get the new DNS
server working.
II DVR Network Setup
Q9. How to configure DHCP on DVR server?
A9.
(I)EB Series DVR Network Setup
EB 4CH series DVR OSD Setup
EB 16CH series DVR OSD Setup
23
MAIN MENU
CAMERA SELECT
VIDEO RECORD
AUDIO RECORD
AUDIO MUTE
RECORD MODE
RECORD FRAMERATE
VIDEO QUALITY
RECORD SCHEDULE
SUBMENU
HARD DRIVE SETUP
NETWORK SETUP
USB BACKUP
LANGUAGE
Use
▲
and
▼
1
1
2
2
3
3
MAIN MENU
CAMERA
RECORD
HARD DRIVE
SENSOR / ALARM
MOTION
NETWORK
BACKUP
SYSTEM
4
4
ON
D1
60
GOOD
ENGLISH
buttons to go up and
Use
▲
and
▼
buttons to go up and
change the selections to Static IP and press
or
to make a selection.
change the selections to Static IP and press
or
to make a selection.
NETWORK SETUP
IP MODE
NW ENABLE
VIDEO PORT
UPGARDE PORT
▼
down and select IP MODE, and then
press
. Use ▲ and ▼ buttons to
▼
down and select IP MODE, and then
press
. Use ▲ and ▼ buttons to
NETWORK SETUP
DHCP
1
2
80
5005
3
4
IP MODE
NW ENABLE
VIDEO PORT
UPGARDE PORT
1 2 3
9 10 11
0080
5005
4
12
5
13
6
14
7
15
8
16
The DVR system will try to get an IP address Select GET IP to start getting IP. The DVR
from the DHCP server. A message window
system will try to get an IP address from the
will show up as below:
DHCP server. A message window will show
up as below:
24
IP MODE
IP MODE
IP ADDR ESS
SUB NET
GATEWAY
DNS
MAC ADDR ES S
GET IP
GET IP NOW! WAITING...
NETWORK INFORMATION
IP ADDRESS
SUB NET
GATEWAY
DNS
MAC ADDRESS
CHANGE
DHCP
192 . 168 . 153 . 100
255 . 255 . 255 . 255
192 . 168 . 153 . 254
000 . 000 . 000 . 000
00 . 18 . 1A. 02. 00 . 0F
192.168.153.100
255.255.255.255
192.168.153.254
192.168.153.1
00.00.00.00.00.00
G E T IP N O W . W A IT IN G .. .
If system didn’t get any network information, it means that get IP from DHCP server fail.
NETWORK INFORMATION
IP ADDRESS
SUB NET
GATEWAY
DNS
MAC ADDRESS
N/A
000.000.000.000
000.000.000.000
000.000.000.000
000.000.000.000
00.00.00.00.00.00
(II)NV/NX Series DVR Network Setup
Step 1:
Select My Network places on Desktop and right click mouse button to prompt
drop-down menu then select Properties.
25
Step 2:
Select Local Area connection or network connection icon and double click the
icon.
Step 3:
Select the Properties under General page of Connection status and select
Properties on connection properties to enter IP setup.
26
Step 4:
Please leave your IP setting as illustrated. Press OK to save the setting.
Q10. How to configure Static IP on DVR server?
A10.
27
Setup the network parameters for the internet or intranet remote monitor or
playback.
(I)EB Series DVR Network Setup
EB 4CH series DVR OSD Setup
MAIN MENU
CAMERA SELECT
VIDEO RECORD
AUDIO RECORD
AUDIO MUTE
RECORD MODE
RECORD FRAMERATE
VIDEO QUALITY
RECORD SCHEDULE
SUBMENU
HARD DRIVE SETUP
NETWORK SETUP
USB BACKUP
LANGUAGE
Use
▲
and
▼
1
1
2
2
3
3
EB 16CH series DVR OSD Setup
MAIN MENU
CAMERA
RECORD
HARD DRIVE
SENSOR / ALARM
MOTION
NETWORK
BACKUP
SYSTEM
4
4
ON
D1
60
GOOD
ENGLISH
Use
buttons to go up and
▲
and
▼
buttons to go up and
change the selections to Static IP and press
or
to make a selection.
change the selections to Static IP and press
or
to make a selection.
NETWORK SETUP
IP MODE
NW ENABLE
VIDEO PORT
UPGARDE PORT
▼
down and select IP MODE, and then
. Use ▲ and ▼ buttons to
press
▼
down and select IP MODE, and then
. Use ▲ and ▼ buttons to
press
NETWORK SETUP
STATIC
1
2
0080
5005
3
4
IP MODE
NW ENABLE
VIDEO PORT
UPGARDE PORT
1 2 3
9 10 11
0080
5005
4
12
5
13
6
14
7
15
8
16
The DVR system will try to get an IP address Select GET IP to start getting IP. The DVR
from the DHCP server. A message window
system will try to get an IP address from the
will show up as below:
DHCP server. A message window will show
up as below:
28
NETWORK INFORMATION
IP ADDRESS
SUB NET
GATEWAY
DNS
MAC ADDRESS
CHANGE
192.168.153.100
255.255.255.255
192.168.153.254
192.168.153.1
00.00.00.00.00.00
IP MODE
IP MODE
IP ADDR ESS
SUB NET
GATEWAY
DNS
MAC ADDR ES S
CHANGE
STATIC
192 . 168 . 153 . 100
255 . 255 . 255 . 255
192 . 168 . 153 . 254
000 . 000 . 000 . 000
00 . 18 . 1A . 02. 00 . 0F
After perform setting of static, please select CHANGE to save the change of IP information.
(II)NV/NX Series DVR Network Setup
Step1:
Select My Network places on Desktop and right click mouse button to prompt
drop-down menu then select Properties.
Step2:
Select Local Area connection or network connection icon and double click the
icon.
29
Step3:
Select the Properties under General page of Connection status and select
Properties on connection properties to enter IP setup.
Step 4:
Input the Static IP and subnet mask, gateway and DNS server information
provided by ISP or network admin…etc
30
Q11. How to setup PPPOE on DVR server?
A.11
(I)EB Series DVR PPPOE Network Setup
Set DVR as Static IP configurationÎ Access through IE to input PPPOE
informationÎLet DVR server get IP by using PPPOE connection.
Step1.Use Internet Explorer to connect DVR
Select Internet Explorer Icon on Desktop and double click it.
31
Input IP of DVR on the Address column and it will prompt Information bar for
installing ActiveX control please press OK on the Information inquiry.
Right click on the information bar and select to Install ActiveX Control.
Internet Explorer will therefore prompt an ActiveX installed message and press
install to install it.
32
After installed the ActiveX, Web viewer will prompt login inquiry message as
following.
Number of
channels
Default ID for
changing setting,
view live video, and
playback……etc.
Default ID for view
live video only
Default ID for live
viewing and
playback using
remote console
4CH DVR
superuser
user
N/A
USER
OPERATOR
16CH DVR
i
ADMIN
or
ADMINISTRATOR
The factory default for all login IDs’ password is 111111.
After input ID and password please select network type to connect, if you are
not for sure of the type, please select LAN.
33
You can access DVR web viewer as illustrated below.
Step 2: Use Web Viewer to connect DVR and perform network setup
Access DVR through Internet Explorer by using above steps and press
Remote setup option button as illustrated below.
34
Web Viewer will prompt for login inquiry message as illustrated.
i
Make sure you have input login ID that has authority for changing setting
After input password, web Viewer will therefore prompt the remote setup
option as following. Press Network button
Network setup where you can setup IP mode and DDNS setting
35
i
Before you setup the DVR setting from Static IP to PPPOE IP mode, please select the IP mode to
PPPOE first.
Select IP mode to PPPOE first, and input PPPOE User ID and password, if
you are not for sure what information needs to input please consult ISP
After input login Id and password Press OK to update the setting.
Step3: Configure the DVR setup as PPPOE mode
Then back to DVR side select PPPOE mode. Use ▲
to go up and down and select PPPOE, and then press
and ▼ buttons
or to make
36
selection. A message window will show up as below:
When DVR system gets an IP address PPPOE, the information format is
similar as below all valued
If system didn’t get any network information, it means that get IP from
PPPOE server fail. Please contact your ISP or network service vendor for
further suggestion.
i
To Setup PPPOE you need to first configured the DVR as static IP first .Please set your
Stand Alone series DVR IP the same network with your PC to proceed inputting login
information of PPPOE connection through Web Viewer.
(II)NV/NX Series DVR Network Setup
To Set up PPPOE on Windows XP:
Select My Network places on Desktop and right click mouse button to prompt
drop-down menu then select Properties
37
.
It will bring up a new screen. Click on “Create a New Connection”
This will start a New Connection Wizard. This is a simple process that will set
up your PPPOE connection. The following dialogue box will appear. Click Next.
38
Select “Connect to the Internet” and then clock the “Next” button.
Select “Set up my connection manually” and click the “Next” button
Select the second option, “Connect using a broadband connection that
requires a user name and password”, then click on the “Next” button.
39
Type your desire name for this connection into the “ISP Name” field, and then
click the “Next” button
PPPOE
Make sure that you have “Anyone’s Use” selected, especially if you have
40
different users set up in your XP. If it is not, you will have to make a new
PPPOE for EVERY connection, not just yours.
Enter your username and password into the applicable fields. Your username
is the ID your ISP supplier provides, normally it is “[email protected]” and
your password is also provided by ISP. If you are not for sure of the login ID
And password for key in, please consult your ISP. After input data click “Next”.
aaaa.net
41
Check the box “Add a shortcut to this connection to my desktop” as in the
example below, then click on the “Finish” button to complete the set up of your
PPPOE connection.
Your connection has now been configured and is ready to use. Ensure your
DSL modem is plugged in, then double click on the “PPPOE”(or the name you
input in ISP name) icon on your desktop, and then click “Connect”. Windows
should then connect you to Internet.
42