1
ENGLISH
ROMÂN$
FRANÇAIS
DVD/CD RECEIVER
RÉCEPTEUR
DVD/CD
RADIO
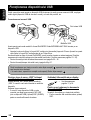
DVD/CD
PLAYER
KD-DV7302/KD-DV7301
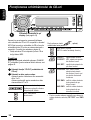
For canceling the display demonstration, see page 7.
Pour annuler la démonstration des affichages, référez-vous à la page 7.
Pentru a opri derularea mesajelor pe a!"aj, vezi pagina 7.
For installation and connections, refer to the separate manual.
Pour l’installation et les raccordements, se référer au manuel séparé.
Pentru instruc#iuni de instalare "i conectare, consulta#i manualul separat.
MANUAL
DE
INSTRUCTIONS
INSTRUC!IUNI
MANUEL D’INSTRUCTIONS
GET0452-003B
[EU]
ENGLISH
ROMÂN$
V% mul#umim c% a#i ales un produs JVC.
Înainte de utilizare, vã rugãm sã citi#i cu aten#ie toate instruc#iunile pentru a vã asigura cã le în#elege#i în
întregime "i pentru a bene!cia de o func#ionare optimã a aparatului.
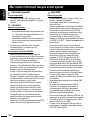
IMPORTANT PENTRU PRODUSELE CU LASER
1. PRODUS CU LASER CLASA 1
2. ATEN!IE: nu deschide#i capacul superior. În interiorul aparatului nu exist% piese care s% poat% !
reparate de utilizator; încredin#a#i toate repara#iile personalului cali!cat.
3. ATEN!IE: la deschiderea aparatului se emit radia#ii laser din clasa 1M vizibile "i/sau invizibile. Nu
privi#i direct în interior cu ajutorul instrumentelor optice.
4. MODEL DE ETICHET$: ETICHET$ DE ATEN&IONARE, APLICAT$ PE PARTEA EXTERIOAR$ A
APARATULUI.
ATEN!IE
La deschiderea aparatului se emit
radia#ii laser din clasa 1M vizibile
"i/sau invizibile.
Nu privi#i direct razele.
[Doar [European
pentru Uniunea
European%]
Union only]
Acest
produsincorporates
con#ine tehnologie
sub
This product
copyright a'at%
protection
inciden#a
de autor,
protejat%
technologydrepturilor
that is protected
by U.S.
patentsdeand
brevete ale S.U.A. "i alte drepturi de proprietate
other intellectual
property
rights.tehnologii
Use of this
intelectual%.
Utilizarea
acestei
protejate
drepturile
de autormust
trebuie
s%
copyright de
protection
technology
be authorized
!e
autorizat% deand
Macrovision
poate
by Macrovision,
is intended "ifornu
home
and!
utilizat% decât în scopuri casnice "i alte scopuri
other limited
uses
onlyautoriza#ii
unless otherwise
restrânse,
cuviewing
excep#ia
altor
oferite de
authorized by Recon!gurarea
Macrovision. Reverse
engineering or
Macrovision.
"i dezasamblarea
sunt
interzise.
disassembly
is prohibited.
limbii pentru indica"ii:
I ÎnSelectarea
acest manual, sunt folosite, pentru explica#ii, indica#iile în limba englez%. Pute#i selecta limba în
care s% apar% explica#iile pe monitor din setarea „LANGUAGE” (vezi pagina 46).
2
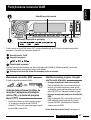
•• Your
Toate
set!rile
anterioare
preset
adjustments
will vor
also ",bede
erased (except
asemenea, #terse (cu excep$ia dispozitivului
the
registeredînregistrat,
Bluetooth device,
see page
31).
Bluetooth
vezi pagina
31).
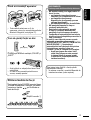
Cumtos"forcibly
ejecta#i
for#at
How
eject
a discun disc
[&ine#i ap%sat]
Pe a!"aj and
apar“EJECT”
alternativ
mesajele
„PLEASE”
“PLEASE”
appear
alternately
on the "i
„EJECT”.
display.
• Ave$i grij! s! nu sc!pa$i discul atunci când
ejectat.
• Beeste
careful
not to drop the disc when it ejects.
• În cazul în care aceast! metod! nu are
• Ifsucces,
this doesreseta$i
not work,aparatul.
reset your unit.
WARNINGS:
AVERTISMENTE:
To prevent
and damage
Pentru
a preveniaccidents
riscul de accident
#i deteriorare
•• DO
NUNOT
instala"i
#i nu
lega"i cabluri
în
installunit$"i
any unit
in locations
where;
locuri în care:
–– itpot
mayîmpiedica
obstruct the
steering
wheelaand
buna
func"ionare
volanuluilever
#i aoperations.
schimb$torului de viteze.
gearshift
func"ionarea
–– itpot
mayîmpiedica
obstruct the
operation of
safety
dispozitivelor
de siguran"$,
precum
devices
such
as
air
bags.
sistemul de airbaguri.
nivelul de vizibilitate.
–– itpot
mayobstruc"iona
obstruct visibility.
• NU manipula"i aparatul în timp ce
• DO
NOT operate
the unit while driving.
conduce"i
autovehiculul.
•• IfDacã
trebuie
sã manipula"i
aparatul
you need
to operate
the unit
while
în timp ce
conduce"i
driving,
be sure
to lookautovehiculul,
ahead carefully.
men"ine"i-vã privirea asupra drumului.
driver mustautovehiculului
not watch the monitor
•• The
Conduc$torul
nu trebuie
s$ aib$
privirea îndreptat$ spre monitor în
while
driving.
timp ce conduce.
the parking
brakede
is not
engaged,
În Ifcazul
în care frâna
parcare
nu este
“DRIVER pe
MUST
NOT WATCH
MONITOR
ac"ionat$,
monitor
apare THE
mesajul
“DRIVER
MUST NOT
WATCH
MONITOR
WHILE DRIVING.”
appears
onTHE
the monitor,
WHILE DRIVING.” („Conduc$torul
and
no
playback
picture
will
be
shown.
autovehiculului nu trebuie s$ aib$ privirea
îndreptat$
spre monitor
timpwhen
ce the
– This warning
appearsînonly
conduce”)
#ibrake
nu vawire
% a%#at$
nicio imagine.
connected
to the
– parking
Acest mesaj
apare is
doar
atunci când
parking
brakede
system
built
inconectat
the car
cablul frânei
parcare
este
la sistemul
de parcare instalat
(refer
to the frânei
Installation/Connection
în autovehicul (consulta"i Manualul de
Manual).
instalare/conectare).
Acest
aparat
este dotat
func#ie pentru
This unit
is equipped
withcu
theosteering
wheel
telecomanda volanului.
remote
control
function.
• În vederea conect%rii, consulta#i Manualul de
• See
the Installation/Connection
Manual (separate
instalare/conectare
(volum separat).
volume) for connection.
Utilizarea
func#ii
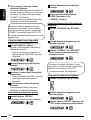
How
to use modului
functions de
mode
IfDac%
you press
M MODE,
goes aparatul
into functions
ap%sa#i
tastathe
M unit
MODE,
trece
în modul
a func#iilor,
mode,
thende
theselectare
number buttons
and 5iar
/∞tastele
buttons
numerice
"i tastele
5/buttons.
∞ pot ! utilizate ca
work
as different
function
taste de func#ii.
[Dup%
[Within55secunde...]
seconds...]
3
ENGLISH
ROMÂN$
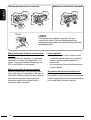
Cum
How
to s!
resetreseta"i
your unit aparatul
Montarea
comand!
Attachingpanoului
the controldepanel
ENGLISH
ROMÂN$
Scoaterea
panoului
comand!
Detaching the
control de
panel
Lever
Cursor
ATEN!IE:
CAUTION:
0 dup%
Dac%
ap%sa#i
butonul
ce the
panoul
a fostwhile
scos,the
0 button
The lever
comes
out if you
pressed
cursorul iese în afar%. Dac% se întâmpl% acest lucru,
panel is detached.
this happens,
pushde
theblocare
lever back
into lock
împinge#i
cursorulIfînapoi
în pozi#ia
înainte
de
position before
attaching the panel.
montarea
panoului.
M"suri de precau#ie la redarea unui disc de tip
DualDisc
Fa#a non-DVD a unui „DualDisc” nu corespunde
standardului “Compact Disc Digital Audio”. Prin
urmare, nu este recomandat% utilizarea fe#ei nonDVD a unui DualDisc cu acest aparat.
M"suri de precau#ie la reglarea volumului
Discurile "i dispozitivele USB conectate produc
foarte pu#in zgomot în compara#ie cu alte tipuri de
surse audio. Înainte de redarea surselor, mic"ora#i
nivelul volumului pentru a evita deteriorarea
difuzoarelor cauzat% de cre"terea brusc% a
nivelului de redare a sunetului.
4
Pentru siguran#"...
• Nu m%ri#i prea mult nivelul volumului, pentru
cã astfel sunetele din exterior vor ! acoperite,
punând în pericol siguran#a deplas%rii cu
autovehiculul.
• Opri#i autovehiculul înainte de efectuarea unor
opera#ii complexe.
Temperatura din interiorul autovehiculului...
Dacã autovehiculul a sta#ionat o perioadã
îndelungatã în condi#ii de temperaturã redusã sau
ridicatã, a"tepta#i pân% când temperatura atinge un
nivel normal înainte de a porni aparatul.
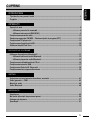
INTRODUCERE
Tipul de disc care poate $ redat ......................................................................................................6
Preg"tire ............................................................................................................................................7
OPERA II
Opera#ii de baz" ................................................................................................................................8
• Utilizarea panoului de comand" .............................................................................................. 8
• Utilizarea telecomenzii (RM-RK241) .........................................................................................9
Func#ionarea aparatului radio .......................................................................................................12
C"utarea programului FM RDS – C"utarea tipului de program (PTY) .......................................13
Func#ionarea CD player-ului ..........................................................................................................15
Func#ionarea dispozitivului USB ...................................................................................................28
Utilizarea func#iei Dual Zone ..........................................................................................................30
DISPOZITIVE!EXTERNE
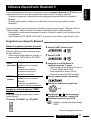
Utilizarea dispozitivelor Bluetooth ® ............................................................................................31
• Utilizarea telefonului mobil Bluetooth .................................................................................33
• Utilizarea playerului audio Bluetooth .....................................................................................35
Func#ionarea schimb"torului de CD-uri .......................................................................................36
Func#ionarea tunerului DAB ..........................................................................................................37
Func#ionarea iPod-ului/D. Player-ului .......................................................................................... 38
Func#ionarea altor componente externe ..................................................................................... 39
SET"RI
Selectarea unui mod presetat de redare a sunetului ................................................................. 41
Set"ri generale — PSM .................................................................................................................. 43
Meniul de set"ri .............................................................................................................................. 46
Set"ri Bluetooth ............................................................................................................................ 48
REFERIN E
Între#inerea ..................................................................................................................................... 49
Mai multe informa#ii despre acest aparat .................................................................................... 50
Îndrumar de depanare ................................................................................................................... 57
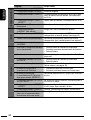
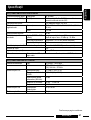
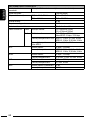
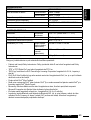
Speci$ca#ii ...................................................................................................................................... 61
5
ENGLISH
ROMÂN$
CUPRINS
ENGLISH
ROMÂN$
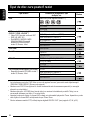
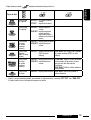
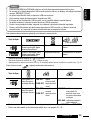
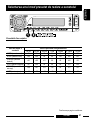
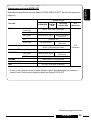
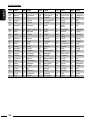
Tipul de disc care poate $ redat
Tipul de disc
DVD
Formatul de înregistrare, tipul
de %#ier, etc.
Video DVD (codul regional include “2”) *1
Redare
DVD Audio
DVD-ROM
DVD inscriptibil/reinscriptibil
(DVD-R *2/-RW, +R/+RW *3)
• Video DVD: formatul universal UDF
• DVD-VR: UDF 201
• DivX/MPEG-1/MPEG-2/MP3/
WMA/AAC/WAV: Respect%
formatul ISO 9660 nivelul 1,
nivelul 2, Romeo, Joliet
DVD-VR (exclusiv f%r% cod CPRM)
Video DivX/MPEG-1/MPEG-2
MP3/WMA/AAC *4/WAV
DVD+VR
JPEG/MPEG4
DVD-RAM
Toate tipurile
Dual Disc
Fa#% DVD
Video DVD
Fa#a non-DVD
CD/VCD
CD/CD Audio (CD-DA)/DTS-CD Text *5
VCD (CD Video)
CD-ROM
CD-I (CD-I Ready)
CD inscriptibil/reinscriptibil (CD-R/-RW) CD-DA
• Respect% formatul ISO 9660 nivelul 1, Video DivX/MPEG-1/MPEG-2
nivelul 2, Romeo, Joliet
MP3/WMA/AAC *4/WAV
JPEG/MPEG4
*1
*2
*3
*4
*5
La introducerea unui disc DVD Video cu un cod regional incorect, pe monitor este a"#at mesajul
“REGION CODE ERROR” (Eroare cod regional).
Redarea unui DVD-R inscrip$ionat în format incremental este de asemenea permis! (cu excep$ia
discurilor cu strat dublu).
Redarea discurilor +R/+RW (doar format video) cu sesiune încheiat! este posibil!. Totu#i, nu se
recomand! utilizarea unui disc +R cu strat dublu.
Aparatul poate reda "#iere în format AAC codate prin intermediul playerului iTunes. Aparatul nu poate
reda "#iere în format AAC achizi$ionate de pe iTunes Store.
Pentru redarea sunetului DTS, utiliza$i ie#irea digital! DIGITAL OUT. (vezi paginile 47, 54 #i 55).
6
ENGLISH
ROMÂN$
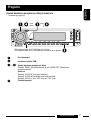
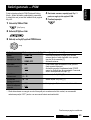
Preg"tire
Anula#i derularea mesajelor pe a$%aj %i seta#i ora
• Consulta#i "i pagina 43.
[&ine#i
ap%sat]
[Roti#i]
Când!aparatul!este!oprit:!veri#carea!orei!curente
When the power is turned off: Check the current clock time
Când!aparatul!este!pornit:!schimbarea!informa$iilor!de!pe!display.
When the power is turned on: Change the display information
~
Ÿ
!]⁄
@
Porni"i
aparatul.
Turn on
the power.
Introduce"i
set$rile
PSM.
Enter the PSM
settings.
Anula"i
mesajelor
pe a%#aj.
Cancel derularea
the display
demonstrations
Selecta#i
„DEMO”
demonstrativ)
"i apoi „DEMO OFF” (Dezactivare
Select “DEMO,”
then(Mod
“DEMO
OFF.”
mod
Set demonstrativ).
the clock
Seta"i
ora H” (hour), then adjust the hour.
Select “CLOCK
Selecta#i „CLOCK H” (ora), apoi seta#i ora.
Select “CLOCK M” (minute), then adjust the minute.
Selecta#i „CLOCK M” (minutele), apoi seta#i minutele.
Select “24H/12H,” then “24H” (hour) or “12H” (hour).
Selecta#i „24H/12H,” apoi “24H” (ora) sau “12H” (ora).
Finaliza"i
opera"ia.
Finish the
procedure.
INTRODUCERE
7
ENGLISH
ROMÂN$
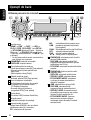
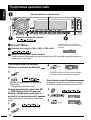
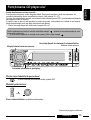
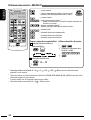
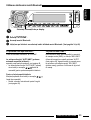
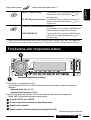
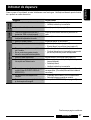
Opera#ii de baz"
Utilizarea panoului de comandã
1 Selecta#i sursa.
FM/AM = DAB * = DISC * = USB =
CD-CH */ IPOD */D.PLAYER * (sau EXT IN)
= BT-PHONE (Bluetooth Phone – Telefon cu
Bluetooth) * = BT-AUDIO (Bluetooth Audio
– Dispozitiv audio Bluetooth) * = LINE IN = (de
la început)
* Nu ve$i putea selecta aceste surse dacã nu
sunt activate sau conectate.
2 • FM/AM/DAB: selecta#i frecven#ele.
• DISC/USB: începe#i redarea.
3 • Porni#i alimentarea cu energie.
• Opri#i alimentarea cu energie [&ine#i ap%sat].
• Atenua#i sunetul (când aparatul este
deja pornit).
• Butonul pentru volum [Roti#i].
4 • Regla#i modul de sunet.
• Accesa#i set%rile PSM [&ine#i ap%sat].
5 Ecran de a!"are a informa#iilor
6 • Activa#i/dezactiva#i func#ia de recep#ie
în a"teptare a informa#iilor rutiere
(TA Standby Reception).
• Accesa#i func#ia de c%utare a
programului RDS [&ine#i ap%sat].
7 Ejecta#i discul.
8 Port intrare USB (Universal Serial Bus)
9 Deta"a#i panoul.
10 Schimba#i informa#iile de pe a!"aj.
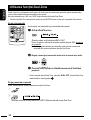
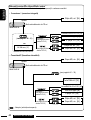
11 Accesa#i modul de func#ii.
Ap%sa#i tasta M MODE, apoi una dintre
urm%toarele taste (în 5 secunde)...
EQ : selecta#i modul de sunet.
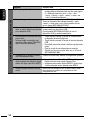
8
MO : activa#i/dezactiva#i recep#ia mono.
SSM : presetarea automat% a posturilor
[#ine#i ap%sat].
DUAL : Activa#i/dezactiva#i func#ia Dual Zone.
RPT : selecta#i redarea repetat%.
RND : selecta#i redarea aleatorie.
5 / ∞ : trece#i peste 10 capitole/piese.
12 • FM/AM/DAB: selecteaz% postul de radio/
serviciul DAB presetat.
• DISC/USB: selecteaz% capitolul/titlul/
programul/directorul/piesa/discul (pentru
schimb%torul de CD-uri).
• BT-PHONE: selecteaz% num%rul de telefon
presetat.
13 • FM/AM/DAB: c%ut% un post de radio/
ansamblu DAB.
• DISC/USB: selecteaz% capitolul/piesa.
• IPOD/D.PLAYER: selecteaz% piesa.
• BT-PHONE/BT-AUDIO: selecteaz%
o op#iune de setare/selecteaz% un
dispozitiv înregistrat.
14 • DAB: selecteaz% un serviciu DAB.
• DISC/USB: selecteaz% titlul/
programul/lista de redare/directorul.
• IPOD/D.PLAYER: Acceseaz% meniul
principal/Întrerupe temporar sau opre"te
redarea/Con!rm% selec#ia f%cut%.
• BT-PHONE/BT-AUDIO: Întrerupe
temporar sau porne"te redarea/
Acceseaz% meniul de set%ri/Con!rm%
selec#ia f%cut%.
ENGLISH
ROMÂN$
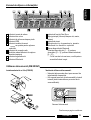
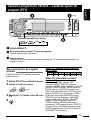
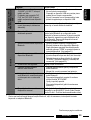
Ecranul de a$%are a informa#iilor
1
2
3
4
5
6
7
8
9
Indicatorii sursei de redare
Indicatorul de volum
Indicatorii de informare despre piesã
Indicatorii RDS
Indicatorii modului de sunet
•
se aprinde pentru op#iunea
selectat%.
Indicatorii de recep#ie radio
Modul de redare/indicatorii de op#iune
(aleatoriu/repetare)
Indicatorul egalizatorului
Indicatorul Bluetooth
10 Indicatorul func#iei Dual Zone
11 A!"aj principal (informa#ii despre or%, meniu,
redare)
12 Indicatorul piesei
13 A!"ajul sursei /nr. de presetare /nr. piesei/nr.
directorului /nr. discului/nr. capitolului
14 Starea dispozitivului Bluetooth
(Num%rul dispozitivului, [1 – 5]; puterea
semnalului, [0 – 3]*; puterea r%mas% a bateriei,
[0 – 3]*)
* Cu cât num!rul este mai mare, cu atât puterea
semnalului/bateriei cre#te.
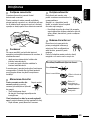
Utilizarea telecomenzii (RM-RK241)
Instalarea bateriei cu litiu (CR2025)
Înainte de utilizarea telecomenzii:
• Îndrepta#i telecomanda direct spre senzorul de
telecomand% al aparatului.
• NU expune#i senzorul de telecomand% la luminã
intensã (lumin% natural% sau provenind de la
surse arti!ciale).
Senzorul telecomenzii
Continuare pe pagina urm!toare
OPERA II
9
ENGLISH
ROMÂN$
AVERTISMENTE:
Pentru a preveni riscul de accident #i deteriorare
• Nu instala#i nici un alt tip de baterie în afar% de
CR2025 sau baterii similare.
• Nu l%sa#i telecomanda în locuri expuse direct
la lumina solar% (cum ar ! plan"a de bord)
pe perioade îndelungate de timp.
• Nu l%sa#i bateria la îndemâna copiilor.
• Nu reînc%rca#i, scurtcircuita#i, dezasambla#i
sau înc%lzi#i bateria "i nu o arunca#i în foc.
• Nu l%sa#i bateria împreunã cu alte materiale
metalice.
• Nu perfora#i bateria cu pensete sau alte
instrumente similare.
• Înf%"ura#i bateria în band% adeziv% "i izola#i-o
atunci când o arunca#i sau o pune#i la p%strare.
IMPORTANT:
În cazul în care func#ia Dual Zone este activat%
(vezi pagina 30), telecomanda func#ioneaz%
exclusiv pentru operarea DVD/CD player-ului.
MONITOR EXTRA
1 Butoanele de comandã ale monitorului
• Utilizate pentru monitor JVC—KV-MR9010,
KV-MH6510, KV-M706 sau KV-M705.
RADIO DVD/CD PLAYER
2 • Porne"te aparatul dac% este ap%sat%
rapid sau atenueaz% sunetul atunci
când aparatul este deja pornit.
• Opre"te aparatul prin ap%sare prelungitã.
3 Selecteaz% sursa.
4 Selecteaz% frecven#ele FM/AM/DAB.
5 Nu se aplic% la acest aparat.
6 Activeaz% sau dezactiveaz% func#ia Dual Zone.
7 Regleaz% nivelul volumului.
• Func#ioneaz% "i ca buton secundar de
reglare a volumului când este ap%sat
simultan cu butonul SHIFT (vezi pagina 30).
8 *1• Video DVD /DivX: a!"eaz% meniul discului.
• DVD-VR: a!"eaz% op#iunea ORIGINAL
PROGRAM (program ini#ial)
• VCD: începe redarea PBC.
9 *1 Acceseaz% meniul de setare a discului.
10 Butonul SHIFT
11 Pentru opera"iile discului/ dispozitivului
USB:
•
: opre"te redarea.
•
: începe redarea.
•
: întrerupe redarea.
Pentru utilizarea func"iilor Bluetooth:
•
: întrerupe apelul pentru utilizarea
telefonului.
•
: preia apelul pentru utilizarea telefonului.
•
func#ioneaz% "i ca buton ZOOM când
este ap%sat simultan cu butonul SHIFT (vezi
pagina 23).
• Nu se aplic% pentru operarea schimb%torului
de CD-uri /iPod-ului/D. player-ului.
10
•
•
: schimb% posturile presetate.
:
– Prin ap%sare scurt% caut% automat
posturile de radio.
– Prin ap%sare continu% caut% manual
posturile de radio.
Pentru opera"ii avansate ale discului/
dispozitivului USB:
:
•
Video DVD: selecteaz% titlurile.
DVD-VR: selecteaz% programele.
Pentru alte discuri/USB (cu excep#ia VCD/
CD): selecteaz% directoarele dac% acestea
sunt incluse.
•
:
– Prin ap%sare scurt% trece la piesa
anterioar%/urm%toare.
– Prin ap%sare continu% caut% înapoi/
înainte.
•
: c%utare înapoi/înainte.*2
Pentru utilizarea func"iilor Bluetooth:
•
: trece la piesa anterioar%/
urm%toare în cazul func#iilor audio.
Pentru operarea tunerului DAB:
•
: schimb% serviciile presetate.
•
:
– Prin ap%sare scurt% schimb% serviciul.
– Prin ap%sare continu% caut% ansamble.
Pentru operarea iPod-ului de la Apple/D.
player-ului JVC
: opre"te temporar/complet sau reia redarea.
•
: acceseaz% meniul principal.
(Acum tastele
func#ioneaz% ca taste de selectare a
meniului.)*3
•
(în modul de selectare a
meniului)
– Ap%sarea rapid% selecteaz% o op#iune.
(Prin ap%sarea tastei
este con!rmat%
selec#ia f%cut%).
– Ap%sarea prelungitã sare peste
10 op#iuni odat%.
•
:
– Prin ap%sare scurt% trece la piesa
anterioar%/urm%toare.
– Prin ap%sare continu% caut% înapoi/înainte.
13 A!"eaz% bara de ecran.
• Func#ioneaz%, de asemenea, ca buton
de activare a func#iei DIRECT când este
ap%sat simultan cu butonul SHIFT. *4
14 *1 • Video DVD /DivX: a!"eaz% meniul discului.
• DVD-VR: acceseaz% a!"ajul PLAY LIST
(lista de redare).
• VCD: începe redarea PBC.
15 *1 • Selecteaz%/seteaz%.
•
: Video DivX/MPEG: caut% meniul
index în timpul red%rii.
• DISC +/–: schimb% discurile atunci când sursa
este „CD-CH” (schimb%torul de CD-uri).
16 *1 Butonul RETURN (REVENIRE)
17 • Video DVD: selecteaz% limba de
*1
redare audio
, subtitr%rile
, unghiul
*5
de vizualizare
.
• DVD-VR: selecteaz% limba de redare audio
*1
"i subtitr%rile
.
• DivX: selecteaz% limba de redare audio
*1
, subtitr%rile
.
• VCD: selecteaz% canalul audio
.
*1
*2
*3
*4
*5
Func$ioneaz! ca taste numerice la ap!sarea
simultan! cu butonul SHIFT.
– FM/AM/DAB: selecteaz! posturile/serviciile
presetate (1 – 6).
– DISC/USB: selecteaz! capitolul/titlul/
directorul/piesa dup! ce
accesa$i modul de c!utare prin
ap!sarea butoanelor SHIFT #i
DIRECT.
– BT-PHONE: formeaz! numerele de telefon
presetate (1 – 6).
Nu se aplic! pentru operarea schimb!torului
de CD-uri.
: revine la meniul anterior.
: con!rmã selec#ia.
Cu ajutorul tastelor numerice pute$i selecta
direct titlul /capitolul /programul/ lista de redare
/directorul /piesa (vezi paginile 20 - 22).
Func$ioneaz! ca tasta SURROUND atunci
când este ap!sat! simultan cu tasta SHIFT (nu
se aplic! la acest aparat).
OPERA II
11
ENGLISH
ROMÂN$
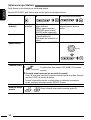
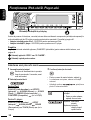
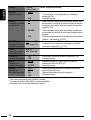
12 Pentru func"ionarea tuner-ului FM/AM:
ENGLISH
ROMÂN$
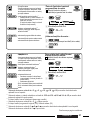
Func#ionarea aparatului radio
Select preset
station.
Selecta"i posturile
de radio
presetate.
Schimba"i
informa"iile
de pe display.
Change the
display information
~ Selecta!i"“FM/AM.”
Select “FM/AM.”
Selecta!i"frecven!ele:"FM1->"FM2"->"FM3->AM
Ÿ Select the bands.
Se
aprinde
atunci receiving
când recep#ioneaz%
o
Lights
up when
an FM stereo
transmisie FM stereo cu un semnal su!cient
broadcast
with
sufficient
signal
strength.
de puternic.
de radio
– c$utare automat$.
! C$uta"i
Searchun
forpost
a station
to listen—Auto
Search.
C%utare manual%: #ine#i ap%sat% una dintre taste pân% când „M” lumineaz% intermitent pe display "i
Manualtasta
Search:
one of the buttons until “M” flashes on the display, then press it repeatedly.
ap%sa#i
în Hold
modeither
repetat.
Când recep#ionarea
frecven#eis hard
When
an FM stereounei
broadcast
FM stereo se realizeaz" cu di$cultate
to receive
1
3
[Roti#i]
Posturile
locale with
cu cele
puternice
semnale
Local FMFM
stations
themai
strongest
signals
are
sunt c%utate "i memorate automat în banda FM.
searched and stored automatically in the FM band.
2
Recep#ia
este
îmbunãtã#itã,
dareffect
se vawill
pierde
Reception
improves,
but stereo
be lost.
efectul
• MOstereo.
indicator lights up.
• Se aprinde!indicatorul!MO.
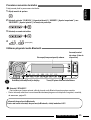
Presetarea automat! a posturilor FM
FM
station
automatic presetting
— SSM
(Strong-station
Sequential—
Memory
- Memorarea Sequential
secven"ial! a
SSM
(Strong-station
posturilor cu emisie puternic!)
Memory)
Pute#i preseta pânã la "ase posturi pentru !ecare
You
can preset up to six stations for each band.
bandã.
1
2
12
Presetarea
manual!
Manual presetting
De exemplu: memorarea postului FM cu frecven#a
Ex.: MHz
Storing
stationdeof presetare
92.5 MHz into
92,5
la FM
num%rul
4 alpreset
benziinumber
FM1.
4 of the FM1 band.
1
2
3
[Roti#i]
ENGLISH
ROMÂN$
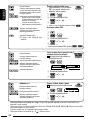
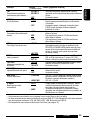
C"utarea programului FM RDS – C"utarea tipului de
program (PTY)
[Roti#i]
Schimba"i
de pe display.
Change theinforma"iile
display information
PTY.
~ Activa"i
Activatec$utarea
PTY Search.
Selecta"i
unul
dintre
codurile
PTY (tipuri detypes).
programe).
Ÿ Citi#i
Select one of the PTY
codes (programme
mai departe pentru a a'a detalii.
See the following for details.
c$utarea.
! Începe"i
Start searching.
Dac%
de radio
transmite
un programofcu
codcode
PTYasselectat
dumneavoastr%,
If thereunispost
a station
broadcasting
a programme
theacela"i
same PTY
you havede
selected,
that stationve#i
is tuned
recep#iona acel post.
in.
Memorarea
programe
Storing yourtipurilor
favoritedeprogramme
preferate
Coduri
PTY
asociate tastelor numerice
Preset
(de
la 1PTY
la codes
6): in the number buttons (1 to 6):
types
Pute#i stoca codurile PTY preferate asociindu-le
You can store
your favorite PTY codes into the number
tastelor
numerice.
Coduri
PTY
(disponibile
butonul
PTY codes
(available
with thecu
control
dial):
de
comand$):
NEWS,
AFFAIRS, INFO, SPORT, EDUCATE, DRAMA,
NEWS!(%tiri),!AFFAIRS!(afaceri), INFO!
CULTURE, SCIENCE, VARIED, POP M (music), ROCK M
(informa$ii),!SPORT,!EDUCATE!(emisiuni
(music), EASY M (music), LIGHT M (music), CLASSICS,
educative),!DRAMA!(teatru!radiofonic),!CULTURE
(cultur&),!SCIENCE!(%tiin$&),!VARIED!(diverse),
OTHER M (music), WEATHER, FINANCE, CHILDREN,
[Roti#i]
POP!M!(muzic&!pop),!ROCK!M!(muzic&!rock),
SOCIAL,MRELIGION,
PHONE IN, TRAVEL, LEISURE, JAZZ,
EASY
(muzic&!ambiental&),!LIGHT!M!(muzic&
COUNTRY, NATION M (music), OLDIES, FOLK M (music),
u%oar&),!CLASSICS!(muzic&!clasic&),!OTHER
2 pentru
a stoca other
alte coduri M
3 Repeta"i
Repeat pa#ii
steps11#iand
2 for storing
(alte!tipuri!de!muzic&),!WEATHER!(meteo),
DOCUMENT
buttons.
cod
PTY(see
(veziright
coloana
din dreapta).
1 Selecta"i
Select aun
PTY
code
column).
num$r
de presetare.
2 Selecta"i
Select aun
preset
number.
PTY.
PTY codes.
4
FINANCE!(informa$ii!#nanciare),!CHILDREN!
(emisiuni!pentru!copii),!SOCIAL,!RELIGION!
(religie),!PHONE!IN!(emisiuni!interactive),
TRAVEL!(c&l&torii),!LEISURE!(programe!de!
divertisment),!JAZZ!(muzic&!de!jazz),!COUNTRY!
(muzic&!country),!NATION!M!(muzic&!popular&),!
OLDIES!(muzic&!veche),!FOLK!M (muzic&!folk),
DOCUMENT (documentare)
OPERA II
13
ENGLISH
ROMÂN$
Activarea/dezactivarea func#iilor de recep#ie în a%teptare a informa#iilor rutiere
(TA) %i a tipului de program (PTY) favorit
Func"ia TA Standby Reception
(Recep"ie în a#teptarea informa"iilor
rutiere)
Indicator
Pentru activarea func#iei, ap%sa#i
tasta .
Recep"ie PTY Standby Reception
(Recep"ie în a#teptarea unui anumit
tip de program)
Indicator
Vezi pag. 44.
Aparatul va trece, temporar, în modul de Se aprinde
transmitere a informa#iilor rutiere (TA),
dac% acesta este disponibil, de la alte
surse decât posturile de radio AM*.
Volumul trece la nivelul presetat pentru
TA (informa#ii rutiere) dacã nivelul
curent este mai redus decât acesta.
(vezi pagina 44).
Func#ie înc% neactivat%. C%uta#i alt post Se aprinde
de radio cu semnale de emisie RDS.
intermitent
Aparatul va trece, temporar, la
redarea tipului de program favorit,
de la alte surse decât posturile de
radio AM*.
Pentru dezactivarea func#iei, ap%sa#i
tasta .
Pentru dezactivarea func#iei, selecta#i
op#iunea „OFF” pentru codul PTY (vezi
pagina 44).
Se stinge
Se aprinde
Func#ie înc% neactivat%. C%uta#i alt post Se aprinde
de radio cu semnale de emisie RDS.
intermitent
Se stinge
• La conectarea unui tuner DAB, func#ia de recep#ie în a"teptare a informa#iilor rutiere "i a tipului de program
favorit efectueazã, de asemenea, cãutarea serviciilor DAB. (Vezi, de asemenea, paginile 37 "i 44).
* La stabilirea unei leg!turi telefonice prin intermediul func$iei “BT-PHONE” (telefon Bluetooth), aparatul
nu mai trece în modul de transmitere a informa$iilor rutiere sau a tipului de program favorit.
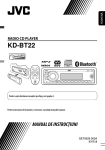
Identi$carea aceluia%i program – Network-Tracking Reception (Recep#ionare
optim" în re#ea)
Dacã vã deplasa#i într-o zonã unde banda FM nu se
recep#ioneazã destul de puternic, aparatul va trece
imediat pe frecvenþa altui post FM RDS apar#inând
aceleia"i re#ele, care probabil transmite acela"i
program, având însã un semnal mai puternic (vezi
imaginea din dreapta).
Func#ia Network-Tracking Reception (Recep#ie
optim% a postului de radio) este activat% din fabric%.
Pentru a modi%ca set$rile func"iei NetworkTracking Reception , vezi sec#iunea „AF-REG” de
la pagina 44.
• La conectarea unui tuner DAB, consulta#i, de
asemenea, sec#iunea “Identi!carea aceluia"i
program – Recep#ia unei frecven#e alternative” de
la pagina 37.
Programul
în spectre
de frecven#%
ProgrammeAAtransmis
broadcasting
on different
frequency
diferite
(01– –05)05)
areas (01
Selectarea automat" a postului de radio – C"utarea programului
În mod obi"nuit, atunci când ap%sa#i tastele numerice, aparatul intr% pe frecven#a posturilor de radio
corespunz%toare presetate.
Dac% semnalul postului FM RDS presetat nu este su!cient de puternic pentru o recep#ie de calitate,
Aaparatul, utilizând date AF, va intra pe alt% frecven#% de emisie a aceluia"i program transmis de postul
presetat ini#ial.
• Acest aparat are nevoie de câteva momente pentru a intra pe frecven#a altui post de radio utilizând
func#ia de cãutare a programului.
• Consulta#i "i pagina 44.
14
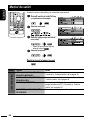
Înainte de efectuarea oric$ror opera"ii...
Porni#i monitorul pentru a vedea imaginea redat%. Dac% porni#i monitorul, pute#i, de asemenea, s%
controla#i redarea altor discuri consultând monitorul. (Vezi paginile 23 – 27.)
Tipul de disc este detectat automat, iar redarea începe automat (pentru DVD: pornirea automat% depinde
de programul intern al discului).
În cazul în care un disc nu este prevãzut cu meniu de operare, toate piesele vor ! redate în mod repetat
pânã când schimba#i sursa sau pânã când discul este ejectat.
• Pentru informa#ii despre alte set%ri vezi "i paginile 46 "i 47.
If “ ”laappears
on the
when
pressing
a button,
the unit cannot
accept the
have tried
to
“ ”, aparatul
Dac%
ap%sarea
uneimonitor
taste pe
monitor
este
a!"at mesajul
nuoperation
accept% you
opera#ia
pe care
do.
încerca#i
s% o efectua#i.
•• InÎnsome
unelecases,
cazuri,
aparatul
nu accept%
unele opera#ii,
a a!"a mesajul “ ”.
will notf%r%
be accepted.
without
showing
“ ,” operations
Începe"i
redarea,
dac$ este necesar.
Start playback
if necessary.
Deschide"i Open
panoul
comand$
introduce"i
thedecontrol
panel#iand
insert thediscul.
disc.
Redarea începe automat.
Playback starts automatically.
Schimba"i
informa"iile
de pe display.
Change the
display information
Pentru
a opri
a ejecta discul
To stop play
andredarea
eject the%idisc
• Pentru
Press SRC
to listen altã
to another
source.
a asculta
sursã playback
de redare,
ap%sa#i SRC.
Blocarea
eject"rii
discului
Prohibiting
disc ejection
[Roti#i]
Pentru
a anula
blocarea, repeta#i
aceastã
opera#ie.
To cancel
the prohibition,
repeat the
same procedure.
C
Continuare pe pagina urm!toare
OPERA II
15
ENGLISH
ROMÂN$
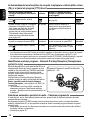
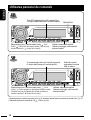
Func#ionarea CD player-ului
ENGLISH
ROMÂN$
Utilizarea panoului de comand"
*1
*1
În timp
aparatul
During
stop: este
Locateoprit:
title localiza#i titlul
*1 ce
În timpul
red%rii/întreruperii:
localiza#i
capitolul
*1 During
play/pause: Locate
chapter
Elapsed
de=
redare
scurs)
Elapsed playing
playingtime
time(Timpul
= Clock
Current
title Clock
(Ceas)
chapter
(Titlul curent "i
(back
to thenumber
beginning)
and chapterCurrent
numbertitle=and
num%rul capitolului)
(înapoi de la început)
*1
*1
*1
*2
Ap!sare:
selecteaz%
Press: Select
chaptercapitolul
Ap!sare prelungit!: caut% capitolul 2
Hold:
Reverse/fast-forward
chapter *
anterior/urm%tor *2
În timp*1ceDuring
aparatul
este
oprit:program
localiza#i programului
stop:
Locate
În timpul
red%rii/întreruperii:
capitolul
*1 During
play/pause:localiza#i
Locate chapter
Elapsed
playing time
redare
scurs
)
Clock
Elapsed playing
time(Timpul
= Clockde=
Current
program
(Ceas)
Current program (or playlist) and chapter number
(or
playlist)
number
and
chapter
number
=
(back
to "i
(Num%rul curent al programului (sau al listei de redare)
the beginning)
num%rul
capitolului)
(înapoi de la început)
Selecta#i
titlul
Select title
Selecta#i
num%rul
Select program
number/
programului/ num%rul
playlist
listei
denumber
redare
Ap!sare:
selecteaz%
Press: Select
chapter capitolul
Ap!sare prelungit!: caut% capitolul 2
Hold: Reverse/fast-forward
chapter *
*2
anterior/urm%tor
Ap!sa$i pentru a selecta un num!r între 1 #i 6; men$ine$i ap!sat pentru a selecta un num!r între 7 #i 12.
Viteza de c!utare se schimb! la x 2
x 10 pe monitor.
16
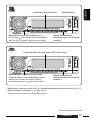
direct unfolder
anumit
director
1 Locate particular
*Localiza#i
directly
Elapsed
time =
(Timpul
de Folder
redarenumber
scurs )
Elapsed playing time
Clock =
Clock
(Ceas)
(Num%rul directorului)
= Track
title = Folder
(back tonumber
the beginning)
Track title (Titlul piesei)
(înapoi de la început)
*1
ENGLISH
ROMÂN$
*1
Selecta#i
directorul
Select folder
Ap!sare:
selecteaz%
Press: Select
track piesa
Ap!sare
prelungit!: piesa anterioar%/
Hold: Reverse/fast-forward
track *2
urm%toare *2
Localizare
a unei anumite
piese (PBC
(PBCnot
nuineste
Locate particular
track directly
use)utilizat)
*1direct%
Elapsed
time and
andCurrent
Currenttrack
track
number
Elapsed playing
playing time
number
=
(Timpul
deCurrent
redare track
scursnumber
"i num%rul
piesei
curente)
Clock and
= (back
to the
Clock and Current track number (Ceasul "i
beginning)
num%rul piesei curente)
(înapoi de la început)
Ap!sare:
selecteaz%
Press: Select
track piesa
Ap!sare
prelungit!: piesa anterioar%/
Hold: Reverse/fast-forward
track *3
urm%toare *3
*1
Ap!sa$i pentru a selecta un num!r între 1 #i 6; men$ine$i ap!sat pentru a selecta un num!r între 7 #i 12.
Viteza de c!utare se schimb! la x 1 x 2 pe monitor.
*3
Viteza de c!utare se schimb! la x 2 x 10 pe monitor.
*2
Continuare pe pagina urm!toare
OPERA II
17
ENGLISH
ROMÂN$
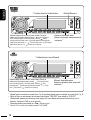
*1
Localiza#i
direct unfolder
anumit
director
*1 Locate particular
directly
Elapsed
playing
timetime
andand
Current
tracktrack
number
(Timpul de
Elapsed
playing
Current
number
redare scurs "i num%rul piesei curente)
Clock and Current
=
Clock
and
Current
track
number
=
Album
Album
track number (Ceasul "i num%rul piesei curente)
*2
) (Numele
name/performer
(folder
namename
name/performer
(folder
*2) = albumului/interpretului
Track title
*2
*2
)) to the
Track
title (!le name ) (Titlul piesei
(denumirea
(file namedirectorului
*2) = (back
beginning)
(înapoi de la început)
(denumirea !"ierului *2))
*1
*2
*3
*4
Ap!sare:
selecteaz%
Press: Select
track piesa
Ap!sare
prelungit!: piesa anterioar%/
Hold: Reverse/fast-forward
track *3
urm%toare *3
Localiza#i
o anumit%
pies%
particular
track directly
*1 Locatedirect
Elapsed
playing
timetime
and and
Current
tracktrack
number
(Timpul de
Elapsed
playing
Current
number
Clock and Current
redare scurs "i numãrul piesei curente)
=
Clock
and
Current
track
number
=
Disc
Disc
track number (Ceasul "i numãrul piesei curente)
*4
title/performer
*4 = Track
title *4 = (back *4to) the Track
(Denumirea
discului/interpretului
title/performer
*4
(Titlul piesei)
(înapoi de la început)
titlebeginning)
*1
Selecta#i
directorul
Select folder
Ap!sare:
selecteaz%
Press: Select
track piesa
Ap!sare
prelungit!: piesa anterioar%/
Hold: Reverse/fast-forward
track *3
urm%toare *3
Ap!sa$i pentru a selecta un num!r între 1 #i 6; men$ine$i ap!sat pentru a selecta un num!r între 7 #i 12.
Dac! un "#ier nu are element de informare sau func$ia “TAG DISP” este setat! la “TAG OFF”
(Dezactivare element de informare) (vezi pagina 45), sunt a"#ate denumirea directorului #i cea a
"#ierului. Indicatorul TAG nu se va aprinde.
Viteza de c!utare se schimb! la x 2
x 10 pe monitor.
Pentru CD-uri audio, este a"#at mesajul “NO NAME”.
18
, ap%sa#i urm%toarele taste pentru a...
ENGLISH
ROMÂN$
Dup% ap%sarea tastei
Tipul de disc
Trece peste
10 capitole*
CHP RPT: Se repet% capitolul
curent
TIT RPT: repet% titlul curent
Trece peste
10 capitole*
—
CHP RPT: repet% capitolul
curent
PRG RPT: repet% programul
curent (nu este
disponibil% pentru
redarea unei liste de
piese)
TRK RPT: repet% piesa curent% —
FLDR RPT: repet% directorul
curent
Trece peste
10 piese
(în cadrul
aceluia"i
director)
Trece peste
10 piese
(PBC nu este
utilizat)
Trece peste
10 piese
(în cadrul
aceluia"i
director)
Trece peste
10 piese
—
TRK RPT: repet% piesa curent% DISC RND: sunt redate toate piesele
(PBC nu este
în ordine aleatorie (PBC nu este
utilizat)
utilizat)
TRK RPT: repet% piesa curent% FLDR RND: Red% în ordine aleatorie
FLDR RPT: repet% directorul
toate piesele din directorul curent,
curent
apoi pe cele din directoarele
urm%toare.
DISC RND: Red% în ordine aleatorie
toate piesele
TRK RPT: repet% piesa curent% DISC RND: red% toate piesele în
ordine aleatorie
• Pentru a anula redarea repetat% sau redarea în ordine aleatorie, selecta#i “RPT OFF” sau “RND OFF.”
* În timpul red!rii sau a întreruperii temporare a red!rii
OPERA II
19
ENGLISH
ROMÂN$
Utilizarea telecomenzii—RM-RK241
redarea
: opre"te
Stop play
: întrerupe
Pause (Frame
frame playback
pressed
during
redareabytemporar
(ap%sat% îniftimpul
întreruperii
temporare,
pause.) tasta declan"eaz% redarea cadru cu cadru).
: porne"te
Start playredarea
*1 1
capitolul anterior/urm%tor
: caut%
Reverse/forward
chapter search
*
• Redare cu vitez%
redus% *2 în timpul întreruperii temporare. Nu
2 during
• Slow
motion
*
pause.
No sound can be heard.
se emite nici un sunet.
*3
: Ap!sare:
Press: Select
chaptercapitolul
*3
selecteaz%
*4
Ap!sare
prelungit!: caut% capitolul
anterior/urm%tor
Hold: Reverse/fast-forward
chapter
search *4
: selecteaz%
Select title titlul
: selecteaz%
Select audiolimba
language
pentru redarea audio
: selecteaz%
Select subtitle
limbalanguage
pentru subtitrare
: selecteaz%
Select viewunghiul
angle de vizualizare
Pentru a c$uta direct capitolul/titlul Utilizarea func"iilor din meniu...
To
search forfunc#ia
chapter/title
directly
Using menu driven features...
1 Selecta#i
de c%utare
a
1capitolului/titlului.
Select chapter/title search.
1
/
o op#iune
pe care
2 Selecta#i
Select an item
you want
to
+
dori#i
s% o reda#i.
start play.
3
2 Introduce#i num%rul dorit.
2 Enter the desired number.
+
3
*1
*2
*3
*4
Viteza de c!utare se schimb! la x 2
x5
x 10
x 20 x 60 pe monitor dac! tasta este
ap!sat! în mod repetat.
Viteza de redare cu vitez! sc!zut! se schimb! la 1/32
1/16 1/8
1/4
1/2 pe monitor dac!
tasta este ap!sat! în mod repetat.
În timpul red!rii sau al întreruperii temporare a red!rii
Viteza de c!utare se schimb! la x 2
x 10 pe monitor.
20
Pentru
a c$uta
direct capitolul/
To search
for chapter/program/
programul/lista
playlist directly de redare
1
func#ia de c%utare a
1 Selecta#i
Select chapter/program/playlist
capitolului/programului/listei
de redare.
search.
ENGLISH
ROMÂN$
redarea
: opre"te
Stop play
redarea
(ap%sat%
: întrerupe
Pause
(Frame
by temporar
frame playback
if
în timpul întreruperii temporare, tasta
pressed during
pause.)
declan"eaz%
redarea
cadru cu cadru).
: porne"te
Start playredarea
*1 1
capitolul anterior/urm%tor
: caut%
Reverse/forward
chapter search
*
• Redare înainte cu vitez%2 sc%zut% *2 în
• Forward
slow motion
* during
timpul întreruperii
temporare.
Nu se
emite nici
sunet.
pause.
No un
sound
can be heard.
(Func#ia de redare înapoi cu vitez%
(Reverse
slow
motion
does not
redus% nu func#ioneaz%.)
work.)
*3
selecteaz%
: Ap!sare:
Press: Select
chaptercapitolul
*3
Ap!sare prelungit!: caut% capitolul
Hold: Reverse/fast-forward
chapter
*4
anterior/urm%tor
search *4
programul/lista de redare
: selecteaz%
Select program/playlist
: selecteaz%
Select audiolimba
language
pentru redarea audio
: selecteaz%
Select subtitle
limbalanguage
pentru subtitrare
+
num%rul
dorit.
2 Introduce#i
Enter the desired
number.
+
3
Utilizarea
func"iilor
din meniu...
Using menu
driven features...
1
/
o op#iune
pe care
dori#i
2 Selecta#i
Select an item
you want
to start
play.s% o reda#i.
3
: opre"te
Stop playredarea
: întrerupe
Pause (Frame
by frame
playback
if
redarea
temporar
(ap%sat%
în
timpul during
întreruperii
temporare, tasta
pressed
pause.)
declan"eaz% redarea cadru cu cadru).
: porne"te
Start playredarea
piesa anterioar%/urm%toare
: caut%
Reverse/forward
track search *6 *6
3
*3
: Ap!sare:
Press: Select
track *piesa
selecteaz%
Ap!sare
prelungit!:
caut%
piesa
Hold:
Reverse/fast-forward
track
*7
anterioar%/urm%toare
search *7
: selecteaz%
Select folderdirectorul
Derularea scenelor
: • Return/advance
theînainte/înapoi
scenes by
cu aproximativ 5 minute (c%utare în
about
5
minutes
(Index
search).
meniul index).
chapter.
• Select
Selectarea
capitolului.
selecteaz%
limbalanguage
pentru subtitr%ri
: DivX: Select
subtitles
selecteaz%
pentru redarea
: DivX: Select
audiolimba
language
Pentru
a c$uta
direct(within
o pies$ the
(în cadrul
To search
for track
same
aceluia#i director)/un director
folder)/folder
directly
1 Selecta#i func#ia de c%utare a piesei/
1directorului.
Select track/folder search.
+
num%rul
dorit.
2 Introduce#i
Enter the desired
number.
+
3
audio
*1
*2
*3
*4
*5
*6
*7
Viteza de c!utare se schimb! la x 2
x5
x 10
x 20
x 60 pe monitor dac! tasta este
ap!sat! în mod repetat..
Viteza de redare cu vitez! sc!zut! se schimb! la 1/32
1/16
1/8
1/4
1/2 pe monitor dac!
tasta este ap!sat! în mod repetat.
În timpul red!rii sau al întreruperii temporare a red!rii
Viteza de c!utare se schimb! la x 2
x 10 pe monitor.
În timpul red!rii programului original (PG)/ listei de redare (PL)
Viteza de c!utare se schimb! 1
2
3
pe monitor dac! tasta este ap!sat! în mod repetat.
Viteza de c!utare se schimb! la 1
2 pe monitor.
Continuare pe pagina urm!toare
OPERA II
21
ENGLISH
ROMÂN$
redarea
: opre"te
Stop play
redareabytemporar
(ap%sat% if
: întrerupe
Pause (Frame
frame playback
în timpul întreruperii temporare, tasta
pressed
during
pause.)
declan"eaz% redarea cadru cu cadru).
: porne"te
Start playredarea
piesa anterioar%/urm%toare
: caut%
Reverse/forward
track search *1*2*1
• Redare înainte cu vitez% sc%zut%
• Forward
slow motion
*2 during
în timpul întreruperii
temporare.
Nu
se emite
un sunet.
pause.
Nonici
sound
can be heard.
(Func#ia de redare înapoi cu
(Reverse
slow nu
motion
does not
vitez% redus%
func#ioneaz%.)
work.)
3
*3
: Ap!sare:
Press: Select
track *piesa
selecteaz%
Ap!sare
prelungit!: caut% piesa
Hold: Reverse/fast-forward
track
*4
anterioar%/urm%toare
search *4
: selecteaz%
Select audiocanalul
channel
audio.
(ST:
stânga,
(ST: stereo,
stereo, L:
L: left
left,- R:
Right)R: right
– dreapta)
Pentru
a selecta
direct piesa
To select
track directly
• Pentru discurile VCD cu func#ie
• For
VCD
with
PBC,
a list of items
PBC, pe meniul discului
este is
a!"at%ono the
list%disc
de menu.
op#iuni.
shown
1
+
num%rul
dorit.
2 Introduce#i
Enter the desired
number.
+
3
return
to thela previous
menus, press
•• To
Pentru
a reveni
meniurile anterioare,
ap%sa#i
Anularea red$rii PBC...
. .
Canceling the PBC playback...
1
2
+
num%rul
dorit.
3 Introduce#i
Enter the desired
number.
+
4
To resume
PBC,redarea
press PBC, ap%sa#i
/
.
• • Pentru
a relua
:
:
:
:
:
opre"te
redarea
Stop play
Pause redarea temporar
întrerupe
porne"te
Start playredarea
.
Pentru
a c$uta
direct(within
o pies$the
(în cadrul
To search
for track
aceluia#i director)/un director
same
folder)/folder
directly
1 Selecta#i
func#ia de c%utare a
1 piesei/directorului.
Select track/folder search.
Reverse/forward
track search *1 *1
caut%
piesa anterioar%/urm%toare
+
3
*3
Press: Select
tracks *piesele
Ap!sare:
selecteaz%
Ap!sare
prelungit!: caut% piesa
Hold: Reverse/fast-forward
track
*4
anterioar%/urm%toare
4
search *
directorul
: selecteaz%
Select folder
/
num%rul
dorit.
2 Introduce#i
Enter the desired
number.
+
3
:
:
:
:
:
*1
*2
*3
*4
opre"te
Stop playredarea
întrerupe
Pause redarea temporar
Pentru
a c$uta
direct
o pies$
To search
for track
directly
1 Selecta#i func#ia de c%utare a piesei.
1
Select track search.
Start playredarea
porne"te
Reverse/forward
track search*1*1
caut%
piesa anterioar%/urm%toare
Press: Select
tracks *piesele *3
Ap!sare:
selecteaz%
Hold: Reverse/fast-forward
track
Ap!sare
prelungit!: caut% piesa
*4
anterioar%/urm%toare
search *4
3
+
num%rul
dorit.
2 Introduce#i
Enter the desired
number.
+
3
Viteza de c!utare se schimb! la x 2
x5
x 10
x 20
x 60 pe monitor dac! tasta este
ap!sat! în mod repetat.
Viteza de redare cu vitez! sc!zut! se schimb! la 1/32
1/16
1/8
1/4
1/2 pe monitor dac!
tasta este ap!sat! în mod repetat.
În timpul red!rii sau al întreruperii temporare a red!rii
Viteza de c!utare se schimb! la x 2
x 10 pe monitor.
22
ENGLISH
ROMÂN$
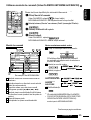
view—Zoom
in (transfocare)
(DVD/DVD-VR/DivX/MPEG
Video/VCD)
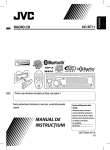
M"rireaEnlarging
imaginii –the
func#ia
Zoom in
(DVD/DVD-VR/DivX/MPEG
Video/VCD)
În timpul During
red%rii play
sau or
al pause...
întreruperii temporare a red%rii ...
1 În timp ce #ine#i ap%sat butonul
, ap%sa#i în mod repetat
.
1 While holding
, press
repeatedly.
the portion.
enlarged
por#iunea
m%rit%. portion.
2 Deplasa#i
Move2
the Move
enlarged
w—Zoom inEnlarging
(DVD/DVD-VR/DivX/MPEG
the view—Zoom Video/VCD)
in (DVD/DVD-VR/DivX/MPEG Video/VCD)Enlarging the view—Zoom in (DVD/DV
During play or pause...
ENGLISH
During play or pause...
To
cancel
zoom,
selectselecta#i
“ZOOM op#iunea
OFF.” “ZOOM OFF” (zoom dezactivat).
• Pentru• anularea
zoomului,
zoom,
select
“ZOOM
OFF.”
, pressTo1cancel
repeatedly.
While
holding
, press
repeatedly.
1 While holding
ENGLISH
e...
, press
repea
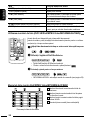
Utilizarea
barei
de the
ecran
(DVD/DVD-VR/DivX/MPEG
Video/VCD) Video/VCD)
Operations
using
on-screen
bar (DVD/DVD-VR/DivX/MPEG
Aceste
func#ii sunt
intermediul
ged portion. 2 Move the enlarged portion.
2 remote
Move the
enlarged portion.
These operations
aredisponibile
possible on prin
the monitor
usingtelecomenzii.
the
controller.
~
Selecta#i
bareibar
de ecran
(vezi pagina
Show
thea!"area
on-screen
(see page
24). 24).
elect “ZOOM OFF.”
• To cancel zoom, select “ZOOM OFF.”
Ÿ
(de
dou% ori)
(twice)
Ÿ anSelect
an item.
Selecta"i
oitem.
op"iune.
Select
• To cancel zoom, select “ZOOM OFF.”
sing the on-screen
barusing
(DVD/DVD-VR/DivX/MPEG
Video/VCD) Operations
Operations
the on-screen bar (DVD/DVD-VR/DivX/MPEG
Video/VCD)
using the on-screen
!
Make
selection.
Efectua"i
selec"ia.
!the
Make
ausing
selection.
These operations are possible on
monitor
the
remote
controller.
These
operations
areapossible
on the monitor using the remote controller.
These operations
~ Show the on-screen bar~
(seeShow
pagethe
24).on-screen bar (see page 24).
~ Show th
(twice)
Ÿ
Select an item.
!
Make a selection.
(twice)
În
cazul înIfmenu
careappears...
pemenu
ecranappears...
apare meniul pop-up...
pop-up
If pop-up
Ÿ
Select an item.
To
cancel
pop-up
menu,ap%sa#i
press
•• Pentru
a• anula
meniul
pop-up,
To cancel
pop-up
menu,
press
.
Select an
!
Make a s
..
Fortime/numbers,
entering
time/numbers,
see the etapele
following.urm%toare.
a• introduce
ora/numere,
parcurge#i
For
entering
see the
following.
!•• Pentru
Make
a selection.
Dezactiva"i
bara
de
ecran.
⁄ Remove
the on-screen
⁄ Remove
the on-screen
bar. bar.
If pop-up menu appears...
(tw
Ÿ
If pop-up menu appears...
If pop-up m
Introducerea orei/numerelor
Entering time/numbers
Ap%sa#i
pentru a modi!ca num%rul, apoi ap%sa#i
pentru a ajunge la urm%toarea
Press
to change the number, then press
to move to the next entry.
pozi#ie.
• To cancel pop-up menu, press • To cancel
.
pop-up menu, press
.
• To cance
• Each
time you
press
, ,the
numbercre"te/descre"te
increases/decreases by
one value.
• La•!ecare
ap%sare
a tastei
num%rul
o unitate.
For entering
time/numbers,
see•theForfollowing.
entering
time/numbers, see thecufollowing.
• For ente
• Dup% ce
a#i introdus
ap%sa#i
• After
enteringnumerele,
the numbers,
press
.
⁄
the
on-screen
bar.
⁄
Remove
the
on-screen
bar.
⁄
Remove
• NuRemove
este
necesar
s%
introduce#i
zeroul
"i
celelalte
zerouri
din
coad%
(ultimele
dou%
cifre
din
exemplul
de
• It is not required to enter the zero and tailing zeros (the last two digits in the example below).
mai jos).
Ex.: Time search
Exemplu: c%utarea timpului de redare
DVD: _:_ _:_ _ (Ex.: 1:02:00)
umbers DVD:
Entering
_:_ _:_ time/numbers
Press_ (Ex.: 1:02:00)
once, then
twice to go to the third entry,
Entering time/numbers
twice, then press ENTER.
to change the
number,
todemove
thepentru
next entry.
Press thenopress
change the number,
then
press
movepozi#ie,
to Press
the next entry.
to change
the number, the
Ap%sa#i
dat%,toapoi
dou%to
ori
a ajunge la to
a treia
de dou%
ori, apoi
ap%sa#i
ss
thetasta
number
by
onenumber
value. increases/decreases by one value.
• ,Each
timeENTER.
youincreases/decreases
press
, the
• Each time you press
, the numb
Continuare
pe pagina
urm!toare
numbers, press
.
• After entering
the numbers, press
.
• After entering
the
numbers,
pressnext page.
Continued
on the
o enter the zero
tailing
zeros to
(the
lastthe
twozero
digits
the example
below).
• Itand
is not
required
enter
andintailing
zeros (the
last two digits in the •example
It is notbelow).
required to enter the zero and tailing
OPERA II
Ex.: Time search
Ex.: Time search
23
ENGLISH
ROMÂN$
ENGLISH
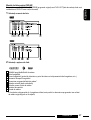
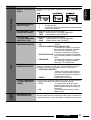
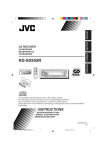
On-screen
bar
Bara
de ecran
Thank you for purchasing a JVC product.
De
exemplu:
Video DVD
Please
all instructions
carefully before operation, to ensure your complete understanding and to obtain the best
Ex.:read
DVD-Video
possible performance from the unit.
Informa#ii
Information
IMPORTANT
FOR LASER PRODUCTS
Opera#ie
Operation
1. CLASS 1 LASER
PRODUCT
2. CAUTION: Do not open the top cover. There are no user serviceable parts inside the unit; leave all servicing to
qualified service personnel.
3. 1
CAUTION:
open.red%rii
Dostatus
not view directly with optical
Tipul
de Visible
disc and/or invisible class 1M laser radiation when
6 Starea
Playback
Disc type
instruments.
Redare
Play
2
signal
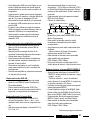
•• DVD-Video/DVD-VR/DTS-CD:
Video DVD/DVD-VR/DTS-CD:Audio
tipul formatului
4. REPRODUCTION
LABEL:
CAUTION
LABEL, PLACED OUTSIDE THE UNIT. C%utare
semnaluluiOFaudio
"i type
canalul
înainte/înapoi
Forward/reverse
search
format
and channel
• VCD: PBC
• VCD:
PBC
de redare
3 Modul
Playback
mode **11
Forward/reverse
slow-motion
Derulare
înapoi/înainte
cu vitez% redus%
Pauz%
Pause de redare
Redare
Stop oprit%
opera#iilor
7 Pictogramele
Operation icons
Schimbarea
de redare
Change timetimpului
indication
(see 5(vezi
) 5)
T. RPT: repetarea titlului
DVD-Video: C.
T. RPT:repetarea
Title repeat
RPT:
capitolului
C. RPT:
capitolului
C. RPT:repetarea
Chapter
repeat
PG. RPT: repetarea programului
DVD-VR:
C.
RPT:
Chapter
repeat
Video DivX/MPEG:
repetarea
piesei
Timevolume
Search
(Enter
the (introduce#i
elapsed playing
PG. RPT:
Program
repeat
Caution on
setting:
C%utarea
timpului
de redare
timpul de
Warning: T. RPT:
F. RPT: repetarea directorului
redare
scurs
alcurrent
titlului curent
sau
time
of
the
title
or ofal discului.)
the disc.)
DivX/MPEG
Video:
T.
RPT:
Track
repeat
*2
RPT:
repetarea
piesei
Discs produce very little noise compared with other
If you VCD
need to: operateT.the
unit while
driving,
be
C%utarea
titlului
num%r)
Title Search
(by (dup%
its number)
A. RND:
în ordine
F. RPT:redarea
Folder
repeat
sources. Lower C%utarea
the volume
before playing
a disc
sure to look ahead
carefully or you
may bea tuturor
involved
capitolului
(dup%
num%r)
Chapter Search
(by its
number)
VCD *2:
T. RPT:aleatorie
Track repeat
pieselor
to avoid damaging
the speakers
by the
sudden
in a traffic accident.
C%utarea
piesei
(dup%
num%r)
Track Search (by its number)
A. RND:
All random
T. INT:
redarea
intro-ului
*3
increase of the output level.
Schimbarea
limbii pentru
redarea
audio
Change the audio
language
or audio
T. INT:piesei
Track intro *3
sau a canalului audio
redare
channel
4 Informa#ii
Playbackdespre
information
Titlul/capitolul
curent
Schimbarea
limbii
redare a subtitr%rii
Changeyour
the subtitle
Current title/chapter
How to reset
unitdelanguage
This symbol is only valid in
Schimbarea
unghiului
Change the view
anglede vizualizare
Current program/chapter
Programul/capitolul
curent
the European Union.
Repeat play
*1 *1
Redare
repetat%
Current playlist/chapter
3 *3
Redare
intro
Intro
play
*
Lista de redare/capitolul curent
Information for Users
on Disposal of Old
Redare
Randomaleatorie
play *1 *1
Piesa
Currentcurent%
track
Equipment
curent%
Current
*1
This symbol indicatesDirectorul/piesa
that thefolder/track
product
with
redarea
repetat!/aleatorie,
asemenea
*1 Pentru
For repeat
play/random
play, see vezi
also de
page
19.
pagina 19.
A!
"area
timpului
Time
indication
this5symbol
should
notde
beredare
disposed as general
*2 2
* ÎnWhile
is notnuineste
use.utilizat..
timp PBC
ce PBC
Timpul
de
redare
scurs
(pentru
Elapsed
playingIf you
timewish
of the
*3
household waste at its
end-of-life.
to disc
15 secunde
din... of...
video DVD, timpul de redare scurs al
*3 Red!
Playsprimele
the beginning
15 seconds
(Forplease
DVD-Video,
playing
dispose of this product,
do so inelapsed
accordance
titlului
curent.)
TRACK
INTRO :Toate
Allpiesele
tracks ofdethe
disc.
TRACK
INTRO:
pecurrent
discul curent.
timelegislation
of the current
title.)rules in
with applicable national
or other
INTRO:
piese
din
toate
directoarele
• FOLDER
YourFOLDER
preset
adjustments
willtracks
also be
erased.
INTROPrimele
:
First
of
all
folders
of the
de pe discul curent (exclusiv pentru
DVD-Video/DVD-VR:
Remaining
DVD-Video/DVD-VR:
timpul
r%mas
your country and municipality.
By disposing
of this
current
(for MP3/WMA/
discurile
de disc
tip MP3/WMA/AAC/WAV).
de redare
a titlului time
title/program
product correctly, youVCD:
will timpul
help tor%mas
conserve
naturala
*4
de redare
How
forcibly
eject
aonly).
disc
Nu
esteto
valabil
#i pentru
discurile
DVD-VR.
AAC/WAV
VCD:
Remaining
disc negative
time
discului
resources and will help
prevent
potential
*4 Not applicable for DVD-VR.
Timpul
deplaying
redaretime
scursofdin
capitolul/
Elapsed
the
current
effects on the environment
and human
health.
*4
piesa curent
chapter/track *4
Timpul
de redare
r%mas
din capitolul/
Remaining
time
of
the current
Note: Only for [EX] model
users
in UK
and
piesa curent*4 4
chapter/track
*
European countries
For security reasons, a numbered ID card is provided
• Be careful not to drop the disc when it ejects.
with this unit, and the same ID number is imprinted on
• If this does not work, reset your unit.
the unit’s chassis. Keep the card in a safe place, as it will
help the authorities to identify your unit if stolen.
Video DVD:
DVD-VR:
2
24
24
Radio operations ............................. 7
FMo RDS
operations ........................... 8
How to use the M !
MODE
button
Selecta"i
director
sau
pies$.
!
Select
a folder
or track.
Select
aun
folder
or track.
!!
Select
a folder
or track.
Select
a folder
or track.
Searching for your favorite FM RDS programme ... 8
If you press M MODE, the unit goes into functions mode,
then the number buttons and 5/∞ buttons work as
Disc / USB memory operations........... 11
⁄
Start
playback. Playing a disc in the unit ..................................... 11
redarea.
StartStart
playback.
⁄
playback.
different function buttons. ⁄ Începe"i
Video
DivX/MPEG:
ap%sa#i
DivX/MPEG
Video:
Press
DivX/MPEG
Video:Video:
PressPress
DivX/MPEG
.. CD changer ........................... 11
Playing discs. in the
MP3/WMA/AAC/WAV/CD:
redarea
începe
automat.
MP3/WMA/AAC/WAV/CD:
Playback
starts
automatically.
MP3/WMA/AAC/WAV/CD:
Playback
starts
automatically.
Playback
Ex.: When number button 2 works as MP3/WMA/AAC/WAV/CD:
Playing
from astarts
USB automatically.
memory ................................ 11
MO (monaural) button.
Sound adjustments .......................... 14
Meniul
de comand"
Pentru
selecta
un mod
de
redare
Control
screen
Toaselect
select
playback
mode
Control
screen
To select
a playback
mode
Control
screen
To
aaplayback
mode
1General
settings
—
PSM
..................
În timp
ce
este
a!"at
meniul
de
comand%...
1 While
While
control
screen
displayed...
1 While
control
screenscreen
is displayed...
1
control
isisdisplayed...
To use these buttons for their original functions
again after pressing M MODE, wait for 5 seconds
without pressing any of these buttons until the
functions mode is cleared or press M MODE again.
Detaching the control panel
15
DAB tuner operations....................... 18
iPod/D. player operations................. 19
Other
external
component
operations
PePlayback
sec#iunea
listei
deselection
directoare
a meniului
Playback
mode
selection
screen
appears
on21
the
mode
selection
screen
appears
on ...
theon
Playback
mode
screen
appears
the
de comand%
estesection
a!"atofmeniul
de selectare
a
folder
list
the
control
screen.
folder
list
section
of
the
control
screen.
folder
list
section
of
the
control
screen.
Maintenance
...................................
22
modului de redare.
2 Select
Select
aplayback
playback
mode.
Select
a un
playback
mode.
2
amod
mode.
22Selecta#i
redare.
More
about
thisdeunit
........................ 23
Troubleshooting .............................. 26
3 Select
Select
anitem.
item.
3 Selecta#i
op#iune.
3
Select
anoitem.
3
an
Specifications
..................................
29
De
disc MP3/WMA/WAV
Ex.: MP3/WMA/WAV
MP3/WMA/WAV
disc
Ex.:exemplu:
MP3/WMA/WAV
disc disc
Ex.:
REPEAT/INTRO
: ::
REPETARE/INTRO:
REPEAT/INTRO
ForREPEAT/INTRO
safety...
1 Current
Current
folder
number/total
folder
number
1directoare
Current
folderfolder
number/total
folderfolder
number
1
number/total
number
• Do not raise the volume level too much, as this will
REDARE
RANDOM:
2 directoarelor
Folder
listwith
with
the
current
folder
selected
2 Lista
RANDOM:
2
Folder
list with
the
current
folderfolder
selected
RANDOM:
2
Folder
list
the
current
selected
cu
directorul
curent
selectat
block
outside
sounds, making driving dangerous.
ALEATORIE
3
Selected
playback
mode
3 Modul
3
Selected
modemode
de playback
redare
selectat
3 Selected
playback
•4 Stop the car before performing any complicated
selec#ia.
4 Timpul
4 Elapsed
Elapsed
playing
thecurrent
current
track
4rm%
Confirm
theselection.
selection.
deplaying
redare
scurs
dinofofcurrent
piesa
curent%
4
Elapsed
time
oftime
the
tracktrack
4Con!
Confirm
the
selection.
4
playing
time
the
4
Confirm
the
operations.
5 Pictograma
5 Operation
Operation
mode
icon
¡
opera#iei
5
Operation
mode
icon (icon
3, 7
,38, ,7
,7¡
1, ,1
)1))
5
mode
((3
, ,88, ,¡
6 Num%rul
piesei
curente/num%rul
total
deofofpiese
6
Current
track
number/total
number
tracks
the
6
Current
track
number/total
number
of tracks
in theininthe
6
Current
track
number
tracks
Attaching
thenumber/total
control
panel
insidefor
the
car...
1 Not
din
directorul
curent
(num%rul
de
de disc)
video
DivX/MPEG
11 Nu
current
folder
(total
number
tracks
ondisc)
the
disc) *1*Temperature
selectable
DivX/MPEG
Video
current
folderfolder
(total(total
number
of total
tracks
onpiese
theon
Not
selectable
for DivX/MPEG
VideoVideo
**1este
current
number
ofoftracks
the
Notdisponibil!
selectable
forpentru
DivX/MPEG
*2If2you have
parked
the car for a (INTRO
long
in hot or cold
pe
disc)
2 FOLDER
FOLDER
INTRO/RANDOM
DIRECTOR/
2
2
*
7
Track
information
INTRO/RANDOM:
Fortime
MP3/WMA/AAC/WAV
* FOLDER
7 Track
information
INTRO/RANDOM:
For MP3/WMA/AAC/WAV
* FOLDER
7 Track
information
INTRO/RANDOM:
For
MP3/WMA/AAC/WAV
weather,
wait
until
the
temperature
in
the
car becomes
7 Informa#ii despre pies%
REDARE
ALEATORIE
A
DIRECTORULUI):
only
8 Track
Track
listwith
withcurrent
thecurrent
current
trackselected
selected
only only
8 Track
list with
the
tracktrack
selected
8
list
the
8 Lista pieselor cu piesa curent% selectat%
normal
before
operating
the unit.
exclusiv
pentru
MP3/WMA/AAC/WAV
1 Num%rul directorului curent/num%rul total de
Continuare pe pagina urm!toare
Continued
onnext
thepage
nextpage
page
Continued
on theon
Continued
the
next
OPERATIONS
253
OPERATIONS
25 25
OPERATIONS
25
OPERA
II
ENGLISH
ENGLISH
These
operations
arepossible
possible
onmonitor
themonitor
monitor
using
theremote
remote
controller.
Aceste
func#ii
sunt
prin
intermediul
telecomenzii.
TheseThese
operations
aredisponibile
possible
onControl
theon
usingusing
the KD-G632/KD-G631
remote
controller.
operations
are
the
the
controller.
panel
—
....... 4
: External CD changer operations.
meniul
de
comand$.
~
Show
the
control
screen.
~ Activa"i
Show
the
control
screen.
~ Show the controlRemote
screen. controller — RM-RK50........... 5
: External USB memory
operations.
DivX/MPEG
Video:
Press duringduring
play.
Video
DivX/MPEG:
ap%sa#i
înduring
timpul
red%rii.
DivX/MPEG
Video:Video:
Press
play.
DivX/MPEG
Press
play.
Getting
started
................................
6
MP3/WMA/AAC/WAV/CD:
Automatically
appear
during
play.
MP3/WMA/AAC/WAV/CD:
suntAutomatically
a!"ate appear
automat
în during
timpul
red%rii.
MP3/WMA/AAC/WAV/CD:
Automatically
during
play. play.
appear
: Indicator displayed
forMP3/WMA/AAC/WAV/CD:
the
Basic operations ...................................................
6
corresponding
Ÿ
Select
“Folder”
column
or“Track”
“Track”
column
(except
forCD).
CD).
Ÿoperation.
Select
“Folder”
column
or
column
(except
forCD-urilor).
CD).
Selecta"i
coloana
„Director”
sau“Track”
coloana
„Pies$”
(cu
excep"ia
Ÿ
Select
“Folder”
column
or
column
(except
for
ENGLISH
ENGLISH
ENGLISH
ROMÂN$
Utilizarea
meniului
dethe
comand"
(Video
DivX/MPEG
/MP3/WMA/AAC/WAV/CD)
Operations
using
the
control
screen
(DivX/MPEG
Video/MP3/WMA/AAC/WAV/
Operations
the
control
screen
(DivX/MPEG
Video/MP3/WMA/AAC/WAV/
Operations
using
screen
(DivX/MPEG
Video/MP3/WMA/AAC/WAV/
The
followingusing
marks
are
used
tocontrol
indicate...
CONTENTS
CD)
CD)CD)
: Built-in CD player operations.
Enlarging the view—Zoom in (DVD/DVD-VR/DivX/MPEG Video/VCD)
ENGLISH
ROMÂN$
ENGLISH
During play or pause...
Mode
Playback
functions
Mod
Func"iile repeatedly.
modului de redare
1 While
holding
, press
Thank
you for purchasing
a JVC product.
repet%
directorul
curent
F.
RPT
(folder
repeat):
Repeat
current
folder
F.
RPT
(repetarea
directorului):
Please read all instructions carefully before operation, to ensure your complete understanding
and to obtain the best
repet%
piesa
curent%
T.
RPT
(repetarea
piesei):
possible
performance
from
the
unit.
T. RPT (track repeat):
Repeat current track
sunt redate
F.
(intro director):
F. INT
INT (folder
intro):
Plays the beginning 15 seconds
of firstprimele
tracks of15allsecunde
folders ofale
the primei
currentpiese
disc
2 Move the enlarged portion.din toate directoarele de pe discul curent
IMPORTANT FOR LASER PRODUCTS
T.
INT
(track
intro):
Plays
the
beginning
15
seconds
of
all
tracks
of
the
current
disc
sunt redate primele 15 secunde ale tuturor pieselor
INT (intro
pies%):
1. T.CLASS
1 LASER
PRODUCT
de pe discul
curent
A.
RND
(all
random):
Randomly
play
all
tracks
2. CAUTION: Do not open the top cover. There are no user serviceable
parts
inside the unit; leave all servicing to
• To cancelpieselor):
zoom, select “ZOOM OFF.”
toatefolder,
piesele
în tracks
ordineofaleatorie
A.
RND(folder
(redare
aleatorie
service
personnel.a tuturor
F.qualified
RND
random):
Randomly play all tracks red%
of current
then
next folders
ordine
din directorul
RND (redare
aleatorie
a directorului):
3. F.CAUTION:
Visible
and/or invisible
class 1M laser radiationred%
whenînopen.
Doaleatorie
not view toate
directlypiesele
with optical
curent, apoi pe cele din directoarele urm%toare.
instruments.
Operations using the on-screen bar (DVD/DVD-VR/DivX/MPEG Vid
4. REPRODUCTION OF LABEL: CAUTION LABEL, PLACED OUTSIDE THE UNIT.
Operations
using the
list screen
(DVD-VR/DivX/MPEG
Video/MP3/WMA/AAC/
Utilizarea
meniului
de liste
(DVD-VR/DivX/MPEG
Video/MP3/WMA/AAC/WAV)
These operations
are possible on the monitor using the remote contr
WAV)
~
Show the on-screen bar (see page 24).
Aceste
func#ii sunt
prinmonitor
intermediul
These operations
aredisponibile
possible on the
usingtelecomenzii.
the remote controller.
(twice)
Înainte
de redare,
pute#i
s% a!the
"a#ifolder
lista list/track
directoarelor/pieselor
pentru
a con!
Before playing,
you can
display
list to confirm the
contents
andrma
con#inutul
începe redarea
Ÿ piesei.
Select an item.
start playing"i aatrack.
Warning:
~
A%
#a"i lista
în timp
ce
întrerupt$ temporar.
Caution
onredarea
volumeeste
setting:
Display
thedirectoarelor
folder list while
stop.
produce
very little noise compared with other
If you need to operate the unit while driving, be
!DiscsMake
a selection.
sources. Lower the volume before playing a disc
sure to look ahead carefully or you may be involved
op"iune
lista
directoarelor.
tothe
avoid
damaging
in a traffic accident.
Ÿ Selecta"i
Select anoitem
fromdin
folder
list. the speakers by the sudden
increase
of themenu
output
level.
If pop-up
appears...
• Track
Aparelistlista
pieselor
directorul
selectat.
of the
selecteddinfolder
appears.
How
to reset
your unit
This symbol is only
valid ina reveni la lista directoarelor,
•• To
Pentru
butonul
.
• press
To cancel pop-up
menu,
press
go back to the folder list,
.ap%sa#i
the European Union.
• For entering time/numbers, see the following.
!
Selecta"i
o pies$
a începe redarea.
Select a track
topentru
start playing.
⁄ Remove the on-screen bar.
Information for Users on Disposal of Old
Equipment
This symbol indicates that the product
•• with
MP3/WMA/AAC/WAV:
este screen
a!"at meniul
MP3/WMA/AAC/WAV:
Control
appearsde
(seecomand%
page 25).(vezi pagina 25).
this symbol should not be disposed
as general
Entering
time/numbers
household waste at its end-of-life. If you wish to
Press
to change the number, then press
to move to the next entry.
dispose
of this
product,
please do so
in accordance
Meniul
de(For
liste
(pentru
DivX/MPEG
• Each
time you press Video/MP3/WMA/AAC/WAV)
, the number increases/decreases by one value.
List
screen
DivX/MPEG
Video/MP3/WMA/AAC/WAV)
with applicable national legislation or other rules in
Your preset.adjustments will also be erased.
• After entering the numbers,•press
11Num%rul
curent/num%rul
total de
Current directorului
folder number/total
folder number
your country and municipality. By disposing of this
• It is not required to enter the zerodirectoare
and tailing zeros (the last two digits in the example below).
2 Current track number/total number of tracks in the
product correctly, you will help to conserve natural
How topiesei
forcibly eject a disc
2 Num%rul
current folder curente/num%rul total de piese
resources and will help prevent potential negative
Ex.: Time search
din
directorul
curentnumber of the pages included
3 Current page/total
effects on the environment and human health.
DVD: _:_ _:_ _ (Ex.: 1:02:00) 3 Num%rul paginii curente/num%rul total de pagini
in the list
Press
once, then
twice
to go to
twice, then press ENTER.
incluse
în the
list%third entry,
4 Current folder/track (highlighted bar)
Note: Only for [EX] model users in UK and
4 Directorul/piesa curent% (bara eviden#iat%)
European countries
For security reasons, a numbered ID card is provided
Continue
• Be careful not to drop the disc when it ejects.
with this unit, and the same ID number is imprinted on
De
exemplu:
lista
de
directoare
•
If
this
does
not
work,
reset
your
unit.
OPERATI
Ex.:card
Folder
the unit’s chassis. Keep the
in alist
safe place, as it will
help the authorities to identify your unit if stolen.
2
26
26
Meniul
de for
liste
pentru DVD-VR
List screen
DVD-VR
The utiliza
following
marks
are used to indicate...
Pute#i
meniul
(programul
sau PLAY
LIST
de redare)
You can use ORIGINALORIGINAL
PROGRAM orPROGRAM
PLAY LIST screen
anytimeoriginal)
while playing
DVD-VR
with(lista
its data
recorded.când sunt
redate discuri DVD-VR
care
con#in
informa#ii.
: Built-in CD player
operations.
Control panel — KD-G632/KD-G631....... 4
11 Selecta"i
de
: meniu
External
CDliste.
changer operations.
Select aun
list
screen.
Remote controller — RM-RK50........... 5
: External USB memory operations.
: Indicator displayed for the
corresponding operation.
How to use the M MODE button
If you press M MODE, the unit goes into functions mode,
then the number buttons and 5/∞ buttons work as
different function buttons.
Ex.: When number button 2 works as
MO (monaural) button.
To use these buttons for their original functions
again after pressing M MODE, wait for 5 seconds
without pressing any of these buttons until the
22functions
Selecta"i
o op"iune
din
list$.list.
mode
isitem
cleared
or press
M MODE again.
Select
an
from
the
Detaching the control panel
1
2
3
4
5
6
7
8
9
Getting started ................................ 6
ENGLISH
ENGLISH
ROMÂN$
CONTENTS
Basic operations ................................................... 6
Radio operations ............................. 7
FM RDS operations ........................... 8
Searching for your favorite FM RDS programme ... 8
Disc / USB memory operations........... 11
Playing a disc in the unit ..................................... 11
Playing discs in the CD changer ........................... 11
Playing from a USB memory ................................ 11
Sound adjustments ..........................
General settings — PSM ..................
DAB tuner operations.......................
iPod/D. player operations.................
Other external component operations ...
Maintenance ...................................
More about this unit ........................
Troubleshooting ..............................
Specifications ..................................
14
15
18
19
21
22
23
26
29
Num%rul
programului/listei
de redare
1 Program/playlist
number
Data
2 înregistr%rii
Recording date
Sursa
înregistr%rii
(postul
de televiziune,
de of
intrare
al echipamentului
înregistrare, etc.)
3 Recording
source
(TV station,
the inputportul
terminal
the recording
equipment,de
etc.)
Momentul începerii înregistr%rii
For
safety...
4 Start time of recording
Denumirea programului/listei de redare*
• Do not raise the volume level too much, as this will
5 Title of the program/playlist *
Selec#ia curent% (bar% eviden#iat%)
block outside sounds, making driving dangerous.
6 Current selection (highlighted bar)
Data de creare a listei de redare
•
Stop the car before performing any complicated
7 Creating
date of playlist
Num%rul
de capitole
operations.
8
Number
of
chapters
Durata de redare
Playback
time
* În9
func#ie
de echipamentul
de panel
înregistrare utilizat, este posibil ca denumirea programului sau a listei
Attaching
the control
Temperature
inside
car...equipment.
The titleoriginal(%)
of the original
program
playlist may not be displayed
depending
on thethe
recording
de* redare
s% nu
!e a!or
"at%,
If you have parked the car for a long time in hot or cold
weather, wait until the temperature in the car becomes
normal before operating the unit.
OPERATIONS
OPERA II
27
27
3
device), portable HDD, etc. to the unit. possible performance from the unit.
Pute#i conecta la acest aparat un dispozitiv USB de stocare în masã, precum memoria USB, un player
You can connect a USB mass storage class device such as a USB memory, Digital Audio Player (USB mass storage class
audio digital (dispozitiv USB de stocare în masã), un hard disk portabil, etc.
device),
portable
HDD, PRODUCTS
etc. to the unit.
Attaching
a USB
memory
IMPORTANT
FOR
LASER
ENGLISH
ENGLISH
ENGLISH
ROMÂN$
Listening to the USB device
Thank you for purchasing
a JVC product.
Func#ionarea
dispozitivului
USB
You
canListening
connect
a USB massto
storage
class
device
such
astoa ensure
USB memory,
Digital Audio
Player (USB
storage
the
USB
device
Please
read
all instructions
carefully
before
operation,
your complete
understanding
andmass
to obtain
theclass
best
unei
memorii USB
1. Conectarea
CLASS 1 LASER
PRODUCT
Attaching a USB memory
2. CAUTION: Do not open the top cover. There are no user serviceable parts inside the unit;USB
leave
allterminal
servicing to
input
qualified service personnel.
Port
intrare
USB
USB
input
terminal
3. CAUTION: Visible and/or invisible class 1M laser radiation when open. Do not view directly with
optical
instruments.
4. REPRODUCTION OF LABEL: CAUTION LABEL, PLACED OUTSIDE THE UNIT.
USB memory
Disc operations
This unit can play DivX/MPEG Video/MP3/WMA/AAC*/WAV tracks stored in a USB device.
Memorie
USB
USB memory
* This unit can play back AAC files encoded using iTunes. This unit cannot
play back
AACDisc
files any
purchased
from iTunes
Before
performing
operations...
operations
Acest
aparat
poate
melodii
în format DivX/MPEG Video/MP3/WMA/AAC*/WAV
stocate pe un
Caution
setting:
Warning:
This
unit can
play reda
DivX/MPEG
Video/MP3/WMA/AAC*/WAV
tracks
storedon
in volume
a USB device.
Store.
Turn on the monitor to watch the playback picture. If you turn
dispozitiv USB.
* need
This unit
can playthe
back AAC
filesdriving,
encodedbeusing iTunes. This
unit
cannot
playlittle
back
AAC
files
purchased
from
iTunes
Before
performing
any
operations...
discs
by referring
tonoise
the
monitor
screen.
(See
pages 23 – 27.)
produce
very
compared
with
other
If* you
topoate
operate
while
Aparatul
reda "unit
#iere
în format AAC
codate prinDiscs
intermediul
playerului
iTunes.
Aparatul
nu
poate
Store.
Turn
on
the
monitor
to
watch
the
playback
picture
if
you
play
back
a
DivX/MPEG
file.
You
can
also
control
playback
Turn
on
the
monitor
to
watch
the playback
The Lower
disc type
automatically
detected,
and playback
startspic
au
theisvolume
before playing
a disc
surereda
to look
ahead
or you
may be involved
"#iere
în carefully
format AAC
achizi$ionate
de pe iTunessources.
Store.
by in
referring
to
the
monitor
screen.
(See
also
pages
23
–
26.)
discs
by
referring
to
the
monitor
screen.
(See p
internal
program).
to avoid damaging
speakers
by the Pute#i
suddende
a traffic
Dac%
esteaccident.
redat un !"ier în format DivX/MPEG, porni#i monitorul
pentru athe
vedea
imaginea.
Turn on20the
monitor
toredarea
watchusing
theprin
playback
picture
if you increase
play Ifback
DivX/MPEG
file.
can
also
playback
• See
pages
– 26
for operation
theintermediul
remote
controller.
Thelevel.
discYou
typehave
is automatically
detected,
andwillpl
theofacurrent
disc
does
not
any
all tracks
asemenea
s%
controla#i
monitorului.
(Vezi
deoutput
asemenea
paginile
23 control
-disc
26).menu,
the
by referring
monitor
screen. (See
also pages 23
– 26.)
• See
pages
46informa#ii
andto47the
forprivind
more settings.
internal
program).
• Pentru
utilizarea
telecomenzii
vezi
paginile
20
–
26
.
eject the disc.
• See pages
20 – 26
for operation
using
the"iremote
controller.
the47
current
discsettings.
does not have any disc menu
• Pentru
informa#ii
despre
alte set%ri
vezi
paginile
46 "i 47.
• See pages 46Ifand
for more
How accept
to reset
your
pageson46theand
47
for
more
settings.
If “ • ” See
appears
monitor
when
pressing
a
button,
the
unit cannot
theeject
operation
you have tried to
theunit
disc.
This symbol is only valid in
do. Dac% la ap%sarea
• See
pages
46 and
47 for
more
onnu
the
monitor
when
pressing
a button, the
taste Union.
pe monitor este a!"at mesajulIf “ ”,appears
aparatul
accept%
opera#ia
pe settings.
theunei
European
If “încerca#i
” appears
the
monitor
pressingwill
a button,
unit
• Incare
some
cases,
without
showing
“ when
,” operations
not be the
accepted.
s% on
o efectua#i.
do.cannot accept the operation you have tried to
do.unelefor
”.appears
on the
whenwill
pressin
• În
cazuri,
nu accept%
mesajul
In "a
some
cases,If “without
showing
“ monitor
,” operations
not
Information
Usersaparatul
on Disposal
of Old unele opera#ii, f%r% a• a!
• In some cases, without showing “ ,” operations will not be accepted. do.
Equipment
• In some cases, without showing “ ,” ope
This
symbol
indicates
the product
Pentru
a trece
lathat
sursa
„USB”with
în timpul
Schimba#i informa#iile de pe display.
Change
the
display
information
Tothis
change
the
source
to
“USB”
while
listening
ascult"rii
altei
surse
de
redare
symbol should not be disposed as general
• • SeeVezi
alsodepages
17 and 18.
asemenea
Ap%sa#i
butonul
(surs%) pentru
selecta
to household
other playback
source
waste atSRC
its end-of-life.
If youawish
to
Start the
playback
if necessary.
Change
display
information
paginile
17 "i 18.
„USB”,
înselect
cazul
în care
conectat
un astfel
de
To to
change
the
source
“USB”
while
listening
dispose
of
this
product,
so inisaccordance
Press
SRC
“USB”
ifplease
a este
USBtodo
device
attached.
dispozitiv.
• See also pages 17 and 18.
toapplicable
otherautomatically.
playback
source or other rules in
with
national legislation
Playback
starts
• Pentru
Your preseta adjustments
will playback
also
erased.
opri redarea
%i abedeconecta
Start
if necessary.
Redarea
începemunicipality.
automat. By disposing of this
To dispozitivul
stop play andUSB
detach the USB device
country
Press
SRCand
toisselect
“USB”“NO
if a USB”
USB device
is attached.
• Ifyour
no
USB
device
attached,
appears
on
• În cazul în care dispozitivul USB nu este
product
correctly,
youtowill
helptotoanother
conserveplayback
natural
Straightly
pullto
it out
from the
Playback
starts
the
display.
Press
listen
Scoate#i-l
din
unitate
peeject
ounit.
traiectorie
rectilinie.
How
forcibly
athe
disc
conectat,
pe SRC
a!automatically.
"aj apare
mesajul “NO
USB”
ToSRCstop
play
detach
USB
device
resources
and
will
helpisUSB).
prevent
potential
negative
toalisten
toand
another
playback
source.
• If no
device
attached,
“NO SRC
USB”
appears
on • Press
source.
• Pentru
asculta
altã sursã
de redare,
ap%sa#i
(nici
unUSB
dispozitiv
Ap%sa#i
(SURS$)
effects
on
the
environment
and
human
health.
Straightly
pull
it
out
from
the
unit.
the
display.
Press
SRC
to
listen
to
another
playback
SRC.
pentru a asculta alt% surs% de redare.
• Press SRC to listen to another playback source.
source.
Note: Only for [EX] model users in UK and
European countries
For security reasons, a numbered ID card is provided
Change the display information
• Be careful not to drop the disc when it ejects.
with this unit, and the same ID number is imprinted on
• If this does not work, reset yourChange
unit. the display information
the unit’s chassis. Keep the card in a safe place, as it will
28
help the authorities to identify your unit if stolen.
To stop play and eject the disc
2
28
28
• Press SRC to listen to another playback sou
To stop play and eject the disc
Cautions:Cautions:
Cautions:
Cautions:
Cautions:
Cautions:
• Avoid
using
the ifUSB
devicehinder
if it might
safety driving.
Cautions:
Aten"ie:
Cautions:
• The
Avoid
using
themarks
USB
device
it might
yourhinder
safety your
driving.
following
are used
to indicate...
ENGLISH
ENGLISH
ENGLISH
ENGLISH
ROMÂN$
ENGLISH
CONTENTS
ENGLISHENGLISH
ENGLISH
ENGLISH
ENGLISH
ENGLISH
• ••Avoid
the
USB
device
ifattach
your
safety
driving.
Avoid
using
thenot
USB
device
if itUSB
might
hinder
your
safety
driving.
Avoid
using
the
USB
device
itdevice
might
hinder
your
safety
driving.
•using
Do
pull
out
and
thehinder
USB
device
repeatedly
while is“READING”
is flashing
on the display.
Avoid
using
the
USB
device
ifitifitmight
might
hinder
safety
driving.
••• Do
pull
out
and
attach
the
repeatedly
“READING”
flashing
on
the display.
Evita#i
sãpull
folosi#i
dispozitivul
acest
lucruyour
arwhile
putea
afecta
siguran#a
dumneavoastr%
la volan.
••not
Avoid
using
the
USB
device
ifmight
itdacã
might
hinder
your
safety
driving.
using
the
USB
device
ifUSB
itengine
hinder
your
safety
driving.
•Avoid
DoDo
not
out
and
attach
the
USB
device
repeatedly
while
“READING”
isisflashing
onon
the
display.
:
Built-in
CD
player
operations.
•• • Do
Do
not
pull
out
and
attach
the
USB
device
repeatedly
while
“READING”
is
flashing
on
the
display.
Do
not
pull
out
and
attach
the
USB
device
repeatedly
while
“READING”
is
flashing
on
the
display.
•
Do
not
start
the
car
if
a
USB
device
is
connected.
•
not
pull
out
and
attach
the
USB
device
repeatedly
while
“READING”
flashing
the
display.
start
the"icar
ifdispozitivul
a USB
device
is connected.
• Do
Nunot
scoate#i
nuengine
ata"a#i
USB
în modwhile
repetat
în
timp ce,
peflashing
display,
este
a!"at intermitent
Do
not
pull
out
and
attach
the
USB
device
repeatedly
while
“READING”
is
on
the
display.
pull
out
and
attach
the
USB
device
repeatedly
“READING”
is
flashing
on
the
display.
• •••not
Donot
not
start
the
car
engine
if
a
USB
device
is
connected.
Control
panel
—
KD-G632/KD-G631
....... 4
•• • Stop
Do
start
the
car
engine
if
a
USB
device
is
connected.
Do
not
start
the
car
engine
if
a
USB
device
is
connected.
•back
Stop
play
back
before
disconnecting
a
USB
device.
Do
not
start
the
car
engine
if
a
USB
device
is
connected.
play
before
disconnecting
a
USB
device.
mesajul
“READING”
(„Citire”).
:the
External
CD
changer
operations.
••Stop
Do
not
start
the
car
engine
ifable
a USB
device
isdevice.
connected.
not
start
car
engine
ifbe
a USB
device
isUSB
connected.
•Do
play
back
before
disconnecting
a
USB
device.
•••• This
Stop
play
back
before
disconnecting
a
USB
device.
Stop
play
back
before
disconnecting
a
•
This
unit
may
not
to
play
the
files
depending
on
the
type
of
USB
device.
• Stop
playautovehiculul
backbebefore
adepending
USB device.
controller
may
not
able todisconnecting
play the
theRemote
type of USB
device. — RM-RK50........... 5
Nu
porni#i
dac%
un files
dispozitiv
USBoneste
conectat.
• unit
Stop
back
before
disconnecting
adepending
USB
device.
• This
play
back
before
disconnecting
athe
USB
device.
•Stop
unit
may
not
bebe
able
tototoplay
the
files
depending
onon
ofofofUSB
:may
External
USB
memory
operations.
unit
may
not
be
toable
play
the
the
type
oftype
USB
device.
This
unit
may
not
be
play
files
depending
onthe
thetype
USBdevice.
device.
•play
You
cannot
connect
atoplay
computer
to
the
USBoninput
terminal
the
unit.
••This
This
unit
not
able
the
depending
the
type
USB
device.
Opri#i
redarea
înainte
de
deconectarea
dispozitivului
USB.
••• You
cannot
connect
aable
computer
thefiles
USBfiles
input
terminal
of
unit.
•
This
unit
may
not
be
able
to
play
the
files
depending
on
the
type
of
USB
device.
Getting
started
................................
6
unit
may
not
be
able
to
play
the
files
depending
on
the
type
of
USB
device.
•This
You
cannot
connect
a
computer
to
the
USB
input
terminal
of
the
unit.
•••• Make
You
cannot
connect
a
computer
to
the
USB
input
terminal
of
the
unit.
•
You
cannot
connect
a
computer
to
the
USB
input
terminal
of
the
unit.
•
Make
sure
all
important
data
has
been
backed
up
to
avoid
losing
the
data. !"iere.
În• func#ie
de
tipul
de dispozitiv
USB
nu
va losing
! posibil%
redarea
anumitor
You
cannot
connect
a computer
tothe
theconectat,
USBupinput
terminal
of the data.
unit.
sure
all
important
data
has
been
backed
to
avoid
:
Indicator
displayed
for
•
You
cannot
connect
a
computer
to
the
USB
input
terminal
of
the
unit.
Basic
operations
...................................................
6 or
•
You
cannot
connect
a
computer
to
the
USB
input
terminal
of
the
unit.
•
Make
sure
all
important
data
has
been
backed
up
to
avoid
losing
the
data.
Make
sure
all
has
been
backed
up
toup
avoid
losing
the
data.
Make
sure
important
data
has
been
backed
up
avoid
losing
thedata.
data.
• sure
Do
not
leave
acomputer
USBthe
device
inbeen
thebacked
car,
expose
toUSB
direct
sunlight,
or
high temperature
to avoid deformation
Nu
pute#i
conecta
un data
laexpose
portul
de
intrare
allosing
aparatului.
••not
Make
allallimportant
data
has
toto
avoid
the
••• Do
leave
aimportant
USB
device
in
car,
to
direct
sunlight,
or
high
temperature
to avoid deformation
or
corresponding
operation.
••not
Make
sure
all
important
data
has
been
backed
up
to
avoid
losing
the
data.
sure
all
important
data
has
been
backed
up
to
avoid
losing
the
data.
•Make
Do
not
leave
a
USB
device
in
the
car,
expose
to
direct
sunlight,
or
high
temperature
to
avoid
deformation
or
••• cause
Do
leave
a
USB
device
in
the
car,
expose
to
direct
sunlight,
or
high
temperature
to
avoid
deformation
or
Pentru
a
evita
pierderile
de
date,
asigura#i-vã
cã
de#ine#i
copii
dup%
informa#iile
importante.
Do
not
leave
a
USB
device
in
the
car,
expose
to
direct
sunlight,
or
high
temperature
to
avoid
deformation
or
to the
device.
Radio operations
.............................
• Dodamages
not cause
leavetoadamages
USBdevice.
device
in the
car, expose to direct sunlight,
or high temperature
to avoid deformation or7
•cause
Do
not
leave
athe
USB
device
in the
car,
expose
todispozitivului
direct
sunlight,
or high
temperature
to avoid
deformation
Do
not
leave
a to
USB
device
indevice.
the
car,
expose
to direct
sunlight,
orUSB
high
temperature
avoid
or or
to
device.
•• cause
Pentru
adamages
evita
deformarea
sau
deteriorarea
conectat,
nu-ltol%sa#i
îndeformation
interiorul
damages
the
device.
cause
damages
the
cause
damages
totothe
the
device.
FM
RDS
operations
...........................
8
How
to
use
the
M
MODE
button
cause
damages
to the
device.la lumina solar% direct% sau la temperaturi ridicate.
cause
damages
to nu-l
the
device.
autovehiculului,
expune#i
Searching
for
your
favorite
FM
RDS
programme
...
8
If you press
M MODE,
the
unit goes
into functions
mode,
(or
holding)
thebuttons
following
buttons
allows you
to...pute#i s%...
Pressing
(orPressing
holding)
the
following
allows
you to...
Prin
ap%sarea
(sau
men#inerea
ap%sat%)
awork
urm%toarelor
taste
then
the
number
buttons
and
5
/
∞
buttons
as
Pressing
(or
holding)
the
following
allows
you
to...
Disc / USB memory operations........... 11
Pressing
(or holding)
the following
buttons
allows
you to...
Pressing
(orholding)
holding)
thefollowing
following
buttons
allows
youto...
to...
Pressing
(or
the
buttons
allows
you
Pressing
(or holding)
following
buttons
allows
Pressing
(or
holding)
the the
following
buttons
allows
youyou
to...to... Playing a disc in the unit ..................................... 11
different
function
buttons.
File type File type
Playing discs in the CD changer ........................... 11
Tipul
de
%#ier
Cautions:
3
File
type
File
type
File
type
(Number
File
type
Ex.:
When
number
button
2 works as
(Number
buttons)
*3 buttons)
device if it might
hinder
your safety
driving.
Playing from a USB memory
................................
11 *
type
FileFile
type
3 *3*3*33
(Taste
numerice)
(Number
buttons)
(Number
buttons)
*
(Number
buttons)
(Number
buttons)
*
(monaural)
button.
• MO
Avoid
using
USBPress:
device
if it might
hinder
safetyfolder
driving.
ttach the USB device
repeatedly
“READING”
is track
flashing
on your
theSelect
display.
Select
folder Locate
Locate
particular
directly
3
Press:thewhile
Select
trackSelect
particular
folder
directly
(Number
buttons)
(Number
buttons)
*3 *folder
Sound
adjustments
..........................
14
1 folder
Press:
Select
track
Select
Locate
particular
folder
directly
Ap!sare:
selecteaz%
piesa
Selecteaz%
directorul
Localiza#i
direct
un
anumit
• Do isnot
pull
out
and
attach
the
USB device
repeatedly
while
“READING”
is flashing
on
the
display.
Press:
Select
track
Select
Locate
particular
folder
directly
ngine if a USB device
connected.
Press:
Select
track
Select
folder
Locate
particular
folder
directly
Hold:
Reverse/fast-forward
track
*folder
1
Press:
Select
track
Select
folder
Locate
particular
folder
directly
Hold:
Reverse/fast-forward
track
*
Ap!sare
prelungit!:
piesa
director
Press:
Select
track
Select
foldersettings —
Locate
particular
folder
directly
Press:
Select
track
folder
Locate
particular
folder
directly
1connected.
General
PSM
..................
15 directly
Hold:
Reverse/fast-forward
track
**1*11Select
DoCautions:
not
start
the
car
engine
if a USB device
is*track
Hold:
Reverse/fast-forward
track
e disconnecting a• USB
device.
Hold:
Reverse/fast-forward
*1 track
Hold:
Reverse/fast-forward
Press:
Locate
particular
folder
anterioar%/urm%toare
1
Press:
Select
trackSelect tracktrack
folderSelect folder Locate particular
folder
directly
1 *Select
Hold:
Reverse/fast-forward
track
Hold:
Reverse/fast-forward
*
•
Stop
play
back
before
disconnecting
a
USB
device.
able to play the filesAvoid
depending
on
the
type
of
USB
device.
2 driving.
Press:
Select
track
Select
folder
Locate
particular
folder
directly
using
the
USB
device
if
it
might
hinder
your
safety
Press:
Select
track
Select
folder
Locate
particular
folder
directly
Press:
Select
track
Select
folder
Locate
particular
folder
directly
DAB
tuner
operations
.......................
18
Hold:
Reverse/fast-forward
track
*
2
Select track
Select folderdirectorul Localiza#i
Locate particular
folder
directly
Hold:Press:
Reverse/fast-forward
track
* 2 Selecteaz%
Ap!sare:
selecteaz%
piesa
direct un
anumit
Press:
Select
track
Select
folder
Locate
folder
directly
Press:
Select
track
folder
Locate
folder
directly
This
unitpull
may
not
be
able
to
play
thedevice
files
depending
on
the “READING”
type of USBisdevice.
2 * *22Select
computer to the• USB
input
terminal
ofReverse/fast-forward
the
unit.
Hold:
Reverse/fast-forward
track
Do not
out
and
attach
the
USB
repeatedly
while
flashing
onparticular
theparticular
display.
Hold:
Reverse/fast-forward
track
*track
Hold:
Reverse/fast-forward
Ap!sare
prelungit!:
piesa
director
track
* 2 iPod/D.
1 SearchHold:
player
operations
.................
19
speed
changes
1
]
2
on
the
monitor.
*
2
1
*2
Hold:
Reverse/fast-forward
track
*
use
these
buttons
for
their
original
functions
Hold:
Reverse/fast-forward
track
*
Search
speed
changes
1
]
2
on
the
monitor.
* Tobeen
•
You
cannot
connect
a
computer
to
the
USB
input
terminal
of
the
unit.
ant data has
backed
up
to
avoid
losing
the
data.
anterioar%/urm%toare
Do
not
start
the
car
engine
if
a
USB
device
is
connected.
1 1Search2 speed changes 1 ] 2 on the monitor.
1 *Search
speed
changes
1]
21]
on
the
monitor.
Search
speed
changes
]
2to
on
the
monitor.
*1expose
*
Search
speed
changes
×
2
]
×
10
on
the
monitor.
Search
speed
changes
1
2
on
the
monitor.
*
after
pressing
M
MODE,
wait
for
5
seconds
***12again
Search
speed
changes
to
×
2
×
10
on
the
monitor.
•
Make
sure
all
important
data
has
been
backed
up
to
avoid
losing
the
data.
evice in the
car,
to
direct
sunlight,
or
high
temperature
to
avoid
deformation
or
Stop
play
back
before
a2the
USB
device. Other external component operations ... 21
1 Search
Viteza
de
c!utare
se
schimb!
la×1the
pemonitor.
monitor.
2*
speed
changes
1to
2the
monitor.
Search
speed
changes
2]
monitor.
*2 1*Search
3 speed
changes
tonumber
×disconnecting
2×on
10
on
speed
changes
to1to
×]
2to
]
×
10
on
the
monitor.
Search
speed
2in
]
×6;
10
on
theselect
monitor.
*select
Press
tochanges
select
1on
toselect
hold
to
number
7the
to type
12.or high
**222•Search
Search
speed
×
2]
]
×xuntil
10
on
the
monitor.
pressing
any
ofUSB
buttons
the
to
number
6;
hold
to
number
7 todirect
12. sunlight,
Do
not
leave
achanges
device
the
car,
expose
to
temperature
e device. ****23without
This
unit
may
not
be
able
to
play
files
depending
on
of USB
device. to avoid deformation or
Viteza
de
c!utare
se1these
schimb!
la
2thethe
x 10
pe
2 Press
3*
Search
speed
changes
to
×
2
]
×
10
on
the
monitor.
Search
speed
changes
to
×
2
]
×
10
on
monitor.
3
Maintenance
...................................
22
3
*
Press
to
select
number
1
to
6;
hold
to
select
number
7monitor.
to7toto
12.
3 Press
**3functions
Press
to
select
number
1
to
6;
hold
to
select
number
7
to
12.
*
Press
to
select
number
1
to
6;
hold
to
select
number
12.
*
to
select
number
1
to
6;
hold
to
select
number
7
12.
mode
is
cleared
or
press
M
MODE
again.
cause
damages
to
the
device.
Ap!sa$i
pentru
a
selecta
un
num!r
între
1
#i
6;
men$ine$i
ap!sat
pentru
a selecta un num!r între 7 #i 12.
You
cannot
connect
a
computer
to
the
USB
input
terminal
of
the
unit.
3• Press
3
*
to
select
number
1
to
6;
hold
to
select
number
7
to
12.
* Press to select number 1 to 6; hold to select number 7 to 12.
More
about
this unit ........................ 23
Make suretastei
all important data
has been
backed up totaste
avoid
losing
the data.
Dup%•ap%sarea
, ap%sa#i
urm%toarele
pentru
a...
After
pressing
,inpress
thebuttons
following
buttons
to... or high temperature to avoid deformation or
pressing
,USB
press
the following
to...
followingAfter
buttons
allows
you
to...
Detaching
the
control
panel
•
Do
not
leave
a
device
the
car,
expose
to
direct
sunlight,
Troubleshooting
.............................. 26
After
pressing
, press
buttons
to...
thethe
following
buttons
to...
After
pressing
After
pressing
press
thefollowing
following
buttons
to...
After
pressing
, ,press
the
following
buttons
Pressing
(ordamages
holding), press
thethe
buttons
allows
youto...
to...
cause
device.
pressing
, following
press
following
buttons
AfterAfter
pressing
,topress
the the
following
buttons
to...to... Specifications .................................. 29
type
Tipul
deFile
%#ier
File
type
FileFile
type
Filetype
type
File
type
type
FileFile
type
(Number buttons) *3
Pressing (or holding) the following buttons allows you to...
(Number buttons) *3
Skip
10 tracks
theRPT:
TRK
RPT:
Repeat
current
Forcurrent
safety...
Skip 10Select
tracks
(within
the (within
TRK
RPT:
Repeat
track
elect track
folder
Locate
particular
folder
directly
Trece
peste
10
— track —
TRK
repet%
—
Skip
10
tracks
(within
the
TRK
RPT:
Repeat
current
track
Skip
10
tracks
(within
the
TRK
RPT:
Repeat
current
track
Skip
10
tracks
(within
the
TRK
RPT:
Repeat
current
track
same
folder)
FLDR
RPT:
Repeat
current
folder
piese
(în
cadrul
1
Skip
10 Select
tracks track
(within the
RPT:
Repeat
current
• current
Do not
raise
the volume
level too
much, asfolder
this will
folder)
FLDRTRK
RPT:
Repeat
foldertrack
Press:
Select
folder
particular
directly
piesa
curent%
everse/fast-forward track *same
——
—Locate
—
Skip
10folder)
tracks
(within
TRK
RPT:
Repeat
current
track
Skip
10aceluia"i
tracks
(within
the the
TRK
RPT:
Repeat
current
track
same
folder)
FLDR
RPT:
current
folder
same
folder)
FLDR
RPT:
Repeat
current
folder
same
FLDR
RPT:
Repeat
current
folder
1 Repeat
File typeSkip
same
folder)
FLDR
RPT:
Repeat
current
folder
—
block
outside
sounds,
making
driving
dangerous.
—
Skip
10director)
tracks
(within
the
RPT:
Repeat
current
track
FLDR
RND:
Randomly
play all
FLDR
RPT:
repet%
directorul
Hold:
Reverse/fast-forward
track
*TRK
10
tracks
(within
the
TRK
RPT:
Repeat
current
track
FLDR
RND:
Randomly
play
all
elect track
Select
folder
Locate
particular
folder
directly
same
folder)
FLDR
RPT:
Repeat
current
folder
same
folder)
FLDR
RPT:
Repeat
current
folder
3
Skip
101010tracks
(within
the
TRK
RPT:
Repeat
current
track
FLDR
RND:
Randomly
play
all
(Number
buttons)
*
curent
Skip
10
tracks
(within
the
TRK
RPT:
Repeat
current
track
FLDR
RND:
Randomly
play
all
Skip
tracks
(within
the
TRK
RPT:
Repeat
current
track
FLDR
RND:
Randomly
play
all
•
Stop
the
car
before
performing
any
complicated
same
folder)
FLDR
RPT:
Repeat
current
folder
tracks
of
current
2
Skip
tracks
(within
the
TRK
RPT:
Repeat
current
track
FLDR
RND:
Randomly
play
all
folder)
FLDRTRK
RPT:RPT:
Repeat
current
foldertrack FLDR
tracks
of current
Press:
Select
track
Select
folder
Locate
particular
folder
directly
everse/fast-forward track *same
Skip
10folder)
tracks
(within
the
Repeat
current
RND:
Randomly
play
all tracks of
Skip
10Trece
tracks
(within
TRK
RPT:
Repeat
current
track
FLDR RND:
Randomly
play
allthen
same
folder)
FLDR
RPT:
current
folder
tracks
ofoffolder,
current
same
folder)
RPT:
Repeat
current
folder
tracks
ofthen
current
same
FLDR
Repeat
current
folder
tracks
of
current
operations.
2 Repeat
peste
10the FLDR
TRK
RPT:
repet%
piesa
FLDR RND:
red%
în
ordine
aleatorie
same
folder)
FLDR
RPT:
Repeat
current
folder
tracks
current
Press:
Select
track
Select
folder
Locate
particular
folder
folder,
tracks
ofdirectly
Hold:
Reverse/fast-forward
track
*RPT:
same
folder)
FLDR
RPT:
Repeat
current
folder
tracks
of
current
same
folder)
FLDR
RPT:
Repeat
current
folder
tracks
of
current
1 ] 2 on the monitor.
piese (în cadrul
folder,
then
tracks
of of
folder,
then
tracks
of
folder,
then
tracks
1
next
folders
toate
piesele
din
curent%
folder,
then
tracks
Hold: Reverse/fast-forward
track *
next folder,
foldersthen tracks of
1 Attaching
of
folder,
then
tracks
of play
Search
speed changes
1 ] 2director)
on the monitor.
theaceluia"i
control
panel
to × 2 ] × 10*on
the monitor.
next
folders
FLDR RPT: repet%
directorul inside
directorul
curent,
apoi
next
folders
next
folders
DISC
RND:
Randomly
Temperature
the
car...
next
folders
DISC
RND:
Randomly
play
all
Select folder
Locate
particular
folder
directlyall
2 Search speed changes
next
folders
next
folders
to × 2 track
] × 10 on the monitor. curent
1 to 6; hold to*select
number 7 toPress:
12. Select
DISC
RND:
Randomly
play
all
pe
cele
din
directoarele
DISC
RND:
Randomly
play
all
DISC
RND:
Randomly
play
all
tracks
If
you
have
parked
the
car
for
a
long
time
in
hot
or
cold
DISC RND:
play all
tracksRandomly
track *27 to 12.
DISC
RND:
Randomly
play
DISCtemperature
RND:
Randomly
all all
*3 Press to select Hold:
numberReverse/fast-forward
1 to 6; hold to select number
urm%toare.
tracks
tracks
tracks
weather,
wait until
the
in the play
car becomes
tracks
•
To
cancel
repeat
play
or
random
play,
select
“RPT
OFF”
or
“RND
OFF.”
tracks
1 Search
tracks
• To*cancel
repeat
play
or random
select
“RPT OFF” or “RND
OFF.”
DISC
RND:
red%
toate
piesele
în
speed
changes
1
]play,
2
on
the
monitor.
normal
before
play
orplay,
play,
select
“RPT
OFF”
oror
OFF.”
To• •select
cancel
repeat
playsee
orplay
random
play,
select
“RPT
OFF”
or “RND
OFF.”
•To
Tocancel
cancel
repeat
random
play,
select
“RPT
OFF”
or“RND
“RND
OFF.”operating the unit.
•intro
Torepeat
select
intro
see
pages
23
–the
25
for
details.
cancel
repeat
play
ororrandom
random
select
“RPT
OFF”
“RND
OFF.”
ordine aleatorie
2To
To
play,
pages
23
–]
25play,
for
details.
press the ••following
buttons
to...
*
Search
speed
changes
to
×
2
×
10
on
monitor.
•
To
cancel
repeat
play
or
random
play,
select
“RPT
OFF”
or
“RND
OFF.”
cancel
repeat
play
orsee
random
play,
select
“RPT
OFF” or “RND OFF.”
intro
pages
forfor
• •• To•ToPentru
select
intro
play,
see
pages
23 –23
25
for
•To
Toselect
select
introplay,
play,
see
pages
23–following
–25
fordetails.
details.
•After
select
intro
play,
see
23
–sau
2525details.
details.
3To
pressing
, press
buttons
to...
a toanula
repetat%
redarea
în ordine
select
number
1pages
to236;the
to
number
7 to 12.aleatorie, selecta#i “RPT OFF” sau “RND OFF.”
ToPress
select
play,
pages
2325
–for
25select
for details.
• To•* select
introintro
play,redarea
see see
pages
–hold
details.
• Pentru mai multe detalii privind selectarea red%rii intro, vezi paginile 23 – 25.
File type
OPERATIONS
29
OPERATIONS
29
After pressing
, press the following buttons to...
OPERATIONS
OPERATIONS
OPERATIONS 2929
29
racks (within the TRK RPT: Repeat current track
OPERATIONS
29
—
OPERATIONS
OPERATIONS
2929 3
29
OPERA
II
10 tracks
der)
FLDR RPT:Skip
Repeat
current(within
folderthe TRK RPT: Repeat current track
—
File type same folder)
FLDR RPT: Repeat current folder
ENGLISH
ROMÂN$
ENGLISH
Dual
Zone func#iei
operations
Utilizarea
Dual Zone
Thank you for purchasing a JVC product.
Please read all instructions carefully before operation, to ensure your complete understanding and to obtain the best
You canconecta
connectun
anechipament
external audioaudio
equipment
2ndcelei
AUDIO
OUT
plug
on theaudio
rear, and
play back
a disc separately
possible
performance
from
thedoua
unit.ie"iri
Pute#i
externto
lathe
mufa
de-a
din partea
posterioar%
"i
from
the
source
selected
on
the
unit.
reda un disc separat de sursa selectat% pentru aparat.
Youpute#i
cannotselecta
select
“AM”
“USB”sau
as the
source
when
Dual
Zone isfunc#ia
activated.
IMPORTANT
FOR LASER
PRODUCTS
Nu
sursaor„AM”
„USB”
când
este
activat%
Dual Zone.
•
When
Dual
Zone
is
in
use,
you
can
only
operate
the
DVD/CD
player
using thedoar
remote
•
Când
func#ia
Dual
Zone
este
activat%,
pute#i
controla
DVD/CD
player-ul
princontroller.
intermediul telecomenzii.
1. CLASS 1 LASER PRODUCT
2. CAUTION: Do not open the top cover. There are no user serviceable parts inside the unit; leave all servicing to
De
pe telecomand":
Onqualified
the
remote
servicecontroller:
personnel.
Aceste
func#ii
prin
intermediul
telecomenzii.
3. CAUTION: Visible and/or invisible
class
1M sunt
laser
radiation
when
Do using
not view
optical
These operations
aredisponibile
possible on
theopen.
monitor
the directly
remote with
controller.
instruments.
Activa"i
func"ia
Dual
Zone.
~ Activate Dual Zone.
4. REPRODUCTION OF LABEL: CAUTION LABEL, PLACED OUTSIDE THE UNIT.
Sursa
de redare
se schimb%
automat
la „DISC”.
The source
automatically
changes
to “DISC.”
Pentru
alt% surs%
de redare,
butonul
SRC
panoul
To selectaaselecta
differento source
to listen
throughap%sa#i
the speakers,
press
SRCdin
on the
de
comand%.
control
panel.
•• By
Prin
intermediul
panoului
de comand%,
pute#i
controla
noua
surs%
on volume
using
the buttons
on theCaution
control
panel,
you
cansetting:
operate the
newly
selected
selectat% f%r% a afecta utilizarea func#iei Dual Zone.
Warning:
sourcebewithout affecting
Zone operations.
DiscsDual
produce
very little noise compared with other
If you need to operate the unit while driving,
sources. Lower the volume before playing a disc
sure to look ahead carefully or you may be involved
to
avoid damaging
speakers
the sudden
in a traffic accident.
volumul
printhrough
intermediul
celei
de-a
ie#iri audio.
Ÿ Regla"i
Adjust the
volume
themufei
2ndthe
AUDIO
OUTbydoua
plug.
increase of the output level.
How to reset your unit
This symbol is only valid in
the European Union.
Controla"i DVD/CD player-ul utilizând telecomanda #i consultând
!
Operate the DVD/CD player using the remote controller by
monitorul.
referring to the monitor screen.
Information for Users on Disposal of Old
Equipment
•• To
Pentru
anula
func#ia
Dual Zone,
„DUAL
OFF”
cancelaDual
Zone
operations,
select selecta#i
“DUAL OFF”
in step
~. (func#ia Dual Zone
This symbol indicates that the product with
dezactivat%) în timpul pasului 1 .
this symbol should not be disposed as general
household
waste atde
itscomandã:
end-of-life. If you wish to
De
pe panoul
On the
control panel:
dispose of this product, please do so in accordance
Pute#i,
de
asemenea,
"i dezactiva
func#ia Dual Zone.
You can
also
activate
andactiva
deactivate
with
applicable
national
legislation
orDual
otherZone.
rules in
• Your preset adjustments will also be erased.
1
your country and municipality. By disposing of this
product correctly, you will help to conserve natural
How to forcibly eject a disc
resources and will help prevent potential negative
2
effects on the environment and human health.
Sursa
redare
se users
schimb%
automat
la when
„DISC”Dual
când
este
activat% func#ia Dual Zone.
The
source
automatically
changes
to
“DISC”
Zone
is activated.
Note: Only
forde[EX]
model
in UK
and
European countries
For security reasons, a numbered ID card is provided
• Be careful not to drop the disc when it ejects.
with this unit, and the same ID number is imprinted on
• If this does not work, reset your unit.
the unit’s chassis. Keep the card in a safe place, as it will
help the authorities to identify your unit if stolen.
2
30
30
OPERATIONS
ENGLISH
ENGLISH
ENGLISH
ENGLISH
ENGLISH
ENGLISH
ROMÂN$
The following
marks
are used to®indicate...
Using
the Bluetooth
Bluetooth
devices
Utilizarea
dispozitivelor
Bluetooth
®
CONTENTS
Using
the
® devices
: Built-in CD player operations.
Usingoperations,
thefunc#iilor
Bluetooth
® devices
For Bluetooth
Bluetooth
operations,
required
to connect
connect
the
Bluetooth
Adapter
(KS-BTA200)
toKD-G632/KD-G631
the CD
CD (KS-BTA200)
changer jack
jack.......
onla mufa
Control
panel —
4
Pentru utilizarea
Bluetooth,
estethe
necesar
s% conecta#i
adaptorul
Bluetooth
For
itit isis required
to
Bluetooth
Adapter
(KS-BTA200)
to
the
changer
on
:deExternal
CD
changer
operations.
the rear
rear
of this
this unit.
unit. See
See
also
page
schimb%torului
CD-uri
de40.
pe partea
posterioar% a acestui aparat. Consulta#i "i pagina 40.
the
of
also
page
For Bluetooth
itsupplied
is 40.
required
to the
connect
the Bluetooth
Adapter
(KS-BTA200)
to the
CD changer
jack on 5
RM-RK50
...........
Remote
controller
—
•• Refer
Refer
also to
to the
theoperations,
instructions
with
Bluetooth
adapter
and
the
Bluetooth
device.
• also
Consulta#i,
de
asemenea,
instruc#iunile
furnizateadapter
împreun%
cu adaptorul
Bluetooth "i dispozitivul
:
External
USB
memory
instructions
supplied
with operations.
the Bluetooth
and
the
Bluetooth
device.
the
rear
of
this
unit.
See
also
page
40.
•• Refer
Refer to
to the
the list
list (included
(included in
in the
the box)
box) to
to see
see the
the countries
countries where
where you
you may
may use
usestarted
the
Bluetooth®
function.
Bluetooth.
Getting
................................
6
the Bluetooth®
function.
•• Refer
also to the
instructions
adapter
and
the
device.
: Indicator
forwith
the the aBluetooth
Consulta#i
lista
(inclus%displayed
însupplied
caset%)
pentru
vedea #%rile
în care
esteBluetooth
permis%
utilizarea func#iei
Basic
operations
...................................................
Bluetooth
operations,
it is the
required
to see
connect
the Bluetooth
Adapter
(KS-BTA200)
to thefunction.
CD changer jack on 6
•ForRefer
to the operations,
list
(included
box)(“BT-PHONE”
to
the countries
where Adapter
you
maytheuse
thetime,
Bluetooth®
corresponding
Bluetooth®.
For
it isinrequired
to
connect
theand
Bluetooth
(KS-BTA200)
to the
To use
use
aBluetooth
Bluetooth
device
through
theoperation.
unit
“BT-AUDIO”)
for
first
you
needCDto
tochanger
establishjack on
To
a
Bluetooth
device
through
the
unit
(“BT-PHONE”
and
“BT-AUDIO”)
for
the
first
time,
you
need
establish
the rear of this unit. See also page 40.
Radio operations .............................
7
the rear
of this connection
unit. See also
page 40.
Bluetooth
wireless
between
the
unit
and
the
device.
Bluetooth
wireless
between
the
unit
and
device.
•Pentru
Refer
also
toconnection
the
instructions
supplied
with
thethe
Bluetooth
adapter
andcu
the
Bluetooth
device.
To
use
a
Bluetooth
device
through
the
unit
(“BT-PHONE”
and
“BT-AUDIO”)
for
the
first
time,
you
need
to
establish
a
folosi
pentru
prima
oar%
dispozitivul
Bluetooth
împreun%
acest
aparat,
(“Bluetooth
Phone”
"i
FM
RDS
operations
...........................
8
How
to
use
the
M
MODE
button
•
Refer
also
to
the
instructions
supplied
with
the
Bluetooth
adapter
and
the
Bluetooth
device.
Once the
the connection isis established,
established, itit isis registered
registered in
in the
the unit
unit even
even ifif you
you reset
reset your
your unit.
unit. Up
Up to
to five
five devices
devices can be
•• Once
• Referconnection
to the
list (included
thestabili#i
box) to
see theand
countries
whereBluetooth
you may use
the Bluetooth®
function.can be
Bluetooth
connection
between
the
thewireless
device.
Audio”),
trebuieinins%
conexiunea
între
"iFM
dispozitiv.
Searching
your
favorite
RDS
programme ... 8
•“Bluetooth
toinwireless
the
(included
seeunit
the countries
you mayforuse
theaparat
Bluetooth®
function.
registered
total.
IfRefer
you press
Mlist
MODE,
the unitthe
goesbox)
intotofunctions
mode, where
registered
in
total.
Odat%
conexiunea
se înregistreaz%
în the
aparat,
chiarifdac%
îl reseta#i.
SeUp
pottoînregistra
la
•• Once
the stabilit%,
connection
is established,
it is for
registered
in
unit even
you
reset
your unit.
five devicespân%
can be
•• Only
Only
one
device
can
be
connected
at
a
time
each
source
(“BT-PHONE”
and
“BT-AUDIO”).
then
the
number
buttons
and
5
/
∞
buttons
work
as
Disc / USB
memory
operations
...........
one
device
bedevice
connected
at athe
time
each source (“BT-PHONE”
and for
“BT-AUDIO”).
Toregistered
use
a Bluetooth
through
unitfor(“BT-PHONE”
and “BT-AUDIO”)
the first time,
you need to
establish11
cinci
dispozitive.
incan
total.
Todifferent
use a Bluetooth
device
through
the
unit
(“BT-PHONE”
and
“BT-AUDIO”)
for
the
first
time,
you
need
to
establish
function
buttons.
Playingconecta
a disc
the unit
.....................................
Bluetooth
wireless
connection
between
the
unit
and
the
device.
Pentru
!device
ecarecan
sursã
"i
“BT-AUDIO”)
nu
se(“BT-PHONE”
poate
un singur
dispozitiv odatã. 11
• Only
•Bluetooth
onewireless
be (“BT-PHONE”
connected
at athe
time
forand
eachthe
source
andindecât
“BT-AUDIO”).
connection
between
unit
device.
Playing
discsreset
in the
CDunit.
changer
...........................
Registering
a
Bluetooth
device
•
Once
the
connection
is
established,
it
is
registered
in
the
unit
even
if
you
your
Up
to
five devices can be11
Registering
a Bluetooth
device
• Once
the connection
is established,
in the unit even
if you
reset
yourmemory
unit. Up................................
to five devices can be11
Ex.: When
button
2 works itasis registered
Playing
from
a USB
registered
innumber
total.unui
Înregistrarea
dispozitiv
Bluetooth
Registration
(Pairing)
methods
2 Select
Select “NEW.”
“NEW.”
registered(Pairing)
in total.
Registering
a Bluetooth
device
Registration
button.
2
• Only MO
one(monaural)
device canmethods
be
connected at a time for each source
(“BT-PHONE”
and “BT-AUDIO”).
Sound adjustments
.......................... 14
Use
either
of
the
following
items
in
the
Bluetooth
menu
•
Only
one
device
can
be
connected
at
a
time
for
each
source
(“BT-PHONE”
and “BT-AUDIO”).
Use either
of the
following
itemsmethods
in the Bluetooth
menu
Registration
(Pairing)
Metode
de
înregistrare
(torsadare
în
perechi)
2
Select
“NEW.”
2General
Selecta"i
“NEW”
(dispozitiv
nou).
to
register
and
establish
the
connection
with
a
device.
settings — PSM ..................
15
to register
andînregistrarea
establish
the"iconnection
with
a device.cumenu
Pentru
stabilirea
conexiunii
un
Use
either
of
the following
itemsasinthe
the
Bluetooth
Registering
a
Bluetooth
device
•• Select
Select
“BT-PHONE”
or
“BT-AUDIO”
source
to
3
Select
“OPEN.”
Registering
Bluetooth
“BT-PHONE”
ora“BT-AUDIO”
as thedevice
source
to
dispozitiv,
utiliza#i
una
dintre
urm%toarele
op#iuni
DAB
tuner
operations
.......................
18
3
Select
“OPEN.”
to
register
and
establish
the
connection
with
a
device.
operate
the Bluetooth
Bluetooth
menu. methods
Registration
(Pairing)
meniul
Bluetooth.
operate
the
menu.
Select “NEW.”
•dinSelect
“BT-PHONE”
or “BT-AUDIO”
Registration
(Pairing)
methodsas the source to
2
Selectplayer
“NEW.”
32
“OPEN.”
operations................. 19
3iPod/D.
Selecta"i
“OPEN.”
use
these
buttons
foritems
their
original
functions
•ToPentru
activarea
meniului
Bluetooth,
selecta#i,
ca
Use
either
of
the
following
in
the
Bluetooth
menu
operate
the
Bluetooth
menu.
OPEN
Make
the
unit“BT-PHONE”
ready
to establish
establish
a new
new
Use
either
of the
following
items
inwait
the
Bluetooth
menu
surs%
de
redare,
sau
“BT-AUDIO”.
again
after
pressing
M
MODE,
for
5
seconds
OPEN
Make
the
unit
ready
to
a
Other external
component
operations ... 21
to register and establish the connection with a device. 4 Enter
PIN (Personal
(Personal
Identification
Bluetooth
connection.
towithout
register
and establish
connection
with the
a device. 4 Enter aa PIN
Identification
pressing
any
ofthe
these
buttons
connection.
• SelectBluetooth
“BT-PHONE”
or
“BT-AUDIO”
as until
the source
to
Number)
code
to
the
unit.
OPEN
Make
the
unit
ready
to
establish
a
new
3
Select
“OPEN.”
Maintenance
...................................
22
Connection
established
byMas
operating
theto
• functions
SelectConnection
“BT-PHONE”
“BT-AUDIO”
the
source
Number)
code
to
the PIN
unit.(Num$r
3
Select
mode
isPreg%te"te
cleared
or press
MODE
again.
4
Enter
a“OPEN.”
PINany
(Personal
Identification
isis or
established
by
operating
the
aparatul
pentru
Introduce"i
un
cod
de to
OPEN
operate the
Bluetooth
menu.
•4You
You
can enter
enter
number
you
like (1-digit
(1-digit
Bluetooth
connection.
Bluetooth
device.
operate
the
Bluetooth
menu.
•
can
any
number
you
like
to
More
about
this
unit
........................
23
Number)
to
the0000]
unit.
stabilirea
unei noi by
conexiuni
identi%
carecode
personal)*
în
aparat.
Bluetooth
device.
(deschidere)
16-digit
number).
[Initial:
Connection
is established
operating the
number).
[Initial:
0000]
ions, SEARCH
it is required
to connect
the
Bluetooth
Adapter
(KS-BTA200)
to the16-digit
changer
jack on
Bluetooth.
•CD
Pute#i
introduce
orice
num%r
dori#i
(num%r
cu
•
You
can
enter
any
number
you
like
(1-digit
to
OPEN Detaching
Make
the
unit
ready
to
establish
a
new
the
control
panel
Make
the
unit
ready
to
establish
a
new
Troubleshooting
..............................
Some devices
devices have
have their
their own
own PIN
PIN code.
code. Enter
Enter the 26
Bluetooth
device.
SEARCH
the unit
ready
to establish
a new
OPEN
Make
the
unit
ready
to establish
a new
**4Some
Enter
PIN
(Personal
Identification
Conexiunea
se
stabile"te
1-16 acifre).
[Setare
ini#ial%:
0000] the
See also
page
40. Make
16-digit
number).
[Initial:
0000]
Bluetooth
connection.
Bluetooth
connection.
4
Enter
a
PIN
(Personal
Identification
specified
PIN
code
to
the
unit.
Bluetooth
connection.
Bluetooth
connection.
Specifications
..................................
specified
PIN
code
to
the
unit.propriul
code
totheir
the
unit. cod
laBluetooth
punerea
întofunc#iune
* Number)
Unele
dispozitive
au
PIN.
nstructionsSEARCH
supplied
with
thethe
adapter
and
theaaBluetooth
Make
unit
ready
new the device.
Some
have
own
code.
Enter the29
Connection
is established
by operating
Connection
established
byestablish
operating
code
to(or
the
unit.PIN
1 *Number)
Move
todevices
the
next
(or
previous)
number
isis established
by
operating
Connection
is established
bymay
operating
the
dispozitivului
Bluetooth.
1 function.
Move
to
the
next
previous)
number
Introduce$i
în
aparat
codul
PIN
speci"
cat.
•
You
can
enter
any
number
you
like
(1-digit
to
ncluded in the box)Connection
to
see
the
countries
where
you
use
the
Bluetooth®
Bluetooth
connection.
specified
PIN
code
to
the
unit.
Bluetooth device.
the unit.
unit.
•position.
You can enter any number you like (1-digit to
the
Bluetooth
device.
position.
16-digit
number).
[Initial:
0000]
Preg%te"te
aparatul
1 Trece"i
SEARCH
Connection
is established
by pentru
operating
la
num$rul
urm$tor
(sau
anterior).
1
Move
to
the
next
(or
previous)
number
16-digit number). [Initial: 0000]
SEARCH
Make
the unit ready
establish
a new
stabilirea
uneitonoi
conexiuni
Some
(c$utare)
For*need
safety...
evice through
the unitthe
(“BT-PHONE”
the first time, you
to devices
establishhave their own PIN code. Enter the
unit.
position.
SEARCH
Make
the unit and
ready“BT-AUDIO”)
to establishfor
a new
* Some
devices have their own PIN code. Enter the
Registering
using
“OPEN”
Bluetooth.
Bluetooth
connection.
specified
PINvolume
code to the
•
Do
not
raise
the
levelunit.
too much, as this will
onnection
between using
theBluetooth
unit“OPEN”
and the
device.
Registering
connection.
specified
PINnum$r
codeortoblank
the
unit.
2
Select
number
space.
2 block
Conexiunea
stabile"te
la your unit. Up
un
sau
spa"iu
liber.
Connection
established
operating
2
Select
aa number
blank
space.
Preparationit is registered
1
Move
tosounds,
thebeor
next
(orun
previous)
number
making
driving
dangerous.
on is established,
inisisthe
unitse
even
ifbyyou
reset
toSelecta"i
fiveoutside
devices
can
Preparation
RegisteringConnection
using
“OPEN”
established
by
operating
1
Move
to
the
next
(or
previous)
number
punerea
în
func#iune
a
aparatului.
thetounit.
Operate
the
device
turn
on
its
Bluetooth
function.
position.
•
Stop
the
car
before
performing
any
complicated
2
Select
a
number
or
blank
space.
Operate
the device
turn on its Bluetooth function.
thetounit.
position.
Preparation
n be connected
at“BT-PHONE”
a time for
each or
source
(“BT-PHONE”
and “BT-AUDIO”). operations. [Roti#i]
1 Operate
Select
“BT-AUDIO.”
Înregistrare
folosind
op#iunea
“OPEN”
the device
to turn
its Bluetooth
function.
1
Select
“BT-PHONE”
or on
“BT-AUDIO.”
Registering
using “OPEN”
Preg$tire
Registering
usingthe
“OPEN”
Attaching
control
panel
1
Select
“BT-PHONE”
or “BT-AUDIO.”
2 Select
ainside
number
or car...
blanklaspace.
Temperature
3 Repeta"i
2or
pa#ii
#i the
încheierea
Pune#i
dispozitivul
pentru a activa
Preparation
Bluetooth
device în func#iune
2
Select
a number
blank
space.
3
Repeat
steps
11 and
2pân$
until you
you
finish
Preparation
3
Repeat
steps
1
and
2auntil
If you
have parked
the
car for
long
timefinish
in hot
or cold
procedurii
de
introducere
a
codului
PIN.
func#ia Bluetooth.
Operate
the
device
to
turn
on
its
Bluetooth
function.
entering
a
PIN
code.
ring) methods
Operate the device to turn on its2Bluetooth
entering
PIN
code.
Select function.
“NEW.”
4 Con%
weather,
waitauntil
the
temperature
in the
carfinish
becomes
rma"i
introducerea
codului
PIN.
3
Repeat
steps
1
and
2
until
you
4 Confirm the entry.
1 Selecta"i
“BT-PHONE”orsau
“BT-AUDIO”.
Select
“BT-PHONE”
“BT-AUDIO.”
4
Confirm
the
entry.
owing items
the Bluetooth
menu or “BT-AUDIO.”
normal
before
operating
the unit.
entering
a PIN flashes
code.
11inSelect
“BT-PHONE”
“OPEN...”
onintermitent
the display.
display. mesajul
Pe display,
este
a!"at
“OPEN...”
flashes
on
the
lish the connection with a device.
4 Confirm the entry.
“OPEN...”.
3 Repeat steps
1 and
2 until
you finish
” or “BT-AUDIO” as the source to
“OPEN...”
flashes
on the
3 Select “OPEN.”
3 Repeat steps
1 and
2 until
youdisplay.
finish
entering a PIN code.
ooth menu.
entering a PIN code.
4 Confirm the
entry. pe pagina urm!toare
Continuare
4 Confirm the entry.
Continued
onon
thethe
nextdisplay.
page
e unit ready to establish a new
“OPEN...”
flashes
Continued
on
the
next
page
“OPEN...” flashes on the display.
4
Enter
a
PIN
(Personal
Identification
th connection.
EXTERNAL
DEVICES
31page
31
Continued on the next
DISPOZITIVE"EXTERNE
DEVICES
31
Number) code to the unit. EXTERNAL
ion is established by operating the
• You can enter any number you like (1-digit to
Using the
the Bluetooth
Bluetooth®® devices
devices
Using
ENGLISH
Bluetooth ® devices
3
N
theBluetooth A
For BluetoothConnection
operations,is itestablished
is requiredby
to operating
connect the
•
Bluetooth
Registering a Bluetooth device
the rear of this
unit. Seedevice.
also page 40.
2
Selecta"i
pe care dori"i
5 Pentru c$utare
#i conectare,
utiliza"i
• aRefer
also Make
todispozitivul
thethe
instructions
withas$-l
the
Bluetooth adapte
Registration
(Pairing)
methodsThank
you for purchasingSEARCH
JVC
product.
unit readysupplied
to establish
new
2
Select
“NEW.”
*
conecta"i.
dispozitivul Bluetooth.
•
Refer
to
the
list
(included
in
the
box)
to
see
the
where
Please
read of
allthe
instructions
carefully
operation,
to ensure your complete
understanding
and to obtain the countries
best
Bluetooth
connection.
Use Introduce#i
either
itemscare
inbefore
the
Bluetooth
înfollowing
dispozitivul
urmeaz%
s%menu
!e
performance
from Adapter
the unit.
Connection
is established
by operating
Forregister
Bluetooth
operations,
itPIN
isconnection
required
towith
connect
the Bluetooth
(KS-BTA200)
to the CD changer
jack on
1
to
andacela"i
establish
the
aintrodus
device.
conectat
cod
pe carepossible
l-a#i
To3 use a Bluetooth
device through the unit (“BT-PHONE” and “BT-A
the
unit.
Pentru
conectare,
utiliza"i op"iunile
the
rear
of
this
unit.
See
also
page
40.
• Select
“BT-AUDIO”
as"at
themesajul
source to
"i în “BT-PHONE”
aparat. Pe or
display,
este a!
3
Select
“OPEN.”
Bluetooth
wireless connection between
the unit and the device.
“OPEN”(„Deschidere”)
sau
IMPORTANT
PRODUCTS
• operate
Refer
alsothetoFOR
the LASER
instructions
supplied with the Bluetooth adapter
and the Bluetooth device.
Bluetooth
menu.
“CONNECT”(„Conectare”).
• Once
the connection is established, it is registered in the unit eve
“SEARCH”(„C$utare”).
Conexiunea
acuminstabilit%;
pute#i
utiliza
to1the
listeste
(included
the box) to
see the
countries where
you may use the“OPEN”
Bluetooth® function.
1.• Refer
CLASS
LASER
PRODUCT
Registering
registered inusing
total.
dispozitivul
intermediul
Make
theopen
unit the
ready
establish
a new
2.OPEN
CAUTION:
Doprin
not
toptoaparatului.
cover.
There
are no user serviceable
parts
inside
the
unit; leave at
allaservicing
to source (“BT-2
Preparation
•Conectarea/deconectarea
Only
one device
can
be connected
time for
dispozitivului
4
Enter
a for
PIN
(Personal
Identification
For
Bluetooth
operations,
it is required
to connect
the Bluetooth
Adapter
(KS-BTA200)
to the
CD
changer
jackeach
on
Bluetooth
connection.
To
use
a
Bluetooth
device
through
the
unit
(“BT-PHONE”
and
“BT-AUDIO”)
the
first
time,
you
need
to
establish
qualified
service
personnel.
ct the Bluetooth
Adapter
(KS-BTA200)
topage
the 40.
CD changer jack on
Operate
the device
to turn
on itsunit.
Bluetooth function.
înregistrat
Number)
code
to the
theDispozitivul
rear
of wireless
this
unit.connection
Seeînregistrat
also
r%mâne
chiar
"i
dup%
Connection
is
established
by
operating
the
Bluetooth
between
the
unit
and
the
device.
3. CAUTION: Visible and/or invisible class 1M laser radiation when open. Do not view directly with optical
1 Selecta"i
• You
can
enter
anyunit.
number
likedevices
(1-digit
•• deconectarea
Refer
alsoconnection
to the
instructions
supplied
the Bluetooth
adapter
and
the
Bluetooth
device.
“BT-PHONE”
sau
“BT-AUDIO”.
dispozitivului.
Pentru
1
Select
“BT-PHONE”
orUp
“BT-AUDIO.”
Registering
ayour
Bluetooth
device
Bluetooth
device.
Once
the
is established,
itconect%rile
iswith
registered
in the unit
even
if you
reset
toyou
five
cantobe
instruments.
e Bluetooth adapter
and
the
Bluetooth
device.
16-digit
number).
[Initial:
0000]
ale
aceluia"i
dispozitiv,
utiliza#i
func#ia
• ulterioare
Refer
to
the
list
(included
in
the
box)
to
see
the
countries
where
you
may
use
the
Bluetooth®
function.
registered
inuse
total.
REPRODUCTION
OF LABEL:
CAUTION
LABEL,aPLACED
THE UNIT. (Pairing) methods
Registration
e countries 4.
where
you mayMake
the
Bluetooth®
2 S
SEARCH
the
unit
ready
tofunction.
establish
new OUTSIDE
(sau
func#ia
“AUTO CNT”).
* Some devices
have their own PIN code. Enter the
• “CONNECT“
Only
one device
canactiva#i
be connected
atchanger
a time for
each
source (“BT-PHONE”
and “BT-AUDIO”).
3
ct the Bluetooth
Adapter
(KS-BTA200)
to
the
CD
jack
on
Use
either
of the
following
items
in need
the Bluetooth
menu
informa#iile
urm%toare
"i cele de and “BT-AUDIO”)
Bluetooth
connection.
specified
the unit.
To(Consulta#i
use a Bluetooth
device
through theprecum
unit (“BT-PHONE”
forPIN
thecode
firsttotime,
you
to establish
PHONE” and Bluetooth
“BT-AUDIO”)
for theconnection
firstistime,
you need
tooperating
establish
la pagina
48.)
to register
and establish
the connection
withnumber
a device.
Connection
established
bythe
1 Move
to the next
(or previous)
wireless
between
unit and the device.
4
eand
Bluetooth
adapter
and the Bluetooth
device. device
Registering
a Bluetooth
the device.
• Select
“BT-PHONE”
or “BT-AUDIO”
as the
source
the
unit.
position.
•C"utarea
Once the connection
is
established,
it
is
registered
in
the
unit
even
if
you
reset
your
unit.
Up
to
five
devices
cantobe
3 S
dispozitivelor
disponibile
2 Selecta"i dispozitivul înregistrat pe care
eered
countries
where
you
may
use
the
Bluetooth®
function.
in the unit
even if youinreset
your unit.
Up to five devices can be
Bluetooth menu.
registered
Registration
(Pairing)
methods
2operate
Selectthe
“NEW.”
Efectua#i
pa"iitotal.
1 "i 2 de la
pagina 31, apoi…
dori"i
s$-l
conecta"i.
•Use
Only
one
device
can
be
connected
at
a
time
for
each
source
(“BT-PHONE”
and “BT-AUDIO”).
1
using
“OPEN”
Selecta"i
“SEARCH”(„C$utare”).
either of the
following
itemsyouin need
the Bluetooth
menu
and Registering
“BT-AUDIO”)
for
the
first
time,
to establish
rPHONE”
each source
(“BT-PHONE”
and
“BT-AUDIO”).
OPEN
Make
unit ready
to establish
Caution
volume
Warning:
2
Selecton
a the
number
orsetting:
blank
space. a new
Aparatul
c%uta dispozitive
disponibile
"i
to
register
andvaestablish
the connection
with a device.
Preparation
4 E
and the device.
Bluetooth
connection.
a!
"eaz%
lista
acestora.
3 Selecta"i
“CONNECT”
sau
“DISCNNCT”,
•Operate
Select
“BT-PHONE”
or
“BT-AUDIO”
as
the
source
Registering
a
Bluetooth
device
Discs
produceConnection
very
little isnoise
compared
with
other the
If you
operate
the
unitits
driving,
becantobe
device
to
turn
on
Bluetooth
function.
N
ered in the unit
evenneed
ifthe
youto
reset
your
unit.
Upwhile
to five
devices
3
Select
“OPEN.”
established
by
operating
• Dac%
nu
este g%sit
niciun dispozitiv, se
pentru
conectarea/deconectarea
Bluetooth
menu.
sources.
Lower
the volume
before playing aunui
disc
to looktheahead
carefully
or you
may be involved
•
Registration
(Pairing)
methods
1sureoperate
Select
“BT-PHONE”
or
“BT-AUDIO.”
Bluetooth
device.
a!"eaz%
mesajul “UNFOUND”
(Dispozitiv
2
Select
“NEW.”
dispozitiv
selectat.
to avoid
damaging
the speakers by the sudden
in(“BT-PHONE”
a traffic
accident.
r each source2
and “BT-AUDIO”).
Select
“NEW.”
indisponibil)
Use
either
ofMake
the following
items to
in the
Bluetooth
OPEN
the unit ready
establish
a newmenu
SEARCH
Make
the unit
increase
of
the
output
level.ready to establish a new
*
h menu
4 Enter
aBluetooth
PINsteps
(Personal
to register and
establishconnection.
the connection with a device.
3 Repeat
1 andIdentification
2 until you finish
Bluetooth
connection.
evice.
Number)
code
toisthe
unit. by operating
• Select “BT-PHONE”
or “BT-AUDIO”
asbytheoperating
source tothe
entering
a PIN
code.
Connection
is established
3 Select
“OPEN.”
Connection
established
1
2 Bluetooth
Selecta"i
dispozitivul
care dori"i
s$-l the Bluetooth
e to
For
operations,
it ispe
required
to connect
Adapter
(KS-BTA200)
to
theyou
CD changer
jack on
•
You
can
enter
any
number
like (1-digit
How
to
reset
your
unit
3
Select
“OPEN.”
operate
the
Bluetooth
menu.
4
Confirm
the
entry.
La
punerea
în
func#iune
a
aparatului,
îl pute#ito
Bluetooth
device.
the
unit.
2
Select
“NEW.”
This
symbol
is
only
valid
in
conecta"i.
the rear of this unit. See also page 40.
[Initial:
0000]on
“OPEN...”
flashes
display.
seta 16-digit
pentru anumber).
se conecta
automat
la the
dispozitivul
the European
Union.
cth menu
the Bluetooth
Adapter
to the
changer
jack
on
• Refer
also Make
to (KS-BTA200)
thethe
instructions
supplied
withathe
Bluetooth
adapter
and the
Bluetooth
device.
SEARCH
* Some
devices
have their
own PINCNT”
code. Enter the
OPEN
unit ready
toCDestablish
new
Bluetooth.
(Vezi
sec#iunea
“AUTO
evice.
4– Conectare
Enter
a PIN
(Personal
Identification
Registering
using
“OPEN”
ew
• Refer to theBluetooth
list (included
in the box) to see the countries where
you
may
use
Bluetooth®
function.48.)
connection.
specified
PINthe
code
to-the
automat%
de unit.
la pagina
3 Introduce"i
4
Enter
a“OPEN.”
PIN
(Personal
Identification
înUsers
aparat
PINof
al BluetoothNumber)
Information
for
on
Disposal
Old
to
2
eeBluetooth
adapter
and the
Bluetooth
code
to
the
For
Bluetooth
operations,
itdevice.
iscodul
required
tospeci%
connectc the
Adapter
(KS-BTA200)
to(orunit.
theprevious)
CD changer
jack on
3
Select
Preparation
1
Move
to
the
next
number
Connection
is
established
by
operating
the
Number)
code
toalso
the
unit.
dispozitivului.
Equipment
engcountries
you
may
use
the
Bluetooth®
function.
•
You
can
enter
any
number
you
like
(1-digit
to
the where
To
use
a of
Bluetooth
device
through
the
unit
(“BT-PHONE”
and
“BT-AUDIO”)
for
the
first
time,
you
need
to
establish
the
rear
this
unit.
See
page
40.
the
unit.
Operate
the
device
turn on Continued
its Bluetooth
function.
&tergerea
unuitodispozitiv
înregistrat
position.
Bluetooth
device.codului
on the
next page
••symbol
Pentru
identi!
carea
consulta#i
You
can
enter
any
you PIN,
like
(1-digit
to the device.
This
indicates
thatnumber
the product
with
16-digit
number).
0000]
connection
between
the
unit
•Bluetooth
Refer
alsowireless
to
the instructions
supplied
with
theand
Bluetooth
adapter
and the“BT-PHONE”
Bluetooth[Initial:
device.
1 Selecta"i
sau
“BT-AUDIO”.
instruc#iunile
furnizate
împreun%
cu
1
Select
“BT-PHONE”
or
“BT-AUDIO.”
16-digit
number).
[Initial:
0000]
ew
symbol
should
not
disposed
asitgeneral
Make
the
unit
ready
tobox)
establish
athe
newcountries
PHONE” and SEARCH
“BT-AUDIO”)
for
first
you
need
establish
EXTERNAL
DEVICES
31
*you
Some
have
theirUp
own
PIN
Enter
Once
the
connection
isbetime,
established,
in the unit
even
if may
youdevices
reset
your
unit.
to
fivecode.
devices
canthe
be
•this
Refer
to the
listthe
(included
in the
toistoregistered
see
where
use
the
Bluetooth®
function.
4
Enter
aBluetooth
PIN
Identification
Registering
using
dispozitivul.
ew
* Some
devices
have
their own
PIN
code.
household
waste
at(Personal
its“OPEN”
end-of-life.
If you
wishEnter
to the
connection.
and the device.
specified
PIN
code
to
the
unit.
in
total.
4registered
2 Select a number or blank space.
Pentru
conectare,
dispozitivul
Number)
code
toplease
the
unit.
specified
PIN
code
toutiliza"i
theUp
unit.
Preparation
ng the
this
product,
dotoso
inby
3
Connection
established
operating
ered
in the unit
even
ifof
you
reset
your
five
devices
be and “BT-AUDIO”)
1 Move
tothe“BT-AUDIO”).
the
(oryou
previous)
number
•dispose
Only
device
can
beisunit.
connected
at
aaccordance
time
forcan
each
(“BT-PHONE”
and
To
use
aone
Bluetooth
device
through
the
unit
(“BT-PHONE”
for
firstnext
time,
need to establish
Bluetooth.
•1
You
can
enter
any
number
you
like
(1-digit
to source
ng
Move
to
the
next
(or
previous)
number
Operate
the
device
to
turn
on
its
Bluetooth
function.
with
applicable
national
legislation
or
other
rules
in
the
unit.
position.
•
Your
preset
adjustments
will
also
be
erased.
Bluetooth
wireless
connection
between
the
unit
and
the
device.
Conexiunea
este stabilit%;
utiliza
16-digit
number).
[Initial:Bypute#i
0000]
position.
country
and
municipality.
disposing
of this in the unit even if you reset your unit. Up to five devices can be
4
rew
each source1
(“BT-PHONE”
andprin
“BT-AUDIO”).
Select
“BT-PHONE”
orown
“BT-AUDIO.”
•your
Once
the
connection
is established,
itcode.
is registered
dispozitivul
intermediul
aparatului.
Registering
a
Bluetooth
device
*
Some
devices
have
their
PIN
Enter the
product
correctly,
you“OPEN”
will help to conserve natural
registered
in
total.
2
Registering
using
Selecta"i
dispozitivul
înregistrat
Conectarea
unui
special
How to forcibly
eject
a disc pe care
specified
PIN
codedispozitiv
to methods
the unit.
Registration
(Pairing)
and
will
help
prevent
potential
negative
Select
“NEW.”
2
asteps
number
or blank
space.
•resources
Only
one
device
connected
at31,
a time
for each source2
(“BT-PHONE”
and
“BT-AUDIO”).
dori"i
s$-l
#terge"i.
Efectua#i
pa"ii
1 can
"i
2be
de
la (or
pagina
apoi…
3 Select
Repeat
1 and
2 until
you finish
ng
Preparation
1
Move
to
the
next
previous)
number
2
Select
a
number
or
blank
space.
effects
on the
environment
and human
health. menu
1 Selecta"i
Use
either
ofdevice
the
following
items
in the Bluetooth
op"iunea
entering a PIN code.
Operate
the
to turn“SPECIAL”.
on
its Bluetooth
function.
position.
2
Selecta!
“NEW.”
"eaz%
listathe
dispozitivelor
presetate.
toAparatul
register
and
establish
connection with
a device.
ion.
4 Confirm the entry.
Registering
Bluetooth
device
Select
or “BT-AUDIO.”
Only“BT-PHONE”
for“BT-PHONE”
[EX]amodel
users
in UK
andsource to
3 Selecta"i op"iunea “DELETE” (&tergere), apoi
h menu Note:
•1Select
or “BT-AUDIO”
as the
3
Select “OPEN.”
“OPEN...” flashes on the display.
Registration
(Pairing)menu.
methods
European
evice.
2 “YES”,
Select pentru
“NEW.”a #terge dispozitivul selectat.
operatecountries
the Bluetooth
2
Select
a
number
or
blank
space.
For
a numbered
providedmenu
e to
3 Repeat steps 1 and 2 until you finish
Usesecurity
either
of“OPEN.”
the following
itemsIDincard
the isBluetooth
3
Selectreasons,
• Be careful not to drop the disc when it ejects.
3 unit,
Repeat
steps
1
2
until
youafinish
with
this
and
the
IDand
number
is with
imprinted
on
ion.
OPEN
Make
thesame
unit
to establish
new
entering a PIN code.
to
register
and
establish
theready
connection
device.
•
If
this
does not
work,
reset your Identification
unit.
4 Enter
a PIN
(Personal
entering
a PIN
code.in a safe
the
unit’s chassis.
Keep
the
card
place,
as it to
will
Bluetooth
connection.
4
Confirm
the
entry.
• Select
“BT-PHONE”
or
“BT-AUDIO”
as the
source
3
Select
“OPEN.”
Continued
on the next page
Number)
code
to
the
unit.
4authorities
Confirm
theidentify
entry.
helpoperate
the
to
your unitby
if stolen.
ew
ismenu.
established
operating the
“OPEN...” flashes on the display.
theConnection
Bluetooth
4
Enter
a
PIN
(Personal
Identification
•
You
can
enter
any
number
you
like
(1-digit to31
“OPEN...”
flashes
on
the
display.
EXTERNAL DEVICES
32
Bluetooth device.
2
3
Repeatcode
stepsto1the
andunit.
2 until you finish
Number)
16-digit
number).
[Initial:
0000]
ng the
OPEN
Make the unit ready to establish a new
ENGLISH
Using the Bluetooth ® devices
ENGLISH
evices
Using the Bluetooth ® devices
ENGLISH ENGLISH
evices
ENGLISH ENGLISH
evices Using the Bluetooth ® devices
ENGLISH
ENGLISH
ROMÂN$
Using the Bluetooth ® devices
: Built-in CD player operations.
Control panel — KD-G632/KD-G631....... 4
Remote controller — RM-RK50........... 5
Getting started ................................ 6
Bluetooth cellular phone
: External CDUsing
changerthe
operations.
: External USB memory operations.
: Indicator displayed for the
corresponding operation.
ENGLISH
ENGLISH
ROMÂN$
Using
the Bluetooth
cellular phone
Utilizarea
telefonului
mobil Bluetooth
The following
marks are used
to indicate...
Using
the Bluetooth
cellular
phone
CONTENTS
Basic operations ................................................... 6
Radio operations ............................. 7
Change the display information
FM RDS operations ........................... 8
How to Schimba"i
use the Minforma"iile
MODE button
de pe display.
Change the display information
Searching for your favorite FM RDS programme ... 8
If you press M MODE, the unit goes into functions mode,
then the number buttons and 5/∞ buttons work as
Disc / USB memory operations........... 11
~ Select “BT-PHONE.” Change the display
different function buttons.
information
Playing
a disc in the unit ..................................... 11
Selecta"i
“BT-PHONE”.
~ SelectŸ“BT-PHONE.”
Enter Bluetooth menu.
Playing discs in the CD changer ........................... 11
meniul
Bluetooth.
When Bluetooth
number
button
2 works as
ŸEx.:Accesa"i
Enter
Playingsetting
from a USB
memory
................................
11
!
Make amenu.
call or setting using the Bluetooth
menu.
(See
pages 34 and 48.)
MO
(monaural)
button.
Select
“BT-PHONE.”
~
Ini"ia"i un apel telefonic sau efectua"i set$ri utilizând meniul Bluetooth. (Vezi paginile 34 #i 48)
!
Soundmenu.
adjustments
..........................
14
Make a call or setting using the Bluetooth setting
(See pages
34 and 48.)
Ÿ Enter Bluetooth menu.General settings — PSM .................. 15
When a call comes
an SMSsetting
comes
in.... (See pages
! in....
Make a call or settingLa
using
theWhen
Bluetooth
menu.
DAB
tuner
operations
.......................
18 34 and 4
La primirea unui apel telefonic…
primirea
unui SMS…
When a callThecomes
When an SMS
sourcein....
is automatically changed to “BT-PHONE.”
If thecomes
cellularin....
phone is compatible with SMS (Short
Sursa
se
schimb%
automat
la “BT-PHONE”.
Dacã
telefonul
mobil
este compatibil
cu serviciul19
iPod/D.
player
operations
.................
To use
these
buttons
forchanged
their
original
functions
and “MSG-INFO”
(message info) is set
The
source
is automatically
to “BT-PHONE.”
Ifdethe
cellularMessage
phone(SMS),
isService)
compatible
with “MSG-INFO”
SMS (Short
mesaje
scurte
iar func#ia
again afterWhen
pressing
M
MODE,
wait
for
5
seconds
Other
external
component
operations
...isand
21
to “AUTO”
(seesetat%
page 48),
the unit
rings
“RCV MSG”
“AUTO“AUTO
ANS” (answer)
is activated.... Message
Service)
and
“MSG-INFO”
(message
info)
set
La activarea func"iei
ANS”
(preluare
(informa#ii
mesaje)
are
op#iunea
“AUTO”
a call
in....
When an SMS comes
in....
without“AUTO
pressing
anyanswers
oftelefonic)…
theseWhen
buttons
untilcomes
the automatically,
(receiving
message)
on“RCV
the sonor
display
to inform
unit
the
calls
see
When
ANS”
(answer)
is incoming
activated....
to
“AUTO”
(see
page...................................
48),
the emite
unitappears
rings
and
MSG”
automat$
aThe
apelului
(vezi
pagina
48),
aparatul
un semnal
Maintenance
22
source
is automatically
to “BT-PHONE.”
the
cellular
phone
is compatible with
functions
mode
is48.
cleared
or The
press
Mautomatically,
MODE
again.48.
you
thea!
arrival
ofIfon
the
message.
pageapelurile
The
unit answers
the
incoming
calls
see changed
(receiving
message)
appears
the
displayMSG”
to inform
aparatul
preia
automat,
vezi
pagina
iar pe ecran
este
"at mesajul
“RCV
Message
Service) and “MSG-INFO” (mes
More
about
unit
• When “AUTO
ANS”
(answer)
is deactivated,
any
page
you
the arrival
ofthis
the
message.
• La48.
dezactivarea
func#iei
“AUTO
ANS”,
ap%sa#i press
(primire
mesaj),
pentru
a v%........................
informa c% a#i primit23
When
“AUTO
ANS”
(answer)
isunactivated....
to “AUTO” (see page 48), the unit rings a
/control
dial)
to answer
the
(except
Detaching
the
control
panel
/tastei
de
orice
tast%button
(cu
mesaj.
• When
“AUTO
ANS”excep#ia
(answer)
is deactivated,
press
any
Troubleshooting
..............................
26
The unit
answers
the incoming
calls automatically, see
(receiving message) appears on the disp
comand%)
pentru preluarea
apelului
incoming
call./control
button
(except
dial)
to telefonic.
answer
the
Specifications ..................................
29
page 48.
you the arrival of the message.
incoming call.
•
When
“AUTO
ANS”
(answer)
is
deactivated,
press
any
Pentru a încheia
apelul
telefonic
To end the call
button
(except /control dial).
/control dial) to answer the
Men#ine#i
tast%
(cu excep#ia
Hold
button
(except
To
end theap%sat%
call anyorice
/tastei de comand%).
For safety...
incoming
Hold any button (except
/controlcall.
dial).
• Nivelul volumului microfonului poate ! reglat
• Do not raise the volume level too much, as this will
• You can adjust the microphone volume level (see
(vezi pagina 48).
block outside sounds, making driving dangerous.
To end
the call
page
• You can adjust
the48).
microphone
volume
level (see
• /control
Stop thedial).
car before performing any complicated
Hold
any
button
(except
page 48).
operations.
• You can adjust the microphone volume level (see
Attaching the control
pagepanel
48).
Temperature inside the car...
If you have parked the car for a long time in hot or cold
weather, wait until the temperature in the car becomes
normal before operating the unit.
EXTERNAL DEVICES 33
DISPOZITIVE"EXTERNE 33
EXTERNAL
DEVICES 33 3
ENGLISH
ROMÂN$
Ini#ierea unui apel telefonic
Thank you for purchasing a JVC product.
Pute#i efectua un apel telefonic prin urm%toarele metode.
Please
read all instructions carefully before operation, to ensure your complete understanding and to obtain the best
possible performance from the unit.
Selecta#i “BT-PHONE”, apoi efectua#i pa"ii urm%tori pentru a ini#ia apelul telefonic:
IMPORTANT FOR LASER1PRODUCTS
2
3 (cu excep#ia altor men#iuni)
1. CLASS 1 LASER PRODUCT
2. CAUTION: Do not open the top cover. There are no user serviceable parts inside the unit; leave all servicing to
qualified
service personnel.
A!"a#i meniul Selecta#i una dintre arhivele de Selecta#i un nume (dac% este
Arhiva
apelurilor
deinvisible
apelare.class 1M
apeluri
sauwith
un optical
num%r de
3. telefonice
CAUTION: Visible and/or
laser telefonice.
radiation when open. Do notmemorat)
view directly
REDIAL (apeluri repetate),
telefon.
instruments.
RECEIVED (apeluri primite),
4. REPRODUCTION OF LABEL: CAUTION LABEL,
PLACED(apeluri
OUTSIDEnepreluate)
THE UNIT.
MISSED
Agenda telefonic$
Selecta#i op#iunea “PH BOOK”
(„Agenda telefonic%”).
Este a!"at% lista numerelor de
telefon.
Selecta#i op#iunea “NUMBER”.
Apelare direct$
Selecta#i un nume din list%.
Introduce#i num%rul de telefon.
Caution on volume setting:
Warning:
If you need to operate the unit while driving, be
sure to look ahead carefully or you may be involved
in a traffic accident.
How to reset your unit
Comanda vocal$ This symbol is only valid in
the1European Union.
[&ine#i ap%sat]
[Roti#i]
Discs produce very little noise compared with other
sources. Lower the volume before playing a disc
to avoid damaging the speakers by the sudden
increase of the output level.
Pe display este a!"at mesajul „SAY NAME” (Pronun#area
numelui)
Information for Users on Disposal of Old
2 Pronun"a"i numele persoanei pe care dori"i s$ o apela"i.
Equipment
• Pute#i, de asemenea, s% activa#i comanda vocal% din meniul de apelare. Selecta#i
This symbol indicates that the
product“VOICE”
with din meniul de apelare.
op#iunea
this symbol should not be
• disposed
În cazulasîngeneral
care telefonul mobil nu este prev%zut cu sistem de recunoa"tere
household waste at its end-of-life.
wish toeste a!"at mesajul “ERROR” (Eroare).
vocal%,Ifpeyou
display
dispose of this product, please do so in accordance
with
applicable
national legislation or other rules in
• Your preset adjustments will also be erased.
Num$r
de telefon
your
country
and
municipality. By disposing of thisPentru informa#ii despre set%ri consulta#i pagina 35.
presetat
product correctly, you will help to conserve natural
How to forcibly eject a disc
resources and will help prevent potential negative
effects on the environment and human health.
Note: Only for [EX] model users in UK and
European countries
For security reasons, a numbered ID card is provided
with this unit, and the same ID number is imprinted on
the unit’s chassis. Keep the card in a safe place, as it will
help the authorities to identify your unit if stolen.
2
34
• Be careful not to drop the disc when it ejects.
• If this does not work, reset your unit.
1 Pute#i
Display
the pân%
Dial Menu.
preseta
la "ase numere de telefon.
: Built-in CD player operations.
1 A%#a"i meniul de apelare.
CONTENTS
Control panel — KD-G632/KD-G631....... 4
Remote controller — RM-RK50........... 5
: External
USB memory
operations.
2 Select “PH BOOK,”
“MISSED,”
“REDIAL,”
or “RECEIVED”
whichever
want to use.
Getting
startedyou
................................
6
: External CD changer operations.
2 Selecta"i op"iunile
“PH
BOOK“for(“Agenda
telefonic$”), “MISSED” („Apeluri nepreluate”), sau
: Indicator
displayed
the
Basic operations ...................................................
“RECEIVED”corresponding
(„Apeluri primite”),
operation.în func"ie de preferin"e.
How
to usenumber
the M MODE button
3 Select
a phone
press Mun
MODE,
the unit
goes into functions mode,
3If you
Selecta"i
num$r
de telefon
then the number buttons and 5/∞ buttons work as
different function buttons.
4
4 Ex.: When number button 2 works as
MO (monaural) button.[&ine#i ap%sat]
ENGLISH
ROMÂN$
YouPresetarea
can preset up tonumerelor
six phone numbers.
de telefon
The following marks are used to indicate...
ENGLISH
Presetting the phone number
6
Radio operations ............................. 7
FM RDS operations ........................... 8
Searching for your favorite FM RDS programme ... 8
Disc / USB memory operations........... 11
Playing a disc in the unit ..................................... 11
Playing discs in the CD changer ........................... 11
Playing from a USB memory ................................ 11
Sound adjustments .......................... 14
General settings — PSM .................. 15
Utilizarea playerului audio Bluetooth
DAB tuner operations....................... 18
Using the Bluetooth audio player
Accesa"i meniul
iPod/D. player operations
19de
de setare
(Lista
Enter .................
setting
menu
To use these buttons for their original functions
Întrerupe"iPause/start
temporar/porni"i
redarea (Devicedispozitive)
play
back
list)
again after pressing M MODE, wait for 5 seconds
Other external component operations ... 21
without pressing any of these buttons until the
Maintenance
................................... 22
functions mode is cleared or press M MODE again.
More about this unit ........................ 23
Detaching the control panel
Troubleshooting .............................. 26
Specifications .................................. 29
Schimba"i
informa"iile
pe display.
Change
the displaydeinformation
~
1
Selecta"i “BT-AUDIO”.
For safety...
piesa
anterioar$/urm$toare
Reverse
skip/forward
•Trece"i
Do not la
raise
the volume
level tooskip
much, as this will
block outside sounds, making driving dangerous.
• Stop the car before performing any complicated
operations.
Select
“BT-AUDIO.”
Dac% redarea nu începe automat, utiliza#i playerul audio Bluetooth pentru pornirea acesteia.
playback
did notthe
start
automatically,
operate the Bluetooth audio playerunui
to start
playback.
• IfPentru
informa#ii
referitoare
lapanel
conectarea/deconectarea/"tergerea
dispozitiv
înregistrat, consulta#i,
Attaching
control
Temperature inside
the car...
de asemenea, pagina 32.
you havedevice.
parked the car for a long time in hot or cold
• Refer also to page 32 for connecting/disconnecting/deleting a Ifregistered
weather, wait until the temperature in the car becomes
normal before operating the unit.
Informa"ii despre func"ia Bluetooth:
Pentru mai
multe informa"ii despre func"ia Bluetooth, vizita"i website-ul JVC.
Bluetooth
Information:
If you wish to receive more information about Bluetooth, visit our JVC web site.
EXTERNAL DEVICES
DISPOZITIVE"EXTERNE
35
35
3
Func#ionarea schimb"torului de CD-uri
ENGLISH
ROMÂN$
ENGLISH
Thank you for purchasing a JVC product.
Please read all instructions carefully before operation, to ensure your complete understanding and to obtain the best
possible performance from the unit.
Listening to the CD changer
IMPORTANT FOR LASER PRODUCTS
1. CLASS 1 LASER PRODUCT
2. CAUTION: Do not open the top cover. There are no user serviceable parts inside the unit; leave all servicing to
qualified service personnel.
3. CAUTION: Visible and/or invisible class 1M laser radiation when open. Do not view directly with optical
instruments.
4. REPRODUCTION OF LABEL: CAUTION LABEL, PLACED OUTSIDE THE UNIT.
Schimba"i
de pe
Change theinforma"iile
display information
display.
(see page(vezi
18) pagina 18)
Împreun%
cu acest aparat
recomand%
utilizarea
It is recommended
to use aseJVC
MP3-compatible
CD
unui
schimb%tor
de unit.
CD-uri
cu changer
formatul
changer
with your
YouJVC
cancompatibil
connect a CD
MP3
Pute#i
conectajack
un on
schimb%tor
CD-uri
to the
CD changer
the rear ofdethe
unit. la
Seemufa
also
Warning:
schimb%torului
de
CD-uri
de
pe
partea
posterioar%
a
page 40.
aparatului.
Consulta#i,
de asemenea, pagina
40.
canto
only
play conventional
(including
If •youYou
need
operate
the unit whileCDs
driving,
be CD
• Pute#i reda doar CD-uri obi"nuite (inclusiv CD-uri
Text)
andahead
MP3 carefully
discs. or you may be involved
suretext)
to look
"i discuri MP3.
in a traffic accident.
Preparation
Preg$tirea
Make sure “CHANGER”
is selected
for the external
input
Asigura#i-v%
c% este selectat%
op#iunea
„CHANGE
setting, see page 45. setarea intr%rii externe, vezi
R”(„schimb%tor”)pentru
pagina 45.
This symbol is only valid in
~ Select “CD-CH.”
the European Union.
(schimb$tor de
ŸSelecta"i
Select afunc"ia
disc to“CD-CH”
start playing.
1
CD-uri).
Press: for
ForUsers
selecting
disc number
1 – 6.
Information
on Disposal
of Old
2 Selecta"i
unselecting
disc pentru
redare.7 – 12.
Hold: For
disc number
Equipment
Ap!sare:
pentruthat
a selecta
un disc
This symbol
indicates
the product
withnumerotat
de la 1 la 6.
this symbol should not be Press:
disposed as general
track un disc
Ap!sare prelungit!: pentruSelect
a selecta
household waste at its end-of-life.
If you wish to
numerotat de la 7 laHold:
12. Reverse/fast-forward
dispose of this product, please do track
so in accordance
with applicable national Ap!sare:
legislationselecteaz%
or other rulespiesa
in
MP3: Select
foldersc%utare
Ap!sare
prelungit!:
your country and municipality. By disposing of this
înapoi/rapid% înainte
product correctly, you will help to conserve natural
MP3: selecteaz%
resources and will help prevent
potential negative
directoarele
effects on the environment and human health.
Note: Only for [EX] model users in UK and
European countries
For security reasons, a numbered ID card is provided
with this unit, and the same ID number is imprinted on
the unit’s chassis. Keep the card in a safe place, as it will
help the authorities to identify your unit if stolen.
2
36
36
After pressing
, press the following buttons
Dup%
to... ap%sarea tastei
urm%toarele taste pentru a...
, ap%sa#i
Cautiontrece
on
volume
setting:
Skip
10 tracks
peste
10 piese
(MP3:
same folder)
(MP3:
înwithin
cadrulthe
aceluia"i
director)
Discs produce very
little
noise
compared
with
other
sources. Lower the volume before playing a disc
to avoid damaging
speakers
by the
sudden
TRKthe
RPT:
Repeat
current
track
RPT:
piesaallcurent%
increase of theTRK
output
level. repet%
FLDR
RPT:
MP3: Repeat
tracks of
FLDR RPT: MP3:
currentrepet%
foldertoate piesele
din directorul curent
DISC RPT: Repeat all tracks of the
DISC RPT:
repet% toate piesele de
How to reset
your unit
current disc
pe discul curent
FLDRRND:
RND: MP3:
MP3: Randomly
play all
FLDR
red% în ordine
tracks of the
aleatorie
toatecurrent
pieselefolder,
thendirectorul
tracks ofcurent,
the next
din
apoi
folder
pe
cele din directoarele
DISC RND: urm%toare.
Randomly play all tracks of
DISC RND: red%
în disc
ordine aleatorie
current
piesele
MAG RND: toate
Randomly
playde
all pe
tracks of
discul
curent.
the inserted
discs
MAG RND:
red%beînerased.
ordine aleatorie
• Your preset adjustments
will also
• To cancel repeat play or random
play, select
toate piesele
de pe
“RPT OFF” or “RND OFF.”discurile introduse
How to forcibly eject a disc
• Pentru a anula redarea repetat% sau redarea în
ordine aleatorie, selecta#i “RPT OFF” sau “RND
OFF.”
• Be careful not to drop the disc when it ejects.
• If this does not work, reset your unit.
Listening
tothe
the
DAB
tuner
: Built-in
CD
player
operations.
Listening
to
the
DAB
tuner
Listening
to
DAB
tuner
Control panel — KD-G632/KD-G631....... 4
Select
preset
service.
Remote
controller — RM-RK50........... 5
Selecta"i
serviciul
presetat.
Select
preset
service.
preset
service.
: External USB memory operations.Select
Getting started ................................ 6
: External CD changer operations.
: Indicator displayed for the
corresponding operation.
How to use the M MODE button
If you press M MODE, the unit goes into functions mode,
then the number buttons and 5/∞ buttons work as
different function buttons.
Change the
the display
display information
information
Schimba"i
de pe display.
Change
Change
the2informa"iile
display
Ex.: When number
button
works asinformation
MO (monaural) button.
Basic operations ................................................... 6
ENGLISH
ENGLISH
ROMÂN$
ENGLISH
ENGLISH
The following marks are used
to indicate...DAB
Func#ionarea
tunerului
CONTENTS
Radio operations ............................. 7
FM RDS operations ........................... 8
Searching for your favorite FM RDS programme ... 8
Disc / USB memory operations........... 11
Playing a disc in the unit ..................................... 11
Playing discs in the CD changer ........................... 11
Playing from a USB memory ................................ 11
Sound adjustments .......................... 14
15
aparatului. Consulta#i, de asemenea, pagina 40.
DAB tuner operations....................... 18
~
Select “DAB.”
“DAB.”
~
Select
1 use
~
Select
iPod/D. player operations................. 19
Selecta"i
func"ia for
“DAB”.
To
these“DAB.”
buttons
their original functions
Ÿ
Select
the
bands.
2 Selecta"i
frecven"ele.
Ÿ
Select
the
bands.
again
after
pressing
M
MODE,
wait
for
5
seconds
Other external component operations ... 21
Ÿ Select the bands.
without pressing any of these buttons until the
Maintenance
................................... 22
functions
mode is cleared
press M MODE again.
! Searching
Searching
for an
anorensemble.
ensemble.
!
Searching
for
!
for
an
ensemble.
3 C$utarea
unui ansamblu.
Moreflashes
aboutonthis
unit ........................
23
Manual Search:
Search:
Hold either
either one
one of
of the
the buttons
buttons until
until “MANU”
“MANU”
the display,
display,
then press
press itit repeatedly.
repeatedly.
Manual
Hold
flashesonon
the
then
Manual
Search:#ine#i
Hold
either one
of the
buttons
flashes
the
display,
then
press
it repeatedly.
C%utare
manual%:
ap%sat%
una
dintre
tasteuntil
pân%“MANU”
când „MANU”(“C%utare
manual%”)
lumineaz%
Detaching
the
control
panel
Troubleshooting
..............................
26
⁄ Select
Select
serviceapoi
(either
primary
or secondary)
secondary)
to listen
listen to.
to.
intermitent
peaaadisplay,
ap%sa#i
tasta în
repetat. to
⁄
Select
service
(either
primary
to
⁄
service
(either
primary
orormod
secondary)
listen to.
4 Selecta"i un serviciu (%e primar %e secundar) pentru
Specifications
a-l asculta. .................................. 29
You can
can connect
connect aa JVC
JVC
DAB
tuner
to the
theJVC
CD changer
changer
jack
on the
the
rear of
ofde
the
unit. See
See —
also
page 40.
40.posterioar% a
Pute#i
tuner
DAB
marca
la mufajack
schimb%torului
CD-uri
pepage
partea
General
settings
PSM
You
DAB
tuner
jack
rear
the
unit.
also
page
You
canconecta
connectun
a JVC
DAB
tuner
totothe
CDCDchanger
ononthe
rear
of the
unit.
Seedealso
40...................
Storing DAB
DABserviciilor
services in
in
memory
Memorarea
DAB
Storing
services
memory
Storing DAB services in memory
ÎnWhile
timp listening
ce asculta#i
un serviciu
While
listening
to aa DAB
DAB
service...DAB...
to
service...
While listening to a DAB service...
[&ine#i
ap%sat]
Activarea/dezactivarea
func#iilor
Activating/deactivating
TA/PTYde
Activating/deactivating
TA/PTY
Activating/deactivating
TA/PTY
Attaching
the
control
panel
recep#ie
în
a%teptarea
informa#iilor
StandbyReception
Reception
Standby
Reception
Standby
rutiere
(TA)
a tipului
deasprogram
•• Operations
Operations
are%iexactly
exactly
the same
same
explained on
on page
page
are
the
explained
• Operations
are
exactly the
same asasexplained
on page
favorit
(PTY)
14 for FM RDS stations.
forFM
FMRDS
RDSstations.
stations.
1414for
• • Func#iile
suntstore
identice
cu celeseparately
prezentateforlathe
pagina
You cannot
cannot
PTY codes
codes
DAB
You
storePTY
PTY
separatelyfor
forthe
theDAB
DAB
• • You
cannot
store
codes de
separately
14,
în leg%tur%
cu posturile
radio FM RDS.
tuner
and
for
the
FM
tuner.
tunerand
andfor
forthe
the
FMtuner.
tuner.
• tuner
Codurile
PTY
nuFMpot
! memorate separat pentru
tunerul DAB "i tunerul FM.
Tracing
theaceluia%i
sameprogramme—
programme—
Identi$
carea
program – Recep#ia
Tracing
the
same
programme—
Tracing
the
same
For
safety...
unei
frecven#e alternative
Alternative
Frequency Reception
Frequency
Reception
•Alternative
Do not raise theFrequency
volume level tooReception
much, as this will
Alternative
• • În
timpul
recep"ion$rii
unui serviciu DAB:
While
receiving
a DAB
DAB
service:
block
outside
sounds,
making
driving dangerous.
While
receiving
service:
• • While
receiving
aaDAB
service:
Dac%
v%
deplasa#i
într-o
zon%a unde
uncannot
anumit
When
driving
in
an
area
where
service
be
• When
Stop
the
car
before
performing
complicated
When
driving
in
an
area
where
aservice
service
cannot
driving
in an area
where aany
cannot
bebe
serviciu
nu
poate
! recep#ionat,
acest
aparat
received,
this
unit
automatically
tunes
in
to
another
operations.
received,
this
unitautomatically
automatically
tunesin
intotopost
another
received,
this
tunes
another
va
identi!
caunit
automat
alt ansamblu
sau
de
ensemble
or FM
FM
RDS station,
station,
broadcasting
the same
same
ensemble
or
RDS
broadcasting
the
radio
FMorRDS
care
transmite
acela"i program.
ensemble
FM RDS
station,
broadcasting
the
same
programme. inside the car...
programme.
•Temperature
În
timpul recep"ionãrii unui post de radio FM
programme.
•• you
While
receiving
ancarFM
FM RDS
RDS
station:
If
have
parked the
a long
time in hot or cold
RDS:
While
receiving
an
station:
• While
receiving
an
FMfor
RDS
station:
When v%
driving
in an
an
area
where
a unde
DAB
service
is
Dac%
deplasa#i
într-o
zon%
uncarserviciu
weather,
wait
until
the
temperature
in the
becomes
When
driving
in
area
where
a
DAB
service
When driving in an area where a DAB
service
isis
broadcasting
the
same
programme
as
the
FM
RDS
DAB
transmite
acela"i
program
ca
"i
postul
normal
before operating
unit. asasthe
broadcasting
thesame
samethe
programme
theFM
FMRDS
RDS
broadcasting
the
programme
station
is FM
broadcasting,
thisaparat
unit automatically
automatically
tunes
de
radiois
RDS, acest
va transmitetunes
station
broadcasting,
this
unit
station is broadcasting, this unit automatically tunes
in
to
the
DAB
service.
automat
serviciul
DAB.
in to the DAB service.
in to the DAB service.
Pentru
dezactivarea
acestei func"ii,
vezi pagina 44.
To deactivate
the Alternative
Frequency
deactivatethe
theAlternative
AlternativeFrequency
Frequency
ToTodeactivate
Reception, see
see page
page 44.
44.
Reception,
Reception,
see page
44.
DISPOZITIVE"EXTERNE 37
3
EXTERNAL DEVICES
DEVICES 37
37
EXTERNAL
EXTERNAL
DEVICES 37
Listening to the
iPod / D. player
Func#ionarea
iPod-ului/D.
Player-ului
ENGLISH
ROMÂN$
ENGLISH
Thank you for purchasing a JVC product.
Please read all instructions carefully before operation, to ensure your complete understanding and to obtain the best
possible performance from the unit.
IMPORTANT FOR LASER PRODUCTS
1. CLASS 1 LASER PRODUCT
2. CAUTION: Do not open the top cover. There are no user serviceable parts inside the unit; leave all servicing to
qualified service personnel.
3. CAUTION: Visible and/or invisible class 1M laser radiation when open. Do not view directly with optical
instruments.
informa"iile
dePLACED
pe display.
Change
the
displayLABEL,
information
4. REPRODUCTIONSchimba"i
OF LABEL:
CAUTION
OUTSIDE THE UNIT.
Înainte de punerea în func#iune, conecta#i oricare dintre urm%toarele componente (achizi#ionate separat) la
Before
operating, connect
either de
onepeof partea
the following
(separately
purchased)
to the CD"ichanger
mufa
schimb%torului
de CD-uri
posterioar%
a aparatului.
Consulta#i
paginajack
40.on the rear of
unit. Seeinterfa"ã
also pagepentru
40. iPod - KS-PD100 pentru operarea unui iPod.
• the
Adaptor
Interfaceinterfa"ã
adapterD.
forplayer
iPod—KS-PD100
controlling
an iPod.
• • Adaptor
- KS-PD500forpentru
operarea
unui D. player.
• D. player interface adapter—KS-PD500 for controlling a D. player.
Caution on volume setting:
Warning:
Preg$tire
este the
selectat%
op#iunea
(schimb%tor)
setarea
externe,
vezi
Preparation
Discs producepentru
very little
noiseintr%rii
compared
with other
IfAsigura#i-v%
you need to c%
operate
unit while
driving,„CHANGER”
be
pagina 45.
Make
sureahead
“CHANGER”
is selected
for the
external input setting,
see Lower
page 45.
sources.
the volume before playing a disc
sure
to look
carefully
or you may
be involved
Selecta"i
op"iunile “IPOD” sau “D. PLAYER”. to avoid damaging the speakers by the sudden
in1~
a traffic
accident.
Select “IPOD” or “D. PLAYER.”
increase of the output level.
2 Selecta"i o pies$ pentru redare.
Ÿ
Select a song to start playing.
symboldin
is only
valid in
Selectarea uneiThispiese
meniu
Selecting a track
fromUnion.
the menu
the European
1 Accesa"i meniul principal
1 Enter
the
main
menu.
Dac%
se efectueaz%
opera#ie
Information
fornu
Users
on
Disposalnicio
of Old
How to reset your unit
3 Con%rma"i selec"ia efectuat$.
3 Confirm the selection.
mode will5besecunde,
canceled ifacest
no
aproximativ
Equipmenttimp deThis
operations
are
done
for
about
mod
este
anulat.
This symbol indicates that the product with
• Pentru a reveni la meniul anterior, ap%sa#i .
5not
seconds.
• To move back to the previous menu, press 5.
this
symbol should
be disposed as general
2 Selecta"i
meniul
dorit.
• La selectarea unei piese, redarea va începe
• If a track is selected, playback starts
2 Select
theatdesired
menu.
household
waste
its end-of-life.
If you wish to
automat.
automatically.
• Ap%sând
continuu
, pute#i trece
dispose of this product, please do so in accordance
• Holding
4
/¢ can skip 10 items at
Pentru
iPod:national legislation or other rules in
peste
10 elemente
odatã.
with
applicable
• Your preset
adjustments
will
also
be
erased.
a time.
PLAYLIST
de redare)By disposing
ARTISTS
your
country(List$
and municipality.
of this
(Interpre"i)
ALBUMS
(Albume)
SONGS
For
iPod:
product correctly, you will help to conserve natural
Opre"te
redarea temporar/
How to forcibly eject
a disc
(Piese)
(Genuri
muzicale)
PLAYLIST
Ô
ALBUMS
Ô SONGS
Pause/stop playback
complet
resources
andGENRES
willÔ
helpARTISTS
prevent
potential
negative
COMPOSER
(Compozitor)
(de
la(back
început)
• To
Pentru
redarea,
Ô
GENRES
Ô COMPOSER
Ô
to the
resumea relua
playback,
press
effects
on the
environment
and human
health.
ap%sa#i
nou tasta.
beginning)
the
buttondinagain.
Pentru D. player:
Ap!sare:
selecteaz%
Note: Only
[EX] model users in UK and
Press: Select
tracks
For for
D.(List$
player:
PLAYLIST
de redare)
ARTIST
piesele
European
countries
Hold:
Reverse/fast-forward
Ô ARTIST
Ô ALBUMGENRE
Ô GENRE
PLAYLIST ALBUM
(Album)
(Interpret)
Ap!sare prelungit!:
For security
reasons,
a numbered
is provided
track
TRACK Ô
(back to ID
thecard
beginning)
(Gen Ô
muzical)
TRACK
(Pies$)
(de la
• Be careful not to drop the disc when
itc%utare
ejects. înapoi/
with
this
unit,
and
the
same
ID
number
is
imprinted
on
început)
•
If
this
does
not
work,
reset
your
unit.
rapid% înainte
the unit’s chassis. Keep the card in a safe place, as it will
help the authorities to identify your unit if stolen.
2
38
38
Theap%sarea
followingtastei
marks are used to, indicate...
Dup%
ap%sa#i urm%toarele taste pentru a...
Control
panella —
ONE RPT (Repetã o piesã):
Func#ioneaz%
fel caKD-G632/KD-G631
op#iunea „Repeat.......
One” a 4
: External CD changer operations.
One”of
iPod-ului
sau
modul
“Repeat
Mode
=
One”
ONE RPT:
Functions the same as “Repeat
One”
of
the
iPod
or
“Repeat
Mode
Remote controller — RM-RK50........... 5
al D-player-ului.
: External USB memory
theoperations.
D. player.
Getting
ALL
RPT
(Repetã
toate
piesele):
Func#ioneaz%
fel................................
ca
op#iuneaMode
„Repeat
ALL”
a6
ALL
RPT:
Functions
the
same
as
“Repeat
All” started
of thelaiPod
or “Repeat
= All”
of the
: Indicator displayed for the
iPod-ului
sau modul
“Repeat Mode
All” al 6
Basic
operations
...................................................
D. player.
corresponding operation.
ENGLISH
ROMÂN$
ENGLISH
CONTENTS
CD player
operations.
the following
buttons to...
After pressing : Built-in, press
D-player-ului.
Radio operations ............................. 7
ALBM RND*:
same asa“Shuffle
Albums” of the iPod.
ALBM RND*Functions
(Redare the
aleatorie
albumelor):
FM
RDS
operations
How toSONG
use RND/RND
the M MODE
buttonthe same as “Shuffle
Func#ioneaz%
ca ...........................
op#iunea
„Shuf'
On” of8
ON: Functions
Songs”
oflathefeliPod
or “Random
Play e=Albums”
Searching
for
your
favorite
FM
RDS
programme
... 8
(Redare
aleatorie
a
albumelor)
a
iPod-ului.
the
D.
player.
If you press M MODE, the unit goes into functions mode,
SONG
RND/RND
Func#ioneaz% la fel ca op#iunea „Shuf'e Songs”
then the number buttons
and 5
/∞ buttonsON:
work as
/OFF.”
USB memory operations........... 11
• To cancel repeat play or random play, select “RPT OFF” or Disc
“RND
a iPod-ului
sau modul“ Random Play
On”
different function buttons.
Playing a disc in the unit ..................................... 11
al D-player-ului.
Playing
discs in the CD changer ........................... 11
iPod:
Functions
only if you select
“ALL” in “ALBUMS” of the main
“MENU.”
•* Ex.:
Pentru
a anula
aleatorie,
selecta#i “RPT OFF” sau “RND OFF.”
When
numberredarea
button repetat%
2 works assau redarea în ordine Playing
from a USB memory ................................ 11
* iPod: Disponibil! doar dac! a$i selectat op$iunea “ALL” (Toate) pentru „ALBUMS” (Albume) în meniul principal.
MO (monaural) button.
Sound adjustments ..........................
settings — PSM ..................
Listening
to the
other
externalGeneral
components
Func#ionarea
altor
componente
externe
DAB tuner operations.......................
iPod/D. player operations.................
To use these buttons for their original functions
again after pressing M MODE, wait for 5 seconds
Other external component operations ...
without pressing any of these buttons until the
Maintenance
...................................
functions mode is cleared or press M MODE again.
More about this unit ........................
Detaching the control panel
Troubleshooting ..............................
Specifications ..................................
Schimba"i
informa"iile
de pe display.
Change the
display information
14
15
18
19
21
22
23
26
29
For safety...
• Do not raise the volume level too much, as this will
Pute#i
extern% to:
la ...
block outside sounds, making driving dangerous.
You canconecta
connectoancomponent%
external component
• mufa schimb%torului de CD-uri situat% în partea posterioar%
a aparatului
ajutorul urm%toarelor
Stop the
car beforecu
performing
any complicated
• CD changer jack on the rear of this unit using the following•adapters:
adaptoare:
operations.
–– Line
Input
Adapter,
KS-U57
Adaptorul intr$rii linie, KS-U57
–– AUX
Input Adapter,
KS-U58 KS-U58
Adaptorul
intr$rii
auxiliare,
Attaching
the
control
Temperature
inside
thepagina
car...45.
Make
sure
“EXT
IN”
is
selected
forpanel
the„EXT
external
setting,
seeintr%rii
page 45.
Asigura#i-v% c% a#i selectat op#iunea
IN”input
pentru
setarea
externe,
vezi
If you have parked the car for a long time in hot or cold
IN terminals
on the
rear of
this unit. a acestui aparat.
•• LINE
Mufele
LINE IN din
partea
posterioar%
1
Selecta"i “EXT IN” sau “LINE IN.”
weather, wait until the temperature in the car becomes
normal before operating the unit.
~
Selectcomponenta
“EXT IN” or “LINE
IN.” #i începe"i redarea sursei.
2 Porni"i
conectat$
Ÿ
Turn on
the connected
3 Regla"i
nivelul
volumului.component and start playing the source.
4 Regla"i
!
Adjustsunetul
the volume.
în func"ie de preferin"e (vezi paginile 41 #i 42).
Continuare pe pagina urm!toare
⁄ Adjust the sound as you want (see pages 41 and 42).
DISPOZITIVE"EXTERNE
Continued on the next39
page
3
ENGLISH
ROMÂN$
ENGLISH
Schema
conexiunilor
Concept diagram
of the dispozitivului
external
connection
Thankdevice
you forextern
purchasing a JVC product.
Consulta#i
decarefully
instalare/conectare
(volum
separat)
în
vedereaunderstanding
conect%rii. and to obtain the best
Please
all Manualul
instructions
before operation,
to(separate
ensure
your
complete
Forread
connection,
see Installation/Connection
manual
volume).
possible performance from the unit.
• Conexiunea 1 (conexiune integrat$)
• Connection 1 (integrated connection)
IMPORTANT FOR LASER PRODUCTS
Player
MD,etc.,
etc.,
MD player,
[39][39]
1. CLASS 1 LASER PRODUCT
Aparat
Unit
2. CAUTION: Do not open the top cover. There are no user serviceable parts inside the unit; leave all servicing to
Mufa
schimb%torului
de CD-uri
qualified service personnel.
CD changer
jack
3. Mufe
CAUTION:
Visible
and/or
invisible
class
1M
laser
radiation when open. Do not view directly with optical
IN
LINE INLINE
terminals
instruments.
4. REPRODUCTION OF LABEL: CAUTION LABEL, PLACED OUTSIDE THE UNIT.
Schimb%torul
de CD-uri[36]
JVC, [36]
JVC CD changer,
(vezi
paginile
(see pages
31 –31
35)– 35)
or
sau
(schimb%tor)
(see page 45 of the
(vezi pagina 45 pentru
”EXT IN””EXT
setting)
setarea
IN”)
iPod
de iPod,
la Apple
Apple
[38] [38]
D.
JVC,
JVCplayer
D. player,
[38][38]
Player
MD,etc.,
etc.,[39]
[39]
MD player,
Caution on volume setting:
Warning:JVC DAB tuner, [37]
(vezi
Player
MD,etc.,
etc.,
(see pagina
page 4545ofpentru
the
MD player,
[39][39]
IN”) Discs produce very little noise compared with other
If you need to operate the unit while driving,setarea
be IN””EXT
”EXT
setting)
sure to look ahead carefully or you may be involved
Conexiunea
(conexiuneconnection)
alternativ$)
Connection
22(alternative
in• •a traffic
accident.
sources. Lower the volume before playing a disc
to avoid damaging the speakers by the sudden
increase of the output level.
Aparat
Unit
Mufe
IN
LINE INLINE
terminals
This symbol
isschimb%torului
only
Mufa
CD changer
jackvalid in de CD-uri
the European Union.
Player
MD,etc.,
etc.,
MD player,
[39][39]
How to reset your unit
Information for Users on Disposal of Old
(vezi
paginile
31 – 35)
(see
pages
31 – 35)
Equipment
This symbol indicates that the product with
this symbol should not be disposed as general
Tuner
DABtuner,
JVC,[37]
[37]
JVC DAB
household waste at its end-of-life. If you wish to
dispose of this product, please do so in accordance
Schimb%torul
de CD-uri[36]
JVC, [36]
with applicable national legislation or other rules in
• Your preset adjustments will JVC
alsoCDbechanger,
erased.
your country and municipality. By disposing of this
iPod
de iPod,
la Apple
Apple
[38] [38]
product correctly, you will help to conserve(schimb%tor)
natural
(seepagina
page 4545ofpentru
the How to forcibly eject a disc
(vezi
DJVC
player
JVC,[38]
[38]
D. player,
resources and will help prevent potential negative
”EXT IN””EXT
setting)
setarea
IN”)
effects on the environment and human health.
Player
MD,etc.,
etc.,
MD player,
[39][39]
Note: Only for [EX] model users in UK and(vezi pagina 45 pentru
Player
MD,etc.,
etc.,
MD player,
[39][39]
(see page 45 of the
setarea ”EXT IN”)
European countries
”EXT IN” setting)
For security reasons, a numbered ID card is provided
: Adaptor
Adapter
purchased)
• Be careful not to drop the disc when it ejects.
(achizi#ionat
separat)
with this unit,
and the(separately
same ID number
is imprinted on
• If this does not work, reset your unit.
the unit’s chassis. Keep the card in a safe place, as it will
help the authorities to identify your unit if stolen.
2
40 EXTERNAL
DEVICES
DISPOZITIVE"EXTERNE
: Built-in
CD player operations.
Selecting
a preset
sound mode
Control panel — KD-G632/KD-G631....... 4
Remote controller — RM-RK50........... 5
Getting started ................................ 6
: External CD changer operations.
: External USB memory operations.
: Indicator displayed for the
corresponding operation.
Basic operations ................................................... 6
ENGLISH
ENGLISH
ROMÂN$
The following marksunui
are usedmod
to indicate...
Selectarea
presetatCONTENTS
de redare a sunetului
Radio operations ............................. 7
FM RDS operations ........................... 8
How to use the M MODE button
Searching for your favorite FM RDS programme ... 8
If you press M MODE, the unit goes into functions mode,
then the number buttons and 5/∞ buttons work as
different function buttons.
Preset"rile frecven#elor:
Ex.: When number button 2 works as
PresetMO
frequency
settings:
(monaural)level
button.
Disc / USB memory operations........... 11
Playing a disc in the unit ..................................... 11
Playing discs in the CD changer ........................... 11
Playing from a USB memory ................................ 11
Sound adjustments .......................... 14
Preset
equalizing
values
General
settings
— PSM .................. 15
Valorile presetate
ale egalizatorului
Mod
de mode
redare a
Sound
sunetului
6060HzHz 150
400 Hz
HzDAB 1tuner
1kHz
kHz operations
2.5kHz
kHz .......................
6.3kHz
kHz
15kHz
kHz18
150Hz
Hz 400
2,5
6,3
15
USER (sunet normal)
00
00
00
00
00
00
00
.................
USER
00 original functions
00
00 iPod/D.00player operations
00
00
00 19
To use these buttons for their
ROCK (Muzic% rock)
+03
+02
00
00
+01
+02
+01
again
after
pressing
M
MODE,
wait
for
5
seconds
component
operations
... 21
ROCK
+03
+02
00 Other external
00
+01
+02
+01
CLASSIC (Muzic%
+01 until the
+03
+01
00
00
+02
00
without pressing any of these buttons
clasic%)
Maintenance
...................................
CLASSIC
+01M MODE +03
+01
00
00
+02
00 22
functions mode is cleared or press
again.
POPS (Muzic% u"oar%)
00
+02
00 More about
00
00
+01
+02
this unit ........................ 23
POPS
00
+02
00
00
00
+01
+02
HIP HOP (muzic% funk
+04panel +01
–01 Troubleshooting
–02
00..............................
+01
00 26
Detaching
the
control
sau rap)
HIP HOP
+04
+01
–01
–02
00
+01
00
JAZZ (muzica jazz)
+03
+02
+01 Specifications
+01
+01
+03
+01 29
..................................
JAZZ
+03
+02
+01
+01
+01
+03
+01
For safety...
• Do not raise the volume level too much, as this will
block outside sounds, making driving dangerous.
• Stop the car before performing any complicated
operations.
Attaching the control panel
Temperature inside the car...
If you have parked the car for a long time in hot or cold
weather, wait until the temperature in the car becomes
normal before operating the unit.
Continuare pe pagina urm!toare
Continued on the next page
SET#RI
SETTINGS
41
41
3
ENGLISH
ENGLISH
ROMÂN$
ENGLISH
Memorarea
set"ri pentru
Reglarea
Storing yourpropriilor
own sound
Adjustingsunetului
the sound
Thank you for purchasing a JVC product.
sunet
adjustments
Please read all instructions carefully before operation, to ensure1
your complete understanding and to obtain the best
1
11
possible performance from the unit.
IMPORTANT FOR LASER PRODUCTS
volumului.
2 Regla"i
Adjust nivelul
the level.
2
1. CLASS 1 LASER PRODUCT
[Roti#i]
2. CAUTION: Do not open the top cover. There are no user serviceable parts inside the unit; leave all servicing to
Accesa"i
modul
deadjustment
reglare a sunetului.
3qualified
Enterservice
the
sound
mode.
personnel.
3. CAUTION: Visible and/or invisible class 1M laser radiation when open.
Do not view directly with optical
FAD *11 (fader)
R06 to F06
instruments.
Între R06 "i
FAD *1the
(fader)
Adjust
front and rear speaker
4. 4REPRODUCTION
OF LABEL:to
CAUTION
THE UNIT.
Selecta"i
frecven"$
de
reglat.LABEL, PLACED OUTSIDERegleaz%
F06
Select aofrequency
adjust.
balance. balansul între
difuzoarele din fa#% "i din spate.
BAL (balance)
L06 to R06
Între L06 "i
BAL (balans)
Adjust
the
left
and
right
speaker
R06
Regleaz% balansul între
balance.
difuzoarele din stânga "i
volumului.
5 Regla"i
Adjustnivelul
the level.
Warning:
[Roti#i]
If you need to operate
the unit while driving, be
sure to look ahead carefully or you may be involved
in a traffic accident.
5 pentru
a reglathe
#i other
6 Repeta"i
Repeat pa#ii
steps44#iand
5 to adjust
celelalte
benzi
de frecven"$.
frequency
bands.
This symbol
isinonly
valid
in
7 Memora"i
Store thereglajele
adjustments
the
respective
în modul
respectiv.
mode.
the European Union.
Information for Users on Disposal of Old
Equipment
This symbol indicates that the product with
this symbol should not be disposed as general
household waste at its end-of-life. If you wish to
dispose of this product, please do so in accordance
with applicable national legislation or other rules in
your country and municipality. By disposing of this
product correctly, you will help to conserve natural
resources and will help prevent potential negative
effects on the environment and human health.
Note: Only for [EX] model users in UK and
European countries
For security reasons, a numbered ID card is provided
with this unit, and the same ID number is imprinted on
the unit’s chassis. Keep the card in a safe place, as it will
help the authorities to identify your unit if stolen.
2
42
dreapta.
LOUD ON or
LOUD
(loudness)
LOUD
LOUD
(intensitate)
OFFsau
Boost
low
and
high
frequencies
to
Caution on volume setting: LOUDON
Accentueaz%
frecven#ele
joase
produce
a well-balanced
sound
at low LOUD OFF
Discs
produce
veryalittle
noise compared
with other
"i înalte
pentru
produce
un
volume
level.
sources.
Lower
the
volume
before
playing
a disc
sunet echilibrat
la
un
nivel
redus
SUB.W *22 (subwoofer)
00 to 08;
volum.
todeavoid
damaging the speakers by the sudden
Adjust subwoofer
output
balance.
initial: 04
increase
output
level.
între 00 "i 08
SUB.Wof*2the
(difuzor
de
bas)
33 (volume adjust)
–05 to
+05;
VOL.A
*
setare
ini#ial%:
Regleaz% balansul de ie"ire a
04initial: 00
Adjust
and store
auto-adjustment
sunetelor
din difuzorul
de bas.
How*3to reset
volume
for eachyour
source,unit
între -05 "i
VOL.Alevel
(reglarea
volumului)
comparing
to
the
FM
volume
level. +05;
Regleaz% "i memoreaz% nivelul
de reglare
VOL
(volume)automat% a volumului setare
00 to ini#ial%:
30
pentru !ecare surs%, în func#ie 00
Adjust
the volume.
(or 50) *44
de nivelul volumului FM.
11 If you are using a two-speaker system, set the fader
*VOL
între 00 "i 30
(volum)
level to “00.”
(sau 50) *4
Regleaz%
nivelul volumului.
*22 This takes effect only when a subwoofer is connected.
**133 Dac!
utiliza$i
un sistem
cu dou!
You cannot
make
an adjustment
fordifuzoare,
FM. “FIX” seta$i
nivelul
faderului la „00.”
appears.
• *2Your
preset adjustments
will
alsoînbeconsiderarea
erased.
setare
luat!
*44 Aceast!
Depending
on theeste
amplifier
gain control setting.doar
(See
când este conectat un difuzor de bas.
page
45
for
details.)
*3
*4
Nu
pute$i
modi"ca setarea
How
to forcibly
eject aFM.
discApare mesajul
“FIX”.
În func$ie de setarea controlului ampli"c!rii.
(Pentru mai multe detalii, vezi pagina 45.)
• Be careful not to drop the disc when it ejects.
• If this does not work, reset your unit.
CD player—
operations.
General: Built-in
settings
PSM
Pute#i schimba:op#iunile
(Preferred
Setting
External PSM
CD changer
operations.
Mode
Modul de
preferen#iale)
prezentate
You can– change
PSMset%ri
(Preferred
Setting Mode)
items
: External
USB
memory
în
tabelul
mai
jos sau
dinontabelele
de
paginile
listed
in thedetable
below
and
pages 44operations.
andla45.
44 "i 45.
1
: Indicator displayed for the
corresponding
Introduce"i
set$rile
PSM.operation.
Enter the PSM
settings.
[&ine#i ap%sat]
How to use the M MODE button
oPSM
op"iune
PSM.
press Ma MODE,
the unit
goes into functions mode,
2If youSelecta"i
Select
item.
then the number buttons and 5/∞ buttons work as
different function buttons.
Selecta"i
regla"i
op"iunea
PSM
selectat$.
Select orsau
adjust
the
selected
PSM
item.
3Ex.: When number button 2 works as
General
settings — PSM
CONTENTS
You can change PSM (Preferred Setting Mode) items
panel
— and
KD-G632/KD-G631
.......
listed
in theeste
tablenecesar,
below
on pagespa#ii
44 and
4Control
Dac$
repeta"i
2 #i45.3
...........
—op"iuni
pentru
acontroller
regla
PSM.
4Remote
Repeat
steps#i2alte
and
3RM-RK50
to adjust
other
4
5
15Getting
Enter
the
PSM
settings.
PSM
items
if
necessary.
started
................................
6
Finaliza"i opera"ia.
Basic operations ................................................... 6
ENGLISH
ENGLISH
ROMÂN$
The following marks are used to indicate...
Set"ri
generale — PSM
4
Rep
PSM
5
Fin
5Radio
Finish
the procedure.
operations
............................. 7
2 Select a PSM item.
FM RDS operations ........................... 8
Searching for your favorite FM RDS programme ... 8
/ USBormemory
...........
3DiscSelect
adjust theoperations
selected PSM
item. 11
Playing a disc in the unit ..................................... 11
Playing discs in the CD changer ........................... 11
Playing from a USB memory ................................ 11
MO (monaural) button.
Sound adjustments .......................... 14
General settings — PSM .................. 15
DAB tuner operations....................... 18
Indica"ie
Op"iune ( _: setare ini#ial%) Setare, [pagin$ de referin"$]
iPod/D. player
operations
19
To
use these buttons for
their original
mesajelor
pe a!"aj va.................
! activatã
DEMO
• DEMO
ON functions : Derularea
Indication
Item nicio opera#ie
Setting, [reference pag
automat
dacã
nu
este
efectuatã
Derularea
again
after pressing M MODE, wait for 5 seconds
Other external component operations ... 21
timp de 20 de secunde, ([7]. : Initial)
mesajelor pe a!"aj
without
pressing any of these buttons until the
: Anuleaz%
Indication
page]setarea.................................... 22
• Item
DEMO OFF Setting, [reference
Maintenance
functions mode
is cleared or press M MODE again.
DEMO
• DEMO ON : Display demonstration w
: Ceasul
este a!"at
chiar "i atunci 23
CLK DISP *1
• (ON: Initial)
Moreaparatul
about
thisîntotdeauna
unit ........................
Display
demonstration
is done for about 20 sec
când
este oprit.
A!"area ceasului
• DEMOtastei
OFF if Dno
: DISP,
Cancels.26
Detaching the• control
DEMO
•OFF
DEMOpanel
ON : Display demonstration
willopera#ia:
be activated
automatically
operation
: Anuleaz%
la ..............................
ap%sarea
Troubleshooting
ceasul
va ! a![7].
"at timp de aproximativ 5 secunde,
Display demonstration
is done for about
20 seconds,
Specifications
..................................
29 is shown on
CLK
DISP
*1 aparatul
• oprit,
ON [7]. : Clock time
atunci
când
este
• DEMO OFF : Cancels.
[Roti#i]
CLOCK H
Setarea
CLK DISPorei
*1
Clock display
CLOCK
M
Setarea minutelor
24H/12H
Modul de a!"are a
ceasului
CLOCK H
Hour adjustment
0 – 23
(1 •– ON
12
00 – 59
• OFF
• 12H
• 24H
0 – 23
(1 – 12)
Clock display
turned off.
: setare
ini#ial%: 0 (0:00), [7].
• OFFwhen the power
: Cancels;
: Clock time is shown on the display at all times
is pressing D DISP
when the power is turn
For safety...
turned off. : setare
ini#ial%: 00 (0:00), [7].
• Do
not raise
the volume
level
tooformuch,
will
: Cancels; pressing
D DISP
will show
the clock
time
aboutas5this
seconds
CLOCK
Houtside7,sounds,
0 – 23
: Initial: 0 (0:00), [7].
: Vezi
"i pagina
efectu%rii
set%rii.
making
driving dangerous.
when the power
isblock
turned
off, [7].în vederea
Hour
adjustment
(1 – 12)any complicated
• Stop
the car before performing
: Initial: 0 (0:00), [7].
operations.
CLOCK M
00 – 59
: Initial: 00 (0:00), [7].
Minute adjustment
Dac! alimentarea cu energie nu este întrerupt! prin scoaterea
cheii din contact, se recomand!
Attaching the control panel
inside the car...
selectarea
autovehiculului.
CLOCK
M pozi$iei “OFF”
00 –pentru
59 a se :economisi
Initial: 00 bateria
(0:00),Temperature
[7].
24H/12H
Seeoralso
page 7 for setti
If you have parked the car•for12H
a long time in: hot
cold
Minute adjustment
Time
display
• 24H in the car becomes
weather,
waitmode
until the temperature
24H/12H
• 12H
: See also page 71normal
for setting.
before operating the unit.
* If the power supply is not interrupted by turning off the ignition key
Time display mode
• 24H
save the car’s battery.
*1 If the power supply is not interrupted by turning off the ignition key of your car, it is recommended to select “OFF” to
save the car’s battery.
Continuare pe pagina urm!toare
*1
Continued on the next43
page
SET#RI
3
ENGLISH
ROMÂN$
Indica"ie
Op"iuneThank
( _: you forSetare,
[pagin$
de referin"$]
purchasing
a JVC product.
setarebefore
ini#ial%)
Please read all instructions carefully
operation, to ensure your complete understanding and to obtain the best
the unit.este reglat automat cu ajutorul datelor
: Ceasulfrom
încorporat
CLK ADJ
• AUTO possible performance
CT (clock time - orã) recep#ionate prin intermediul
semnalului RDS.
: Anuleaz% setarea.
• OFF
1. CLASS 1 LASER
PRODUCT
*2
semnalele recep#ionate devin slabe, aparatul intrã
• top
AFcover. There are: noCând
2. AF-REG
CAUTION: Do not open the
user serviceable
parts inside the unit; leave all servicing to
pe frecven#a unui alt post de radio sau a unui alt serviciu
Frecven#% alternativ%/
qualified service personnel.
(programul
poate
! altul decât cel transmis în momentul
recep#ie local%
3. CAUTION: Visible and/or invisible class 1M laser radiation
when open. Do not view directly with optical
respectiv), [14].
instruments.
: Când semnalele recep#ionate devin slabe, aparatul intr%
• AF REG
4. REPRODUCTION OF LABEL: CAUTION LABEL, PLACEDpeOUTSIDE
THE unui
UNIT.alt post de radio care transmite acela"i
frecven#a
program.
: Anulare (aceast% opera#ie nu este posibil% când op#iunea
• OFF
„DAB AF” este setat% la „AF ON”).
OFF, coduri PTY : Este activat% func#ia PTY Standby Reception (Recep#ie
PTY-STBY
în a"teptare a unui anumit tip de program) cu ajutorul
Recep#ie PTY (tip de (vezi pagina 13)
unuia dintre codurile PTY, [13, 14].
program) în a"teptare
Caution on volume setting:
Warning:
: setare ini#ial%: VOL 15, [14].
VOL 00 —
TA VOL
*3
Discs
produce very little noise compared with other
IfVolumul
you needde
to operate
the
unit
while
driving,
be
redare a VOL 30 sau 50
sources. Lower the volume before playing a disc
sure
to look ahead
carefully or you may be involved
informa#iilor
rutiere
to avoidfunc#ia
damaging
the speakers
by the sudden
inP-SEARCH
a traffic accident.
*2
: Este activat%
de c%utare
a programului,
[14].
• ON
increase
of the output level.
: Anuleaz%
setarea.
C%utarea programului • OFF
: Identi!cã programul în cadrul serviciilor DAB "i a
DAB AF *4
• AF ON
posturilor de
radio
RDS,your
[37].unit
Recep#ia unei
How
toFM
reset
This symbol
only valid in : Anuleaz% setarea.
frecven#e alternative
• AFisOFF
the European
Union.
: Scade intensitatea luminoas% a a!"ajului atunci când
DIMMER
• AUTO
aprinde#i farurile din fa#%.
Atenuator de
Information
for Users on •Disposal
: Reduce intensitatea luminoas% a a!"ajului.
intensitate luminoas%
ON of Old
Equipment
: Anuleaz% setarea.
• OFF
Reglarea ceasului
IMPORTANT FOR LASER PRODUCTS
This symbol indicates that the product with
*2
Doar
pentru
de radioasFM
RDS presetate.
this
symbol
shouldposturile
not be disposed
general
*3
În func$ie
de at
setarea
“AMP GAIN”
household
waste
its end-of-life.
If you (controlul
wish to ampli"c!rii).
*4
Esteofa"this
#atproduct,
doar când
tunerul
este conectat.
dispose
please
do soDAB
in accordance
with applicable national legislation or other rules in
• Your preset adjustments will also be erased.
your country and municipality. By disposing of this
product correctly, you will help to conserve natural
How to forcibly eject a disc
resources and will help prevent potential negative
effects on the environment and human health.
Note: Only for [EX] model users in UK and
European countries
For security reasons, a numbered ID card is provided
with this unit, and the same ID number is imprinted on
the unit’s chassis. Keep the card in a safe place, as it will
help the authorities to identify your unit if stolen.
2
44
• Be careful not to drop the disc when it ejects.
• If this does not work, reset your unit.
Setare, [pagin$ de referin"$]
CONTENTS
: Selectând una dintre aceste op#iuni, sonorul
Control panel
— KD-G632/KD-G631
aparatului
va ! întrerupt
când este utilizat.......
telefonul4
celular.
Remote controller — RM-RK50........... 5
: Anuleaz% setarea.
Getting
: Deruleazã started
informa#ia................................
de pe disc o singurã datã. 6
Basic operations
...................................................
: Repetã
opera#iunea
de derulare (la intervale de 6
corresponding operation.
5 secunde).
Radio operations
.............................
: Anuleaz%
setarea. (Ap%sarea
continu% a tastei 7
• OFF
D DISP poate declan"a derularea a!"ajului,
FM
RDS
operations
...........................
8
How to use the M MODE button
indiferent de set%ri.)
Searching
for
your
favorite
FM
RDS
programme
...
IfWOOFER
you press M MODE, the unit goes•intoLOW
functions mode, : Frecven#ele mai joase de 85 Hz sunt trimise c%tre 8
difuzorul
de bas.
Frecven#a-limit%
a difuzorului
then
the number buttons
and 5/∞ buttons work as
Disc / USB
memory operations........... 11
: Frecven#ele mai joase de 125 Hz sunt trimise
de bas function buttons.
• MID
different
Playing
a discde
in the
c%tre difuzorul
bas.unit ..................................... 11
Playing discs
in joase
the CDde
changer
...........................
: Frecven#ele
mai
165 Hz
sunt trimise 11
• HIGH
c%tre
difuzorul
bas.
Ex.: When number button 2 works as
Playing
from adeUSB
memory ................................ 11
: Frecven#a limit% a difuzorului de bas este
HPF MO (monaural) button.
• HPF ON
Sound adjustments
..........................
selectat%
automat în func#ie
de set%rile func#iei 14
Filtru High-Pass (trece sus)
WOOFER
(LOW/MID/HIGH)
astfel
încât s% pute#i15
General settings — PSM
..................
savura doar tonurile joase transmise de difuzorul
de
bas,tuner
în cazul
în care acesta
este conectat. 18
DAB
operations
.......................
: Anuleaz% setarea.
• HPF OFF
iPod/D.
player
operations
.................
19
*6
To
useINthese
buttons for their original
functions : Pentru
a putea
utiliza
un schimb%tor
de CD-uri JVC,
• CHANGER
EXT
[36],
un
iPod
Apple
sau
un
D.
player
JVC,
[38].
Intrarea
extern%
again
after
pressing M MODE, wait for 5 seconds
Other external component operations ... 21
: Pentru a utiliza orice alt% component% extern%, [39].
• EXT
without pressing any of these buttons
until IN
the
Maintenance
...................................
22
: A!"eaz% elementele
de informare în timpul red%rii
TAG DISP
• MODE
TAG again.
ON
functions
mode is cleared or press M
pieselor în format MP3/WMA/AAC/WAV.
A!"area elementelor de
More about
this unit ........................ 23
: Anuleaz%
setarea.
informare
• TAG OFF
Detaching
the
control
panel
*7
Troubleshooting
..............................
: Selecta#i aceast% op#iune
pentru a activa ie"irea26
REAR SPK
• ON
difuzorului din spate.
Ie"irea difuzorului din spate
Specifications
: Anuleaz%
setarea. .................................. 29
• OFF
: VOL 00 – VOL 30 (Selecta#i aceast% op#iune dac%
AMP GAIN
• LOW PWR
puterea maxim% a difuzorului este mai mic% de 50
Control ampli!care
WFor
pentru
a preveni defectarea acestuia.)
safety...
: VOL
VOLthe
50 volume level too much, as this will
• HIGH PWR
• Do00
not–raise
: Cre"te
selectivitate
tunerului,
pentru
IF BAND
• AUTO
blockgradul
outsidedesounds,
makingadriving
dangerous.
a reduce interferen#ele dintre posturile de radio
Banda de frecven#%
•
Stop
the
car
before
performing
any
complicated
apropiate (Se poate pierde efectul stereo.)
intermediar%
: Voroperations.
ap%rea interferen#e între posturile de radio
• WIDE
apropiate, dar calitatea sunetului nu va sc%dea, iar
efectul stereo va ! p%strat.
Attaching the control panel
ENGLISH
ROMÂN$
The following marks are usedOp"iune
to indicate...
Indica"ie
(_: setare ini#ial%)
: Built-in CD player operations.
TEL
• MUTING 1/
Dezactivarea sunetului
: External la
CD changerMUTING
operations.2
primirea unui apel telefonic
• OFF
: External USB memory
operations.
• ONCE
SCROLL *5
: Indicator displayed
the
Scroll (Derulare)
• for
AUTO
Temperature inside the car...
*5
*6
*7
If you have
the pe
car a"
for#aj.
a long time in hot or cold
Unele caractere sau simboluri nu vor apãrea în mod corect
(sauparked
vor lipsi)
weather,
wait until
temperature
in the
carselectatã
becomes
Nu este necesar! pentru adaptorul Bluetooth #i tunerul
DAB JVC.
Este the
a"#at!
doar când
este
una dintre sursele urm!toare—FM, AM, DAB, DISC, USB,
sau LINE
normalBluetooth
before operating
theIN.
unit.
Este a"#at! doar când este activat! func$ia Dual Zone (vezi pagina 30).
SET#RI
45
3
Meniul de set"ri Thank you for purchasing a JVC product.
ENGLISH
ROMÂN$
ENGLISH
Setup
menucarefully before operation, to ensure your complete understanding and to obtain the best
read all instructions
SetupPlease
menu
possible
performance
from the
unit.
Aceste
func#ii
sunt
intermediul
These operations
aredisponibile
possible on prin
the monitor
usingtelecomenzii.
the remote controller.
These operations are possible on the monitor using the remote controller.
Accesa"i
set$ri
în timp
~
Enter themeniul
setupde
menu
while
IMPORTANT FOR~
LASER
PRODUCTS
Enter
the ce
setup
menueste
while
redarea
întrerupt$.
stop.
1. CLASS 1 LASER PRODUCT
stop.
2. CAUTION: Do not open the top cover. There are no user serviceable parts inside the unit; leave all servicing to
qualified service personnel.
Selecta"i
un meniu.
3. CAUTION: Visible and/or invisible
class 1M
laser
radiation when open. Do not view directly with optical
Select
a menu.
Ÿ SelectŸ
a menu.
instruments.
4. REPRODUCTION OF LABEL: CAUTION LABEL, PLACED OUTSIDE THE UNIT.
!
care to
dori"i
! Selecta"i
Select anop"iunea
item youpewant
set
Select an item
you want to set
s$
up.o seta"i.
up.
• Pentru a anula meniul pop-up,
Caution .on volume setting:
• To cancel pop-up menu, press
• To cancel pop-up
menu,
press
.
ap%sa#i
butonul
Discs
produce very little noise compared with other
If you need to operate the unit⁄
whileSelecta"i
driving,
be
op"iune.
Select anooption.
Select
an may
option.
sources. Lower the volume before playing a disc
sure to look ahead⁄
carefully
or you
be involved
to avoid damaging the speakers by the sudden
in a traffic accident.
increase of the output level.
Pentru
a reveni
la meniul
To return
to normal
screen normal
Warning:
To return to normal screen
This symbol is only valid in
the European Union.
Meniu
Op"iune
How to reset your unit
Setare
46
LANGUAGELANGUAGE (LIMBA)
LANGUAGE
InformationMENU
for Users
on Disposal
of OldDE
Selecta#i limba ini#ial% de redare a meniului.
LANGUAGE
(LIMBA
EquipmentREDARE A MENIULUI)
Consulta#i "i „Codurile limbilor” de la pagina 56.
This symbol indicates
that the product
with DE
Selecta#i limba ini#ial% de redare audio. Consulta#i "i
AUDIO LANGUAGE
(LIMBA
this
symbol should
disposed
as general
Menu
Item not be
Setting
„Codurile limbilor” de la pagina 56.
REDARE
AUDIO)
Menu household
Item waste
Setting
at its end-of-life.
If you wish to
Selecta#i
limba
ini#ialã
redare a subtitr%rii
sau 56.
SUBTITLE
(SUBTITR'RI)
MENU please doSelect
the initial disc menu
language.
Refer
also tode“Language
codes” on page
dispose
so indisc
accordance
MENU of this product,
Select the initial
menu language."terge#i
Refer also
to “Language
codes”
on page "i56.„Codurile
subtitrarea
(OFF).
Consulta#i
LANGUAGE
with
applicable national legislation or other rules in
LANGUAGE
limbilor”
de la adjustments
pagina 56. will also be erased.
• Your preset
AUDIO
the initial
language.
Refer
“Language
codes” on page 56.
your
country
andSCREEN
municipality.
BySelect
disposing
of thisaudioRefer
Selecta#i
limbaalso
detoa!
"are on
a informa#iilor
ON
LANGUAGE
AUDIO
Select the
initial
audio(LIMBA
language.
also to “Language
codes”
page 56. pe ecran.
LANGUAGE
product
correctly,
you
will
help
to
conserve
natural
DE
AFI&ARE)
LANGUAGE
How to forcibly eject a disc
resources andSUBTITLE
will help prevent potential
Select thenegative
initial subtitle language or remove the subtitle (OFF). Refer also to
SUBTITLE
Select
the
initial
subtitle
language
or
remove
the subtitle (OFF). Refer also to
effects on the environment and human
health.
“Language
codes” on page 56.
“Language codes” on page 56.
SCREEN
Select
language for the on screen display.
Note:
Only forON
[EX]
model
in UK the
and
ON SCREEN
Select users
the language
for the on screen display.
LANGUAGE
European
countries
LANGUAGE
For security reasons, a numbered ID card is provided
• Be careful not to drop the disc when it ejects.
with this unit, and the same ID number is imprinted on
• If this does not work, reset your unit.
the unit’s chassis. Keep the card in a safe place, as it will
help the authorities to identify your unit if stolen.
46
2
46
CONTENTS
tipul
de a!"aj
pentru
vizualizarea
imagini
panoramice
pe
MONITOR TYPE
(TIPUL
DE Selecta#i
TYPE
Select the
monitor
type
to watch
a wide unei
screen
picture
on your monitor.
: Built-in CDMONITOR
player
operations.
monitor.
AFI&AJ)
: External CD changer operations.
PICTURE (IMAGINE)
: External USB memory operations.
Control panel — KD-G632/KD-G631....... 4
Remote controller — RM-RK50........... 5
Getting started ................................ 6
ENGLISH
ROMÂN$
Menu
Item
Setting
The following
marks are
used to indicate...
Op"iune
Setare
Meniu
PICTURE
: Indicator displayed for the
Basic operations ................................................... 6
corresponding
operation. Selecta#i pozi#ia barei de ecran pe monitor.
OSD
POSITION (POZI!IA
OSD POSITION •Select
bar
position on the
monitor.
Radiomai
operations
.............................
7
1 the on-screen
: Pozi#ie
înalt%
BAREI DE ECRAN)
•• 1
2
joas% (Informa#iile a'ate sub meniul de setare
:: Pozi#ie
Higher mai
position
FM
RDS
operations
...........................
8
How to use the M MODE button• 2
discului vor disp%rea.)
:a Lower
position (Guidance below the disc setup menu will disappear.)
for your
Selecta#i
!"ier care dori#i
s% !favorite
e redat.FM RDS programme ... 8
FILE TYPE
(DISC)
TIPUL
If you press M MODE,
the unit
goes–into
functions
mode,tipul de Searching
AUDIO
: redarea
"ierelor în format MP3/WMA/WAV.
FILEPE
TYPE
(DISC) •Select
the file
type to!play.
DE FI&IER (DE
DISC)
then the number buttons and 5/∞ buttons work
as
Disc / !USB
memory
operations
........... 11
•• AUDIO
VIDEO :: redarea
"ierelor
video DivX/MPEG.
Play MP3/WMA/AAC/WAV
files.
different function
buttons.
Playing
a disc
the!eunit
..................................... 11
Selecta#i
tipul: de
!"ier
care
dori#iin
s%
redat.
FILE
TYPE (USB)
•
VIDEO
Play
DivX/MPEG
Video
files.
MP3/WMA/WAV.
– TIPUL DE FI&IER (DE PE • AUDIO : redarea
Playing!"ierelor
discs in întheformat
CD changer
........................... 11
VIDEO
!"ierelor video DivX/MPEG.
DISPOZITIVUL
USB)
TYPEas(USB) •Select
the file: redarea
type
to play.
Ex.: When number
buttonFILE
2 works
Playing
from a USB memory ................................ 11
Selecta#i
semnal emis prin mufafiles.
DIGITAL OUT (optic%).
DIGITAL
AUDIO OUTPUT
• AUDIOformatul
: PlaydeMP3/WMA/AAC/WAV
MO (monaural)
button.
• OFF
: anulare.
(IE&IRE AUDIO DIGITAL')
Sound
adjustments
14
: Play
DivX/MPEG
Video
files...........................
•• VIDEO
PCM ONLY
(DOAR
PENTRU
FORMATUL
PCM)
General
—
PSMthe
..................
15 terminal
Select the signal
format tosettings
be aemitted
through
DIGITAL
OUT (Optical)
sau
unui decodor
incompatibil
cu formatele
Digital, DTS, .......................
MPEG Audio sau la
• OFF
: Cancels.
DAB tunerDolby
operations
18
conectarea unui echipament de înregistrare.
ONLY
Select forla an
amplifierunuiorampli!
a decoder
incompatible
•• PCM
DOLBY
DIGITAL/PCM
: se :selecteaz%
conectarea
cator19
iPod/D.
player
operations
.................
To use these buttons for their original functions
sau a unui
compatibilDTS,
cu formatul
Dolby or when
withdecodor
Dolby Digital,
MPEG Audio,
Digital. component operations ... 21
again after pressing M MODE, wait for 5 seconds
Other external
connecting
to a recording
device.
• STREAM/PCM
: se selecteaz%
la conectarea
unui ampli!
cator
without pressing any of these buttons until the • DOLBY DIGITAL/PCM sau :a unui
decodor
Select
for ancompatibil
amplifiercuorformatele
a decoder22
compatible
Maintenance
...................................
Dolby Digital, DTS sau MPEG Audio.
functions mode is cleared or press M MODE again.
with Dolby Digital.
La redarea unuiMore
disc multi-canal,
setare........................
uen#eaz% semnalele 23
DOWN MIX
about aceast%
this
unit
• STREAM/PCM
Select
for mufa
anin'
amplifier
a decoder
redate
prin mufele de ie"ire LINE :OUT("i
prin
DIGITALor
OUT
atunci compatible
(MIXARE A SUNETULUI)
Detaching the control panel când func#ia „PCM
ONLY” este setat%
la „DIGITAL
AUDIODTS,
INPUT”).
with
Dolby Digital,
and MPEG26
Audio.
Troubleshooting
..............................
: se selecteaz% la conectarea unui ampli!cator
AUDIO
DIGITAL AUDIO
OUTPUT
AUDIO
DOWN MIX
D. RANGE COMPRESSION
(COMPRESIE DINAMIC'
A RAZEI)
D. RANGE
COMPRESSION
DivX REGISTRATION
(ÎNREGISTRARE DivX)
• SURROUNDFor
COMPATIBLE
safety... : Select to enjoy multi-channel surround audio by
În timpul red%rii programului software
Dolby Digital,
v% pute#icompatible
bucura de
analtoo
amplifier
• Do
notnivel
raisesc%zut
theconnecting
volume
level
much, as this will with Dolby
un sunet puternic
la un
sau mediu
volumului.
Surround.
selecteaz%
pentru aplicarea
func#iei la
• AUTO
: se sounds,
block outside
making
driving dangerous.
programele
software
multi-canal
codate (nu se
• STEREO • Stop the car
: Normally
select
this.complicated
before
performing
any
aplic%
la programele
software
cu un canal "i cu
dou% canale).
You can enjoy a operations.
powerful sound
at low or middle volume levels while playing a
• ON
: pentru utilizarea permanent%, selecta#i
Dolby Digital software. aceast% op#iune.
Temperature
the
car...
• AUTO
Select
apply
the Îneffect
to multi-channel encode
Acest
aparat dispune
de propriul: inside
cod
de to
înregistrare.
vederea
protej%rii dreptului
de have
autor,parked
la redarea
unuifor
disc
în care
a fost
memorat
If you
the car
a long
time
in hot
orand
cold2-channel
software
(excluding
1-channel
codul de înregistrare, codul de înregistrare al aparatului este suprascris.
• ON
OTHER
OTHER
(ALTELE)
Attaching the control panel
• SURROUND COMPATIBLE
: pentru..................................
a v%
bucura
de sunetul
surround
When playingSpecifications
back a multi-channel
disc,
this setting
affects
the signals
29 reproduce
selecta#i aceast% func#ie prin
through the LINE OUT jacksmulti-canal,
(and through
DIGITAL
terminal
conectarea
unuithe
ampli!
cator OUT
compatibil
cu when
Surround.
“PCM ONLY” is selected forformatul
“DIGITALDolby
AUDIO
OUTPUT”).
• STEREO :
se selecteaz% în mod normal.
DivX
REGISTRATION
weather, wait untilsoftware).
the temperature in the car becomes
normal before operating
unit. use this function.
: Select tothealways
This unit has its own Registration Code. Once you have played back a disc in which
the Registration Code recorded, this unit’s Registration Code is overwritten for
copyright protection.
SET#RI
SETTINGS
47 3
4
ENGLISH
ROMÂN$
ENGLISH
Bluetooth
settings
Set"ri Bluetooth
Thank you for purchasing a JVC product.
Please read all instructions carefully before operation, to ensure your complete understanding and to obtain the best
You
canschimba
change the
settings
listed on the
right column
possible
performance
from
the de
unit.
Setting
menu
( (__:
: Initial)
Pute#i
set%rile
enumerate
în
coloana
din
Meniul
setare
setare ini#ial%)
according
to func#ie
your preference.
dreapta, în
de preferin#e.
AUTO CNT (connect)
IMPORTANT FOR LASER PRODUCTS
Selecta"i
“BT-PHONE”
“BT-AUDIO”.
Select
“BT-PHONE”
“BT-AUDIO.”
1.1 CLASS
1 LASER
PRODUCT or sau
Information
Users ondup$
ca"ifor
setarea,
caz. of Old
5 Modi%
Change
the
settingDisposal
accordingly.
Equipment
This symbol indicates that the product with
this symbol should not be disposed as general
household waste at its end-of-life. If you wish to
dispose of this product, please do so in accordance
with applicable national legislation or other rules in
your country and municipality. By disposing of this
product correctly, you will help to conserve natural
resources and will help prevent potential negative
effects on the environment and human health.
Note: Only for [EX] model users in UK and
European countries
For security reasons, a numbered ID card is provided
with this unit, and the same ID number is imprinted on
the unit’s chassis. Keep the card in a safe place, as it will
help the authorities to identify your unit if stolen.
2
AUTO CNT (connect) (Conectare automat$)
When
the unitaparatului,
is turned on,
connection
is
La pornirea
sethe
stabile"te
automat
established
with....
conexiuneaautomatically
cu...
OFF:
No Bluetooth
OFF (Dezactivat):
Bluetooth.
2. CAUTION: Do not open the top cover. There are no user serviceable
parts
inside niciun
thedevice.
unit;dispozitiv
leave all servicing
to
LAST (Ultimul):
ultimul dispozitiv
LAST:
The last connected
BluetoothBluetooth
device.
qualified service personnel.
conectat.
registered
Bluetooth
3. CAUTION: Visible and/or invisible class 1M laser radiation ORDER:
when open.The
Doavailable
not view
directly with
optical device
ORDER (Ordine):
dispozitivul disponibil înregistrat
found at first.
instruments.
Bluetooth pe care îl detecteaz%
4. REPRODUCTION OF LABEL: CAUTION LABEL, PLACED OUTSIDE THE UNIT.
primul.
AUTO
ANS
(answer)
Bluetooth.
2 Accesa"i
Enter themeniul
Bluetooth
menu.
Only for the device being connected for “BT-PHONE.”
AUTO ANS (answer) (preluare automat$ a
ON:
The unit answers the incoming calls
apelului telephonic)
automatically.
Doar pentru
dispozitivele conectate pentru
OFF:
The unit“BT-PHONE”.
does not answer the calls
utilizarea func#iei
Selecta"i
op"iunea
“SETTING”
(Setare).
3 Select “SETTING.”
automatically.
Answer
theapelurile
calls manually.
ON
(Activat):
aparatul
preia
Caution on volume
setting:
Warning:
REJECT: The unit rejects
all incoming calls.
automat.
Discs
very little
noise compared
other
If you need to operate the unit while driving, be
OFF produce
(Dezactivat):
aparatul
nu preia with
apelurile
sources.
Lower the
volume
before
playingmanual
a disc apelul
sure to look ahead carefully or you may be involved
automat.
MSG-INFO
(message
info)Prelua#i
Selecta"i
o op"iune
de setare.
to
avoid
damaging
thetelefonic.
speakers
by the
in
Only
for the
device being
connected
for sudden
“BT-PHONE.”
4a traffic
Selectaccident.
a setting
item.
REJECTof(Respinge):
increase
the output
level.aparatul
AUTO:
The
unit informs
you of therespinge
arrival of
apelurile
primite.
a message by ringing
and displaying
“RCV MSG” (receiving message).
How
to
reset your unit
MSG-INFO
mesaje)
This symbol is only valid in
MANUAL:
The unit(Informa"ii
does not inform
you of the arrival of
Doar pentru dispozitivele conectate pentru
the European Union.
a message.
48
48
SETTINGS
SET#RI
utilizarea func#iei “BT-PHONE”.
AUTO:
aparatul v% informeaz% în
MIC SET (microphone
setting)
leg%tur%
cu primirea unui mesaj
Only for the device being
connected
for “BT-PHONE.”
printr-un
semnal
sonor "i
Adjust microphone volume
connected
to the
Bluetooth
a!"area
mesajului
“RCV
MSG”
adapter, [LEVEL 01/02/03].
(Primire mesaj).
MANUAL:
aparatul nu v% informeaz% în
leg%tur% cu primirea unui mesaj.
VERSION
software and
versions are
• The
YourBluetooth
preset adjustments
will hardware
also be erased.
MIC SET (setarea microfonului)
shown.
doar pentru dispozitivele conectate pentru
How to
forcibly
eject a disc
utilizarea
func#iei
“BT-PHONE”.
Regleaz% volumul microfonului conectat la
adaptorul Bluetooth, [NIVEL 01/02/03].
VERSIUNE
Sunt a!"ate versiunile Bluetooth software "i
hardware.
• Be careful not to drop the disc when it ejects.
• If this does not work, reset your unit.
The following marks are used to indicate...
How to clean the connectors
Pentru adetachment
reduce: Indicator
la minim
aceastã the
posibilitate,
Frequent
detachment
willdeteriorate
deteriorate
thethe
connectors.
Frequent
will
connectors.
displayed
for
connectors
with
a cotton
swab
or cloththe
moistened
with
Frequent
detachment
will
deteriorate
connectors.
How
to
the
connectors
"terge#i
periodic
conectorii
cu o bucat%
dethe
vatã sau
To
minimize
thisclean
possibility,
periodically
wipe
the
To
minimize
this
possibility,
periodically
wipe
corresponding
operation.
alcohol,
being
careful
not
to
damage
the
connectors.
To
minimize
this
possibility,
periodically
wipe
the
cu
un
material
textil
impregnat
cu
alcool;
efectua#i
connectors
withaacotton
cotton
swab
cloththe
moistened
with
Frequent
detachment
willswab
deteriorate
connectors.
connectors
with
ororcloth
moistened
with
connectors
apossibility,
cotton
moistened
opera#ia
cuwith
aten#ie
pentru
a or
nucloth
deteriora
conectorii.
alcohol,
being
careful
notswab
damage
the
connectors.
To
minimize
this
periodically
wipe
the with
alcohol,
being
careful
not
totoM
damage
the
connectors.
How
to
use
the
MODE
button
alcohol,
being
notswab
to damage
connectors.
connectors
withcareful
a cotton
or cloththemoistened
with
If
you
press
M
MODE,
the
unit
goes
into
functions
mode,
alcohol, being careful not to damage the connectors.
then the number buttons and 5/∞ buttons work as
different function buttons.
Ex.: When number button 2 works as
MO (monaural)Connector
button.
Conector
Connector
Connector
Moisture condensation
CondensulConnector
Moisture
may condense
on the lens inside the unit in
Connector
Moisture
condensation
Moisture
condensation
Din cauza
umidit%#ii,
pe lentila din interiorul
the following
cases:
Moisture
condensation
aparatului
poate
ap%rea
fenomenul
dethe
condens,
Moisture
may
condense
on
the
lensoriginal
inside
the
unitinin în
may
condense
on
lens
unit
To
usestarting
these
buttons
forthe
their
functions
•Moisture
After
thecondensation
heater
car.inside
Moisture
may condense
oninthethelens
inside the unit in
Moisture
urm%toarele
cazuri:
the
following
cases:
the
following
again
aftercases:
pressing
M MODE, wait for 5 seconds
•the
If dup%
it becomes
very sistemului
humid inside
the
car. din
following
cases:
pornirea
decar.
înc%lzire
••without
After
starting
theany
heater
inthe
the
car.
may
condense
lens
inside
thethe
unit in
•Moisture
After
starting
the
inthe
pressing
ofon
these
buttons
until
Should
this
occur,
theheater
unit
may
malfunction.
In this
interiorul
autovehiculului.
••the
After
starting
the
heater
in
the
car.
•functions
Iffollowing
itbecomes
becomes
very
humidor
inside
the
car. again.
cases:
If
it
very
humid
inside
the
car.
mode
is
cleared
press
M
MODE
case,
theunui
disc
and
leave
thedeunit
turned
a
• IfAfter
în
cazul
ridicat
umiditate
în for
••Should
iteject
becomes
very
humid
the
car. on
thisoccur,
occur,
the
unit
may
malfunction.
this
starting
thegrad
heater
ininside
themalfunction.
car.
Should
this
unit
may
InIn
this
few
hours
until
thethe
moisture
evaporates.
interiorul
autovehiculului.
Should
this
occur,
the
unit
may
malfunction.
In
this
eject
thedisc
disc
and
leaveinside
theunit
unit
turnedon
onfor
foraa
•case,
If iteject
becomes
veryand
humid
the turned
car.
case,
the
leave
the
Detaching
the
control
În aceste
cazuri,
aparatul
poate
nu func#ioneze
case,
eject
the
disc
and
leave
the
units%panel
turned
on
for a
few
hours
until
the
moisture
evaporates.
Should
this
occur,
the
unit
may
malfunction.
In
this
few
hours
until
the
moisture
evaporates.
corespunz%tor.
discul
"i l%sa#i aparatul
Howuntil
to handle
discs
few
hours
theScoate#i
moisture
evaporates.
case,
and
leave
the unit
turned on for a
porniteject
timpthededisc
câteva
ore pân%
la evaporarea
When
removing
a
disc
from
its
few
hours
the
moisture
evaporates.Center holder
Howuntil
tohandle
handle
discs
How
to
discs
umidit%#ii.
case, How
press down
the center
holder
to handle
discs
Centerholder
holder
Whenremoving
removingaadisc
discfrom
fromits
its
Center
When
of
theHow
case
and
lift
thedisc
discdiscs
out, its
Center holder
When
removing
a
from
to
handle
discurilor
case,Manevrarea
pressdown
downthe
thecenter
center
holder
case,
press
holder
holding
it bydown
the edges.
case,
center
holder
Center central
holder
of
thepress
case
andlift
liftthe
the
disc
out,
When
removing
athe
disc
from
its
the
case
and
disc
out,
Pentru
ahold
scoate
un
disc
din
•of
Always
the disc
by
the
edges. DoSuport
not touch
its
of
the
case
and
the
disc
out,
holding
itby
by
theliftedges.
edges.
case,
press
down
the
center
holder
holding
it
the
carcas$,
ap%sa#i
pe
centrul
recording
surface.
holding
it
by
the
edges.
"iand
scoate#i
#inându-l
Always
hold
the
discdiscul
bythe
the
edges.Do
Donot
nottouch
touchits
its
the
casehold
lift disc
the
disc
out,
•of•carcasei
Always
the
by
When
storing
a disc
itsedges.
case, gently
•holding
Always
discinto
by the
edges.
Do notinsert
touchthe
its
derecording
margini.
recording
surface.
it hold
bysurface.
thetheedges.
disc
around
the
center
holder
(with
the
printed
surface
surface.
• recording
&ine#i
întotdeauna
storing
disc
into
itsedges.
case,gently
gently
insertthe
the
•When
Always
hold
the
discinto
bydiscul
the
Do
not insert
touch
its
When
storing
aadisc
its
case,
Attaching
the
control
panel
facing
up).
When
storing
a
disc
into
itssuprafa#a
case,the
gently
insert
the
de
margini.
Nu
atinge#i
sa de
disc
around
the
center
holder
(with
the
printed
surface
recording
surface.
disc
around
the
center
holder
(with
printed
surface
•disc
Make
surethe
to store
discs
into(with
the casesprinted
after use.
inscrip#ionare.
around
holder
surface
facing
up).
When
storing
acenter
disc into
its case,the
gently insert
the
facing
up).
Cândup).
introduce"i un disc în carcas$, ap$sa"i-l
facing
• Make
Make
surethe
storediscs
discs
into(with
thecases
cases
afteruse.
use.
around
center
holder
the printed
surface
•disc
sure
totostore
into
the
after
u#or
centrul
carsasei
(cu the
fa#acases
imprimat%
în sus).
•facing
Makeîn
sure
to store
discs into
after use.
up).
• Dup% utilizare, pune#i discurile în carcase.
CONTENTS
Control
panel
KD-G632/KD-G631....... 4
Cur"#area
discurilor
To
keep
discs—
clean
discul
este
murdar,
RM-RK50........... 5
Remote
controller
—este
ADacã
dirtyTo
disc
may
not
playclean
correctly.
To
keep
discs
clean
keep
discs
posibil
ca
redarea
acestuia
s% nu !e
IfGetting
a disc
does
become
dirty,
wipe it with
To
keep
discs
clean
started
................................
6
Acorespunz%toare.
dirtydisc
discmay
maynot
notplay
playcorrectly.
correctly.
dirty
aAAsoft
cloth
in
a
straight
line
from
center
Basic
operations
...................................................
6
dirty
disc
may
not
play
correctly.
Todoes
keep
clean
cubecome
o discs
bucat%
dewipe
lavet%
disc
does
become
dirty,
wipe
with
IfIf<terge#i-l
aaedge.
disc
dirty,
ititwith
to
IfaAamoale,
a
disc
does
become
dirty,
wipe
it
with
cu
mi"c%ri
liniare
începând
Radio
.............................
7
softcloth
cloth
inaastraight
straight
line
fromcenter
center
dirty
discoperations
may
not playline
correctly.
soft
•adin
Docentru
not
useinspre
any
solvent
(forfrom
example,
conventional
soft
cloth
a straight
line
from
margine.
edge.
IftoFM
aedge.
disc
doesin
become
dirty,
wipe
itcenter
with
to
RDS
operations
...........................
8
record
cleaner,
spray,
thinner,
benzine,
etc.)
to
clean
Nu utiliza#i niciun tip de solvent (de exemplu,
to• edge.
ENGLISH
ENGLISH
ENGLISH
ENGLISH
ENGLISH
ROMÂN$
Între#inerea
Maintenance
: Built-in CD player operations.
Maintenance
Cur"#area
conectorilor
How
to
clean
the CD
connectors
: External
changer operations.
Maintenance
Scoaterea
frecvent%will
a panoului
frontal
Frequent
detachment
deteriorate
theoperations.
connectors.
Maintenance
How
to
clean
the
connectors
:
External
USB
memory
How
to
clean
the
connectors
deterioreaz% conectorii.
To minimize this possibility, periodically wipe the
Do
not
use
any
solvent
(forfrom
example,
conventional
cloth
infor
a straight
line
center
•a• soft
Do
not
use
any
solvent
(for
example,
conventional
Searching
FM
programme
... 8
agent
obi"nuit
defavorite
cur%#are
aRDS
discurilor
de vinil,
•todiscs.
Do
not cleaner,
use
anyyour
solvent
(for example,
conventional
record
cleaner,
spray,thinner,
thinner,
benzine,
etc.)totoclean
clean
edge.
record
spray,
benzine,
etc.)
spray,
diluant,
benzin%
etc.)
pentru
cur%#area
record
cleaner,
spray,
thinner,
benzine,
etc.)
to
clean
/ USB
memory
operations
........... 11
discs.
• Disc
Do
not
use any
solvent (for
example, conventional
discs.
discurilor.
To play
discs.
Playing
a discnew
inspray,
thediscs
unit
.....................................
record
cleaner,
thinner,
benzine, etc.) to clean11
Playing
discshave
in the
CD changer
........................... 11
New
discs
may
some
rough spots
discs.
Toplay
play
new
discs
To
new
discs
Redarea
discurilor
noi
Playing
from
aand
USB
memory
................................
11
around
theplay
innernew
outer
edges.
If
To
discs
New
discsmay
maypot
haveavea
someparticule
roughspots
spots
New
discs
have
some
rough
Discurile
noi
such
a
disc
is
used,
this
unit
may
reject
New
discs
may
have
rough
Tope
play
new
discs
Sound
adjustments
..........................
14
around
the
inner
andsome
outer
edges.spots
around
inner
and
outer
edges.
prinse
marginile
interioare
"iIfIf
the
disc.the
around
themay
inner
and
outer
edges.
If
such
a
disc
is
used,
this
unit
may
reject
New
discs
have
some
rough
spots
such
a
disc
is
used,
this
unit
may
reject
exterioare.
Dac%
se
utilizeaz%
un
General
settings
— PSM
..................
To
remove
these
rough
spots,
rub the
edges with a 15
such
a disc
isinner
used,
thisouter
unitîl edges.
may
the
disc.
around
thedisc,
and
If
the
disc.
astfel
de
aparatul
poatereject
pencil
or
ball-point
pen,
etc.
DAB
tuner
operations
.......................
18
the
disc.
respinge.
To
remove
rough
spots,
rubreject
theedges
edgeswith
withaa
such
a disc these
isthese
used,
this unit
may
To
remove
rough
spots,
rub
the
To
remove
these
rough
spots,
rub
the
edges
with
a
Pentru
îndep%rta
aceste
r%zui#i
iPod/D.
playerpen,
operations
.................
19
pencil
ball-point
pen,
etc. particule,
the
disc.
pencil
ororaball-point
etc.
pencil
or ball-point
pen,spots,
etc.
marginile
cu unrough
creion
sau rub
cu un
pix
etc.with a
To
remove
these
the
edges
Other
external
component operations ... 21
Do not
use the following
pencil
or ball-point
pen, etc. discs:
Maintenance
...................................
Nu
utiliza"i
urm$toarele
Donot
not
usethe
the
followingtipuri
discs: de discuri:
Do
use
following
discs:
Warped
disc
Do
not
use
the
following
discs:
More about this unit ........................
Do not
use the
discs:
Discurile
deformate
Warped
discfollowing
Warped
disc
Troubleshooting
..............................
Warped Sticker
disc
Sticker residue
Specifications
..................................
Warped disc
22
23
26
29
Discuri cu autocolante
Sticker
Sticker
Discuri
cu resturi de
Stickerresidue
residue
Sticker
eticheteresidue
Sticker
Stick-on label
For safety...Sticker
Sticker residue
Discuri
• Do not raise the volume level too
much,cu
as this will
Stick-on
label
Stick-on
label
autocolante
Stick-on
labelpe
block outside sounds, making driving
dangerous.
întreaga
suprafa#%
Unusual shape
• Stop the car before performing any
complicated
Stick-on
label
operations.
Discuri
o form%
Unusualcu
shape
Unusual
shape
Unusual
shape
neobi"nuit%
Sticker
Temperature inside the car...
Unusual shape
If you have parked the car for a long time in hot or cold
weather, wait until the temperature in the car becomes
normal before operating the unit.
• Make sure to store discs into the cases after use.
REFERIN
E
REFERENCES
49
49
3
Mai multe informa#ii despre acest aparat
Thank you for purchasing a JVC product.
Please read all instructions carefully before operation, to ensure your complete understanding and to obtain the best
possible performance from the unit.
ENGLISH
ENGLISH
ROMÂN$
More about this unit
Informa#ii generale
General
Pornirea aparatului
IMPORTANT FOR LASER PRODUCTS
• on
Printhe
ap%sarea
Turning
power tastei SRC, pute#i s% porni#i
Disc/USB
Disc/USB
Informa#ii generale
• În acest manual, termenii “pies%” "i “!"ier” sunt
General
1. CLASS
1 LASER
PRODUCT
folosi#i ca termeni inter"anjabili.
aparatul.
Dac%
sursa este preg%tit%, va începe
• In serviceable
this
words
“track”
and
are
• By2.pressing
SRC onDo
thenot
unit,
youthe
cantop
also
turnThere
on theare no user
• manual,
Acestparts
aparat
poate
de asemenea,"i
CAUTION:
open
cover.
inside
thereda,
unit;“file”
leave
all servicing to
redarea.
power. qualified
If the source
is ready,
playback also starts.
interchangeably
used.
discuri de
8 cm.
service
personnel.
FM/AM/RDS
• Dac%
peDo
acela"i
disc
sunt
inscrip#ionate
• This when
unit
can
also
play
8 cm
discs.
3. Memorarea
CAUTION: Visible
and/or invisible class 1M laser radiation
open.
notback
view
directly
with optical diferite
posturilor
tipuri
de !play
"iereback
audio,
acest
aparat files
poate
•
This
unit
can
only
audio
CD
(CD-DA)
if reda
instruments.
• În timpul c%ut%rii SSM...
doar
piesele
de recorded
pe CD-urile
audio
(CD-DA).
different
type
of
files
are
in
the
same
disc.
4.FM/AM/RDS
REPRODUCTION
LABEL: CAUTION
PLACED
UNIT.
– frecven#eleOF
recep#ionate
sunt LABEL,
presetate
de laOUTSIDE
Acest
aparat poate a!"a doar caractere de un byte.
• THE
cancaractere
display only
one-byte characters. No
nr. 1 (frecven#a
cea mai joas%) pân% la nr. 6• This unitAlte
nu sunt a!"ate corespunz%tor.
Storing stations
in memory
other• characters
can be correctly
(frecven#a cea mai înalt%).
Dacã introduce#i
un discdisplayed.
în fantã în pozi#ie
• During SSM
search...
disc is inserted
upside
“PLEASE”
andmesajele
– când
c%utarea SSM s-a încheiat, aparatul va• When ainvers%,
pe a!"aj
vordown,
ap%rea
alternativ
– Receivedintra
stations
are preset
in No.
(lowest postului “EJECT” „PLEASE”
în mod
automat
pe1frecven#a
appear alternately
on theAp%sa#i
display. tasta
Press 0 to
"i „EJECT”.
pentru a
frequency)
to No. 6 la(highest
memorat
nr.1. frequency).
eject theejecta
disc. discul.
– When
SSM
is over, theposturilor,
station stored
in No.
1 will
În cazul
ejectat
nu este
îndep%rtat
• La
memorarea
toate
posturile
• If the• ejected
discîniscare
notdiscul
removed
within
15 seconds,
într-un
interval
de
15
secunde,
acesta
va ! reintrodus
Caution
on
volume
setting:
Warning:anterior
be automatically
tuned in.vor ! "terse "i vor !
presetate
the disc is automatically inserted again into the
automat în fanta de înc%rcare pentru a ! protejat
memorate
altele
• WhenIf you
storing
thenoi.
previously
preset
stations
loading
slot
to protect
it
from
dust.
Playback
starts
Discsîmpotriva
produce
very
little
noise
compared
with
needstations,
to operate
the
unit while
driving,
be
prafului. Redarea începe automat.other
Func#ionarea
sistemului
RDS
are erased
and
stations
are storedorFM
newly.
automatically.
sources.
Lower
the volume
before
a disc
sure
to
look
ahead
carefully
you
may
be
involved
•
Dupã
ejectarea
unui disc
sauplaying
îndep%rtarea
• Pentru ca func#ia de Network-Tracking Reception
• Aftertoejecting
a disc or USB,
removing
USB
dispozitivului
va !a a!
"atdevice,
unul
dintre
avoid
damaging
the speakers
by
the
sudden
in a(Func#ia
traffic accident.
de
recep#ionare
optimã
în
re#ea)
sã
func#ioneze
FM RDS operations
mesajele
„NO
DISC”(Niciun
sau “NO
DISC”
or of
“NOtheUSB”
appears
cannot
output
level.and youdisc)
corespunz%tor, este nevoie de douã tipuri de semnale “NO increase
dispozitiv
USB),
iar unele
operateUSB“(Niciun
some of the buttons.
Insert
another
disc, taste
• Network-Tracking
Reception
requires two
types
of
RDS – semnale
PI (Programme
Identi!
cation
deveni
inoperabile.
un alt disc,
reattachvor
a USB
device,
or press SRCIntroduce#i
to select another
RDS signals—PI
(Programme
and AF
- Identi!care
program) "iIdentification)
semnale AF (Alternative
reconecta#i
dispozitivul
USB sau ap%sa#i SRC
How
to
reset
your
unit
source.
(Alternative
Frequency)
toThis
work
correctly.
Without
Frequency
– Frecven#ã
alternativã).
Dac%
aceste
symbol
is only
valid
in date nu playback(SURS$)
pentru a selecta alt% surs% de redare.
the source,
also sine
stops.oprirea red%rii.
receivingsunt
these
dataîncorrectly,
Network-Tracking
primite
modthe
corect,
func#ia Union.
de Network-Tracking• If you• change
European
Schimbarea
surseiplayback
atrage dup%
Reception
s% nu
func#ioneze corect.
Next time
you selectdat%
the same
source again,
playback
Reception
will notpoate
operate
correctly.
Urm%toarea
când selecta#i
aceea"i
sursã,
• În cazul
în care
suntis recep#ionate
where
has been
stopped
previously.
redarea
vaitîncepe
de unde
a fost
întreruptã anterior.
• If a Traffic
Announcement
received
by TAinforma#ii
Information
for Users
on Disposal
ofStandby
Old rutiere starts from
printhe
intermediul
func#iei
TA Standbychanges
Reception
În cursul
pe un
• While• playing
fromred%rii
a USBde
device,
thedispozitiv
playback USB,
order
Reception,
volume level
automatically
to
Equipment
înVOL)
a"teptare
informa#iilor
ordinea
de redare
poate sã difere fa#ã de cea a
from other
players.
the preset
level (TA
ifthat
theacurrent
levelwith
isrutiere),
lower volumul may differ
This(Recep#ie
symbol
indicates
the
product
playere. with the USB Full-Speed.
! adus
automat la nivelul presetat (TA VOL), dac%• This unitaltor
is compatible
thanthis
thevasymbol
preset
level.
should not be disposed as general
• Acest aparat este compatibil cu interfa#a USB
nivelul actual este mai mic decât acesta.
• Depending
on the shape of the USB devices and
• Whenhousehold
Alternative
Frequency
Reception Ifis you
activated
waste
at its end-of-life.
wish to
Full-Speed.
• Când este activat% func#ia Alternative Frequency
connection
ports, some
USB devices
may notUSB
be "i
(withdispose
AFReception
selected),
Network-Tracking
Reception
is
of this(Recep#ia
product,
please
do
so
in
accordance
•
În
func#ie
de forma
dispozitivelor
unei frecven#e alternative)
attached
properly
or
the
connection
might
be
also with
activated
automatically.
On
the
other
hand,
a
porturilor
de
conectare,
este
posibil
ca
applicable
national
legislation
or
other
rules
in
• Your preset adjustments will also be erased.loose.
(având o frecven#% alternativ% selectat%), func#ia
unele dispozitive
USBrefer
sã nualso
setoata"eze
a USB device,
its
Network-Tracking
Reception
cannotByva
bedisposing
yourNetwork-Tracking
country and
municipality.
of this • When connecting
Reception
!deactivated
, de asemenea,
corespunz%tor sau ca leg%tura !zicã dintre
without
deactivating
Alternative
Frequency
product
correctly,
youPewilldehelp
to
conserve
activat%
automat.
alt%
parte,
func#ianatural
Network- instructions.
How to forcibly
eject
a disc
dispozitiv
"i aparat sã
!e instabilã.
Reception.
(Seeand
page
resources
will44.)
help nu
prevent
negative
Tracking
Reception
poatepotential
! dezactivat%
f%r% • Connect one USB device to the unit at a time. Do not
• Pentru conectarea unui dispozitiv USB citi#i, de
use
a
USB
hub.
• If youeffects
want
to know
more
about
RDS,human
visit health.
dezactivarea
func#iei
de recep#ionare
a frecven#ei
on
the environment
and
asemenea, "i instruc#iunile referitoare la acesta.
• If the• connected
USB
not have
the correct
alternative. (Vezi pagina 44.)
<http://www.rds.org.uk>.
Conecta#i
la device
aparatdoes
un singur
dispozitiv
USB o
•
Dac%
dori#i
mai
multe
informa#ii
despre
sistemul
RDS,
files, “NOdat%.
FILE”Nu
appears.
Note: Only for [EX] model users in UK and
utiliza#i un hub USB.
vizita#icountries
adresa de internet http://www.rds.org.uk.
• În cazul în care dispozitivul USB conectat nu
European
con#ine !"iere compatibile, este a!"at mesajul
For security reasons, a numbered ID card is provided
• Be careful
not to(Niciun
drop the!"ier).
disc when it ejects.
“NO FILE”
with this unit, and the same ID number is imprinted on
• If this does not work, reset your unit.
the unit’s chassis. Keep the card in a safe place, as it will
help the authorities to identify your unit if stolen.
50
2
50
Playing
Recordable/Rewritable
Ex.: When
number button 2 works asdiscs
Redarea
inscriptibile/Reinscriptibile
MOdiscurilor
(monaural)
button.
• This unit
can recognize
a total of 5 000 files and 250
• Aparatul poate recunoa"te pân% la 5000 de
folders (a maximum of 999 files per folder).
!"iere "i 250 de directoare (maxim 999 de
• This unit can recognize a total 25 characters for file/
!"iere/director).
names.
• folder
Aparatul
poate recunoa"te pân% la 25 de
• Use
only “finalized”
discs. !"ierelor/directoarelor.
caractere
în denumirile
use
these
buttons
their original
••ToThis
unit
can
play
back
multi-session
discs;functions
however,
Utiliza#i doar discurifor
“!
nalizate”.
after
pressing
wait
for playing.
5 seconds
unclosed
sessions
willMreda
beMODE,
skipped
while
•again
Acest
aparat
poate
discuri
multisesiune,
pressing
anymay
ofsesiunile
these
buttons
until
•without
Some
discs
or files
not be
played
backthe
due
cu toate
acestea,
ne!nalizate
vorto!
functions
mode
is cleared
or press Mconditions.
MODE again.
ignorate
în timpul
red%rii.
their
characteristics
or
recording
• Rewritable
Unele discuri
"iere nua longer
pot ! redate
discssau
may!require
readoutdin
time.
cauza
caracteristicilor
lor sau apanel
condi#iilor de
Detaching
the control
inscrip#ionare.
Playing
DVD-VR
• Discurile reinscriptibile ar putea avea nevoie de
• This
unit
play
back
CPRM (Content Protection
un timp cannot
de citire
mai
lung.
for Recordable Media) protected files.
• For details
about DVD-VR
format and playlist, refer
Redarea
discurilor
DVD-VR:
the instructions
with!"iere
the recording
• toAcest
aparat nu supplied
poate reda
protejate
printr-un cod CPRM (Content Protection for
equipment.
Recordable Media).
•Playing
PentruDivX
detalii
privind formatul DVD-VR "i
files
lista de redare, consulta#i instruc#iunile oferite
• This
unit cancuplay
back DivX filesdewith
the extension
împreun%
echipamentul
înregistrare.
the control
panel of the
codeAttaching
<.divx>, <.div>,
<.avi> (regardless
letter
case—upper/lower).
Redarea $%ierelor în format DivX
unit supports
DivX !6.x,
5.x,în4.x,
and 3.11.
• This
Aparatul
poate reda
"iere
format
DivX
cu codul de extensie >.divx?, >.div?, >.avi?
(indiferent dac% sunt scrise cu majuscule sau
nu).
• Aparatul poate reda !"iere cu format DivX 6.x,
5.x, 4.x "i 3.11.
• Acest aparat poate a!"a un cod unic de
înregistrare — DivX Video-on-Demand (VOD—
• This
unitdecan
display
a unique
registration code—
un fel
Digital
Rights
Management).
Pentru
DivX
Video-on-Demand
(VOD—a
kind of
Digital
activare
"i mai —
multe
detalii,
vizita#i
>www.divx.
Control
panel
KD-G632/KD-G631
....... 4
com/vod?.
Rights
Management). For activation and more
controller
—s%RM-RK50
•Remote
Fi"ierele
audio
trebuie
respecte...........
formatul 5
details,
visit
<www.divx.com/vod>.
MP3 stream
saustarted
Dolby
Digital.
•Getting
Audio
should
conform to MP3 or Dolby Digital.
................................
6
•• Basic
C%utare
în meniul
index:
Index
Search:
operations
...................................................
6
CONTENTS
ENGLISH
ENGLISH
ROMÂN$
• Unele dispozitive USB sau unele !"iere nu vor
The
following
areacest
used aparat
to indicate...
putea
! redatemarks
de c%tre
datoritã
• This
unit may :beBuilt-in
unable
to
play
back
some
USB de
caracteristicilor
lor sau
din
cauza
condi#iilor
CD player operations.
devices
or some files due to their characteristics or
înregistrare.
: nu
External
changer operations.
• recording
Acest aparat
poateCDrecunoa"te
un dispozitiv
conditions.
USB
decannot
stocare
în mas%a USB
cu omass
valoare
diferit%
• The
unit
recognize
storage
classde
: External
USB memory
operations.
cea dewhose
5 V "irating
careisnuother
dep%"e"te
device
than 5 V500
and mA.
does not
• exceed
Este posibil
acest aparat
s% nu
:caIndicator
displayed
for recunoasc%
the
500 mA.
un dispozitiv
USB
conectataoperation.
printr-un
de
corresponding
• This
unit may not
recognized
USB devicecititor
connected
carduri USB.
through a USB card reader.
• În cazul în care utiliza#i un cablu de extensie
to use
theback
M MODE
• ThisHow
unit may
not play
files in abutton
USB device
USB, este posibil ca redarea !"ierelor dintr-un
properly
when
using
a
USB
extension
If you
press MUSB
MODE,
goes into cord.
functions mode,
dispozitiv
s%the
nuunit
!e corespunz%toare.
This
unitnumber
cannotnu
assure
proper
or work
supplyas
the
buttons
and
5functions
/∞ func#ionarea
buttons
••then
Acest
aparat
poate
asigura
power
to
all types
ofsau
USBalimenta
devices. orice tip de
different
function
buttons.
corespunz%toare
dispozitiv USB.
Pozi#ia curent% de redare
Radio operations
............................. 7
FM RDS operations ........................... 8
Searching for your favorite FM RDS programme ... 8
Disc / USB memory operations........... 11
This
unitadoes
notthesupport
GMC
(Global
Motion
• Playing
Aparatul
nu in
poate
reda.....................................
formatul
GMC
(Global11
disc
unit
Motion
Compression).
Compression).
Playing discs in the CD changer ........................... 11
• The
Estefileposibil
codatescanning
în modulmode
encoded
in!"ierele
the
interlaced
Playing
from aca
USB
memory
................................
11
de explorare
intercalat%
s% nu !e redate
may
not be played
back correctly.
corespunz%tor.
•Sound
This
unitadjustments
cannot play back..........................
the following files: 14
• –Acest
aparat nu
poate
reda urm%toarele tipuri
Files
encoded
in
Codec
(Compressor-decompressor)
General
settings — PSM .................. 15
de !"iere:
other than DivX Codec.
DAB
tunercodate
operations
.......................
– !"iere
în alt Codec
(Compresor- 18
• The maximum bit rate for video signals (average) is
decompresor) decât DivX Codec.
iPod/D.
player operations................. 19
follow:
• asRata
maxim% de transfer pentru semnalele
DVD:
4
Mbps;
USB:
2 Mbps
video
(medii)
este
urm%toarea:
Other external
component
operations ... 21
• IfDVD:
you want
to know
more
about DivX, visit
4 Mbps;
USB:
2 Mbps
Maintenance
...................................
22
• <http://www.divx.com>.
Dac% dori#i mai multe informa#ii despre DivX,
vizita#i
adresathis
de internet
>http://www.divx.com?.
More
about
unit ........................
23
Playing
MPEG-1/MPEG-2
files
Troubleshooting
..............................
26
Redarea $%ierelor în format MPEG-1/MPEG-2
• This unit can play back MPEG-1/MPEG-2 files with the
..................................
•Specifications
Aparatul code
poate<.mpg>,
reda !"iere
în format
MPEG- 29
extension
<.mpeg>,
<.mod>*.
1/MPEG-2
având
codurile
de
extensie
* <.mod> is an extension code used for the >.mpg?,
MPEG-2
>.mpeg?,
>.mod?*.
files recorded
by JVC Everio camcorders.
* Codul de extensie <.mod> se utilizeaz!
•For
Thesafety...
stream format should conform to MPEG system/
pentru
"#ierele
în format
• program
Do
not raise
the volume
levelMPEG-2,
too much,înregistrate
as this will
stream.
cu ajutorul
camerelor
JVC Everio.
block
outside
sounds,
making
driving
dangerous.
•• The
file
format
should
be
MP@ML
(Main
at
Formatul
inscrip#ionare
trebuie
s%Profile
respecte
• Main
Stop
the
cardebefore
performing
any complicated
Level)/SP@ML
(Simple
sistemul/programul
MPEG.Profile at Main Level)/
operations.
(Main
Profiletrebuie
at Lows%
Level).
Formatul
!"ierelor
!e MP@ML (Main
• MP@LL
• Audio
conform to(Simple
MPEG-1Pro!
Audio
Pro!lestreams
at Mainshould
Level)/SP@ML
le at
Temperature
inside
Layer-2
or Dolby
Digital.the
Main Level)/
MP@LL
(Maincar...
Pro!le at Low Level).
have
parked
a respecte
long
time formatul
in hot or cold
•If you
Fi"ierele
audio
trebuie
The
maximum
bitthe
ratecarforfors%
video
signals
(average)
is
weather,
wait
until
the
temperature
in
the
car becomes
MPEG-1
Audio
Layer-2
sau
Dolby
Digital.
as follow:
the unit.
•normal
Rata4before
maxim%
de 2transfer
pentru semnalele
DVD:
Mbps;operating
USB:
Mbps
video (în medie) este urm%toarea:
DVD: 4 Mbps; USB: 2 Mbps
Continuare pe pagina urm!toare
REFERIN
E on the next51
Continued
page
3
ENGLISH
ROMÂN$
• Acest aparat nu poate reda urm%toarele tipuri
Redarea $%ierelor în format MP3/WMA/AAC/WAV
Thank
de !product.
"iere:
• Aparatul poate reda !"iere având
codulyou
defor purchasing a JVC
Pleaseextensie
read all>.mp3?,
instructions
carefully
beforesau
operation,
understanding
and toMP3i
obtain"ithe
best
– !complete
"iere MP3
codate în format
MP3
>.wma?,
>.m4a?
>.wav?to ensure your
possiblesau
performance
from the
unit.
PRO.
(indiferent dac% sunt scrise cu majuscule
nu).
– !"iere MP3 codate în format Layer 1/2.
• Acest aparat poate reda !"iere în format
– !"iere WMA codate în format fãrã pierderi,
MP3/WMA/AAC/WAV,
în cazul în care sunt
IMPORTANT
FOR LASER PRODUCTS
profesional "i voice.
îndeplinite condi#iile de mai jos:
1. CLASS
1 LASER PRODUCT
– !"iere WMA care nu au ca baz% programul
MP3:
2. CAUTION:
not open32
thekbps
top cover.
There
parts inside
the unit;
leave all servicing to
Windows
Media®
Audio.
– Rat% deDotransfer:
— 320
kbpsare no user serviceable
qualified
servicedepersonnel.
– !"iere AAC create cu o alt% aplica#ie decât
– Frecven#a
e"antionare:
3. CAUTION:
class 1M
laser radiation when open.
Do not view directly with optical
iTunes.
48 kHz,Visible
44,1 and/or
kHz, 32invisible
kHz (pentru
MPEG-1)
instruments.
– !"iere AAC codate în format Apple f%r%
24 kHz, 22,05 kHz, 16 kHz (pentru MPEG-2)
4. REPRODUCTION
OF LABEL: CAUTION LABEL, PLACED OUTSIDE THE pierderi.
UNIT.
WMA:
– !"iere WAV codate prin MS-ADPCM.
– Rat% de transfer: 32 kbps — 320 kbps
– !"iere care con#in date în format AIFF,
– Frecven#a de e"antionare: 48 kHz, 44,1 kHz,
ATRAC3 etc.
32 kHz, 22,05 kHz
– Canal: Mono/stereo
AAC:
Func#iile Bluetooth
– Rat% de transfer: 16 kbps — 320 kbps
Informa#ii
generale
Caution
on volume setting:
–Warning:
Frecven#a de e"antionare: 48 kHz, 44,1 kHz
• În timpul deplas%rii cu ma"ina, nu efectua#i
– Canal: 1 ch/2 ch
Discsopera#iuni
produce very
little noiseprecum
compared
with other
If you need to operate the unit while driving, be
complicate,
apelarea
WAV:
sources.
Lower the
volume before
playing
a disc
numerelor
de telefon,
folosirea
agendei
sure–toFrecven#a
look aheadde
carefully
or
you
may
be
involved
e"antionare: 44,1 kHz
telefonice,
etc.the speakers by the sudden
to
avoid
damaging
in a–traffic
accident.
Canal: 1 ch/2 ch
În cazul
efectu%rii
unor astfel de ac#iuni, opri#i
increase
of the
output level.
• Acest aparat poate recunoa"te în total 5.000 de
autovehiculul într-un loc sigur.
!"iere "i 250 de directoare (999 de !"iere per
• În func#ie de versiunea Bluetooth a
director).
How to reset
your
unitca unele dispozitive
dispozitivului,
este
posibil
symbol is only
valid
in
• Num%rul maxim This
de caractere
pentru
denumirile
Bluetooth s% nu !e conectate la aceste aparate.
directoarelor "i !the
"ierelor
esteUnion.
de 25 de
European
• Este posibil ca acest aparat s% nu !e compatibil
caractere; 128 de caractere pentru elementele
cu unele dispozitive Bluetooth.
de
identi!
care
MP3/AAC/WAV;
64
de
caractere
Information for Users on Disposal of Old
• Condi#iile de conectare pot varia, în func#ie de
pentru elementul de identi!care WMA.
Equipment
împrejur%ri.
aparat
poatethat
a!"a
de identi!care
• Acest
This
symbol
indicates
theelementele
product with
• La oprirea aparatului, dispozitivul este
ID3 (versiunea 1.0, 1.1, 2.2, 2.3 sau 2.4) pentru
this symbol should not be disposed as general
deconectat.
!"ierele MP3 "i poate a!"a elementele de
household waste at its end-of-life. If you wish to
identi!care pentru !"ierele WMA/AAC/WAV.
dispose
of aparat
this product,
so inînregistrate
accordance în
• Acest
poateplease
reda !do"iere
withformat
applicable
legislation
otherderules
in
• Your preset adjustments will also be erased.
VBRnational
(variable
bit rate –orrat%
transfer
yourvariabil%).
country and municipality. By disposing of this
product
correctly,
you will help
to conserve
natural
Fi"ierele
înregistrate
în format
VBR au
How to forcibly eject a disc
resources
and willînhelp
preventtimpului
potentialscurs.
negative
discrepan#e
indicarea
effects on the environment and human health.
Note: Only for [EX] model users in UK and
European countries
For security reasons, a numbered ID card is provided
with this unit, and the same ID number is imprinted on
the unit’s chassis. Keep the card in a safe place, as it will
help the authorities to identify your unit if stolen.
2
52
REFERIN E
• Be careful not to drop the disc when it ejects.
• If this does not work, reset your unit.
The following marks are used to indicate...
CD player
Dispozitivul
esteoperations.
înregistrat,
ERR CNCT : Built-in
dar conexiunea nu a putut !
(Eroare de
: External CD changer operations.
realizat%. Pentru reconectarea
conectare)
dispozitivului,
utiliza#ioperations.
func#ia
: External
USB memory
“CONNECT”. (Vezi pagina 32.)
: Indicator displayed for the
Efectua#i din nou opera#ia. Dac%
ERROR
corresponding
operation.
mesajul “Error”
este a!"at din
(Eroare)
nou, veri!ca#i dac% dispozitivul
How to use
the M
MODE
button
suport%
func#ia
respectiv%.
Func#ia
“SEARCH”
IfUNFOUND
you press M MODE, the unit goes into (C%utare)
functions mode,
nu a detectat
dispozitiv
(Dispozitiv
then
the number buttons
and 5/niciun
∞ buttons
work as
indisponibil)
different
function Bluetooth
buttons. disponibil.
Aparatul actualizeaz% agenda
LOADING
telefonic%
text.
(Actualizare)
Ex.: When number
button 2"i/sau
worksmesajele
as
button.
Aparatul
se preg%te"te s%
WAITMO (monaural)
utilizeze func#ia Bluetooth.
(A"tepta#i)
Dac% mesajul nu dispare,
opri#i "i reporni#i aparatul, apoi
reconecta#i dispozitivul (sau
reseta#i
To use these buttons
foraparatul).
their original functions
Veri!M
ca#iMODE,
conexiunea
RESET
8 pressing
again
after
wait fordintre
5 seconds
adaptor
"i acest
aparat.
without pressing any
of these
buttons
until the
functions mode is cleared or press M MODE again.
DAB
• Doar
serviciul primar
DAB poate
! presetat,
Detaching
the control
panel
chiar dac% memora#i "i un al doilea serviciu.
• Un serviciu DAB presetat va ! "ters la
memorarea unui nou serviciu DAB cu acela"i
numãr de presetare.
iPod sau D. player
• La pornirea acestui aparat, iPod-ul sau D.player-ul
vor ! alimentate prin intermediul acestuia.
• La conectarea iPod-ului sau a D.player-ului,
toate func#iile acestora sunt dezactivate.
Efectua#i
toate opera#iile
prin intermediul
Attaching
the control
panel acestui
aparat.
• Informa#iile în format text pot sã nu !e a!"ate
corect.
• Dacã informa#ia în format text con#ine mai mult
de 8 caractere, aceasta se va derula pe a!"aj.
Pe a!"ajul acestui aparat, pot ap%rea pân% la
40 de caractere.
Observa"ie:
CONTENTS
La utilizarea unui iPod sau D.player, unele
opera#ii nu sunt efectuate corect sau în condi#iile
Control
—vizita#i
KD-G632/KD-G631
.......
dorite. În panel
acest caz,
urm%torul site
JVC: 4
Remote controller — RM-RK50........... 5
Pentru utilizatorii de iPod: >http://www.jvc.co.jp/
Getting
started ................................ 6
english/car/support/ks-pd100/index.html?
ENGLISH
ROMÂN$
Mesaje de avertizare pentru func#iile Bluetooth
Basic operations
6
Pentru
utilizatorii...................................................
de D. player: >http://www.jvc.
co.jp/ english/car/support/ks-pd500/index.html?
Radio operations ............................. 7
FM RDS operations ........................... 8
Searching
your favorite FM RDS programme ... 8
Set"riforgenerale—PSM
•Disc
Setarea
“AUTO”
pentru
atenuatorul........... 11
/ USB memory
operations
intensit%#ii
poate
Playing
a discluminoase
in the unit(“DIMMER”)
.....................................
11
func#iona
necorespunz%tor
în
cazul
anumitor 11
Playing discs in the CD changer ...........................
autovehicule, mai cu seam% al celor prev%zute
Playing
from a USB memory ................................ 11
cu buton de sc%dere a intensit%#ii luminoase.
Sound
adjustments
..........................
În acest
caz, seta#i “DIMMER”
la o op#iune 14
diferit% de “AUTO.”
General settings — PSM .................. 15
• Dacã schimba#i setarea „AMP GAIN”
DAB
tuner
operations
.......................
(Ampli!
cator)
de la„”HIGH
PWR” (Putere 18
ridicat%) la „LOW PWR” (Putere sc%zut%) în
iPod/D.
player operations................. 19
timp ce volumul este setat la un nivel mai ridicat
decât
treapta
30”, aparatul
va aduce... 21
Other external„VOL
component
operations
automat volumul la nivelul „VOL 30”.
Maintenance ................................... 22
More
aboutde
thisset"ri
unit ........................ 23
Meniul
•Troubleshooting
În cazul în care limba
pe care a#i selectat-o 26
..............................
nu este înregistrat% în !"ier, limba original% se
Specifications
.................................. 29
utilizeaz% în mod automat ca limb% ini#ial%. În
plus, set%rile limbilor ini#iale nu vor func#iona
a"a cum le seta#i datorit% program%rii lor
Forinterne.
safety...
raise the aspectului
volume levelpanoramic
too much, „16:9”
as this will
•• Do
La not
selectarea
pentruoutside
o imagine
cumaking
aspectdriving
4:3, imaginea
sufer%
block
sounds,
dangerous.
u"oare
c%ri performing
ca urmare any
a procesului
de
• Stop
the modi!
car before
complicated
convertire a aspectului.
operations.
• Pentru unele discuri, chiar "i la selectarea
aspectului „4:3 PAN SCAN”, m%rimea ecranului
Temperature
inside the car...
poate deveni „4:3 LETTERBOX”.
If you have parked the car for a long time in hot or cold
weather, wait until the temperature in the car becomes
normal before operating the unit.
Continuare pe pagina urm!toare
REFERIN E
53
3
ENGLISH
ROMÂN$
ENGLISH
Pictogramele
de ghidare
ecranyou for purchasing a JVC product.
On-screen guide
icons de peThank
În timpul red%rii, urm%toarele pictograme de ghidare pot ap%rea pe monitor pentru o perioad% de timp.
Please
readplayback,
all instructions
carefullyguide
beforeicons
operation,
to ensure
understanding and to obtain the best
During
the following
may appear
for a your
whilecomplete
on the monitor.
possible performance from the unit.
Redare
:
Playback
:
Pause de redare
Pauz%
DVD-Video/DVD-VR/VCD:
slowînainte
motion cu vitez% redus%
IMPORTANT: FOR
LASER
PRODUCTS Forward
Video
DVD/DVD-VR/VCD:
derulare
: Video
DVD-Video:
motion
DVD:Reverse
redareslow
înapoi
cu vitez% redus%
1. CLASS 1 LASER
PRODUCT
Forward
search
C%utare
înainte
2. CAUTION:: Do
not open
the top cover. There are no user serviceable parts inside the unit; leave all servicing to
: C%utare
Reverse
search
înapoi
qualified service
personnel.
3. CAUTION: Visible and/or invisible class 1M laser radiation when open. Do not view directly with optical
DVD:
Urm%toarele
pictograme
apar
începutulofunei
scene
care con#ine:
DVD:
The
following icons
appear at
thelabeginning
a scene
containing:
instruments.
Limbi
pentru
mai
multe
subtitr%ri
:
Multi-subtitle
languages
4. REPRODUCTION OF LABEL: CAUTION LABEL, PLACED OUTSIDE THE UNIT.
: Limbi
Multi-audio
languages
multi-audio
: Vizualizare
Multi-angle din
views
mai multe unghiuri
About sounds reproduced through the rear terminals
Caution on volume setting:
Warning:
Semnalele
sonore emise prin ie%irile din spate
nd
Through
theanalogice
analog terminals
(Speaker
out/LINE
2-channel
signal iscuemitted.
AUDIOAUDIO
OUT):OUT):
este emis
un semnal
2 canale.
• • Prin
ie#irile
(Speaker
out/LINE
OUT/2OUT/2nd
Discs
produce
little noiseDTS
compared
with! other
If youLa
need
to
operate
the
unit
while
driving,
be
When
playingunui
a multi-channel
encoded
disc, multi-channel
arevery
downmixed.
sound
cannot
be
redarea
disc multi-canal,
semnalele
multi-canalsignals
sunt mixate.
Sunetul DTS
nu poate
redat.
sources. Lower the volume before playing a disc
sure(AUDIO—DOWN
to look ahead(AUDIO—DOWN
carefully
you MIX:
may
be
reproduced.
seeinvolved
page 47.)
MIX:orvezi
pagina
47).
to avoid damaging the speakers by the sudden
in• •a traffic
accident.
Through
DIGITAL
OUT OUT
(optical):
Prin
ie#irea
DIGITAL
(optic$):
increase
of the
output
level.
Prin
aceast%
digitale
PCM,
Dolby
Digital,
DTS,
MPEG(For
Audio).
Digital
signals ie"ire
(Linearsunt
PCM,emise
Dolbysemnale
Digital, DTS,
MPEG(Linear
Audio)
are
emitted
through
this
terminal.
more
(Pentru
a a'
a mai
detalii, consulta#i tabelul de la pagina 55).
details, see
table
on multe
page 55.)
Pentru
redarea
sunetelor multi-canal,
precum
Dolby Digital,
"i Audio,
MPEGconnect
Audio, an
conecta#i
To reproduce
multi-channel
sounds such as
Dolby Digital,
DTS,
andDTS
MPEG
amplifierlaoraceast%
a
How
to
reset
your"iunit
ie"ire
un
ampli!
cator
sau
un
decodor
compatibil
cu
aceste
surse
multi-canal
seta#i
corect
func#ia
This
symbol
is
only
valid
in
decoder compatible with these multi-channel sources to this terminal, and set “DIGITAL AUDIO
OUTPUT”
„DIGITAL
AUDIO
(Ie"ire audio digital%). (Vezi pagina 47.)
theOUTPUT”
European Union.
correctly. (See
page
47.)
• Func"ia Dual Zone:
• About Dual Zone:
Prin cea de-a
douaon
ie"ire audioofsunt
emise semnale sonore cu 2 canale. La redarea unui disc multiInformation
for2nd
Users
Oldsignal
Through the
AUDIODisposal
OUT, 2-channel
is emitted. When playing a multi-channel encoded disc, multicanal, semnalele multi-canal sunt mixate. (Vezi pagina 30.)
Equipment
channel signals are downmixed. (See page 30.)
This symbol indicates that the product with
this symbol should not be disposed as general
household waste at its end-of-life. If you wish to
dispose of this product, please do so in accordance
with applicable national legislation or other rules in
your country and municipality. By disposing of this
product correctly, you will help to conserve natural
resources and will help prevent potential negative
effects on the environment and human health.
Note: Only for [EX] model users in UK and
European countries
For security reasons, a numbered ID card is provided
with this unit, and the same ID number is imprinted on
the unit’s chassis. Keep the card in a safe place, as it will
help the authorities to identify your unit if stolen.
2
54
• Your preset adjustments will also be erased.
How to forcibly eject a disc
• Be careful not to drop the disc when it ejects.
• If this does not work, reset your unit.
Output
signalsmarks
through
the DIGITAL
OUT terminal
The
following
are used
to indicate...
Output signals: are
different
depending
on
the
Built-in CD player operations. “DIGITAL AUDIO OUTPUT” setting on the setup menu (see page
47).
Control
— KD-G632/KD-G631
.......
Semnalele
de ie"ire difer% în func#ie de setarea „DIGITAL
AUDIOpanel
OUTPUT”
din meniul de setare
(vezi 4
: External CD changer operations.
pagina 47).
Remote controller — RM-RK50........... 5
: External USB memory operations.
Output Signal
Playback Disc
: Indicator displayed for the
STREAM/PCM
Disc redat
corresponding operation.
Getting started
................................ 6
Semnal de ie#ire
ENGLISH
ENGLISH
ROMÂN$
CONTENTS
Semnale emise prin ie%irea DIGITAL OUT
DOLBY
PCM ONLY
OFF 6
Basic
operations ...................................................
DOLBY
Doar
pentru
OFF
DIGITAL/PCM
STREAM/PCM DIGITAL/
Radio operations
.............................
formatul
PCM
(Dezactivat) 7
PCM
DVD-Video 48 kHz, 16/20/24 bits
48 kHz, 16
stereo
Linear PCM *........................... 8
FMbits
RDS
operations
48MkHz,
16/20/24
bi#i
How to use
MODE
button
DVD-Video
Linearthe
PCM
48
kHz,
16
bi#i
stereo PCM Linear*
Linear PCM
Searching for your favorite FM RDS programme ... 8
If you press M MODE,
theLinear
unit goes
into functions mode,
96 kHz,
PCM
48 48
kHz,
16 16
bitsbi#istereo
96 kHz,
PCM Linear
kHz,
stereoLinear
PCM PCM
Linear
then the number buttons and 5/∞ buttons work as
Disc
/
USB
memory
operations
........... 11
48
kHz, 48
16 kHz,
bi#i stereo
Dolby Digital
16 bits
Dolby
Digital
Flux
de
bi#i
Dolby
Digital
different function buttons.
Dolby Digital bitstream
Playing a disc in the
unit
..................................... 11
PCM
Linear
stereo
Linear PCM
Playing
in the CD changer ........................... 11
DTS
Flux dediscs
bi#i DTS
DTS button 2 works as
DTS
bitstream
Ex.: When number
Playing
from48
a USB
................................ 11
kHz,memory
16 bi#i stereo
MPEG Audio
Flux de bi#i MPEG
PCM Linear
Linear PCM
MO (monaural)
MPEG button.
Audio
MPEG bitstream Sound
48 kHz,adjustments
16 bits stereo
.......................... 14
CD audio, CD video
Audio CD, Video CD
CD audio cu DTS
OFF
44,1 kHz, 16 bi#i stereo PCM Linear /
(Dezactivat)
44.148
kHz,
1616
bitsbi#istereo
Linear
kHz,
stereo
PCM PCM
Linear
General
settings
—/ PSM ..................
OFF 15
48 kHz, 16 bits
Fluxstereo
de bi#i Linear
DTS PCM
DAB tuner operations....................... 18
19
21
22
23
AACDetaching the control panel
44.1/48Troubleshooting
kHz, 16 bits Linear PCM
.............................. 26
*WAV
În cazul în care discurile nu sunt protejate împotriva
semnalele
digitale pot " emise la o
44.1 kHz,Specifications
16copierii,
bits stereo
Linear
PCM
..................................
29
DivX/MPEG
Audio
CD with DTS Dolby Digital
DTSDigital
bitstream48 kHz, 16 bi#i stereo
Flux de bi#i Dolby
Linear
iPod/D.
playerPCM
operations
.................
ToDivX/MPEG
use these buttons
for their original functions
Dolby Digital
48
kHz, 16 bits
MPEG Audio
32/44,1/48
kHz,
16
bi#i
PCM
Linear
Dolby DigitalOther
bitstream
again after pressing M MODE, wait for 5 seconds
external component
operations ...
32/44,1/48 kHz, 16 bi#i PCMstereo
LinearLinear PCM
MP3/WMA
without pressing any of these buttons until the
Maintenance
...................................
44,1/48
kHz,16
16bits
bi#i PCM
Linear
MPEG Audio
32/44.1/48
kHz,
Linear
PCM
AAC
functions mode is cleared or press M MODE again.
44,1 kHz,
16 bi#i
PCM PCM
Linear........................
WAV
MP3/WMA
32/44.1/48
kHz,
16stereo
bits Linear
More
about
this
unit
rat! de 20 sau 24 bi$i (la rata de transfer original!) prin ie#irea DIGITAL OUT.
* Digital signals may be emitted at 20 or 24 bits (at their original bit rate) through the DIGITAL OUT terminal if the
discs are not copy-protected.
For safety...
• Do not raise the volume level too much, as this will
block outside sounds, making driving dangerous.
• Stop the car before performing any complicated
operations.
Attaching the control panel
Temperature inside the car...
If you have parked the car for a long time in hot or cold
weather, wait until the temperature in the car becomes
normal before operating the unit.
Continuare pe pagina urm!toare
Continued on the next page
REFERENCES
REFERIN
E
55
55
3
ENGLISH
ROMÂN$
Codurile limbilor
Thank you for purchasing a JVC product.
Please
read
all
instructions
carefully
before
operation,
to ensure your complete
understanding and Cod
to obtain
the best
Cod Limb$
Cod Limb$
Cod Limb$
Cod Limb$
Limb$
possible performance from the unit.
AA
Afar
FA
Persan%
KL
Groenlandez%
OC
Occitan%
ST
AB
Abhaz%
FI
Finlandez%
KM
Cambogian%
OM
(Afan) Oromo
SU
Sundanez%
KN
Kannada
OR
Oriya
SW
Swahili
IMPORTANT
FOR LASER
PRODUCTS
AF
Afrikaans
FJ
Fiji
Sesotho
1. AM
CLASSAmeharic
1 LASER PRODUCT
FO Faroez%
KO
Coreean%(KOR) PA
Panjabi
TA
Tamil
2. ARCAUTION:
top cover. There are
serviceable parts
the unit; leaveTE
all servicing
Arab%Do not open
FY theFrizian%
KS no user
Kashmiri
PLinsidePolon%
Teluguto
qualified
service personnel.
AS
Assamez%
GA Irlandez%
KU
Kurd%
PS
Pashto,
TG
Tajik
Pushto
3. CAUTION: Visible and/or invisible class 1M laser radiation when open. Do not view
directly with optical
AYinstruments.
Aymara
GD Galez% sco#ian% KY
Kirghiz
PT
Portughez%
TH
Thailandez%
4. AZREPRODUCTION
OF LABEL:
CAUTION LABEL, PLACED
Azer%
GL
Galician%
LA OUTSIDE
Latin% THE UNIT. QU
Quechua
TI
Tigrinya
BA
Bashkir
GN
Guarani
LN
RM
Retoroman%
TK
Turkmen%
BE
Bielorus%
GU
Gujarati
LO
Lao#ian%
RN
Kirundi
TL
Tagalog
BG
Bulgar%
HA
Hausa
LT
Lituanian%
RO
Român%
TN
Setswana
BH
Bihari
HI
Hindi
LV
Leton%
RW
Kinyarwanda
TO
Tonga
BI
Bislama
HR
Croat%
MG
Malagasy
SA
Sanscrit%
TR
Turc%
Bengalez%
HU
Ungar%
MI
Maori
SD
Sindhi
TS
Tsonga
BN
Warning:
IfBO
you need
to operate HY
the unitArmean%
while driving, beMK
Tibetan%
sure
ahead carefully
you may be involved
BR to look
Breton%
IA orInterlingua
ML
inCA
a trafficCatalan%
accident. IE Interlingue
MN
MO
Caution on volume setting:
Discs produceSG
very little
noise compared
other
Macedonean%
Sangho
TT with
T%tar%
sources. Lower
before playing
disc
Malayalam
SHthe volume
S%rbo-croat%
TW a Twi
to avoid damaging
the
speakers by the
Mongol%
SI
Singhalez%
UK sudden
Ucrainean%
increase of the
level.
Moldoveneasc%
SKoutput
Slovac%
UR
Urdu
CO
Corsican%
IK
Inupiak
CS
Ceh%
IN
Indonezian%
MR
Marathi
CY
Galez%
IS
Islandez%
MS
Malay (MAY)
How toSM
resetSamoan
your unit VI
Vietnamez%
DZ
Bhutani
Maltez%
SN
Shona
VO
Volapuk
EL
Greac%
Burmez%
SO
Somalez%
WO
Wolof
EO
Esperanto
Nauru
SQ
Albanez%
XH
Xhosa
Nepalez%
SR
Sârb%
YO
Yoruba
Norvegian%
SS
Siswati
ZU
Zulu
This
is only valid inMT
IW symbol
Ebraic%
the
European
Union.
JI
Idi"
MY
JW
Javanez%
NA
Information for Users on Disposal of Old
ET
Eston%
KA
Georgian%
NE
Equipment
EU
Basc%
KK
Kazakh
NO
This symbol indicates that the product with
this symbol should not be disposed as general
household waste at its end-of-life. If you wish to
dispose of this product, please do so in accordance
with applicable national legislation or other rules in
your country and municipality. By disposing of this
product correctly, you will help to conserve natural
resources and will help prevent potential negative
effects on the environment and human health.
Note: Only for [EX] model users in UK and
European countries
For security reasons, a numbered ID card is provided
with this unit, and the same ID number is imprinted on
the unit’s chassis. Keep the card in a safe place, as it will
help the authorities to identify your unit if stolen.
2
Lingala
56
SL
Sloven%
UZ
Uzbek%
• Your preset adjustments will also be erased.
How to forcibly eject a disc
• Be careful not to drop the disc when it ejects.
• If this does not work, reset your unit.
CONTENTS
: Built-in CD player operations.
panel
.......
Ceea ce pare a ! o problem%, nu este întotdeauna cevaControl
foarte grav.
Veri!—
ca#iKD-G632/KD-G631
urm%toarele puncte
înainte4
CDservice.
changer operations.
de a apela la un: External
centru de
Informa"ii
generale
: External USB memory operations.
Simptom
: Indicator displayed for the
• Difuzoarele
nu emit
niciun sunet.
corresponding
operation.
• Aparatul nu func#ioneazã.
How
to use the M MODE button
FM/AM
If you press• MFunc#ia
MODE, the
unit goes into
functionsa mode,
de presetare
automatã
then the number
buttonsSSM
and 5
buttons work as
sistemului
nu/∞
func#ioneazã.
different function
buttons.zgomot de fond în timpul
• Se percepe
Remote controller — RM-RK50........... 5
Getting
started ................................ 6
Solu"ie/Cauz$
ENGLISH
ROMÂN$
The following marks
used to indicate...
Îndrumar
dearedepanare
Basic operations ................................................... 6
• Regla#i volumul la nivelul optim.
• Radio
Veri!ca#i
cablurile "i .............................
conexiunile.
operations
Reseta#i
(vezi pagina
3).
FM RDSaparatul
operations
...........................
7
8
Searching for your favorite FM RDS programme ... 8
Efectua#i memorarea manual% a posturilor de
radio.
Disc / USB memory operations........... 11
Playing bine
a discantena.
in the unit ..................................... 11
Conecta#i
func#ion%rii aparatului de radio.
Playing discs in the CD changer ........................... 11
Ex.: When
numbernu
button
as
• Discul
poate2 works
! redat.
Introduce#i
discul
în mod
corect.
Playing from
a USB
memory
................................ 11
MO•(monaural)
Discul nubutton.
poate ! nici redat, nici ejectat. • Sound
Debloca#i
discul
(vezi
pagina
15).
adjustments ..........................
14
Generalit$"i ale discurilor
• Discurile inscriptibile/reinscriptibile nu
pot ! redate.
• Nu se poate trece peste piesele
discurilor inscriptibile/reinscriptibile.
To use these buttons for their original functions
•
nu M
este
recunoscut.
again after Discul
pressing
MODE,
wait for 5 seconds
•
Sunetul
"i
imaginile
suntuntil
uneori
without pressing any of these buttons
the
întrerupte sau distorsionate.
• Ejecta#i discul în mod for#at (vezi pagina 3).
settings
PSM!nalizat.
.................. 15
• General
Introduce#i
în fant% —
un disc
• DAB
Finaliza#i
prin intermediul
componentei
tunerdiscurile
operations
.......................
18
pe care a#i utilizat-o pentru inscrip#ionare.
iPod/D. player operations................. 19
Ejecta#i discul în mod for#at (vezi pagina 3).
Other external component operations ... 21
• Întrerupe#i redarea în timpul deplas%rilor pe
Maintenance
................................... 22
teren accidentat.
functions mode is cleared or press M MODE again.
• Schimba#i discul.
More about this unit ........................ 23
• Veri!ca#i cablurile "i conexiunile.
Detaching
the
control
panel
Troubleshooting
..............................
• Pe monitor nu este a!"at% nicio imagine Cablul
frânei de parcare
nu este conectat în mod26
redat% (Video DVD/DVD-VR/DivX/
corespunz%tor. (Consulta#i Manualul de instalare/
Specifications .................................. 29
MPEG/VCD).
conectare).
• Pe monitor nu este a!"at% nicio
• Conecta#i cablul video în mod corespunz%tor.
imagine.
• Selecta#i intrarea corect% pe monitor.
For safety...
• Pe monitor nu apar marginile din stânga Selecta#i
“4:3 LETTERBOX” (vezi pagina 47).
• Do not raise the volume level too much, as this will
"i din dreapta ale imaginii.
block outside sounds, making driving dangerous.
• Stop the car before performing any complicated
operations.
Attaching the control panel
Temperature inside the car...
If you have parked the car for a long time in hot or cold
weather, wait until the temperature in the car becomes
normal before operating the unit.
Continuare pe pagina urm!toare
REFERIN E
57
3
6). • Ad%uga#i extensia >.divx?, >.div?, >.avi?,
>.mpg?, >.mpeg?, >.mp3?, >.wma?, >.m4a?, sau
IMPORTANT FOR LASER PRODUCTS
>.wav? la denumirea !"ierelor.
Se produc
zgomote.
Piesa redat% nu este în formatul MP3/WMA/AAC/WAV.
1. CLASS• 1 LASER
PRODUCT
la alt% pies%.
(Nu ad%uga#i
>.mp3?,to
2. CAUTION: Do not open the top cover. There are no Trece#i
user serviceable
parts inside
the unit; extensia
leave all servicing
>.wma?, >.m4a? sau >.wav? pentru piesele care nu
qualified service personnel.
sunt în format MP3/WMA/AAC/WAV).
3. CAUTION:
Visible se
and/or
invisible
1Mînlaser radiation
when open. Do not viewnu
directly
with
optical
• Sunetul
întrerupe
dinclass
când
Piese MP3/WMA/AAC/WAV
au fost
copiate
instruments.
când, în timpul red%rii unei piese de corespunz%tor pe dispozitivul USB.
pe un dispozitiv
USB. LABEL, PLACEDCopia#i
MP3/WMA/AAC/WAV din nou în
4. REPRODUCTION
OF LABEL: CAUTION
OUTSIDEpiesele
THE UNIT.
dispozitivul USB "i repeta#i opera#iunea.
• Este nevoie de un interval mai lung • Timpul de citire variaz% în func#ie de complexitatea
pentru citire.
con!gura#iei directorului/!"ierului.
• În timpul red%rii con#inutului unui
• Timpul de citire variaz% în func#ie de tipul de dispozitiv
dispozitiv USB mesajul “READING”
USB.
apare intermitent pe display.
• Nu utiliza#i prea multe ierarhii, directoare "i directoare
goale*.
Caution on volume setting:
Warning:
• Opri#i "i porni#i din nou alimentarea cu energie.
* Director
sau very
carelittle
con$ine
dar nuwith
în format
Discs gol
produce
noisedate,
compared
other
If you need to operate the unit while driving, be
MP3/WMA/AAC/WAV.
sources. Lower the volume before playing a disc
sure to look ahead carefully or you may be involved
Piesele nu pot ! redate în ordinea
Ordinea
redare
este stabilit%
la înregistrarea
to de
avoid
damaging
the speakers
by the sudden!"ierelor.
in a traffic• accident.
dorit% de dumneavoastr%.
increase of the output level.
• Nu se emite niciun sunet atunci
• Înregistra#i piesa audio utilizând MP3 sau Dolby
când imaginea este a!"at% în timpul
Digital ca format audio pentru !"ierele DivX.
red%rii unui !"ier video DivX/MPEG. • Înregistra#i
audio your
utilizând
MPEG1 Audio Layer
Howpiesa
to reset
unit
This symbol is only valid in
2 ca format audio pentru !"ierele video MPEG.
European
Union.
• Timpul detheredare
scurs
nu este cel Acest lucru se întâmpl% uneori în timpul red%rii. Acest
corect.
lucru depinde de ordinea în care piesele au fost
înregistrate pe disc.
Information for Users on Disposal of Old
DivX/MPEG Video/MP3/WMA/AAC/WAV #i dispozitiv USB
ENGLISH
ROMÂN$
Simptom
Solu"ie/Cauz$
Thank you for purchasing
a JVC product.
Please read• allPiesele
instructions
carefully
before operation, to• ensure
your complete
and to obtain the best
nu pot
! redate.
Înregistra#i
piesele understanding
utilizând o aplica#ie
corespunz%toare
possible performance
from the unit. diferitelor tipuri de disc (vezi pagina
Equipment
This symbol indicates that the product with
.
this symbol should not be disposed as general
household waste at its end-of-life. If you wish to
dispose of this product, please do so in accordance
with applicable national legislation or other rules in
your country and municipality. By disposing of this
product correctly, you will help to conserve natural
resources and will help prevent potential negative
effects on the environment and human health.
Note: Only for [EX] model users in UK and
European countries
For security reasons, a numbered ID card is provided
with this unit, and the same ID number is imprinted on
the unit’s chassis. Keep the card in a safe place, as it will
help the authorities to identify your unit if stolen.
2
58
• Your preset adjustments will also be erased.
How to forcibly eject a disc
• Be careful not to drop the disc when it ejects.
• If this does not work, reset your unit.
• : Pe
display
apar alternativ
Built-in
CD player
operations.mesajele
„PLEASE” "i „EJECT” în timpul
disc. operations.
: red%rii
Externalunui
CD changer
• Pe display apar mesajele “NO
: FILE”
External
memory
sauUSB
“NO
USB” operations.
în timpul
red%rii con#inutului unui dispozitiv
: USB.
Indicator displayed for the
correspondingnuoperation.
• Caracterele
sunt a!"ate
corect (de exemplu, denumirea
albumului).
How to use the M MODE button
Solu"ie/Cauz$
• Introduce#i un disc care con#ine piese codate
într-un format corespunz%tor.
Control
panel — KD-G632/KD-G631.......
• Conecta#i un dispozitiv USB care con#ine piese
codate
într-un
format corespunz%tor.
Remote controller
— RM-RK50...........
• Nu pot ! accesate în mod corespunz%tor toate
Getting
started
................................
piesele înregistrate pe un dispozitiv USB.
CONTENTS
4
5
6
ENGLISH
ROMÂN$
DivX/MPEG Video/MP3/
WMA/AAC/WAV #i dispozitiv
USB
The following
marks are used to indicate...
Simptom
Basic operations ................................................... 6
Acest aparat poate a!"a doar litere (majuscule),
Radio"i operations
.............................
numere
un num%r limitat
de simboluri.
7
FM RDS operations ........................... 8
for poate
your favorite
FM RDS
programme
AcestSearching
aparat nu
! conectat
decât
cu un ... 8
telefon
mobil
Bluetooth
"i
un
dispozitiv
audio
Disc / USB memory operations........... 11
Bluetooth, la !ecare conectare. În timpul conect%rii
a discaparatul
in the unit
.....................................
unuiPlaying
dispozitiv,
nu poate
! detectat de la 11
discs in
the CD changer
...........................
un altPlaying
dispozitiv.
Deconecta#i
dispozitivul
curent 11
conectat
"i c%uta#i
din memory
nou. ................................ 11
Ex.: When number button 2 works as
Playing
from a USB
MO (monaural)
button.
• Aparatul
nu detecteaz% dispozitivul • Veri!ca#i setarea Bluetooth a dispozitivului.
Sound adjustments .......................... 14
Bluetooth.
• Efectua#i c%utarea de la dispozitivul Bluetooth.
Dup% detectarea
aparatului
de ..................
c%tre dispozitiv, 15
General
settings
— PSM
selecta#i op#iunea “OPEN” a aparatului pentru a
conecta
dispozitivul.
(Vezi .......................
pagina 31.)
DAB
tuner
operations
18
• Aparatul nu este compatibil cu
• iPod/D.
Introduce#iplayer
acela"ioperations
cod PIN atât .................
pentru aparat cât
19
To use these buttons
for their
original functions
dispozitivul
Bluetooth.
"i pentru dispozitivul pe care dori#i s%-l conecta#i..
again after pressing M MODE, wait for 5 seconds
• Other
Selecta#i
denumirea
dispozitivului
din
op#iunea
external component operations ... 21
“SPECIAL” (Dispozitiv special) "i încerca#i s%-l
without pressing any of these buttons until the
Maintenance
22
reconecta#i. (Vezi...................................
pagina 32.)
functions mode is cleared or press M MODE again.
• Se aud ecouri sau zgomote.
Regla#i
pozi#ia
microfonului.
More about this unit ........................ 23
• Calitatea
sunetului
apelului
• Reduce#i distan#a dintre aparat "i dispozitivul
Detaching
the
control
panel
Troubleshooting
.............................. 26
telefonic este sc%zut%.
audio Bluetooth.
• Specifications
Merge#i într-o zonã
cu
semnal mai puternic. 29
..................................
• În timpul red%rii unui dispozitiv
• Reduce#i distan#a dintre aparat "i dispozitivul
audio Bluetooth, sunetul este redat
audio Bluetooth.
cu întreruperi sau nu este redat
• Deconecta#i dispozitivul conectat în vederea
For
safety...
deloc.
utiliz%rii
func#iei “BT-PHONE”.
Do not
raise the volume
level too much, as this will
• •Opri#i
"i reporni#i
aparatul.
block outsidedispozitivul
sounds, making
dangerous.
• Reconecta#i
(pân%driving
la restaurarea
•sunetului).
Stop the car before performing any complicated
• Dispozitivul audio conectat nu
Veri!operations.
ca#i dac% dispozitivul audio conectat este
r%spunde la comenzi.
compatibil cu pro!lul AVRCP (Audio Video Remote
Control Pro!le – Pro!l de telecomand% audio-video).
Attaching the control panel
Bluetooth *
If you press M•MODE,
the unit goes
into functions
mode,
Dispozitivul
Bluetooth
nu
then the numberdetecteaz%
buttons andaparatul.
5/∞ buttons work as
different function buttons.
Temperature inside the car...
you have
parked the car
for a long time
in hot or cold
* Pentru mai multe informa$ii despre func$iile Bluetooth,Ifciti$i,
de asemenea,
instruc$iunile
furnizate
weather, wait until the temperature in the car becomes
împreun! cu adaptorul Bluetooth.
normal before operating the unit.
Continuare pe pagina urm!toare
REFERIN E
59
3
Schimb$torul de CD-uri
iPod/D. player
DAB
ENGLISH
ROMÂN$
Simptom
Solu"ie/Cauz$
Thank you for purchasing
a JVC product.
•
Pe
a!
"aj
apare
mesajul
“NO
DISC”.
Introduce#i
un disc înunderstanding
magazie. and to obtain the best
Please read all instructions carefully before operation, to ensure
your complete
• Pe a!"aj apare mesajulpossible
“NO MAG”.
Introduce#i
performance
from themagazia.
unit.
• Pe a!"aj apare mesajul „RESET 8”. Conecta#i aparatul la schimb%torul de CD-uri în mod
corect "i ap%sa#i tasta de resetare a schimb%torului
IMPORTANT FOR LASER PRODUCTS
de CD-uri.
1. CLASS 1•LASER
PRODUCT
Pe a!
"aj apare mesajul „RESET 1” Ap%sa#i tasta de resetare a schimb%torului de CD-uri.
2. CAUTION: –Do„RESET
not open7”.the top cover. There are no user serviceable parts inside the unit; leave all servicing to
qualified• service
personnel.de CD-uri nu
Schimb%torul
Reseta#i aparatul (vezi pagina 3).
3. CAUTION: func#ioneaz%.
Visible and/or invisible class 1M laser radiation when open. Do not view directly with optical
• Pe a!"aj apare mesajul
Merge#i într-o zon% cu semnal mai puternic.
instruments.
„noSIGNAL”
semnal).
4. REPRODUCTION
OF LABEL:(f%r%
CAUTION
LABEL, PLACED OUTSIDE THE UNIT.
• Pe a!"aj apare mesajul „RESET 8”. Conecta#i acest aparat "i tunerul DAB în mod
corespunzãtor "i reporni#i aparatul (vezi pagina 3).
• Tunerul DAB nu func#ioneazã deloc. Reconecta#i acest aparat "i tunerul DAB în mod
corespunz%tor. Apoi, reseta#i aparatul (vezi pagina 3).
• Pe a!"aj apare mesajul
Veri!ca#i cablurile "i conexiunile.
„ANTENNA”.
Caution
Warning:
• iPod-ul sau D. player-ul nu porne"te • Veri!ca#i
cablulon
de volume
conectaresetting:
"i conexiunea.
sau nu func#ioneazã.
• Actualiza#i versiunea dumneavoastrã de !rmware.
Discs produce very little noise compared with other
If you need to operate the unit while driving, be
• Încãrca#i bateria.
sources. Lower the volume before playing a disc
sure to look ahead carefully or you may be involved
• Sunetul este distorsionat.
Dezactiva#i
e egalizatorul
aparatului
!e sudden
al iPod / D.
to avoid!damaging
the speakers
by the
in a traffic accident.
player-ului.
increase of the output level.
• Pe a!"aj apar mesajele „NO IPOD” • Veri!ca#i cablul de conectare "i conexiunea.
sau „NO DP”.
• Încãrca#i bateria.
• Redarea este întreruptã.
C%"tile s-au
în timpul
red%rii.
Howdeconectat
to reset your
unit
This symbol is only valid in
Relua#i redarea (vezi pagina 38).
the European
Union.la
• Nu se emite
niciun sunet
• Deconecta#i cã"tile de la iPod-ul nano.
conectarea unui iPod nano.
• Actualiza#i versiunea !rmware a iPod-ului nano.
Information for Users on Disposal of Old
• Nu se emite niciun sunet.
Deconecta#i adaptorul de la D. player. Apoi conecta#i-l
Equipment
din nou.
• La conectarea unui D. Player, pe
This symbol indicates
that the
product
with 01”.
a!"aj apare
mesajul
„ERROR
this symbol• should
disposed
as general
Pe a!not
"aj be
apar
mesajele
„NO FILES” Nu exist% nicio pies% în memorie. Introduce#i piese în
sauat„NO
TRACK”. If you wish to
iPod sau în D. player.
household waste
its end-of-life.
dispose of •thisPe
product,
please do
so in accordance
a!"aj apare
mesajul
„RESET 1” Deconecta#i adaptorul atât de la aparat cât "i de la
– „RESET
7”.
conecta#i-l din nou.
with applicable
national legislation
or other rules in iPod/D.
• Yourplayer.
preset Apoi
adjustments
will also be erased.
• and
Pe a!
"aj apare mesajul
„RESET
your country
municipality.
By disposing
of this8”. Veri!ca#i conexiunea dintre adaptor "i acest aparat.
product correctly,
you williPod-ului
help to conserve
sau D. natural
Reseta#iHow
iPod-ul
D. player-ul.
• Comenzile
tosau
forcibly
eject a disc
nu func#ioneazã
dupã
resources andplayer-ului
will help prevent
potential negative
deconectarea
de
la
acest
aparat.
effects on the environment and human health.
Note: Only for [EX] model users in UK and
European countries
For security reasons, a numbered ID card is provided
with this unit, and the same ID number is imprinted on
the unit’s chassis. Keep the card in a safe place, as it will
help the authorities to identify your unit if stolen.
2
60
• Be careful not to drop the disc when it ejects.
• If this does not work, reset your unit.
CONTENTS
: Built-in CD player operations.
SEC!IUNEA AMPLIFICATORULUI
AUDIO
: External CD changer operations.
Putere maxim% de ie"ire: Fa#%/Spate:
: External USB memory operations.
Putere continu% (RMS): Fa#%/Spate:
Control panel — KD-G632/KD-G631....... 4
Remote
50
W/canalcontroller — RM-RK50........... 5
19
W/canal la
4 \, 40 ................................
– 20 000 Hz, cu o distorsiune 6
Getting
started
ENGLISH
ROMÂN$
The following
marks are used to indicate...
Speci$
ca#ii
armonicã totalã mai micã de 0,8^
: Indicator displayed for the
Basic operations ................................................... 6
Impedan#% de intrare:
4 \ (admisibil între 4 \ "i 8 \)
corresponding operation.
Radio
operations
Gam% de control a
Frecven#e:
60
Hz, 150
Hz, 400 Hz,.............................
1 kHz, 2,5 kHz, 6,3 kHz, 7
egalizatorului:
15
FMkHz
RDS operations ........................... 8
How to use the M MODE button
Nivel:
± 10
dB for your favorite FM RDS programme ... 8
Searching
If you press M MODE, the unit goes into functions mode,
Raport
70 dB
then
the semnal/zgomot:
number buttons and 5/∞ buttons work as
Disc / USB memory operations........... 11
Nivelul de
ie"irebuttons.
a
Digital (DIGITAL OUT:
Lungimea
660 nm
different
function
Playing aundei
disc inde
thelucru:
unit .....................................
11
sunetului:
optic%):
Nivel de ie"ire: între –21 dBm "i –15 dBm
Playing discs in the CD changer ........................... 11
Nivel as
ie"ire/impedan#%: Sarcinã de 2,5 V/20 k\ (scarã completã)
Ex.: When number button 2 works
Playing from a USB memory ................................ 11
Impedan#%
de ie"ire:
1 k\
MO (monaural) button.
Sounddeadjustments
..........................
14
Nivel de ie"ire pentru difuzorul de bas/Impedan#% : Sarcinã
2,5 V/20 k\ (scarã
completã)
General settings — PSM .................. 15
Sistem de culori:
PAL
Ie"ire video (compus%):
1DAB
Vp-p/75
\ operations....................... 18
tuner
Alte mufe:
Schimb%tor de CD-uri, intrare telecomand% volan, intrare LINE IN, a doua
iPod/D. player operations................. 19
ie"iri
audio.functions
To use these buttons for their
original
again after pressing M MODE, wait for 5 seconds
without
pressingRADIORECEPTORULUI
any of these buttons until the
SEC!IUNEA
functions
mode
is cleared or press
Interval de
frecven#%:
FM:M MODE again.
AM:
Detaching the control panel
Radioreceptor FM:
Radioreceptor UM
Radioreceptor UL
Sensibilitate util%:
Prag de sensibilitate de
50 dB:
Selectare de canale
alternative (400 kHz):
R%spuns în frecven#%:
Separare stereo:
Sensibilitate/
Selectivitate:
Sensibilitate:
Attaching the control panel
Other external component operations ...
Maintenance ...................................
87,5 MHz - 108,0 MHz
More522
about
unit
(UM)
kHz –this
1.620
kHz........................
(UL)
144 kHz - 279 kHz
Troubleshooting
..............................
11,3 dBf (1,0 `V/75 \)
Specifications ..................................
16,3 dBf (1,8 `V/75 \)
21
22
23
26
29
65 dB
For safety...
• Do
raise
theHzvolume level too much, as this will
40
Hznot
- 15
000
30block
dB outside sounds, making driving dangerous.
• Stop the car before performing any complicated
20 `V/35 dB
operations.
50 `V
Temperature inside the car...
If you have parked the car for a long time in hot or cold
weather, wait until the temperature in the car becomes
normal before operating the unit.
Continuare pe pagina urm!toare
REFERIN E
61
3
ENGLISH
ROMÂN$
SEC!IUNEA DVD/CD PLAYER-ULUI
Thank you for purchasing a JVC product.
Sistem
Citireoperation,
optic% f%r%
mecanic
(laser
cu semiconductori)
Please
readde
all detectare
instructionsacarefully before
to contact
ensure your
complete
understanding
and to obtain the best
semnalului:
possible performance from the unit.
Num%r de canale:
2 canale (stereo)
R%spuns în frecven#%:
DVD, fs=48 kHz/96 kHz:
16 Hz - 22 000 Hz
IMPORTANT FOR LASER PRODUCTS
CD, fs=44,1 kHz:
16 Hz - 20 000 Hz
1. CLASS 1 LASER PRODUCT
Interval dinamic:
96 dB
2. CAUTION: Do not open the top cover. There are no user serviceable parts inside the unit; leave all servicing to
Raport
semnal/zgomot:
98 dB
qualified
service personnel.
sunetului:
Subnotlimita
3. Distorsiuni
CAUTION: ale
Visible
and/or invisible class 1M laser radiation when open. Do
viewm%surabil%
directly with optical
Video
DivX/MPEG: Video: Rezolu#ie maxim%:
720 × 480 pixeli (30 fps)
instruments.
4. REPRODUCTION OF LABEL: CAUTION LABEL, PLACED OUTSIDE THE UNIT. 720 × 576 pixeli (25 fps)
Audio: Rat% de transfer:
DivX: 32 kbps – 320 kbps
Video MPEG: 32 kbps – 320 kbps
Frecven#% de e"antionare: DivX: MPEG-1: 32 kHz, 44.1 kHz, 48 kHz
MPEG-2: 16 kHz, 22,05 kHz, 24 kHz
Frecven#% de e"antionare:
32 kHz, 44,1 kHz, 48 kHz
Video MPEG:
Caution32onkbps
volume
Warning:
MP3:
Rat% de transfer:
– 320setting:
kbps
kHz,
44,1 kHz,
kHz
Discs produceMPEG-1:
very little 32
noise
compared
with48other
If you need to operate the unit whileFrecven#%
driving, be de e"antionare:
MPEG-2: 16 kHz, 22,05 kHz, 24 kHz
sources. Lower the volume before playing a disc
sure to look ahead carefully or you may be involved
WMA:
Rat% de transfer:
32 kbps – 320 kbps
to avoid damaging the speakers by the sudden
in a traffic accident.
Frecven#% de e"antionare:
22,05
kHz,
32 kHz, 44,1 kHz, 48 kHz
increase of the output
level.
AAC:
Rat% de transfer:
16 kbps – 320 kbps
Frecven#% de e"antionare:
44,1 kHz, 48 kHz
How to reset your unit
WAV:
Rat%valid
de transfer
la cuanti!care: 16 bi#i
This symbol is only
in
the European Union.
Frecven#% de e"antionare:
44,1 kHz
Information for Users on Disposal of Old
Equipment
This symbol indicates that the product with
this symbol should not be disposed as general
household waste at its end-of-life. If you wish to
dispose of this product, please do so in accordance
with applicable national legislation or other rules in
your country and municipality. By disposing of this
product correctly, you will help to conserve natural
resources and will help prevent potential negative
effects on the environment and human health.
Note: Only for [EX] model users in UK and
European countries
For security reasons, a numbered ID card is provided
with this unit, and the same ID number is imprinted on
the unit’s chassis. Keep the card in a safe place, as it will
help the authorities to identify your unit if stolen.
2
62
• Your preset adjustments will also be erased.
How to forcibly eject a disc
• Be careful not to drop the disc when it ejects.
• If this does not work, reset your unit.
The following
marks are used to indicate...
Sec"iunea
USB-ului
USB Standard:: Built-in CD player operations.
USB 1,1/USB 2,0
Rata de transfer a datelor:
Vitez% maxim%: Control
Maximpanel
12 Mbps
— KD-G632/KD-G631....... 4
: External CD changer operations.
Vitez% redus%: Remote
Maxim controller
1,5 Mbps — RM-RK50........... 5
: External USB memory operations.
Dispozitiv compatibil:
Dispozitiv de stocare în mas%
Getting
started ................................ 6
Sisteme de !"iere
compatibile:
FAT 12/16/32
: Indicator
displayed for the
Basic operations ................................................... 6
Format audio/video
ce poate operation.
! redat:
DivX/MPEG Video/MP3/WMA/AAC/WAV
corresponding
Radio
operations ............................. 7
Curent maxim:
500 mA
How to use the M MODE button
ENGLISH
ROMÂN$
CONTENTS
FM RDS operations ........................... 8
GENERALE
Searching for your favorite FM RDS programme ... 8
IfINFORMA!II
you press M MODE,
the unit goes into functions mode,
Alimentare:
V CC.
(tolerat operations
între 11 V - 16...........
V)
then
the number buttons and 5/∞ buttonsTensiune
work as de Disc14,4
/ USB
memory
11
func#ionare:
different function buttons.
Playing a disc in the unit ..................................... 11
Sistem de legare la masã:
Mas% negativ%
Playing discs in the CD changer ........................... 11
Temperatur%
admis%
de func#ionare:
între from
0°C "i
+40°C
Ex.: When number
button
2 works as
Playing
a USB
memory ................................ 11
Dimensiuni
(L
×
Î
×
A):
Spa#iu
necesar
182
mm
×
52
mm × 158 mm
MO (monaural) button.
pentru instalare Sound adjustments .......................... 14
(aproximativ):
General settings — PSM .................. 15
Dimensiunile
188 mm × 58 mm × 12 mm
panoului
DAB tuner operations....................... 18
(aproximativ):
iPod/D.
player operations................. 19
To
use (aproximativ):
these buttons for their original functions
Mas%
1,6 kg (f%r% accesorii)
again after pressing M MODE, wait for 5 seconds
Other external component operations ... 21
Maintenance
................................... 22
functions mode is cleared or press M MODE again.
• Fabricat sub licen#a Dolby Laboratories. Dolby "i simbolul
dublu
D
sunt
ale Dolby 23
More about thism%rci
unitînregistrate
........................
Laboratories.
Detaching the control panel
.............................. 26
• “DTS” "i “DTS Digital Out” sunt m%rci înregistrate ale Troubleshooting
DTS, Inc.
• “DVD Logo” este marc% a DVD Format/Logo Licensing
Corporation înregistrat%
în S.U.A., Japonia "i29
Specifications
..................................
Design-ul
#i datele
pot schimba
without pressing
anytehnice
of thesese
buttons
until thef!r! noti"care prealabil!.
alte #%ri.
• DivX, DivX Ultra Certi!ed "i logo-urile asociate sunt m%rci înregistrate ale DivX, inc. "i nu pot ! utilizate
decât sub contract de licen#%.
For safety...
• Produs o!cial DivX® Ultra Certi!ed
®
® • Do not raise the volume level too much, as this
• Red% orice versiune de DivX video (inclusiv DivX 6) cu redare avansat% a !"ierelor media DivX® will
"i a
block outside sounds, making driving dangerous.
formatului media DivX® Media Format
Stop
the car
complicated
• Microsoft "i Windows Media sunt !e m%rci înregistrate• ca
atare,
!ebefore
m%rci performing
apar#inândany
companiei
operations.
Microsoft Corporation din Statele Unite ale Americii "i/sau
din alte #ãri.
• iPod este marcã înregistratã a Apple Inc., înregistratã în S.U.A. "i în alte #ãri.
Attaching
theBluetooth
control sunt
panel
• Logotipul
"i siglele
de#inute de Bluetooth
SIG, Inc. "i orice
utilizare
a m%rcii de c%tre
Temperature
inside
the car...
compania Victor Company of Japan, Limited (JVC) seIf face
sub parked
licen#%.the
Alte
înregistrate
"i or cold
you have
carm%rci
for a long
time in hot
denumiri comerciale apar#in proprietarilor de drept. weather, wait until the temperature in the car becomes
normal before operating the unit.
REFERIN E
63
3