1
Basic Operation
!
The DragonFly can be run from the internal battery pack, external 120-240VAC power or external
12-24VDC power. The DragonFly is designed to automatically detect the preferred power source
and to use that source on start-up. The default source is external AC, followed by external DC
then the internal battery back. The DragonFly has three operational modes - on/charging, on/not
charging and off/charging. On/charging is the most commonly used mode. On/charging is typically
only used when the external power source is also limited, such as an external battery pack, solar
panel or vehicle. Off/charging is used to charge the unit when audio system isn’t needed but the internal battery is drained.
!
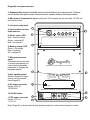
To start the unit, press and hold the power button until the LED lights light up. Then release
the power button and press the button until the desired operational state has been reached.
Press once for on/charging, twice for on/not charging and three times for off/charging. Press four
times to shut the unit off completely. The charge and power LEDs will show what the operational
state of the unit is.
!
If the unit is running from a source that becomes unavailable, then it will automatically switch over
to the next available default power source. If the unit is running from the internal battery and the
battery gets depleted then the unit will simply shut off.
!
After the unit is operational, you can set the volume level for whatever audio source you are using
by adjusting the appropriate level control knob on the upper panel of the DragonFly. You can use
all four audio inputs simultaneously.
!
Clip light - this LED signals when the inputs to the DragonFly are being overdriven. While it is acceptable for the Clip LED to flicker during operation, the LED should not stay constantly lit. If the
LED is fully lit, all active inputs levels should be reduced until the light is occasionally flickering.
The audio mixer of the DragonFly does incorporate a limiter circuit to reduce clipping.
!
Wireless Microphone operation
!
The wireless microphone system integrated into the DragonFly ships with the handheld transmitter
paired to the receiver inside the unit. To start using the wireless system, you can simply take the
handheld unit, press the power/mute button until the green light on the mic is on. To mute the microphone, press the button once. When muted, the indicator on the handheld transmitter should
be red. To shut the microphone off, simply press and hold the button until the light goes off. If you need to change the channel that the system is using, you will need to access the microphone receiver settings. First, remove the microphone access panel by undoing the two knurled
knobs. You can now see the programming panel of the unit. Press and release the channel button.
This will scan for an available channel and select that channel. Next, turn on the handheld unit
and remove the battery cover by unscrewing the lower part of the handheld transmitter. Point the
base of the unit towards the microphone receiver and press and hold the sync button on the receiver. Hold the button until the red lights on the receiver and handheld unit stop flashing. The receiver ready light should now be lit and the system should be set to operate on the new channel.
Re-attach the battery cover on the handheld unit.
The operational range of the wireless transmitter is approximately 300’.
!
!