1
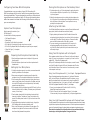
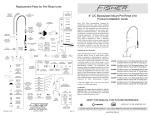
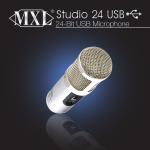
Care
Dust and moisture will degrade the performance of a microphone over time so always store
the unit in its case. It is strongly advised to use a mesh pop-filter to avoid moisture from
damaging the capsule.
NEVER clean the microphone with any household cleaner or any liquid cleaner.
Warranty
Marshall microphones are guaranteed against defects in material and workmanship for one year from date of
purchase. Should you encounter any problem with this unit, promptly contact the company you purchased
it from for assistance. The original dated sales receipt will be necessary for any warranty claim. Do not send
any unit directly to us without prior authorization from our service department! Warranty coverage is limited
to repair or replacement (at our option) of the microphone, and does not cover incidental damages due to
use of this unit, nor damage caused by accidental misuse of this product.
DRK Users Manual
Marshall Electronics, Inc. Professional Audio Division, El Segundo, CA
www.MXLmics.com • www.mogamicable.com • [email protected]
Configuring Your New MXL Microphone
Placing the Microphone on the Desktop Stand
Congratulations on your purchase of your MXL Recording Kit.
MXL microphones are the result of world-class engineering and manfacturing capabilities. They are designed to provide you with outstanding peformance and exceptional value. To help you get started, please
take a few moments to review the following instructions for setting up
your new microphone.
1. On the microphone clip, you’ll find an adjustment for angling the position
of the microphone. Adjust the clip so that the “cup” of the microphone
clip is facing upward.
2. Holding the microphone securely in one hand, place the microphone into
the “cup” portion of the microphone clip and then tighten the knurled ring
back onto the base of the microphone. Your microphone is now sup
ported by the microphone stand.
Unpack Your Microphone
Begin by removing the contents of your
MXL Recording Kit.
You should have the following components:
•
•
•
•
•
•
Self-Powered Microphone
Desktop Stand
Microphone Clip (this holds the microphone)
XLR cable (this is the cable with 3-prong connections on each end)
XLR to Mini-Plug Adapter Cable (this cable enables you to patch into your computer)
3.5mm Mini-Plug to ¼-inch adapter
• 9-Volt battery
Preparing the Microphone Stand and Clip
1. Open the desktop microphone stand so the tripod is fully open and
standing upright.
2. Take the microphone clip and screw it onto the microphone stand’s
threaded mount.
Setting Up Your Microphone
1. Holding the microphone securely in one hand, unscrew and remove the
knurled ring at the base of the microphone.
2. Now unscrew and remove the sloped ring around the base of the
microphone’s body. The microphone’s tubular body will now be loose.
3. Prior to removing the microphone’s main body housing, take a few mo
ments to visually orient yourself to the position of the battery switch rela
tive to the On/Off\ markings on the microphone’s body. Now carefully
remove the main body housing.
4. On the opposite side of the microphone from the On/Off switch, you’ll see
the housing that holds the 9-volt battery. The battery can only be inserted
one way - so don’t worry!
5. Place the battery (terminals first) into the battery housing and slide it
down and into position. The battery will “snap” into place when fully
inserted. If the battery doesn’t seem to fit, flip it over and re-insert it into
the housing.
6. Carefully replace the microphone’s main body housing - aligning the
On/Off markings with the microphone’s battery switch.
7. Next, re-install the sloped ring onto the base of the microphone. The
microphone’s body parts will now be secure and the On/Off switch
should move freely between the two positions.
Attaching the XLR Cable
Your XLR cable has different connectors on each end. One end has three small
prongs (male), while the other has three small holes (female).
1. Begin by attaching the female end of the XLR cable to the base of the
microphone by aligning the notches (one notch each for the microphone
and the cable). The cable will fit snugly into place. To remove the cable,
press and hold the release switch on the cable’s connector.
2. If you are connecting your microphone into the XLR connector of a
microphone preamplifier or the input channel of a mixer, the other
end of the XLR cable will patch directly into the external device and you
will be ready to begin.
Using Your Microphone with a Computer
Most computers use what is known as a 3.5mm mini jack for audio input and
output. To connect your microphone to a computer, you’ll need to use the
supplied XLR - 3.5mm Mini-Plug adapter cable.
With your XLR cable already attached to the microphone, connect the male
end of the XLR cable to the female (XLR) end of the adapter cable. The other
end of the cable will have a 3.5mm connector. You are now ready to connect
to the computer’s audio input.
Using Your Microphone with ¼ -inch Input - Equipped Devices
Many self-contained personal recording systems use ¼-inch inputs. Others have
both ¼-inch and XLR inputs. If the external device has XLR connectors, you can
patch the microphone directly into the external unit by using the supplied XLR
cable. If the external device uses ¼-inch inputs, you’ll need to use the supplied
XLR to Mini-Plug Adapter Cable with the 3.5mm to ¼-inch Adapter.
1. Connect your microphone and XLR cable to the XLR to Mini-Plug
Adapter Cable as previously described.
2. Plug the 3.5mm mini jack into the supplied 3.5mm to ¼-inch adapter.
You are now ready to use your microphone with ¼-inch input-equipped devices.
Using Your Self-Powered Microphone with Phantom Power
Your self-powered MXL microphone can be used with phantom power without fear of damaging either the microphone or the phantom power source. If the microphone senses phantom
power, it will automatically bypass the internal battery and operate using phantom power.
Please turn the microphone to the off position when not in use and remove the battery
when storing or not using the microphone for long periods of time.