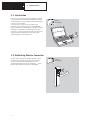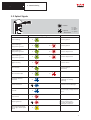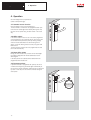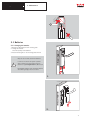
1
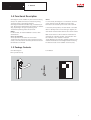
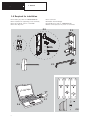
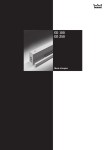
DORMA
Installation Manual
XS-Fitting Pro
XS-Fitting Pro
Contens
1. General. . . . . . . . . . . . . . . . . . . . . . . . . . . . . . . . . . 3
3. Commissioning . . . . . . . . . . . . . . . . . . . . . . . . . . 15
1.1 Correct use . . . . . . . . . . . . . . . . . . . . . . . . . . . . . . 4
3.1 Initialisation . . . . . . . . . . . . . . . . . . . . . . . . . . . . 16
1.2 Further Sources of Information . . . . . . . . . . . . . . . . 4
3.2 Establishing Wireless Connection . . . . . . . . . . . . . 16
1.3 Disposal . . . . . . . . . . . . . . . . . . . . . . . . . . . . . . . . 4
3.3 Optical Signals . . . . . . . . . . . . . . . . . . . . . . . . . . 17
1.4 Functional Discription . . . . . . . . . . . . . . . . . . . . . 5
4. Operation . . . . . . . . . . . . . . . . . . . . . . . . . . . . . . 18
1.5 Package Contents . . . . . . . . . . . . . . . . . . . . . . . . . 5
5. Maintenance . . . . . . . . . . . . . . . . . . . . . . . . . . . . 19
1.6 Required for Installation . . . . . . . . . . . . . . . . . . . . 6
5.1 Batteries. . . . . . . . . . . . . . . . . . . . . . . . . . . . . . . 19
2. Assembly . . . . . . . . . . . . . . . . . . . . . . . . . . . . . . . 7
5.2 Tamper alarm . . . . . . . . . . . . . . . . . . . . . . . . . . . 21
2.1 Door requirements . . . . . . . . . . . . . . . . . . . . . . . . . 7
EC Declaration of Conformity . . . . . . . . . . . . . . . . . . 22
2.2 Preparation . . . . . . . . . . . . . . . . . . . . . . . . . . . . . . 9
6. Technical Data . . . . . . . . . . . . . . . . . . . . . . . . . . 24
2.3 Mounting plate . . . . . . . . . . . . . . . . . . . . . . . . . . 11
2.4 Final assembly . . . . . . . . . . . . . . . . . . . . . . . . . . 14
2
XS-Fitting Pro
1. General
The information provided in these installation instructions
may be modified without prior notification.
All previous versions cease to be valid with the publication
of these instructions.
The information in these installation instructions has been
compiled in good faith and based on the best knowledge
available to us. DORMA accepts no liability for the correctness and completeness of the details provided.
In particular, DORMA cannot accept liability for any
consequential damages due to incorrect or incomplete information.
The recommendations for installation made in this manual
are based on the assumption that prevailing basic conditions are favourable. DORMA accepts no liability for the
perfect functioning of XS-Fitting Pro in external, non-system
environments.
Despite every effort to prevent mistakes, they can never
be completely avoided. Therefore, we would be grateful to
receive notification of any errors or omissions.
DORMA accepts no liability for the information included
in this document being free of protected third party rights.
DORMA does not provide any licences for its own or third
party patents or other protected rights with this document.
This manual or sections of it may not be reprinted, copied or distributed to third parties, other than for your own use,
without he approval of DORMA Time + Access GmbH.
All rights reserved.
DORMA Time + Access GmbH
Postfach 21 01 85
53156 Bonn
http://www.dorma-time-access.de
E-Mail [email protected]
© Copyright 2012 by DORMA Time + Access GmbH
Z.-Nr.: 1099G-00-B-EN
Stand: 03/13 V1.30
3
XS-Fitting
XS-Fitting Pro
Pro
1. General
1.1 Correct Use
The XS-Fitting Pro is a mechatronic access control unit for
installation on internal doors.
The XS-Fitting Pro may only be used for opening doors.
Installation on fire and smoke protection doors is only
permitted with components approved by DORMA and a
separate fire protection kit. Proof of suitability in conjunction
with the fire or smoke protection door concerned is required.
Installation in the direction of escape on emergency and
escape doors is not permitted.
However, it can be used as an outside access device in conjunction with emergency exit door latches, i.e. installation
against the direction of escape, on doors along escape and
rescue routes.
Proof of suitability for use with the respective emergency exit
door latch is required for use as an outside access device.
Use for any other purpose than that described is not
permitted.
1.2 Further Sources of Information
Further documents are available on request.
User Manual XS-Manager
Describes the configuration of the XS components.
1.3 Disposal
The device was manufactured using recyclable materials and
components.
When disposing of the device and the packaging, please
ensure environmentally friendly recycling.
Information for EU Countries
European Directive 2002/96 EC applies to this device.
This means that this product must not be disposed of with
normal household waste. We, the manufacturer, will take
back our electric and electronic products and dispose of
them for you free of charge. Correct disposal of your old
equipment protects people and the environment from
possible harmful consequences.
Batteries
This device requires alkaline batteries for operation.
According to European directive 2006/66/EC, disposable and
rechargeable batteries must not be disposed of with normal
household waste.
Please check your local regulations for separate disposal of
batteries. Correct disposal of batteries protects people and
the environment from possible harmful consequences.
4
Mandatory legal regulations must be observed
and may mean that use on doors that are subject
to special requirements is not permitted.
This device is categorised as class 2 radio equipment according to R&TTE directive 1999/5/EC.
The frequency bands are not harmonised.
In some countries, use may not be permitted or
may be subject to restrictions.
Cf. Technical Data.
XS-Fitting
XS-Fitting Pro
Pro
1. General
1.4 Functional Description
XS Fitting Pro can be installed in place of the door fitting
and put into operation without the need for any wiring.
The power supply is provided by batteries.
XS Fitting Pro reads ID card data using a contactless process. XS Fitting Pro authorisations are checked in different
ways, depending on the type of operating mode.
The different operating modes are as follows:
Offline:
In offline mode, an internal database is used to check
authorisations.
Access on Card (AoC):
Access permissions are saved onto the ID card.
The ID card user retrieves the current permissions from a
central, online AoC station and these permissions are then
transmitted to the ID card.
Online:
In online mode, XS Fitting Pro is connected to an access
control terminal via the XS Traffic Point radio node.
Permissions are checked by the access control terminal.
If the check proves positive, the door handle is unlocked.
When in standby mode or if the booking is negative, the
door handle remains blocked and the door remains locked.
Data reconciliation for offline mode and initialisation is
performed via a wireless interface. Communication with
this interface is via a netbook or notebook.
The XS Manager communication software installed on the
netbook allows data to be exchanged between XS Fitting
Pro and the access control software on the PC (host).
1.5 Package Contents
A 1x XS-Fitting Pro
B 1x Cylinder with key
A
C 1x Manual
B
C
DORMA
Installationshandbuch
XS-Beschlag
5
XS-Fitting
XS-Fitting Pro
Pro
1. General
1.6 Required for installation
Z.1
Z.2
Z.3
Z.4
1x
1x
1x
1x
battery set, order no. 19000070400130
installation kit (depending on door thickness)
drilling gauge, order no. 19191400
Allen key 2 mm
Z.5
Z.6
Z.7
Z.8
1x screw clam
Netbook with XS-Manager
USB-RF-Stick, order no. 1900070402707
Fire-/ smoke protection kit, order no. 19167498
Z.2
Z.3
Z.1
+
+
+
+
5x
5x
4x
Z.4
Z.5
annaaggeerr
M
a
S
X
X
Z.7
Z.6
Z.8
6
2. Assembly
XS-Fitting Pro
2.1 Door requirements
2.1.1 Door thickness
32 - 105mm
2.1.2 Profile cylinder
For an XS-Fitting Pro without profile-cylinder bore, the profile cylinder may protrude up to 17 mm.
2.1.3 Latch pins (a)
max.17
8 mm or 9 mm latch pins may be used. The latch pin
should extend 35 mm into the handle on the other side.
max 35o
<35
35
2.1.4 Backset (b)
The backset must be at least 35 mm.
If the backset for the XS-Fitting Pro is too small, there is a
danger that the body of the XS-Fitting Pro can come into
contact with the rebate.
2.1.5 Centre-to-centre dimension (c)
With the XS-Fitting Pro , the centre-to-centre dimension
may vary between 72 and 92 mm.
b
min. 35
The IBL-I interior plates are only suitable for
centre-to-centre dimensions of 72 mm or
92 mm.
For other dimensions, roses must be fitted.
c
8/9
74 / 78
c
a
8/9
72 / 92 / 88
a
RZ
PZ
min. 35
min. 35
b
b
7
2. Assembly
XS-Fitting Pro
2.1.6 Opening direction
Depending on the model, XS Fitting Pro is suitable for use
on both left-handed and right-handed doors..
The handle direction depends on the model
used and cannot be changed at a later stage.
DIN-right
Handle right
(DR)
8
DIN-left
Handle left
(DL)
2. Assembly
XS-Fitting Pro
2.2 Preparation
Use the drilling gauge to drill the
mounting holes
2.2.3 Drilling gauge
1.
2.
3.
4.
5.
Remove the existing handle and profile cylinder
Set centres distance
Drill centring holes
Remove drilling gauge and lock
Fasten drilling gauge into place
1.
=
Ø 7/8/9
40
Ø 17/22
mm
Ø2
,5
3.
2.
=
2.
1.
40
mm
Ø2
,5
3.
1.
1.
2.
3.
2.
4.
5.
9
XS-Fitting Pro
2. Assembly
2.2.2 Installation on Fire and Smoke Protection Doors
nameplate
Only XS-Fitting Pro s with fire protection handles may be installed on fire and smoke protection doors.
This is indicated on the nameplate.
Installation is only permitted in combination
with a fire protection kit.
The installation is described in separate
instructions supplied with the fire protection
kit.
nameplate
Proof of suitability in conjunction with the fire
or smoke protection is required.
Code Handle
Installation at Fire and Smoke
Protection Doors permitted
01
Standard
No
02
8155 FS
Yes
03
8906 FS
Yes
04
8998 FS
Yes
05
8830 FS
Yes
08
8100 FS
Yes
BL-0-D#-PX#-##-#-#-#
4x Mignon 1,5V ##
XXXXXXXX-XXXXX-XXX XX
Fire-/ smoke protection kit
Instruction
Fire protection kit
10
9
2. Assembly
XS-Fitting Pro
2.3 Mounting plate
113,25
205
91,75
2.3.1 Long backplate screwed through
IBL-I
38
5xØ 9
1.
ok
3.
Use only countersunk screws to fasten the
mounting plate.
The screws may not protrude beyond the
surface of the mounting plate.
If installed improperly, the batteries can be
damaged and thereby cause high discharge
currents to arise.
Risk of excessive heat, explosion and fire.
2.
1.
2.
11
2. Assembly
XS-Fitting Pro
3
135,25
101
12,5 7,5
22
69,75
2.3.1 Rose screwed through
38
ok
Use only countersunk screws to fasten the
mounting plate.
The screws may not protrude beyond the
surface of the mounting plate.
If installed improperly, the batteries can be
damaged and thereby cause high discharge
currents to arise.
Risk of excessive heat, explosion and fire.
4xØ9
5 x Ø 2,5 x 50mm
1.
3.
3.
M4
2.
2.
4.
M4
4.
4x
2.a
12
1.
1.
2.b
2. Assembly
XS-Fitting Pro
135,25
22
69,75
2.3.1 Long backplate or rose not screwed through
38
We recommend screwing through simple
doors, such as those made with a flaxboard
core.
ok
Use only countersunk screws to fasten the
mounting plate.
The screws may not protrude beyond the
surface of the mounting plate.
If installed improperly, the batteries can be
damaged and thereby cause high discharge
currents to arise.
Risk of excessive heat, explosion and fire.
5 x Ø 2,5 x 50mm
1.
3.
2.
1.
2.
13
XS-Fitting Pro
2. Assembly
2.4 Final assembly
1.
2.
Only ever use unused, brand new batteries!
In order to ensure that the system operates
without problems we recommend that only
batteries of type Energizer Ultra+ 1,5V be used.
Rechargeable batteries and disposable batteries
with differing voltage must not be used.
+
Do not use electrically conductive tools to
insert/remove the batteries.
If the batteries are handled improperly, high
discharge currents can arise.
Risk of excessive heat, explosion and fire.
+
+
3.
4.
14
+
XS-Fitting Pro
2. Assembly
During fitting, make sure that no components
are damaged.
4.
The grub screw (5.5) must be tightened with a
torque of 0.8 Nm.
1.
5.
2.
3.
5.
4.
15
XS-Fitting Pro
3. Commissioning
3.1 Initialisation
In order to put the XS-Fitting Pro into operation, a netbook
with a USB-RF-Stick and installed XS Manager is required.
The XS-Fitting Pro must be configured and initialised before
it can be put into operation.
In order to do this, the door must be created in the
host system and the data synchronised with XS Manager.
During initialisation, the XS-Fitting Pro is assigned a unique
identification number. Once the XS-Fitting Pro has been
initialised, you need to upload access data, such as ID card
numbers of authorised ID cards, from the host system.
The XS-Fitting Pro is then ready for use.
Manual
XS-Manager
annaaggeerr
X
XS- Ma
3.2 Establishing Wireless Connection
You first need to start the XS Manager application, which
will search for all available XS-Fitting Pro and list them.
You can then select an XS-Fitting Pro from this list.
The selected XS-Fitting Pro can be indicated by
A blue
flashing light indicates connection with XS Manager.
16
Manual
XS-Manager
XS-Fitting Pro
3. Commissioning
3.2 Optical Signals
= flashes
= lights up
about 100ms
Function
Signalling
R = red
G = green
B = blue
Y = yellow
Note
Positive booking
1x
G
Positive booking in
Battery Warning Level 1
1x
G
4x
R
Access is granted
Positive booking in
Battery Warning Level 2
1x
G
4x
R
Access is delayed 3 sec
Positive booking in
Battery Warning Level 3
1x
G
4x
R
Access is delayed 6 sec
Negative booking
1x
R
Access is denied
Office released
2x
G
Access is granted
permanently
Office released ended
1x
G
Selected for wireless
connection
5x
B
Shows which cylinder
XS-Manager is currently
addressing
B
Connection with XS Manager
After the supply voltage has been
put on
Wireless connection
Power On
1x
B
Motor blocked
3s
R
R
Tampering attempt
Launching / De-launching
only by Legic reader system
(PX51)
1x
Access is granted
1x
R
The XS-Fitting Pro was removed
from the mounting plate.
This signal ceases after the
XS-Fitting Pro is replaced
Y
17
XS-Fitting Pro
4. Operation
4. Operation
Use with badges with lock permissions
(cards or transponder tags).
4.1 Standard access function
Hold the badge in Front of the XS-Fitting Pro .
The door handle is unlocked for the programmed door open
time and then locked again automatically. During this time,
the door can be opened using the door handle in the usual
way.
4.2 Office release
If the office release function is set in the access programme
of the XS-Fitting Pro for a specified period, this function can
be activated for that particular period by holding a badge
with the relevant authorisation to the XS-Fitting Pro for
approx. 3 seconds. During these 3 seconds, the green LED
flashes twice.
The door remains unlocked until the programmed time and
then locks automatically.
4.3 Reset office release
During the office release time, the door can be locked again
by holding a badge with the relevant authorisation to the
XS-Fitting Pro .
It remains possible to re-activate office release within the
programmed office release time.
4.4 Permanent release
If permanent release is programmed for a period, the door is
unlocked at the beginning and locked again automatically at
the end of this period. Permanent release cannot be influenced
by users. In this case, the door remains unlocked during the
entire period
00:00:03
18
5. Maintenance
XS-Fitting Pro
5.1 Batteries
5.1.1 Changing the batteries
1. Remove the XS-Fitting Pro from mounting plate
2. Change the batteries
Check the polarity of the batteries!
3. Put the XS-Fitting Pro on the mounting plate and lock
Only ever use unused, brand new batteries!
In order to ensure that the system operates
without problems we recommend that only
batteries of type Energizer Ultra+ 1,5V be used.
Rechargeable batteries and disposable batteries
with differing voltage must not be used.
1.
2.
19
5. Maintenance
XS-Fitting Pro
Do not use electrically conductive tools to
insert/remove the batteries.
If the batteries are handled improperly, high
discharge currents can arise.
Risk of excessive heat, explosion and fire.
1.
3.1 Open up the bracket
3.2 Pull on bracket gently, so that you can remove the
1.
batteries
2.
2.
3.
+
+
1.
2.
+
+
4.
5.
The grub screw (3.5) must be tightened with a
torque of 0.8 Nm.
1.
5.
The battery status must be reset in
XS manager after the batteries have
been replaced.
20
2.
3.
3.
4.
5. Maintenance
XS-Fitting Pro
5.1.2 Battery warnings
The XS-Fitting Pro uses a series of changing signals during the
opening process to indicate that the batteries capacity
will soon no longer be sufficient to ensure proper operation.
There are three warning levels.
First warning level:
When a badge is held in front of the XS-Fitting Pro , the
lock permission is issued as programmed.
The LED will light green and subsequent flash reed four times
when the door is unlocked.
Second warning level:
If the battery capacity is further reduced, then there will also
be a delay of 3 seconds before the XS-Fitting Pro unlocks
the door. The signal is the same as stage 1
Third warning level:
If the battery capacity is further reduced, then there will also
be a delay of 6 seconds before the XS-Fitting Pro unlocks
the door. The signal is the same as stage 1.
Batteries must be replaced immediately with
new ones as soon as any of the battery warnings
occurs.
1.
1x
G
4x
R
Access is granted
2.
1x
G
4x
R
Access is delayed 3 sec
3.
1x
G
4x
R
Access is delayed 6 sec
5.2 Tamper alarm
If the XS-Fitting Pro is removed from the mounting plate,
a visual alarm signal is emitted.
This signal ceases after the XS-Fitting Pro is replaced.
21
XS-Fitting Pro
22
EG Konformitätserklärung
EC Declaration of Conformity
CE Déclaration de conformité
XS-Fitting Pro
EG Konformitätserklärung
EC Declaration of Conformity
CE Déclaration de conformité
125 kHz in pipeline
23
6. Technical Data
XS-Fitting Pro
Power supply
4 Batteries
Energizer Ultra+, LR6, 1.5 V
Battery
Operating life at room temperature (20 °C)
Typical number of locking cycles: 30,000
Typical operating life when not operated: 4 years
The specified number of cycles relates to the times that
the UID from the respective ID card type is read.
Different configurations of reader properties may reduce
the number of cycles by up to 40%.
Ambient Conditions
Operating temperature: +5 °C to +50 °C
Storage temperature: -20 °C to +70 °C
Humidity: 0 to 80%, non-condensing
Tested to DIN IEC 60068-2-1/2/3
Protection rating
IP30
Dimensions
66 x 248 x 79 2) (w x h x d)
2) Depends on handle fitted
Colour:
Stainless-steel look; front: anthracite
Data Retention
10 years without battery
Date / time:
Clock buffering when battery replaced: usually 1 minute
Clock drift at room temperature: ±10 minutes/year
At +5 °C and +65 °C: –50 minutes/year.
Wireless Interface
865 - 870MHz
Range: max. 10 m
Compliance with ETSI EN 300 220
Signalling
1 x LED (red, green, blue, yellow)
Weight
1,800g, including batteries
Door dimensions
Door thickness: 32–105 mm
Backset: >= 35 mm
Centres distance: 72–92 mm
General Design
Device with internal power supply as per EN 60950-1.
Human exposure to electromagnetic fields as per EN 50364
and EN 62479
Anti-tamper monitoring
Available
Use of the device is permitted in the countries listed below.
Number of Permissions
Depends on the access control system
Reader systems
The following reader systems are available, depending on
the model:
MIFARE (Classic, DESFire)
LEGIC (prime, advant)
• Transmission frequency: 13.56 MHz
• Read range: 2 cm 1)
AT
BE
CY
CZ
DK
EE
FI
FR
DE
GR
HU
IE
IT
LV
LT
LU
MT
NL
PL
PT
SK
SI
ES
SE
GB
BG
RO
ISO 3166 Code
HITAG (HITAG1, HITAG2, EM4102, EM4150)
in pipeline
• Transmission frequency: 125 kHz
• Read range: 2 cm 1)
1) With reference ID card in credit card format
Compliance with ETSI EN 300 330
We reserve the right to make technical modifications and improvements to promote the progress of our equipment.
DORMA Time + Access GmbH
PO box 21 01 85 • D-53156 Bonn • Mainzer Straße 36-52 • D-53179 Bonn
Phone +49 (0) 2 28/85 54-0 • Fax +49 (0) 2 28/85 84-1 75 • www.dorma-time-access.de
DORMA GmbH + Co. KG
PO box 40 09 • D-58247 Ennepetal • DORMA Platz 1 • D-58256 Ennepetal
Phone +49 (0) 23 33 / 793-0 • Fax +49 (0) 23 33 / 79 34 95 • www.dorma.com
24