1
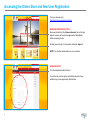
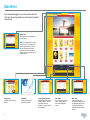
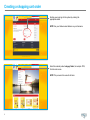
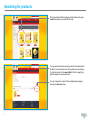
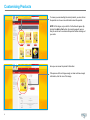
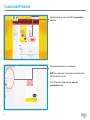
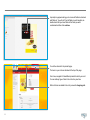
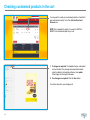
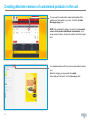
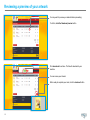
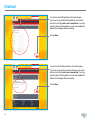
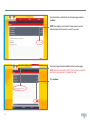
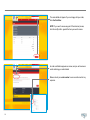
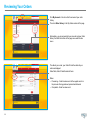
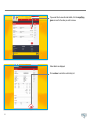
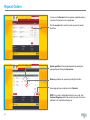
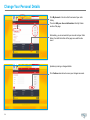
1
Document Name:
Unilever Lipton Ice Tea Online Store –
User Guide
Document No:
001
Geography:
Australia
Release Date
10/04/2014
Review Date:
10/04/2015
Version No:
2.0
Prepared By:
Amanda Winton
Unilever Lipton Ice Tea Online Store – User Guide
2
General Rules
•
Please direct any technical questions or enquiries to [email protected]
•
Make a note of your order ID at all times, as you will need to quote it if you need to make an enquiry regarding an
order.
•
Users will be timed out of the Online Store after approximately 10 minutes when there is no activity. If you are
working on a product, ensure you complete each step in full to avoid losing work.
•
Preferred web browsers are Google Chrome and Firefox.
NOTES on DO’s
3
•
If there are not enough funds in your available DOs, please contact the administrator at [email protected]
•
Unilever Administrator will receive a notification when a DO is below the threshold value
•
Unilever Administrator is required to then raise a new DO
•
Unilever Administrator will log into Admin panel – close and disable existing DO and then add a new DO for use
Accessing the Online Store and New User Registration
From your browser go to:
http://ulcommerce.ergoasia.com/ulstore
NEW USER REGISTRATION ONLY
New users should click the Create an Account link on the login
page. A new user will need to be approved by Administrator
before accessing the site.
Existing users can log in to the system clicking the login link
NOTE: Your Unilever email address is your username
NEW USERS ONLY
Fill in the details and submit the form.
You will be set up in the system and notified via email of your
details to log in once approved by Administrator.
4
Storefront
Once successfully logged in, you can access the storefront.
The links to on the page will take you to their relevant locations
inside the site.
Shopping Cart
Quickly access your active shopping cart
by clicking the link.
NOTE: This will appear empty if you have
no items in your cart. It is possible to log
out of the system with items in your cart
and return at a later date to place the
order against those items. All items will
remain in your cart until such time as you
decide to checkout.
Category Links
Click these links to access the
products.
5
User Manual
Click this link to download a
copy of this user Manual
Frequently Asked Questions
Opens the FAQ’s. Please review
this section carefully. If you are
experiencing issues, any
questions you may have should
be answered here.
Order History
This is a quick link to your order
history. Close the window to
return to the landing page if
required.
My Account
This is a quick link to your
personal account details. Ensure
your details are kept up-to-date
as they will pre-populate the
order page each time you place
an order.
Creating a shopping cart order
Existing users can log into the system by entering the
appropriate details
NOTE: Use your Unilever email address as your Username
Select the relevant product category folder, for example: POS,
from the next screen.
NOTE: The process is the same for all items.
6
Searching for products
All the products inside that category will be listed on the page.
Locate the product you would like to order.
You can also find products using the search functionality within
the Store. If you know the name of the product you are looking
for, type the name into the search field. Click the magnifying
glass to display the required product.
You can change the number of items displayed per page by
clicking the show drop down
7
Customising Products
To ensure you are selecting the correct product, you can click on
the product icon to see more information about the product.
NOTE: At this stage, only an Add to Cart button will appear. By
clicking the Add to Cart button, the product page will open so
that you are forced to customise the product before checking out
your order.
Here you can review the product information
If the preview still is not large enough, or does not show enough
information, click the icon of the image.
8
Customised Products
Select the quantity you require, then Click the personalise in
cart button
Another window will open in your web browser.
NOTE: Only certain areas of products are customisable. These
differ from product to product.
In the left hand side template edit pane, enter your
customisation choices.
9
Click the update button.
The information you entered will display on the template.
If you have made a mistake, or want to change the information
entered, re-enter the information in the template edit pane and
click update to preview your item
When you are happy with the layout, click Save
10
A prompt may appear asking you to ensure all fields are checked
and filled out. You will not fill out all fields on each template, so
double check that you have filled out the fields you want
customised and then click continue.
You will be returned to the product page.
The items in your cart are indicated at the top of the page
From here, navigate to find additional product to add to your cart.
You can add any type of item to the cart at any one time.
When all items are added to the cart, proceed to shopping cart.
11
Checking customised products in the cart
You may want to re-edit your customised product or check that it
was customised correctly. To do this, click the Pencil and
Scissors icon.
NOTE: Only complete this activity if you want to CHECK or
MODIFY a customised template in your cart.
1. If changes are required: The template that you customised
can be checked. If any changes are required to be made,
enter the details in the template edit pane, then update.
When happy with the layout click save
2. If no changes are required: Click the Save button
You will be returned to your shopping cart.
12
Creating alternate versions of customised products in the cart
You may want to create another customised template off the
template you have already in your cart. To do this, click the
Blue pages (copy) icon
NOTE: Only complete this activity if you want to create another
version of the product with different customisation. If you
simply want more items, increase the quantity next to the original
item.
Your template will open with the previous customisations already
on it.
Make the changes you require and click update.
Once happy with the layout, click the Save copy button
13
Creating alternate versions of customised products in the cart
Click ok to continue with your copied product
Your product will appear as an additional item in your cart.
14
Reviewing a preview of your artwork
You may want to preview your artwork before proceeding.
To do this, click the Download preview button
Click download to continue. The file will download to your
machine
You can review your artwork
When ready to complete your order, click the checkout button
15
Checkout
You will arrive at the Billing details on the Checkout page.
If you have not yet provided a billing address you will need to
enter one by clicking I want to use a new address. If you have
previously entered a billing address, you will need to select the
address that is displayed before proceeding.
Click continue
You will arrive at the Delivery details on the Checkout page.
If you have not yet provided a delivery address you will need to
enter one by clicking I want to use a new address. If you have
previously entered a billing address, you will need to select the
address that is displayed before proceeding.
Click continue
16
Select the Delivery method from the Checkout page and click
continue.
NOTE: The shipping cost is fixed for these products and will
calculate based on the products you add to your cart.
Select the Payment method details from the Checkout page.
NOTE: All orders are paid for via DO. You must have a valid DO
and funds in your account to complete the order.
Click continue.
17
The order details will appear. If you are happy with your order,
click Confirm Order.
NOTE: If you need to review any part of the checkout process,
click the modify button against the item you need to review.
An order confirmation appears on screen, and you will receive an
email containing your order details.
Make a note of your order number to use as a reference for any
enquiries.
18
Click the Logout button to exit the Online Store.
19
Reviewing Your Orders
Click My Account in the store front to access all your order
history.
Then click Order History in the My Orders section of the page
Alternatively, you can access both your account and your Order
History from both the bottom of the page menu and the side
menu
The date of your order, your Order ID and the status of your
order are displayed
Order Date, Order ID and Number of items
Status
• Processing – Order has been sent to the supplier and is in
the process of being produced, packed and delivered
• Completed – Order has been sent
20
If you would like to view old order details, click the magnifying
glass icon next to the order you wish to review.
Order details are displayed.
Click continue to return the order history list.
21
Repeat Orders
You can use the Reorder button to organise a duplicate order or
a re-order of some items in an original order
Click the reorder button next to the order you wish to reorder
items from.
Update quantities of the reordered products by entering the
new quantity and clicking the blue arrows.
Delete any products not required by clicking the X button
Once happy with your order items, click Checkout
NOTE: If you wish to add additional items to your order, click
Continue Shopping and find the products you wish to add, and
add them to the cart before checking out.
22
Follow the regular checkout process. The order will proceed as
normal.
23
Change Your Personal Details
Click My Account in the store front to access all your order
history.
Then click Edit your Account Information in the My Orders
section of the page
Alternatively, you can access both your account and your Order
History from both the bottom of the page menu and the side
menu
Update any missing or changed details.
Click Continue when done to ensure your changes are saved.
24