Transcript
Spray screen with cool water to
remove green emulsion from
design area. It may be necessary
to gently rub both sides of screen
by hand or use a sponge to remove
emulsion in detailed design areas.
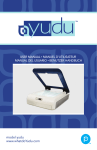
USER MANUAL (Quick start guide)
INTRODUCTION
The Yudu™ screen-printing system is the easiest, cleanest
way to let everyone know who you are—and how you see the
world. Unsilence yourself today—with apparel, home décor,
art prints, posters, cards, schoolwork, and more. Use Yudu to
let your voice be heard.
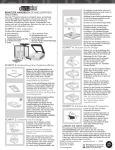
STEP 1: Unpack your box
Your box should contain the following:
A.Yudu machine
B.Adult t-shirt platen
C.Blank ink-jet transparency
D.110 mesh screen
E.Squeegee
Place screen in drying rack and
press the fan button.
STEP 4: Print your design
Tape the front of the screen
around edges to seal any open
screen areas.
F. 2 fl oz black ink
G.Platen adhesive sheet
H.Instructional DVD
I. User manual (Quick start guide)
J. Emulsion sheet
Mount t-shirt or other material on
platen. Open lid and place platen
on platen posts. Close lid.
B
D
G
Apply generous bead of ink onto
screen just above design. Make
sure bead of ink is at least as wide
as design.
C
I F
H
E
Flood screen with ink by gently
pulling squeegee across design.
J
STEP 2: Prepare your screen
Spray the screen with water. It should
be completely wet, but not dripping.
Place screen on Yudu lid, with the
backside facing up.
TIP: You can use a spray bottle to wet screen.
Apply the dull/sticky side of
emulsion sheet to the back of the
wet screen. Run squeegee across
the emulsion sheet.
TIP: Wet your fingers and touch the
corner. The sticky side is the dull side.
Lower lid and grasp squeegee
with both hands. Using firm,
even, downward pressure, pull
squeegee across screen.
TIP: Ink can be reused by scraping
excess back into container.
STEP 5: Heat set design
Allow ink to dry on article.
Place screen in drying rack of
Yudu machine. Press fan button
and let the screen dry for 2045 minutes. Machine will beep
when done. Test for dryness
before moving on to the next
steps. After emulsion has dried,
remove plastic film.
STEP 3: Create your design
Create design on computer and
print on transparency or draw
directly on transparency.
TIP: For multicolored designs,
separate colors into different layers.
Tape transparency to glass. Place
screen front side up/emulsion side
down on registration posts. Place
platen on platen posts, felt side
down, on top of screen.
Close lid and add extra weight to
top of platen (approximately 5 lbs)
Press exposure button.
For apparel items, heat set ink.
Using high setting on an iron,
cover design with paper or cloth
and iron for 3 to 4 minutes on
each side.
LEARN MORE:
For more detailed instructions, visit www.whatdoYudu.com
and download the free Yudu user manual.
Also visit www.unsilenceyourself.com to join our online
community for Yudu users. Watch videos, share your creative
ideas, and download free artwork!
SUPPORT INFORMATION:
Monday–Friday
7:00 a.m.–6:00 p.m. (MST)
© 2008 Provo Craft and Novelty, Inc. All rights reserved
Spanish Fork, UT 84660
Made in China
E-mail: [email protected]
Phone: 1 (877) 9MY-YUDU
1 (877) 969-9838
www.provocraft.com • 066308
DISPOSAL: Do not dispose
this product as unsorted
municipal waste.